AWS Security Blog
Automate Amazon EC2 instance isolation by using tags
Containment is a crucial part of an overall Incident Response Strategy, as this practice allows time for responders to perform forensics, eradication and recovery during an Incident. There are many different approaches to containment. In this post, we will be focusing on isolation—the ability to keep multiple targets separated so that each target only sees and affects itself—as a containment strategy.
I’ll show you how to automate isolation of an Amazon Elastic Compute Cloud (Amazon EC2) instance by using an AWS Lambda function that’s triggered by tag changes on the instance, as reported by Amazon CloudWatch Events.
CloudWatch Event Rules deliver a near real-time stream of system events that describe changes in Amazon Web Services (AWS) resources. See also Amazon EventBridge.
Preparing for an incident is important as outlined in the Security Pillar of the AWS Well-Architected Framework.
Out of the 7 Design Principles for Security in the Cloud, as per the Well-Architected Framework, this solution will cover the following:
- Enable traceability: Monitor, alert, and audit actions and changes to your environment in real time. Integrate log and metric collection with systems to automatically investigate and take action.
- Automate security best practices: Automated software-based security mechanisms can improve your ability to securely scale more rapidly and cost-effectively. Create secure architectures, including through the implementation of controls that can be defined and managed by AWS as code in version-controlled templates.
- Prepare for security events: Prepare for an incident by implementing incident management and investigation policy and processes that align to your organizational requirements. Run incident response simulations and use tools with automation to help increase your speed for detection, investigation, and recovery.
After detecting an event in the Detection phase and analyzing in the Analysis phase, you can automate the process of logically isolating an instance from a Virtual Private Cloud (VPC) in Amazon Web Services (AWS).
In this blog post, I describe how to automate EC2 instance isolation by using the tagging feature that a responder can use to identify instances that need to be isolated. A Lambda function then uses AWS API calls to isolate the instances by performing the actions described in the following sections.
Use cases
Your organization can use automated EC2 instance isolation for scenarios like these:
- A security analyst wants to automate EC2 instance isolation in order to respond to security events in a timely manner.
- A security manager wants to provide their first responders with a way to quickly react to security incidents without providing too much access to higher security features.
High-level architecture and design
The example solution in this blog post uses a CloudWatch Events rule to trigger a Lambda function. The CloudWatch Events rule is triggered when a tag is applied to an EC2 instance. The Lambda code triggers further actions based on the contents of the event. Note that the CloudFormation template includes the appropriate permissions to run the function.
The event flow is shown in Figure 1 and works as follows:
- The EC2 instance is tagged.
- The CloudWatch Events rule filters the event.
- The Lambda function is invoked.
- If the criteria are met, the isolation workflow begins.
When the Lambda function is invoked and the criteria are met, these actions are performed:
- Checks for IAM instance profile associations.
- If the instance is associated to a role, the Lambda function disassociates that role.
- Applies the isolation role that you defined during CloudFormation stack creation.
- Checks the VPC where the EC2 instance resides.
- If there is no isolation security group in the VPC (if the VPC is new, for example), the function creates one.
- Applies the isolation security group.
Note: If you had a security group with an open (0.0.0.0/0) outbound rule, and you apply this Isolation security group, your existing SSH connections to the instance are immediately dropped. On the other hand, if you have a narrower inbound rule that initially allows the SSH connection, the existing connection will not be broken by changing the group. This is known as Connection Tracking.
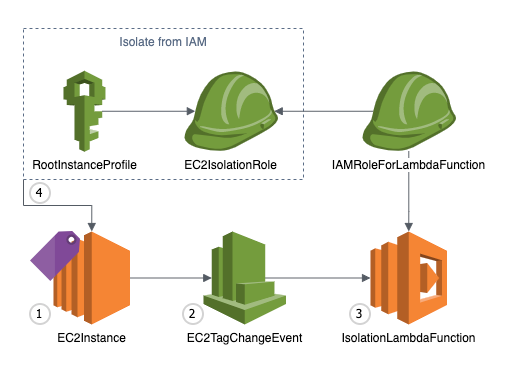
Figure 1: High-level diagram showing event flow
For the deployment method, we will be using an AWS CloudFormation Template. AWS CloudFormation gives you an easy way to model a collection of related AWS and third-party resources, provision them quickly and consistently, and manage them throughout their lifecycles, by treating infrastructure as code.
The AWS CloudFormation template that I provide here deploys the following resources:
- An EC2 instance role for isolation – this is attached to the EC2 Instance to prevent further communication with other AWS Services thus limiting the attack surface to your overall infrastructure.
- An Amazon CloudWatch Events rule – this is used to detect changes to an AWS EC2 resource, in this case a “tag change event”. We will use this as a trigger to our Lambda function.
- An AWS Identity and Access Management (IAM) role for Lambda functions – this is what the Lambda function will use to execute the workflow.
- A Lambda function for automation – this function is where all the decision logic sits, once triggered it will follow a set of steps described in the following section.
- Lambda function permissions – this is used by the Lambda function to execute.
- An IAM instance profile – this is a container for an IAM role that you can use to pass role information to an EC2 instance.
Supporting functions within the Lambda function
Let’s dive deeper into each supporting function inside the Lambda code.
The following function identifies the virtual private cloud (VPC) ID for a given instance. This is needed to identify which security groups are present in the VPC.
The following function modifies the security group of an EC2 instance.
The following function creates a security group on a VPC that blocks all egress access to the security group.
Deploy the solution
To deploy the solution provided in this blog post, first download the CloudFormation template, and then set up a CloudFormation stack that specifies the tags that are used to trigger the automated process.
Download the CloudFormation template
To get started, download the CloudFormation template from Amazon S3. Alternatively, you can launch the CloudFormation template by selecting the following Launch Stack button:

Deploy the CloudFormation stack
Start by uploading the CloudFormation template to your AWS account.
To upload the template
- From the AWS Management Console, open the CloudFormation console.
- Choose Create Stack.
- Choose With new resources (standard).
- Choose Upload a template file.
- Select Choose File, and then select the YAML file that you just downloaded.
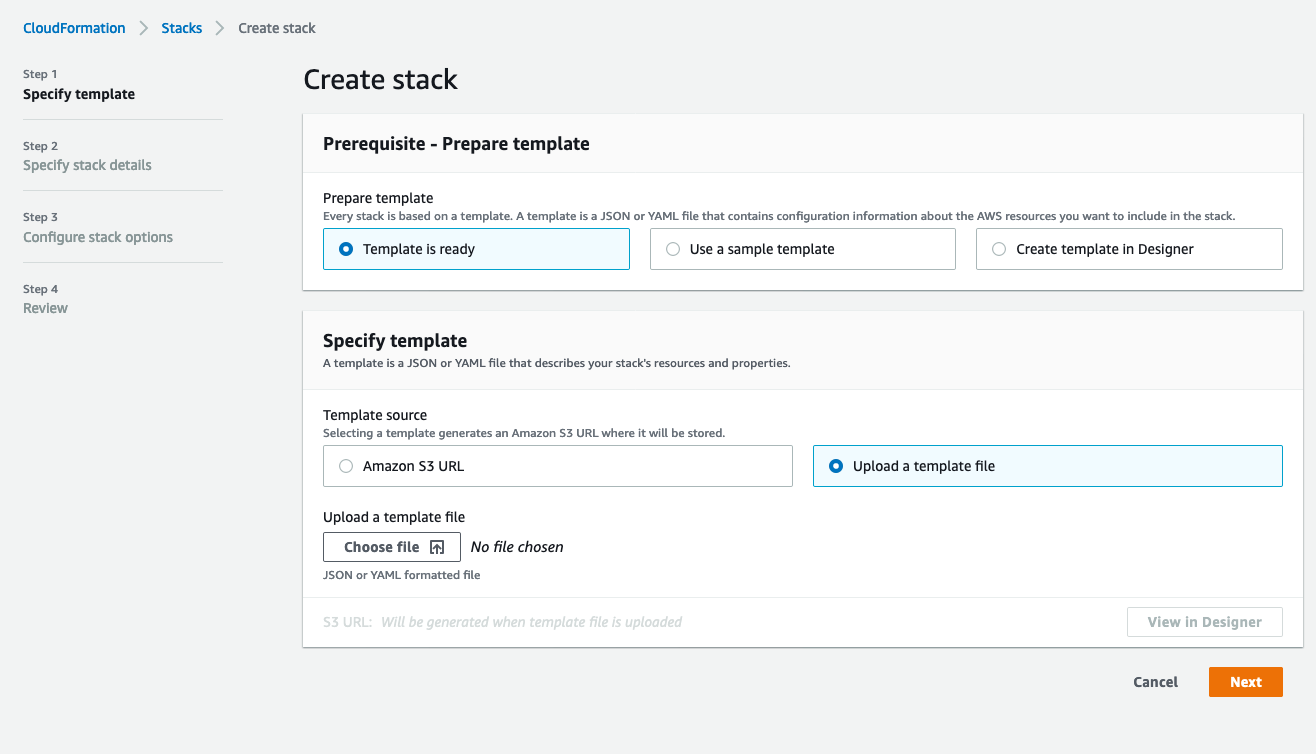
Figure 2: CloudFormation stack creation
Specify stack details
You can leave the default values for the stack as long as there aren’t any resources provisioned already with the same name, such as an IAM role. For example, if left with default values an IAM role named “SecurityIsolation-IAMRole” will be created. Otherwise, the naming convention is fully customizable from this screen and you can enter your choice of name for the CloudFormation stack, and modify the parameters as you see fit. Figure 3 shows the parameters that you can set.
The Evaluation Parameters section defines the tag key and value that will initiate the automated response. Keep in mind that these values are case-sensitive.
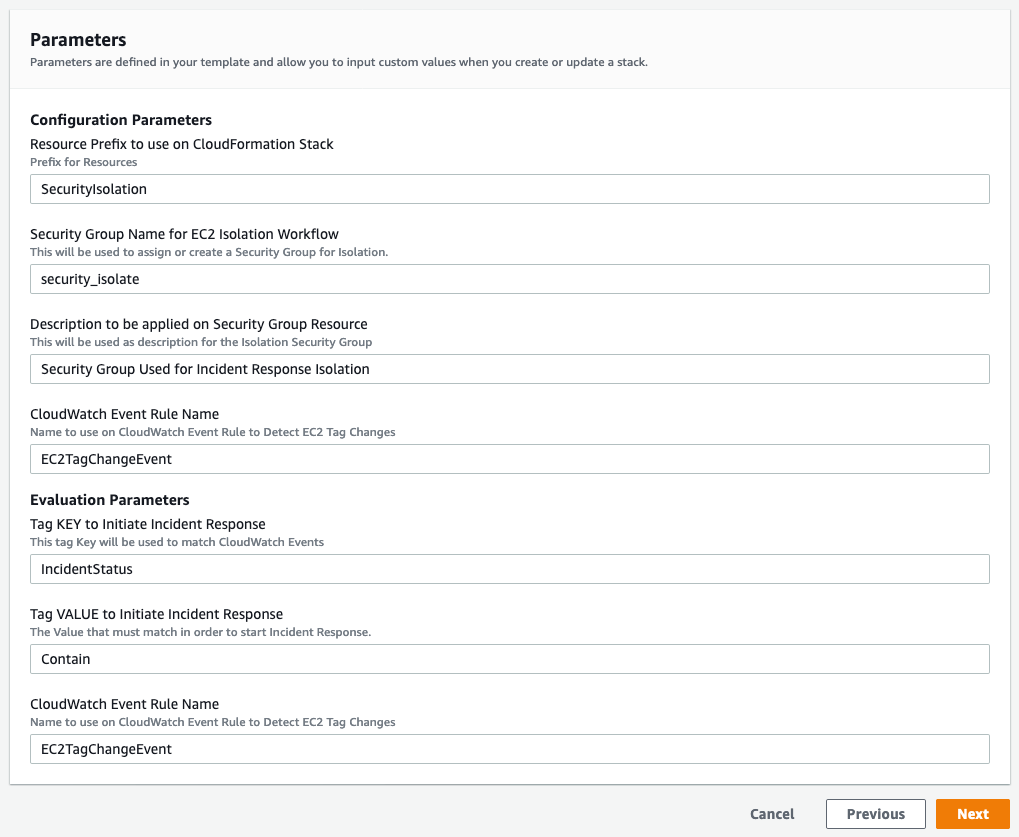
Figure 3: CloudFormation stack parameters
Choose Next until you reach the final screen, shown in Figure 4, where you acknowledge that an IAM role is created and you trust the source of this template. Select the check box next to the statement I acknowledge that AWS CloudFormation might create IAM resources with custom names, and then choose Create Stack.
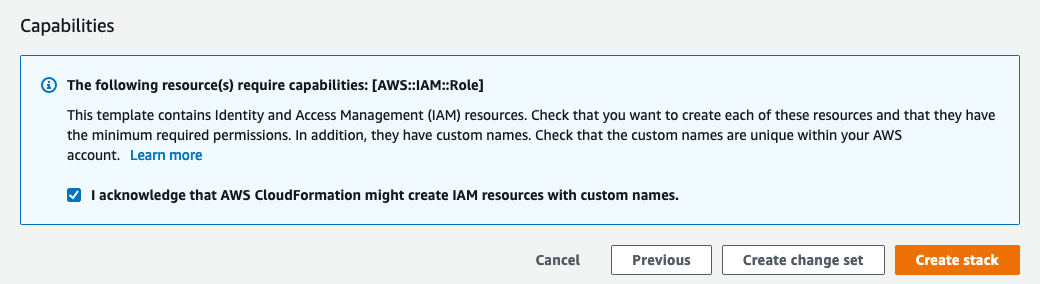
Figure 4: CloudFormation IAM notification
After you complete these steps, the following resources will be provisioned, as shown in Figure 5:
- EC2IsolationRole
- EC2TagChangeEvent
- IAMRoleForLambdaFunction
- IsolationLambdaFunction
- IsolationLambdaFunctionInvokePermissions
- RootInstanceProfile
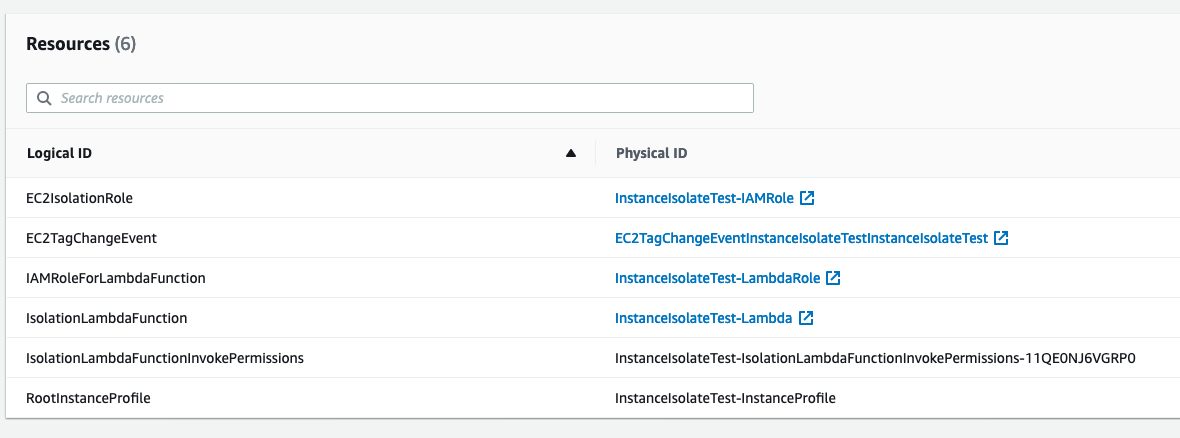
Figure 5: CloudFormation created resources
Testing
To start your automation, tag an EC2 instance using the tag defined during the CloudFormation setup. If you’re using the Amazon EC2 console, you can apply tags to resources by using the Tags tab on the relevant resource screen, or you can use the Tags screen, the AWS CLI or an AWS SDK. A detailed walkthrough for each approach can be found in the Amazon EC2 Documentation page.
Reverting Changes
If you need to remove the restrictions applied by this workflow, complete the following steps.
- From the EC2 dashboard, in the Instances section, check the box next to the instance you want to modify.

Figure 6: Select the instance to modify
- In the top right, select Actions, choose Instance settings, and then choose Modify IAM role.

Figure 7: Choose Actions > Instance settings > Modify IAM role
- Under IAM role, choose the IAM role to attach to your instance, and then select Save.

Figure 8: Choose the IAM role to attach
- Select Actions, choose Networking, and then choose Change security groups.

Figure 9: Choose Actions > Networking > Change security groups
- Under Associated security groups, select Remove and add a different security group with the access you want to grant to this instance.
Summary
Using the CloudFormation template provided in this blog post, a Security Operations Center analyst could have only tagging privileges and isolate an EC2 instance based on this tag. Or a security service such as Amazon GuardDuty could trigger a lambda to apply the tag as part of a workflow. This means the Security Operations Center analyst wouldn’t need administrative privileges over the EC2 service.
This solution creates an isolation security group for any new VPCs that don’t have one already. The security group would still follow the naming convention defined during the CloudFormation stack launch, but won’t be part of the provisioned resources. If you decide to delete the stack, manual cleanup would be required to remove these security groups.
This solution terminates established inbound Secure Shell (SSH) sessions that are associated to the instance, and isolates the instance from new connections either inbound or outbound. For outbound connections that are already established (for example, reverse shell), you either need to shut down the network interface card (NIC) at the operating system (OS) level, restart the instance network stack at the OS level, terminate the established connections, or apply a network access control list (network ACL).
For more information, see the following documentation:
- Security Pillar in AWS Well-Architected Framework
- Boto3 EC2 documentation
- Well Architected Framework – Security Design Principles
- Incident Response Guidelines AWS
- Reverse SSH connection example
- Security group connection tracking
If you have feedback about this post, submit comments in the Comments section below.
Want more AWS Security how-to content, news, and feature announcements? Follow us on Twitter.