AWS Security Blog
Introducing the Amazon GuardDuty investigation agent: on-demand AI-powered threat assessment
The new Amazon GuardDuty investigation agent (now in public preview) investigates security findings across your Amazon Web Services (AWS) environment, reducing investigation time from hours to minutes.
GuardDuty is our managed threat detection service that continuously monitors your AWS accounts and workloads for suspicious, potentially malicious activity, and unauthorized behavior, delivering detailed security findings for visibility and remediation.
Whether you’re investigating a single suspicious finding or assessing security posture across your entire organization, the investigation agent provides structured assessments providing risk levels, confidence scores, and actionable recommendations.
Security teams can spend hours investigating security findings and correlating data across multiple tools. The GuardDuty investigation agent automates this correlation, providing actionable intelligence, built directly into GuardDuty and accessible on demand through the AWS Management Console, AWS Command Line Interface (AWS CLI), AWS APIs, or AWS SDKs.
This post shows you how to:
- Enable the investigation agent in your GuardDuty console.
- Create your first investigation through the console or AWS CLI.
- Use the investigation agent with the AWS MCP server for AI-assisted security operations
Key features of the GuardDuty investigation agent
The GuardDuty investigation agent provides APIs using the same patterns you already know from GuardDuty. Each completed investigation returns a risk level, confidence assessment, MITRE ATT&CK® technique mapping, resource mapping, and prioritized recommendations.
You can scope investigations from the console for a specific finding, an account, or all accounts across your organization. Alternatively, the AWS CLI and API accept a free-form trigger prompt of up to 2,048 characters, so you can describe what to investigate in natural language and guide the analysis of the agent by specifying areas of concern, suspected root causes, or priorities for the investigation.
The investigation agent APIs are also available through the official AWS MCP server, part of the Agent Toolkit for AWS, enabling integration into your existing security toolchains and AI-powered workflows. You don’t need to manage or interact with the agent directly. Call API endpoints, and the agent investigates findings, correlates evidence, and delivers an assessment without the overhead of managing complex configurations.
How the investigation agent analyzes findings
When you create an investigation, the agent uses cross-Region inference to process your findings based on scope and produces a structured output.
Cross-Region inference – GuardDuty investigation uses the Cross-Region Inference Service (CRIS), which selects the optimal AWS Region within your geography to process the investigation assessment. Your data remains stored only in the Region where the investigation request originates. However, investigation data and summary results might be processed outside that Region. Data is transmitted encrypted across the secure network provided by Amazon.
For more information about which inference Regions your request might be routed to see the Cross-Region inference routing table located in the investigation section of the Amazon GuardDuty User Guide.
Investigation output – Each completed investigation produces the following insights: Risk level (Info, Low, Medium, High, or Critical), Confidence (Unknown, Low, Medium, or High), Summary (description of findings and key observations), Investigation Details (additional context), and Recommended Actions (detailed actions including AWS CLI commands).
Account scoping – Account specification is required only when investigating a specific member account. For broader scopes such as your entire organization, no account ID is needed. The agent will only investigate findings within accounts you’re authorized to access per the authorization model that follows.
Prerequisites
Before you get started, make sure you have the following prerequisites in place:
- Amazon GuardDuty enabled in your account
- AWS account in a supported Region (see Availability section)
Required IAM permissions
You will need three new permissions: guardduty:CreateInvestigation to start new investigations, guardduty:GetInvestigation to retrieve results, and guardduty:ListInvestigations to view investigations for a given detector.
Example IAM policy:
Authorization model
Administrator accounts can create investigations, retrieve results, and view investigation lists for themselves and their member accounts. Member accounts can only retrieve results and view investigation lists for their own account. Member accounts can’t create investigations and can’t access investigations belonging to other accounts or the administrator account. Account specification is required only when investigating a specific member account. For your own account or accounts across your organization, no account ID is needed.
To enable and create your first investigation
Before you begin, verify you have the required IAM permissions as described in the prerequisites .
- Open the AWS Management Console in the desired supported Region and navigate to Amazon GuardDuty.
- In the navigation pane, choose Investigations.
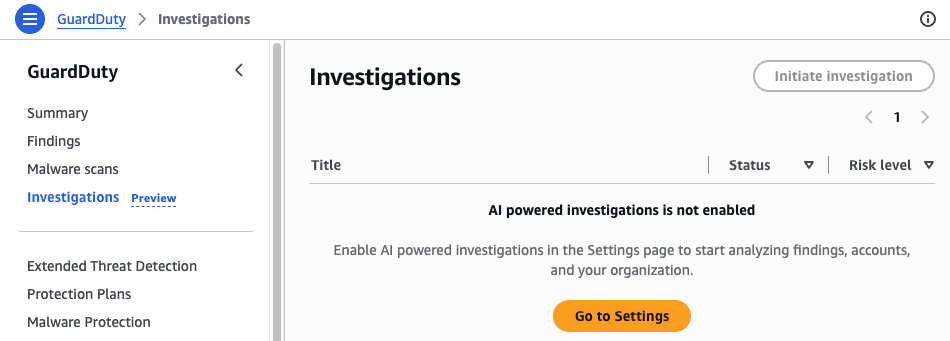
Figure 1: GuardDuty investigation dashboard
- If investigations aren’t enabled choose Go to Settings and then enable investigations by choosing Enable.
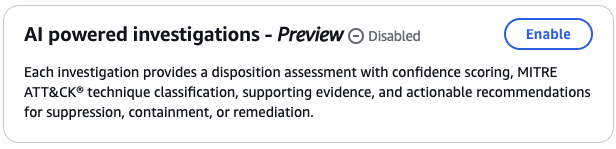
Figure 2: GuardDuty investigations enablement screen
- After investigations are enabled, navigate back to the investigations page.
- In the navigation pane, choose Initiate Investigation.
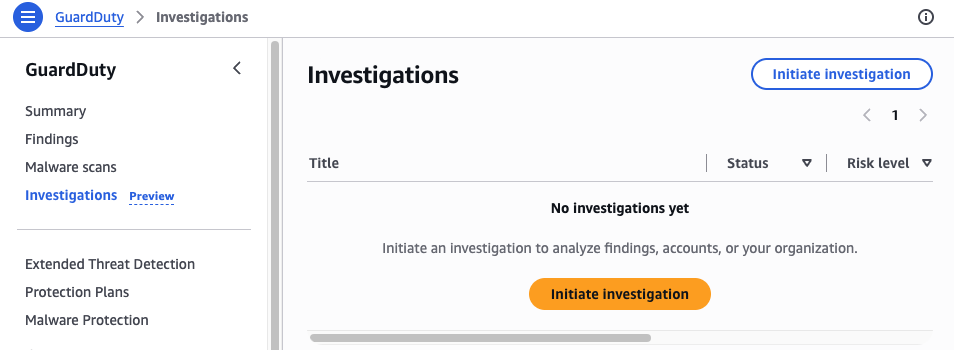
Figure 3: GuardDuty initiate investigation
- Select a scope for your investigation:
- Enter a GuardDuty Finding ID: Use when you want to investigate a specific GuardDuty finding in depth
- Enter an AWS Account ID: Use when you want to assess the overall security posture of a specific AWS account
- All accounts: Use for organization-wide security assessment or when investigating potential lateral movement
- Choose Initiate investigation.
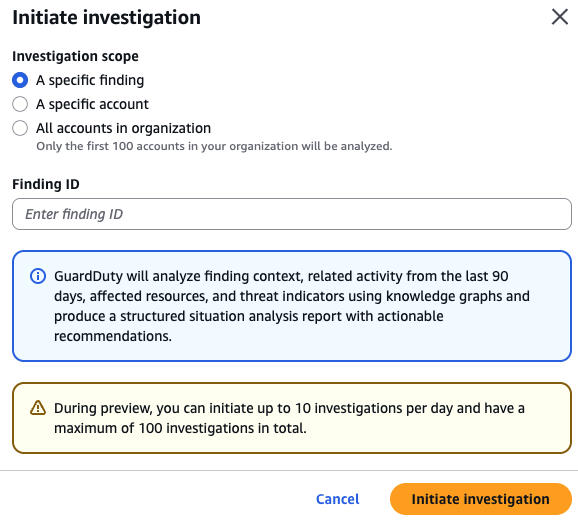
Figure 4: GuardDuty investigation setup
- Wait for the investigation to complete (typically 2–5 minutes for account level and 10–12 minutes for specific finding investigations during preview). The status updates automatically.
- When the investigation completes, select the investigation title to view the full assessment.

Figure 5: GuardDuty investigation completed menu
The investigation assessment contains detailed information about the investigation including general information, a summary of the investigation, mapping, assessment of the threat, and recommended actions.
The General Information section displays the investigation ID, status, triggered-by account, and creation timestamp.
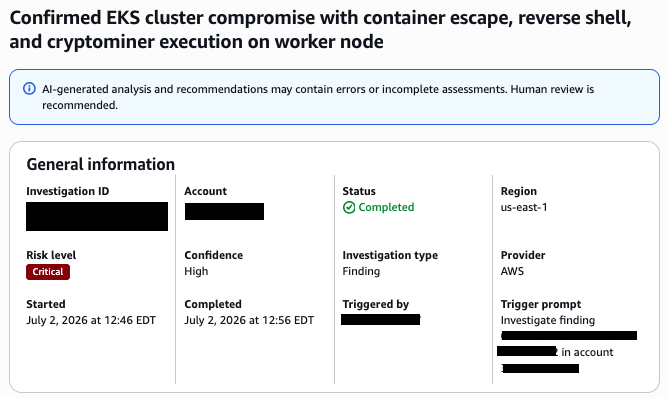
Figure 6: General information section of the assessment
The summary section provides a narrative of key observations and findings.
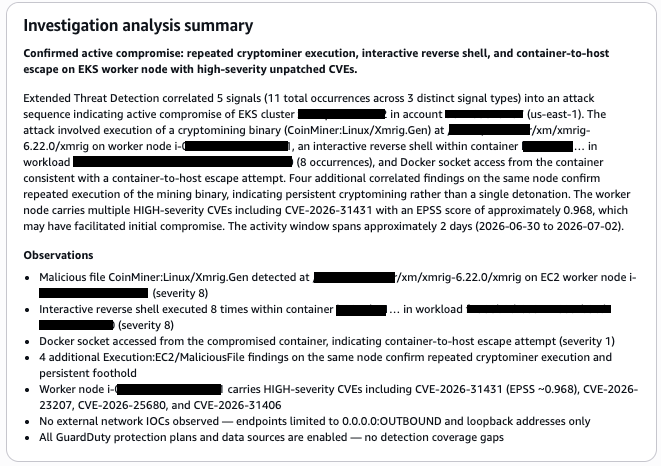
Figure 7: Summary section of the assessment
The mapping section shows attack techniques and affected AWS resources.
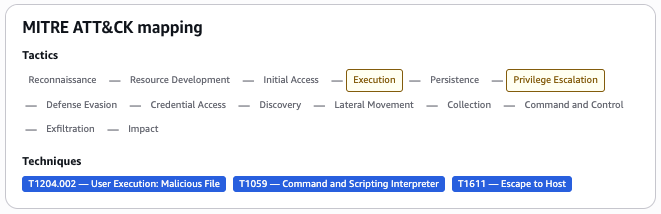
Figure 8: MITRE ATT&CK mapping section of the assessment
The Threat Assessment section displays the risk level, confidence score, and detailed threat analysis.
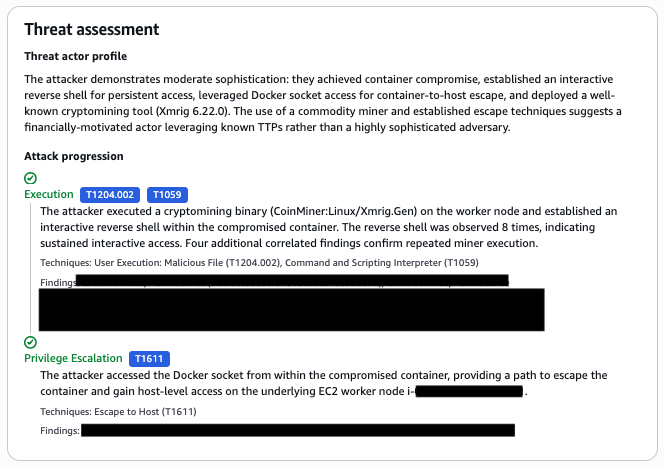
Figure 9: Threat assessment section
The Recommended Actions section lists prioritized remediation steps.
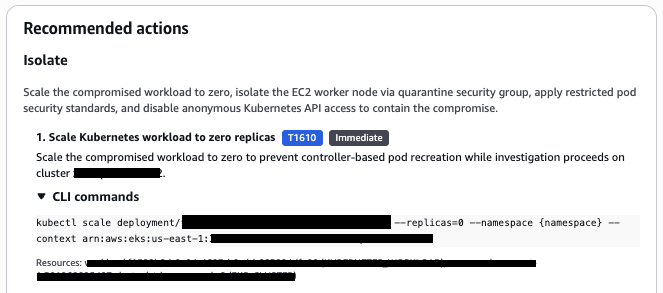
Figure 10: Recommended actions section of the assessment
Investigations can also be conducted with the AWS CLI or SDK using the following API endpoints:
- CreateInvestigation – Initiates a GuardDuty investigation that automatically analyzes security findings, correlates related activity, performs account-level analysis, and produces a structured investigation summary with recommended next steps.
- GetInvestigation – Retrieve the status and results of a specific investigation, including the assessment from the agent, correlated evidence, and recommended actions when completed.
- ListInvestigations – View investigations across your environment with filtering and pagination.
To run investigations using the AWS CLI
Investigations are asynchronous because the agent queries multiple data sources, correlates findings across services, and performs AI-based analysis. After creating an investigation, you’ll need to check its status periodically until it completes.
Step 1: Find your detector ID
Each GuardDuty deployment has a unique detector ID per-account and per-Region that identifies your specific GuardDuty configuration. You will need this for all AWS CLI operations, especially if you have GuardDuty enabled in multiple Regions. You can find your detector ID in the GuardDuty console under Settings, or by running the following command and specifying the Region. For example, if the GuardDuty detector of interest were in the us-east-1 (N. Virginia) Region
aws guardduty list-detectors –-region=us-east-1
Expected response:
Note: the
DetectorIDvalue from the response, you will use it in all subsequent commands.
Or if working only in the same Region, the session can be set as an environment variable to avoid repetition, for example on Linux:
export AWS_DEFAULT_REGION=us-east-1
See the AWS CLI documentation for guidance on configuring this for additional operating systems.
Step 2: Create an investigation
The following is an example of code to investigate a specific finding:
The --trigger-prompt parameter is useful when you have context that isn’t captured in GuardDuty metadata or consumable through the API.
Expected response:
To investigate findings across an entire AWS account, use the following example:
To investigate findings across an entire organization:
Step 3: Check investigation status
Check the status of the investigation shown here using the AWS CLI query command to filter and list only the Status section of the output for simplicity:
Repeat this command until the Status field shows COMPLETED.
Example completed response output:
- Status values –
RUNNING,COMPLETED,FAILED - Timing – Investigation times can very. Checking status every 30 seconds should be sufficient to yield results.
- If status shows FAILED – Review the error message in the response and verify your permissions match the authorization model requirements.
To list all investigations for a given detector run the following, the max-results command is optional but useful to filter the number of returned results.
Beyond running investigations manually, the API-first design addresses a common customer pattern: sending GuardDuty findings to third-party tools. You can now add automated investigation to those existing pipelines, so your team receives enriched, prioritized intelligence rather than raw alerts.
Consider a customer that routes GuardDuty findings through Amazon EventBridge to their Security Information and Event Management (SIEM) platform, where analysts manually investigate each alert. With the investigation agent, an AWS Lambda function can be placed into the pipeline that calls CreateInvestigation with the finding ID, waits for completion, and forwards the enriched results (risk level, confidence score, MITRE ATT&CK mapping, and recommended actions) to their SIEM alongside the original finding. Critical findings route directly to the customer incident response queue for further analysis or automation. Low-risk findings with high confidence get auto-closed or batched for weekly review. The analyst’s time shifts from repetitive log correlation to validating assessments and acting on confirmed threats.
This pattern works with SIEMs, ticketing systems, or automation platforms that can be customized to use the API or EventBridge messaging. The investigation agent fits into the pipeline as a processing step, not a destination.
The agent is fine-tuned on investigating GuardDuty findings. It’s distinct from other AWS frontier agents such as the AWS Security Agent and AWS DevOps Agent. The scope of the investigation agent is focused to deliver specialized analysis of GuardDuty findings.
Integration with the AWS MCP server
The Model Context Protocol (MCP) is an open standard that allows AI assistants to securely connect to external data sources and tools. Because the AWS MCP server implements this standard for AWS services, you can use it to add GuardDuty investigations into AI-powered workflows using tools like Kiro, Anthropic’s Claude, or other MCP-compatible clients.
To configure the AWS MCP server
- Configure your MCP client to connect to the AWS MCP server.
- Use natural language to invoke investigations (for example,“Investigate the recent Unauthorized Access finding for account 123456789012″).
- Review the investigation results returned through your MCP client. These results can vary depending on the model or agent being used, configuration, and the non-deterministic nature of AI.
Integrate the results into your existing agent automation or take manual action based on the findings.
Additional usage examples
- “Investigate the latest high-severity finding in my production account”
- “Create an investigation for finding ID abc123 in account 987654321098 and summarize what happened”
- “List investigations from the last 24 hours and flag those that need human review”
How the investigation agent relates to AWS Security Incident Response
At re:Invent 2024, AWS launched AWS Security Incident Response (AWS SIR), a managed service that you can use to quickly prepare for, respond to, and recover from security incidents. AWS SIR and the GuardDuty investigation agent address different stages of your security workflow. The GuardDuty investigation agent provides an on-demand assessment capability. When your team needs deeper context on a specific finding, an account security posture, or the overall security posture of your organization. You create an investigation and receive a structured assessment with risk levels, confidence scores, MITRE ATT&CK® technique mappings, and actionable recommendations. Security analysts can use this to quickly understand the scope and severity of what GuardDuty has detected.
When you create an AWS-supported case through AWS SIR, a SIR investigation agent activates, working in parallel with AWS Security Incident Response engineers to gather evidence and deliver an investigation summary within minutes. AWS SIR is purpose-built for active security events where you need both AI-powered automation and human expertise to coordinate containment and recovery.
Security teams can use these capabilities to assess and prioritize findings on demand using the GuardDuty investigation agent, escalate confirmed issues to stakeholders with supporting evidence, and create or update an AWS-supported case to accelerate involvement from the AWS SIR team when additional support is needed.
Availability and pricing
Public preview of the GuardDuty investigation agent is available in 10 AWS Regions including US East (N. Virginia), US East (Ohio), US West (Oregon), Canada (Central), Europe (Frankfurt), Europe (Ireland), Europe (London), Europe (Paris), Europe (Stockholm), and Asia Pacific (Tokyo).
During public preview, the investigation agent is available at no charge. Usage is limited to 10 investigations per account per day, with a cumulative limit of 100 investigations per account during the preview period. Failed investigations do not count toward these quotas.
Start investigating findings today
The Amazon GuardDuty investigation agent reduces investigation time from hours to minutes, letting your security team focus on confirmed security events rather than manual correlation.
Get started by:
- Enabling the investigation agent in your GuardDuty console
- Creating your first investigation using a recent GuardDuty finding
- Reviewing the structured assessment, including risk level and recommended next steps
For organizations using the AWS MCP server, you can also invoke investigations through natural language in your AI assistant of choice.
Learn more
- Amazon GuardDuty Investigation Agent documentation – Detailed configuration and usage guidance
- IAM permissions reference for GuardDuty – Required permissions for investigation operations
- Amazon EventBridge User Guide – Learn how to route investigation events to downstream systems
- MITRE ATT&CK®Framework – Getting started resources
- AWS Security Incident Response – AWS Security Blog article
- AWS Activation Days – Information about upcoming complimentary events that provide you prescriptive guidance to achieve outcomes when using AWS
If you have feedback about this post, submit comments in the Comments section below.