AWS Security Blog
Patterns for consuming custom log sources in Amazon Security Lake
As security best practices have evolved over the years, so has the range of security telemetry options. Customers face the challenge of navigating through security-relevant telemetry and log data produced by multiple tools, technologies, and vendors while trying to monitor, detect, respond to, and mitigate new and existing security issues. In this post, we provide you with three patterns to centralize the ingestion of log data into Amazon Security Lake, regardless of the source. You can use the patterns in this post to help streamline the extract, transform and load (ETL) of security log data so you can focus on analyzing threats, detecting anomalies, and improving your overall security posture. We also provide the corresponding code and mapping for the patterns in the amazon-security-lake-transformation-library.
Security Lake automatically centralizes security data into a purpose-built data lake in your organization in AWS Organizations. You can use Security Lake to collect logs from multiple sources, including natively supported AWS services, Software-as-a-Service (SaaS) providers, on-premises systems, and cloud sources.
Centralized log collection in a distributed and hybrid IT environment can help streamline the process, but log sources generate logs in disparate formats. This leads to security teams spending time building custom queries based on the schemas of the logs and events before the logs can be correlated for effective incident response and investigation. You can use the patterns presented in this post to help build a scalable and flexible data pipeline to transform log data using Open Cybersecurity Schema Framework (OCSF) and stream the transformed data into Security Lake.
Security Lake custom sources
You can configure custom sources to bring your security data into Security Lake. Enterprise security teams spend a significant amount of time discovering log sources in various formats and correlating them for security analytics. Custom source configuration helps security teams centralize distributed and disparate log sources in the same format. Security data in Security Lake is centralized and normalized into OCSF and compressed in open source, columnar Apache Parquet format for storage optimization and query efficiency. Having log sources in a centralized location and in a single format can significantly improve your security team’s timelines when performing security analytics. With Security Lake, you retain full ownership of the security data stored in your account and have complete freedom of choice for analytics. Before discussing creating custom sources in detail, it’s important to understand the OCSF core schema, which will help you map attributes and build out the transformation functions for the custom sources of your choice.
Understanding the OCSF
OCSF is a vendor-agnostic and open source standard that you can use to address the complex and heterogeneous nature of security log collection and analysis. You can extend and adapt the OCSF core security schema for a range of use cases in your IT environment, application, or solution while complementing your existing security standards and processes. As of this writing, the most recent major version release of the schema is v1.2.0, which contains six categories: System Activity, Findings, Identity and Access Management, Network Activity, Discovery, and Application Activity. Each category consists of different classes based on the type of activity, and each class has a unique class UID. For example, File System Activity has a class UID of 1001.
As of this writing, Security Lake (version 1) supports OCSF v1.1.0. As Security Lake continues to support newer releases of OCSF, you can continue to use the patterns from this post. However, you should revisit the mappings in case there’s a change in the classes you’re using.
Prerequisites
You must have the following prerequisites for log ingestion into Amazon Security Lake. Each pattern has a sub-section of prerequisites that are relevant to the data pipeline for the custom log source.
- AWS Organizations is configured your AWS environment. AWS Organizations is an AWS account management service that provides account management and consolidated billing capabilities that you can use to consolidate multiple AWS accounts and manage them centrally.
- Security Lake is activated and a delegated administrator is configured.
- Open the AWS Management Console and navigate to AWS Organizations. Set up an organization with a Log Archive account. The Log Archive account should be used as the delegated Security Lake administrator account where you will configure Security Lake. For more information on deploying the full complement of AWS security services in a multi-account environment, see AWS Security Reference Architecture.
- Configure permissions for the Security Lake administrator access by using an AWS Identity and Access Management (IAM) role. This role should be used by your security teams to administer Security Lake configuration, including managing custom sources.
- Enable Security Lake in the AWS Region of your choice in the Log Archive account. When you configure Security Lake, you can define your collection objectives, including log sources, the Regions that you want to collect the log sources from, and the lifecycle policy you want to assign to the log sources. Security Lake uses Amazon Simple Storage Service (Amazon S3) as the underlying storage for the log data. Amazon S3 is an object storage service offering industry-leading scalability, data availability, security, and performance. S3 is built to store and retrieve data from practically anywhere. Security Lake creates and configures individual S3 buckets in each Region identified in the collection objectives in the Log Archive account.
Transformation library
With this post, we’re publishing the amazon-security-lake-transformation-library project to assist with mapping custom log sources. The transformation code is deployed as an AWS Lambda function. You will find the deployment automation using AWS CloudFormation in the solution repository.
To use the transformation library, you should understand how to build the mapping configuration file. The mapping configuration file holds mapping information from raw events to OCSF formatted logs. The transformation function builds the OCSF formatted logs based on the attributes mapped in the file and streams them to the Security Lake S3 buckets.
The solution deployment is a four-step process:
- Update mapping configuration
- Add a custom source in Security Lake
- Deploy the log transformation infrastructure
- Update the default AWS Glue crawler
The mapping configuration file is a JSON-formatted file that’s used by the transformation function to evaluate the attributes of the raw logs and map them to the relevant OCSF class attributes. The configuration is based on the mapping identified in Table 3 (File System Activity class mapping) and extended to the Process Activity class. The file uses the $. notation to identify attributes that the transformation function should evaluate from the event.
Configuration in the mapping file is stored under the custom_source_events key. You must keep the value for the key source_name the same as the name of the custom source you add for Security Lake. The matched_field is the key that the transformation function uses to iterate over the log events. The iterator (1), in the preceding snippet, is the Sysmon event ID and the data structure that follows is the OCSF attribute mapping.
Some OCSF attributes are of an Object data type with a map of pre-defined values based on the event signature such as activity_id. You represent such attributes in the mapping configuration as shown in the following example:
In the preceding snippet, you can see the words enum and evaluate. These keywords tell the underlying mapping function that the result will be the value from the map defined in values and the key to evaluate is the EventId, which is listed as the value of the evaluate key. You can build your own transformation function based on your custom sources and mapping or you can extend the function provided in this post.
Pattern 1: Log collection in a hybrid environment using Kinesis Data Streams
The first pattern we discuss in this post is the collection of log data from hybrid sources such as operating system logs collected from Microsoft Windows operating systems using System Monitor (Sysmon). Sysmon is a service that monitors and logs system activity to the Windows event log. It’s one of the log collection tools used by customers in a Windows Operating System environment because it provides detailed information about process creations, network connections, and file modifications This host-level information can prove crucial during threat hunting scenarios and security analytics.
Solution overview
The solution for this pattern uses Amazon Kinesis Data Streams and Lambda to implement the schema transformation. Kinesis Data Streams is a serverless streaming service that makes it convenient to capture and process data at any scale. You can configure stream consumers—such as Lambda functions—to operate on the events in the stream and convert them into required formats—such as OCSF—for analysis without maintaining processing infrastructure. Lambda is a serverless, event-driven compute service that you can use to run code for a range of applications or backend services without provisioning or managing servers. This solution integrates Lambda with Kinesis Data Streams to launch transformation tasks on events in the stream.
To stream Sysmon logs from the host, you use Amazon Kinesis Agent for Microsoft Windows. You can run this agent on fleets of Windows servers hosted on-premises or in your cloud environment.
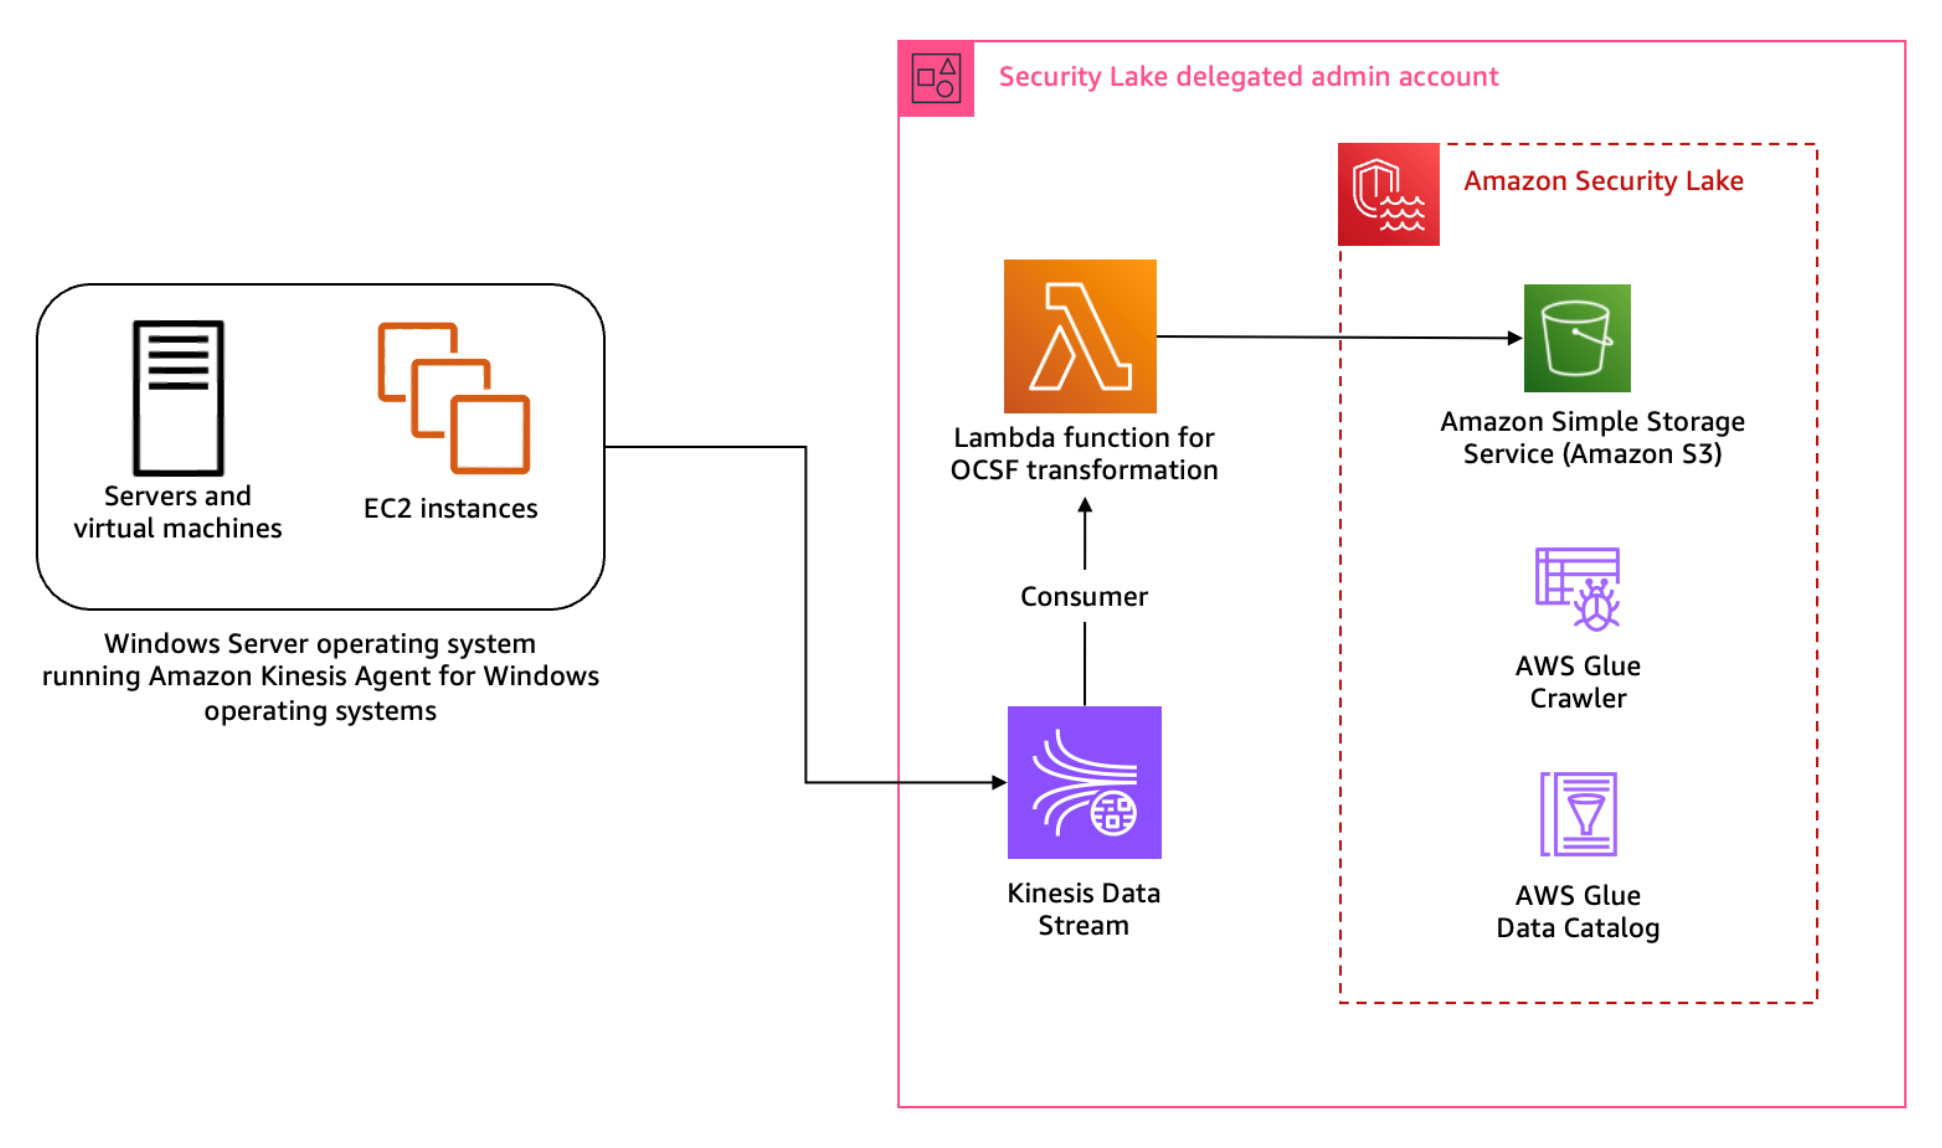
Figure 1: Architecture diagram for Sysmon event logs custom source
Figure 1 shows the interaction of services involved in building the custom source ingestion. The servers and instances generating logs run the Kinesis Agent for Windows to stream log data to the Kinesis Data Stream which invokes a consumer Lambda function. The Lambda function transforms the log data into OCSF based on the mapping provided in the configuration file and puts the transformed log data into Security Lake S3 buckets. We cover the solution implementation later in this post, but first let’s review how you can map Sysmon event streaming through Kinesis Data Streams into the relevant OCSF classes. You can deploy the infrastructure using the AWS Serverless Application Model (AWS SAM) template provided in the solution code. AWS SAM is an extension of the AWS Command Line Interface (AWS CLI), which adds functionality for building and testing applications using Lambda functions.
Mapping
Windows Sysmon events map to various OCSF classes. To build the transformation of the Sysmon events, work through the mapping of events with relevant OCSF classes. The latest version of Sysmon (v15.14) defines 30 events including a catch-all error event.
| Sysmon eventID | Event detail | Mapped OCSF class |
| 1 | Process creation | Process Activity |
| 2 | A process changed a file creation time | File System Activity |
| 3 | Network connection | Network Activity |
| 4 | Sysmon service state changed | Process Activity |
| 5 | Process terminated | Process Activity |
| 6 | Driver loaded | Kernel Activity |
| 7 | Image loaded | Process Activity |
| 8 | CreateRemoteThread | Network Activity |
| 9 | RawAccessRead | Memory Activity |
| 10 | ProcessAccess | Process Activity |
| 11 | FileCreate | File System Activity |
| 12 | RegistryEvent (Object create and delete) | File System Activity |
| 13 | RegistryEvent (Value set) | File System Activity |
| 14 | RegistryEvent (Key and value rename) | File System Activity |
| 15 | FileCreateStreamHash | File System Activity |
| 16 | ServiceConfigurationChange | Process Activity |
| 17 | PipeEvent (Pipe created) | File System Activity |
| 18 | PipeEvent (Pipe connected) | File System Activity |
| 19 | WmiEvent (WmiEventFilter activity detected) | Process Activity |
| 20 | WmiEvent (WmiEventConsumer activity detected) | Process Activity |
| 21 | WmiEvent (WmiEventConsumerToFilter activity detected) | Process Activity |
| 22 | DNSEvent (DNS query) | DNS Activity |
| 23 | FileDelete (File delete archived) | File System Activity |
| 24 | ClipboardChange (New content in the clipboard) | File System Activity |
| 25 | ProcessTampering (Process image change) | Process Activity |
| 26 | FileDeleteDetected (File delete logged) | File System Activity |
| 27 | FileBlockExecutable | File System Activity |
| 28 | FileBlockShredding | File System Activity |
| 29 | FileExecutableDetected | File System Activity |
| 255 | Sysmon error | Process Activity |
Table 1: Sysmon event mapping with OCSF (v1.1.0) classes
Start by mapping the Sysmon events to the relevant OCSF classes in plain text as shown in Table 1 before adding them to the mapping configuration file for the transformation library. This mapping is flexible; you can choose to map an event to a different event class depending on the standard defined within the security engineering function. Based on our mapping, Table 1 indicates that a majority of the events reported by Sysmon align with the File System Activity or the Process Activity class. Registry events map better with the Registry Key Activity and Registry Value Activity classes, but these classes are deprecated in OCSF v1.0.0, so we recommend using File System Activity instead of registry events for compatibility with future versions of OCSF. You can be selective about the events captured and reported by Sysmon by altering the Sysmon configuration file. For this post, we’re using the sysmonconfig.xml published in the sysmon-modular project. The project provides a modular configuration along with publishing tactics, techniques, and procedures (TTPs) with Sysmon events to help in TTP-based threat hunting use cases. If you have your own curated Sysmon configuration, you can use that. While this solution offers mapping advice, if you’re using your own Sysmon configuration, you should make sure that you’re mapping the relevant attributes using this solution as a guide. As a best practice, mapping should be non-destructive to keep your information after the OCSF transformation. If there are attributes in the log data that you cannot map to an available attribute in the OCSF class, then you should use the unmapped attribute to collect all such information. In this pattern, RuleName captures the TTPs associated with the Sysmon event, because TTPs don’t map to a specific attribute within OCSF.
Across all classes in OCSF, there are some common attributes that are mandatory. The common mandatory attributes are mapped shown in Table 2. You need to set these attributes regardless of the OCSF class you’re transforming the log data to.
| OCSF | Raw |
| metadata.profiles | [host] |
| metadata.version | v1.1.0 |
| metadata.product.name | System Monitor (Sysmon) |
| metadata.product.vendor_name | Microsoft Sysinternals |
| metadata.product.version | v15.14 |
| severity | Informational |
| severity_id | 1 |
Table 2: Mapping mandatory attributes
Each OCSF class has its own schema, which is extendable. After mapping the common attributes, you can map the attributes in the File System Activity class relevant to the log information. Some of the attribute values can be derived from a map of options standardised by the OCSF schema. One such attribute is Activity ID. Depending on the type of activity performed on the file, you can assign a value from the pre-defined set of values in the schema such as 0 if the event activity is unknown, 1 if a file was created, 2 if a file was read, and so on. You can find more information on standard attribute maps in File System Activity, System Activity Category.
File system activity mapping example
The following is a sample file creation event reported by Sysmon:
| File created: | |
| RuleName: | technique_id=T1574.010,technique_name=Services File Permissions Weakness |
| UtcTime: | 2023-10-03 23:50:22.438 |
| ProcessGuid: | {78c8aea6-5a34-651b-1900-000000005f01} |
| ProcessId: | 1128 |
| Image: | C:\Windows\System32\svchost.exe |
| TargetFilename: | C:\Windows\ServiceState\EventLog\Data\lastalive1.dat |
| CreationUtcTime: | 2023-10-03 00:04:00.984 |
| User: | NT AUTHORITY\LOCAL SERVICE |
When the event is streamed to the Kinesis Data Streams stream, the Kinesis Agent can be used to enrich the event. We’re enriching the event with source_instance_id using ObjectDecoration configured in the agent configuration file.
Because the transformation Lambda function reads from a Kinesis Data Stream, we use the event information from the stream to map the attributes of the File System Activity class. The following mapping table has attributes mapped to the values based on OCSF requirements, the values enclosed in brackets (<>) will come from the event. In the solution implementation section for this pattern, you learn about the transformation Lambda function and mapping implementation for a sample set of events.
| OCSF | Raw |
| category_uid | 1 |
| category_name | System Activity |
| class_uid | 1001 |
| class_name | File System Activity |
| time | <UtcTime> |
| activity_id | 1 |
| actor | {process: {name: <Image>}} |
| device | {type_id: 6} |
| unmapped | {pid: <ProcessId>, uid: <ProcessGuid>, name: <Image>, user: <User>, rulename: <RuleName>} |
| file | {name: <TargetFilename>, type_id: ‘1’} |
| type_uid | 100101 |
Table 3: File System Activity class mapping with raw log data
Solution implementation
The solution implementation is published in the AWS Samples GitHub repository titled amazon-security-lake-transformation-library in the windows-sysmon instructions. You will use the repository to deploy the solution in your AWS account.
First update the mapping configuration, then add the custom source in Security Lake and deploy and configure the log streaming and transformation infrastructure, which includes the Kinesis Data Stream, transformation Lambda function and associated IAM roles.
Step 1: Update mapping configuration
Each supported custom source documentation contains the mapping configuration. Update the mapping configuration for the windows-sysmon custom source for the transformation function.
You can find the mapping configuration in the custom source instructions in the amazon-security-lake-transformation-library repository.
Step 2: Add a custom source in Security Lake
As of this writing, Security Lake natively supports AWS CloudTrail, Amazon Route 53 DNS logs, AWS Security Hub findings, Amazon Elastic Kubernetes Service (Amazon EKS) Audit Logs, Amazon Virtual Private Cloud (Amazon VPC) Flow Logs, and AWS Web Application Firewall (AWS WAF). For other log sources that you want to bring into Security Lake, you must configure the custom sources. For the Sysmon logs, you will create a custom source using the Security Lake API. We recommend using dashes in custom source names as opposed to underscores to be able to configure granular access control for S3 objects.
- To add the custom source for Sysmon events, configure an IAM role for the AWS Glue crawler that will be associated with the custom source to update the schema in the Security Lake AWS Glue database. You can deploy the ASLCustomSourceGlueRole.yaml CloudFormation template to automate the creation of the IAM role associated with the custom source AWS Glue crawler.
- Capture the Amazon Resource Name (ARN) for the IAM role, which is configured as an output of the infrastructure deployed in the previous step.
- Add a custom source using the following AWS CLI command. Make sure you replace the <AWS_ACCOUNT_ID>, <SECURITY_LAKE_REGION> and the <GLUE_IAM_ROLE_ARN> placeholders with the AWS account ID you’re deploying into, the Security Lake deployment Region and the ARN of the IAM role created above, respectively. External ID is a unique identifier that is used to establish trust with the AWS identity. You can use External ID to add conditional access from third-party sources and to subscribers.
Note: When creating the custom log source, you only need to specify FILE_ACTIVITY and PROCESS_ACTIVITY event classes as these are the only classes mapped in the example configuration deployed in Step 1. If you extend your mapping configuration to handle additional classes, you would add them here.
Step 3: Deploy the transformation infrastructure
The solution uses the AWS SAM framework—an open source framework for building serverless applications—to deploy the OCSF transformation infrastructure. The infrastructure includes a transformation Lambda function, Kinesis data stream, IAM roles for the Lambda function and the hosts running the Kinesis Agent, and encryption keys for the Kinesis data stream. The Lambda function is configured to read events streamed into the Kinesis Data Stream and transform the data into OCSF based on the mapping configuration file. The transformed events are then written to an S3 bucket managed by Security Lake. A sample of the configuration file is provided in the solution repository capturing a subset of the events. You can extend the same for the remaining Sysmon events.
To deploy the infrastructure:
- Clone the solution codebase into your choice of integrated development environment (IDE). You can also use AWS CloudShell or AWS Cloud9.
- Sign in to the Security Lake delegated administrator account.
- Review the prerequisites and detailed deployment steps in the project’s README file. Use the SAM CLI to build and deploy the streaming infrastructure by running the following commands:
Step 4: Update the default AWS Glue crawler
Sysmon logs are a complex use case because a single source of logs contains events mapped to multiple schemas. The transformation library handles this by writing each schema to different prefixes (folders) within the target Security Lake bucket. The AWS Glue crawler deployed by Security Lake for the custom log source must be updated to handle prefixes that contain differing schemas.
To update the default AWS Glue crawler:
- In the Security Lake delegated administrator account, navigate to the AWS Glue console.
- Navigate to Crawlers in the Data Catalog section. Search for the crawler associated with the custom source. It will have the same name as the custom source name. For example, windows-sysmon. Select the check box next to the crawler name, then choose Action and select Edit Crawler.

Figure 2: Select and edit an AWS Glue crawler
- Select Edit for the Step 2: Choose data sources and classifiers section on the Review and update page.
- In the Choose data sources and classifiers section, make the following changes:
- For Is your data already mapped to Glue tables?, change the selection to Not yet.
- For Data sources, select Add a data source. In the selection prompt, select the Security Lake S3 bucket location as presented in the output of the create-custom-source command above. For example, s3://aws-security-data-lake-<region>–<exampleid>/ext/windows-sysmon/. Make sure you include the path all the way to the custom source name and replace the <region> and <exampleid> placeholders with the actual values. Then choose Add S3 data source.
- Choose Next.
- On the Configure security settings page, leave everything as is and choose Next.
- On the Set output and scheduling page, select the Target database as the Security Lake Glue database.
- In a separate tab, navigate to AWS Glue > Tables. Copy the name of the custom source table created by Security Lake.
- Navigate back to the AWS Glue crawler configuration tab, update the Table name prefix with the copied table name and add an underscore (_) at the end. For example, amazon_security_lake_table_ap_southeast_2_ext_windows_sysmon_.
- Under Advanced options, select the checkbox for Create a single schema for each S3 path and for Table level enter 4.
- Make sure you allow the crawler to enforce table schema to the partitions by selecting the Update all new and existing partitions with metadata from the table checkbox.
- For the Crawler schedule section, select Monthly from the Frequency dropdown. For Minute, enter 0. This configuration will run the crawler every month.
- Choose Next, then Update.
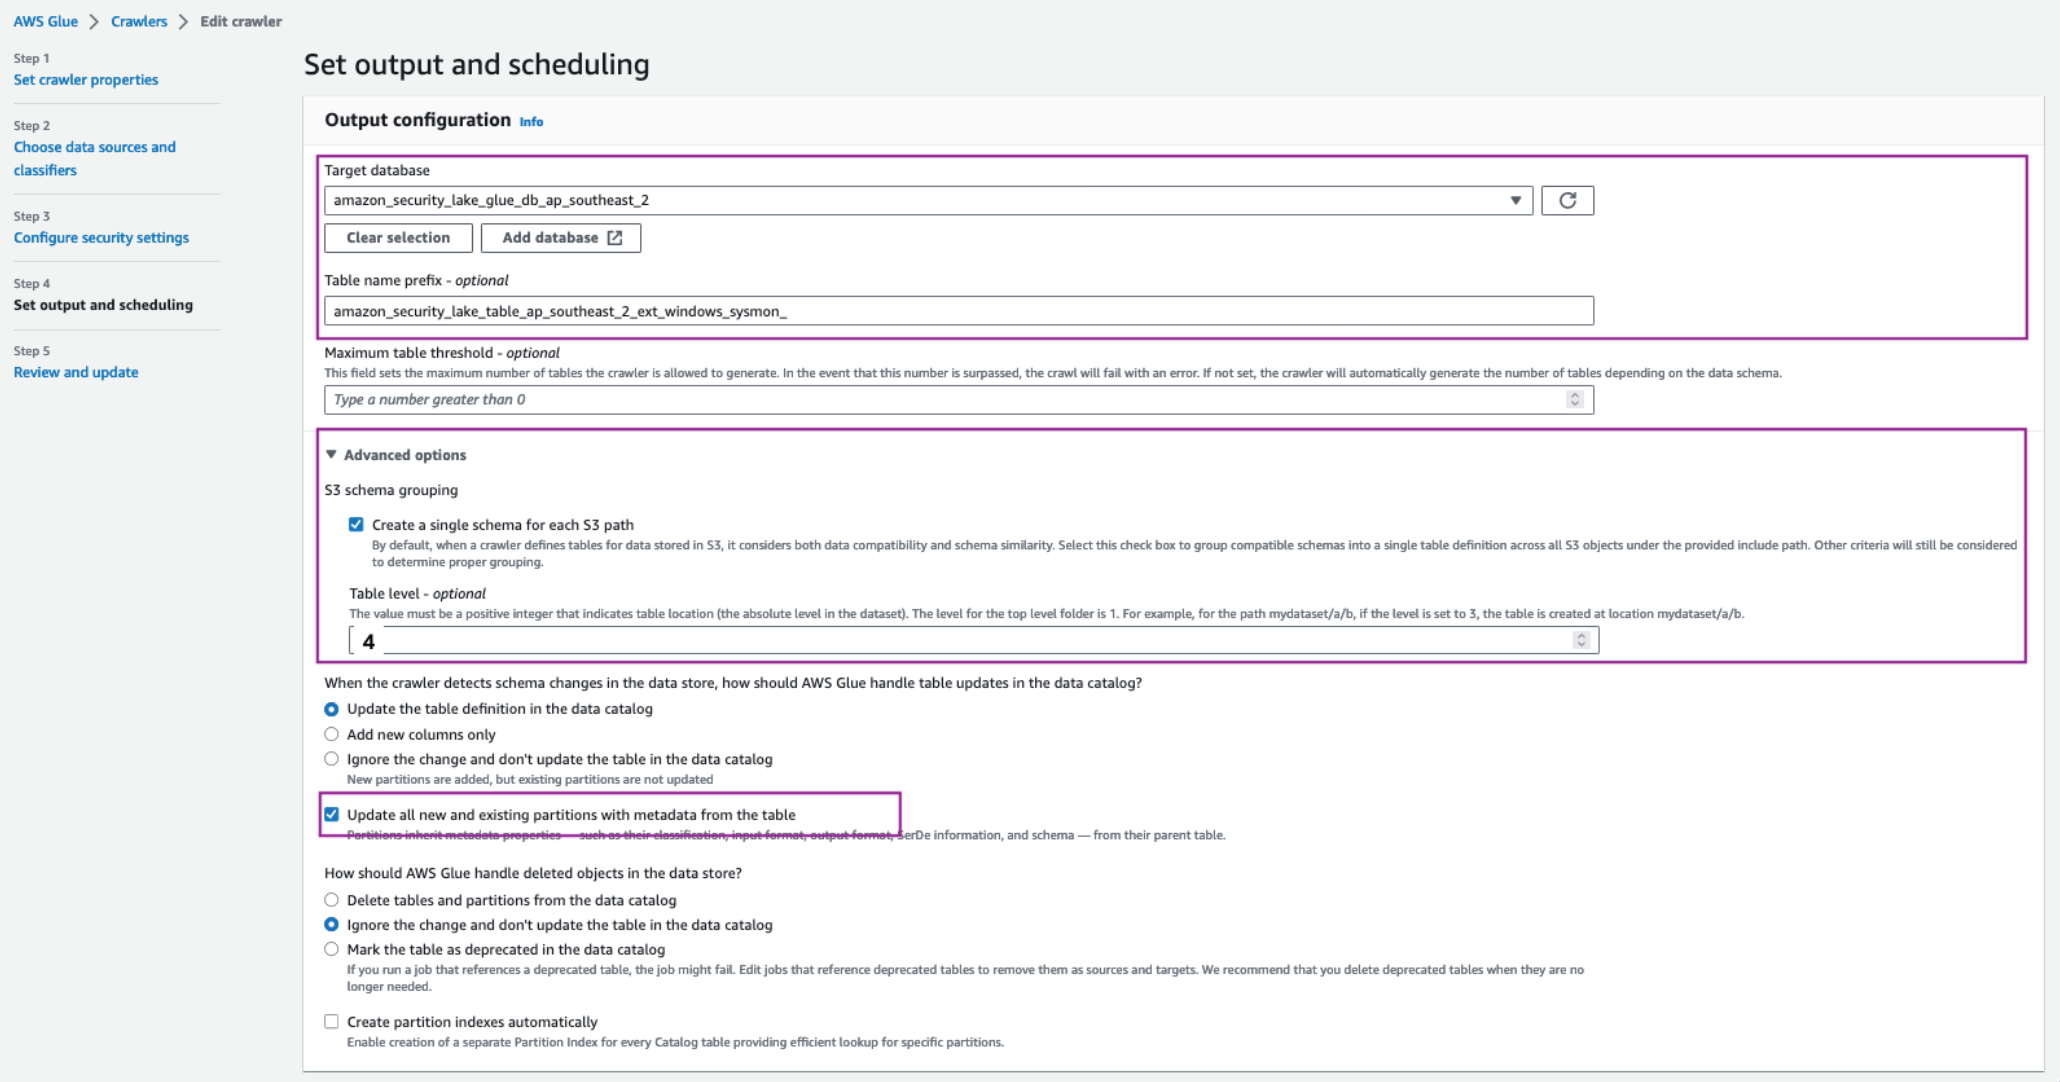
Figure 3: Set AWS Glue crawler output and scheduling
To configure hosts to stream log information:
As discussed in the Solution overview section, you use Kinesis Data Streams with a Lambda function to stream Sysmon logs and transform the information into OCSF.
- Install Kinesis Agent for Microsoft Windows. There are three ways to install Kinesis Agent on Windows Operating Systems. Using AWS Systems Manager helps automate the deployment and upgrade process. You can also install Kinesis Agent by using a Windows installer package or PowerShell scripts.
- After installation you must configure Kinesis Agent to stream log data to Kinesis Data Streams (you can use the following code for this). Kinesis Agent for Windows helps capture important metadata of the host system and enrich information streamed to the Kinesis Data Stream. The Kinesis Agent configuration file is located at %PROGRAMFILES%\Amazon\AWSKinesisTap\appsettings.json and includes three parts—sources, pipes, and sinks:
- Sources are plugins that gather telemetry.
- Sinks stream telemetry information to different AWS services, including but not limited to Amazon Kinesis.
- Pipes connect a source to a sink.
The preceding configuration shows the information flow through sources, pipes, and sinks using the Kinesis Agent for Windows. Use the sample configuration file provided in the solution repository. Observe the ObjectDecoration key in the Sink configuration; you can use this key to add key information to identify the generating system. For example, to identify whether the event is being generated by an Amazon Elastic Compute Cloud (Amazon EC2) instance or a hybrid server. This information can be used to map the Device attribute in the various OCSF classes such as File System Activity and Process Activity. The <KinesisAgentIAMRoleARN> is configured by the transformation library deployment unless you create your own IAM role and provide it as a parameter to the deployment.
Update the Kinesis agent configuration file %PROGRAMFILES%\Amazon\AWSKinesisTap\appsettings.json with the contents of the kinesis_agent_configuration.json file from this repository. Make sure you replace the <LogCollectionStreamName> and <KinesisAgentIAMRoleARN> placeholders with the value of the CloudFormation outputs, LogCollectionStreamName and KinesisAgentIAMRoleARN, that you captured in the Deploy transformation infrastructure step.
- Start Kinesis Agent on the hosts to start streaming the logs to Security Lake buckets. Open an elevated PowerShell command prompt window, and start Kinesis Agent for Windows using the following PowerShell command:
Pattern 2: Log collection from services and products using AWS Glue
You can use Amazon VPC to launch resources in an isolated network. AWS Network Firewall provides the capability to filter network traffic at the perimeter of your VPCs and define stateful rules to configure fine-grained control over network flow. Common Network Firewall use cases include intrusion detection and protection, Transport Layer Security (TLS) inspection, and egress filtering. Network Firewall supports multiple destinations for log delivery, including Amazon S3.
In this pattern, you focus on adding a custom source in Security Lake where the product in use delivers raw logs to an S3 bucket.
Solution overview
This solution uses an S3 bucket (the staging bucket) for raw log storage using the prerequisites defined earlier in this post. Use AWS Glue to configure the ETL and load the OCSF transformed logs into the Security Lake S3 bucket.
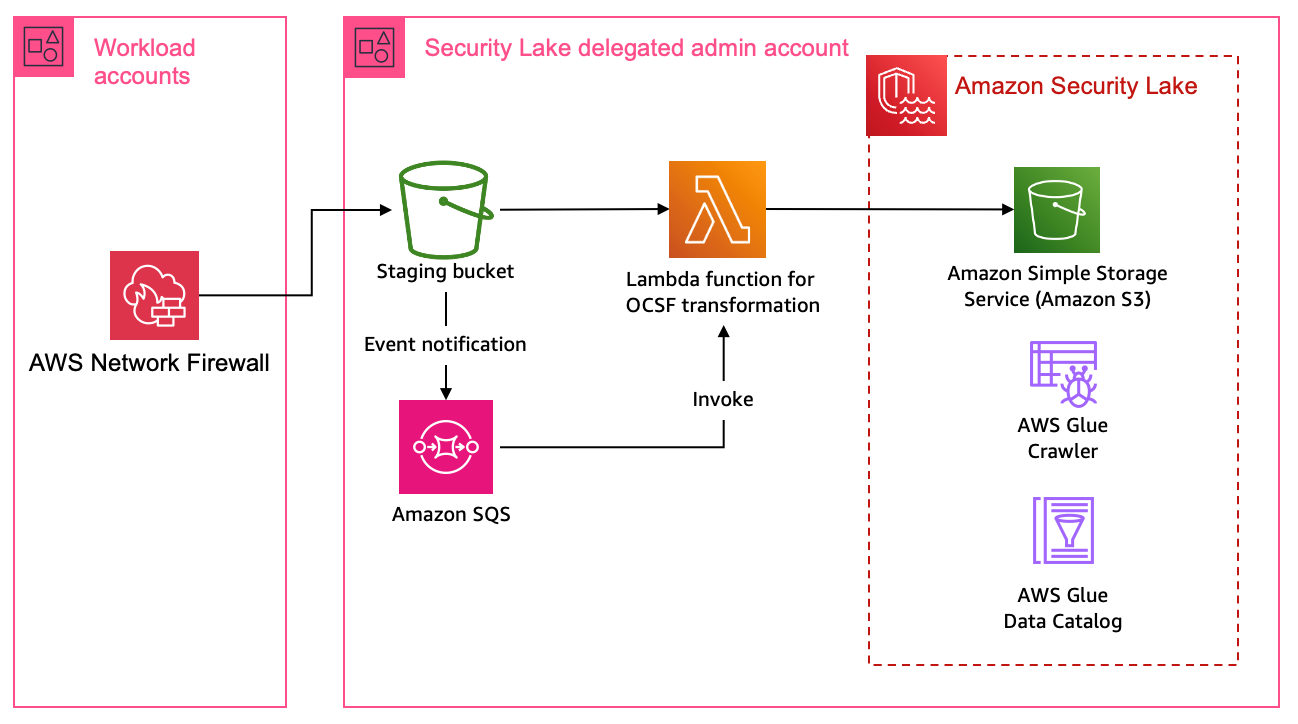
Figure 4: Architecture using AWS Glue for ETL
Figure 4 shows the architecture for this pattern. This pattern applies to AWS services or partner services that natively support log storage in S3 buckets. The solution starts by defining the OCSF mapping.
Mapping
Network firewall records two types of log information—alert logs and netflow logs. Alert logs report traffic that matches the stateful rules configured in your environment. Flow logs are network traffic flow logs that capture network traffic information for standard stateless rule groups. You can use stateful rules for use cases such as egress filtering to restrict the external domains that the resources deployed in a VPC in your AWS account have access to. In the Network Firewall use case, events can be mapped to various attributes in the Network Activity class in the Network Activity category.
Network firewall sample event: netflow log
Network firewall sample event: alert log
The target mapping for the preceding alert logs is as follows:
Mapping for alert logs
| OCSF | Raw |
| app_name | <firewall_name> |
| activity_id | 6 |
| activity_name | Traffic |
| category_uid | 4 |
| category_name | Network activity |
| class_uid | 4001 |
| type_uid | 400106 |
| class_name | Network activity |
| dst_endpoint | {ip: <event.dest_ip>, port: <event.dest_port>} |
| src_endpoint | {ip: <event.src_ip>, port: <event.src_port>} |
| time | <event.timestamp> |
| severity_id | <event.alert.severity> |
| connection_info | {uid: <event.flow_id>, protocol_name: <event.proto>} |
| cloud.provider | AWS |
| metadata.profiles | [cloud, firewall] |
| metadata.product.name | AWS Network Firewall |
| metadata.product.feature.name | Firewall |
| metadata.product.vendor_name | AWS |
| severity | High |
| unmapped | {alert: {action: <event.alert.action>, signature_id: <event.alert.signature_id>, rev: <event.alert.rev>, signature: <event.alert.signature>, category: <event.alert.category>, tls_inspected: <event.alert.tls_inspected>}} |
Mapping for netflow logs
| OCSF | Raw |
| app_name | <firewall_name> |
| activity_id | 6 |
| activity_name | Traffic |
| category_uid | 4 |
| category_name | Network activity |
| class_uid | 4001 |
| type_uid | 400106 |
| class_name | Network activity |
| dst_endpoint | {ip: <event.dest_ip>, port: <event.dest_port>} |
| src_endpoint | {ip: <event.src_ip>, port: <event.src_port>} |
| Time | <event.timestamp> |
| connection_info | {uid: <event.flow_id>, protocol_name: <event.proto>, tcp_flags: <event.tcp.tcp_flags>} |
| cloud.provider | AWS |
| metadata.profiles | [cloud, firewall] |
| metadata.product.name | AWS Network Firewall |
| metadata.product.feature.name | Firewall |
| metadata.product.vendor_name | AWS |
| severity | Informational |
| severity_id | 1 |
| start_time | <event.netflow.start> |
| end_time | <event.netflow.end> |
| Traffic | {bytes: <event.netflow.bytes>, packets: <event.netflow.packets>} |
| Unmapped | {availability_zone: <availability_zone>, event_type: <event.event_type>, netflow: {age: <event.netflow.age>, min_ttl: <event.netflow.min_ttl>, max_ttl: <event.netflow.max_ttl>}, tcp: {syn: <event.tcp.syn>, fin: <event.tcp.fin>, ack: <event.tcp.ack>, psh: <event.tcp.psh>}} |
Solution implementation
The solution implementation is published in the AWS Samples GitHub repository titled amazon-security-lake-transformation-library in the Network Firewall instructions. Use the repository to deploy this pattern in your AWS account. The solution deployment is a four-step process:
- Update the mapping configuration
- Configure the log source to use Amazon S3 for log delivery
- Add a custom source in Security Lake
- Deploy the log staging and transformation infrastructure
Because Network Firewall logs can be mapped to a single OCSF class, you don’t need to update the AWS Glue crawler as in the previous pattern. However, you must update the AWS Glue crawler if you want to add a custom source with multiple OCSF classes.
Step 1: Update the mapping configuration
Each supported custom source documentation contains the mapping configuration. Update the mapping configuration for the Network Firewall custom source for the transformation function.
The mapping configuration can be found in the custom source instructions in the amazon-security-lake-transformation-library repository
Step 2: Configure the log source to use S3 for log delivery
Configure Network Firewall to log to Amazon S3. The transformation function infrastructure deploys a staging S3 bucket for raw log storage. If you already have an S3 bucket configured for raw log delivery, you can update the value of the parameter RawLogS3BucketName during deployment. The deployment configures event notifications with Amazon Simple Queue Service (Amazon SQS). The transformation Lambda function is invoked by SQS event notifications when Network Firewall delivers log files in the staging S3 bucket.
Step 3: Add a custom source in Security Lake
As with the previous pattern, add a custom source for Network Firewall in Security Lake. In the previous pattern you used the AWS CLI to create and configure the custom source. In this pattern, we take you through the steps to do the same using the AWS console.
To add a custom source:
- Open the Security Lake console
- In the navigation pane, select Custom sources.
- Then select Create custom source.

Figure 5: Create a custom source
- Under Custom source details enter a name for the custom log source such as network_firewall and choose Network Activity as the OCSF Event class

Figure 6: Data source name and OCSF Event class
- Under Account details, enter your AWS account ID for the AWS account ID and External ID fields. Leave Create and use a new service role selected and choose Create.

Figure 7: Account details and service access
- The custom log source will now be available.
Step 4: Deploy transformation infrastructure
As with the previous pattern, use AWS SAM CLI to deploy the transformation infrastructure.
To deploy the transformation infrastructure:
- Clone the solution codebase into your choice of IDE.
- Sign in to the Security Lake delegated administrator account.
- The infrastructure is deployed using the AWS SAM, which is an open source framework for building serverless applications. Review the prerequisites and detailed deployment steps in the project’s README file. Use the SAM CLI to build and deploy the streaming infrastructure by running the following commands:
Clean up
The resources created in the previous patterns can be cleaned up by running the following command:
You also need to manually delete the custom source by following the instructions from the Security Lake User Guide.
Pattern 3: Log collection using integration with supported AWS services.
In a threat hunting and response use case, customers often use multiple sources of logs to correlate information to find more information on unauthorized third-party interactions originating from trusted software vendors. These interactions can be due to vulnerable components in the product or exposed credentials such as integration API keys. An operationally effective way to source logs from partner software and external vendors is to use the supported AWS services that natively integrate with Security Lake.
AWS Security Hub
AWS Security Hub is a cloud security posture measurement service that provides a comprehensive view of the security posture of your AWS environment. Security Hub supports integration with several AWS services including AWS Systems Manager Patch Manager, Amazon Macie, Amazon GuardDuty, and Amazon Inspector. For the full list, see AWS service integrations with AWS Security Hub. Security Hub also integrates with multiple third-party partner products that you can use. These products support sending findings to Security Hub seamlessly.
Security Lake natively supports ingestion of Security Hub findings, which centralizes the findings from the source integrations into Security Lake. Before you start building a custom source, we recommend you review whether the product is supported by Security Hub, which could remove the need for building manual mapping and transformation solutions.
AWS AppFabric
AWS AppFabric is a fully managed software as a service (SaaS) interoperability solution. Security Lake supports AppFabric output schema and format—OCSF and JSON respectively. Security Lake supports AppFabric as a custom source using Amazon Kinesis Data Firehose delivery stream. You can find step-by-step instructions in the AppFabric user guide.
Conclusion
Security Lake offers customers the capability to centralize disparate log sources in a single format, OCSF. Using OCSF improves correlation and enrichment activities because security teams no longer have to build queries based on the individual log source schema. Log data is normalized such that customers can use the same schema across the log data collected. Using the patterns and solution identified in this post, you can significantly reduce the effort involved in building custom sources to bring your own data into Security Lake.
You can extend the concepts and mapping function code provided in the amazon-security-lake-transformation-library to build out a log ingestion and ETL solution. You can use the flexibility offered by Security Lake and the custom source feature to ingest log data generated by all sources including third-party tools, log forwarding software, AWS services, and hybrid solutions.
In this post, we provided you with three patterns that you can use across multiple log sources. The most flexible being Pattern 1, where you can choose the OCSF mapped class and attributes that are in-line with your organizational mappings and custom source configuration with Security Lake. You can continue to use the mapping function code from the amazon-security-lake-transformation-library demonstrated through this post and update the mapping variable for the OCSF class you’re mapping to. This solution can be scaled to build a range of custom sources to enhance your threat detection and investigation workflow.
If you have feedback about this post, submit comments in the Comments section below. If you have questions about this post, contact AWS Support.