AWS Storage Blog
Cross-account disaster recovery setup using AWS Elastic Disaster Recovery in secured networks (Part 1: Architecture and network setup)
This post is the first in a two-part series to provide you with a step-by-step guide on cross-account failover and failback with Amazon Web Services Elastic Disaster Recovery (DRS). In this first part, we focus on the architecture and network setup needed to build a secure cross-account disaster recovery (DR) solution that maintains network isolation, preserves IP addressing schemes, and makes sure of continuous operation during DR scenarios.
Introduction
The security of cloud infrastructure is an essential concern for organizations operating in regulated industries or with sensitive workloads. Many users require environments where direct internet access is restricted or completely prohibited, creating challenges for implementing DR solutions such as Elastic Disaster Recovery.
Effective security controls must be maintained throughout the DR process while making sure that critical network configurations remain intact during failover events. Without proper planning, organizations risk compromising their security posture or experiencing application failures due to network configuration changes during recovery operations. To address these challenges, you must implement a comprehensive strategy that maintains network isolation, preserves IP addressing schemes, and makes sure of continuous operation of dependent services during DR scenarios with Elastic Disaster Recovery.
AWS PrivateLink allows you to establish connectivity between Virtual Private Clouds (VPCs) and AWS services, such as Elastic Disaster Recovery, without exposing data to the public internet. This approach eliminates the need for internet gateways while maintaining the isolation and security posture demanded by highly regulated environments. Furthermore, you can use PrivateLink with VPC Peering for Elastic Disaster Recovery to separate network access. This network design would allow you to preserve private IP addresses during failover events and address a critical requirement for applications with dependencies on specific IP addresses or existing DNS configurations.
In this post, we walk you through the process of implementing a secure DR solution that maintains private IP addressing during failover events. This architecture uses Amazon VPC endpoints, VPC Peering, and Amazon Route 53 to create a DR environment that meets stringent security requirements. While the benefits of VPC endpoints are covered extensively in this AWS Storage post, we demonstrate how these components work together in practice, providing a clear path to implementing this solution in your own environment. This approach can enhance your organization’s resilience while maintaining the security controls needed for your most sensitive workloads.
Solution overview
In this post, we demonstrate how to implement Elastic Disaster Recovery in highly secured environments where direct internet access is restricted or prohibited. We protect an Amazon Elastic Compute Cloud (Amazon EC2) instance running in a production account in the Ireland AWS Region (eu-west-1), with DR configured in a recovery account in the London Region (eu-west-2). Both environments operate without internet access, maintaining strict security controls throughout the DR process.
Our solution uses AWS PrivateLink to create secure, private connections between VPCs and AWS services without exposing traffic to the public internet. Combining Elastic Disaster Recovery with PrivateLink, VPC Peering, and Route 53 allows us to create a comprehensive DR solution that preserves private IP addressing during failover events while maintaining security controls.
The architecture consists of four key VPCs:
- A production VPC and staging VPC in the production Account
- A recovery VPC and staging VPC in the recovery Account.
We establish cross-Region VPC Peering connections between the production VPC and recovery account’s staging VPC, as well as between the recovery VPC and production account’s staging VPC. This connectivity pattern makes sure that production and recovery environments remain isolated from each other while enabling the necessary communication for replication, failover, and failback operations.
To facilitate secure access to AWS services, we deploy VPC endpoints throughout the architecture:
- In the recovery account’s staging VPC: Elastic Disaster Recovery, Amazon S3, AWS Security Token Service (AWS STS), and Amazon EC2 VPC endpoints for source servers, replication and conversion servers
- In the recovery account’s recovery VPC: A dedicated Elastic Disaster Recovery VPC endpoint for recovery instances
- In the production account’s staging VPC: Elastic Disaster Recovery, Amazon S3, AWS STS, and Amazon EC2 endpoints to facilitate reverse replication for recovery servers, replication, and conversion servers
- In the production account’s production VPC: A dedicated Elastic Disaster Recovery VPC endpoint for recovery instances
For DNS resolution to private IP addresses of the AWS STS VPC endpoints, we implement Route 53 private hosted zones in both AWS Regions. This make sure of seamless connectivity for the AWS replication agent installer and the AWS replication agent itself.
The overall solution is shown in the following figure 1.
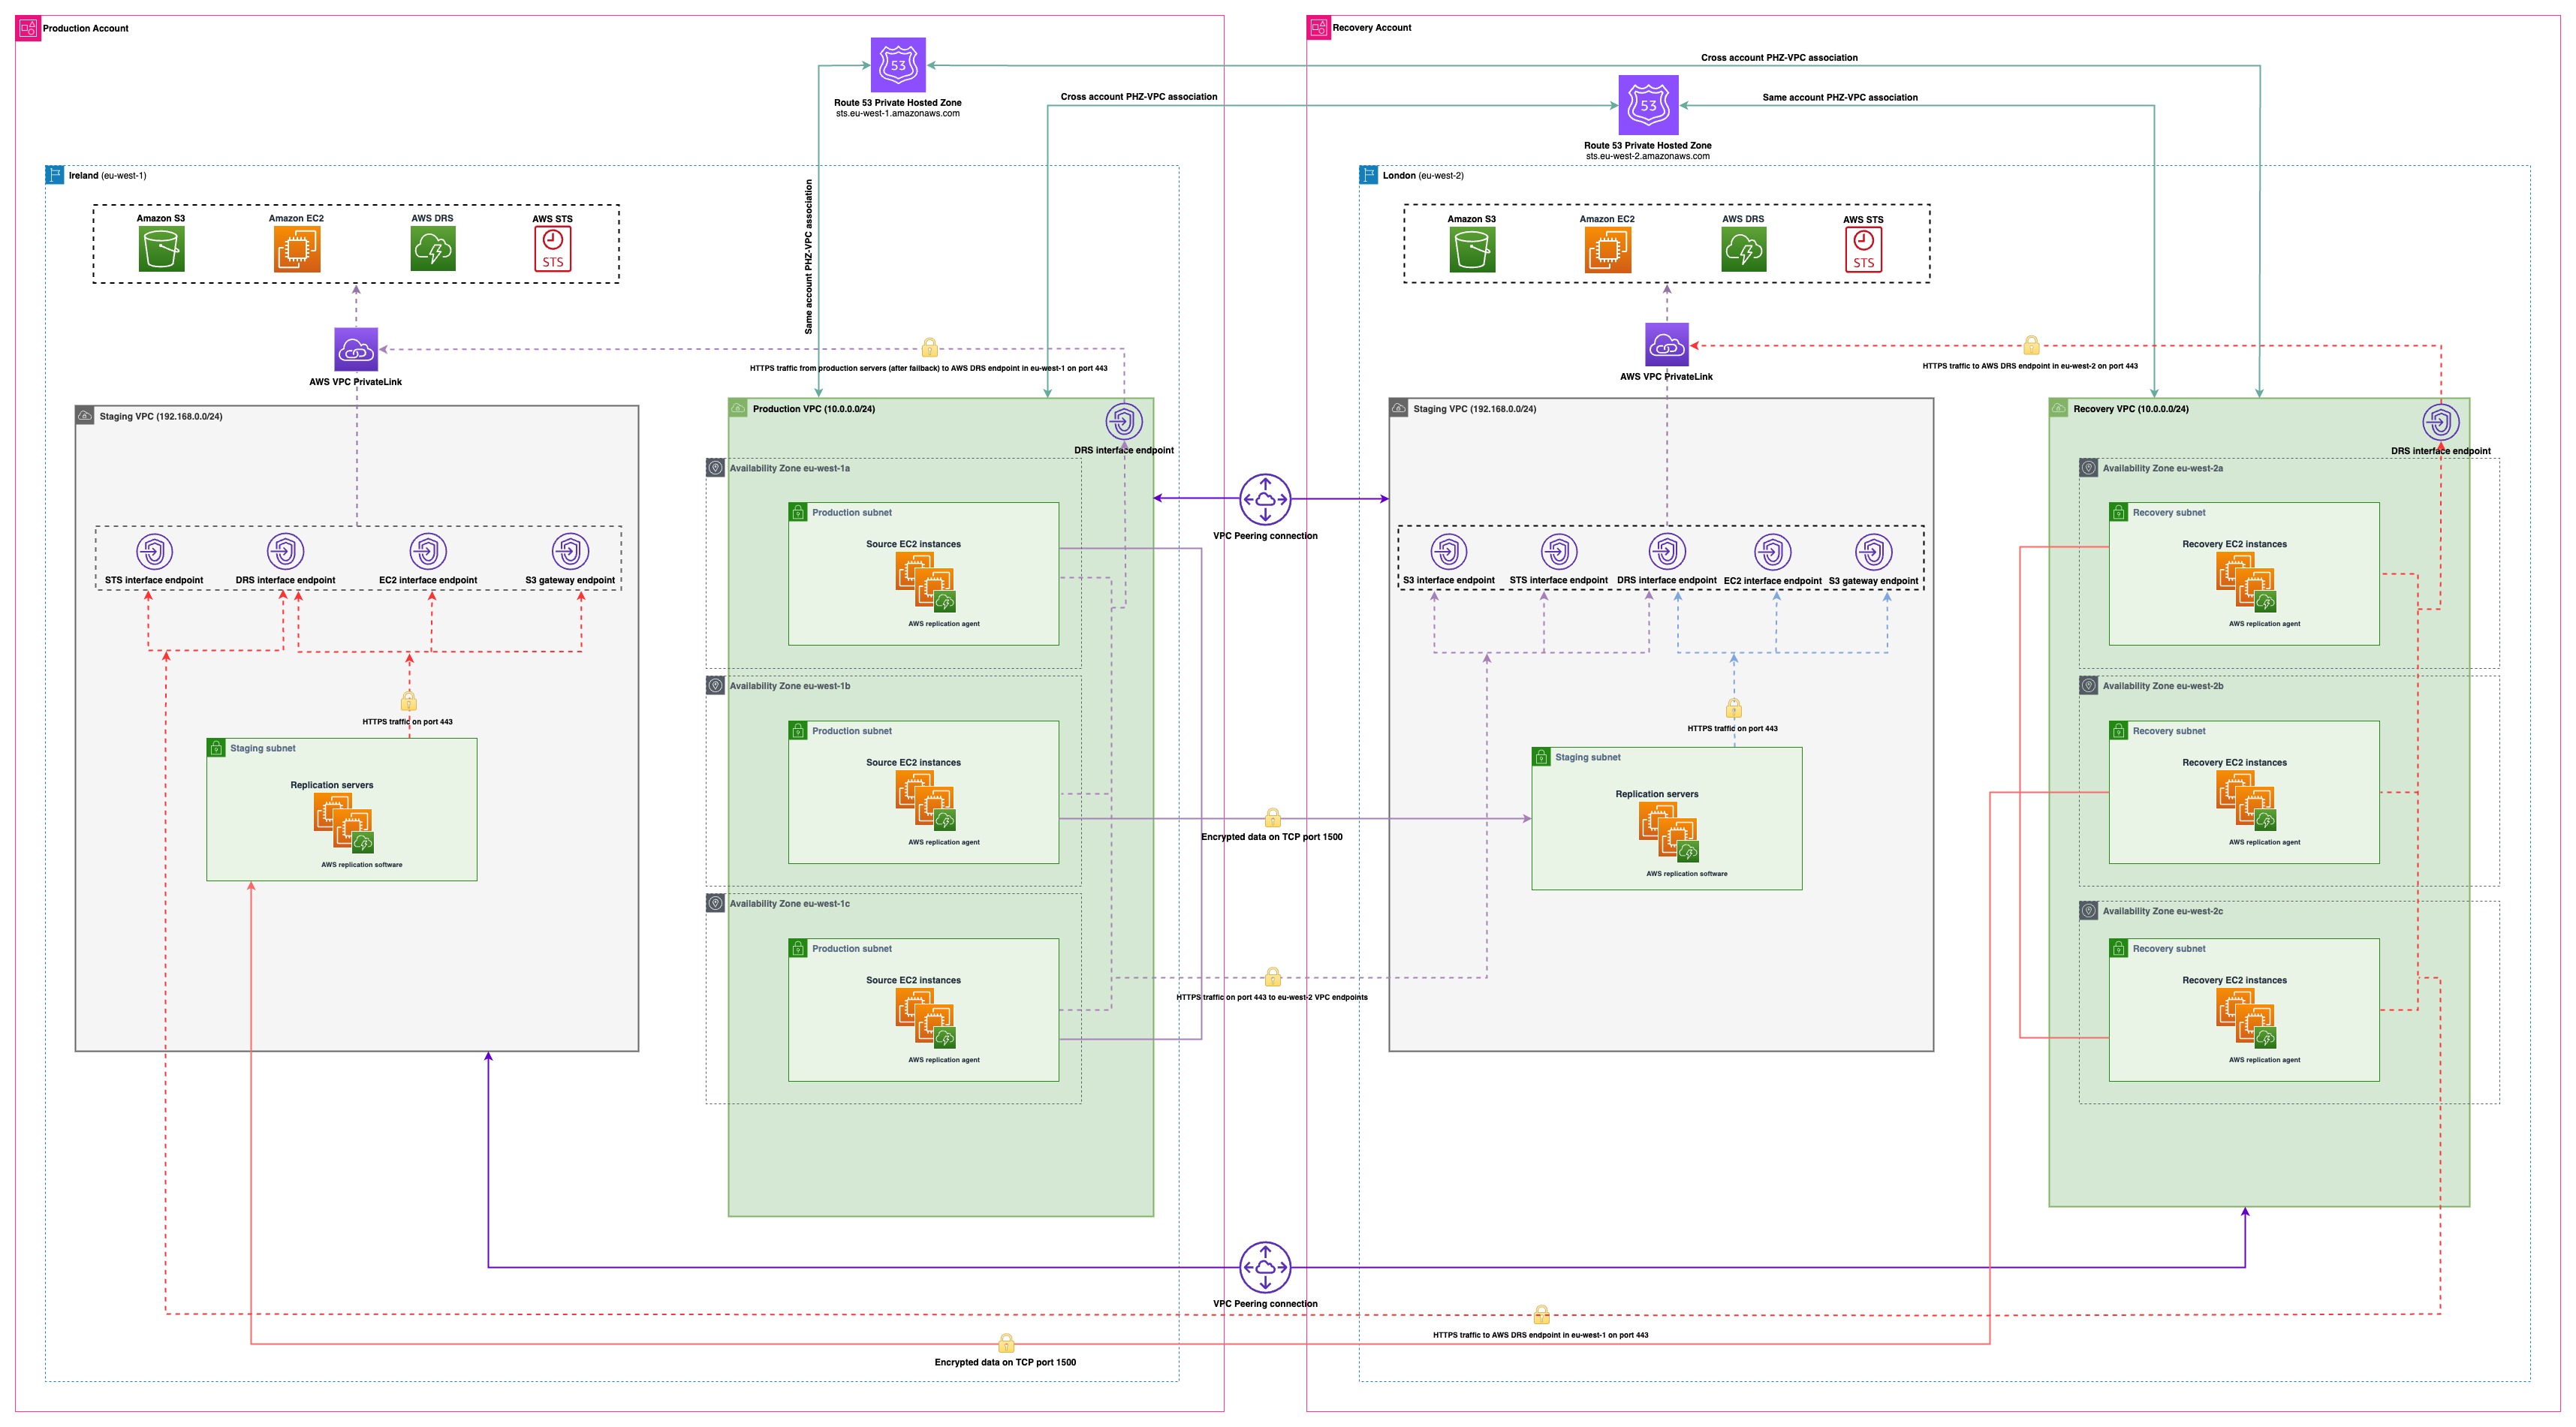 Figure 1: Solution overview
Prerequisites
The following prerequisites are necessary to complete this solution:
- Two AWS accounts:
- Production account: Contains the source Amazon EC2 instances to be protected by Elastic Disaster Recovery service
- Recovery account: Hosts the DR staging and recovery environment
- Elastic Disaster Recovery service initialized in:
- Source region in production account
- Target region in recovery account
Note: During service initialization, make sure you choose Use private IP for data replication (VPN, DirectConnect, VPC peering) option under Data routing and throttling section in step 3 named Configure additional replication settings in both AWS accounts.
- Cross-account trust relationship established:
- Production account added as trusted account in recovery account’s Elastic Disaster Recovery settings
- Recovery account added as trusted account in production account’s Elastic Disaster Recovery settings
Note: During the establishment of cross-account trust, make sure you choose Failback and in-AWS right-sizing roles for both directions: from production account to recovery account and from recovery account to production account.
- Source EC2 instance configured with:
- An AWS Identity and Access Management (IAM) role attached with AWSElasticDisasterRecoveryEc2InstancePolicy
- Two VPCs in both accounts:
- A production VPC in production account for hosting primary production EC2 instances
- A recovery VPC in the recovery account ready to host recovery servers during failover events
- A staging VPC in both accounts: one in the recovery account for hosting staging resources and VPC endpoints during normal operations, and another in the production account used during failback
Walkthrough
The following summarizes the high-level steps covered in this post:
- Create the following VPC endpoints in staging VPC in recovery account with appropriate security group rules to allow communication from production VPC and staging VPC on port 443:
- Elastic Disaster Recovery
- Amazon S3
- AWS STS
- Amazon EC2
- Create the Elastic Disaster Recovery VPC endpoint in recovery VPC in recovery account with appropriate security group rules to allow communication from recovery VPC on port 443.
- Create Route 53 private hosted zone and an alias record for AWS STS in recovery account and associate recovery VPC and production VPC with it.
- Connect production VPC with staging VPC with VPC peering connection and establish appropriate routes in the corresponding route tables.
- Create the following VPC endpoints in staging VPC in production account with appropriate security group rules to allow communication from recovery VPC and staging VPC on port 443:
- Elastic Disaster Recovery
- Amazon S3
- AWS STS
- Amazon EC2
- Create the Elastic Disaster Recovery VPC endpoint in production VPC in production account with appropriate security group rules to allow communication from production VPC on port 443.
- Create Route 53 private hosted zone and an alias record for AWS STS in production account and associate recovery VPC and production VPC with it.
- Connect recovery VPC with staging VPC with VPC peering connection and establish appropriate routes in the corresponding route tables.
Detailed steps
Step 1: Create VPC endpoints in staging VPC in recovery account
The source servers need connectivity to the Elastic Disaster Recovery Regional endpoint and the AWS STS endpoint both during the agent installation and throughout its operational lifetime. They also need connectivity to Amazon S3 to download the AWS replication agent installer and other service artifacts from the Elastic Disaster Recovery service-owned S3 buckets. Similarly, staging resources (replication and conversion servers) need connectivity to both Elastic Disaster Recovery and Amazon S3. Furthermore, replication servers need Amazon EC2 service access to create Amazon Elastic Block Store (EBS) Snapshots of replication volumes. To enable these connections, we create the necessary endpoints in the recovery account’s staging VPC.
To enable the flow of communications, we configure security group rules for the VPC endpoints that permit HTTPS traffic from both the source VPC CIDR and staging subnet(s). For streamlined management, we implement a single security group across all VPC endpoints in the staging VPC.
For Amazon S3 connectivity, we create two distinct endpoint types: 1) an Amazon S3 Interface endpoint used by source servers during AWS replication agent installation, and 2) an Amazon S3 Gateway endpoint used by replication and conversion servers to download software from Elastic Disaster Recovery service-owned S3 buckets. This distinction is further explained in the previously linked post.
Following a failover event, recovery servers in the recovery VPC need connectivity to the Elastic Disaster Recovery service within the recovery Region. Although connecting the recovery VPC to the staging VPC (where VPC endpoints are created) might seem logical, this approach isn’t feasible due to networking constraints. The production VPC is connected with the staging VPC through the VPC peering connection, thus we cannot establish a similar connection between the recovery VPC and staging VPC because both production and recovery VPCs have identical CIDR ranges. This limitation exists because VPC peering technology prohibits routing traffic to VPCs with overlapping CIDR blocks. To overcome this architectural constraint, we deploy a dedicated Elastic Disaster Recovery VPC endpoint directly within the recovery VPC. This makes sure that recovery EC2 instances can communicate with the Elastic Disaster Recovery service in the recovery Region.
Create VPC endpoints in staging and recovery VPCs
- Open the Amazon VPC console in recovery account in aecovery Region.
- In the navigation pane, choose Endpoints.
- Choose Create endpoint.
- In the Endpoint settings section, do the following:
- Provide a name to the endpoint. As shown in the following figure 2, when creating the Amazon S3 interface endpoint in staging VPC, use a descriptive name such as “Amazon S3 Interface Endpoint (Staging VPC)” to clearly distinguish it from endpoints in other VPCs, such as your recovery VPC. You can apply this same naming convention to other endpoints that you create throughout this walkthrough for better organization and identification.
- For Type, choose AWS services.
- In the Services section, search for the appropriate service and choose the appropriate service:
- Search “drs” for Elastic Disaster Recovery
- Search “s3” for Amazon S3
- Search “sts” for AWS STS
- Search “ec2” for Amazon EC2
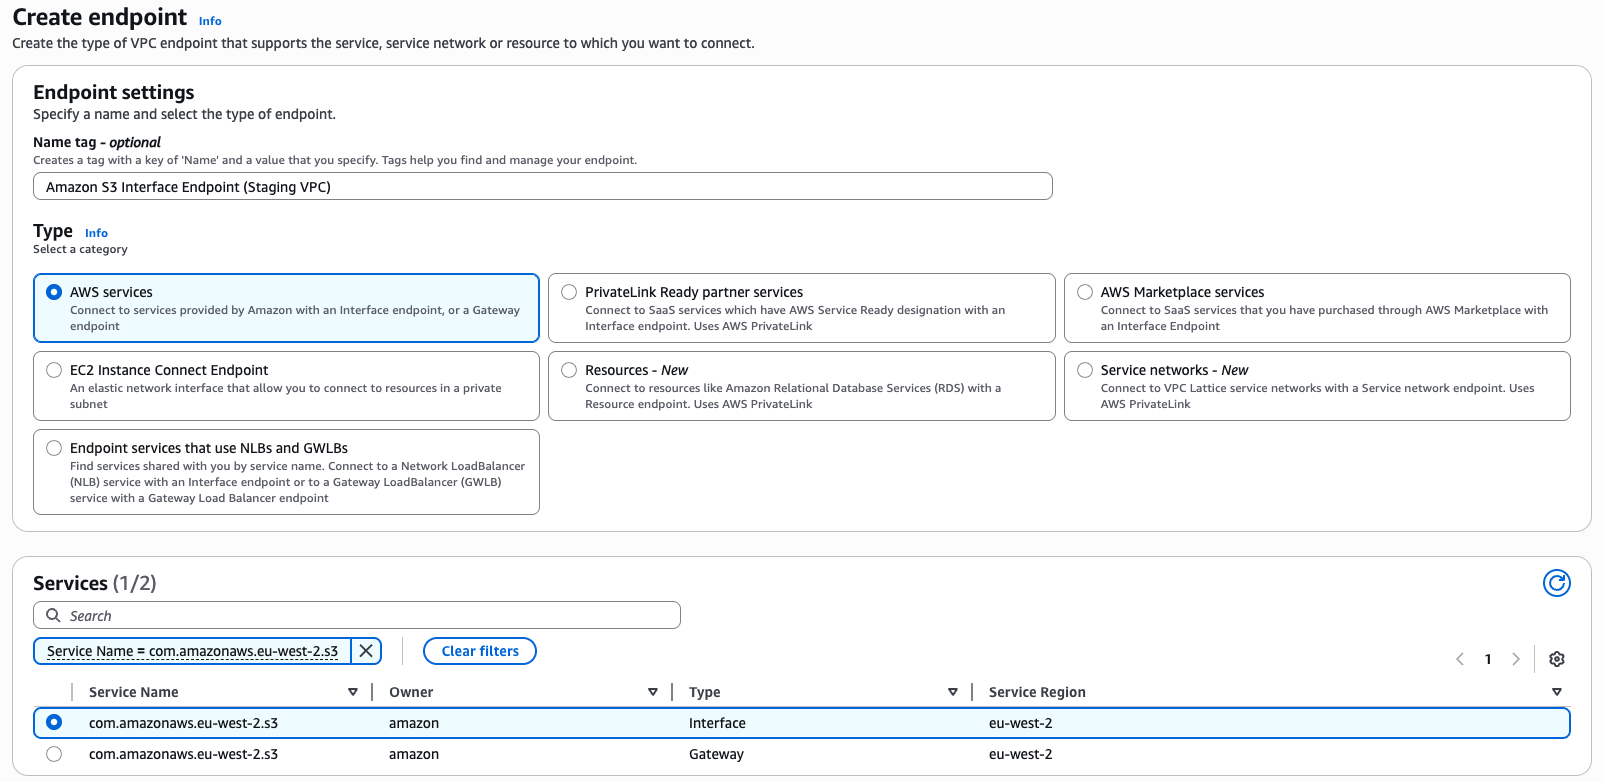
Figure 2: Defining Endpoint name and service
- In the Network settings section, choose staging VPC.
- For all services other than Amazon S3 interface endpoint, Enable DNS name under Additional settings is already chosen. We recommend that you keep the default.
- For the Amazon S3 interface endpoint, Enable DNS name is not selected by default, as shown in the following figure 3. We recommend keeping it unselected (default setting).
- IPV4 is chosen as default for the DNS record IP type option. We recommend that you keep the default.
- When creating the VPC endpoint for Elastic Disaster Recovery in recovery VPC, choose recovery VPC.
- For Subnets, choose the subnets in which to create endpoint network interfaces. You can choose one subnet per AWS Availability Zone (AZ). However, you can’t choose multiple subnets from the same AZ. In this setup, we choose multiple AZs for high availability.
- For Amazon S3 gateway endpoint, choose a route table(s) of staging subnets designated to host staging resources (replication and conversion servers) in the staging VPC. This choice adds the appropriate route to the Amazon S3 service in the chosen route tables.
- For the IP address type option, IPV4 is chosen by default. We recommend that you keep the default.
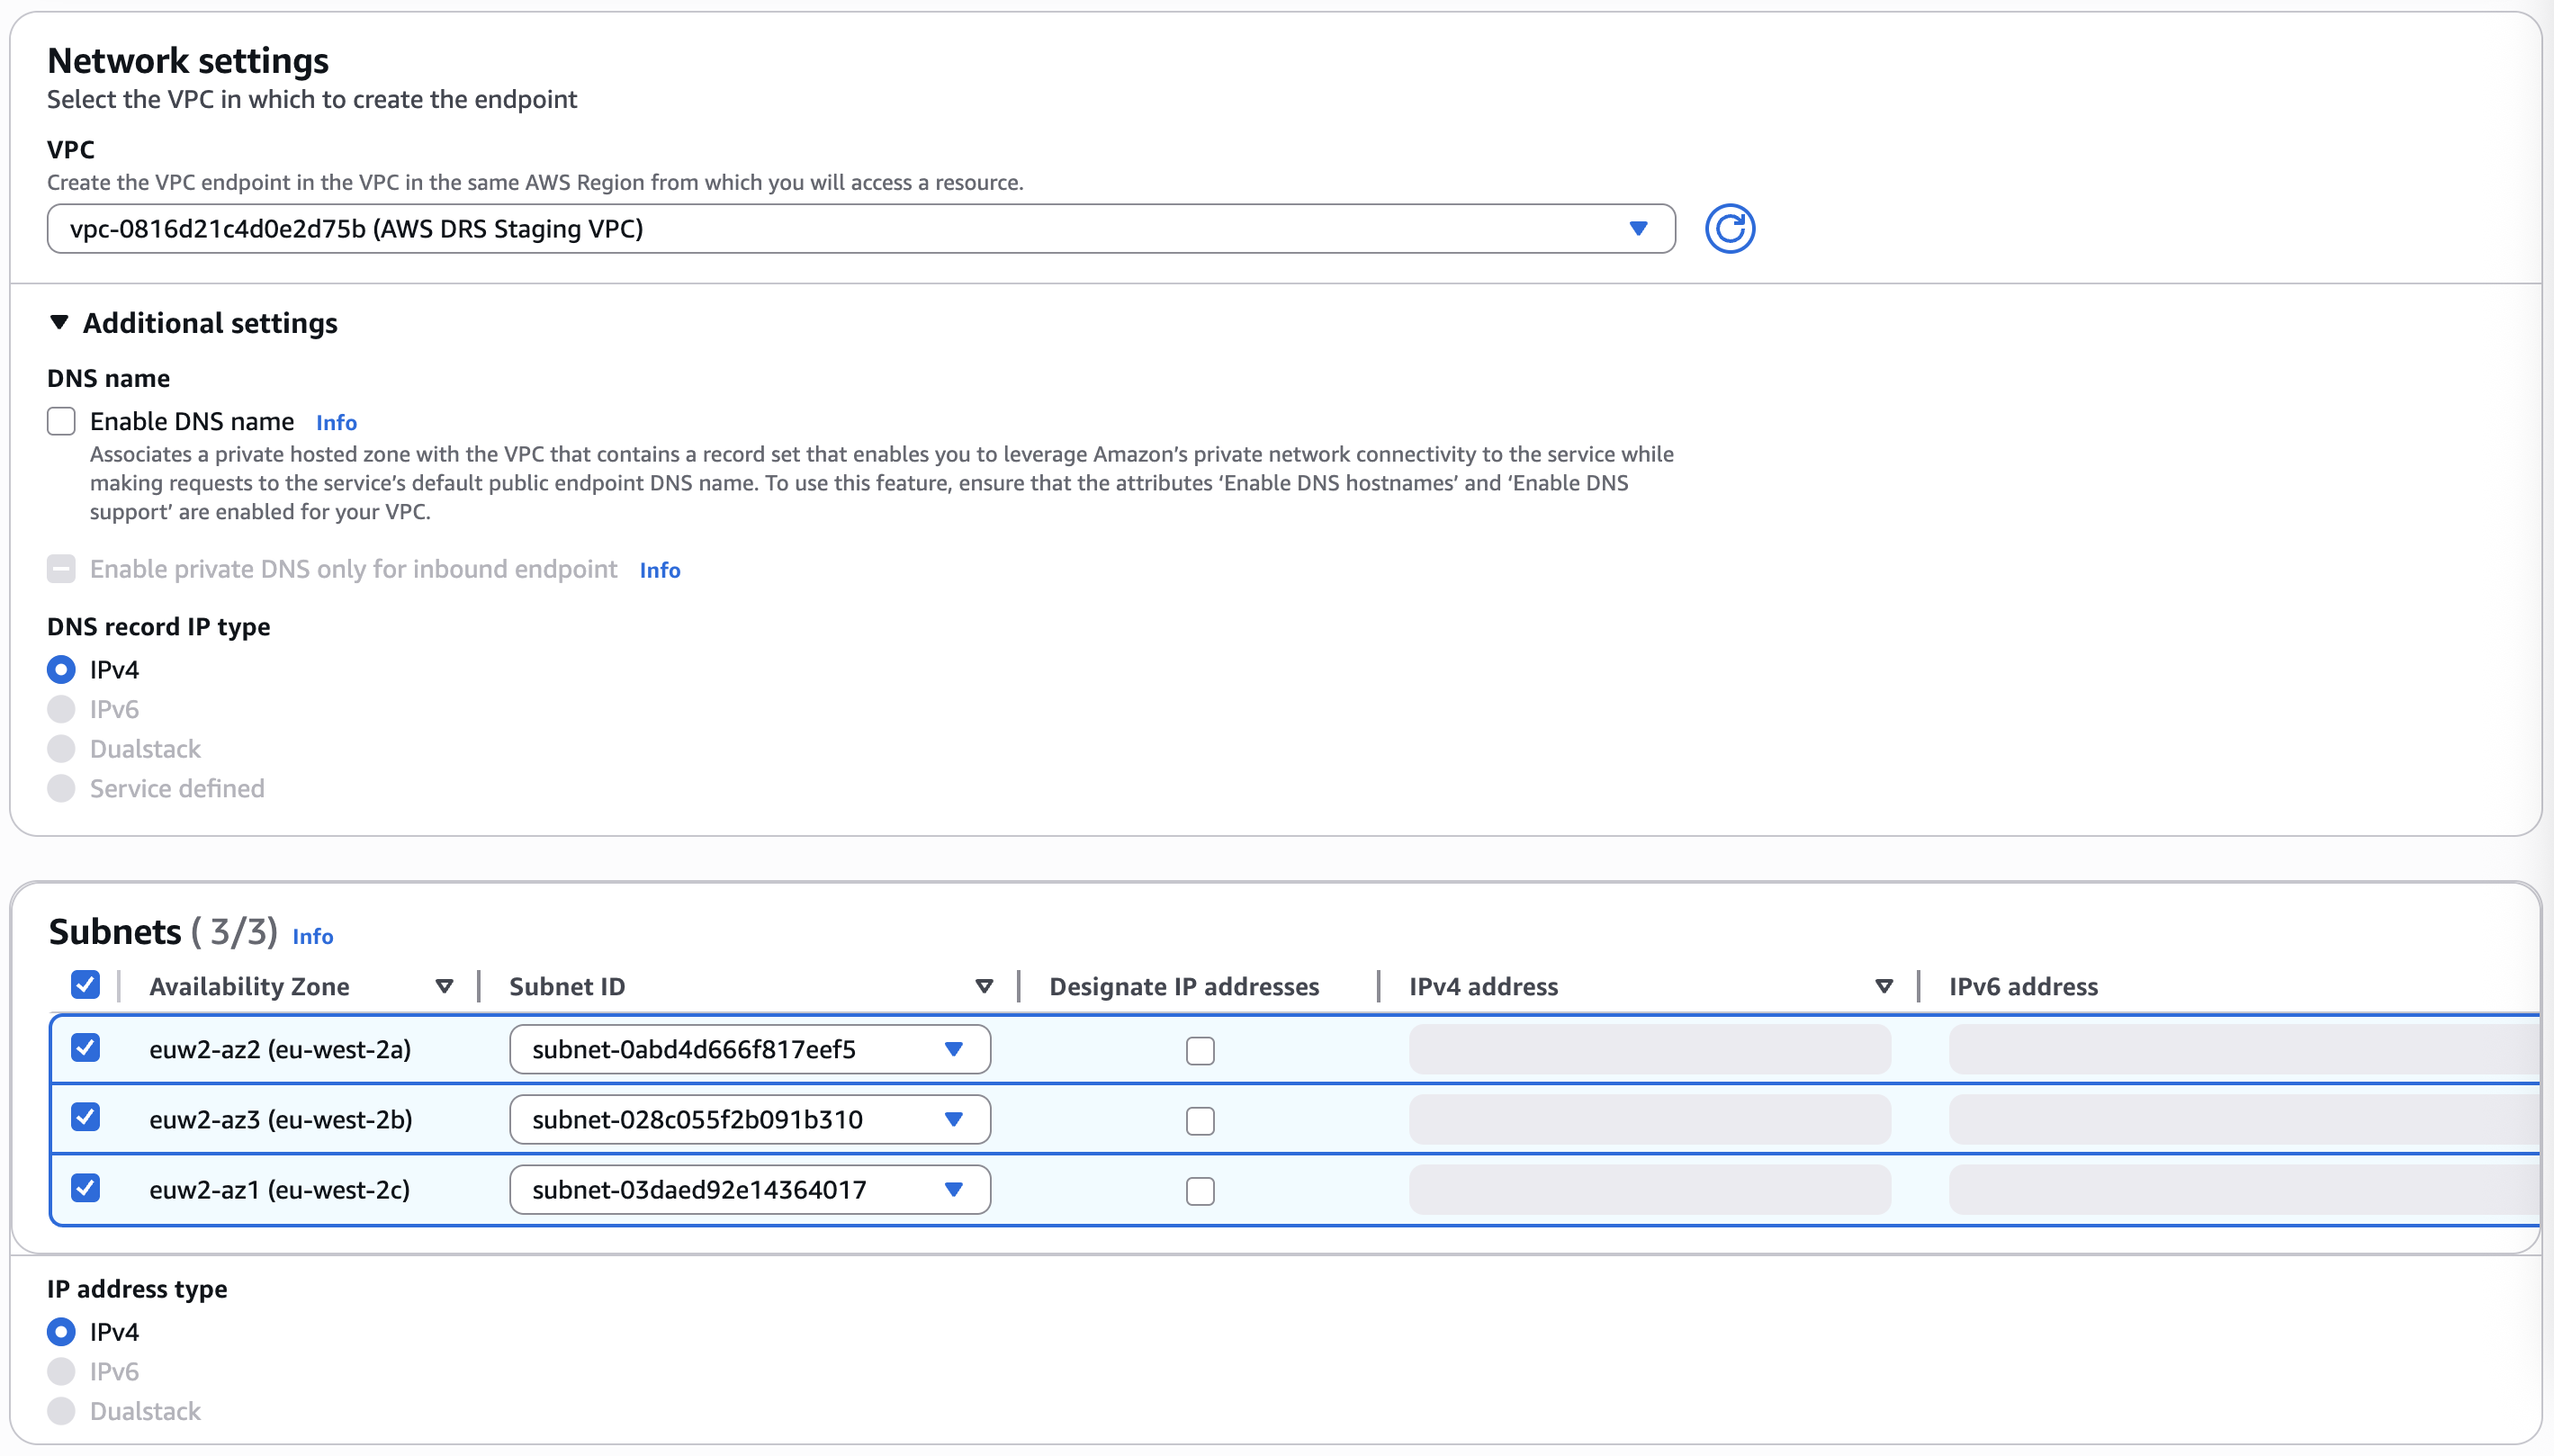 Figure 3: Choosing VPC, subnets and more settings
- For Security groups, choose the security groups to associate with the endpoint network interfaces, as shown in the following figure 4. In this walkthrough, we associate a common security group for all of the VPC endpoints. Remember to configure inbound rules in this security group to allow HTTPS traffic from both the production VPC in the production account and the staging VPC in which these endpoints are created.
- Choose the security group for Elastic Disaster Recovery VPC endpoint in recovery VPC and configure an inbound rule to allow HTTPS traffic from recovery VPC.
- For Policy, to allow all operations by all principals on all resources over the interface endpoint, choose Full access. To restrict access, choose Custom and enter a policy. In this walkthrough, we choose Full access.
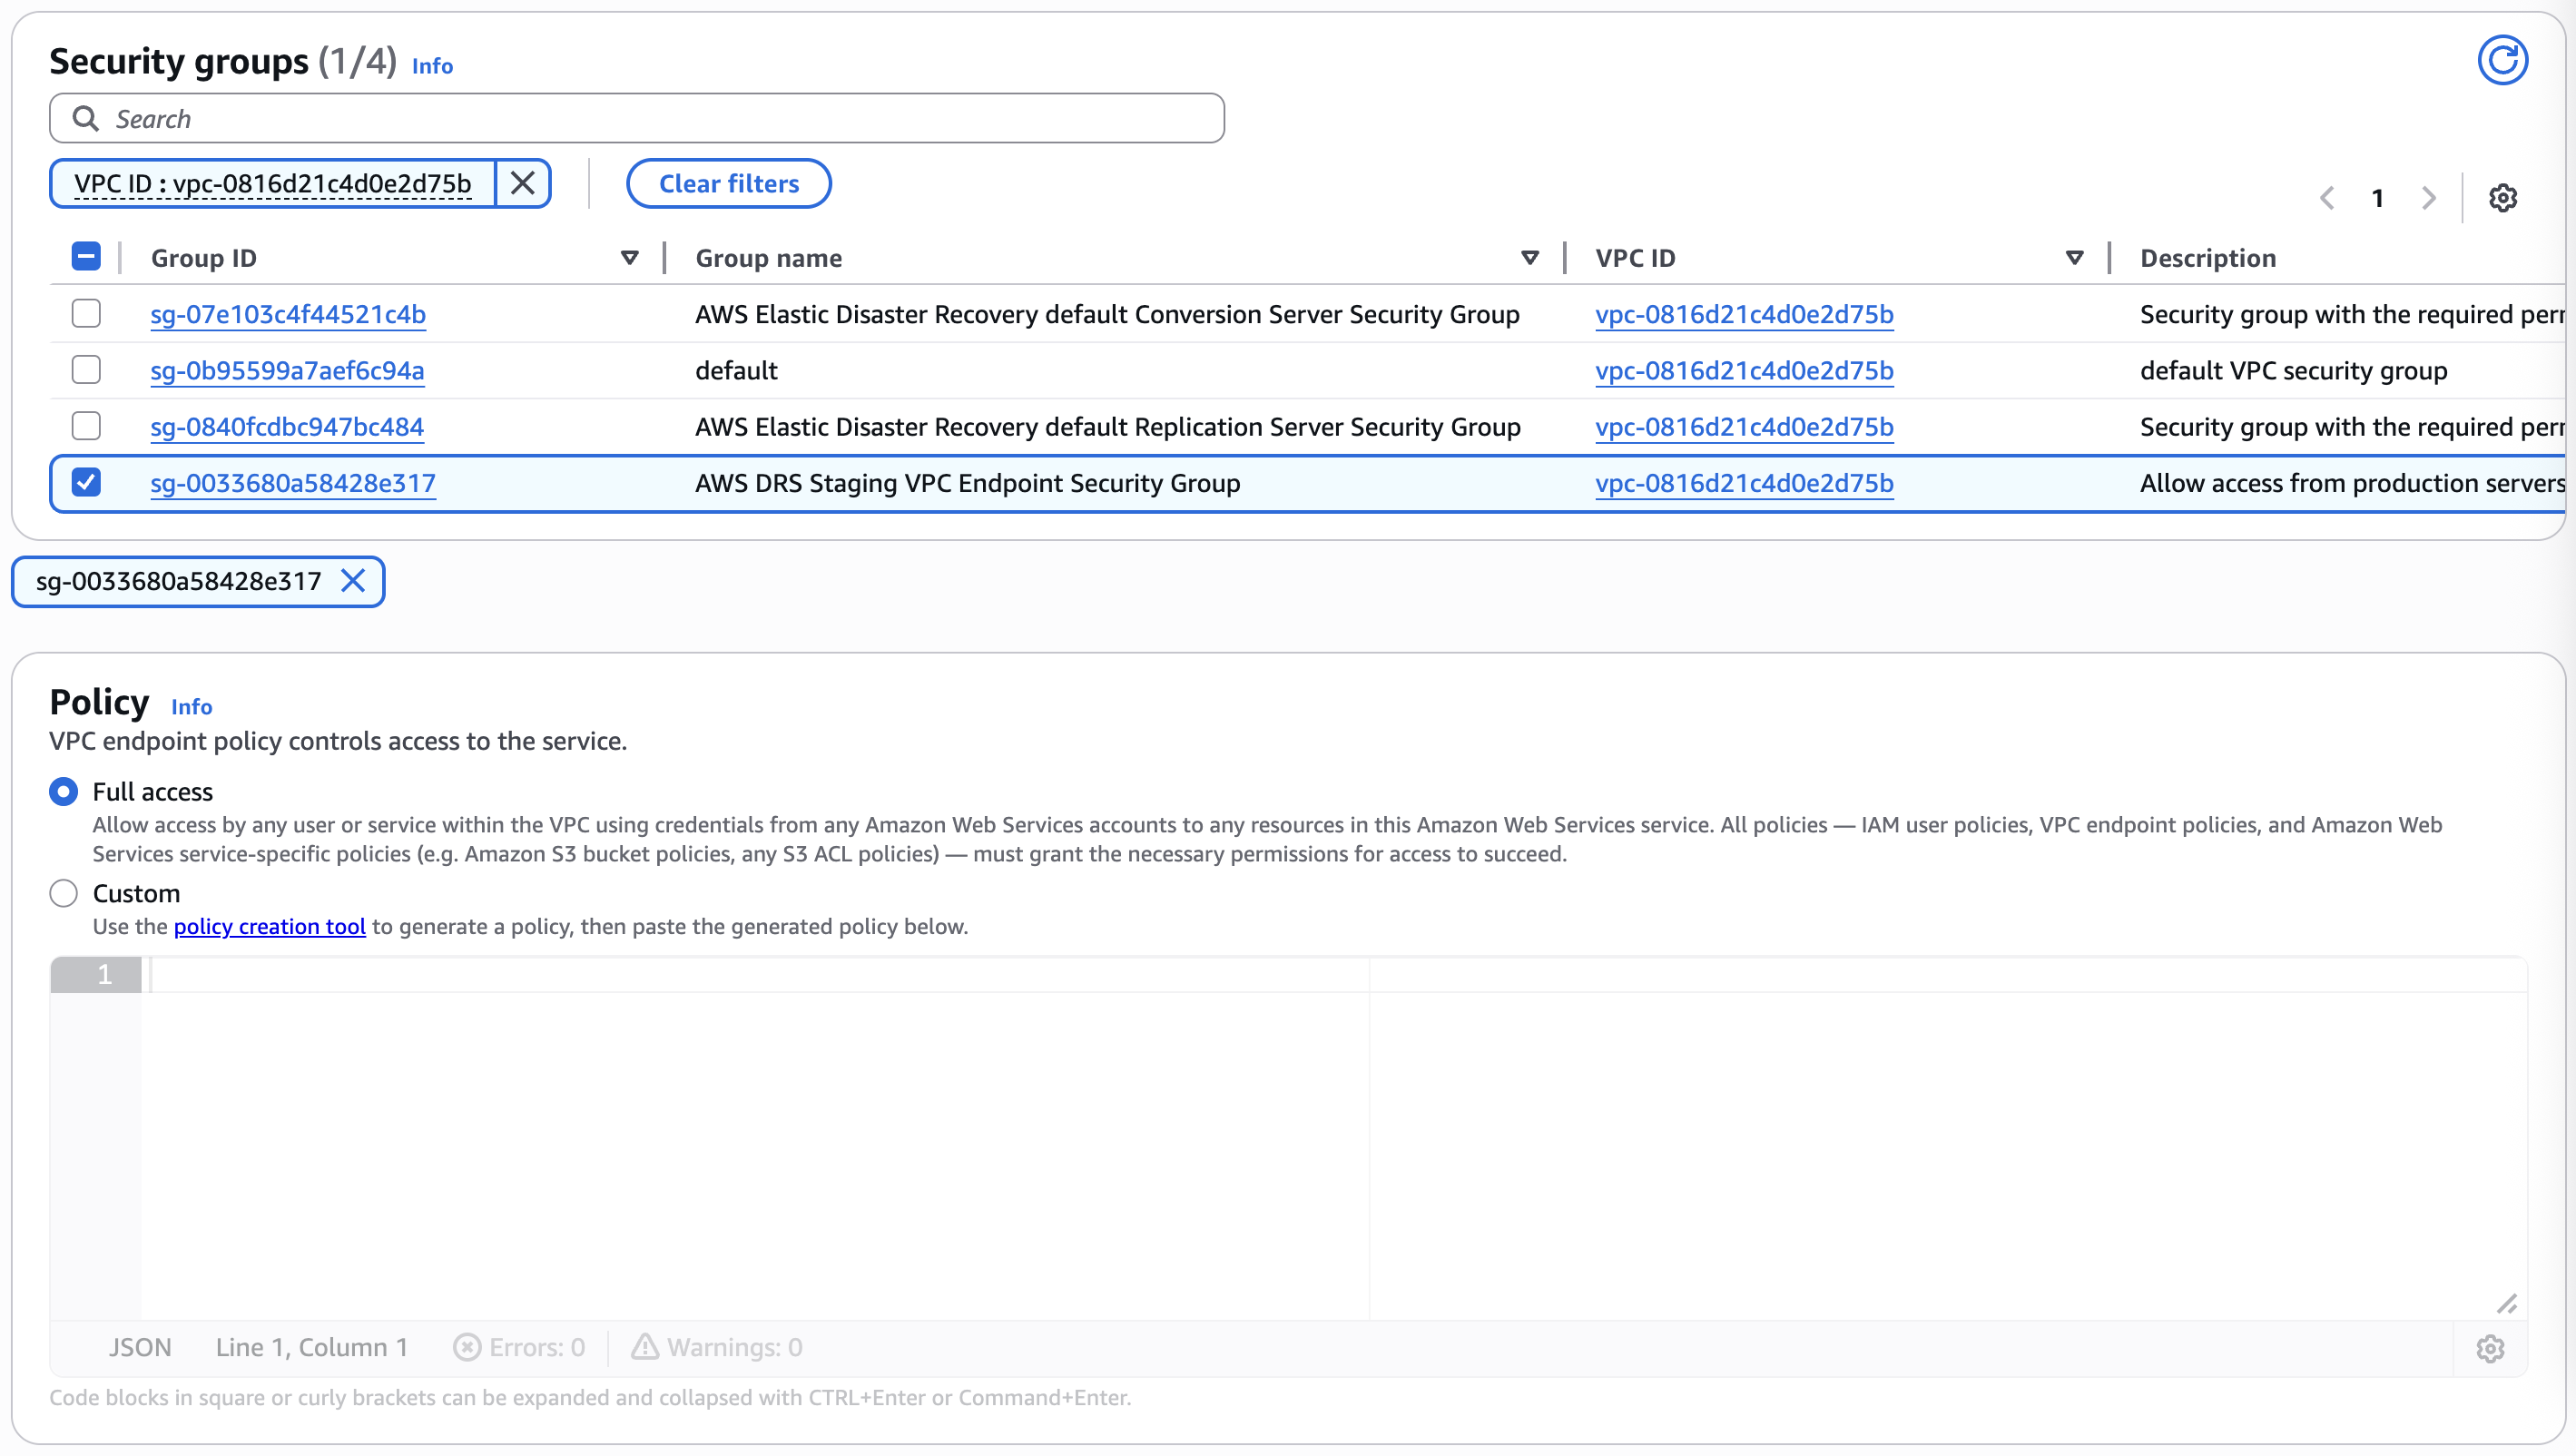 Figure 4: Choosing Security Groups and endpoint policy
- (Optional) To add a tag, choose Add new tag and enter the tag key and the tag value as shown in the following figure 5.
- Choose Create endpoint to finish creating the endpoint.
 Figure 5: Creating tags
By the end of this, you should have the following VPC endpoints in your Recovery Account as shown in the following figure 6:
 Figure 6. VPC endpoints in Recovery Account
Step 2: Create AWS STS Route 53 private hosted zone and an alias record in recovery account
During AWS replication agent installation, the installer needs to connect to the regional AWS STS endpoint in the recovery Region. To use the private IP address of the AWS STS VPC endpoint created previously, we set up a Route 53 private hosted zone in the recovery Region for DNS resolution.
We associate this hosted zone with the recovery VPC, not because it’s needed for functionality, but because a private hosted zone must be associated with at least one VPC. We cannot associate the staging VPC with this hosted zone because the AWS STS endpoint is already created in the staging VPC and a Route 53 hosted zone is already associated with it.
Create AWS STS Route 53 private hosted zone
Before creating the private hosted zone, make sure that the VPC settings enableDnsHostnames and enableDnsSupport are set to true for the recovery VPC.
- Open the Amazon Route 53 console in recovery account.
- Choose Hosted zones in the navigation pane.
- Choose Create hosted zone.
- In the Hosted zone configuration section on the Create hosted zone page, do the following:
- Enter the
sts.eu-west-2.amazonaws.comdomain name and, optionally, a description. - In the Type list, choose Private hosted zone as shown in the following figure 7.
- Enter the
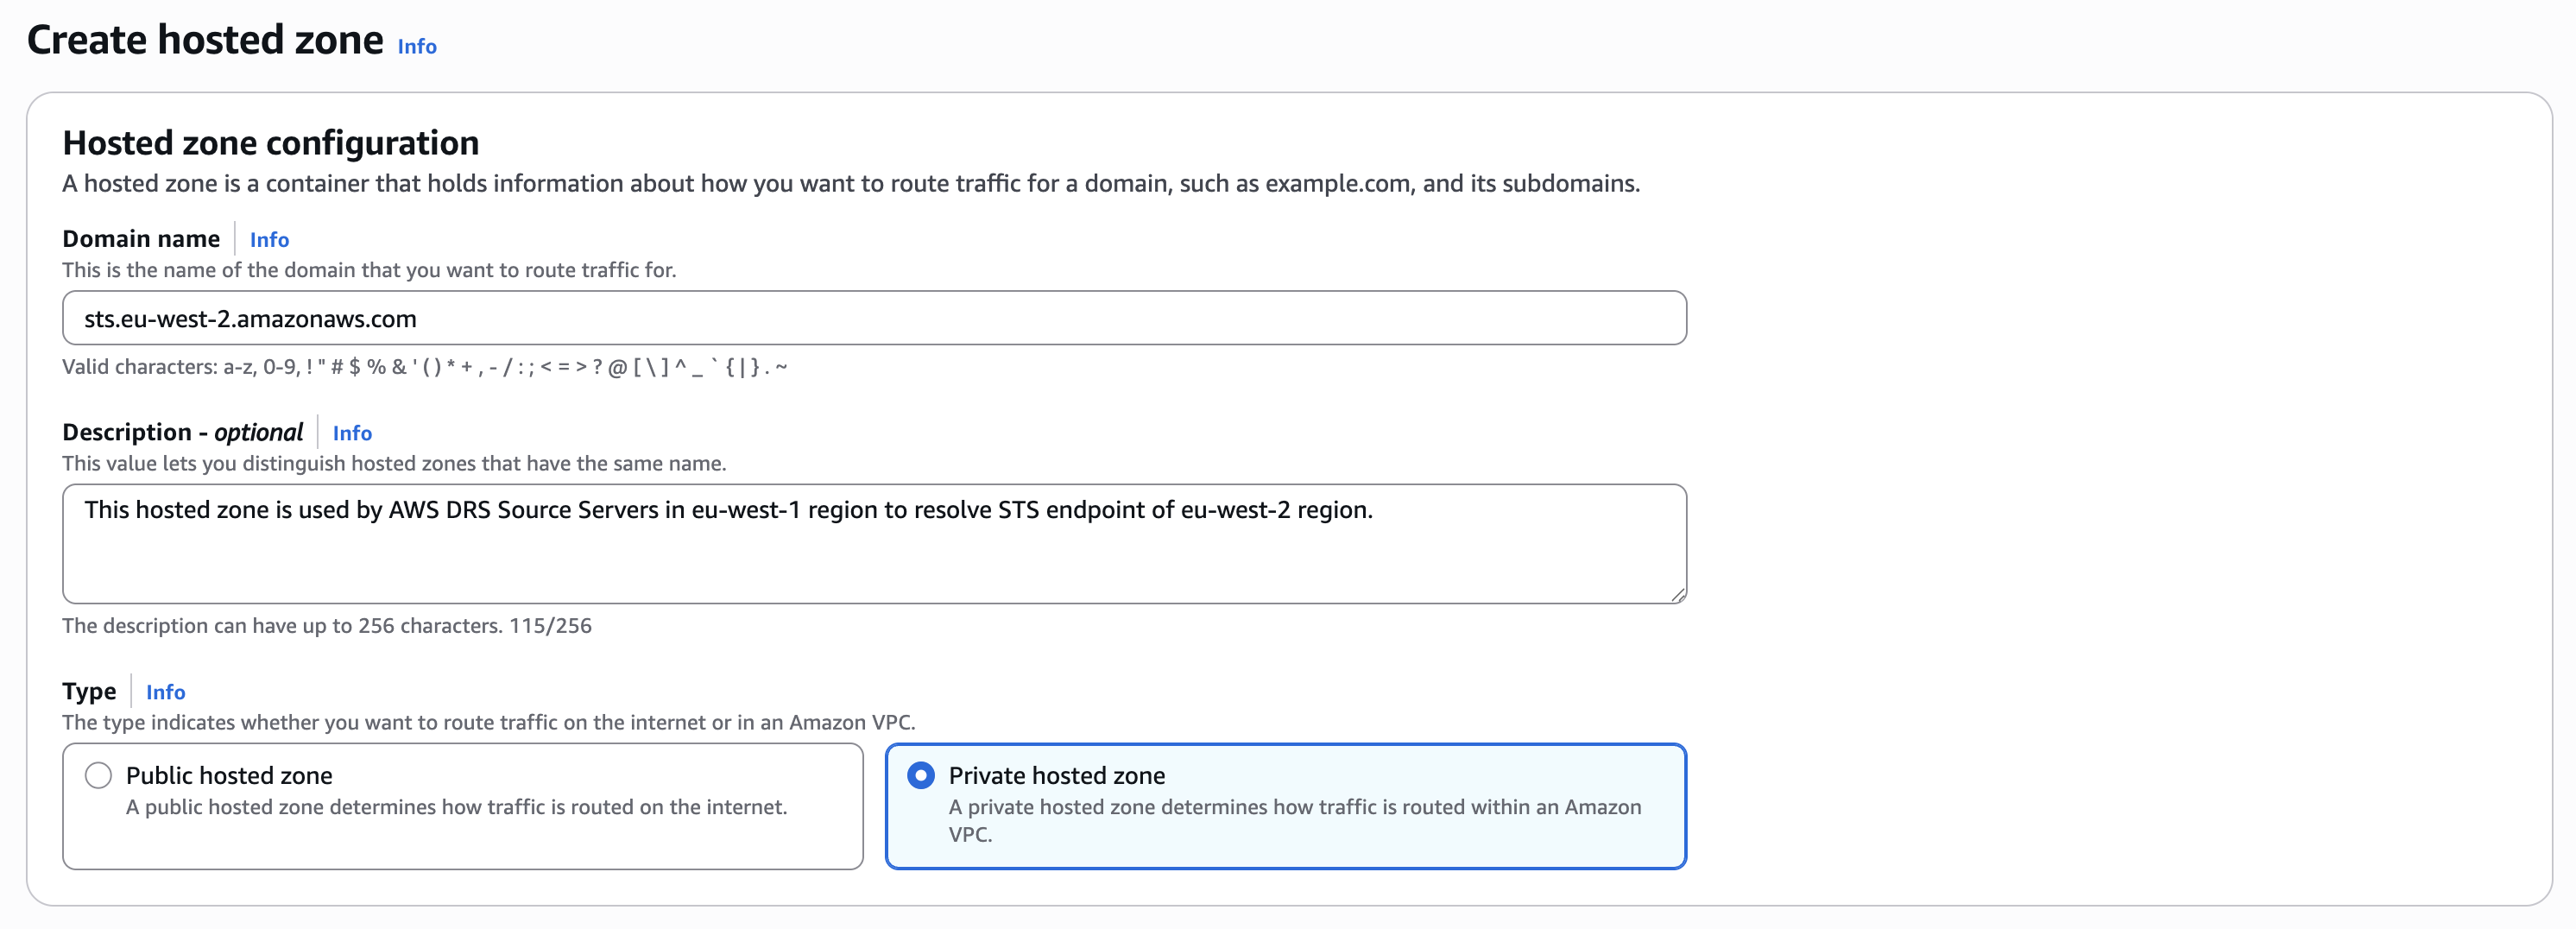 Figure 7. Defining hosted zone domain and type
- In the VPCs to associate with the hosted zone section, choose the recovery region in the Region list and recovery VPC in the VPC ID list to associate with the hosted zone. In this example, we are choosing
eu-west-2Region and a recovery VPC to associate with the hosted zone as shown in the following figure 8. - (Optional) To add a tag, choose Add tag and enter the tag key and the tag value.
- Choose Create hosted zone.
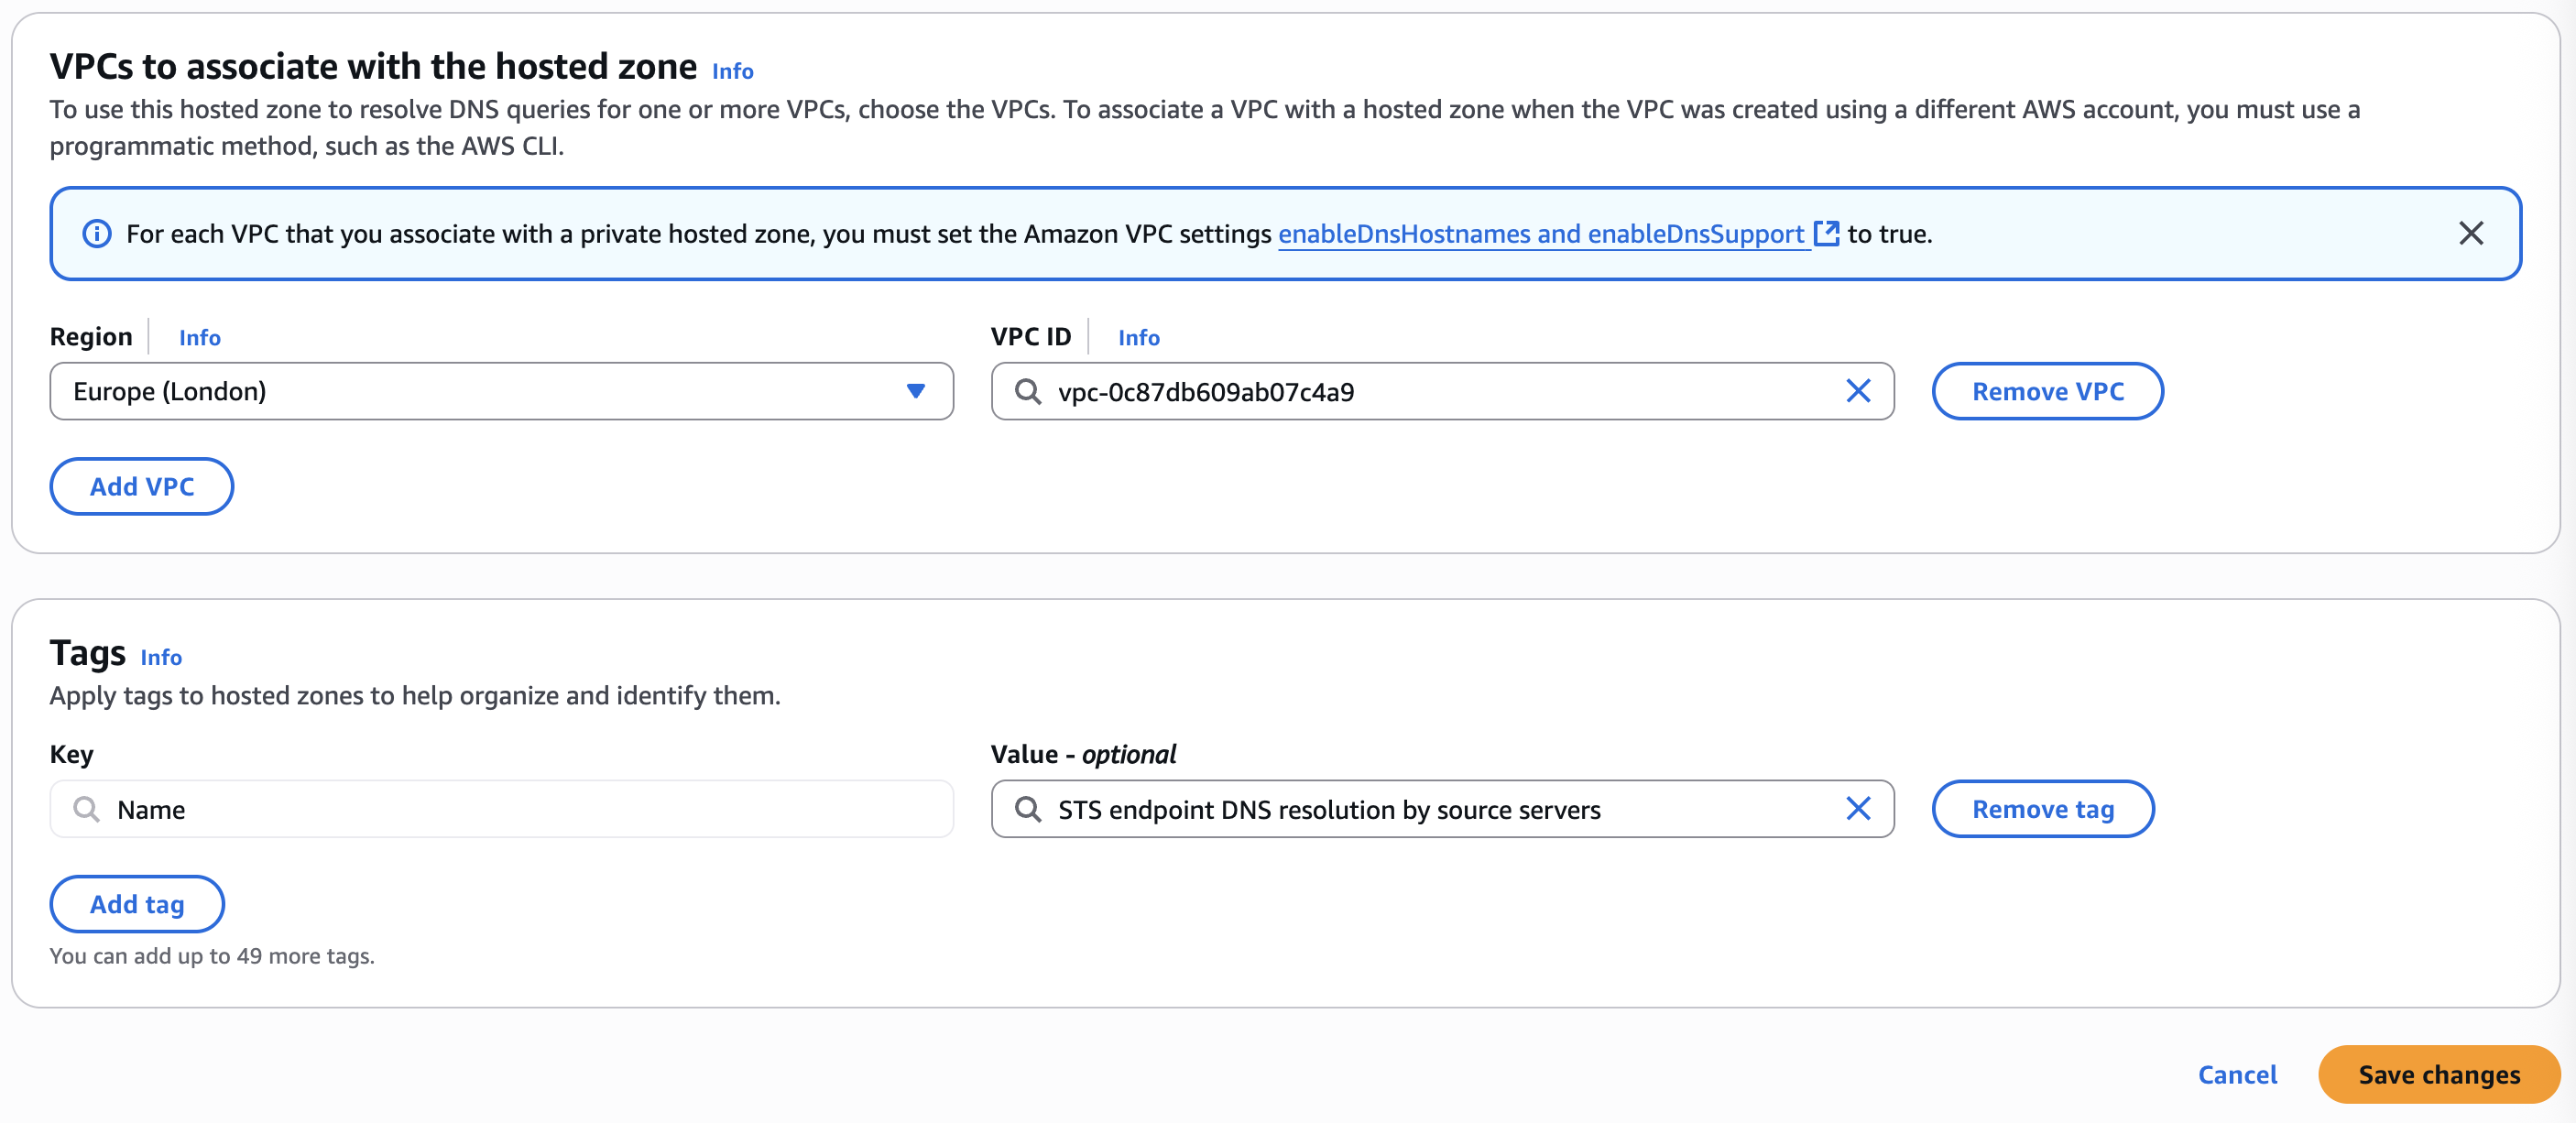 Figure 8. Choosing AWS Region and VPC for hosted zone
Create Alias record in AWS STS hosted zone
- In the navigation pane, choose Hosted zones.
- On the Hosted zones page, choose the hosted zone with the name
sts.eu-west-2.amazonaws.comas shown in the following figure 9. - Choose Create record.
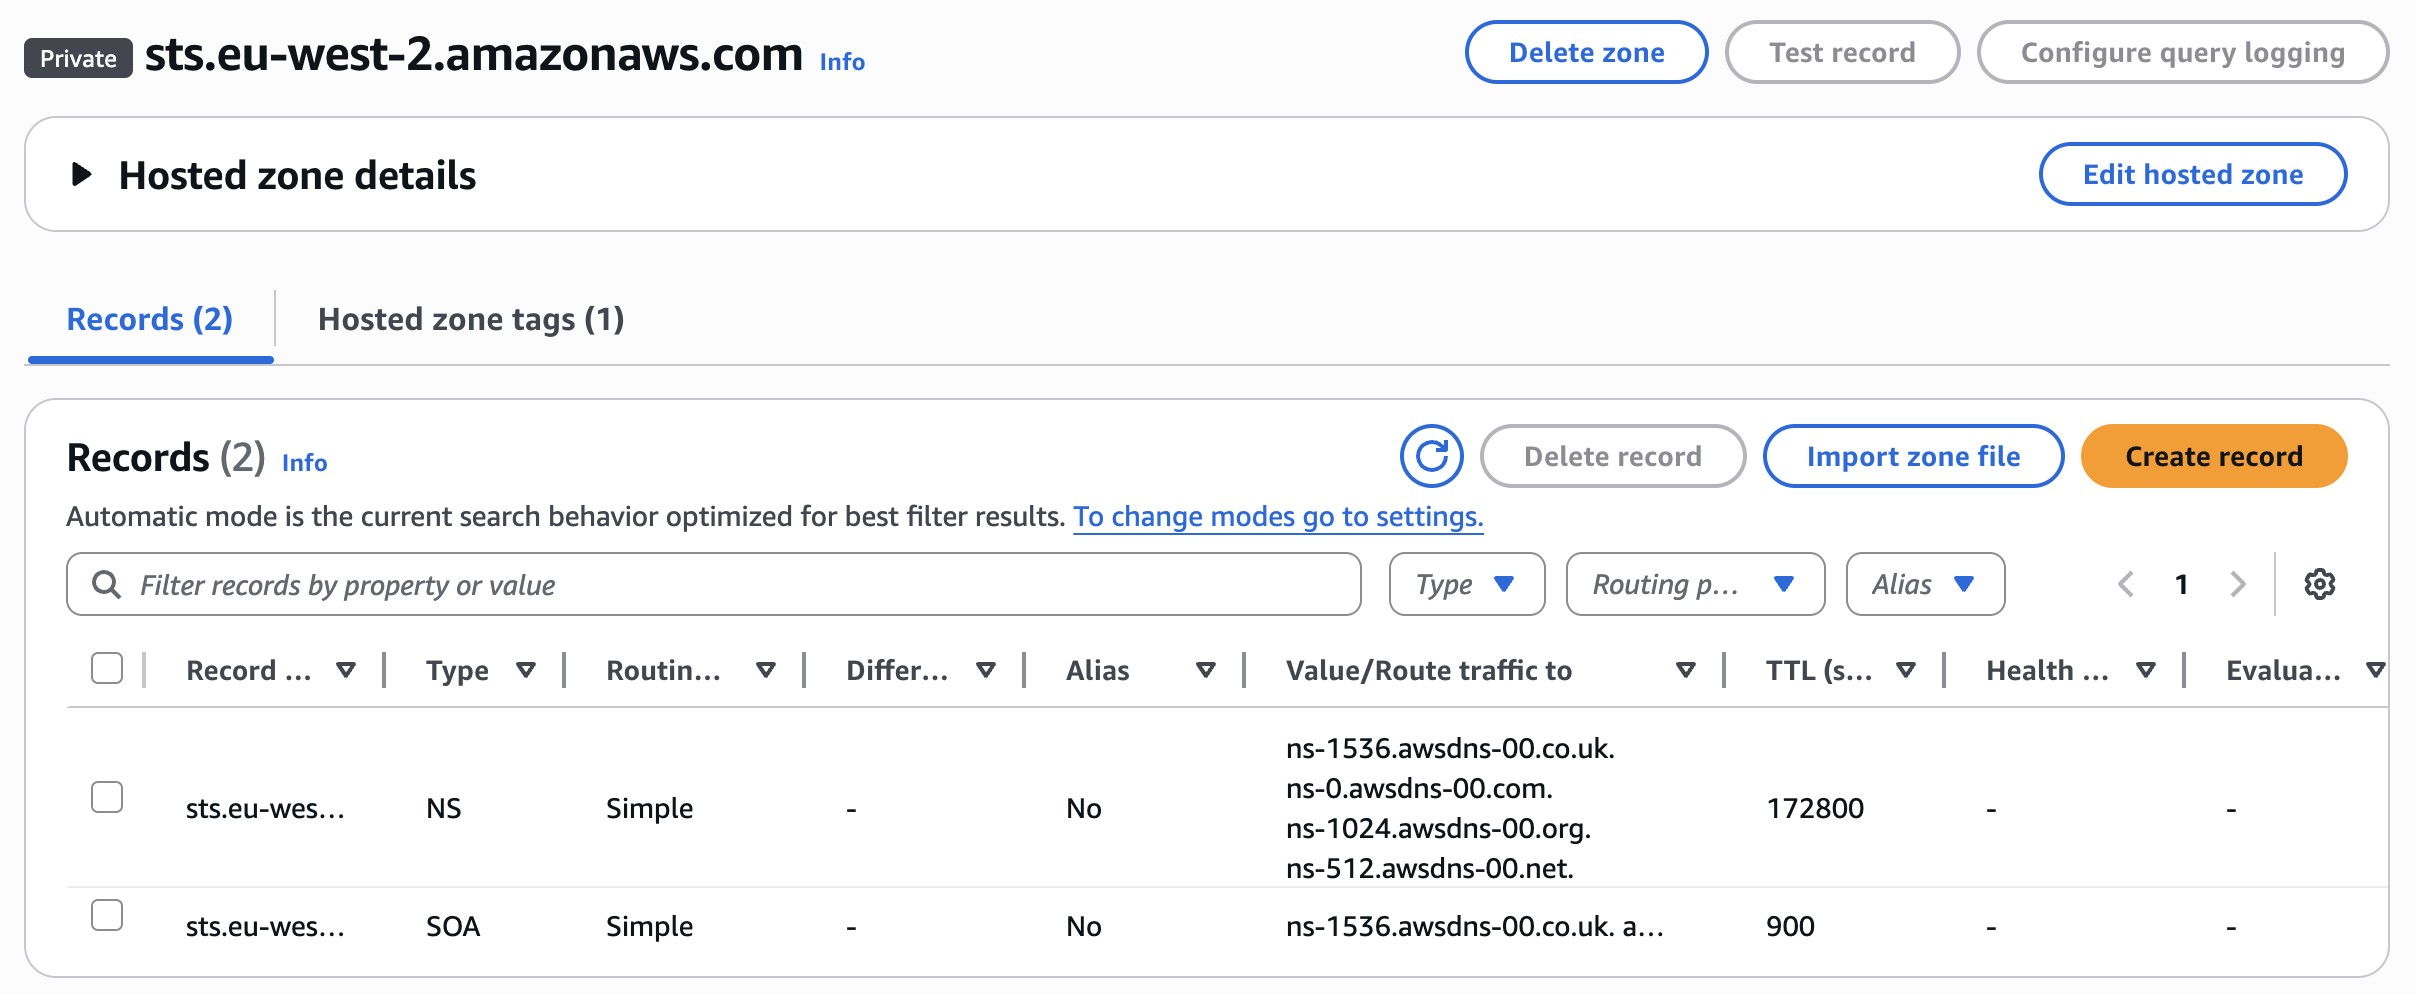 Figure 9. Creating alias record
By default, the Quick create record method to create the records is opened. The following steps apply to this method. If you are using wizard to create records, then adjust the steps accordingly.
- In the Create record page, do the following:
- Leave the subdomain in Record name empty.
- For Record type, accept the default A – Routes traffic to an IPv4 address and some AWS resources.
- Turn on the Alias toggle button as shown in the following figure 10.
- Under the Route traffic to option, do the following:
- Choose Alias to VPC endpoint in the Choose endpoint list.
- Choose the Recovery Region in the Choose Region list.
- Search for AWS STS endpoint DNS in the Choose endpoint search box and choose the DNS name without the AZ in its name.
- For Routing policy, accept the default Simple routing.
- Turn off the Evaluate target health toggle button.
- Choose Create records.
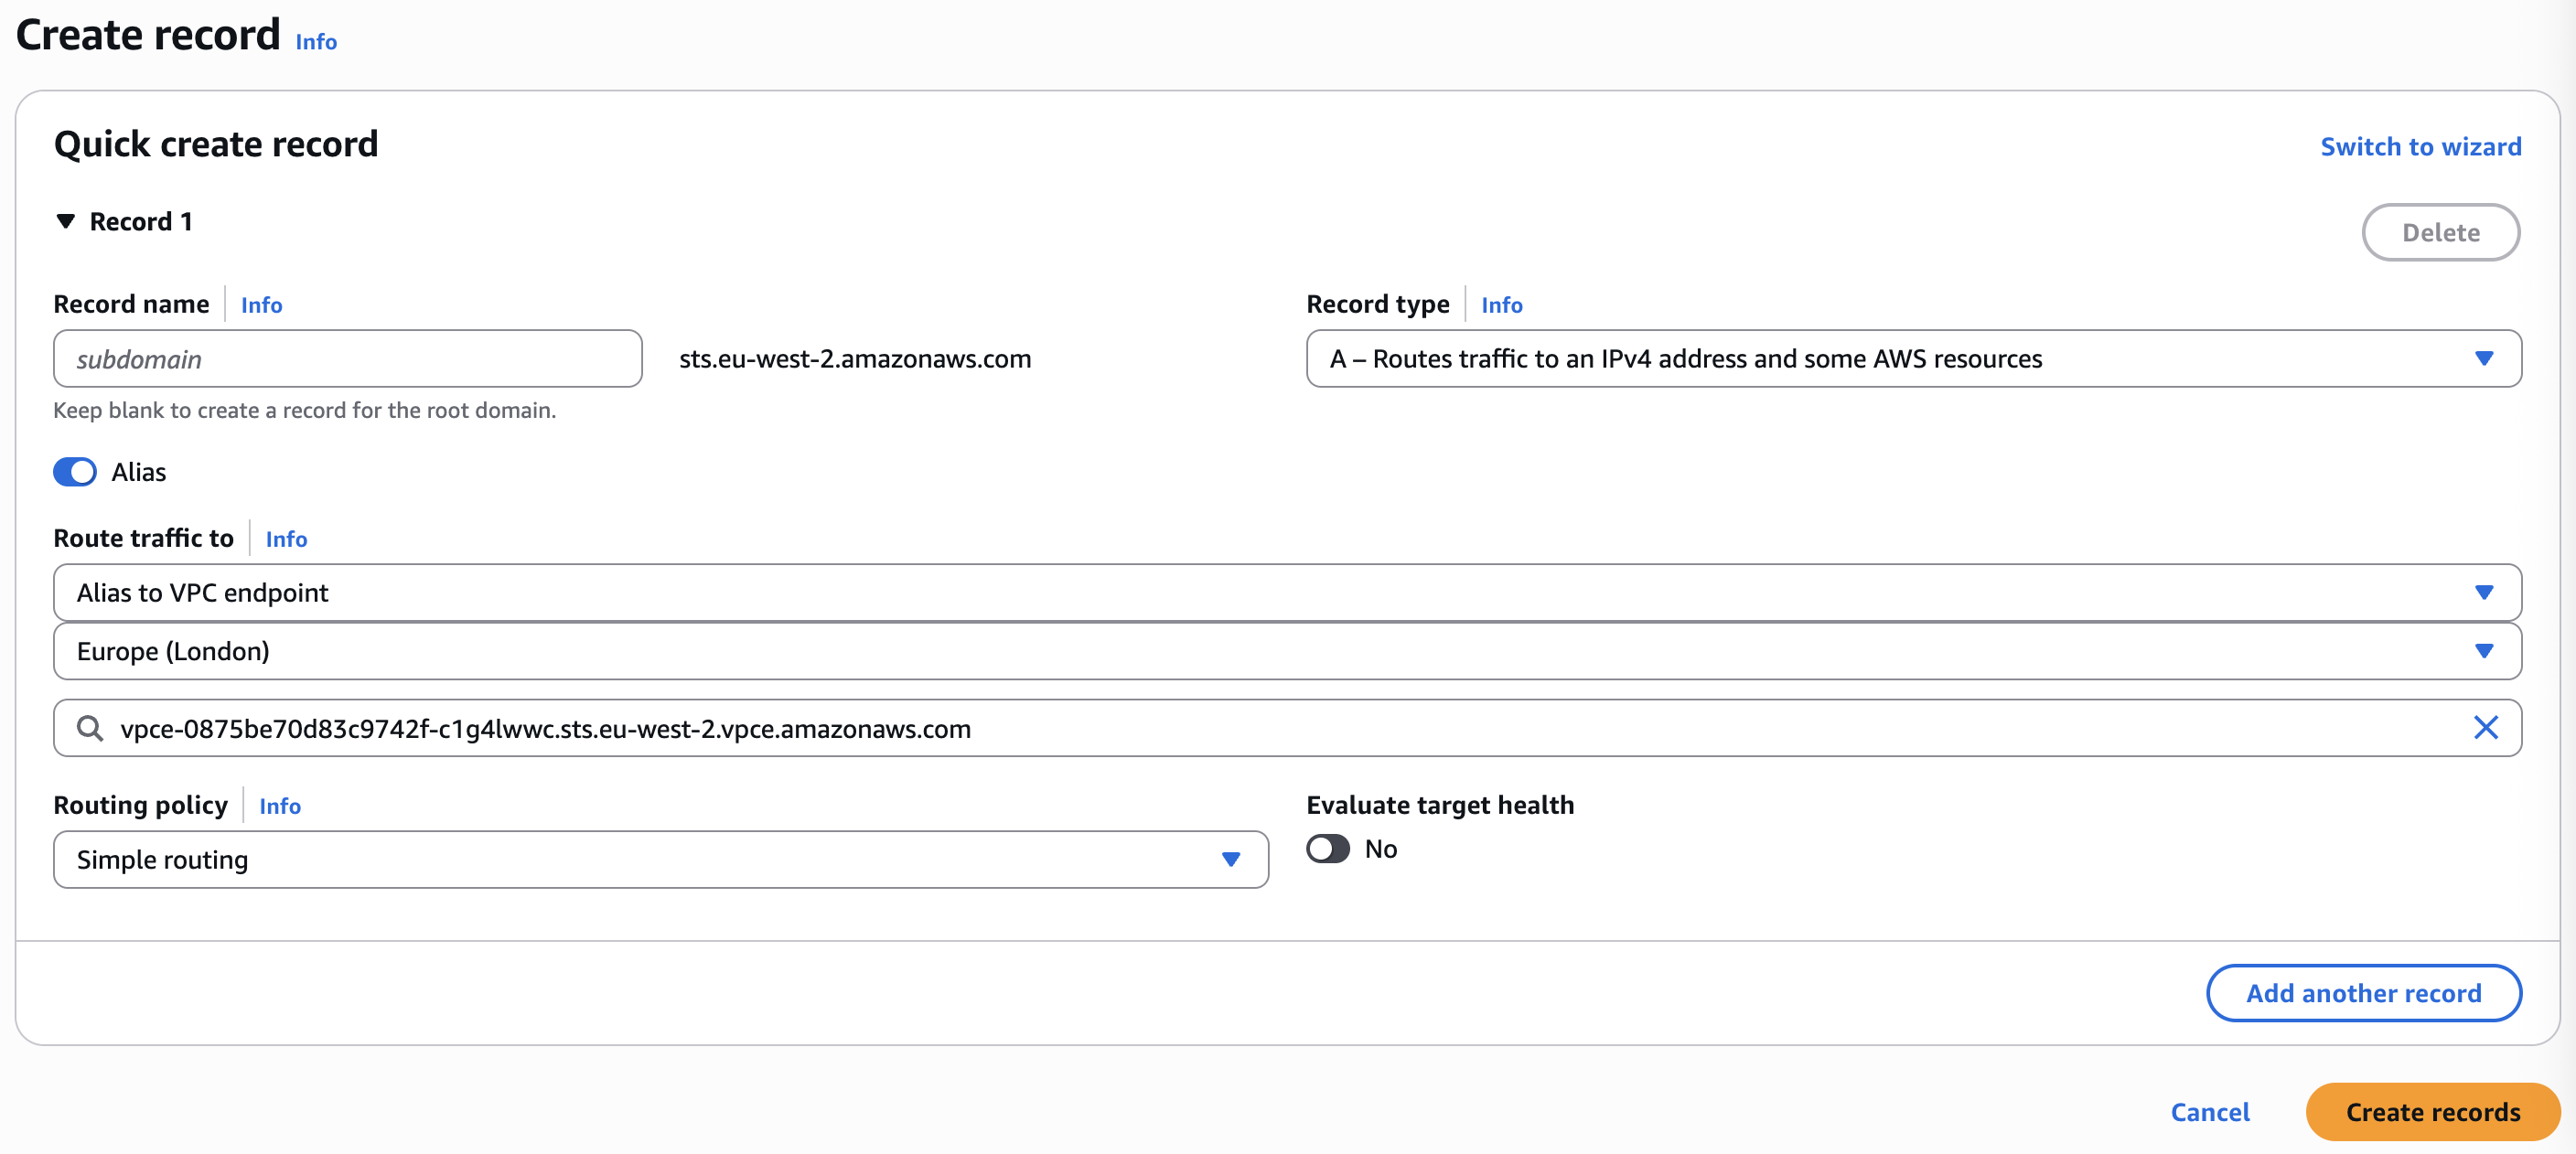
Figure 10. Alias record settings
In the following figure 11, you can see the hosted zone and Alias record:
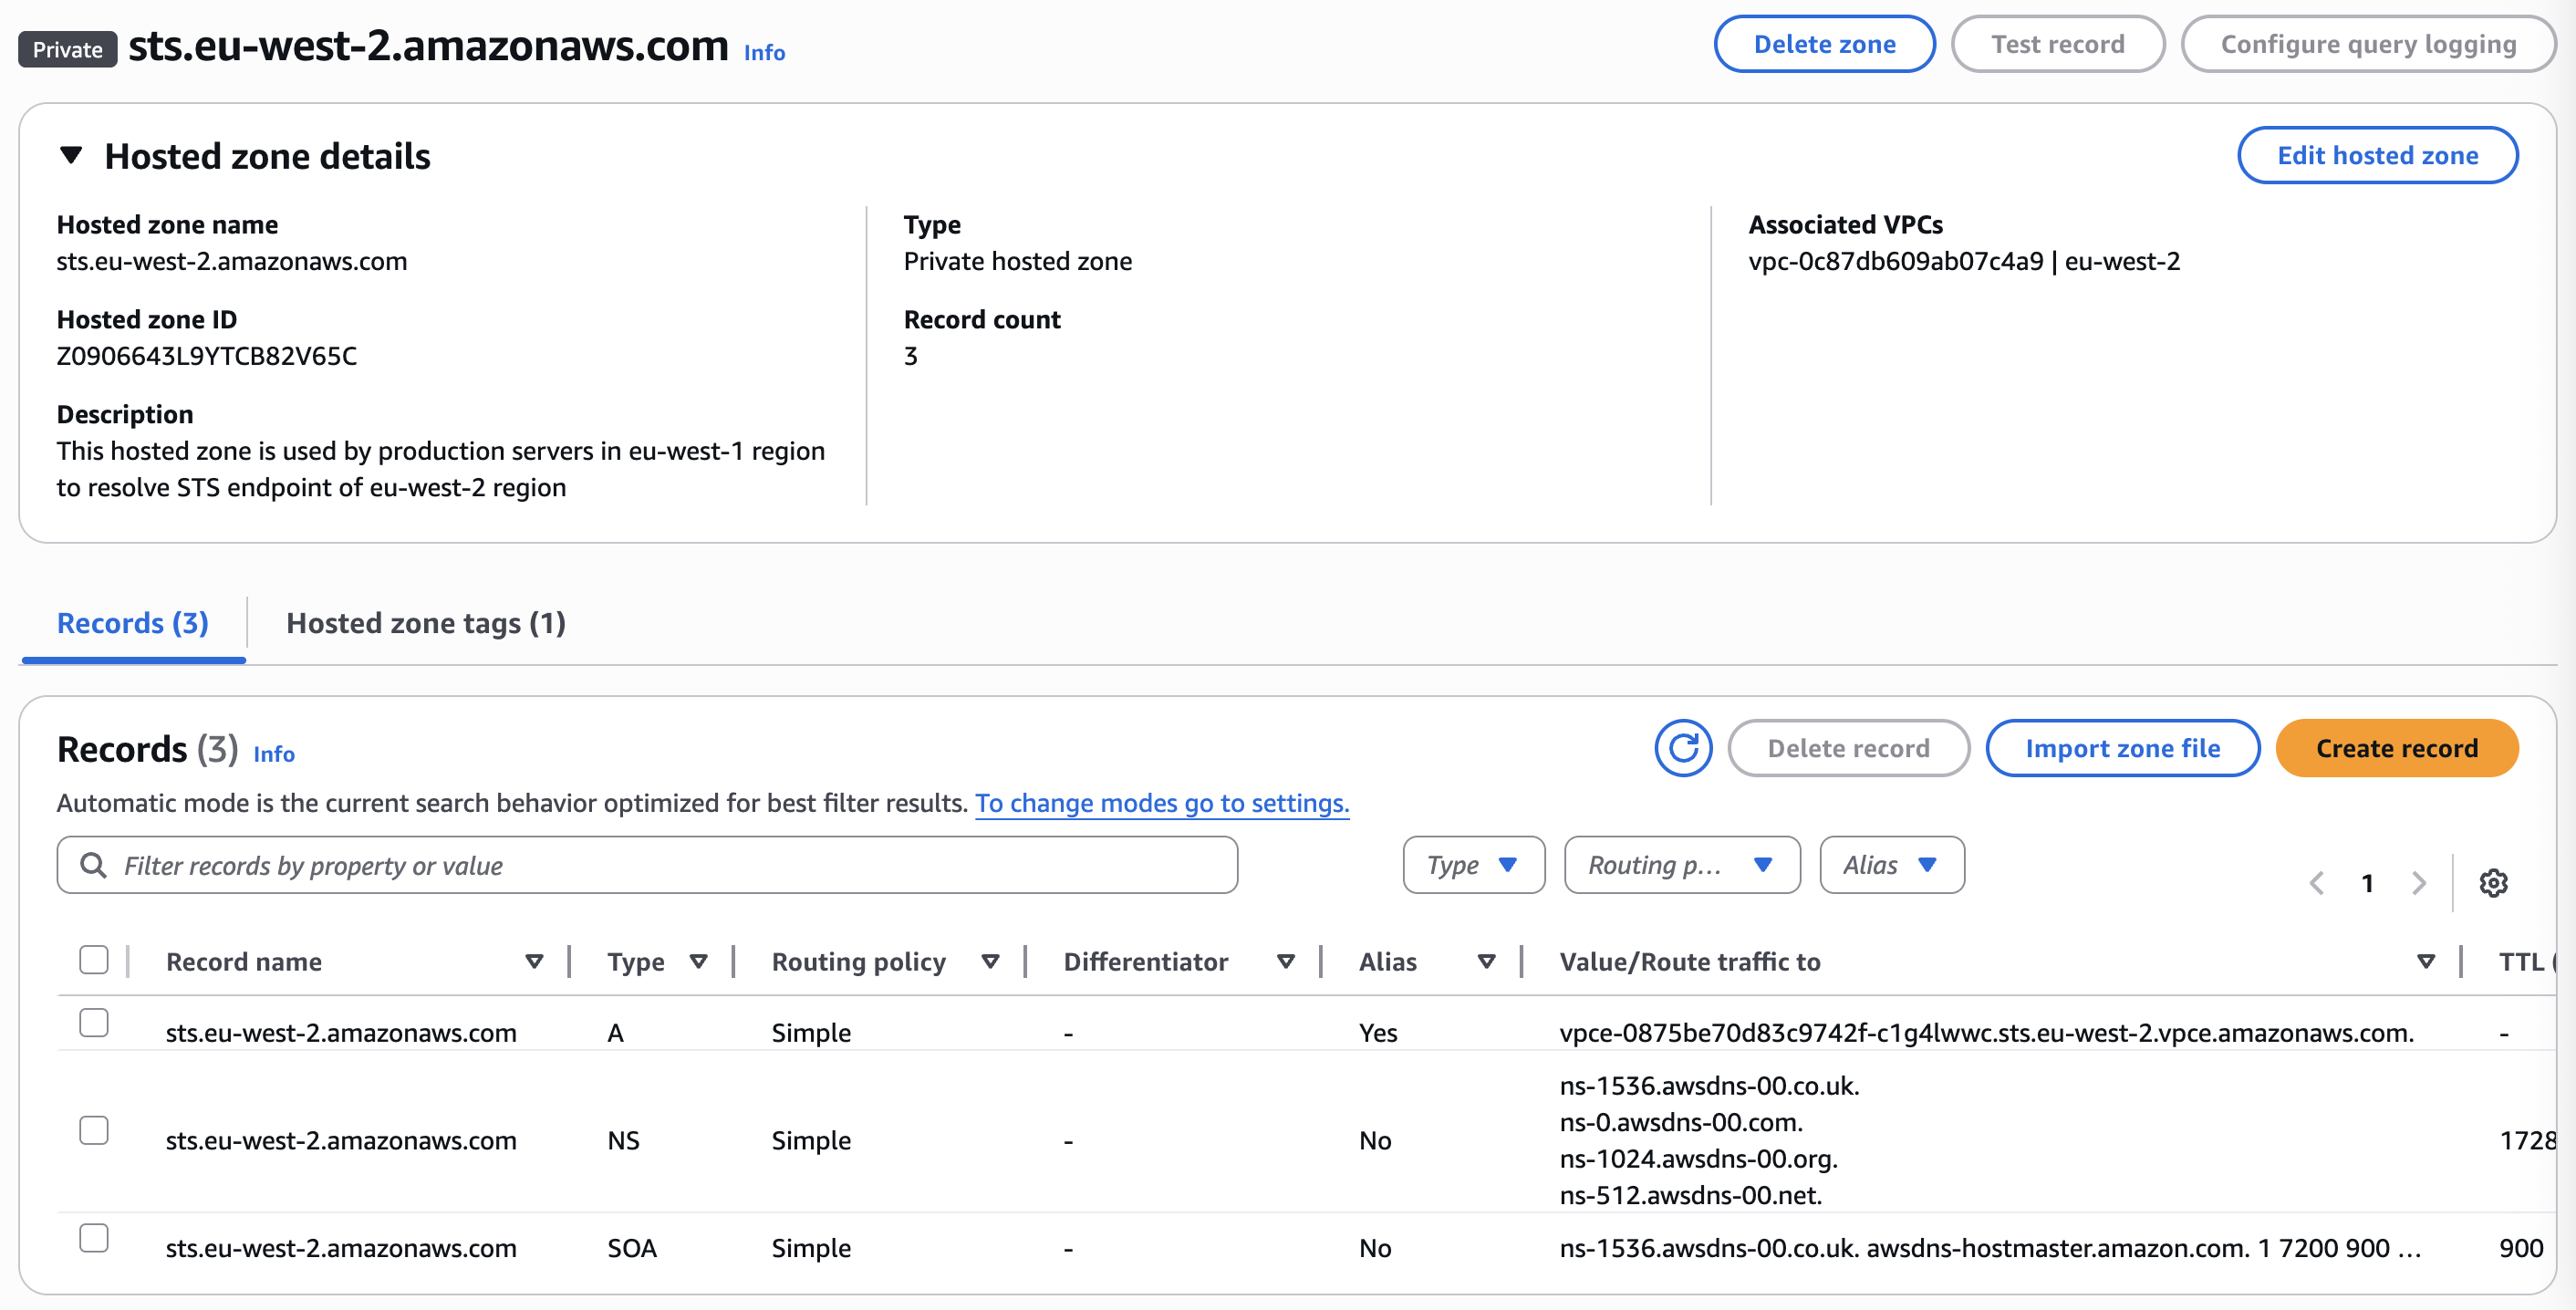 Figure 11. Hosted zone and alias record
Associate Route 53 private hosted zone with production VPC in production account
To make sure that production servers in the production VPC can resolve the AWS STS endpoint of the recovery Region (sts.eu-west-2.amazonaws.com) during both AWS replication agent installation and throughout the replication agent’s operational lifetime, the Route 53 private hosted zone created previously must be associated with the production VPC.
To achieve this, we use AWS Command Line Interface (AWS CLI).
Note: When running the commands in your environment, make sure you change the values appropriately.
- First authorize the association between the Route 53 private hosted zone created for AWS STS in recovery account and the production VPC in production account. Run the following commands in recovery account:
export PROD_REGION=eu-west-1
export STS_HOSTED_ZONE_ID_RECOVERY_ACC=Z0906643L9YTCB82V65C
export PROD_VPC_ID_PRODUCTION_ACC="vpc-077c02a30efcb405d"
aws route53 create-vpc-association-authorization --hosted-zone-id "${STS_HOSTED_ZONE_ID_RECOVERY_ACC}" --vpc VPCRegion="${PROD_REGION}",VPCId="${PROD_VPC_ID_PRODUCTION_ACC}"- In the production account, run the following commands to associate the production VPC with the hosted zone of recovery account:
export STS_HOSTED_ZONE_ID_RECOVERY_ACC=Z0906643L9YTCB82V65C
export PROD_REGION=eu-west-1
export PROD_VPC_ID_PRODUCTION_ACC="vpc-077c02a30efcb405d"
aws route53 associate-vpc-with-hosted-zone --hosted-zone-id "${STS_HOSTED_ZONE_ID_RECOVERY_ACC}" --vpc VPCRegion="${PROD_REGION}",VPCId="${PROD_VPC_ID_PRODUCTION_ACC}"- In recovery account, run the following command to verify the association:
aws route53 list-vpc-association-authorizations --hosted-zone-id "${STS_HOSTED_ZONE_ID_RECOVERY_ACC}"Step 3: Connect production VPC in production account with staging VPC in recovery account
To establish connectivity between the production VPC in the production account and the staging VPC in the recovery account, we implement VPC peering. This peering connection enables production servers to access both the VPC endpoints created previously and the replication servers in the staging VPC for data replication purposes.
For this communication to function properly, appropriate routes must be configured in the production servers’ route tables to direct traffic toward the staging subnets. Moreover, corresponding routes must be added to the staging subnet route tables to allow return traffic to flow back to the production subnets.
Importantly, all traffic between the peered VPCs travels exclusively through the AWS backbone network, never traversing the public internet. This provides enhanced security, lower latency, and higher reliability for the replication traffic between production and recovery environments, because data remains entirely within the AWS private network infrastructure.
Create VPC Peering in recovery account
- Open the Amazon VPC console in recovery account in recovery Region.
- In the navigation pane, choose Peering connections.
- Choose Create peering connection.
- (Optional) For Name, specify a name for the VPC peering connection. This creates a tag with a key of Name and the value that you specify.
- For VPC ID (Requester), choose Staging VPC.
- Under Select another VPC to peer with, do the following:
- For Account, to peer with a VPC in production account, choose Another account and enter the production account ID.
- For Region, to peer with production VPC in production Region, choose Another Region and choose your production Region. In this example, we choose
eu-west-1Region as our production Region. - For VPC ID (Accepter), enter the production VPC ID from the production Account and production Region as shown in the following figure 12.
- (Optional) To add a tag, choose Add new tag and enter the tag key and tag value.
- Choose Create peering connection.
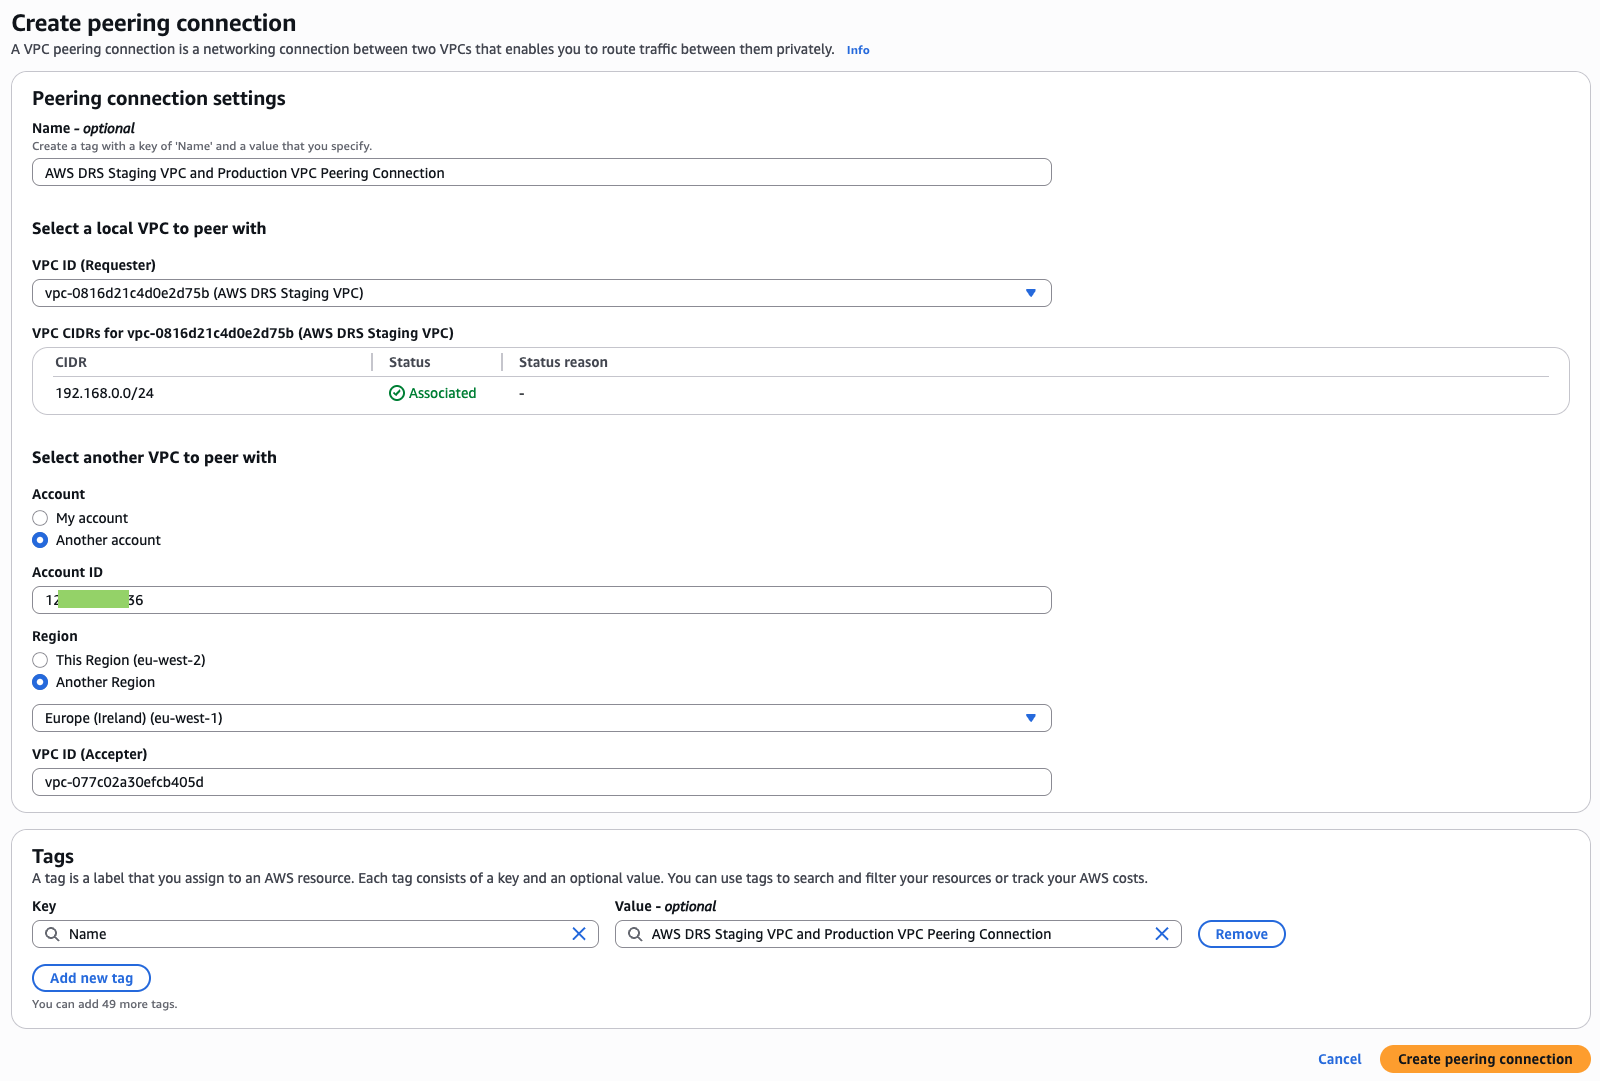 Figure 12. Creating VPC peering connection in Recovery Account
Updating subnet route tables in staging and production VPCs
As stated previously, for replication and HTTPS traffic to flow between peered VPCs (production and staging VPCs), routes must be added to the route tables associated with the subnets for both VPCs. For staging subnet(s) route tables, the route destination is the CIDR block (or portion of the CIDR block) of the peer VPC (Production VPC) and the target is the ID of the VPC peering connection created previously. Similarly, for production subnet(s) route tables, the route destination is the CIDR block (or portion of the CIDR block) of the peer VPC (staging VPC) and the target is the ID of the VPC peering connection created previously.
Initially the VPC peering connection remains in a pending-acceptance state until accepted in the production Account. Although you can add routes for a pending peering connection, these routes are in a “blackhole” state and won’t function until the peering connection becomes active. In our implementation sequence, we first update the route tables in the staging Account, then accept the peering connection in the production Account, and finally update the route tables in the production Account.
- Open the Amazon VPC console in recovery account in recovery Region.
- In the navigation pane, choose Route tables.
- Choose the check box next to the route table that’s associated with the staging subnet(s).
- Choose Actions, Edit routes.
- Choose Add route.
- For Destination, enter the IPv4 address range of production VPC.
- For Target, choose the VPC peering connection as shown in the following figure 13.
- Choose Save changes.
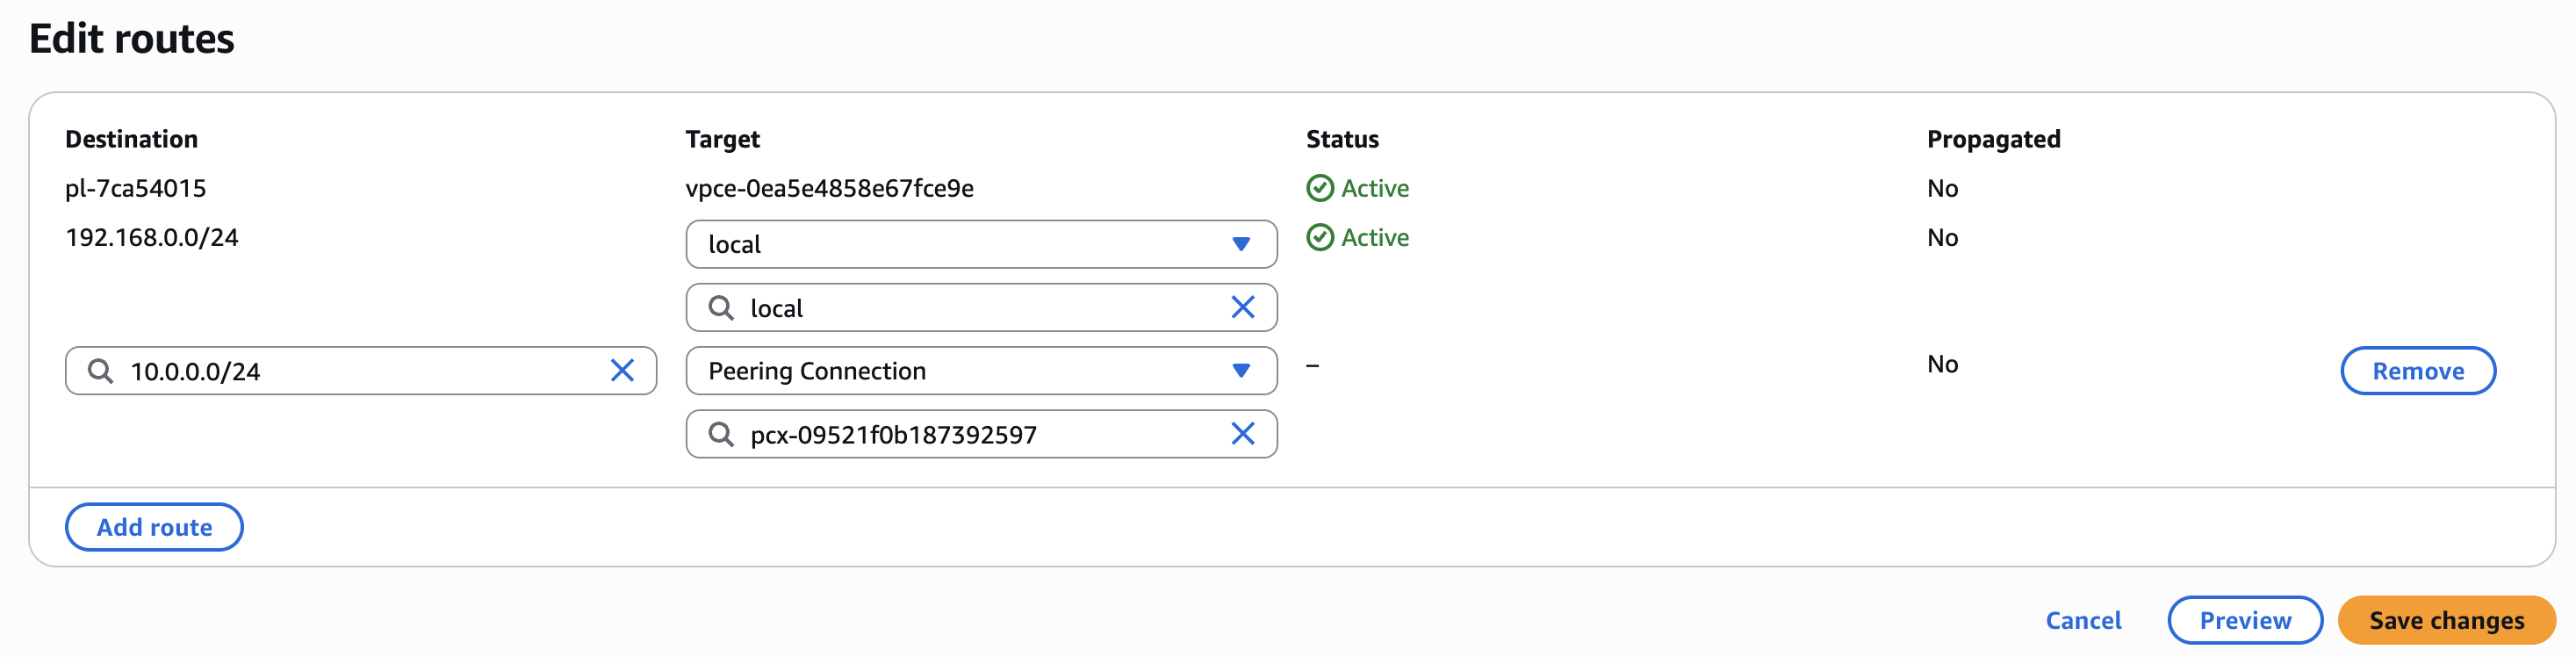 Figure 13. Updating route table(s) with peering connection ID
- To accept peering connection in production Account, sign into the account and open the Amazon VPC console in production Region.
- In the navigation pane, choose Peering connections.
- To accept the peering connection, choose the pending VPC peering connection (the status is pending-acceptance), and choose Actions, Accept request.
- When prompted for confirmation, choose Accept request.
After accepting the peering connection, follow these steps in the production account to update the production subnet route tables.
Step 4: Validating connectivity to VPC endpoints
After establishing VPC peering and configuring routes in the corresponding route tables in both accounts, validate the connectivity between the production servers and the VPC endpoints by logging in to the production servers in the production account and testing connectivity to the necessary VPC endpoints. Run telnet, nc, or curl commands against the Elastic Disaster Recovery, AWS STS, and Amazon S3 VPC interface endpoints as shown in the following network connectivity test example 1. Furthermore, verify DNS resolution for each endpoint using commands such as nslookup to make sure of proper connectivity between your production environment and the DR environment.
[user]# nc -vz vpce-0cfcc5c15c1f23e67-12bk9m17.s3.eu-west-2.vpce.amazonaws.com 443
Ncat: Version 7.93 ( https://nmap.org/ncat )
Ncat: Connected to 192.168.0.120:443.
Ncat: 0 bytes sent, 0 bytes received in 0.04 seconds.

[user]# nc -vz vpce-00aeea736ecca4909-zbxjeg8c.drs.eu-west-2.vpce.amazonaws.com 443
Ncat: Version 7.93 ( https://nmap.org/ncat )
Ncat: Connected to 192.168.0.98:443.
Ncat: 0 bytes sent, 0 bytes received in 0.03 seconds.

[user]# nc -vz vpce-00b0699f809b023f3-66ab0z5t.ec2.eu-west-2.vpce.amazonaws.com 443
Ncat: Version 7.93 ( https://nmap.org/ncat )
Ncat: Connected to 192.168.0.59:443.
Ncat: 0 bytes sent, 0 bytes received in 0.03 seconds.

[user]# nc -vz vpce-0875be70d83c9742f-c1g4lwwc.sts.eu-west-2.vpce.amazonaws.com 443
Ncat: Version 7.93 ( https://nmap.org/ncat )
Ncat: Connected to 192.168.0.33:443.
Ncat: 0 bytes sent, 0 bytes received in 0.03 seconds.

[user]# nslookup sts.eu-west-2.amazonaws.com
Server:         10.0.0.2
Address:        10.0.0.2#53
Non-authoritative answer:
Name:   sts.eu-west-2.amazonaws.com
Address: 192.168.0.91
Name:   sts.eu-west-2.amazonaws.com
Address: 192.168.0.163
Name:   sts.eu-west-2.amazonaws.com
Address: 192.168.0.33
Network connectivity test example 1
To validate the connectivity between the staging subnet(s) in the recovery account with the VPC endpoints created in the staging VPC, you can launch an EC2 instance in all of the staging subnets and test the connectivity against Elastic Disaster Recovery, Amazon EC2 and Amazon S3 through their corresponding VPC endpoints.
Step 5: Create VPC endpoints in staging and production VPCs in production account
At this stage, the VPC endpoints are created at the DR site in the recovery account and necessary connectivity is established. Although we could technically install the AWS replication agent now, we first prepare the primary production Region for reverse replication to support failback events. To enable reverse replication, we create VPC endpoints in the production Region.
The recovery servers in recovery account need connectivity to the source Region’s Elastic Disaster Recovery endpoint and AWS STS endpoint during reverse replication. Staging resources (replication and conversion servers) need connectivity to both Elastic Disaster Recovery and Amazon S3. Furthermore, replication servers need Amazon EC2 service access to create Amazon EBS snapshots of replication volumes. To enable these connections, we create the necessary endpoints in the production account’s staging VPC.
To enable the flow of communications, we configure security group rules for the VPC endpoints that permit HTTPS traffic from both the recovery VPC CIDR and staging subnet(s). For streamlined management, we implement a single security group across all VPC endpoints in the staging VPC.
During reverse replication, the recovery servers don’t need to connect to Amazon S3, so we skip creating the Amazon S3 VPC interface endpoint. Instead, for Amazon S3 connectivity, we create only an Amazon S3 gateway endpoint, which is used by replication and conversion servers to download software from Elastic Disaster Recovery service-owned S3 buckets.
After a successful reverse replication, the next step is to launch new production servers in the production VPC to replace the old production servers that were replicating to the recovery VPC. These new production servers need connectivity to the source Region’s Elastic Disaster Recovery endpoint until they are again protected for DR. Therefore, we create a separate dedicated Elastic Disaster recovery endpoint in the production VPC.
Create VPC endpoints in staging and production VPCs
Follow the steps covered in the section Create VPC endpoints in staging and recovery VPCs at the start of this post to create the endpoints in the production account. Make sure to create the following endpoints in their corresponding VPCs:
Production VPC:
- Elastic Disaster Recovery VPC endpoint
Staging VPC:
- Elastic Disaster Recovery VPC endpoint
- AWS STS VPC endpoint
- Amazon S3 gateway VPC endpoint
- Amazon EC2 VPC endpoint
When choosing the security group for Elastic Disaster Recovery VPC endpoint in production VPC, configure an inbound rule to allow HTTPS traffic from production VPC.
The VPC endpoints in production account are shown in the following figure 14:
 Figure 14. VPC endpoints in Production Account
Step 6: Create AWS STS Route 53 private hosted zone and an alias record in production account
During reverse replication, the recovery servers in the recovery account need connectivity to the AWS STS endpoint of the source Region. To enable DNS resolution to the private IP address of the AWS STS VPC endpoint in the source Region, we create a Route 53 private hosted zone in the source Region.
We associate this hosted zone with the production VPC, not because it’s needed for functionality, but because a private hosted zone must be associated with at least one VPC. We cannot associate the staging VPC with this hosted zone because the AWS STS endpoint is already created in the staging VPC and a Route 53 hosted zone is already associated with it.
Create AWS STS Route 53 private hosted zone
Before creating the private hosted zone, make sure that the VPC settings enableDnsHostnames and enableDnsSupport are set to true for the production VPC.
Follow the steps as described in the Create AWS STS Route 53 private hosted zone section under Step 2: Create AWS STS Route 53 private hosted zone and an alias record in recovery account. For domain name, make sure that you provide the sts.eu-west-1.amazonaws.com name. For Region, select source Region from the Region list, and for VPC to associate with the hosted zone, choose the production VPC from the VPC ID list.
Create Alias record in the AWS STS hosted zone
Follow the steps as described in the Create alias record in AWS STS hosted zone section under Step 2: Create AWS STS Route 53 private hosted zone and an alias record in recovery Account. When choosing the hosted zone, choose the hosted zone with the name sts.eu-west-1.amazonaws.com.
For the Route traffic to option, choose the AWS STS endpoint from the Choose endpoint list and production Region from the Choose Region list.
Associate Route 53 private hosted zone with production VPC in production account
To make sure that recovery servers in the recovery VPC can resolve the AWS STS endpoint of the source Region (sts.eu-west-1.amazonaws.com) during reverse replication, the Route 53 private hosted zone created previously must be associated with the recovery VPC.
To achieve this, we use AWS CLI.
When running the commands in your environment, make sure you change the values appropriately.
- First authorize the association between the Route 53 private hosted zone created for AWS STS in production account and the recovery VPC in recovery account. Run the following commands in production account:
# Keeping the environment variables exported earlier intact, follow the steps below.
export RECOVERY_REGION="eu-west-2"
export STS_HOSTED_ZONE_ID_PROD_ACC="Z01477501SUM22W5183JY"
export RECOVERY_VPC_ID_RECOVERY_ACC="vpc-0c87db609ab07c4a9"
aws route53 create-vpc-association-authorization --hosted-zone-id $STS_HOSTED_ZONE_ID_PROD_ACC --vpc VPCRegion="${RECOVERY_REGION}",VPCId="${RECOVERY_VPC_ID_RECOVERY_ACC}"
{
    "HostedZoneId": "Z08469801CJVREKVYDE23",
    "VPC": {
        "VPCRegion": "eu-west-2",
        "VPCId": "vpc-070e0c677928e0fa4"
    }
}
- In recovery account, run the following command to associate the recovery VPC with the hosted zone of production account:
export STS_HOSTED_ZONE_ID_PROD_ACC="Z01477501SUM22W5183JY"
export RECOVERY_REGION="eu-west-2"
export RECOVERY_VPC_ID_RECOVERY_ACC="vpc-0c87db609ab07c4a9"
aws route53 associate-vpc-with-hosted-zone --hosted-zone-id $STS_HOSTED_ZONE_ID_PROD_ACC --vpc VPCRegion="${RECOVERY_REGION}",VPCId="${RECOVERY_VPC_ID_RECOVERY_ACC}"
{
    "ChangeInfo": {
        "Id": "/change/C00815213IX5A6M3QTNBM",
        "Status": "PENDING",
        "SubmittedAt": "2025-06-11T21:54:51.564000+00:00",
        "Comment": ""
    }
}
- In production account, run the following command to verify the association:
aws route53 list-vpc-association-authorizations --hosted-zone-id "${STS_HOSTED_ZONE_ID_PROD_ACC}"
Route 53 hosted zone in production account is shown in the following figure 15:
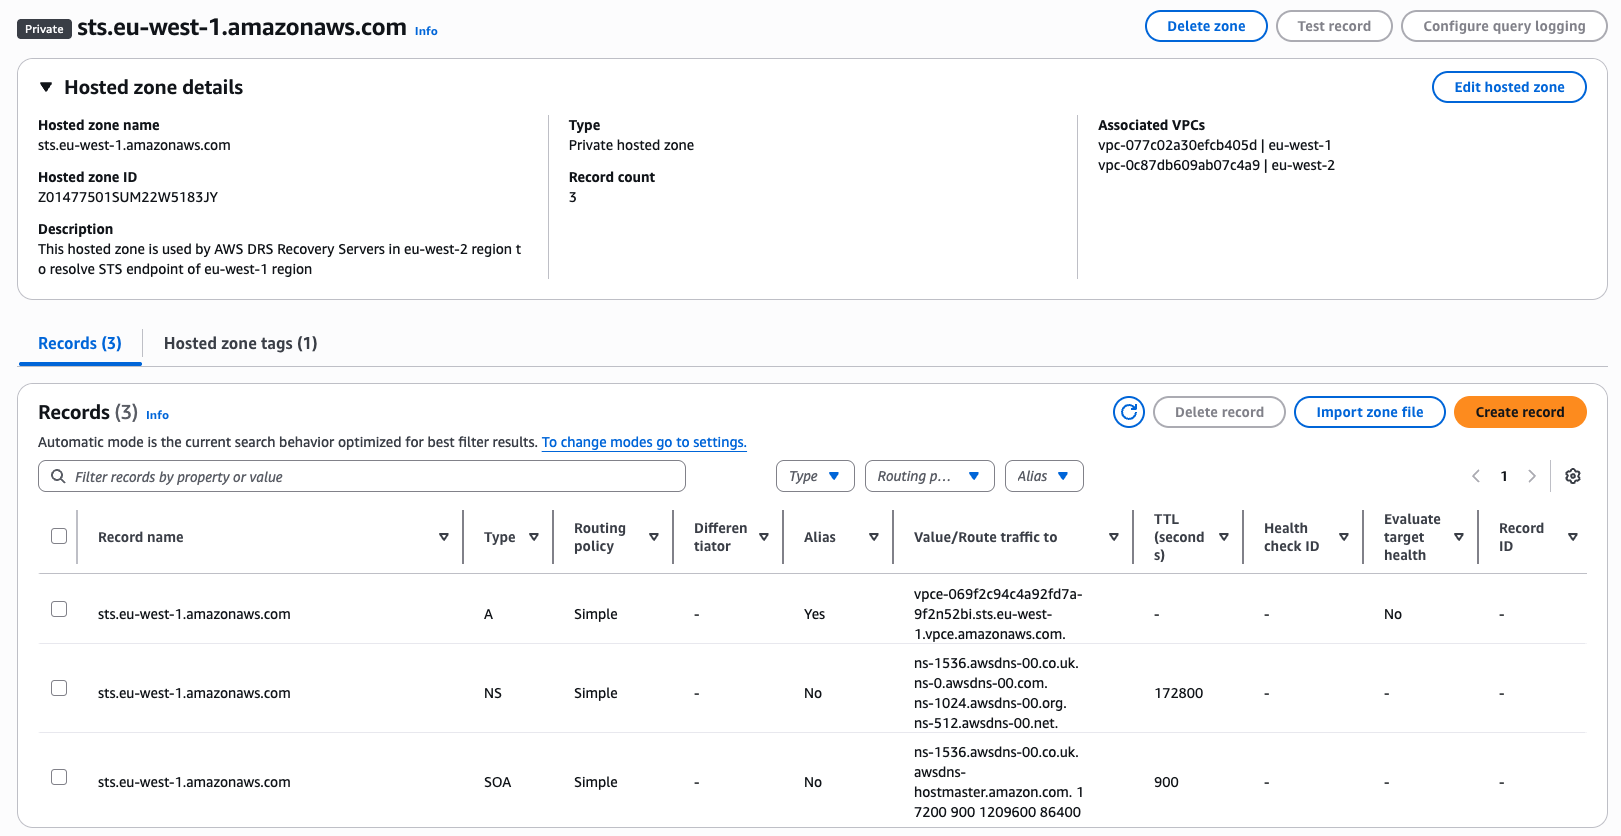 Figure 15. Route 53 hosted zone in Production Account
Step 7: Connect recovery VPC in recovery account with staging VPC in production account
To establish connectivity between Recovery VPC in recovery Account and the staging VPC in production account, we implement VPC peering. This peering connection enables recovery servers to access both the VPC endpoints created earlier and the replication servers in the staging VPC for data replication purposes.
Create VPC peering in production account
Follow the steps in Create VPC peering in recovery account under Step 3. Connect production VPC in production account with staging VPC in recovery account to establish VPC peering between the recovery VPC and the staging VPC.
- For VPC ID (Requester), choose staging VPC.
- Under Select another VPC to peer with, choose Another account and enter the recovery Account ID.
- For the Region, choose Another Region and choose your recovery Region. In this example, we select
eu-west-2as our recovery Region. - For VPC ID (Accepter), enter the recovery VPC ID from the recovery account.
Updating subnet route tables in staging and recovery VPCs
Follow the steps in Updating subnet route tables in staging and production VPCs under Step 3. Connect production VPC in production account with staging VPC in recovery account to update route table(s) of recovery VPC subnet(s) and the route table(s) of staging VPC subnet(s).
When adding route in staging VPC route table(s), for Destination enter the IPv4 address range of recovery VPC. For Target, choose the VPC peering connection.
In the recovery account in the recovery Region, accept the peering connection first before adding the routes in the route table(s) of recovery subnet(s). Follow the steps in Updating subnet route tables in staging and production VPCs under Step 3. Connect production VPC in production account with staging VPC in recovery account to accept the VPC peering.
When adding the route in Recovery VPC route table(s), for Destination enter the IPv4 address range of Staging VPC. For Target, choose the VPC peering connection.
Make sure appropriate routes are configured in the recovery VPC subnet(s) route table(s) to direct traffic toward the staging subnets in production account. Furthermore, corresponding routes must be added to the route table(s) of staging subnet(s) in production account to allow return traffic to flow back to the recovery subnet(s).
Step 8: Validating connectivity to VPC endpoints
After establishing VPC peering and configuring routes in the corresponding route tables in both accounts, validate the connectivity between the recovery servers and the VPC endpoints by logging in to the recovery servers in recovery account and testing connectivity to the required VPC endpoints. As shown in the following network connectivity test example 2, run telnet, nc, or curl commands against the Elastic Disaster Recovery, Amazon S3, and AWS STS endpoints. Moreover, verify DNS resolution for each endpoint using commands such as nslookup to make sure of proper connectivity between your production environment and the DR environment.
[user]# nc -vz vpce-0d13762a52a12230b-kjcq6wzv.sts.eu-west-2.vpce.amazonaws.com 443
Ncat: Version 7.93 ( https://nmap.org/ncat )
Ncat: Connected to 192.168.0.8:443.
Ncat: 0 bytes sent, 0 bytes received in 0.03 seconds.

[user]# nc -vz vpce-096735ea8a001cd05-p9x1vgj0.s3.eu-west-2.vpce.amazonaws.com 443
Ncat: Version 7.93 ( https://nmap.org/ncat )
Ncat: Connected to 192.168.0.22:443.
Ncat: 0 bytes sent, 0 bytes received in 0.02 seconds.

[user]# nc -vz  vpce-09bc7b8f246640ffd-76upxdka.drs.eu-west-2.vpce.amazonaws.com 443
Ncat: Version 7.93 ( https://nmap.org/ncat )
Ncat: Connected to 192.168.0.12:443.
Ncat: 0 bytes sent, 0 bytes received in 0.02 seconds.

[user]# nslookup sts.eu-west-1.amazonaws.com
Server:         10.0.0.2
Address:        10.0.0.2#53

Non-authoritative answer
Name:   sts.eu-west-1.amazonaws.com
Address: 192.168.0.78
Name:   sts.eu-west-1.amazonaws.com
Address: 192.168.0.90

[user]# nc -vz sts.eu-west-1.amazonaws.com 443
Ncat: Version 7.93
Ncat: Connected to 192.168.0.90:443.
Ncat: 0 bytes sent, 0 bytes received in 0.02 seconds.
Network connectivity test example 2
To validate the connectivity between the staging subnet(s) in production account with the VPC endpoints created in the staging VPC, you can launch an EC2 instance in all staging subnets and test the connectivity against Elastic Disaster Recovery, Amazon EC2 and Amazon S3 through their corresponding VPC endpoints.
Cleaning up
To minimize unnecessary AWS costs, delete any resources you’ve created, including Amazon EC2 instances, Elastic Disaster Recovery source servers, VPC endpoints, VPC peering connections and Route 53 hosted zones. Leaving these resources running can result in unexpected charges on your AWS bill, even if they’re not in use. Make sure to review all provisioned resources, and terminate any that are no longer needed.
Conclusion
In this first part of our two-part series, we laid out the architecture and network setup needed for implementing a secure cross-account DR solution using AWS Elastic Disaster Recovery in highly secured networks. We detailed the VPC configurations, endpoint setups, and connectivity requirements that form the foundation of our solution.
This architecture addresses critical requirements for organizations operating in regulated environments where direct internet access is restricted or prohibited. Using AWS PrivateLink with VPC endpoints, VPC peering connections, and Route 53 private hosted zones allowed us to maintain strict security controls throughout the DR process while preserving private IP addressing during failover events.
In the second part of this series, we dive into the implementation of the failover and failback processes, showing you how to install the AWS Replication Agent, perform recovery drills, initiate reverse replication, and complete the failback to the production environment. We also cover the steps needed to make sure that your new production servers remain protected after failback.
Blog series
Direct links to each of the blog posts in this series are as follows: