AWS Storage Blog
Migrating Azure Blob Storage to Amazon S3 using AWS DataSync
UPDATE (7/25/2023): AWS DataSync now supports copying data to and from Azure Blob Storage, view the what’s new post and view our video for more information.
UPDATE (3/26/2024): When deploying the AWS DataSync agent, this repository contains a script designed to convert the DataSync Agent VHDX to VHD on Amazon Linux 2 (AL2), and upload the generated disk to Azure and create an Azure Virtual Machine.
Update (5/29/2025): On May 29, 2025, AWS DataSync launched Enhanced mode support for cross-cloud transfers. Enhanced mode simplifies data transfers between AWS and other clouds by removing the need for a DataSync agent. It also provides higher performance and scalability when compared to Basic mode. For more details, see the What’s New announcement or review the documentation for guidance on implementing the approach in this blog without an agent.
We speak with customers every day about their data migration requirements, which range from AWS service-to-service data transfers, data movement from on premises to AWS, all the way to data migrations between other public providers and storage mediums. The one common theme to these requests is the desire to have an AWS-native, simple, cost-effective method to perform these data transfers. Customers don’t want to write and maintain their own scripts, scheduling tools, and monitoring solutions to simply move data from one location to another.
As a result, we have services such as the AWS Snow Family, AWS Transfer Family, and AWS DataSync. We are constantly working to bring new and improved features to our customers, including a 2022 announcement for support for AWS DataSync to move data between AWS and other public locations. This includes support for Azure Files SMB shares. AWS DataSync just launched a preview of support for Azure Blob Storage as a supported location, which enables more customer use cases to easily transfer data to AWS Storage services, including Amazon Simple Storage Service (Amazon S3), Amazon Elastic File System (Amazon EFS), and Amazon FSx.
In this blog, we cover using AWS DataSync to migrate Azure Blob Storage objects to Amazon S3. Currently, there is no native DataSync agent available for Azure. We show how you can leverage the existing Hyper-V DataSync agent to accelerate moving your data from Azure Blob to Amazon S3. The DataSync agent can also be deployed on EC2, but by deploying it closely to the source storage location you can take advantage of network optimizations such as, in-line compression to reduce your Azure data egress charges when moving data from Azure to Amazon S3.
AWS DataSync supports copying data from Azure Blob Storage
AWS DataSync is a fully managed online data transfer service that makes it easy to automate data transfer at scale. With AWS DataSync you can deploy your agent and within a few clicks or command-line options you’ll have a secure, reliable data transfer task executing without the need to deploy your own software utilities or manage custom scheduled scripts.
When you select Azure Blob Storage containers as your source location, AWS DataSync transfers Azure Blob Storage objects up to 5 TB in size with object metadata not exceeding 2 KB. Azure Blob Storage metadata is additional information such as system properties and additional name-value pairs you may define, such as author name, document type, document class, etc.
Azure Storage provides three access tiers, including: Hot tier, Cool tier, and Archive tier. The Hot and Cool tiers are considered to be online access tiers, meaning that customers can access the data immediately when requested. The Archive tier is intended for data that is rarely accessed. If you have archive data that you need to transfer to AWS storage, you will have to rehydrate objects in the Archive tier to an online access tier before those objects can be transferred to AWS storage. DataSync will simply skip Azure Blob Storage objects that are stored in the Archive tier rather than generating an error.
Solution overview and AWS DataSync terminology
DataSync has four components for data movement: tasks, locations, agents, and task executions. Figure 1 shows the relationship between the components and the configuration settings that we will use for the tutorial.

Figure 1: AWS DataSync primary components
- Agent: A virtual machine (VM) that reads data from, or writes data to, a self-managed location. In this tutorial, we deploy the DataSync to agent to an Azure VM within an Azure virtual network.
- Location: The source and destination location for the data migration. In this tutorial, the source location is an Azure Blob Storage container. The destination location is an Amazon S3 bucket.
- Task: A task comprises one source and one destination location with a configuration that defines how data is transferred. A task always synchronizes data from the source to the destination. Configurations include options such as include/exclude patterns, task schedule, bandwidth limits, and more.
- Task execution: This is an individual run of a task, which includes information such as start time, end time, bytes written, and status.
The following image depicts how data is migrated from Azure Blob Storage to Amazon S3 with AWS DataSync.
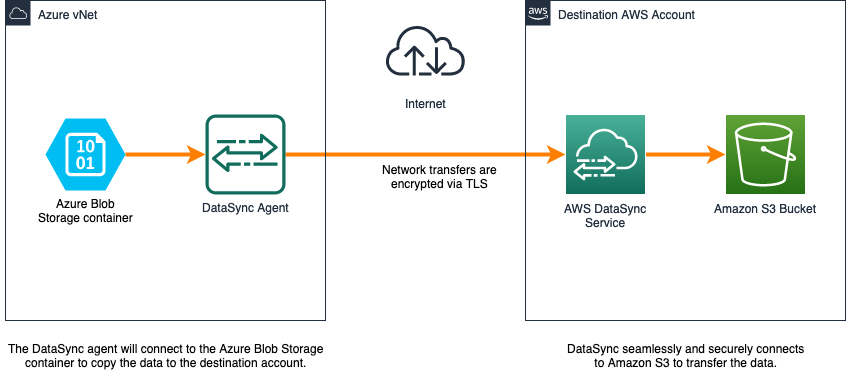
Figure 2: DataSync architecture with Azure Blob storage container
AWS DataSync agent sizing information
When deploying AWS DataSync on Azure, select the instance size appropriate to the number of files to be transferred.
We recommend dedicating the following minimum resources:
- Virtual processors – Four virtual processors assigned to the VM.
- Disk space – 80 GB of disk space for installation of VM image and system data.
- RAM – Depending on your data store configuration:
- 32 GB of RAM assigned to the VM, for tasks that transfer up to 20 million files.
- 64 GB of RAM assigned to the VM, for tasks that transfer more than 20 million files.
While you can deploy a DataSync agent running on an Amazon EC2 instance to access your Azure storage, you may find it beneficial to deploy the agent as close to the storage system that DataSync needs to access. Deploying the DataSync agent on the same network as the source storage system will decrease network latency, take advantage of the in-line data compression provided by the AWS-designed transfer protocol, and negate the need to have a public endpoint for your Azure Storage Account.
Transport Layer Security (TLS) 1.2 encrypts all the data transferred between the source and destination. In addition, the data is never persisted in AWS DataSync itself. The service supports using default encryption for S3 buckets.
Prerequisites
You will need the following to complete the steps in this post:
- AWS Account
- Azure account subscription
- Amazon S3 bucket
- Azure Blob Storage container
- PowerShell
- Azure CLI
- AzCopy
- The following Windows features will need to be enabled on your local machine:
-
- Hyper-V Module for Windows PowerShell
- Hyper-V Services
You can find specifics on how to configure an Azure Blob Storage container here. An S3 bucket will also need to be provisioned. You can find details here on how to create this resource here. We have called the S3 bucket “datasynctest1234” and the Azure storage account “awsblobdatasync” which we will reference later in this blog.
Deploying the DataSync agent
In this section, we will focus on the steps needed to deploy and configure the DataSync agent.
Step 1: Prepare the DataSync agent image for deployment
- Open the AWS DataSync console at https://console.aws.amazon.com/datasync/
- On the Create agent page in the console, select “Microsoft Hyper-V” from the Hypervisor drop-down menu.
- Choose “Download the image” in the Deploy agent section. This downloads the agent in a .zip file that contains a VHDX image file.
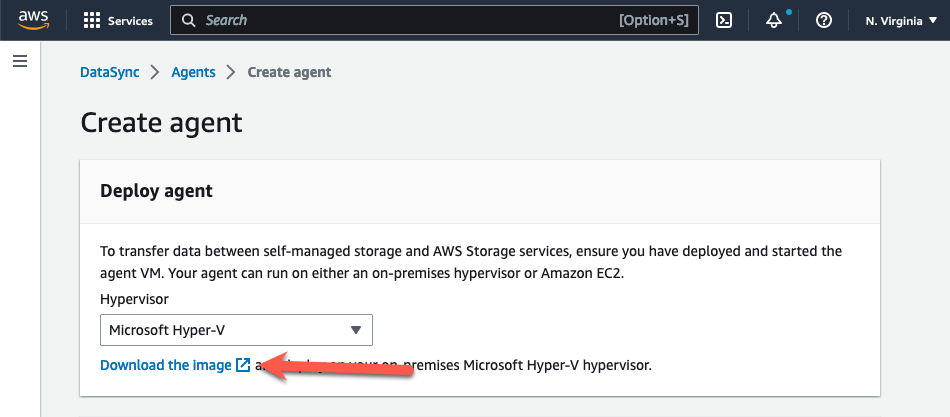
Figure 3: Download the DataSync agent
- Extract the VHDX image file to your workstation.
- The VHDX file will need to be converted to a fixed size VHD file for compatibility with Azure. You can find more information on preparing a VHDX for upload to Azure here. Run the following command, updating the path and file name to match your location:
Convert-VHD -Path .\<path to vhdx>\aws-datasync-2.0.1678813931.1-x86_64.xfs.gpt.vhdx
-DestinationPath .\<path to vhdx>\ aws-datasync-2016788139311-x86_64.vhd -VHDType Fixed
Step 2: Upload the VHD to a Managed Disk
- Determine the size of the VHD so that you can create an empty managed disk that matches. Use the “ls -l .” command in the directory containing the VHD file image. This will provide you with the number of bytes for the VHD file. You will need this for the –upload-bytes-parameter later.

Figure 4: Identify byte size of the DataSync VHD file
- Create the empty managed disk by running the following command. Update the parameters with your information.
az disk create -n <yourdiskname> -g <yourresourcegroupname> -l <yourregion> --upload-type Upload --upload-size-bytes 85899346432--sku standard_lrs
- Generate a writable shared access signature (SAS)
az disk grant-access -n <yourdiskname> -g <yourresourcegroupname> --access-level Write --duration-in-seconds 86400
- Upload the DataSync VHD to the empty managed disk
AzCopy.exe copy "c:\somewhere\mydisk.vhd" "sas-URI"--blob-type PageBlob
- Once the upload is complete, revoke the SAS to prepare the disk for mounting to the new VM.
az disk revoke-access -n <yourdiskname> -g <yourresourcegroupname>
Step 3: Create the DataSync agent VM
- Create the DataSync VM using the managed disk that you created.
az vm create --resource-group myResourceGroup --location eastus --name myNewVM --size Standard_E4as_v4 --os-type linux --attach-os-disk myManagedDisk
- Enable boot diagnostics
- Connect via serial connection and log in to your agent’s local console

Figure 5: Enable boot diagnostics
- On the AWS DataSync Activation – Configuration main menu, enter 0 to get an activation key.
- Enter the AWS Region that you will activate the agent in.
- Enter the service endpoint type that your agent will use. Options include public, FIPS, and VPC with AWS PrivateLink. We will be using the public option for this example.
- The activation key will automatically be generated and display on the screen. Select and copy this value.
Step 4: Activate the DataSync agent VM
- Open the AWS DataSync console at https://console.aws.amazon.com/datasync/
- On the Create agent page in the console, select “Microsoft Hyper-V” from the Hypervisor drop-down menu.
- In the Service Endpoint section, select the Public service endpoints option in the region that you will activate your agent in.
- Under Activation key, select Manually enter your agent’s activation key and paste in the value that you copied from the agent’s local console.
- Provide a unique name for the agent if you’d like and then click the Create agent button
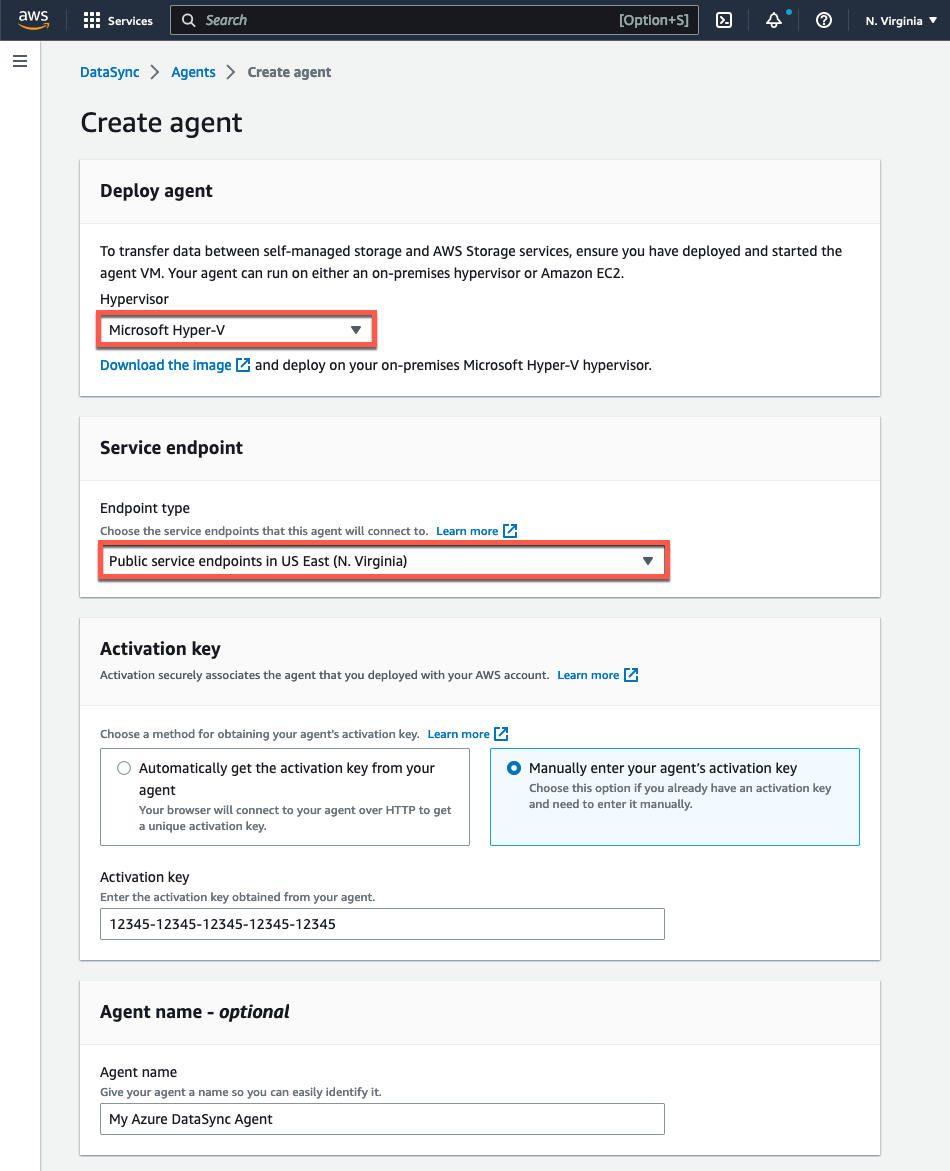
Figure 6: Create the DataSync agent
Setting up data replication
In this section, we will focus on the steps needed to create the storage locations and setup data replication.
Step 1: Configure the source Azure Blob Storage location
Configure the source Azure Blog Storage container as a DataSync Azure Blob location. Choose the Locations option from the left navigation panel, and then select Create Location. Next, select Microsoft Azure Blob Storage as your Location Type. Make sure to select the agent you created in the previous steps.

Figure 7. Creating the Azure Blob Storage location
Next, you will need to specify a Container URL and SAS token. Optionally, you can specify the path of a folder in the container to retrieve a subset of the data. Follow these steps to retrieve the container URL and generate an Azure SAS token.
The Azure SAS token provides delegated access to resources in the storage account. You can provide granular access to your data by defining the resources that can be accessed, the permissions to those resources, and the validity duration of the SAS token. You can generate an Azure SAS token at the storage account level or at the blob container level. Generating the token at the blob container level can be useful when you want to limit access to a single container.
You can generate an Azure SAS token from the Azure portal, Azure Storage Explorer, or the Azure CLI. We’ll be using the Azure Portal method to create an account level token.
1. From within the Azure portal browse to the storage account and select Shared access signature from the left-hand side of the page. Clear all of the Allowed services except Blob.
2. Select Container and Object from the Allowed resource types. Assign read and list from Allowed permissions. Assign Read/Write permission from the Allowed blob index permissions section to copy tags. You can find additional details related to SAS token permissions in the documentation.
3. Specify the signed key Start and Expiry dates/times. Ensure that the token validity period is sufficient to migrate the data.
4. Review the configuration and then select Generate SAS and connection string.
5. The SAS token and Blob Service SAS URL values will display at the bottom of the screen. Copy the SAS token field for the SAS token field in the AWS console.
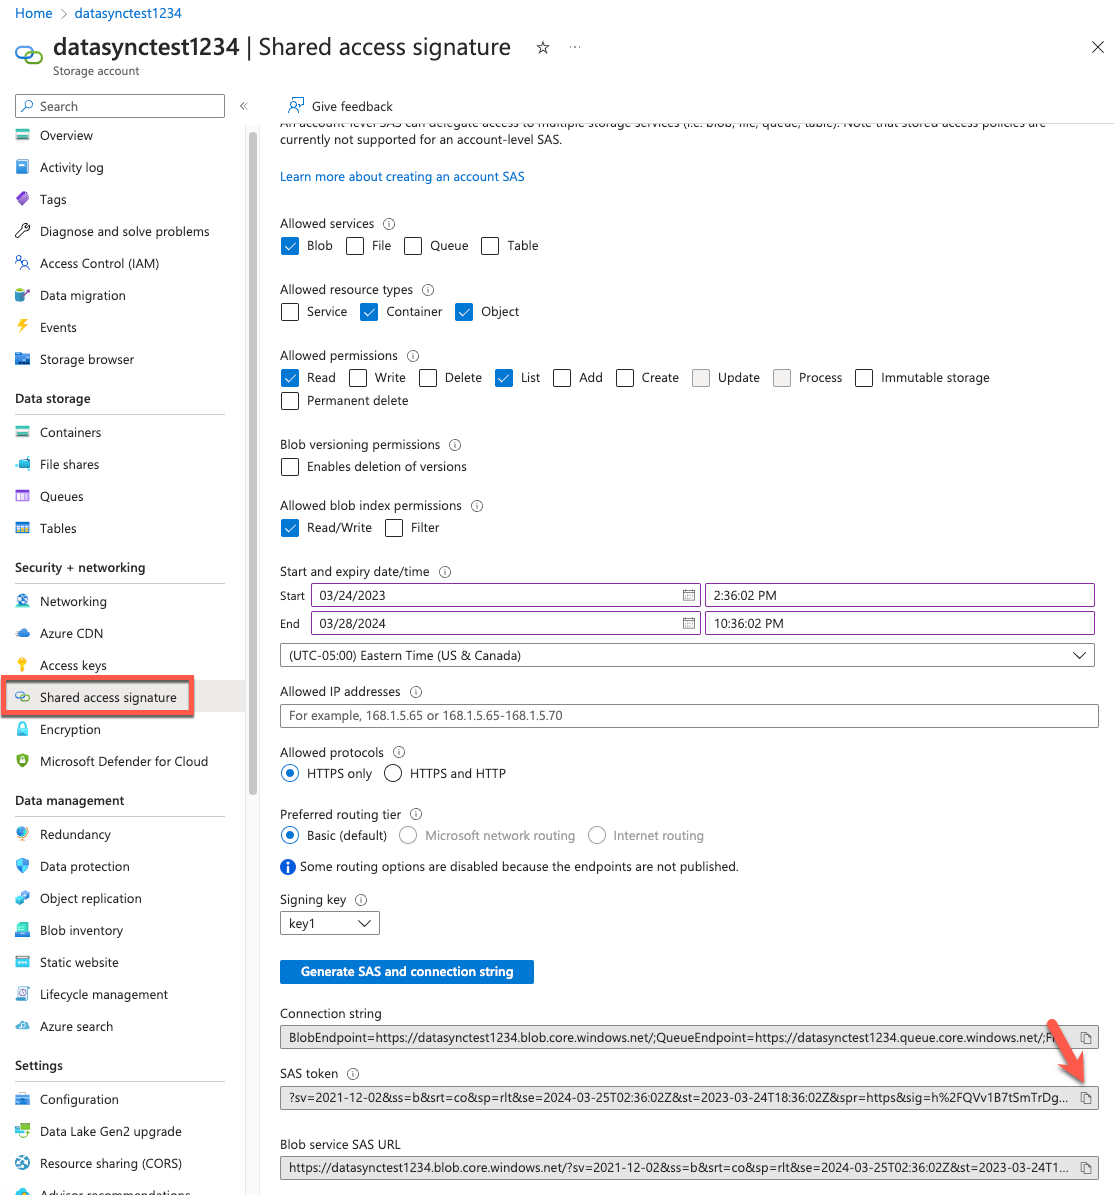
Figure 8: Identify the SAS token
6. Copy the Container URL from the Azure Blob container properties.
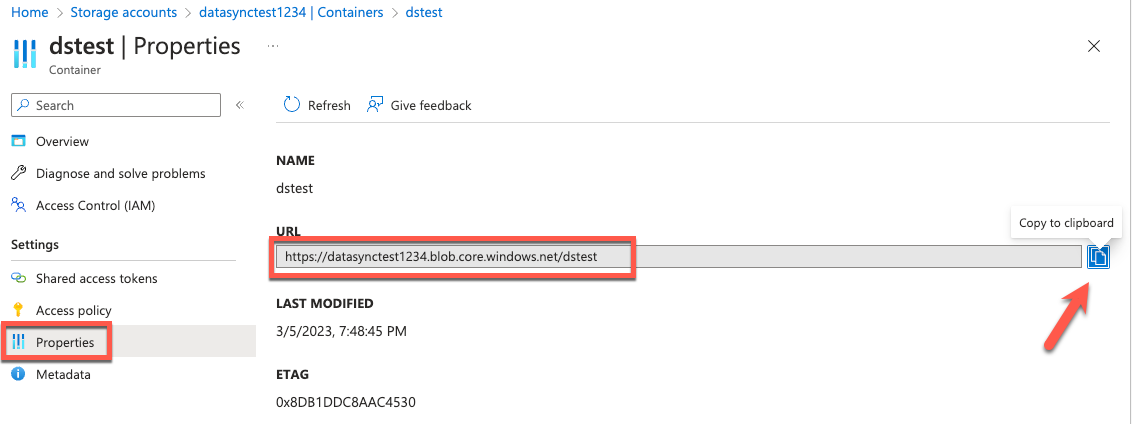
Figure 9: Identify the Container URL
Step 2: Configure the destination location
Configure the destination location as Amazon S3. Select Locations from the left navigation menu, then click on Create Location. Choose your target Amazon S3 bucket, S3 storage class, folder, and the IAM role with the permissions to access the Amazon S3 bucket. DataSync can transfer data directly into all S3 storage classes without having to manage zero-day lifecycle policies. For each transfer, you can select the most cost-effective S3 storage class for your needs. DataSync detects existing files or objects in the destination file system or bucket. Data that has changed between the source and destination location will be transferred on sequential runs of the AWS DataSync task.

Figure 10: Create the S3 location
Step 3: Create the replication task
Configure task settings by mapping the existing source Azure Blob Storage location in step 3 and the destination Amazon S3 bucket in step 4. Refer to task settings documentation to learn more about the task settings and options.

Figure 11: Configure the source location
After configuring the source location, click on Next and select the destination Amazon S3 bucket:

Figure 12: Configure the destination location
The following is an example of the settings which we configured above.
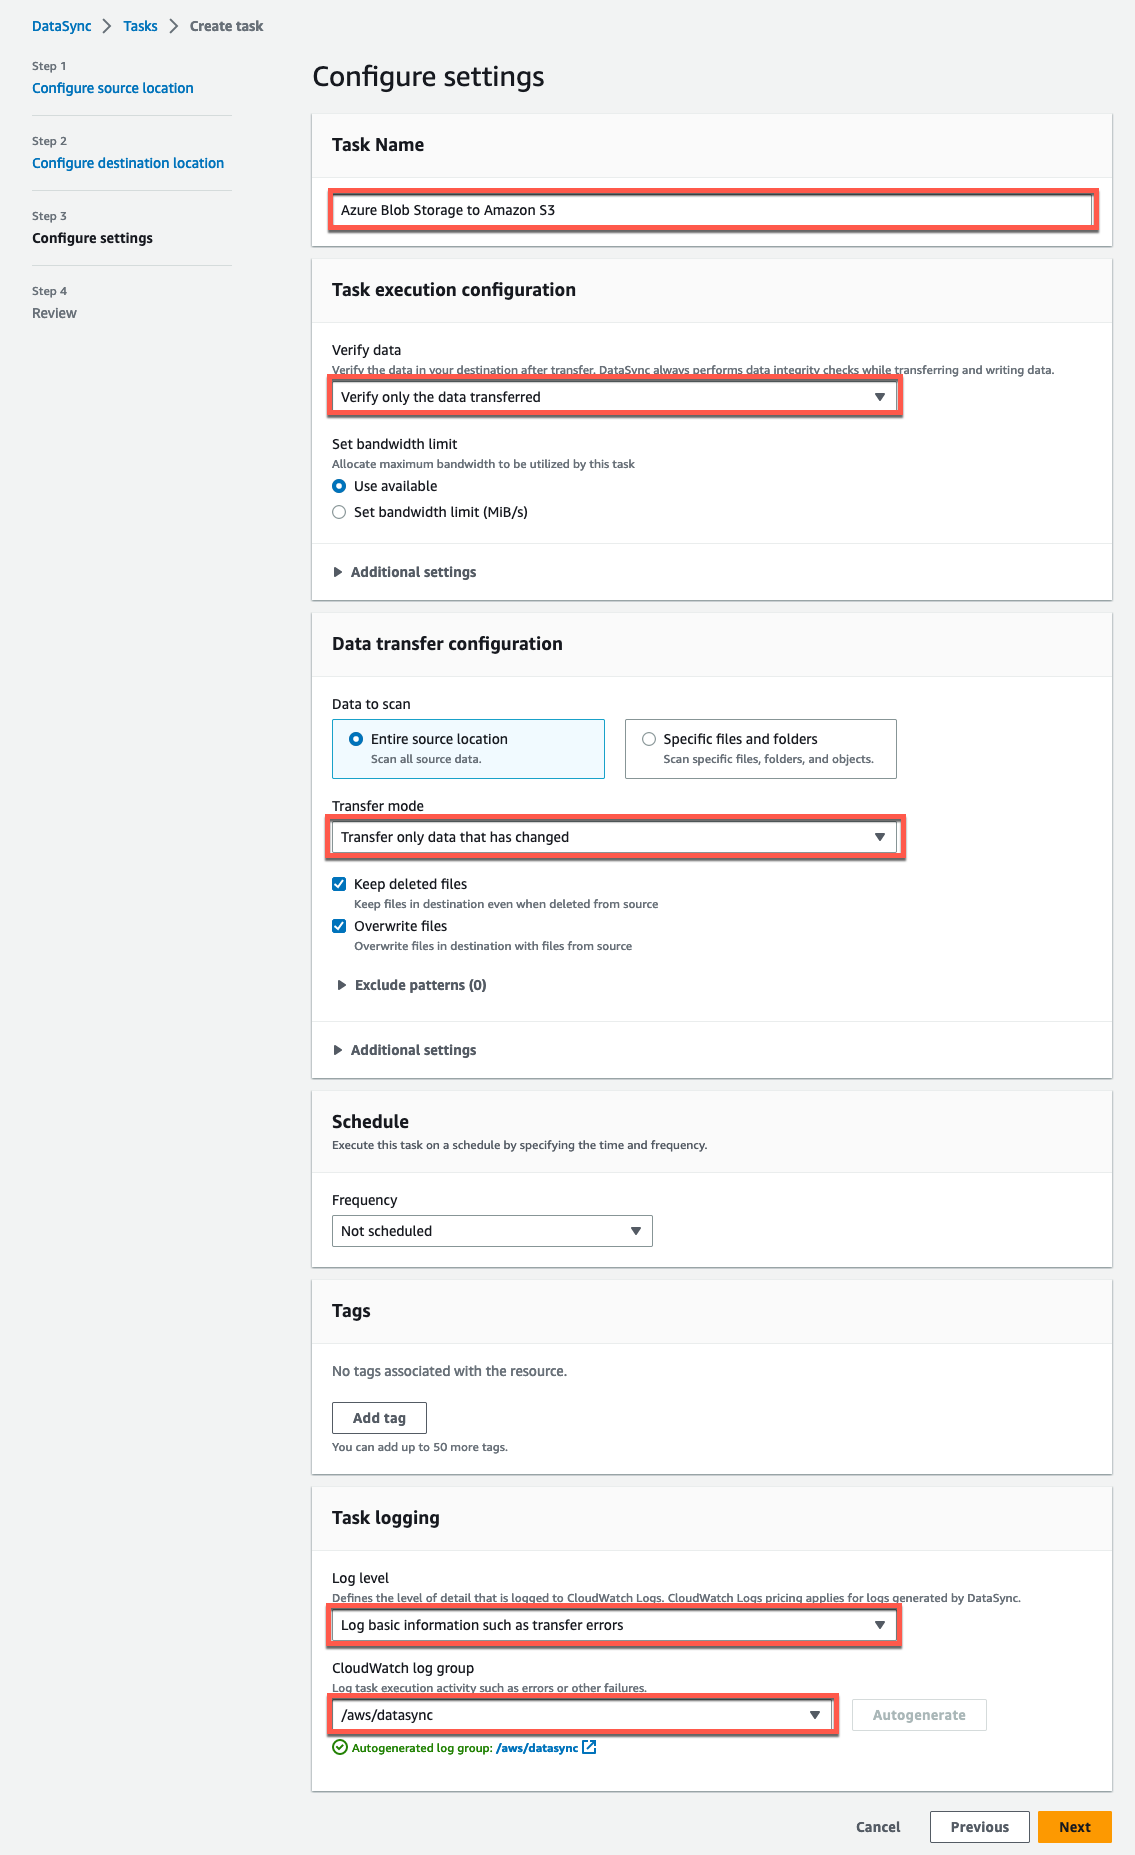
Figure 13: DataSync task settings
Step 4: Start the DataSync task
Start your task so DataSync can transfer the data by clicking Start from the task list, or inside the task overview itself. Learn more about task execution and monitoring your DataSync task with Amazon CloudWatch in the linked documentation.
After completing the steps in this tutorial, you have a secure data pipeline to move your Azure Blob Storage data efficiently to Amazon S3. Each time your DataSync task runs, it scans the source and destination locations for changes and performs a copy of any data and metadata differences. There are several phases that a DataSync task goes through: launching, preparing, transferring, and verifying. The time spent in the preparing phase varies depending on the number of files in the source and destination locations. It usually takes between a few minutes to several hours. Refer to the DataSync User Guide for more information on the DataSync task phases.
Cleaning up
For more information on AWS pricing see the AWS DataSync documentation. While there is no additional charge for inbound data transfer, there may be data egress charges incurred against the source account in Azure. Refer to the vendor’s pricing site for up-to-date information related to egress charges.To avoid ongoing charges for the resources you created, follow these steps:
- Delete the DataSync task created in Step 3 of Setting up data replication.
- Delete the source and destination locations created in Step 1 and 2 of Setting up data replication.
- Delete the DataSync agent created in Step 3 of Deploying the DataSync
- Delete the Azure VM and attached resources created when Deploying the DataSync agent.
- Delete all objects in the S3 bucket from Step 1 of Setting up data replication. The bucket must be empty before you can delete the it following the steps found here.
Conclusion
In this blog post, we explored a step-by-step deployment of the AWS DataSync Agent on Azure. We created and configured a task that copies object data from an Azure Blog Storage container to an S3 bucket on AWS without managing customized scripts or utilities.
Customers can benefit from easily migrating data from Azure Blob Storage to AWS storage services, such as Amazon S3, Amazon Elastic File System, and any supported Amazon FSx file system. Support for copying data from AWS storage services to Azure Blob Storage will be added as part of general availability (GA). Leveraging a managed service like DataSync removes the burden of managing additional infrastructure, saves operational time, and reduces the complexity of moving data at scale.
Here are additional resources to help you get started with AWS DataSync:
- What’s New with AWS DataSync
- AWS DataSync User Guide
- AWS re:Post
- AWS DataSync Primer – free one-hour, self-paced online course
- How to move data from Azure Files SMB shares to AWS using AWS DataSync
Thank you for reading this post on migrating Azure Blob Storage to Amazon S3 using AWS DataSync. I encourage you to try this solution today. If you have any comments or questions, please leave them in the comments section.