AWS Storage Blog
Remap Amazon EKS namespaces on restore with AWS Backup resource modifiers
Teams that run multi-tenant workloads on Amazon Elastic Kubernetes Service (Amazon EKS) often organize applications by namespace: one namespace per team, per environment, or per customer. When something goes wrong with one of those namespaces, the fastest path to recovery is not always to put it back exactly where it was. You might want to restore last night’s copy next to the live namespace so you can compare the two. If a namespace was deleted, you can bring it back under a new name while you investigate what removed it. You can also clone a production namespace into a staging namespace on the same cluster. With AWS Backup resource modifiers, you can now remap a namespace during a restore.
With AWS Backup, you can protect Amazon EKS cluster state, cluster configuration, and persistent volumes as a single composite recovery point. You can restore the whole cluster or individual namespaces from it. Until now, a namespace-level restore always recreated objects in their original namespace. Resource modifiers change that. A resource modifier is a YAML file of rules that you store in an Amazon Simple Storage Service (Amazon S3) bucket. AWS Backup reads the rules and applies them to each Kubernetes object before it creates the object in the cluster. Each rule pairs match conditions with JSON Patch operations, and you need only two rules to move a namespace. If you use Velero today, resource modifiers give you the same namespace remapping that the Velero --namespace-mappings flag provides, natively in AWS Backup.
In this post, you deploy a sample application into a namespace named original-namespace and back up the cluster with AWS Backup. Then you use a resource modifier to restore that namespace into new-namespace on the same cluster.
Solution overview
The following diagram shows the flow. AWS Backup backs up the cluster into a composite recovery point. At restore time, the restore job reads the resource modifier file from Amazon S3, patches each Kubernetes object, and creates the patched objects in the target cluster.
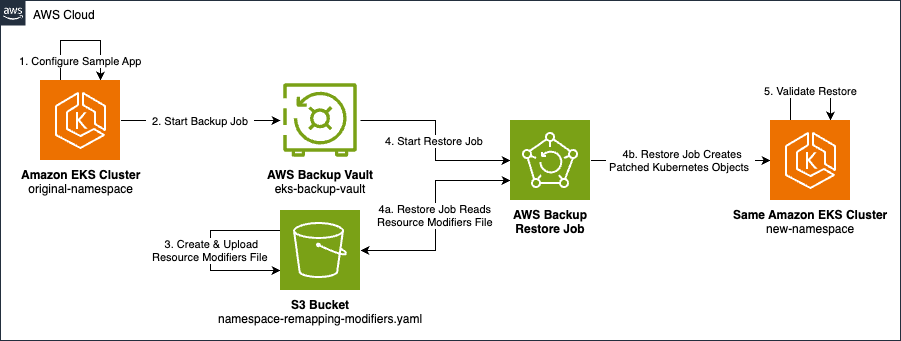
Figure 1: Flow of this walkthrough to restore a namespace into a new namespace with a resource modifier using AWS Backup
This walkthrough has five steps, shown in Figure 1:
- Create the cluster and deploy the sample application. Create an Amazon EKS Auto Mode cluster and deploy a Deployment, ConfigMap, and ServiceAccount into
original-namespace. - Back up the cluster. Create a backup vault and run an on-demand AWS Backup job against the cluster.
- Write the resource modifier and upload it to Amazon S3. Define the rules that rename the namespace and move its objects.
- Restore the namespace with the resource modifier. Start a namespace-level restore job into the same cluster that references the modifier file.
- Validate the restore. Confirm that the application now runs in
new-namespace.
This post uses the AWS Command Line Interface (AWS CLI) so you can copy each step. You can also specify a resource modifier file when you start an Amazon EKS restore job in the AWS Backup console.
How resource modifiers work
When a restore job has a resource modifier, AWS Backup does the following for each Kubernetes object in the recovery point:
- Reads the object as it was backed up from the backup vault.
- Checks the object against each rule in the order the rules appear in the file.
- For every rule whose conditions match, applies that rule’s patches. Each rule sees the object as earlier rules patched it, so a later rule must match on the patched values. For example, after a rule moves an object to
new-namespace, later rules must matchnew-namespace. - Creates the patched object in the target cluster.
The objects in the recovery point never change. AWS Backup applies patches only to the copy it creates in the cluster, so you can restore the same recovery point again with a different modifier file, or with none.
A resource modifier file has a version (v1) and a list of resourceModifierRules. Each rule has conditions that select the Kubernetes objects and patches that modify them:
All conditions are optional, but you must provide at least one condition, and an object must satisfy every condition you specify in a rule for that rule’s patches to apply. AWS Backup evaluates rules in the order they appear in the file. The supported operations are the JSON Patch add, remove, and replace.
How resource modifiers compare to Velero
Many teams protect Kubernetes workloads with Velero, an open source backup tool. Velero remaps namespaces with a dedicated --namespace-mappings flag and patches other fields with a separate resource modifier ConfigMap. AWS Backup uses a single resource modifier file for both. Namespace remapping is only another set of rules, so you can rename a namespace and patch fields inside it from the same file. The following table maps common Velero tasks to their AWS Backup equivalents.
| Task | Velero | AWS Backup |
| Remap a namespace | velero restore create --namespace-mappings original-namespace:new-namespace |
Two resource modifier rules (Step 3) |
| Patch fields at restore time | Resource modifiers ConfigMap, referenced with --resource-modifier-configmap |
Resource modifier YAML file in Amazon S3, referenced in the restore metadata "resourceModifiers" field |
| Resource selector format | <resource>.<group>, for example deployments.apps |
<group>/<version>/<resource>, for example apps/v1/deployments |
Prerequisites
To follow this walkthrough, you need:
- An AWS account with permissions to create Amazon EKS clusters, AWS Backup vaults and jobs, and Amazon S3 objects.
- The AWS CLI version 2, kubectl, eksctl, and jq installed. See Set up to use Amazon EKS.
- An AWS Identity and Access Management (IAM) role that AWS Backup can assume to back up and restore Amazon EKS. See Amazon EKS backups for the required permissions.
- An Amazon S3 bucket in the same AWS Region as the cluster to hold the resource modifier file.
Set the following environment variables. Replace the placeholder values with your own:
Step 1: Create the cluster and deploy the sample application
This walkthrough uses Amazon EKS Auto Mode, but resource modifiers work with any EKS cluster that AWS Backup supports. If you already have a cluster, skip this step.
- Save the following as
cluster-config.yaml: - Create the cluster, wait for it to become
Active, and update your kubeconfig: - Save the sample application as
sample-app.yaml. It contains a namespace, a ServiceAccount with an IAM role annotation, a ConfigMap, and a Deployment that reads its environment from the ConfigMap: - Apply the manifest to deploy the sample application:
- Confirm that the application is running:
You see output similar to the following:
Step 2: Back up the EKS cluster
- Create a backup vault, or reuse an existing backup vault:
- Start an on-demand backup job for the cluster. AWS Backup returns the Amazon Resource Name (ARN) of the composite recovery point that the job creates:
- Check the job until
StateisCOMPLETED:
When the backup finishes, you see output similar to the following:
You can also schedule EKS backups with a backup plan. Resource modifiers apply at restore time and don’t modify the recovery point, so you can use them with existing EKS recovery points.
Step 3: Write the resource modifier and upload it to Amazon S3
Remapping a namespace takes two rules, because the namespace itself and the objects inside it are stored differently:
- The Namespace object is cluster-scoped, and its name lives in
metadata.name. The first rule matches thev1/namespacesresource namedoriginal-namespaceand replaces that name. - Every namespaced object (Deployments, ConfigMaps, ServiceAccounts, and so on) records its namespace in
metadata.namespace. The second rule matches every object inoriginal-namespace, regardless of kind, and replaces that namespace field to restore it innew-namespace.
- Save the following as
namespace-remapping-modifiers.yaml:
To see the effect of the second rule, compare the web Deployment as it was backed up with how AWS Backup restores it. The following manifest shows the Deployment in the recovery point:
After the second rule applies, AWS Backup creates the Deployment with this manifest:
Only the metadata.namespace changes. The ServiceAccount, ConfigMap, and any other objects in that namespace get the same patch. The Deployment still refers to app-sa and app-config by name, and they are now in the same namespace as the Deployment, so those references still work after the restore.
- Upload the file to Amazon S3:
Note: If you turn on versioning for the bucket, AWS Backup uses the latest version of the object when the restore job starts.
Step 4: Restore the namespace with the resource modifier
This step deletes the original namespace to simulate losing it. You can also skip the deletion and restore next to the live namespace. Because the restored objects are created in new-namespace, they don’t conflict with the originals. A restore never overwrites existing objects. If an object with the same name already exists in the target namespace, AWS Backup skips it.
- Delete the sample application:
- Verify that all objects in
original-namespaceare deleted:
You now see only the initial namespaces:
- (Optional) Turn on restore notifications. AWS Backup can publish an Amazon Simple Notification Service (Amazon SNS) notification for each Kubernetes object it fails to restore or skips because it already exists. It also publishes one for each resource modifier patch that succeeds or fails. These notifications are the quickest way to find a rule that did not match what you expected. To turn them on for the vault, see Notification options with AWS Backup.
- Set
CHILD_EKS_RECOVERY_POINT_ARNto the child EKS recovery point. You need it in the Clean up section. Optionally, review the restore metadata that AWS Backup recorded for it, which shows the keys you can set when you restore. - Build the restore metadata. The values in the metadata map are strings, so the
namespaceslist is passed as a JSON-encoded string. Usingjqavoids hand-escaping the quotes:
The output is a single line:
The following table describes each key in this example. For the full list of restore metadata keys, see Restore an Amazon EKS cluster.
| Key | Value in this example | Purpose |
clusterName |
namespace-remapping-demo |
The name of the cluster to restore into. |
newCluster |
"false" |
Restore into an existing cluster. |
namespaceLevelRestore |
"true" |
Restore only the namespaces listed in namespaces. |
namespaces |
["original-namespace"] |
The namespaces to restore, named as they were at backup time. |
resourceModifiers |
s3://.../namespace-remapping-modifiers.yaml |
The resource modifier file to apply in S3 URI format. |
- Call the StartRestoreJob API to start a namespace-level restore from the composite recovery point:
- Check the job until
StatusisCOMPLETED:
When the restore finishes, you see:
Step 5: Validate the restore
- List the namespaces.
new-namespaceis present, andoriginal-namespaceis not, because you deletedoriginal-namespacein Step 4 and the resource modifier renamed it during the restore: - Confirm that the application objects were restored into the new namespace and that the pods are running:
You see the same objects you deployed in Step 1, now in new-namespace:
Considerations
Keep the following in mind when you use resource modifiers for namespace remapping.
References to the old namespace are not rewritten for you
The rules in this post change where objects are created. They do not change values inside objects that mention the old namespace by name. Before you remap a real application, check for references to the old namespace. You need to update these yourself:
RoleBindingandClusterRoleBindingsubjects that reference a ServiceAccount inoriginal-namespace.- In-cluster DNS names such as
my-service.original-namespace.svc.cluster.localin ConfigMaps, environment variables, or Ingress rules. - Trust policies for IAM roles for service accounts (IRSA). Their
subcondition includessystem:serviceaccount:original-namespace:app-sa. - Amazon EKS Pod Identity associations, which are scoped to a namespace and ServiceAccount.
- Any other field that contains the namespace name, such as annotations or command arguments.
More rules can be added to the same file
AWS Backup applies the rules in the order they appear in the file. For example, the following file adds a third rule that updates a hostname in a ConfigMap. The third rule matches new-namespace because rule 2 has already moved the ConfigMap from original-namespace to new-namespace:
Test your rules first
Restore into a test cluster or a scratch namespace before you rely on a resource modifier in a recovery event. Keep the modifier file in source control next to your application manifests. Store it in an S3 bucket with versioning turned on so you can roll back to an earlier version of your rules.
Persistent volumes follow their remapped claims
If the namespace contains PersistentVolumeClaims backed by Amazon Elastic Block Store (Amazon EBS), AWS Backup restores the volumes and binds each remapped claim to its restored volume. You don’t need a rule for PersistentVolumes. Don’t patch spec.claimRef or spec.csi on them, because AWS Backup manages those fields during restores.
More ways to use resource modifiers
The same mechanism handles other restore-time changes. For example, you can:
- Pull container images from an Amazon Elastic Container Registry (Amazon ECR) repository in the target Region or account by replacing
/spec/template/spec/containers/0/image. - Scale Deployments or StatefulSets down in a staging copy by replacing
/spec/replicas, using alabelSelectorto choose which workloads. - Point ConfigMaps at another Region’s endpoints, such as an Amazon Relational Database Service (Amazon RDS) host or an S3 bucket name, when you restore a copy in another Region.
- Update IRSA annotations to use a role in a different account, when you restore a cross-account copy.
- Remove
nodePortvalues from Services to avoid port collisions on the target cluster. - Add a label such as
restored-fromto track where restored objects came from.
Clean up
To avoid ongoing charges, run the following AWS CLI commands to delete the resources that you created:
If you created an Amazon SNS topic or IAM role for this walkthrough, delete them too.
Conclusion
In this post, we showed how to restore an Amazon EKS namespace into a new namespace on the same cluster with AWS Backup resource modifiers. We backed up a cluster and wrote a two-rule resource modifier that renames a namespace and moves its objects. Then we ran a namespace-level restore that applied those rules before creating each object.
You can use resource modifiers with AWS Backup for Amazon EKS in every AWS Region where AWS Backup supports Amazon EKS. There is no additional charge for using resource modifiers, though standard AWS Backup and related service charges apply. For more information, see AWS Backup Pricing. To learn more, see Restore an Amazon EKS cluster in the AWS Backup Developer Guide. For more on protecting Amazon EKS workloads, see Secure EKS clusters with the new support for Amazon EKS in AWS Backup.