AWS Storage Blog
Using Okta as an identity provider with AWS Transfer Family and Amazon EFS
Earlier this year, AWS Transfer Family launched support for Amazon EFS. With this update, you can grant your end users access to files stored in Amazon EFS file systems using any of the protocols supported by Transfer Family. However, if you use Okta as the identity provider, there are additional considerations during setup. For example, how do you allow user credentials stored in Okta to securely access files in your EFS file system over SFTP, FTPS, or FTP?
In a previous post, we outlined how to use Okta as the identity provider when transferring files with AWS Transfer Family to Amazon S3. In this post, we demonstrate how you can use Okta as an identity provider when using AWS Transfer Family to securely transfer files stored in a fully managed Amazon EFS file system. This will allow you to seamlessly maintain users’ credentials and access controls without causing disruptions during your file transfers.
Let’s begin with a short primer on the Portable Operating System Interface (POSIX) file permission model, which Amazon EFS uses to represent file ownership.
POSIX file permissions primer
In POSIX, users in the system are categorized into three distinct permission classes:
- User (u): Owner of the file or directory. Usually, the creator of a file or directory is also the owner.
- Group (g): Set of users that need identical access to files and directories that they share.
- Others (o): All other users that have access to the system except for the owner and group members. This permission class is also referred to as “Public.”
In the POSIX permission model, every file system object (files, directories, symbolic links, named pipes, and sockets) is associated with the previously mentioned three sets of permissions. Amazon EFS file system objects have a Unix-style mode associated with them. This mode value defines the permissions for performing actions on that object.
Additionally, on Unix-style systems, users and groups are mapped to numeric identifiers, which Amazon EFS uses to represent file ownership. For Amazon EFS, file system objects are owned by a single owner and a single group. Amazon EFS uses the mapped numeric IDs to check permissions when a user attempts to access a file system object. When you allow a user to access files stored in an Amazon EFS file system using AWS Transfer Family, you must assign them a “POSIX profile.” This profile is used to determine their access to files and directories in the Amazon EFS file system.
Solution architecture
The following diagram and numbered steps summarize the overall workflow of this solution:
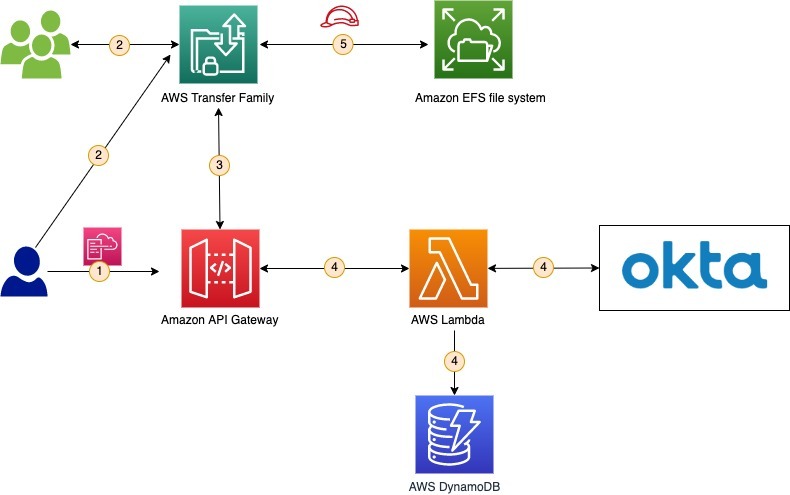
- Using the AWS CloudFormation template provided in the “IAM roles, Lambda function, and API Gateway” section, set up an AWS Transfer Family endpoint, an API using API Gateway, and the corresponding Lambda function for authentication with the Okta Authentication API.
- End user attempts to log in, supplying their Okta user name and password.
- Transfer Family passes these credentials to the API Gateway endpoint that you provided when you created the server (step 1). The API is integrated with a Lambda function.
- The Transfer Family server then uses the API Gateway URL backed by the Lambda function to query Okta and validate the end user’s credentials. Once the user is authenticated, the AWS Lambda function queries for the user’s details (such as logical mapping, or POSIX permission profile) from a DynamoDB table.
- The response from the API Gateway authorizes the end user and grants access to the Amazon EFS file system.
Okta setup
To begin, you must create an Okta org. For this post, we created a demo Okta account with users jdoe and msmith in Okta. Later in this post, we will have these users log in to the AWS Transfer Family console to access the endpoint using an SFTP client.
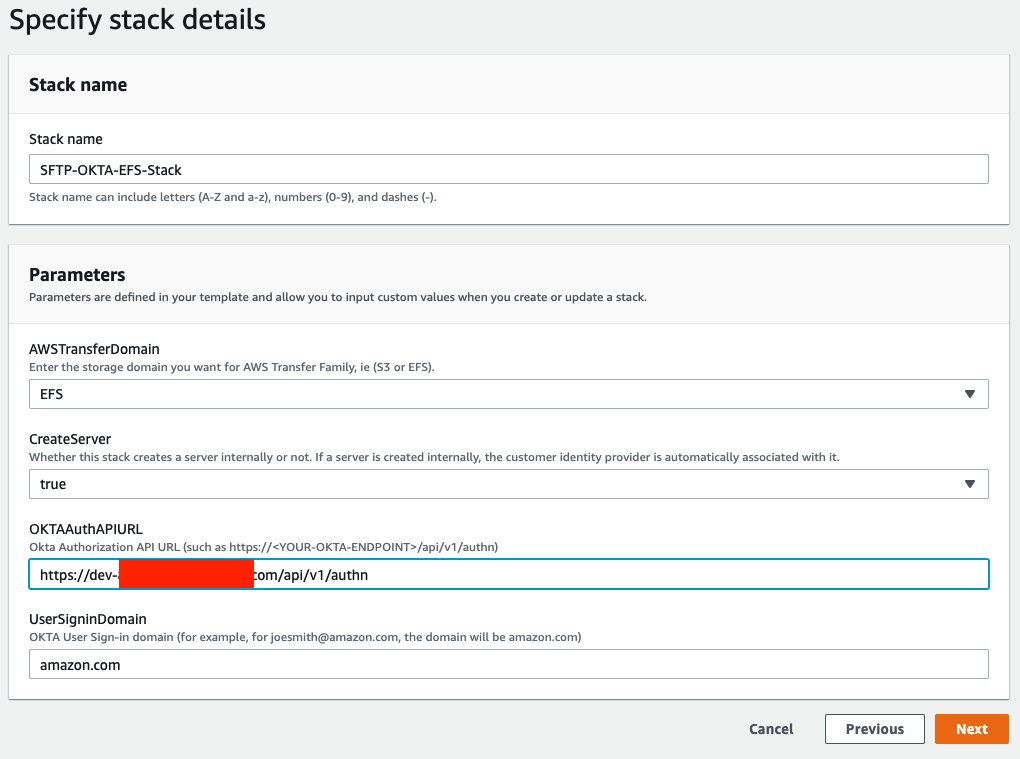
For your setup, note the following:
- Okta Authorization API URL (such as: https://<YOUR-OKTA-ENDPOINT>/api/v1/authn)
- Domain part of user’s sign-in for Okta (for example, for janedoe@amazon.com, the domain is amazon.com)
IAM roles, Lambda function, and API Gateway
The solution assumes the use of an existing Amazon EFS file system. Note that when you use a Transfer Family endpoint and an Amazon EFS file system, the server and the file system must be in the same AWS Region. In addition, you must configure your file system for access using Transfer Family.
First, create users jdoe and msmith, and create a subdirectory for each user. Then make the users the owners of their respective subdirectory, grant full permissions, and mount the Amazon EFS subdirectory on the user’s home directory. To get started, execute the following commands from an EC2 machine already mounted with an Amazon EFS file system. Follow this guide for how to mount an Amazon EFS file system.
For user jdoe:
sudo useradd -c "Jane Doe" -u 2030 jdoe

sudo mkdir efs-mount-point/jdoe

sudo chown 2030:2030 efs-mount-point/jdoe
For user msmith:
sudo useradd -c "Mike Smith" -u 4050 msmith

sudo mkdir efs-mount-point/msmith

sudo chown 4050:4050 efs-mount-point/msmith
Create a new AWS CloudFormation stack by downloading the CloudFormation template.
The CloudFormation template creates the following resources:
- AWS Transfer Family server endpoint.
- IAM role that allows AWS Transfer Family to access your Amazon EFS file system on behalf of your users.
- DynamoDB table where you define the directory map (logical directory mapping) in addition to POSIX profile for a given user.
- Lambda function and API Gateway to access Okta and DynamoDB for authentication and access.
When the CloudFormation stack is successfully created, identify the name of the DynamoDB table from the UserMapping key listed under the stack’s output section. To use the logical directory feature, go to the table and create an entry for the users jdoe and msmith, as shown in the following screenshots for the users jdoe and msmith. Entry is what you would expect users to see when a user logs in to the SFTP endpoint, and Target is the path on the Amazon EFS file system created for this user. Role is TransferIdentityProviderRole created in the CloudFormation stack.
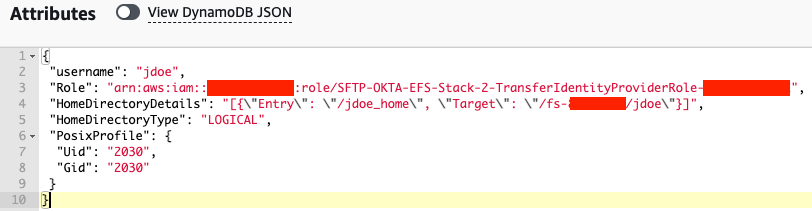
Entry for user “jdoe”

Entry for user “msmith”
Testing
To test the preceding configuration, you can use the TestIdentityProvider API. Start by providing the AWS Transfer Family endpoint, your Okta user name, and password. Then verify that you can log in and access your home directory. If you are not using the API, you can also use any SFTP client to validate your access.
The following code is an example of calling the TestIdentityProviderAPI, using the AWS Command Line Interface (CLI).
aws transfer test-identity-provider —server-id <SFTP Transfer Server ID> —user-name <Okta User Name> —user-password <Okta User Password>
The command returns following fields:
- Message (string)—The result of the authorization test as a message.
- StatusCode (integer) —The HTTP status code that is the response from API Gateway.
- Url (string) —The endpoint of the service used to authenticate a user.
The following screenshot shows an example of a successful login:

Cleaning up
If you are just testing this configuration, don’t forget to delete your server and clean up any other resources to avoid receiving an AWS invoice. If you’re deploying to production, continue to build with AWS.
Summary
In this blog post, we demonstrated using Okta as an identity provider with AWS Transfer Family and Amazon EFS. We began by providing a brief description of the POSIX file permissions model used by Amazon EFS. We then covered the solution architecture, and how to set it up using the CloudFormation template provided. With the CloudFormation template creating most of the components of the solution, all that remained was inputting the entries for our example users in the DynamoDB table that the AWS Lambda function, created by the CloudFormation template, queries for user details. Finally, we tested the solution to show a successful log in.
With AWS Transfer Family, securely provide third parties, including vendors, partners, and customers, with access to your files at scale and avoid having to manage expensive infrastructure. Transfer Family provides you access to a file transfer protocol-enabled endpoint in AWS, enabling you to seamlessly migrate your file transfer based workflows to Amazon EFS while maintaining your users’ clients and configurations. This means you can transfer files without having to disrupt or reconfigure your user credentials and access controls, eliminating potential downtime and ensuring efficient and cost-effective file transfers.
Additionally, you can now easily access your Amazon EFS file systems from Windows, macOS, and Linux environments across several commonly used protocols including SFTP, FTP, and FPTS. This helps expand the accessibility of your data beyond NFS clients and access points to users across multiple environments. Learn more on the AWS Transfer Family product page.
Thanks for reading this blog post. If you have any comments or questions, don’t hesitate to leave them in the comments section.