AWS Security Blog
How to restrict Amazon S3 bucket access to a specific IAM role
February 14, 2025: This post was updated with the recommendation to restrict S3 bucket access to an IAM role by using the
aws:PrincipalArncondition key instead of theaws:useridcondition key.
April 2, 2021: In the section “Granting cross-account bucket access to a specific IAM role,” we updated the second policy to fix an error.
July 11, 2016: This post was first published.
Customers often ask how to limit access to an Amazon Simple Storage Service (Amazon S3) bucket to only a specific AWS Identity and Access Management (IAM) user or role. A popular approach has been to use the Principal element to list the users or roles who need access to the bucket. However, the Principal element needs the exact values of the user ARN, role ARN, or assumed-role ARN. It does not support using a wildcard (*) to include all role sessions, nor does it allow you to use policy variables.
In this blog post, we show how to restrict S3 bucket access to a specific IAM role or user within an account by using the Conditions element. Even if another user in the same account has an Admin policy or a policy with s3:*, they will be denied access if they are not explicitly listed in the Conditions element. You can use this approach, for example, to limit access to a bucket with sensitive content or additional security requirements.
Solution overview
The solution in this post uses a bucket policy to restrict access to an S3 bucket, even if an entity has access to the full API of S3 through an attached identity-based policy. The following diagram illustrates how this works for accessing an S3 bucket within the same account as your IAM user or IAM role. We recommend that you use IAM roles, and only use IAM users for use cases that aren’t supported by federated users.
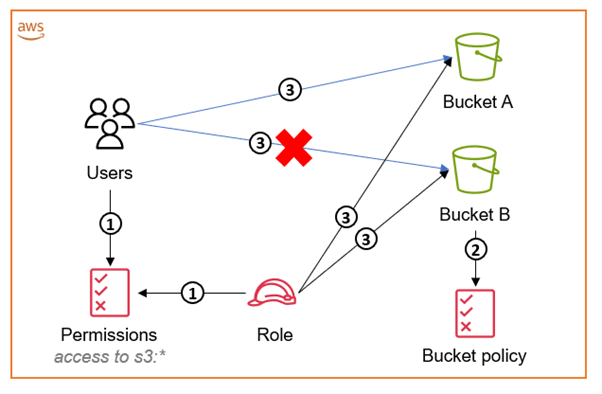
Figure 1: Diagram illustrating how to access an S3 bucket within the same account as your IAM user or IAM role
The workflow in Figure 1 is as follows:
- The IAM user’s policy and the IAM role’s identity-based policy grant access to
“s3:*”. - The S3 bucket policy associated with Bucket B restricts access to only the IAM role. This means that only the IAM role is able to access its content.
- Both the IAM user and the IAM role can access other S3 buckets (for example, Bucket A) in the account. The IAM role is able to access both buckets, but the user can access only the S3 buckets without the bucket policy attached to them. Even though both the role and the user have full
“s3:*”permissions, the bucket policy negates access to the bucket for anyone that has not assumed the role.
The main difference in the cross-account approach is that every bucket must have a bucket policy attached to allow access to the IAM role from the other account. The following diagram illustrates how this works in a cross-account deployment scenario.
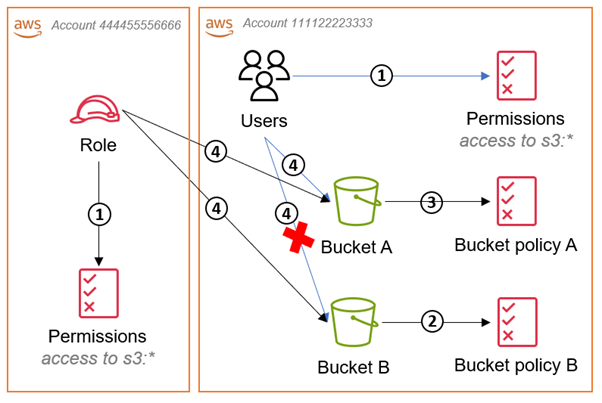
Figure 2: Diagram illustrating how to access an S3 bucket in a different account than your IAM role
The workflow in Figure 2 is as follows:
- The IAM role’s identity-based policy and the IAM users’ policy in the bucket account both grant access to
“s3:*” - Bucket policy B denies access to all IAM users and roles except the role specified, and the policy defines what the role is allowed to do with the bucket.
- Bucket policy A allows access to the IAM role from the other account.
- The IAM user and IAM role can both access Bucket A because the IAM user is in the same account and there is an explicit
Allowin bucket policy A for the role. The role can access both buckets because theDenyin bucket policy B is only for principals other than the IAM role.
Using the aws:PrincipalArn condition
You can use different types of condition keys to compare details about the principal making the request with the principal properties that you specify in the policy. We recommend that you use the aws:PrincipalArn key. The aws:PrincipalArn key compares the Amazon Resource Name (ARN) of the principal that made the request with the ARN that you specify in the policy.
You could also use the aws:userid policy variable to uniquely identify a user or role in their explicit Deny statements. There is added complexity with using aws:userid to find the value because you have to perform an API call using valid credentials. When working with IAM roles this activity has additional complexity because you are required to get the AssumedRoleUser information, which will not only include the unique role ID, but also the role-session-name that was provided while assuming the role. For example, the aws:userid for an AssumedRoleUser will be as follows:
It becomes inconvenient to manage and track these IDs when you have a large list of users and roles to be included in the policy.
To mitigate these challenges, we recommend that you use the aws:PrincipalArn condition key. For IAM roles, the request context returns the ARN of the role, not the ARN of the user that assumed the role. AWS recommends that you specify the ARN for resources in policies instead of unique IDs and that you perform IAM policy audits on a periodic basis. Let’s look at how to use the condition key in an IAM policy.
Granting same-account bucket access to a specific role
When accessing a bucket from within the same account, in most cases it is not necessary to use a bucket policy because the policy defines access that is already granted by the user’s direct IAM policy. S3 bucket policies are usually used for cross-account access, but you can also use them to restrict access through an explicit Deny. The Deny would be applied to all principals whether they were in the same account as the bucket or within a different account.
In this case, you use the IAM user or role ARN with the aws:PrincipalArn condition key in a StringNotEquals or StringNotLike condition with a wildcard string. In addition, you use the aws:PrincipalARN key to compare the ARN of the principal that made the request with the ARN that you specify in the policy. Using a conditional logic element allows for the use of a wildcard string to allow for any role session name to be accepted.
Once you have the ARN of the role to which you want to allow access, you need to block the access of other users from within the same account as the bucket. An example policy to block access to the bucket and its objects for users that are not using the IAM role credentials would look like the following.
Use this same policy for IAM users as shown below.
Granting cross-account bucket access to a specific IAM role
When granting cross-account bucket access to an IAM user or role, you must define what the IAM user or role is allowed to do with the granted access. Learn more about the permissions needed to allow an IAM entity to access a bucket via the CLI/API and the console in Writing IAM Policies: How to Grant Access to an Amazon S3 Bucket. Using the information found in this blog post, an example bucket policy would look like the following.
To grant access to an IAM user in another account, you need to add the ARN for the IAM user to the aws:PrincipalArn condition as outlined in the previous section of this blog post. In addition to the aws:PrincipalArn condition, you would also need to add the IAM user’s full ARN to the Principal element of these policies. An example policy is shown below.
In addition to including role permissions in the bucket policy, you need to define these permissions in the IAM user’s or role’s user policy. The permissions are added to a customer managed policy and attached to the role or user in the IAM console, with the following example policy document.
By following the guidance in this post, you restrict S3 bucket access to a specific IAM role or user in same-account and cross-account scenarios, even if the user has an Admin policy or a policy with “s3:*”. There are many applications of this logic in which requirements will vary across use cases. We recommend to employ the principle of least privilege wherever possible, and to grant only the minimum permissions that are required to perform necessary tasks.
If you have feedback about this post, submit comments in the Comments section below. If you have questions about this post, start a new thread on the AWS Identity and Access Management re:Post or contact AWS Support.