AWS Architecture Blog
Stream Amazon CloudWatch Logs to a Centralized Account for Audit and Analysis
September 8, 2021: Amazon Elasticsearch Service has been renamed to Amazon OpenSearch Service. See details.
Note: This blog post was updated June 6, 2019.
A key component of enterprise multi-account environments is logging. Centralized logging provides a single point of access to all salient logs generated across accounts and regions, and is critical for auditing, security and compliance. While some customers use the built-in ability to push Amazon CloudWatch Logs directly into Amazon Elasticsearch Service for analysis, others would prefer to move all logs into a centralized Amazon Simple Storage Service (Amazon S3) bucket location for access by several custom and third-party tools. In this blog post, I will show you how to forward existing and any new CloudWatch Logs log groups created in the future to a cross-account centralized logging Amazon S3 bucket.
This blog post assumes some knowledge of Amazon CloudFormation, Python3 and the boto3 AWS SDK. You will need to have or configure an AWS working account and logging account, an IAM access and secret key for those accounts, and a working environment containing Python and the boto3 SDK. (For assistance, see the Getting Started Resource Center and Start Building with SDKs and Tools.) All CloudFormation templates and Python code used in this article can be found in this GitHub Repository.
Setting up the solution
You need to create or use an existing S3 bucket for storing CloudFormation templates and Python code for an AWS Lambda function. This S3 bucket is referred to throughout the blog post as the <S3 infrastructure-bucket>. Ensure that the bucket does not block new bucket policies or cross-account access by checking the bucket’s Permissions tab and the Public access settings button.
You also need a bucket policy that allows each account that needs to stream logs to access it when we create the AWS Lambda function below. To do so, update your bucket policy to include each new account you create and the <S3 infrastructure-bucket> ARN from the top of the Bucket policy editor page to modify this template:
{
    "Version": "2012-10-17",
    "Statement": [
        {
            "Effect": "Allow",
            "Principal": {
                "AWS": [
                  "03XXXXXXXX85",
                  "29XXXXXXXX02",
                  "13XXXXXXXX96",
                  "37XXXXXXXX30",
                  "86XXXXXXXX95"
                ]
            },
            "Action": [
                "s3:Get*",
                "s3:List*"
            ],
            "Resource": [
                "arn:aws:s3:::<S3 infrastructure-bucket>",
                "arn:aws:s3:::<S3 infrastructure-bucket>/*"
            ]
        }
    ]
}
Clone a local copy of the CloudFormation templates and Python code from the GitHub repository. Compress the CentralLogging.py and lambda.py into a .zip file for the lambda function we create below and name it AddSubscriptionFilter.zip. Load these local files into the <S3 infrastructure-bucket>. I recommend using folders called /python for the .py files, /lambdas for the AddSubscriptionFilter.zip file and /cfn for the CloudFormation templates.
Multi-Account Configuration and the Central Logging Account
One form of multi-account configuration is the AWS Landing Zone offering, which provides a core logging account for storing all logs for auditing. I use this account configuration as an example in this blog post. Initially, the Landing Zone setup creates several stack sets and resources, including roles, security groups, alarms, lambda functions, a cloud trail stream and an S3 bucket.
If you are not using a Landing Zone, create an appropriately named S3 bucket in the account you have chosen as a logging account. This S3 bucket will be referred to later as the <LoggingS3Bucket>. To mimic what the Landing Zone calls its logging bucket, you can use the format aws-landing-zone-logs-<Account Number>–<Region>, or simply pick an appropriate name for the centralized logging location. In a production environment, remember that it is critical to lock down the access to logging resources and the permissions allowed within the account to prevent deletion or tampering with the logs.
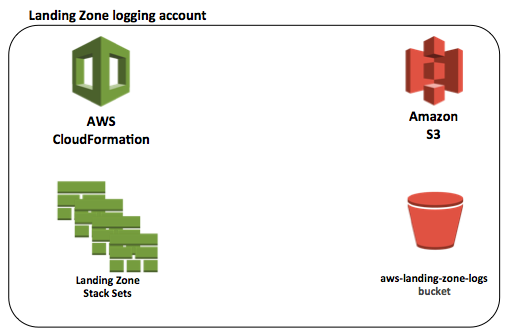
Figure 1 – Initial Landing Zone logging account resources
The S3 bucket – aws-landing-zone-logs-<Account Number>–<Region> is the most important resource created by the stack-sets for logging purposes. It contains all of the logs streamed to it from all of the accounts. Initially, the Landing Zone only sends the AWS CloudTrail and AWS Config logs to this S3 bucket.
In order to send all of the other CloudWatch Logs that are necessary for auditing, we need to add a destination and streaming mechanism to the logging account.
Logging Account Infrastructure
The additional infrastructure required in the central logging account provides a destination for the log group subscription filters and a stream for log events that are sent from all accounts and appropriate regions to load them into the <LoggingS3Bucket> repository.
The centralLogging.yml CloudFormation template automates the creation of the entire required infrastructure in the core logging account. Make sure to run it in each of the regions in which you need to centralize logs. The log group subscription filter and destination regions must match in order to successfully stream the logs.
Installation Instructions:
- Modify the centralLogging.yml template to add your account numbers for all of the accounts you want to stream logs from into the DestinationPolicy where you see the <AccountNumberHere> placeholders. Remove any unused placeholders.
- In the same DestinationPolicy, modify the final arn statement, replacing <region> with the region it will be run in (e.g., us-east-1), and the <logging account number> with the account number of the logging account where this template is to be run.
- Log in to the core logging account and access the AWS management console using administrator credentials.
- Navigate to CloudFormation and click the Create Stack button.
- Select Specify an Amazon S3 template URL and enter the Link for the centralLogging.yml template found in the <S3 infrastructure-bucket>.
- Enter a stack name, such as CentralizedLogging, and the one parameter called LoggingS3Bucket. Enter in the ARN of the logging bucket: arn:aws:s3::: <LoggingS3Bucket>. This can be obtained by opening the S3 console, clicking on the bucket icon next to this bucket, and then clicking the Copy Bucket ARN button.
- Skip the next page, acknowledge the creation of IAM resources, and Create the stack.
- When the stack completes, select the stack name to go to stack details and open the Outputs. Copy the value of the DestinationArnExport, which will be needed as a parameter for the script in the next section.
Upon successful creation of this CloudFormation stack, the following new resources will be created:
- Amazon CloudWatch Logs Destination
- Amazon Kinesis Firehose Stream
- Two AWS Identity and Access Management (IAM) Roles

Because the Landing Zone is a multi-account offering, the Log Destination is required to be the destination for all subscription filters. The key feature of the destination is its DestinationPolicy. Whenever a new account is added to the environment, its account number needs to be added to this DestinationPolicy in order for logs to be sent to it from the new account. Add the new account number in the centralLogging.yml CloudFormation template, and run an update in CloudFormation to complete the addition. A sample Destination Policy looks like this:
{
  "Version" : "2012-10-17",
  "Statement" : [
    {
      "Effect" : "Allow",
      "Principal" : {
        "AWS" : [
          "03XXXXXXXX85",
          "29XXXXXXXX02",
          "13XXXXXXXX96",
          "37XXXXXXXX30",
          "86XXXXXXXX95"
        ]
      },
      "Action" : "logs:PutSubscriptionFilter",
      "Resource" : "arn:aws:logs:<Region>:<LoggingAccountNumber>:destination:CentralLogDestination"
    }
  ]
}
Kinesis Firehose provides a simple and efficient mechanism to receive the records from the Log Destination and load them into the <LoggingS3Bucket> repository. It uses the CloudFormation template parameter to know where to load the logs. All of the CloudWatch logs loaded by Firehose will be under the prefix /CentralizedAccountsLog. The buffering hints for Firehose suggest that the logs be loaded every 5 minutes or 50 MB. Leave the CompressionFormat UNCOMPRESSED, since the logs are already compressed.
There are two AWS Identity and Access Management (IAM) roles created for this infrastructure. The first, CWLtoFirehoseRole, is used by the destination to allow CloudWatch Logs from all accounts to use the destination to put the log object records into the Firehose, as well as to pass the role. The second, FirehoseDeliveryRole, allows Firehose to load the log object records into S3 logging bucket.
Once you have successfully created this infrastructure, the next step is to add the subscription filters to existing log groups.
Adding Subscription Filters to Existing Log Groups
The next step in the process is to add subscription filters for the Log Destination in the core logging account to all existing log groups. Several log groups are created by the Landing Zone, or you may have created them by using various AWS services or by logging application events. For every new AWS account, you will need to run the init_account_central_logging.py Python script to add the subscription filters to all the existing log groups.
The init_account_central_logging.py script takes one parameter, which is the Log Destination ARN. Use the Destination ARN you copied from the stack details output in the previous section as the parameter to the script.
The init_account_central_logging.py script first adds this Destination ARN to the AWS Systems Manager Parameter Store so that the core logic that creates the subscription filter can use it. The script then gets a list of all existing log groups, iterates over them, deletes any existing subscription filters (because there can only be one subscription filter per log group and attempting to create another would cause an error), and then adds the new subscription filter to the centralized logging account to the Log Destination.

Figure 3 – Run script to add subscription filters to existing log groups
Installation Instructions:
- Make sure that Python and boto3 are installed and accessible in the client computer – consider loading into a virtual environment to keep dependencies separate.
- Set the AWS_PROFILE environment variable to the appropriate AWS account profile.
- Log in to the proper account, and obtain administrator or other credentials with appropriate permissions, and add the account access key and secret key to the AWS credentials file.
- Set the region and output in the AWS config file.
- Download and place two python files into a working directory: init_account_central_logging.py and CentralLogging.py.
- Run the script using the command python3 ./init_account_central_logging.py -d <LogDestinationArn>.
Use the AWS Management Console to validate the results. Navigate to CloudWatch Logs and view all of the log groups. Each one should now have a subscription filter named “Logs (CentralLogDestination).”
Automatically Adding Subscription Filters to New Log Groups
The final step to set up the centralized log streaming capability is to run a CloudFormation script to create resources that automatically add subscription filters to new log groups. New log groups are created in accounts by resources (e.g., Lambda functions) and by applications. A subscription filter must be added to every new log group in order to deliver its log events to the logging account,
The AddSubscriptionFilter.yml CloudFormation template contains resources to automatically add subscription filters.
First, it creates a role that allows it to access the lambda code that is stored in a centralized location – the <S3 infrastructure-bucket>. (Remember that its S3 bucket policy must contain this account number in order to access the lambda code.)
Second, the template creates the AddSubscriptionLambda, which reuses the core logic shared by the script in the last section. It retrieves the proper destination from the Parameter Store, deletes any existing subscription filter from the log group, and adds the new subscription filter to the newly created log group. This lambda function is triggered by a CloudWatch event rule.
Third, the CloudFormation creates a Lambda Permission, which allows the event trigger to invoke this particular lambda.
Finally, the CloudFormation template creates an Amazon CloudWatch Events Rule that acts as a trigger for the lambda. This rule looks for an event coming from CloudTrail that signals the creation of a new log group. For each create log group event found, it invokes the AddSubscriptionLambda.
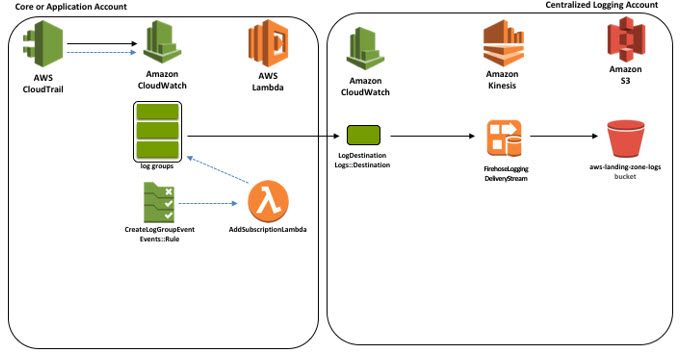
Figure 4 – Infrastructure to automatically add a subscription filter to a new log group and the log flow to the centralized account
Installation Instructions:
(Important note: This functionality requires that the LogDestination parameter be properly set to the LogDestinationArn in the Parameter Store before the Lambda will run successfully. The script in the previous step sets this parameter, or it can be done manually. Make certain that the destination specified is in this same region.)
- Ensure that the <S3 infrastructure-bucket> has the AddSubscriptionFilter.zip file containing the Python code files lambda.py and CentralLogging.py.
- Log in to the appropriate account, and access using administrator credentials. Make sure that the region is set properly.
- Navigate to Cloudformation and click the Create Stack button.
- Select Specify an Amazon S3 template URL and enter the Link for the AddSubscriptionFilter.yml template found in <S3 infrastructure-bucket>
- Enter a stack name, such as AddSubscription.
- Enter the two parameters, the <S3 infrastructure-bucket> name (not ARN) and the folder and file name (e.g., lambdas/AddSubscriptionFilter.zip)
- Skip the next page, acknowledge the creation of IAM resources, and Create the stack.
In order to test that the automated addition of subscription filters is working properly, use the AWS Management Console to navigate to CloudWatch Logs and click the Actions button. Select Create New Log Group and enter a random log group name, such as “testLogGroup.” When first created, the log group will not have a subscription filter. After a few minutes, refresh the display and you should see the new subscription filter on the log group. At this point, you can delete the test log group.
New Account Setup
As a reminder, when you add new accounts that you want to have stream log events to the central logging account, you will need to configure the new accounts in two places in order for this functionality to work properly.
First, add the account number to the LoggingDestination property DestinationPolicy in the centralLogging.yml template. Then, update the CloudFormation stack.
Second, modify the bucket policy for the <S3 infrastructure-bucket>. Select the Permissions tab, then the Bucket Policy button. Add the new account to allow cross-account access to the lambda code by adding the line “arn:aws:iam::<new account number>:root” to the Principal.AWS list.
Conclusion
Centralized logging is a key component in enterprise multi-account architectures. In this blog post, I have built on the central logging in multi-account environments streaming architecture to automatically subscribe all CloudWatch Logs log groups to send all log events to an S3 bucket in a designated logging account. The solution uses a script to add subscription filters to existing log groups, and a lambda function to automatically place a subscription filter on all new log groups created within the account. This can be used to forward application logs, security logs, VPC flow logs, or any other important logs that are required for audit, security, or compliance purposes.