Front-End Web & Mobile
Streaming videos to millions of mobile app users via Amazon CloudFront CDN
Update: October 30, 2018
AWS Mobile Hub console has changed the interface significantly since this article was originally published. In addition, the iOS Swift Sample App provided by Mobile Hub is also no longer available. This is a very popular solution, however, with the changes above, the article would need to be completely re-written to address those changes. For now, we are leaving this article online but beware that some of the features, screens, or steps may not be accurate and sometimes misleading.
Update: March 17, 2017
This post has been updated to address a few operational issues and overall feedback from developers and internal teams. We hope you enjoy and please keep the comments and contributions flowing!
Changes:
- If the Lambda function is/was not getting triggered after a video was uploaded to S3, see new note about your suffix in step 3C. Oh, and the suffix IS case-sensitive. So a suffix of MP4 will not match with a video uploaded as rafting.mp4.
- The event trigger is now configured through the Lambda Console with new screenshots. Also, when creating an event trigger, a Lambda Function Policy is automatically created allowing S3 to invoke the Lambda function.
- Best practices: We added a warning in section 2A stating that you should always create a separate S3 bucket, one for video input and another one for storing the encoded HLS video playlists and segments.
Happy encoding! -Dennis
About
Welcome to the second installment of our blog series (the first post is here) showing how to build some of the most popular end-to-end experiences used by mobile apps.
This post is about HTTP Live Streaming (HLS) video content via Amazon CloudFront to your mobile application. You’ll utilize AWS Mobile Hub to enable the App Content – Global CDN feature that provisions an Amazon S3 bucket to store our streaming content and creates an Amazon CloudFront Web Distribution that will cache your video files using your Amazon S3 bucket as the source (origin) in edge locations around the world. This provides fast, low latency access to your content from mobile devices around the world. In addition, you’ll enable the Cloud Logic feature and use AWS Lambda to automatically generate transcoding jobs for videos uploaded to your S3 bucket.
You’ll walk away with a fully functioning mobile application streaming your own encoded HTTP Live Streaming (HLS) video on demand (VOD) directly from your Amazon CloudFront Web Distribution. This a complete end-to-end solution demonstrating a very common mobile cloud video distribution architecture.
There are five steps in this tutorial.
Step 1. Configure the backend AWS resources via AWS Mobile Hub. This consists of creating a project, enabling features App Content Delivery – Global CDN and Cloud Logic for transcoding videos via Amazon Elastic Transcoder.
Step 2. Staging video and provisioning Amazon S3, AWS Lambda, and Amazon Elastic Transcoder pipeline to be used for transcoding a basic HD video into HLS.
Step 3. Upload video to S3 and encoding HLS content
Step 4. Modify the sample app project code generated by Mobile Hub to explore and stream HLS video content from Amazon CloudFront using the transcoded media files stored in S3.
Step 5. Streaming HLS video content from your own app by following the AWS Mobile Hub integration guide customized for your project.
First, we’ll explain briefly what HLS is, how it works, and how to use Amazon Elastic Transcoder to transcode media into the HLS format. We’ll then briefly explain AWS features (Amazon S3, AWS Lambda, and Amazon CloudFront) that you’ll enable within a Mobile Hub project.
What is HLS?
HTTP Live Streaming (HLS) is a protocol that segments media files for optimization during streaming. HLS enables media players to play segments with the highest quality resolution that is supported by their network connection during playback.
In Step 3 you’ll transcode an HD action movie (filmed on a GoPro) into HLS segments, copy those media files to S3, and stream this content from our modified sample app in Step 4.
What is AWS Lambda?
The Cloud Logic feature is powered by AWS Lambda functions. These functions allow you to simply write code without worrying about managing frameworks and scaling of backend infrastructure. You can write your functions in JavaScript, Java, or Python. You’ll be using Lambda to create encoding jobs via Amazon Elastic Transcoder whenever a video is uploaded to your S3 bucket. Learn more about AWS Lambda
Transcoding HLS using Amazon Elastic Transcoder
Transcoding is the process of converting a media file (audio or video) from one format, size, or quality to another. Elastic Transcoder takes input from an S3 bucket, transcodes it, and writes the resulting file to another bucket or folder. You start with one or more input files and create transcoding jobs in a transcoding pipeline for each file. Each job must reference a particular transcoding preset, and in our case will result in the generation of HLS segments and playlists. Our Lambda starter code will be the job creator and is configured with all the HLS transcoding presets available. Learn more about Elastic Transcoder.
What is Amazon S3?
Amazon Simple Storage Service (Amazon S3) provides secure, durable, highly scalable object storage in the cloud. Using the AWS Mobile SDK, you can directly access Amazon S3 from your mobile app. The AWS Mobile SDK allows you to consume the Amazon S3 service in your mobile application via the S3 Transfer Utility. The fully functional iOS sample app generated by Mobile Hub includes the AWS Mobile SDK for iOS and all the helper code for running the demo app. For this tutorial, you’ll create an S3 bucket and use it to store the video content. The S3 bucket acts as the origin (source of distributed content) for your CloudFront Web Distribution. Learn more about Amazon S3 cloud storage and pricing.
What is Amazon CloudFront?
Amazon CloudFront is a global content delivery network (CDN) service that accelerates delivery of your websites, APIs, video content, and other web assets. It integrates with other AWS services to give developers and businesses an easy way to accelerate content delivery to end users with no minimum usage commitments. For this tutorial, you’ll use CloudFront to distribute HLS streaming content to a mobile device. Learn more about Amazon CloudFront and pricing.
Let’s Begin
Step 1 – Configure your backend content delivery
You’ll use Mobile Hub to create a project. Next, you’ll enable the App Content Delivery feature to store our video content on Amazon S3 and Cloud Logic to launch encoding jobs to encode HLS content. We’ll walk you through the steps and follow up with a recap (explain the magic) of what just happened.
1. Launch AWS Mobile Hub console
2. Select Create new mobile project

3. Provide a project name, (e.g. StreamingBlog) and then select Create project.

Note: If you have never used Mobile Hub before, you’ll be prompted to select Get Started and Yes, grant permissions before you can create a new project.
4.
Select App Content Delivery
. (NOW CALLED Hosting and Streaming – 10/30/2018)
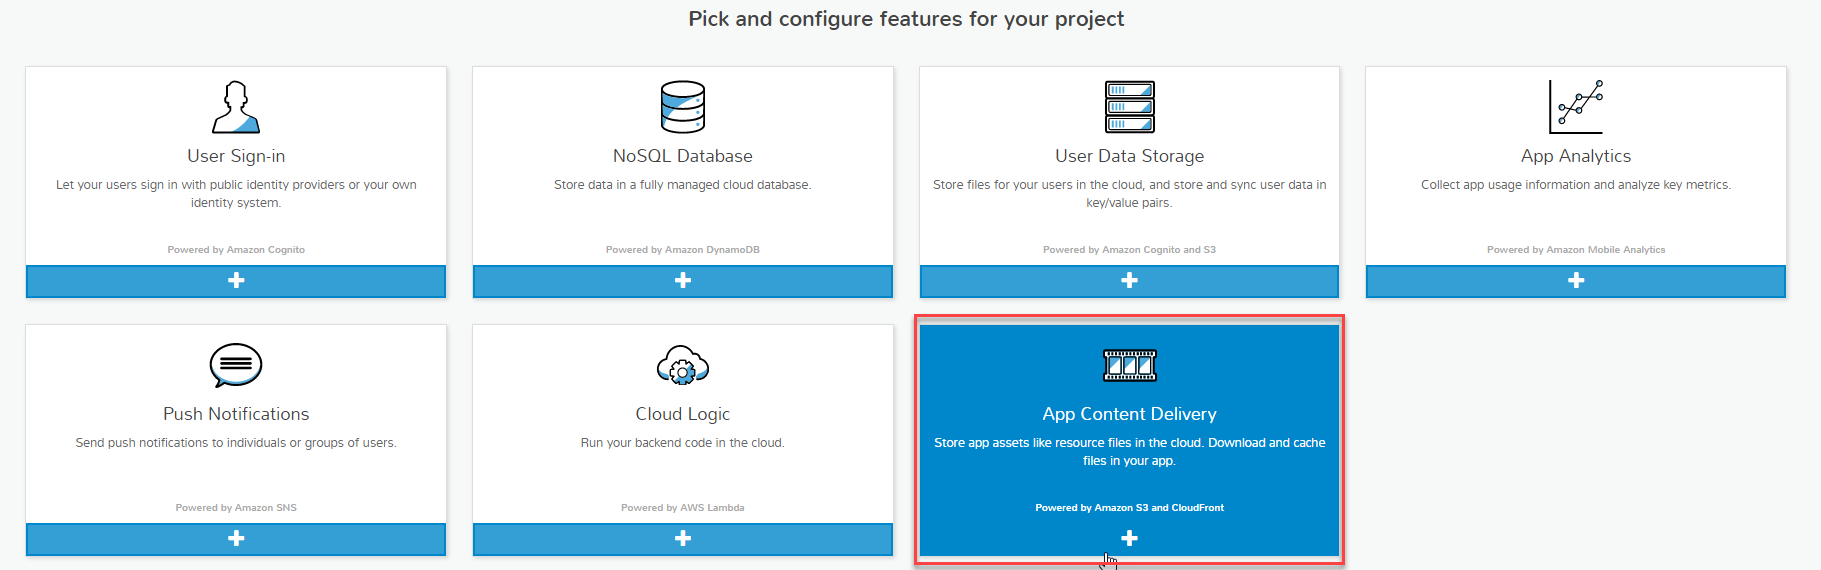
5.
Select Global CDN
and then choose Save changes. (Enable is the only option here – 10/30/2018)

6. Select Configure more features button so we can enable one additional feature.
7. Select Cloud Logic.

8. Select Create new API.

9. Provide the following properties to create your Cloud Logic API.
- API name: encoder
- Description: Encoding Job Trigger
- Change path to: /encoder
- Change Lambda function name to: encoderHandler
- Select Create API

Wait for the API to finish deploying…

10. Select Integrate from the left panel. (NO LONGER AVAILABLE – 10/30/2018)

From the integration tab, make sure iOS Swift is selected and that you are in the Getting Started section.
11. Select the iOS Swift tab and select Download a sample app to download your iOS Swift project source code. We’ll run this project in Xcode in a later step. Note: You may have to wait a few minutes for Cloud Logic API finalize deployment before you can download the sample app project code.

Done. You now have all of your AWS resources configured and the custom-built iOS Swift source code project is downloaded and ready.
What did we just do?
First, you created a new project in AWS Mobile Hub. Note that, for each Mobile Hub project created, an Amazon Cognito identity pool is created on your behalf, regardless of which features are enabled. For this tutorial, we are only utilizing Amazon Cognito, giving permission to list the content of the S3 bucket that you are using as the source for streaming media.
After the project was created with the default Amazon Cognito identity pool, you then enabled the App Content Delivery and Cloud Logic features in your Mobile Hub project.
The App Content Delivery feature first creates an Amazon S3 bucket to store media content and creates a policy within the AWS Identity and Access Management (IAM) role that grants your users access to list all content in your Amazon S3 bucket when they launch the app. Within the S3 bucket, Mobile Hub has uploaded five sample images (e.g., example-image-1.png).
The Cloud Logic feature created an “encoder” API with a Node.js Lambda function along with its own IAM role that allows the Lambda function to call other AWS services such as Amazon Elastic Transcoder. This Lambda function will become your HLS Amazon Elastic Transcoding encoding job creator when new videos are uploaded to your origin S3 bucket via an S3 Event.
Finally, you downloaded the generated project source code to run the Mobile Hub sample app demonstrating the features you just configured.
How does the sample app work? (NO LONGER AVAILABLE – 10/30/2018)
You’ll open the iOS Swift project source project in Xcode to build and run the sample app. Upon first launch of the app, that user is given a unique unauthenticated Amazon Cognito Identity. The user then selects the App Content Delivery feature that lists the sample images from your S3 bucket you just configured. From this demo, the user can choose to Open Remote or Download the sample image. For Open Remote, the image is actually cached from S3, downloaded directly from CloudFront, and viewed in the provided WebViewController. For Download, the app downloads the cached content from CloudFront and caches it locally on the device. You can then open the image offline because it’s now stored on the device.
After running through a few more steps below, you’ll re-launch the app and instead of selecting the sample image, select the HLS master playlist (.m3u8 file) from the list. The app will begin streaming the cached HLS movie natively from your CloudFront Web Distribution using the iOS MoviePlayerController on the device.
Step 2 – Stage Video Content and Encoding Service
In this step, you’ll be doing some backend provisioning to set the stage for storing video content on S3, triggering encoding jobs via Lambda, and creating an Amazon Elastic Transcoder pipeline to transcode our HD video into HTTP Live Streaming (HLS) segments.
This step is broken into five important tasks and we’ll walk you through each one now.
A. Create an Elastic Transcoder Pipeline
Launch the Elastic Transcoder Management Console in the same region as your Mobile Hub project and select Create New Pipeline.
![]()
For the bucket locations, choose the App Content Delivery S3 bucket that was created by Mobile Hub. The field should auto-populate a list of your S3 buckets, taking any guess work away. Leave the default setting for IAM Role and set Storage Class to Standard. Your new pipeline configuration should look something like below. The Notifications and Encryption section can be ignored for this tutorial.
WARNING: Since we are automating this process using S3 events triggering Lambda to create transcoder jobs, you should always specify a different OUTPUT S3 bucket to hold the finalized Transcoded Files! This is why the suffix reference above was so important to avoid run-away recursion in Lambda where newly encoded videos are uploaded to the same S3 bucket. For this tutorial, we are going against this recommendation to simplify the workflow for demonstration purposes. :)

Once you have provided the details, select the Create Pipeline button on the lower right. You just created a new Elastic Transcoder Pipeline.
Save for later: Copy the Pipeline ID from the Pipelines Summary as we’ll reference this in your Lambda function in the next task.

B. Modify the “encoder” Lambda function.
You enabled Cloud Logic earlier, which created a Lambda function within your project. You are now going to overwrite that default function code with the provided Lambda code below.
First, go back to your Mobile Hub project and select Resources from the left navigation and then select the “encoderHandler” link from the AWS Lambda Functions card to launch the function in the AWS Lambda console.

The code editor that appears for the encoder function should look something like this.
//
// Copyright 2016 Amazon.com, Inc. or its affiliates (Amazon). All Rights Reserved.
//
// Code generated by AWS Mobile Hub. Amazon gives unlimited permission to
// copy, distribute and modify it.
//

'use strict';
console.log("Loading function");

exports.handler = function(event, context, callback) {
    var responseCode = 200;
    var requestBody, pathParams, queryStringParams, headerParams, stage,
    stageVariables, cognitoIdentityId, httpMethod, sourceIp, userAgent,
    requestId, resourcePath;
    console.log("request: " + JSON.stringify(event));

    // Request Body
    requestBody = event.body;

    if (requestBody !== undefined && requestBody !== null) {

        // Set 'test-status' field in the request to test sending a specific response status code (e.g., 503)
        responseCode = JSON.parse(requestBody)['test-status'];
    }
...
You are now going to overwrite the “encoder” API code from above with the starter code below. Just copy this code below and paste it into the Lambda function code editor.
//Author: Dennis Hills
//Date: March 15, 2017
//Purpose: HLS Streaming mobile blog
//Requirements: An Elastic Transcoder Pipeline

var aws = require('aws-sdk');
var elastictranscoder = new aws.ElasticTranscoder();

// return filename without extension
function baseName(path) {
   return path.split('/').reverse()[0].split('.')[0];
}

exports.handler = function(event, context) {
    console.log('Received event:', JSON.stringify(event, null, 2));
    var key = event.Records[0].s3.object.key;
    var outputPrefix = baseName(key) + '-' + Date.now().toString();

    var params = {
      Input: {
        Key: key
      },
      PipelineId: '1476775662902-2dp0az', /*Your Elastic Transcoder Pipeline Id*/
      OutputKeyPrefix: 'HLS/' + outputPrefix,
      Outputs: [
        {
          Key: '/output/2M',
          PresetId: '1351620000001-200015', // HLS v3 and v4 (Apple HTTP Live Streaming), 2 megabits/second, Video-only
          SegmentDuration: '10',
        },
        {
          Key: '/output/15M',
          PresetId: '1351620000001-200025', // HLS v3 and v4 (Apple HTTP Live Streaming), 1.5 megabits/second, Video-only
          SegmentDuration: '10',
        },
        {
          Key: '/output/1M',
          PresetId: '1351620000001-200035', // HLS v3 and v4 (Apple HTTP Live Streaming), 1 megabit/second, Video-only
          SegmentDuration: '10',
        },
        {
          Key: '/output/600k',
          PresetId: '1351620000001-200045', // HLS v3 and v4 (Apple HTTP Live Streaming), 600 kilobits/second, Video-only
          SegmentDuration: '10',
        },
        {
          Key: '/output/400k',
          PresetId: '1351620000001-200055', // HLS v3 and v4 (Apple HTTP Live Streaming), 400 kilobits/second, Video-only
          SegmentDuration: '10',
        },
        {
          Key: '/output/aud',
          PresetId: '1351620000001-200060', // AUDIO ONLY: HLS v3 and v4 Audio, 160 k
          SegmentDuration: '10',
        }
      ],
      Playlists: [
        {
            Format: 'HLSv4',
            Name:  '/' + baseName(key) + '-master-playlist',
            OutputKeys: [ '/output/2M', '/output/15M', '/output/1M','/output/600k', '/output/400k', '/output/aud']
        }
      ]
    };

    elastictranscoder.createJob(params, function(err, data) {
      if (err) console.log(err, err.stack); // an error occurred
      else     console.log(data);           // successful response
    });
};
Critical Step: Before saving the Lambda code, change the PipelineId to your Elastic Transcoder Pipeline Id that you copied in the previous task. That is the only code change needed for this Lambda function. Select Save.

C. Create a Lambda trigger to respond to S3 events
From the Lambda Console with your function selected, select the Triggers tab.

Select S3 as your trigger type and provide the following details as shown.Bucket: Select your content Content Delivery S3 bucket
- Event Type: Object Created (All)
- Prefix: <leave blank>
- *Suffix: mp4
- Submit

*Please Note*: The Suffix is really important here. The suffix is stating that this Lambda function should only be invoked by S3 when an object is uploaded to S3 with an mp4 extension. Otherwise, you would trigger this encoder for all the file types uploaded to this bucket. Put in a suffix that matches your incoming video type (e.g. avi, mov, mpg, mp4). Also, only put ONE suffix into a single trigger. If you want to whitelist more than one suffix, add another trigger with a different suffix.
That’s it for creating an S3 event to trigger the Lambda function.
How does this S3 event trigger work? Whenever you upload a video (with a suffix matching your filter) into the S3 bucket, S3 will invoke (S3 has permission to invoke this function based on the auto-generated function policy) your encoder Lambda function and passes the video filename (and other attributes) to this function. Lambda then starts the transcoding job(s) to convert the uploaded video into HLS segments for streaming. Automation, baby!
D. Allow Lambda to create Elastic Transcoder Jobs.
By default, your encoder function was created with a limited IAM execution role as it was intended to only return your request back to you for demonstration purposes. Now, we need to allow Lambda to call the Elastic Transcoder Service.
Go back to your Mobile Hub project and select Resources from the left navigation pane and then select the Lambda Execution Role to launch the role in the IAM console.

In the IAM console for the Lambda Execution role, select Edit Policy under the Inline Policy section as shown.

Within this policy, we are adding permission to call the Amazon Elastic Transcoder CreateJob API. Copy the statement below and paste it into the policy as shown. The highlighted yellow area is the newly appended action after pasting into the policy document editor for the lambdaexecution policy.
{ "Effect": "Allow",
"Action": [
"ElasticTranscoder:CreateJob"
],
"Resource": "*"
}
Select Apply Policy. Now Lambda has access to create transcoding jobs within Elastic Transcoder when triggered by S3 after a new video is uploaded to your Content Delivery S3 bucket. Sweet!
E. Grant CloudFront read permissions by adding a bucket policy just for CloudFront.
For this task, you need to edit the origin configuration for your CloudFront Web Distribution so that it has permission to read from your content delivery S3 bucket for caching the newly transcoded files. By default, Mobile Hub creates the Web Distribution so that all objects in the S3 bucket (origin) need to be Public for the distribution to cache those files. Making this change keeps the restricted access to the S3 bucket but allows CloudFront to read objects without you having to manually update the object permissions in the bucket after each PUT or after transcoding.
Start by going to your Mobile Hub project resources and select the CloudFront Web Distribution.

Within the CloudFront console, select the Origins tab, then select the S3 bucket origin, and select Edit.

Configure the Origin Settings as shown in the following image and select Yes, Edit button on lower right (not shown).

Now CloudFront can access all the contents of your S3 bucket and cache upon request, while keeping your S3 content protected. That was the final task for Step 2.
What did we just do in Step 2?
You just completed Step 2 with five important tasks. Congratulations. It was a big step. In the first task, (A), you created and configured an Amazon Elastic Transcoder pipeline. This pipeline sets the stage for encoding jobs that will convert your videos into HLS segments. In the second task, (B), you modified the “encoder” Lambda function by pasting in the starter code and provided your Elastic Transcoder pipeline ID. In the third task, (C), you enabled an S3 event in your Content Delivery S3 bucket to trigger a Lambda function when you PUT new videos in the bucket. In the fourth task, (D), you modified the Lambda IAM execution policy, allowing it to call the Elastic Transcoder APIs. In the final task, (E), you modified the Origin Settings of the CloudFront Web Distribution, restricting access to your S3 bucket and allowing this distribution to read all contents within the S3 bucket to cache when requested.
Now that we have everything configured on the backend for storing, distributing, and encoding media content, you’ll focus on the client-side project code, upload a video, and start streaming!
Step 3 – Upload video to S3 and trigger HLS encoding
In this step, you’ll download a sample video and upload it to your Content Delivery S3 bucket to begin encoding it to HLS for streaming.
1. Download sample 1-minute HD video (approx. 388MB) here. You can skip this step if you want to upload your own video in the next step!
2. Upload the provided video (or your own .mov or .mp4) to your Content Delivery S3 bucket, using the S3 console here.
3. Select Upload.
4. Select Add Files.
5. Select the video you want to upload.
6. Select Start Upload.
Note: It may take several minutes to upload the video via the S3 console. If you have the AWS CLI or another S3 client, feel free to utilize any of those tools to speed up the process of uploading content to your S3 bucket.
What did we just do?
In this step you just uploaded a video to your Content Delivery S3 bucket. When the file upload completed, your S3 PUT event triggered the Lambda function to begin transcoding your video into HLS segments. For a 1-minute video, the transcoding of all the segments and playlists should be done in less than a minute.
What does the transcoding look like? Once transcoding is complete, you’ll see an HLS/ folder in your bucket and within that folder you’ll see a folder with the video filename, appended with a date string. Within that sub folder is the HLS 4 playlist (.m3u8) and an output/ folder containing all the encoded HLS segments.

Here’s what the output folder looks like, containing all the various bitrates, iframes, and playlists.

From the mobile app you are about to configure, you’ll select the master playlist (rafting-playlist.m3u8) from the S3 bucket list demo and the transcoded video will automatically begin streaming the cached video from CloudFront.
Step 4 – Modify sample app and stream HLS content
In this final step, you just need to make one small modification to the iOS Swift project source code so that it sees the .m3u8 file type as a video file. Remember downloading the source project in Step 1?
Start by opening the project code in Xcode on your Mac.
1. Unzip the iOS Swift project code you downloaded previously.

2. Open the sample app project in Xcode by double-clicking on the Xcode project, MySampleApp.xcodeproj, which is in the project folder.

3. Expand the project folders and open the ContentDeliveryViewController.swift class. Add the highlighted line as shown to your isAudioVideo() function. This allows the app to identify your HLS 4 playlist as video content.

4. Select build/run within Xcode to build and run the sample app.
5. At the main screen of the sample app, select App Content Delivery and then Demo Content Delivery.


7. Select the HLS/ folder and the newly encoded video folder.
8. Tap on the HLS playlist (.m3u8 file) and choose Open Remote.

The app will automatically start streaming the video choosing the correct bitrate for your connection speed. The app is using the default iOS MPMoviePLayerViewController and it does all the heavy lifting to determine the best way to stream the video content.

The magic is that you should experience the same playback quality and smoothness regardless of the network the device is connected to. Switching the app from Wi-Fi to cellular, the built-in player will auto-adjust and begin or continue playing the same video using one of the different bitrate variants you provided when transcoding the original source mp4 video into HLS.
Now, to really see the power of HLS encoded video, play around with the app connection (switching from Wi-Fi to cellular) and see how it performs.
More cool stuff to play with: To highlight the power of HLS streaming content from CloudFront, just select the original .mp4 video source and the app will automatically start playing the movie. If you have a modern device and great bandwidth, you may not notice much. However, try the same source video on another older device or over a slower connection. Doing this, you’ll see the device will have a hard time playing the video without lag, artifacts, or other unbearable viewing experiences. Repeat the same process by selecting the HLS master playlist and you should notice a significant difference in playability.
Planning to integrate this feature into your own app? No problem! In the next step, we’ll walk you through the Mobile Hub integration guide, helping you integrate all the code from the sample app into your own app.
Step 5 – Streaming HLS content to your own app
You just configured backend content delivery and ran our generated sample app to demonstrate the end-to-end functionality of this common mobile feature. To get the same functionality in your own app, use the Mobile Hub integration instructions specific to each mobile project you create.
Let’s get started.
Go back to your Mobile Hub project in the console and select Integrate. The integration instructions from Mobile Hub walk you through Getting Started. The instructions then describe each feature you enabled in your Mobile Hub project and how to integrate each of them into your own app.
Here’s a quick overview of Getting Started and additional instructions for integrating this project into your own application.
The Mobile Hub Getting Started integration instructions include:
- Download the Mobile SDK for iOS and custom source code provided
The download provides the latest SDK, Mobile Hub helper code, and example source code to get you started. - After downloading the SDK and helper code, drag and drop the Sdk folder contained in the download into your own project within Xcode. This assumes you already have an iOS Swift project of your own; if not, create a new one and follow along.
- Add the AWS SDKs as Embed Frameworks.
- Add Run Script phase to your project as directed.
- Copy the AmazonAws folder from the helper code to your project and add a group for it. This source code contains a customized helper framework that simplifies the use of all the SDKs that are required to support your project.
It also contains the AWSMobileClient.swift file, which bootstraps the app and creates an identity manager to establish the user identity with Amazon Cognito. - Copy the AWS dictionary from the integration Info.plist into your own project Info.plist. The AWS dictionary provides the CognitoIdentity poolId and region for your project.
- Add AWS iOS SDK dependencies, libsqlite3.tbd and libz.tbd, under Linked Frameworks and Libraries as directed.
- Set up your Application Delegate by returning the AWSMobileClient singleton as shown in the guide.
You are now done with the Getting Started section.
After you complete Getting Started, you can select App Content Delivery in the left panel of the integration instructions. Here, you just need to do the following:
- Copy the ContentManager key from the AWS dictionary in the integration Info.plist into your own project’s Info.plist. The AWS dictionary already provides all the CognitoIdentity pool IDs for your project as well as your Content Delivery S3 bucket and region.
- View or copy the example upload/download source code provided.
That’s it! You should now be able to run your own application and connect it to your AWS resources like we demonstrated using the sample app generated by AWS Mobile Hub.
Conclusion
You just configured a backend app content delivery feature via AWS Mobile Hub; generated a fully functional sample iOS app that demonstrates opening and streaming videos directly from your Amazon CloudFront CDN; and then walked through integrating the client code into your own app by connecting to the same backend resources demonstrated in the sample app.
Thanks and happy coding!