AWS Big Data Blog
Break down data silos and seamlessly query Iceberg tables in Amazon SageMaker from Snowflake
Organizations often struggle to unify their data ecosystems across multiple platforms and services. The connectivity between Amazon SageMaker and Snowflake’s AI Data Cloud offers a powerful solution to this challenge, so businesses can take advantage of the strengths of both environments while maintaining a cohesive data strategy.
In this post, we demonstrate how you can break down data silos and enhance your analytical capabilities by querying Apache Iceberg tables in the lakehouse architecture of SageMaker directly from Snowflake. With this capability, you can access and analyze data stored in Amazon Simple Storage Service (Amazon S3) through AWS Glue Data Catalog using an AWS Glue Iceberg REST endpoint, all secured by AWS Lake Formation, without the need for complex extract, transform, and load (ETL) processes or data duplication. You can also automate table discovery and refresh using Snowflake catalog-linked databases for Iceberg. In the following sections, we show how to set up this integration so Snowflake users can seamlessly query and analyze data stored in AWS, thereby improving data accessibility, reducing redundancy, and enabling more comprehensive analytics across your entire data ecosystem.
Business use cases and key benefits
The capability to query Iceberg tables in SageMaker from Snowflake delivers significant value across multiple industries:
- Financial services – Enhance fraud detection through unified analysis of transaction data and customer behavior patterns
- Healthcare – Improve patient outcomes through integrated access to clinical, claims, and research data
- Retail – Increase customer retention rates by connecting sales, inventory, and customer behavior data for personalized experiences
- Manufacturing – Boost production efficiency through unified sensor and operational data analytics
- Telecommunications – Reduce customer churn with comprehensive analysis of network performance and customer usage data
Key benefits of this capability include:
- Accelerated decision-making – Reduce time to insight through integrated data access across platforms
- Cost optimization – Accelerate time to insight by querying data directly in storage without the need for ingestion
- Improved data fidelity – Reduce data inconsistencies by establishing a single source of truth
- Enhanced collaboration – Increase cross-functional productivity through simplified data sharing between data scientists and analysts
By using the lakehouse architecture of SageMaker with Snowflake’s serverless and zero-tuning computational power, you can break down data silos, enabling comprehensive analytics and democratizing data access. This integration supports a modern data architecture that prioritizes flexibility, security, and analytical performance, ultimately driving faster, more informed decision-making across the enterprise.
Solution overview
The following diagram shows the architecture for catalog integration between Snowflake and Iceberg tables in the lakehouse.
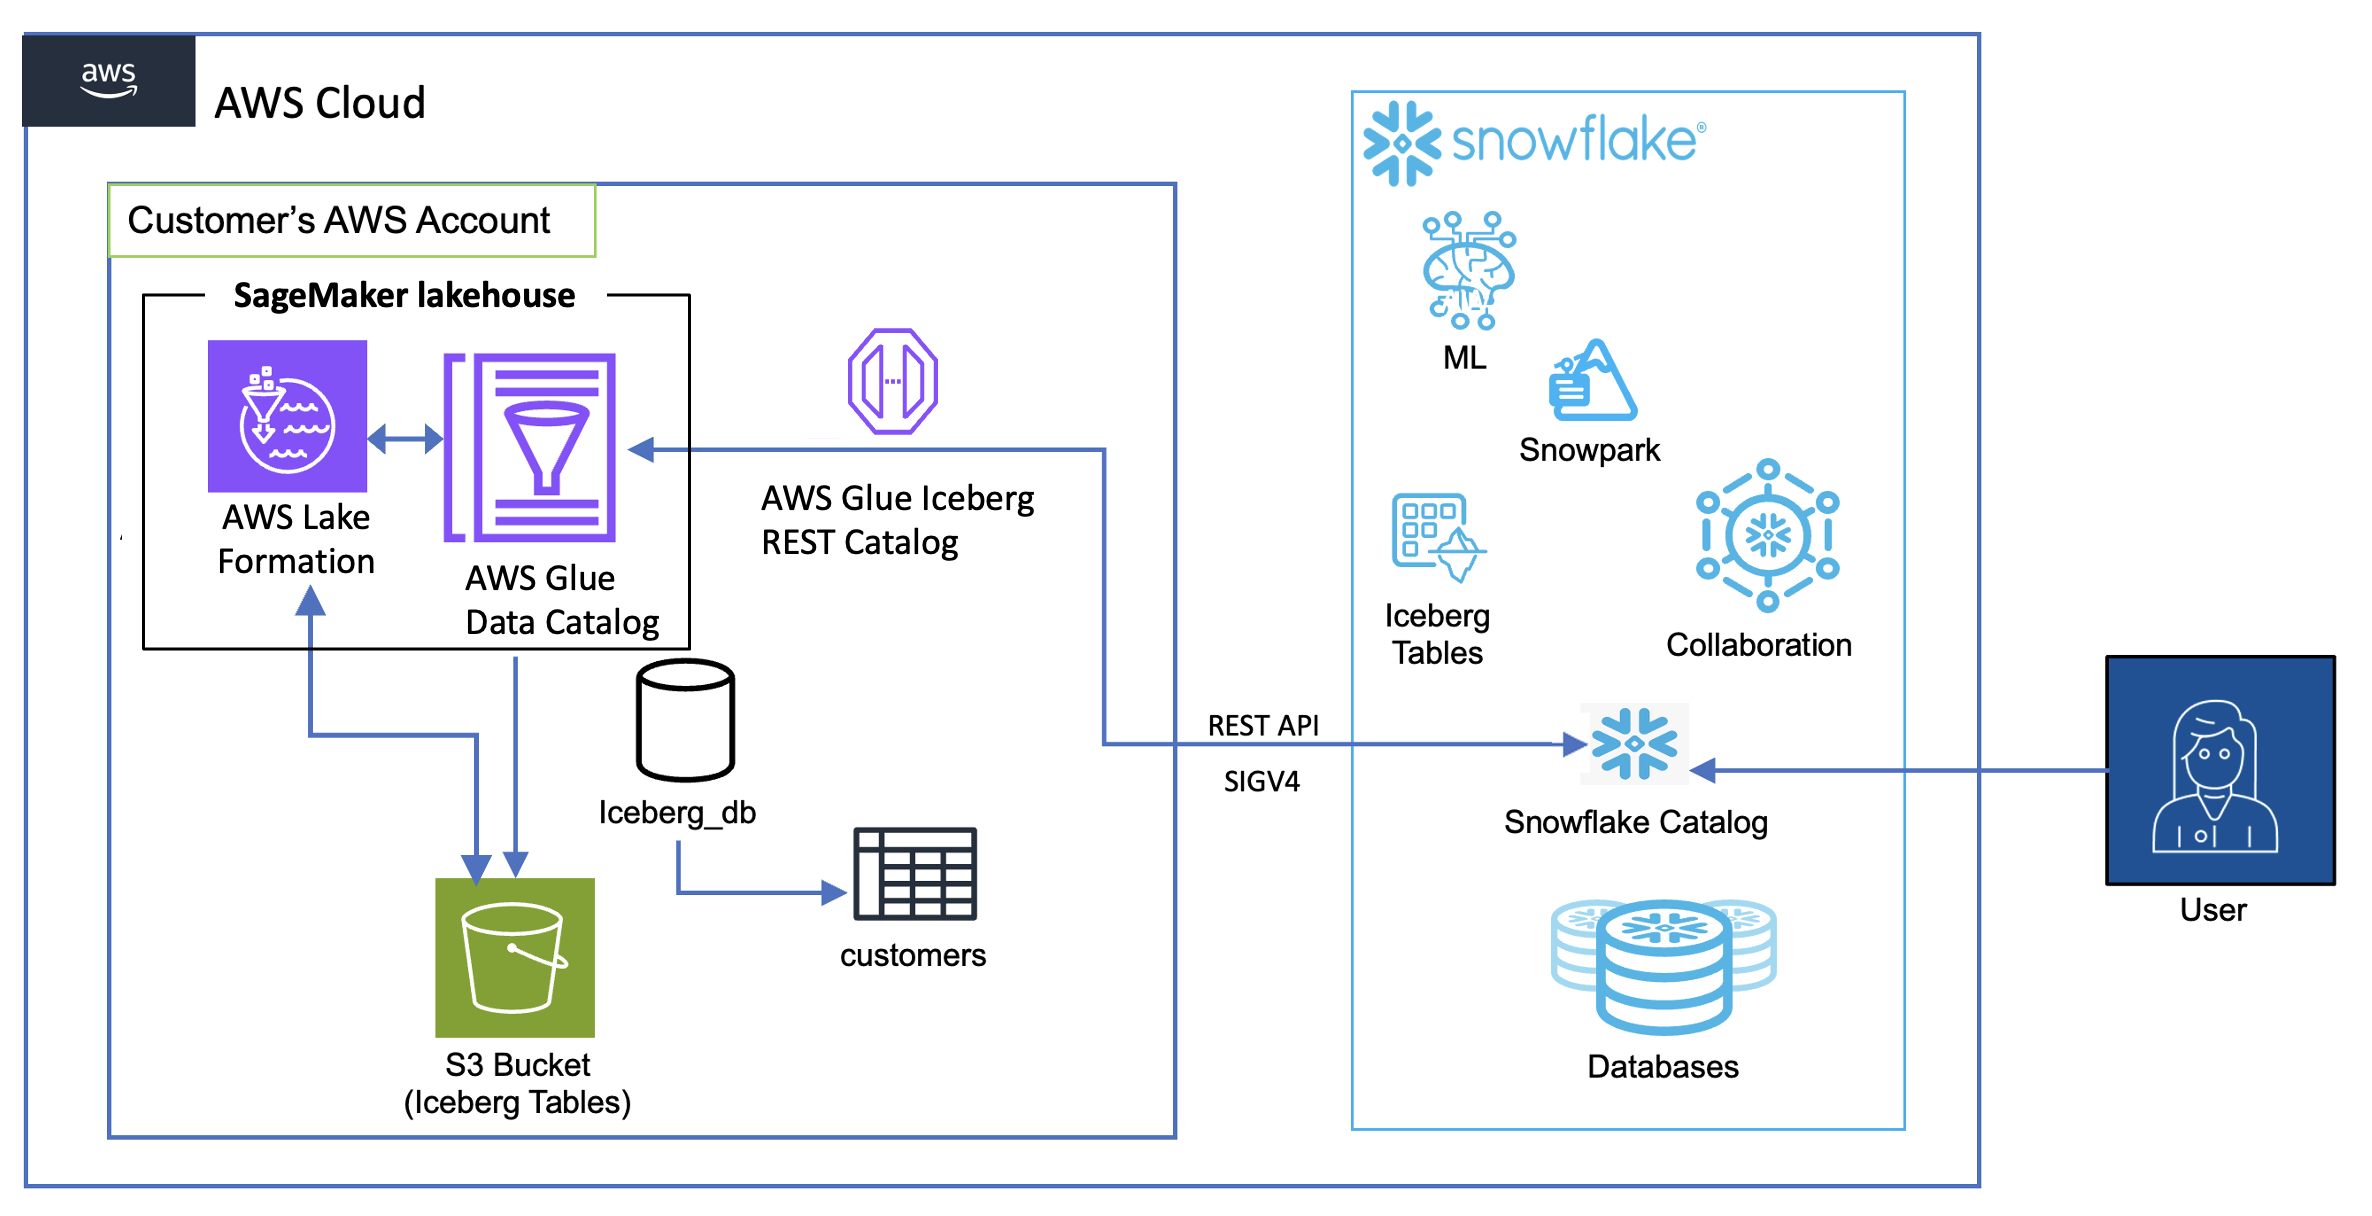
The workflow consists of the following components:
- Data storage and management:
- Amazon S3 serves as the primary storage layer, hosting the Iceberg table data
- The Data Catalog maintains the metadata for these tables
- Lake Formation provides credential vending
- Authentication flow:
- Snowflake initiates queries using a catalog integration configuration
- Lake Formation vends temporary credentials through AWS Security Token Service (AWS STS)
- These credentials are automatically refreshed based on the configured refresh interval
- Query flow:
- Snowflake users submit queries against the mounted Iceberg tables
- The AWS Glue Iceberg REST endpoint processes these requests
- Query execution uses Snowflake’s compute resources while reading directly from Amazon S3
- Results are returned to Snowflake users while maintaining all security controls
There are four patterns to query Iceberg tables in SageMaker from Snowflake:
- Iceberg tables in an S3 bucket using an AWS Glue Iceberg REST endpoint and Snowflake Iceberg REST catalog integration, with credential vending from Lake Formation
- Iceberg tables in an S3 bucket using an AWS Glue Iceberg REST endpoint and Snowflake Iceberg REST catalog integration, using Snowflake external volumes to Amazon S3 data storage
- Iceberg tables in an S3 bucket using AWS Glue API catalog integration, also using Snowflake external volumes to Amazon S3
- Amazon S3 Tables using Iceberg REST catalog integration with credential vending from Lake Formation
In this post, we implement the first of these four access patterns using catalog integration for the AWS Glue Iceberg REST endpoint with Signature Version 4 (SigV4) authentication in Snowflake.
Prerequisites
You must have the following prerequisites:
- A Snowflake account.
- An AWS Identity and Access Management (IAM) role that is a Lake Formation data lake administrator in your AWS account. A data lake administrator is an IAM principal that can register Amazon S3 locations, access the Data Catalog, grant Lake Formation permissions to other users, and view AWS CloudTrail. See Create a data lake administrator for more information.
- An existing AWS Glue database named
iceberg_dband Iceberg table namedcustomerwith data stored in an S3 general purpose bucket with a unique name. To create the table, refer to the table schema and dataset. - A user-defined IAM role that Lake Formation assumes when accessing the data in the aforementioned S3 location to vend scoped credentials (see Requirements for roles used to register locations). For this post, we use the IAM role
LakeFormationLocationRegistrationRole.
The solution takes approximately 30–45 minutes to set up. Cost varies based on data volume and query frequency. Use the AWS Pricing Calculator for specific estimates.
Create an IAM role for Snowflake
To create an IAM role for Snowflake, you first create a policy for the role:
- On the IAM console, choose Policies in the navigation pane.
- Choose Create policy.
- Choose the JSON editor and enter the following policy (provide your AWS Region and account ID), then choose Next.
- Enter
iceberg-table-accessas the policy name. - Choose Create policy.
Now you can create the role and attach the policy you created.
- Choose Roles in the navigation pane.
- Choose Create role.
- Choose AWS account.
- Under Options, select Require External Id and enter an external ID of your choice.
- Choose Next.
- Choose the policy you created (
iceberg-table-access policy). - Enter
snowflake_access_roleas the role name. - Choose Create role.
Configure Lake Formation access controls
To configure your Lake Formation access controls, first set up the application integration:
- Sign in to the Lake Formation console as a data lake administrator.
- Choose Administration in the navigation pane.
- Select Application integration settings.
- Enable Allow external engines to access data in Amazon S3 locations with full table access.
- Choose Save.
Now you can grant permissions to the IAM role.
- Choose Data permissions in the navigation pane.
- Choose Grant.
- Configure the following settings:
- For Principals, select IAM users and roles and choose
snowflake_access_role. - For Resources, select Named Data Catalog resources.
- For Catalog, choose your AWS account ID.
- For Database, choose
iceberg_db. - For Table, choose
customer. - For Permissions, select SUPER.
- For Principals, select IAM users and roles and choose
- Choose Grant.
SUPER access is required for mounting the Iceberg table in Amazon S3 as a Snowflake table.
Register the S3 data lake location
Complete the following steps to register the S3 data lake location:
- As data lake administrator on the Lake Formation console, choose Data lake locations in the navigation pane.
- Choose Register location.
- Configure the following:
- For S3 path, enter the S3 path to the bucket where you will store your data.
- For IAM role, choose
LakeFormationLocationRegistrationRole. - For Permission mode, choose Lake Formation.
- Choose Register location.
Set up the Iceberg REST integration in Snowflake
Complete the following steps to set up the Iceberg REST integration in Snowflake:
- Log in to Snowflake as an admin user.
- Execute the following SQL command (provide your Region, account ID, and external ID that you provided during IAM role creation):
- Execute the following SQL command and retrieve the value for
API_AWS_IAM_USER_ARN:
DESCRIBE CATALOG INTEGRATION glue_irc_catalog_int;
- On the IAM console, update the trust relationship for
snowflake_access_rolewith the value forAPI_AWS_IAM_USER_ARN:
- Verify the catalog integration:
SELECT SYSTEM$VERIFY_CATALOG_INTEGRATION('glue_irc_catalog_int');
- Mount the S3 table as a Snowflake table:
Query the Iceberg table from Snowflake
To test the configuration, log in to Snowflake as an admin user and run the following sample query:SELECT * FROM s3iceberg_customer LIMIT 10;
Clean up
To clean up your resources, complete the following steps:
- Delete the database and table in AWS Glue.
- Drop the Iceberg table, catalog integration, and database in Snowflake:
Make sure all resources are properly cleaned up to avoid unexpected charges.
Conclusion
In this post, we demonstrated how to establish a secure and efficient connection between your Snowflake environment and SageMaker to query Iceberg tables in Amazon S3. This capability can help your organization maintain a single source of truth while also letting teams use their preferred analytics tools, ultimately breaking down data silos and enhancing collaborative analysis capabilities.
To further explore and implement this solution in your environment, consider the following resources:
- Technical documentation:
- Review the Amazon SageMaker Lakehouse User Guide
- Explore Security in AWS Lake Formation for best practices to optimize your security controls
- Learn more about Iceberg table format and its benefits for data lakes
- Refer to Configuring secure access from Snowflake to Amazon S3
- Related blog posts:
These resources can help you to implement and optimize this integration pattern for your specific use case. As you begin this journey, remember to start small, validate your architecture with test data, and gradually scale your implementation based on your organization’s needs.