AWS Big Data Blog
Enterprise scale in-place migration to Apache Iceberg: Implementation guide
Organizations managing large-scale analytical workloads increasingly face challenges with traditional Apache Parquet-based data lakes with Hive-style partitioning, including slow queries, complex file management, and limited consistency guarantees. Apache Iceberg addresses these pain points by providing ACID transactions, seamless schema evolution, and point-in-time data recovery capabilities that transform how enterprises handle their data infrastructure.
In this post, we demonstrate how you can achieve migration at scale from existing Parquet tables to Apache Iceberg tables. Using Amazon DynamoDB as a central orchestration mechanism, we show how you can implement in-place migrations that are highly configurable, repeatable, and fault-tolerant—unlocking the full potential of modern data lake architectures without extensive data movement or duplication.
Solution overview
When performing in-place migration, Apache Iceberg uses its ability to directly reference existing data files. This capability is only supported for formats such as Parquet, ORC, and Avro, because these formats are self-describing and include consistent schema and metadata information. Unlike raw formats such as CSV or JSON, they enforce structure and support efficient columnar or row-based access, which allows Iceberg to integrate them without rewriting the data.
In this post, we demonstrate how you can migrate an existing Parquet-based data lake that isn’t cataloged in AWS Glue by using two methodologies:
- Apache Iceberg migrate and
register_tableapproach. Ideal for converting existing Hive-registered Parquet tables into Iceberg-managed tables. - Iceberg
add_filesapproach. Best suited for quickly onboarding raw Parquet data into Iceberg without rewriting files.
The solution also incorporates a DynamoDB table that acts as a scalable control plane, so you can perform in-place migration of your data lake from Parquet format to Iceberg format.
The following diagram shows different methodologies that you can use to achieve this in-place migration of your Hive-style partitioned data lake:
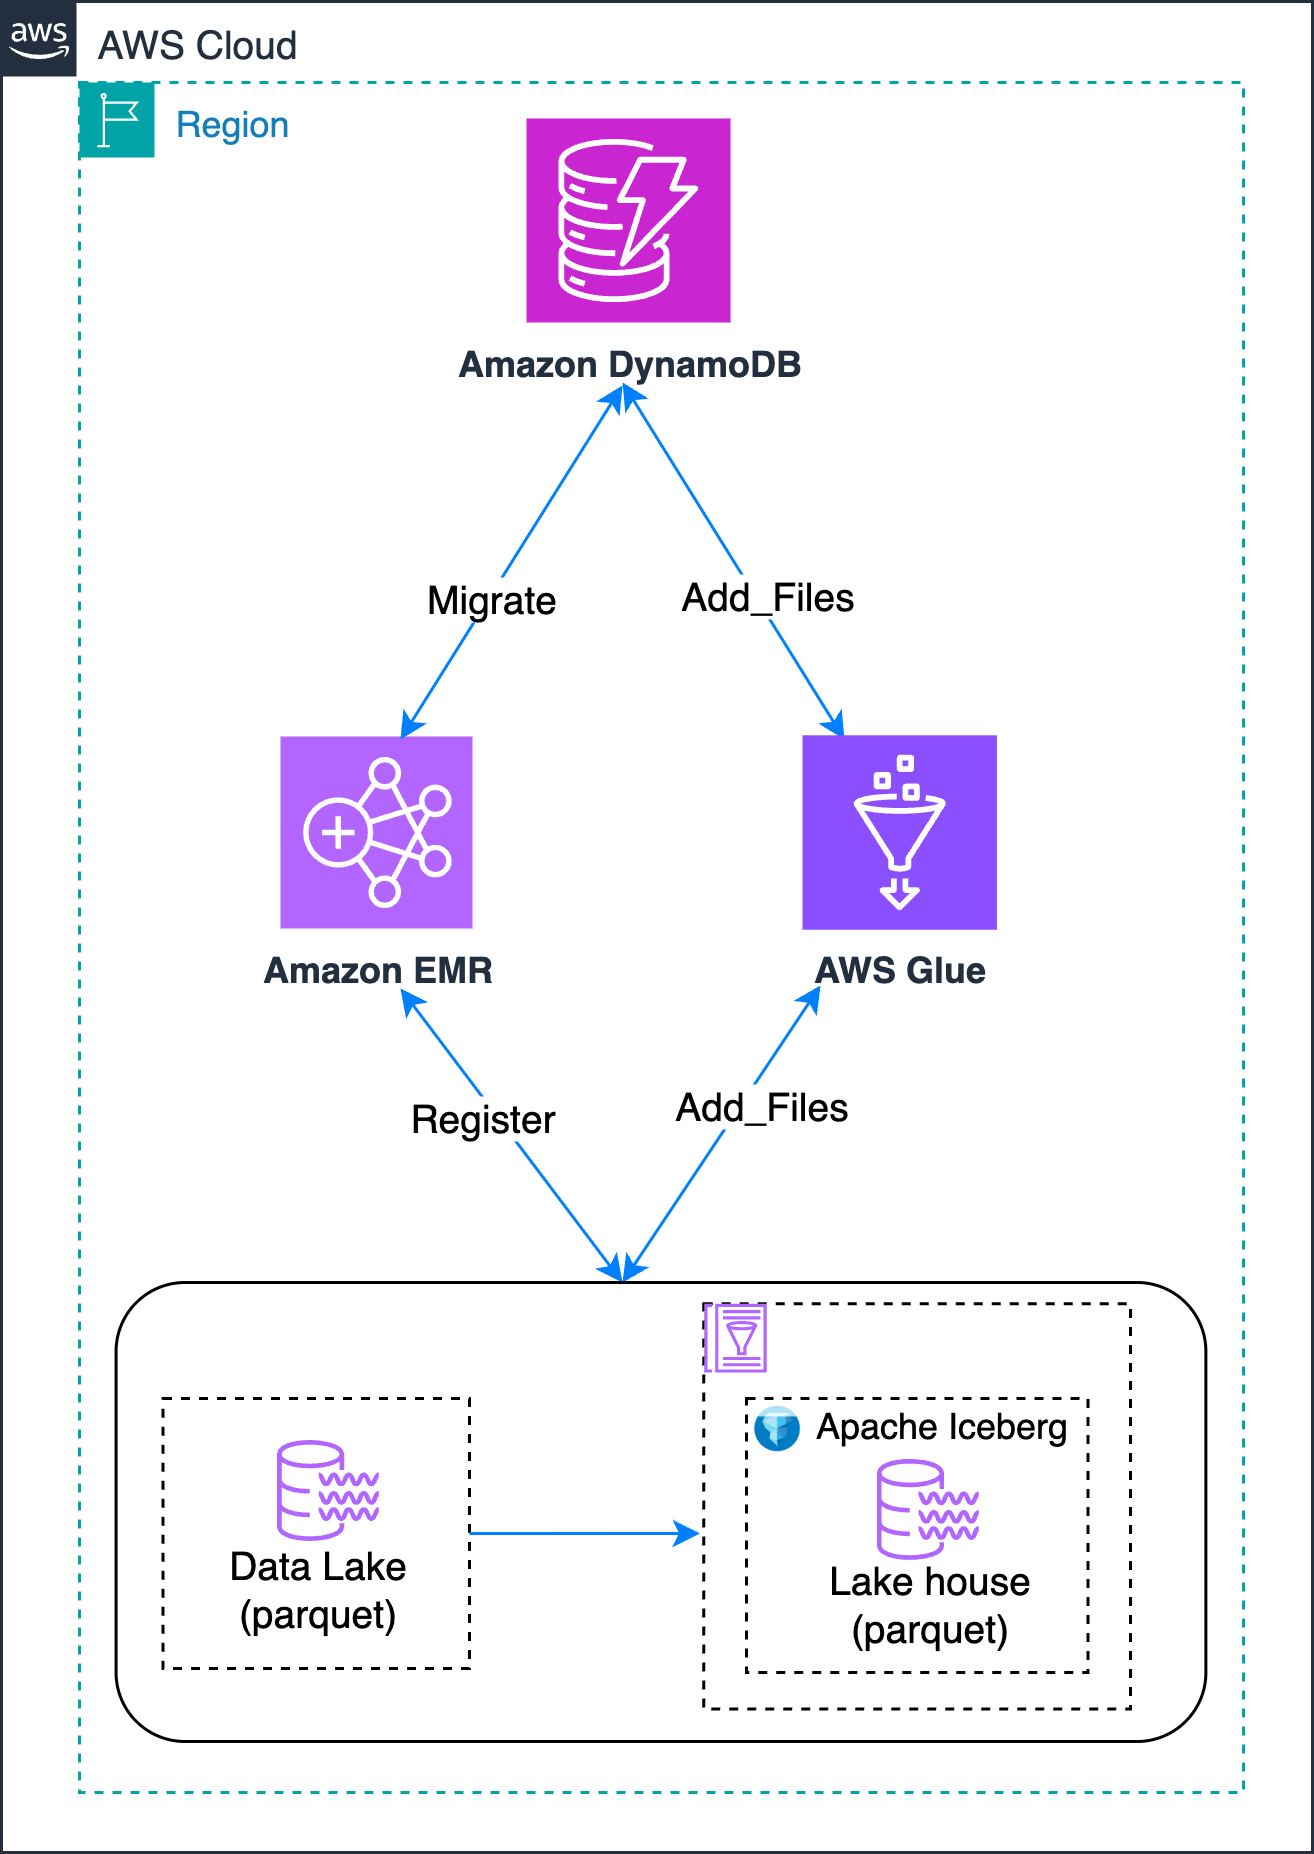
You use DynamoDB to track the migration state, handling retries and recording errors and outcomes. This provides the following benefits:
- Centralized control over which Amazon Simple Storage Service (Amazon S3) paths need migration.
- Lifecycle tracking of each dataset through migration stages.
- Capture and audit errors on a per-path basis.
- Enable re-runs by updating stateful flags or clearing failure messages.
Prerequisites
Before you begin, you need:
- An AWS account
- AWS Command Line Interface (AWS CLI) installed
- AWS Identity and Access Management (IAM) permissions to access Amazon DynamoDB, Amazon EMR, and AWS Glue
- An existing or new Amazon Virtual Private Cloud (Amazon VPC) to Amazon EMR clusters
- Amazon Athena access with a workgroup configured and the query results location (Amazon S3) set
- An Amazon EMR cluster using Hive as the metastore, with SSH access. (See Appendix A for setup instructions.)
- An Amazon EMR cluster or Amazon EMR Serverless environment using AWS Glue Data Catalog as the Spark metastore, with SSH access. (See Appendix B for setup instructions.)
- For AWS Glue exchange, transform, and load (ETL), use Glue 4.0 or later.
Create sample Parquet dataset as a source
You can create the sample Parquet dataset for testing the different methodologies using the Athena query editor. Replace <amzn-s3-demo-bucket> with an available bucket in your account.
- Create an AWS Glue database(
test_db), if not present. - Create a sample Parquet table (
table1) and add to be used for testing theadd_filesapproach. - Create a sample Parquet table (
table2) and add data to be used for testing the migrate andregister_tableapproach. Replace<amzn-s3-demo-bucket>with your bucket name. - Drop the tables from the Data Catalog because you only need Parquet data with the Hive-style partitioning structure.
Create a DynamoDB control table
Before beginning the migration process, you must create a DynamoDB table that serves as the control plane. This table maps source Amazon S3 paths to their corresponding Iceberg database and table destinations, enabling systematic tracking of the migration process.
To implement this control mechanism, create a table with the following structure:
- A primary key
s3_paththat stores the source Parquet data location - Two attributes that define the target Iceberg location:
target_db_nametarget_table_name
To create the DynamoDB control table
- Create the Amazon DynamoDB table using the following AWS CLI command:
- Verify the table is created successfully. Replace
<REGION>with the AWS Region where your data is stored: - Create a
migration_data.jsonfile with the following contents.
In this example:- Replace
<amzn-s3-demo-bucket>and<TablePrefix>with the name of your S3 bucket and prefix containing the Parquet data - Replace
<DatabaseName>with the name of your target Iceberg database - Replace
<TableName>with the name of your target Iceberg table
This file defines the mapping between Amazon S3 paths and their corresponding Iceberg table destinations.
- Replace
- Run the following CLI command to load the DynamoDB control table.
Migration methodologies
In this section, you explore two methodologies for migrating your existing Parquet tables to Apache Iceberg format:
- Apache Iceberg migrate and register_table approach – This approach first converts your Parquet table to Iceberg format using the native migrate procedure, followed by registering it in AWS Glue using the
register_tableprocedure. - Apache Iceberg add_files approach – This method creates an empty Iceberg table and uses the
add_filesprocedure to import existing Parquet data files without physically moving them.
Apache Iceberg migrate and register_table procedure
Use the Apache Iceberg Migrate procedure that is used for in-place conversion of an existing Hive or Parquet table into an Iceberg-managed table. Thereafter, you can use the Apache Iceberg RegisterTable procedure to register the respective table in AWS Glue.
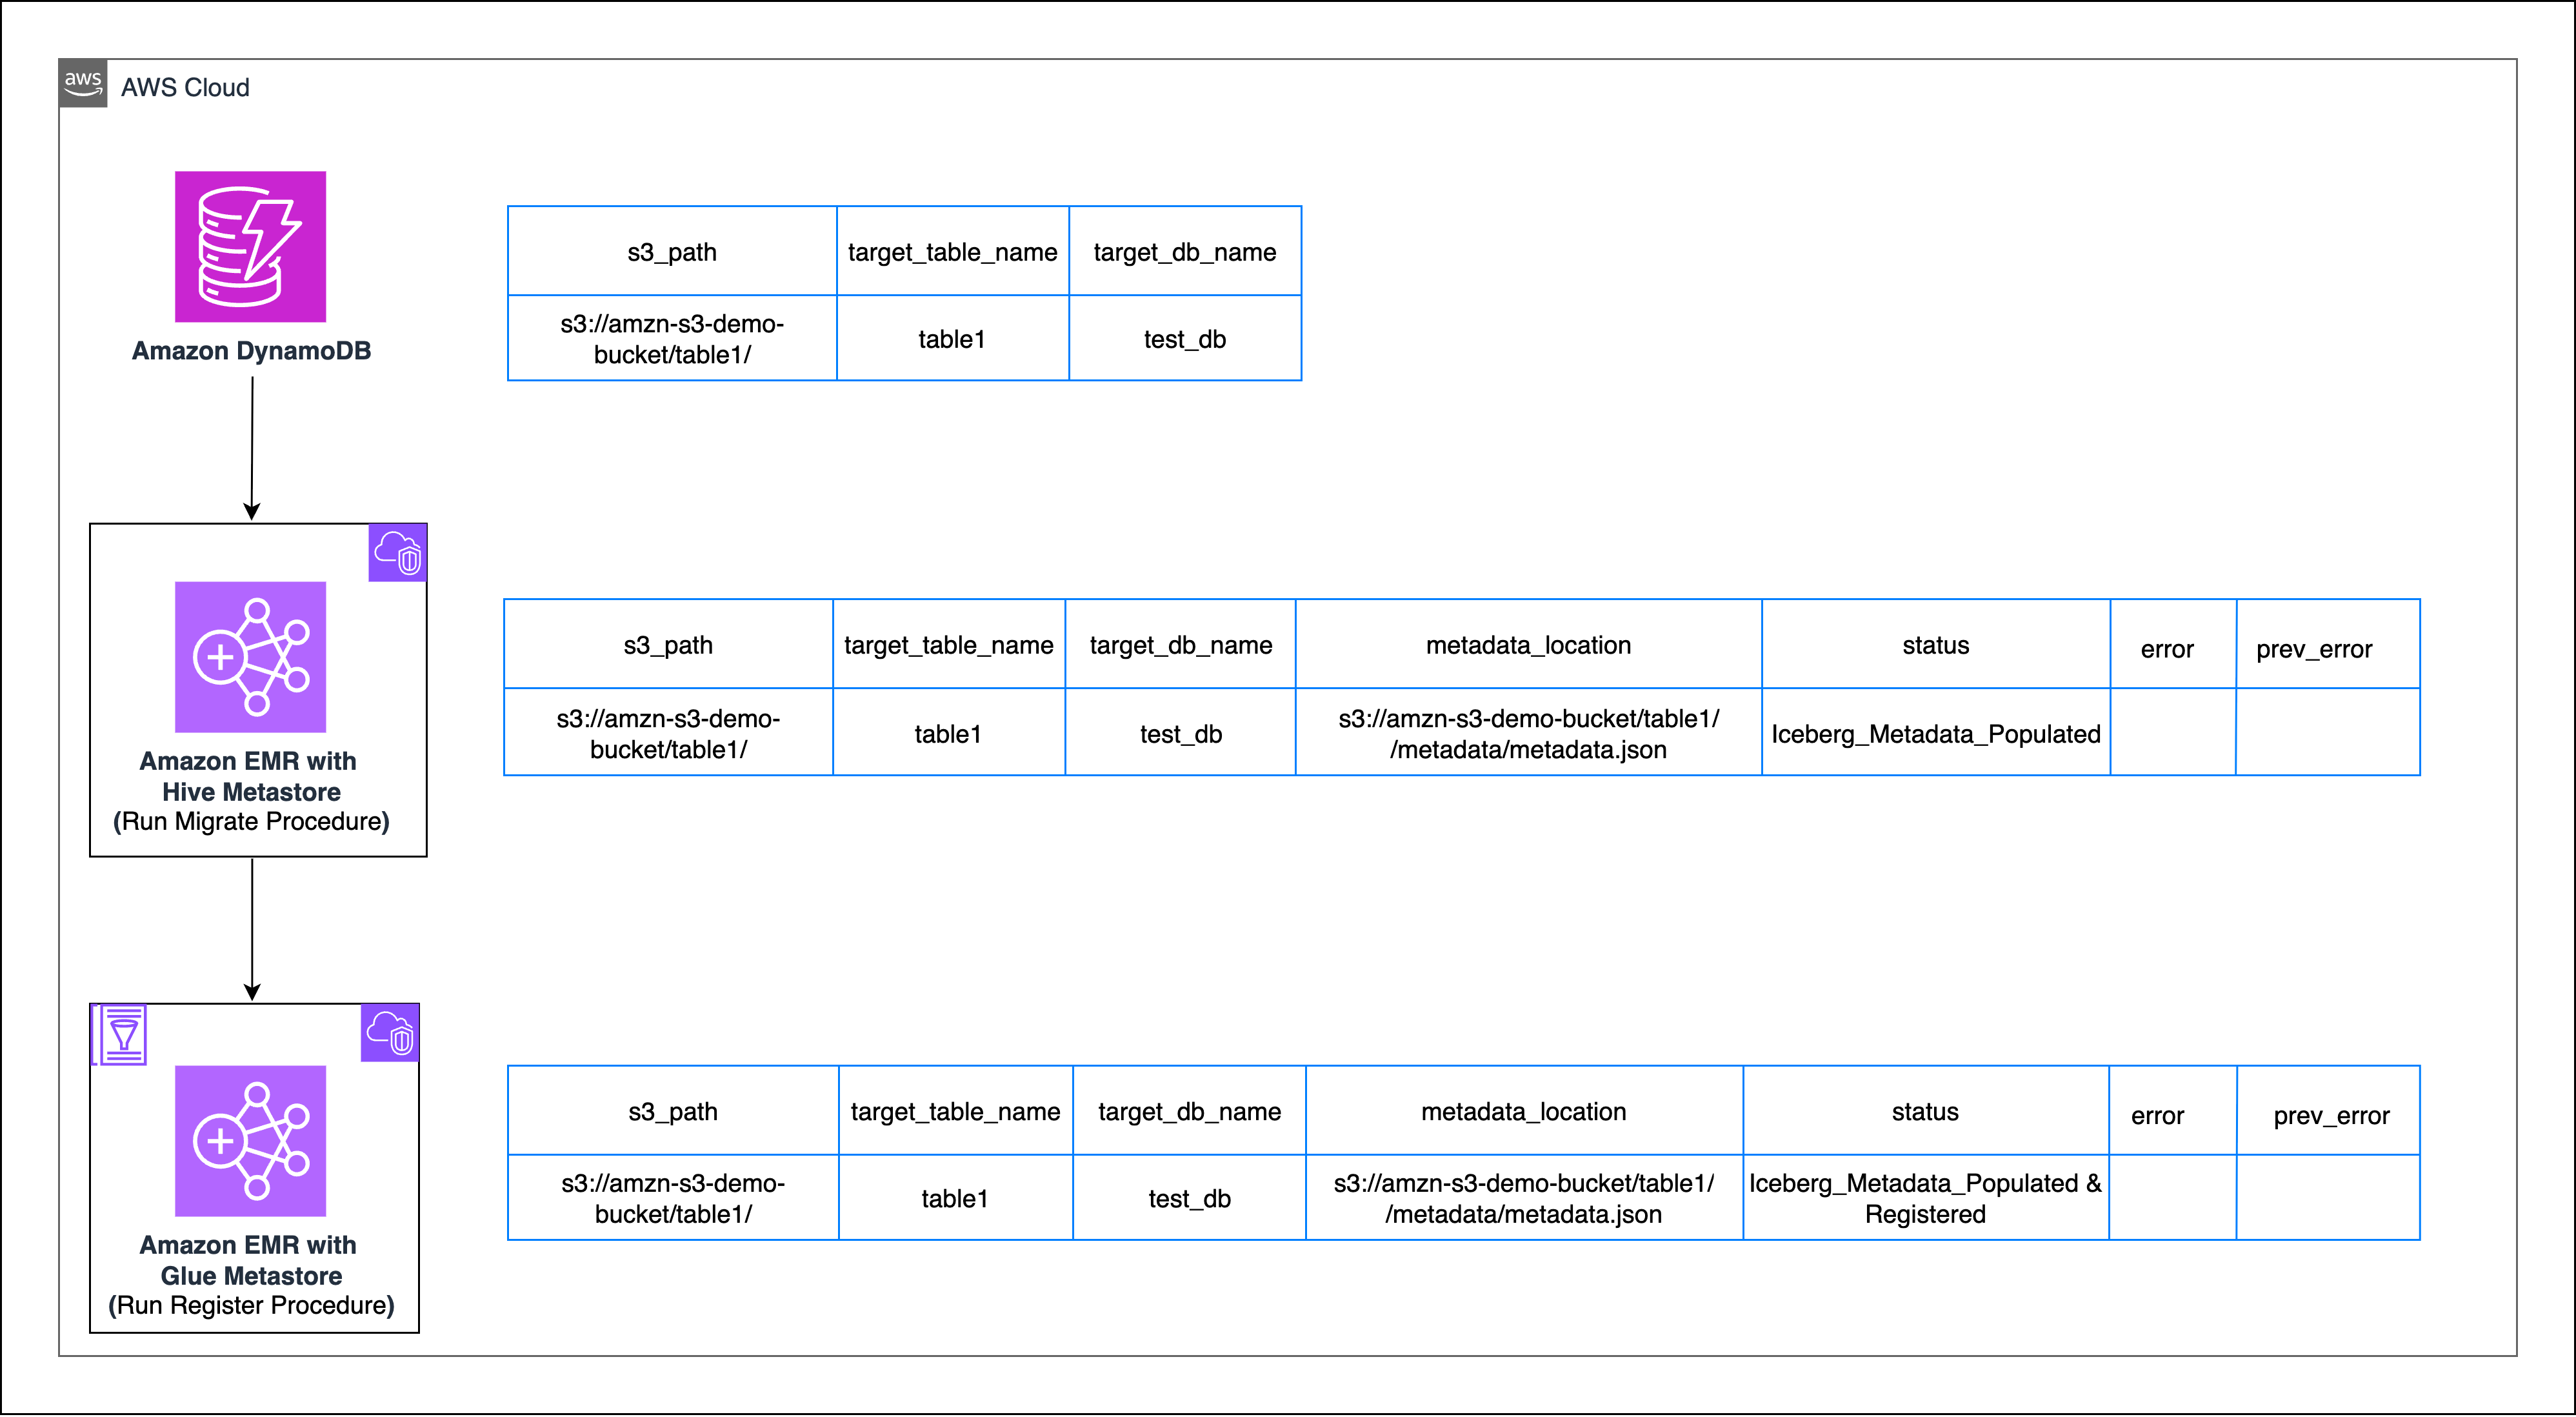
Migrate
- In your EMR cluster with Hive as the metastore, create a PySpark session with the following Iceberg Packages:
This post uses Iceberg v1.9.1 (Amazon EMR build), which is native to Amazon EMR 7.11. Always verify the latest supported version and update package coordinates accordingly.
- Next, create your corresponding table in your Hive catalog (you can skip this step if you already have tables created in your hive catalog). Replace
<amzn-s3-demo-bucket>with the name of your S3 bucket.
In the following snippet, change or remove thePARTITIONED BYcommand based on the partition strategy of your table, theMSCK Repair tablecommand should only be run if your respective table is partitioned. - Convert the Parquet table to an Iceberg table in Hive
Run the migrate command to convert the Parquet-based table to an Iceberg table, creating the metadata folder and the metadata.json file therein
You can stop at this point if you don’t intend to migrate your existing iceberg table from Hive to the Data Catalog.
Register
- Sign in to the AWS Glue as Spark Catalog enabled EMR cluster.
- Register the Iceberg table to your Data Catalog.
Create the session with the respective Iceberg Packages. Replace
<amzn-s3-demo-bucket>with your bucket name, and<warehouse>with warehouse directory. - Run the
register_tablecommand to make the Iceberg table visible in AWS Glue.register_tableregisters an existing Iceberg table’s metadata file (metadata.json) with a catalog(glue_catalog) so that Spark (and other engines) can query it.- The procedure creates a Data Catalog entry for the table, pointing it to the given metadata location.
Replace
<amzn-s3-demo-bucket>and<metadata-prefix>with the name of your S3 bucket and metadata prefix name.Ensure that your EMR Spark Cluster has been configured with appropriate AWS Glue permissions
- Validate that the Iceberg table is now visible in the Data Catalog.
Apache Iceberg’s add_files procedure
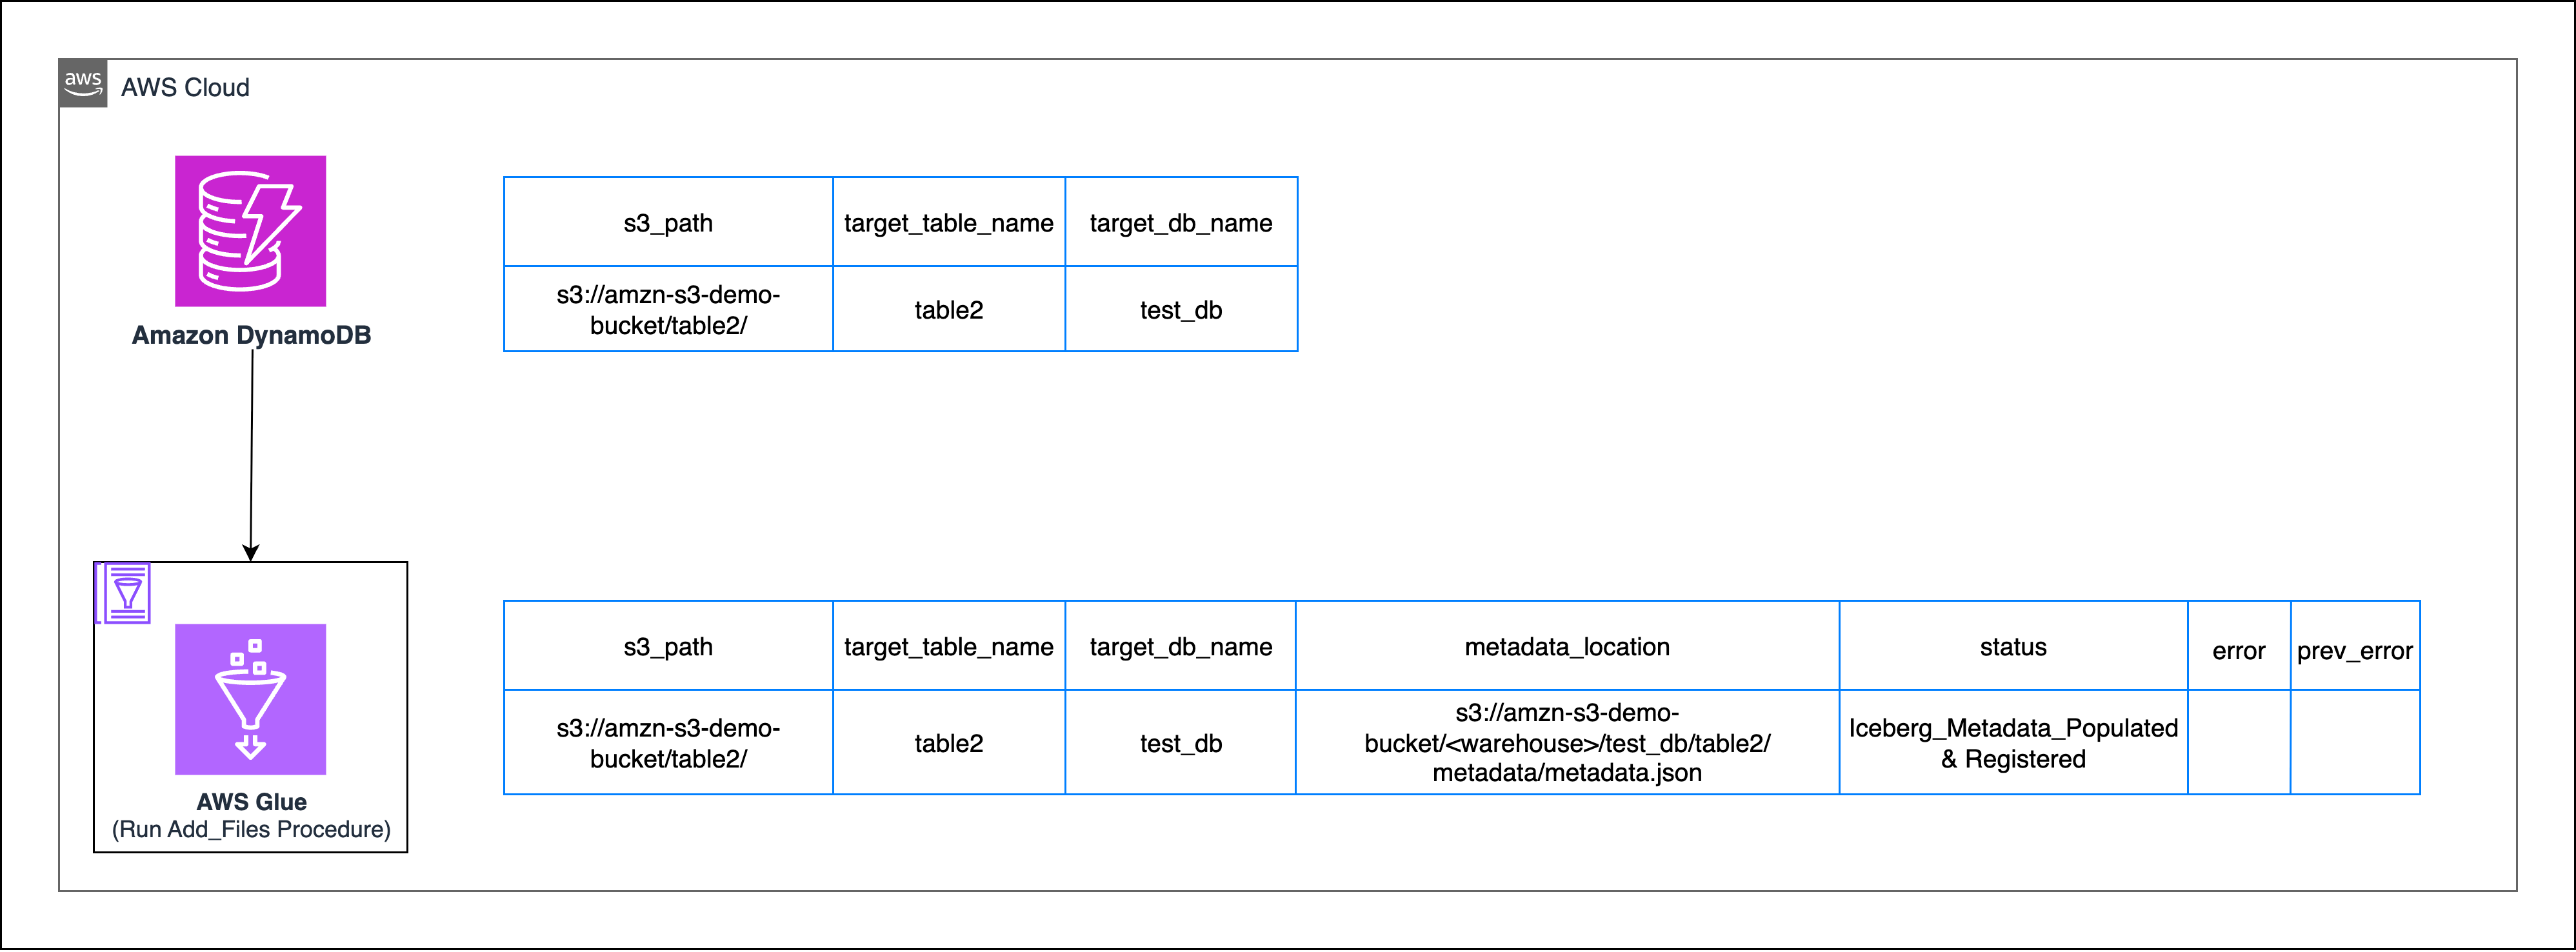
Here, you’re going to use Iceberg’s add_files procedure to import raw data files (Parquet, ORC, Avro) into an existing Iceberg table by updating its metadata. This procedure works for both Hive and Data Catalog, it doesn’t physically move or rewrite the files—it only registers them so Iceberg can manage them.
This methodology comprises the following steps:
- Create an empty Iceberg table in AWS Glue.
Because the add_files procedure expects the iceberg table to be already present, you need to create an empty Iceberg table by inferring the table schema. - Register existing data locations to the Iceberg table
Using the add_files procedure in a Glue-backed Iceberg catalog will register the target S3 path along with all its subdirectories to the empty Iceberg table created in the previous step.
You can consolidate both steps into a single Spark job. For the following AWS Glue job, you have specified iceberg as a value for the --datalake-formats job parameter. See the AWS Glue job configuration documentation for more details.
Replace <amzn-s3-demo-bucket> with your S3 bucket name and <warehouse> with warehouse directory.
When working with non-Hive partitioned datasets, a direct migration to Apache Iceberg using add_files might not behave as expected. See Appendix C for more information.
Considerations
Let’s explore two key considerations that you should address when implementing your migration strategy.
State management using DynamoDB control table
Use the following sample code snippet to update the state of DynamoDB table:
This ensures that any errors are logged and saved to DynamoDB as error_message. On successive retries, previous errors move to prev_error_message and new errors overwrite error_message. Successful operations clear error_message and archive the last error.
Protecting your data from unintended deletion
To protect your data from unintended deletion, never delete data or metadata files from Amazon S3 directly. Iceberg tables that are registered in AWS Glue or Athena are managed tables and should be deleted using the DROP TABLE command from Spark or Athena. The DROP TABLE command deletes both the table metadata and the underlying data files in S3. See Appendix D for more information.
Clean up
Complete the following steps to clean up your resources:
- Delete the DynamoDB control table
- Delete the database and tables
- Delete the EMR clusters and AWS Glue job used for testing
Conclusion
In this post, we showed you how to modernize your Parquet-based data lake into an Apache Iceberg–powered lakehouse without rewriting or duplicating data. You learned two complementary approaches for this in-place migration:
- Migrate and register – Ideal for converting existing Hive-registered Parquet tables into Iceberg-managed tables.
- add_files – Best suited for quickly onboarding raw Parquet data into Iceberg without rewriting files.
Both approaches benefit from DynamoDB centralized state tracking, which enables retries, error auditing, and lifecycle management across multiple datasets.
By combining Apache Iceberg with Amazon EMR, AWS Glue, and Amazon DynamoDB, you can create a production-ready migration pipeline that is observable, automated, and straightforward to extend to future data format upgrades. This pattern forms a solid foundation for building an Iceberg-based lakehouse on AWS, helping you achieve faster analytics, better data governance, and long-term flexibility for evolving workloads.
To get started, try implementing this solution using the sample tables (table1 and table2) that you created using Athena queries. we encourage you to share your migration experiences and questions in the comments.
Appendix A — Creating an EMR cluster for Hive metastore using console and AWS CLI
Console steps:
- Open AWS Management Console for Amazon EMR and choose Create cluster.
- Select Spark or Hive under applications.
- Under AWS Glue Data Catalog settings, make sure the following options are not selected:
- Use for Hive table metadata
- Use for Spark table metadata
- Configure SSH access (KeyName).
- Configure network (VPC, subnets, SGs) to allow access to S3.
AWS CLI steps:
Appendix B — EMR cluster with AWS Glue as Spark Metastore
Console steps:
- Open the Amazon EMR console, choose Create cluster and then select EMR Serverless or provisioned EMR.
- Under Software Configuration, verify that Spark is installed.
- Under AWS Glue Data Catalog settings, select Use Glue Data Catalog for Spark metadata.
- Configure SSH access (KeyName).
- Configure network settings (VPC, subnets, and security groups) to allow access to Amazon S3 and AWS Glue.
AWS CLI (provisioned Amazon EMR):
Appendix C — Non-Hive partitioned datasets and Iceberg add_files
This appendix explains why a direct in-place migration using an add_files-style procedure might not behave as expected for datasets that aren’t Hive-partitioned and shows recommended fixes and examples.
AWS Glue and Athena follow Hive-style partitioning, where partition column values are encoded in the S3 path rather than inside the data files. For example, following the Parquet dataset created in the Create Sample Parquet Dataset as a source section of this post:
- Partition columns (
event_date,hour) are represented in the folder structure. - Non-partition columns (for example,
id,name,age) remain inside the Parquet files. - Iceberg
add_filescan correctly map partitions based on the folder path, even if partition columns are missing from the Parquet file itself.
Partition column |
Stored in path |
Stored in file |
Athena or AWS Glue and Iceberg behavior |
| event_date | Yes | Yes | Partitions inferred correctly |
| hour | Yes | No | Partitions still inferred from path |
Non-Hive partitioning layout (problem case)
- No partition columns in the path.
- File might not contain partition columns.
If you try to create an empty Iceberg table and directly load it using add_files on a non-hive layout, the following happens:
- Iceberg cannot automatically map partitions,
add_filesoperations fail or register files with incorrect or missing partition metadata. - Queries in Athena or AWS Glue will return unexpected NULLs or incomplete results.
- Successive incremental writes using
add_fileswill fail.
Recommended approaches:
Create an AWS Glue table and use the Iceberg snapshot procedure:
- Create a table in AWS Glue pointing to your existing Parquet dataset.
You might need to manually provide the schema because glue crawler might fail to automatically infer it for you.
- Use Iceberg’ s snapshot procedure to convert and move the AWS Glue table into your target Iceberg table.
This works because Iceberg relies on AWS Glue for schema inference, so this approach ensures correct mapping of columns and partitions without rewriting the data. For more information, see Snapshot procedure.
Appendix D — Understanding table types: Managed compared to external
By default, all non-Iceberg tables created in AWS Glue or Athena are external tables, Athena doesn’t manage the underlying data. If you use CREATE TABLE without the EXTERNAL keyword for non-Iceberg tables, Athena issues an error.
However, when dealing with Iceberg tables, AWS Glue and Athena also manage the underlying data for the respective tables, so these tables are treated as internal tables.
Running DROP TABLE on Iceberg tables will delete the table and the underlying data.
The following table describes how the effect of DELETE and DROP TABLE actions on Iceberg tables in AWS Glue and Athena:
| Operation | What it does | Effect on S3 data |
| DELETE FROM mydb.products_iceberg WHERE date = 2025-10-06; | Creates new snapshot, hides deleted rows | Data files stay until cleanup |
| DROP TABLE test_db.table1; | Deletes table and all data | Files are permanently removed |