AWS Big Data Blog
Modernize Amazon Redshift: RA3 to RG Migration best practices
Amazon Redshift is a fully managed, AI-powered cloud data warehouse used by tens of thousands of customers to analyze exabytes of data with industry-leading price-performance. Amazon Redshift delivers SQL analytics across your entire lakehouse in Amazon SageMaker Unified Studio, unifying data from multiple sources. Zero-ETL integrations remove complex pipelines by connecting streaming, databases, and enterprise applications for near real-time insights.
On May 12, 2026, Amazon Redshift launched Graviton-based RG instances, a new generation of provisioned nodes. RG instances deliver up to 2.2x as fast for data warehouse workloads and up to 2.4x as fast for data lake workloads, at 30 percent lower price per vCPU compared to RA3 instances. RG instances support all data lake formats supported by RA3 and remove the per-TB scanning charges for Amazon Redshift Spectrum.
In this post, you learn how to migrate Amazon Redshift RA3 clusters to Graviton-based RG instances. We compare the Elastic Resize, Classic Resize, and Snapshot/Restore migration strategies, with key considerations and best practices to support a smooth migration. We also provide mapping guidance from RA3 to RG to help you right-size your cluster.
Who should migrate to RG?
We recommend that all RA3 customers plan their migration to RG to maximize price-performance. RG is designed to deliver improved performance for both compute-intensive and I/O-intensive workloads compared to RA3, so regardless of your workload pattern, you might see performance improvements. Amazon Redshift Graviton RG instances maintain feature parity with prior-generation RA3 instances, so you can migrate without loss of functionality.
RG node types
The RG instance family currently has two node types available. The following table shows the RG instance types, hardware specifications, and the equivalent RA3 node types. Use these specifications to inform sizing decisions when migrating from RA3.
| Node type | Configuration | vCPU | Memory | Max storage/node | Node range | Status | RA3 equivalent |
| RG.xlarge | Multi Node | 4 | 32 GB | 16 TB | 2-32 | GA (05/12/2026) | Direct equivalent to RA3.xlplus. |
| RG.4xlarge | Multi Node Only | 16 | 128 GB | 128 TB | 2-64 | GA (05/12/2026) | 1.33x more vCPUs and memory vs RA3.4xlarge |
Note: We plan to extend support for additional instance types in the future to provide an optimal price/performance fit for your Amazon Redshift workloads.
For more details on instance types, see the Amazon Redshift documentation.
RA3 to RG node mapping
| Current Node Type | Node Range | Recommended RG Type | Recommended RG Node Count |
| RA3.xlplus | 1-32 | RG.xlarge | 1:1 mapping (same #node count) |
| RA3.4xlarge | 2 | RG.4xlarge | 2 RG.4xl nodes for 2 nodes of RA3.4xl |
| RA3.4xlarge | 3-64 | RG.4xlarge | 3 RG nodes per 4 RA3.4xl nodes (round up to nearest even) |
Note: These are starting recommendations. Depending on your specific workloads, you might need to adjust the target RG node configurations. We recommend testing your workload in a lower environment and validating performance before committing to a target configuration. To test a full production workload, you can also use the Amazon Redshift Test Drive utility.
Mapping consideration: Within the RG family, 1 node of RG.4xlarge equals 4 nodes of RG.xlarge.
Choosing between RG node types: When sizing your Amazon Redshift cluster, a key decision is whether to use fewer large nodes or a greater number of smaller nodes. The key differentiator between RG node types is local SSD cache capacity. Larger nodes provide more local cache per node, which reduces the need to fetch data from managed storage and improves performance for I/O-intensive queries.
Consider larger node types when your workload involves:
- Significant disk spill – complex queries with large intermediate result sets that exceed available memory.
- Leader node-heavy processing – high numbers of concurrent client connections, complex query compilation with many joins and subqueries, or heavy final-stage aggregation.
- Large volumes of frequently accessed data – hot datasets that benefit from local SSD cache to minimize fetches from managed storage.
- Large result sets – queries returning substantial data volumes back to the client application.
- Frequent metadata operations – workloads with high catalog lookup activity or CURSOR-based fetches with many small batches.
Prerequisites
You must have the following prerequisites to follow along with this post.
- An existing Amazon Redshift cluster running RA3 node types.
- AWS Identity and Access Management (IAM) permissions to perform resize operations (
redshift:ResizeCluster,redshift:DescribeClusters). - AWS Command Line Interface (AWS CLI) installed and configured (for AWS CLI-based migration).
- A recent manual snapshot (no more than 10 hours old) if you plan to use Classic Resize.
- Sufficient storage capacity in the target RG configuration for your existing data.
Migration approach
The following diagram compares the three migration approaches.
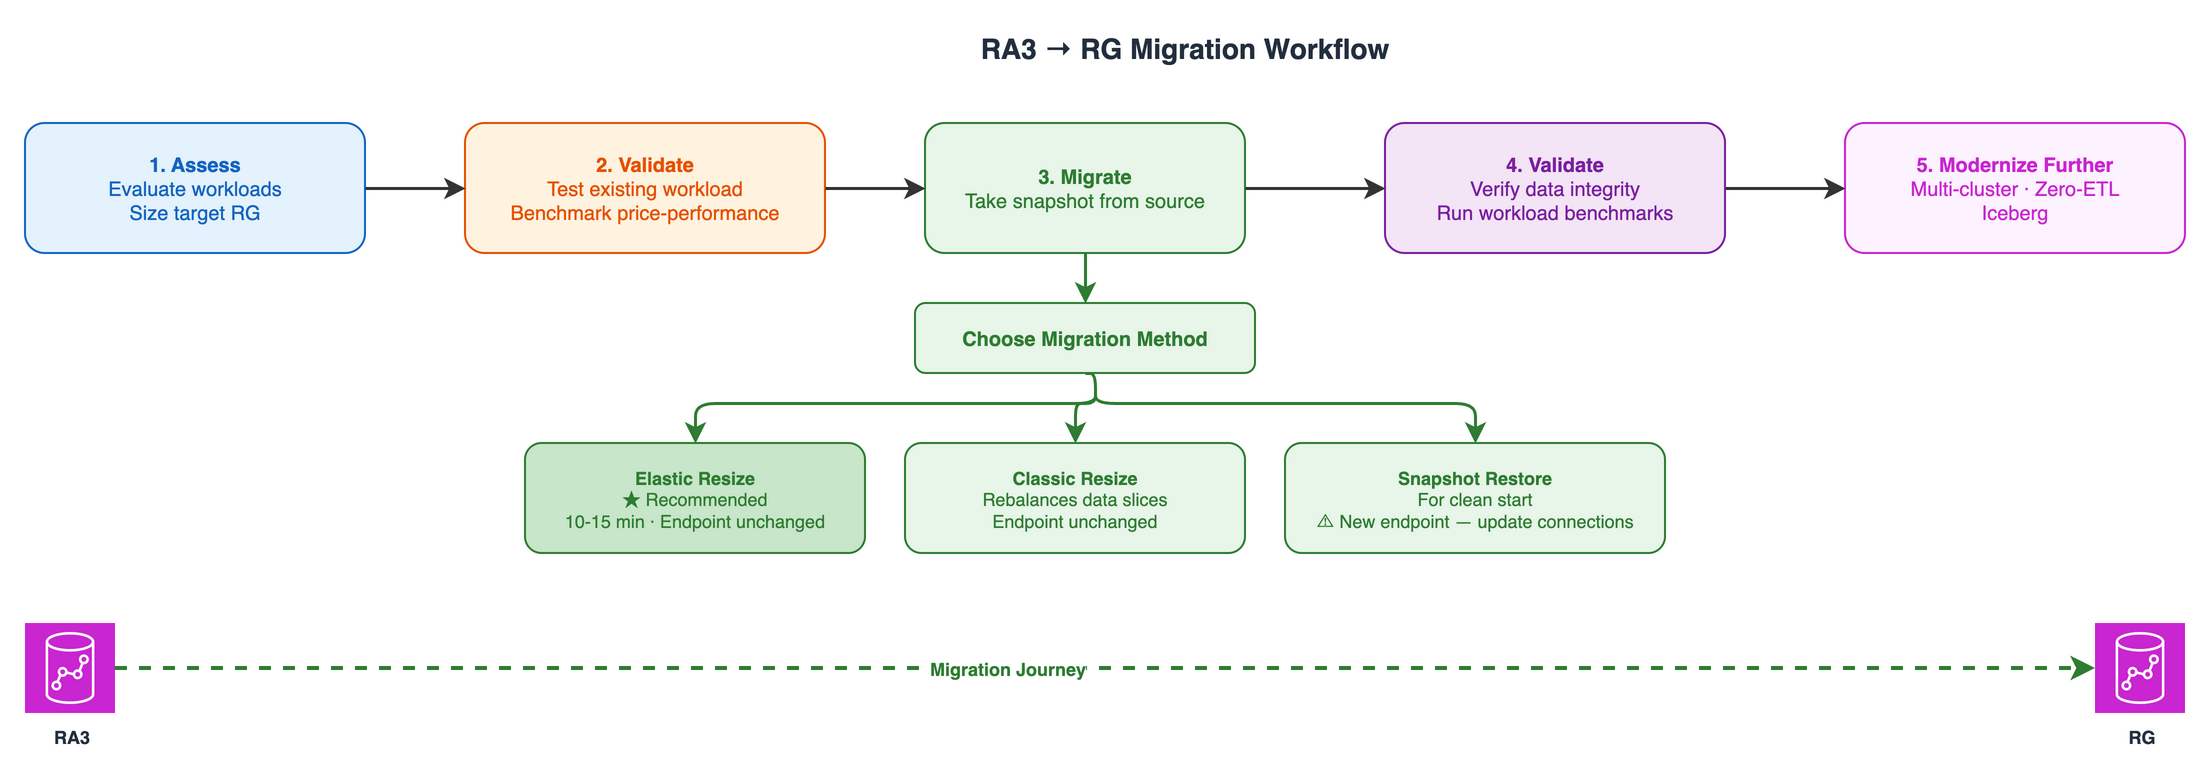
1. Elastic Resize (recommended)
Elastic Resize is the recommended method for performing the node upgrade when the target RG node configuration falls within the supported bounds of Elastic Resize. You can use it to change the node type (for example, from RA3 to RG) and to add or remove nodes from an Amazon Redshift cluster.
When an Elastic Resize is performed, Amazon Redshift first creates a snapshot of the source cluster. A new target cluster is provisioned with the latest data from the snapshot, and data is transferred to the new cluster in the background. During this period, data is read-only. When the resize nears completion, Amazon Redshift updates the endpoint to point to the new cluster and drops all connections to the source cluster. Although unlikely, in case of a failure, rollback happens automatically in most cases without manual intervention.
Advantages
- Typically completes quickly, taking approximately 10–15 minutes on average. We recommend it as your first option.
- Minimal downtime, because the cluster remains in a read-only state during the resize operation.
- Cluster endpoint remains the same, so no connection string changes are required.
- Can be run on demand or scheduled during a maintenance window.
Considerations
- When performing an Elastic Resize to change the node type on a producer cluster, data sharing is unavailable while connections are dropped and transferred to the new target cluster.
- Verify that your target node configuration has enough storage for your existing data.
- Not all target configurations are available under Elastic Resize. Consider Classic Resize or Snapshot/Restore in those cases.
- An Elastic Resize operation can’t be canceled after it’s initiated.
- Data slices remain unchanged. This can potentially cause some data or CPU skew.
You can use either the AWS Management Console or the AWS CLI to initiate an Elastic Resize.
To resize a cluster using the console, follow these steps
- Sign in to the AWS Management Console.
- Open the Amazon Redshift console at https://console.aws.amazon.com/redshiftv2/.
- On the left navigation menu, choose Provisioned clusters.
- Choose the cluster to resize.
- For Actions, choose Resize. The Resize cluster page appears.
- On the Resize cluster page, select the resize type: Elastic resize (recommended).
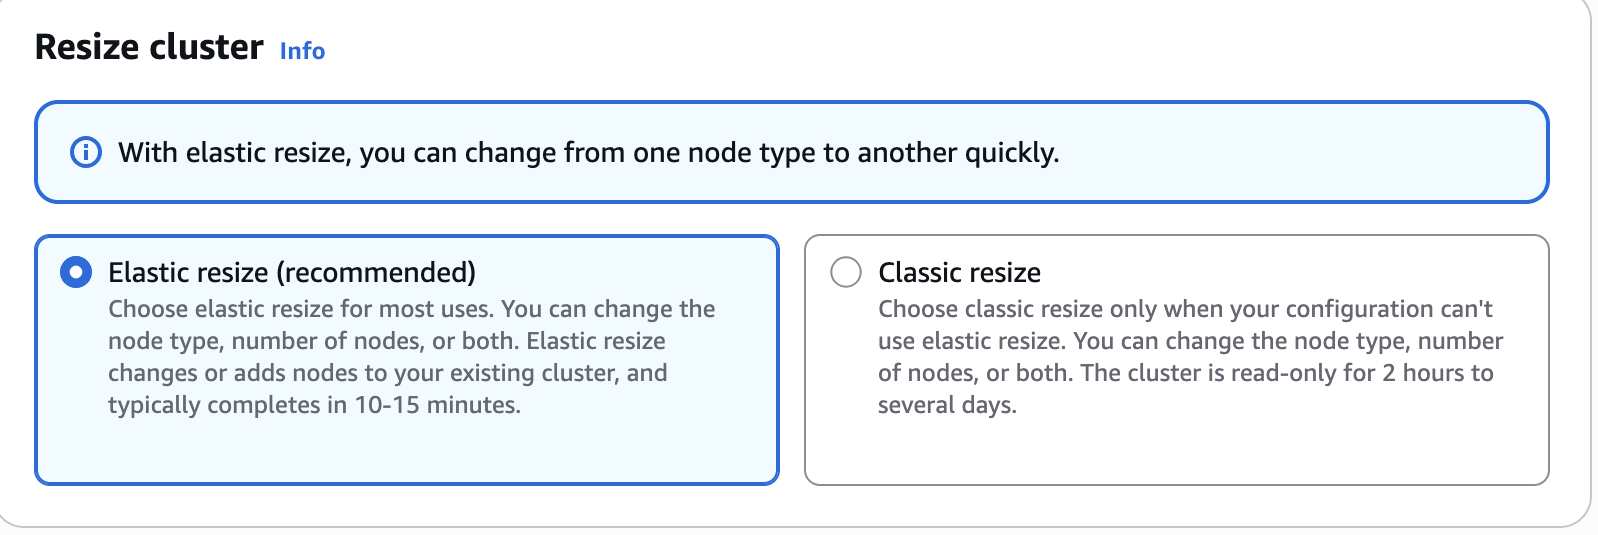
- Under New configuration, select the node type (for example,
rg.4xlarge). - Enter the number of nodes.
- Depending on your choices, choose Resize now or Schedule resize.
To resize a cluster using the AWS CLI, follow these steps
2. Classic Resize
Classic Resize is recommended when the change in cluster size or node type isn’t supported by Elastic Resize. It’s also required for single-node to multi-node conversions.
When you perform a Classic Resize, Amazon Redshift creates a target cluster and migrates your data and metadata from the source cluster using a backup and restore operation. This makes sure that all data, including database schemas and user configurations, is accurately transferred. The source cluster restarts initially and is unavailable for a few minutes. After that, the cluster becomes available for read and write operations while the resize continues in the background.
Enhanced Classic Resize comprises two stages:
- Stage 1 (critical path): Migrating the metadata from the source cluster to the target cluster. During this stage, the source cluster is in read-only mode. This is typically a very short duration. The cluster is then made available for read and write queries. All tables with KEY distribution style are temporarily stored with EVEN distribution and are redistributed to KEY style in Stage 2.
- Stage 2 (off critical path): Redistributing the data per the previous distribution style. This runs in the background. Duration depends on data volume, cluster workload, and node type.
For additional details, see Accelerate resizing of Amazon Redshift clusters with enhancements to classic resize.
Advantages
- Supports all possible target node configurations.
- Allows for comprehensive reconfiguration of the source cluster.
- Rebalances data slices to the default per node, which leads to even data distribution across nodes.
Considerations
- The size of the data on the source cluster must be below 2 petabytes (PB). Use the Snapshot/Restore approach for data larger than 2 PB.
- Before initiating, make sure a manual snapshot is available that is no more than 10 hours old. If not, take a new manual snapshot.
- The snapshot used to perform the Classic Resize can’t be used for a table restore or other purpose.
- The cluster must be in a virtual private cloud (VPC).
- While the resize is in progress, queries can take longer to complete. Consider enabling concurrency scaling.
- Drop tables that aren’t needed before performing a Classic Resize to accelerate data distribution.
- Classic Resize takes more time to complete than Elastic Resize.
- Plan and schedule the resize operation during off-peak hours or maintenance windows.
You can use either the console or the following AWS CLI command to initiate a Classic Resize.
To run a Classic Resize through the console, follow the resize instructions in the preceding section and choose Classic resize, as shown in the following screenshot.

Classic Resize using the AWS CLI
To monitor a Classic Resize of a provisioned cluster in progress, including KEY distribution, use SYS_RESTORE_STATE. It shows the percentage completed for the table being converted. You must be a superuser to access the data.
Elastic Resize vs. Classic Resize
| Behavior | Elastic Resize | Classic Resize |
| System tables | Elastic Resize retains system log data. | Classic Resize doesn’t retain system tables and data. |
| Changing node types | When the node type doesn’t change, Elastic Resize is an in-place resize and most queries are held. With a new node type selected, a new cluster is created and queries are dropped as the resize completes. | A new cluster is created. Queries are dropped during the resize. |
| Session and query retention | Elastic Resize retains sessions and queries when the node type is the same in the source and target. If you choose a new node type, queries are dropped. | Classic Resize doesn’t retain sessions and queries. Queries are dropped, and you can expect some performance degradation. Run the resize during a period of light use. |
| Canceling a resize operation | You can’t cancel an Elastic Resize. | For a Classic Resize to an RG or RA3 cluster, you can’t cancel. |
3. Snapshot, Restore, Resize
Use this method when you need near-constant write access during the migration, or when you want to validate the new RG setup without affecting the existing cluster.
Steps
- In the Amazon Redshift console, choose Provisioned clusters dashboard, select your source cluster, choose Actions, then choose Create manual snapshot. Specify a snapshot name and choose Create snapshot.
- Select your snapshot.
- Choose Restore from snapshot.
- Specify the cluster ID and configuration (target cluster).
- Verify that the sample data exists in the target cluster by following these steps:
- Connect to the target cluster using the new endpoint.
- Run
SELECT COUNT(*) FROM <table_name>for key tables and compare counts with the source cluster. - Verify that all schemas exist.
- Validate that user permissions were restored correctly.
- If you write data to the source cluster after taking the snapshot, manually copy the data to the target cluster.
- Update your application connection strings to use the new cluster endpoint.
Advantages
- Allows validation of the new RG setup without affecting the existing cluster.
- Offers flexibility to restore to different Regions or Availability Zones, which provides additional disaster recovery options.
- Minimizes the amount of time that the cluster is unavailable for write operations.
Considerations
- Setting up the new cluster and restoring data can take longer than Elastic Resize.
- Any data written to the source cluster after the snapshot must be copied manually to the target cluster.
- A new Amazon Redshift endpoint is created, so connection string changes are required.
- To keep the cluster endpoint the same, consider renaming both clusters so the new target cluster has the same name as the original source cluster.
Fallback
You can revert to RA3 at any time using any of the migration approaches described earlier.
DMS, Zero-ETL, and data sharing considerations during migration
If your Amazon Redshift cluster is an AWS Database Migration Service (AWS DMS) target, has Zero-ETL integrations, or is a data sharing producer, keep the following in mind when resizing from RA3 to RG.
AWS DMS change data capture (CDC) tasks aren’t impacted by the resize. The replication instance operates independently and resumes writing after the cluster is available. No task restart is required.
Zero-ETL tables temporarily become unavailable during the resize and enter a resync state. How long the resync takes depends on data volume. Use svv_integration_table_state to check when all tables are back to Synced. For additional details, see Zero-ETL considerations.
When you resize a producer cluster, data sharing is temporarily unavailable while connections transfer to the new cluster. This typically lasts several minutes. Consumer clusters can’t access shared data during this period. After the resize completes, data sharing resumes automatically with no reconfiguration needed. Plan a brief outage window for consumer workloads that depend on the producer being resized.
Snapshot/Restore impact on DMS, Zero-ETL, and data sharing
Zero-ETL integrations are tied to the original cluster. A restored cluster is treated as a new cluster, so replication doesn’t automatically resume. After the restore, you need to create a new Zero-ETL integration pointing to the restored cluster. It performs an initial sync to bring the data current.
AWS DMS connections are endpoint-based. A restored cluster receives a new endpoint, so AWS DMS tasks won’t automatically connect to it. After the restore, you must update the AWS DMS endpoint configuration with the new cluster address and restart the migration tasks.
Data sharing is tied to the cluster namespace. A restored cluster has a different namespace, so existing data shares don’t carry over. As a producer, you need to create new data shares and re-share them with consumer clusters. As a consumer, you lose access until the producer reestablishes the share from the new cluster.
Migration best practices
- Inform downstream teams before the migration. This includes data sharing consumers, Zero-ETL applications, and BI/ETL pipelines.
- Schedule the migration during a maintenance window to reduce impact on production.
- Take a manual snapshot before starting the resize. This serves as your rollback point.
- Test your target RG configuration with a representative workload before migrating production.
- Confirm that downstream applications are working after completion.
Clean up
To avoid incurring future charges, delete the RG provisioned cluster and any manual snapshots created during migration testing. Deleting a cluster permanently removes all data. Make sure you are deleting only the test cluster. Consider taking a final snapshot before deletion if you need to retain any test data.
Conclusion
In this post, we covered the migration options, considerations, and best practices for upgrading Amazon Redshift RA3 instances to Graviton-based RG instances. For more details on the performance benefits of RG, see the announcement blog post.
Start upgrading to Amazon Redshift RG instances today and take advantage of better price-performance with the guidance in this post. For architectural support or proof of concept (POC) assistance, contact AWS Support.