AWS Big Data Blog
Multi-Region identity-based access to Amazon Redshift and S3 Tables
Organizations with lines of business operating across multiple AWS Regions increasingly run analytics workloads on globally distributed data. These organizations want to manage users and groups centrally, typically in the AWS Organizations management account and in a single Region, while still letting each line of business access data from the Region where its workloads run. Organizations should govern access based on the actual workforce user and their group memberships in the corporate directory.
With multi-Region support for AWS IAM Identity Center, organizations can federate workforce identities into a single organization instance in their primary Region. After you replicate this instance to additional Regions, member accounts running services such as Amazon Redshift or Amazon Athena in those Regions can integrate with IAM Identity Center locally, to resolve the same centrally managed users and groups.
This solution uses Trusted Identity Propagation (TIP), a capability that passes a user’s Identity Center identity and group memberships through a chain of AWS services. With TIP, when a user authenticates through Identity Center, that identity context flows to downstream services like AWS Lake Formation and Amazon S3 Access Grants. With this approach, you get consistent, identity-based access control without additional AWS Identity and Access Management (IAM) role configurations.
In Part 1 of this series, we showed how to simplify enterprise data access using the Amazon Redshift integration with Amazon S3 Access Grants. We demonstrated how to grant Amazon Simple Storage Service (Amazon S3) permissions to AWS IAM Identity Center users and groups using S3 Access Grants, and tested the integration using a federated user to unload and load data between Amazon Redshift and Amazon S3 within a single AWS Region.
In this post, we extend that solution across AWS Regions. We introduce a fictional company, AnyCompany Global, to illustrate how organizations with global operations can use AWS IAM Identity Center Multi-Region to set up consistent, identity-based access to Amazon Redshift and Amazon S3 Tables across Regions.
Specifically, we demonstrate:
- How IAM Identity Center Multi-Region replicates identity data so that the same users and groups are available in each enabled Region.
- How AWS Lake Formation grants fine-grained table-level and column-level access to S3 Tables based on group membership.
- How S3 Access Grants controls UNLOAD/COPY operations to Amazon S3 based on the same identity.
We also show how to connect with your preferred SQL client.
Fictional scenario: AnyCompany Global
AnyCompany Global is a retail analytics company with a centralized IT team and distributed analytics teams. They use the following personas:
- Alice — IT administrator (manages IAM Identity Center and AWS accounts).
- Bob — platform engineer (sets up data infrastructure in us-west-2).
- Ethan — data analyst (member of the
awssso-salesgroup, queries data).
AnyCompany Global has two AWS accounts:
- Account A (us-east-1) — management account with IAM Identity Center.
- Account B (us-west-2) — analytics account with Amazon Redshift, Amazon S3, and the AWS Glue Data Catalog.
The same IAM Identity Center user (Ethan) authenticates once and accesses data in Account B (us-west-2) using the same credentials and group memberships — you don’t need additional user provisioning because IAM Identity Center replicates identities to the secondary Region.
Solution overview
The following diagram illustrates the multi-account, multi-Region architecture. Account A (us-east-1) hosts IAM Identity Center, which replicates identities to us-west-2 where Account B runs the analytics workloads.
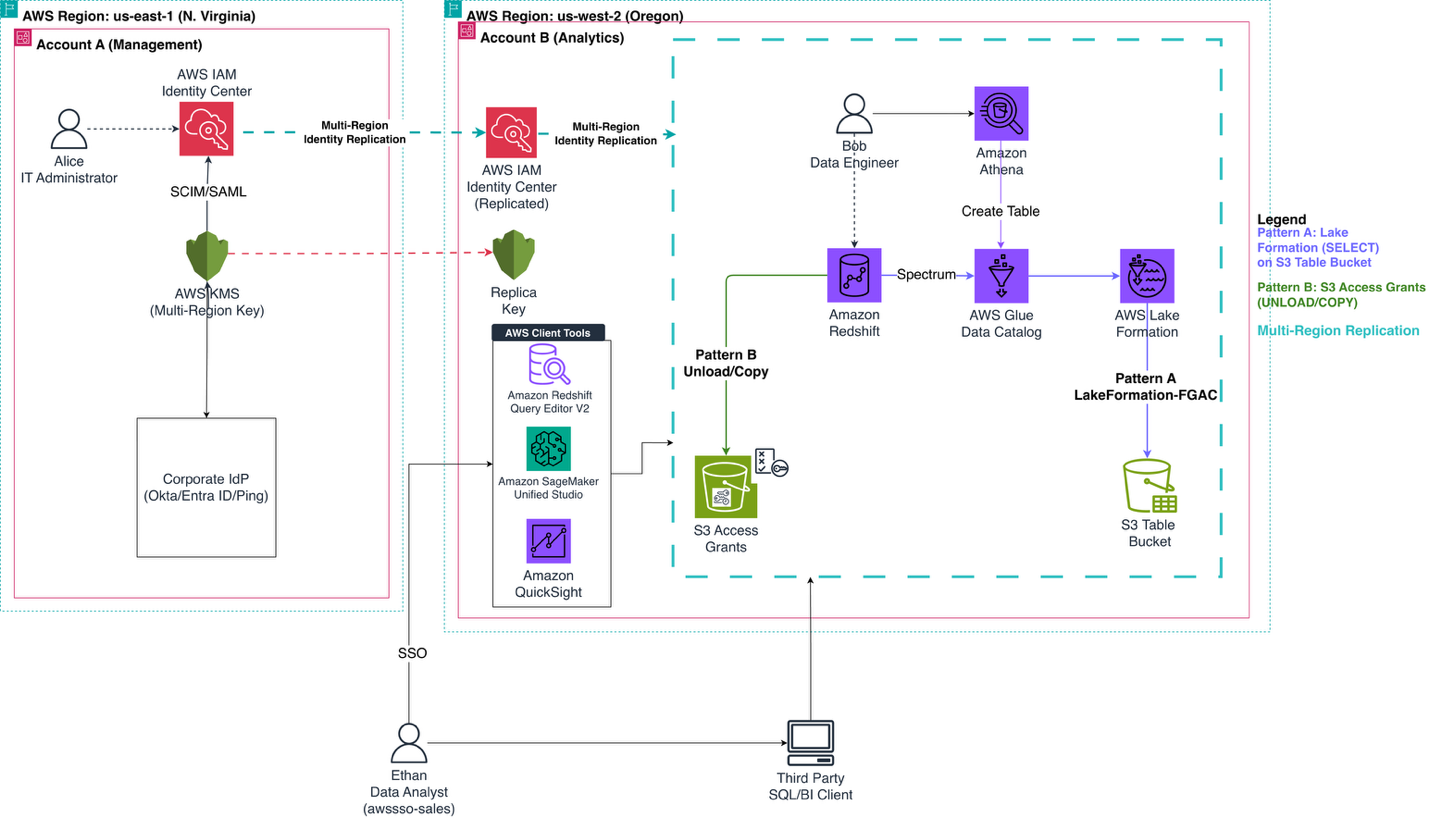
Figure 1: Multi-account, multi-Region architecture with S3 Access Grants, AWS Lake Formation, and IAM Identity Center.
This solution demonstrates two complementary data access patterns, both controlled by the end user identity:
| Pattern | Access method | Permission controlled by |
| Pattern A | SELECT on S3 table bucket through Amazon Redshift Spectrum |
Lake Formation |
| Pattern B | UNLOAD/COPY to and from Amazon S3 |
S3 Access Grants |
The solution workflow includes the following steps:
- Ethan connects from Amazon Redshift Query Editor v2 in us-west-2 and authenticates via the IAM Identity Center endpoint (replicated to us-west-2) using his corporate IdP credentials.
- For Pattern A (
SELECT): Amazon Redshift queries the Amazon S3 Tables catalog (s3tablescatalog). Lake Formation evaluates Ethan’s IAM Identity Center group membership and grants access to the cataloged data. - For Pattern B (
UNLOAD/COPY): Amazon Redshift requests temporary credentials from S3 Access Grants in us-west-2. S3 Access Grants evaluates the request, matches Ethan’s identity and group membership, and vends scoped temporary credentials for the authorized S3 location. - Ethan runs
SELECTto query data through Lake Formation, andUNLOADto write data to Amazon S3 through S3 Access Grants. You don’t need an IAM role ARN in the commands.
Walkthrough
The following sections walk you through enabling IAM Identity Center Multi-Region, configuring Amazon S3 Tables with Lake Formation in the secondary Region, testing both access patterns, and verifying the result with AWS CloudTrail. Start with the prerequisites, then complete each step in order.
Prerequisites
You should have the following prerequisites already set up:
- AWS Organizations enabled with at least two AWS accounts – Centralized Account(Region 1) and Member Account(Region2)
- IAM Identity Center enabled in the management account (Account A, us-east-1) with a delegated administration account
- Corporate IdP integrated with IAM Identity Center (users and groups synced, for example,
awssso-salesandawssso-financegroups). - Resource sharing enabled in your organization with AWS Resource Access Manager (AWS RAM)
- Complete solution from Part 1 replicated in us-west-2 (Account B), including:
- Amazon Redshift cluster (in us-west-2) with IAM Identity Center integration enabled (using the replicated Identity Center endpoint in us-west-2).
- S3 Access Grants instance configured with IAM Identity Center association
- Amazon S3 bucket (for example,
amzn-s3-demo-bucket-west) with folders for each group (for example,awssso-sales/,awssso-finance/). - IAM role for S3 Access Grants (for example,
iamidcs3accessgrant) with trust policy and permissions policy. - S3 Access Grants location registered and grant created for the
awssso-salesgroup. - S3 Access Grants enabled on the Amazon Redshift managed application under Trusted identity propagation
- Cross-account resource sharing via AWS RAM (if Amazon Redshift and S3 Access Grants are in different accounts)
- Lake Formation enabled on the Amazon Redshift managed application under Trusted identity propagation
- Lake Formation and Glue permissions added to the IAM role used in the Amazon Redshift managed application (for example,
IAMIDCRedshiftRole). For the required permissions, see Querying data through AWS Lake Formation.
- An AWS account with an IAM role that has administrative access (e.g., Admin role) configured as a Data Lake Admin in Lake Formation
Note: Creating and using AWS resources in this tutorial incurs charges, including AWS Key Management Service (AWS KMS) keys, S3 table buckets, Amazon Redshift clusters, and Amazon S3 storage. See the cleanup section at the end of this post to avoid ongoing charges.
Step 1: Set up IAM Identity Center Multi-Region
Alice performs this step in the management account (Account A, us-east-1). IAM Identity Center uses encryption at rest for identity data. To enable multi-Region, you must first create a multi-Region customer-managed AWS Key Management Service (AWS KMS) key and replicate it to the additional Region.
Create a multi-Region AWS KMS key
- On the AWS KMS console in us-east-1, choose Create key.
- For Key type, select Symmetric.
- For Key usage, select Encrypt and decrypt.
- Under Advanced options, select Multi-Region key.
- Provide an alias (for example,
idc-multi-region-key). - Apply the AWS KMS key policy as documented in Baseline KMS key policy.
Replicate the key to us-west-2
- On the AWS KMS console in us-east-1, select the key you created.
- Choose the Regionality tab.
- Choose Create new replica keys.
- Select US West (Oregon) us-west-2.
- Choose Replicate key.
For detailed instructions, see Creating multi-Region replica keys.
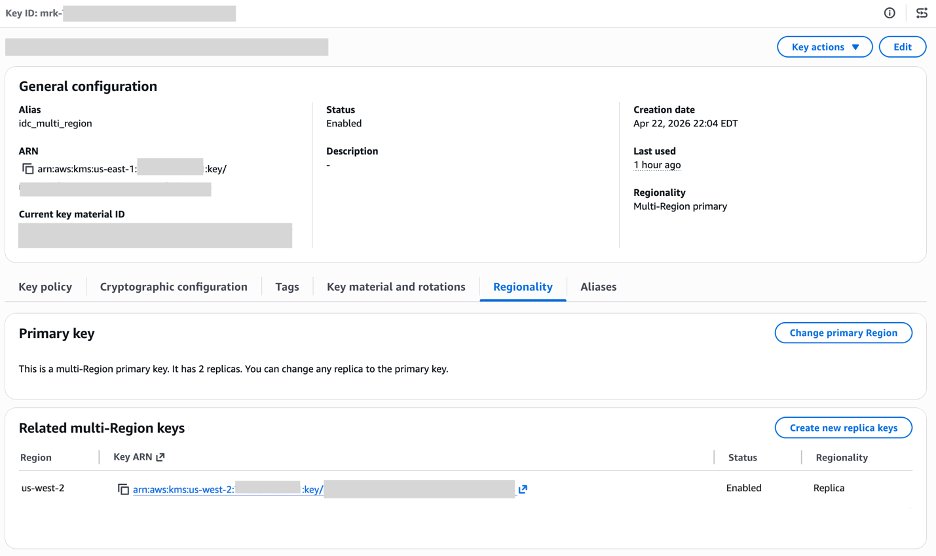
Figure 2: Replica key configured for the additional Region.
Add us-west-2 to IAM Identity Center
- On the IAM Identity Center console in us-east-1, in the navigation pane, choose Settings.
- Choose Add Region.
- From the Region list, select US West (Oregon) us-west-2. The list shows Regions where you replicated the customer-managed AWS KMS key.
- Choose Add Region.
A blue banner indicates that Identity Center is replicating your workforce identities, configuration, and metadata to the new Region. After the initial replication, the Replication Status column changes to Replicated. Your Identity Center endpoints in us-west-2 are now active.
For detailed instructions, see Add the Region in IAM Identity Center.

Figure 3: IAM Identity Center settings showing the multi-Region replica key added for us-west-2.
Update your IdP configuration for the additional Region
You’ve successfully replicated your Identity Center instance to the Oregon (us-west-2) Region. Your workforce identities are now available in that additional Region and can use the new AWS access portal endpoint.
To make sure AWS managed application (service provider-initiated) authentication redirect user to respective application, add the ACS URL for the additional Region so that the app contains both Regional ACS URLs.
In the following section highlighted in red, you can view all ACS URL information:
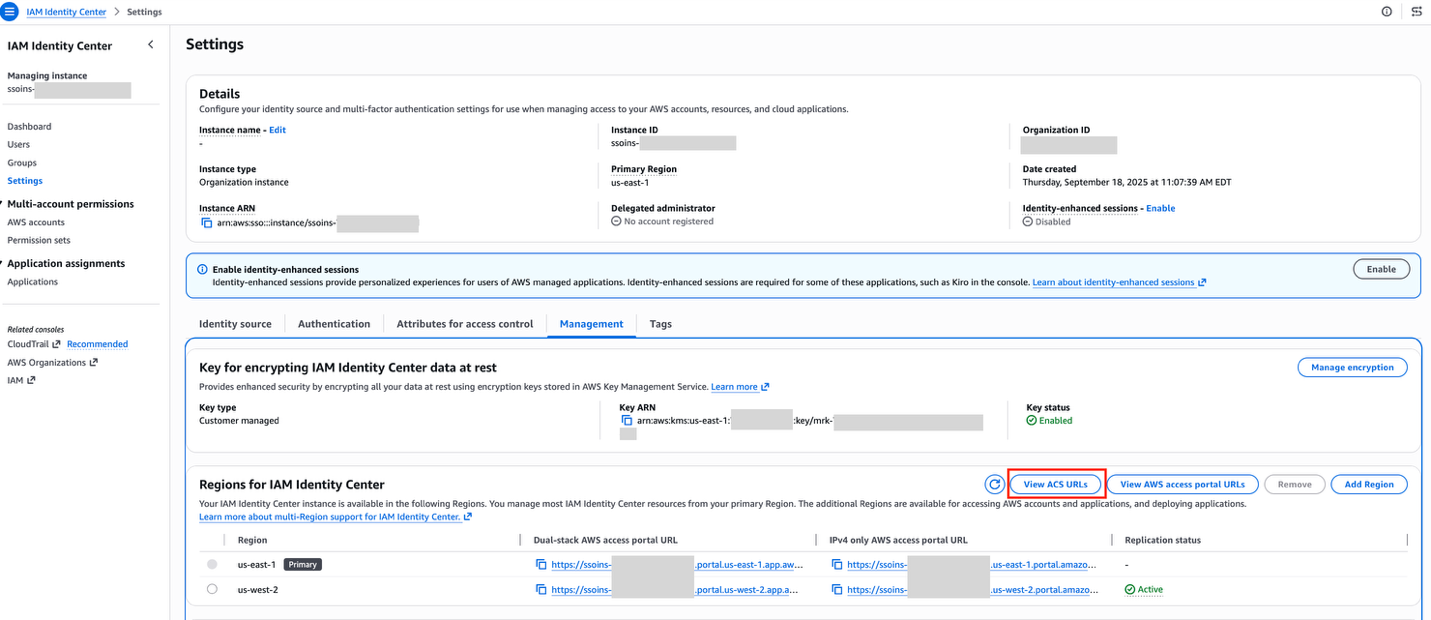
Figure 4: IAM Identity Center settings showing the View ACS URLs option.
Copy the respective ACS URL as shown in the following figure:
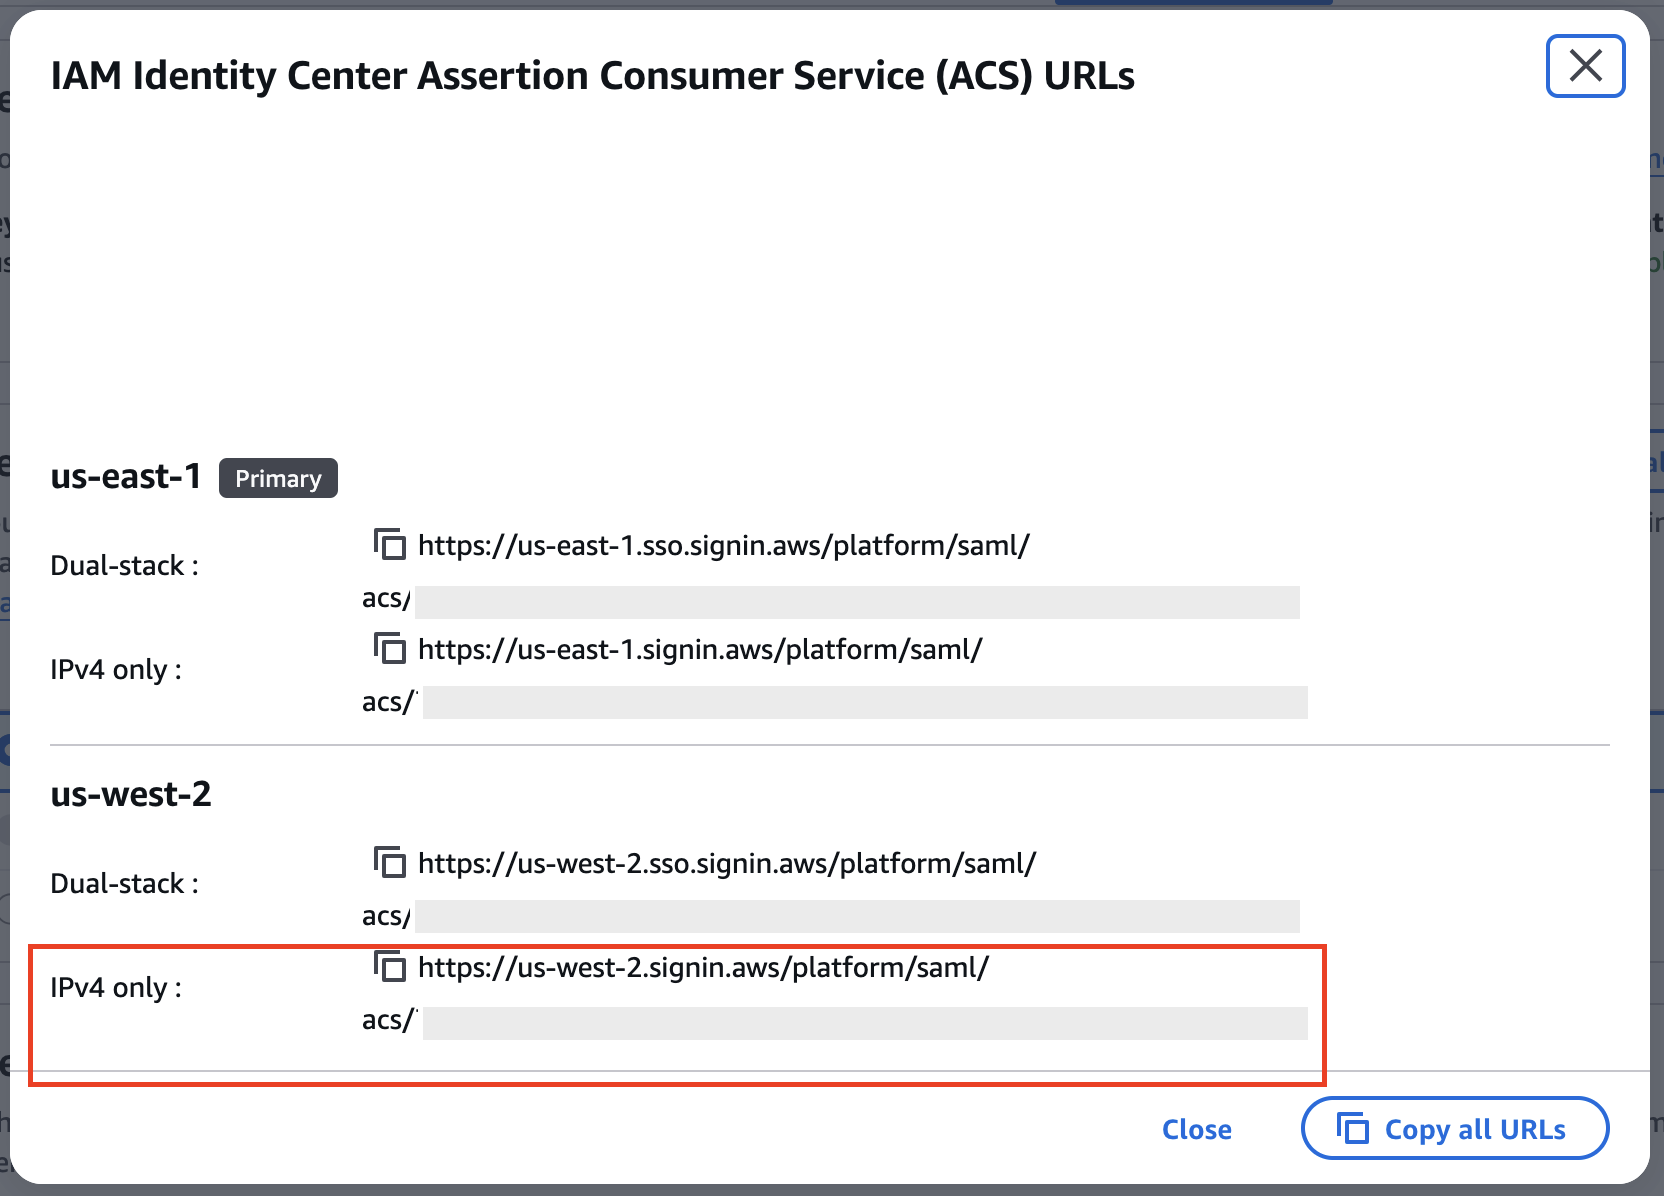
Figure 5: IAM Identity Center settings showing the ACS URLs for both Regions.
Use the following instructions to add the ACS URL for the additional Region in your Identity Center application in Okta:
- Log in to the Okta portal as an Admin.
- Expand the Applications drop-down in the left pane, then choose Applications
- Choose your Identity Center Application
- Select the Sign-on tab and choose Edit in the Settings windows.
- In the AWS SSO ACS URL1 box under Advanced Sign-on Settings – add the additional ACS URL
- Choose Save.
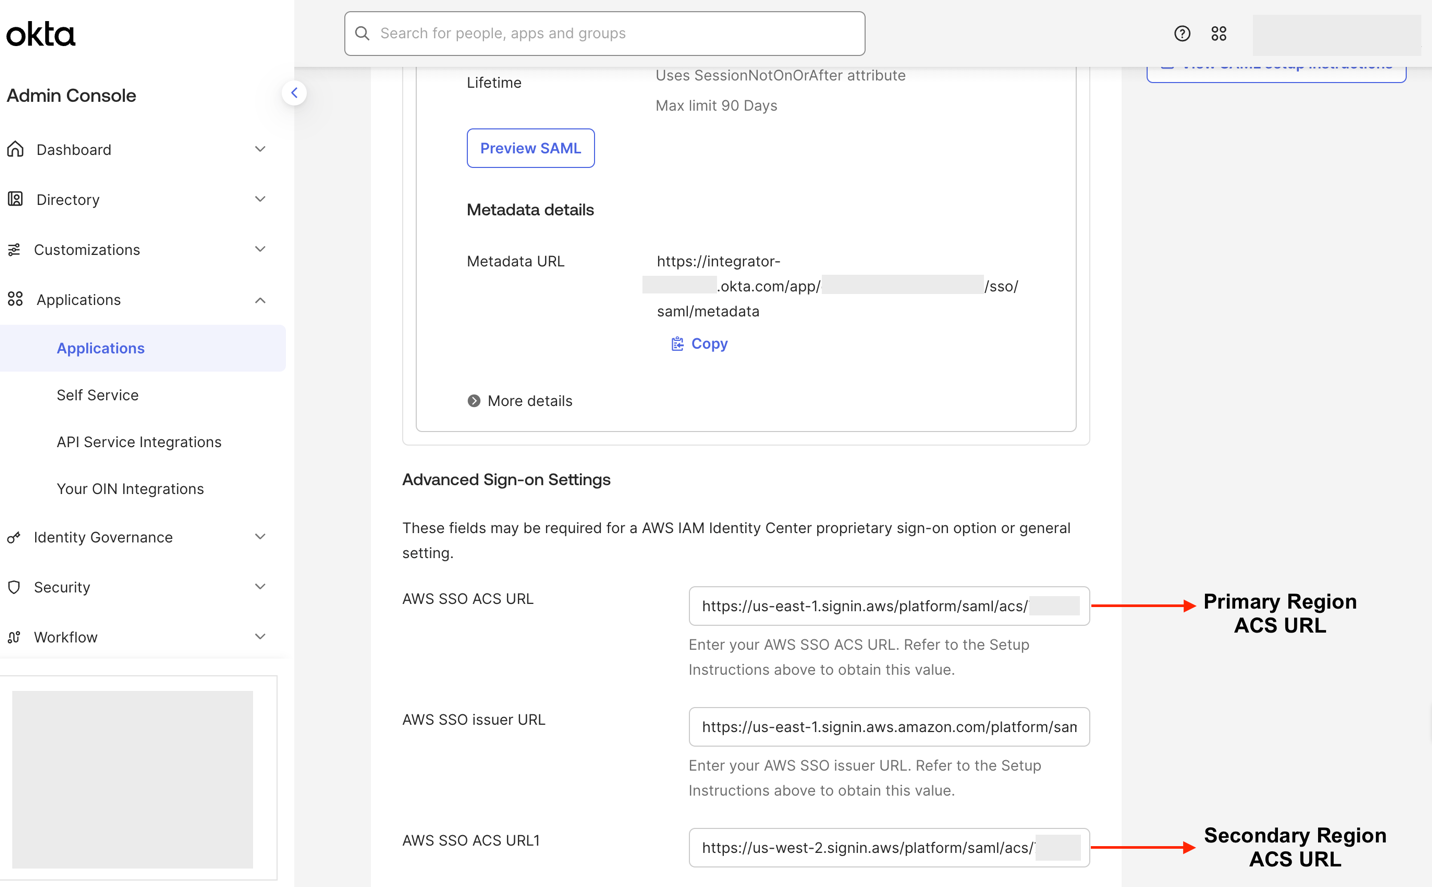
Figure 6: Okta application for IAM Identity Center Sign-on tab to add ACS URLs.
Create a permission set for the secondary Region
Create a permission set in the management account to grant federated users console access to Amazon Redshift Query Editor V2 in the secondary Region (us-west-2). For more information about permission sets, see Permission sets.
- In the management account, open the IAM Identity Center console.
- In the navigation pane, under Multi-Account permissions, choose Permission sets → Create permission set.
- Choose Custom permission set, then choose Next.
- Under AWS managed policies, select AmazonRedshiftQueryEditorV2ReadSharing.
- Under Inline policy, add the following policy:
- Choose Next. Enter a permission set name (for example,
Redshift-QEV2-West). - Under Relay state, set the default to the Query Editor V2 URL for the secondary Region:
https://us-west-2.console.aws.amazon.com/sqlworkbench/home. - Choose Next, then Create.
After creation, assign this permission set to the relevant IAM Identity Center group (for example, awssso-sales) for Account B (us-west-2).
Step 2: Set up Amazon S3 Tables integration with AWS Glue Data Catalog and Lake Formation in Account B (us-west-2)
In this step, the data lake administrator (Bob) sets up Amazon S3 Tables with Lake Formation for fine-grained access control. He completes the following tasks:
- Create an S3 tables bucket.
- Enable S3 Tables integration with AWS Glue Data Catalog and Lake Formation.
- Register the table bucket with Lake Formation (removes default IAM-based access).
- Grant Lake Formation permissions to an IAM Identity Center group (
awssso-sales) so that only authorized users can query data through Trusted Identity Propagation.
Step 2.1: Remove default Lake Formation permissions
Before creating S3 Tables resources, disable the default IAMAllowedPrincipals grants that Lake Formation applies to new databases and tables. By default, Lake Formation grants IAMAllowedPrincipals access to new resources, which means that standard IAM policies (rather than Lake Formation permissions) control access. For identity-based access through Trusted Identity Propagation, you need Lake Formation to be the sole arbiter of access.
The order matters. If you remove these defaults before registering the S3 Tables resource, Lake Formation will not apply IAMAllowedPrincipals to your S3 Tables catalog or its children. If you register the resource first, you need to manually revoke the IAMAllowedPrincipals grants from each resource.
From the console
- Open the Lake Formation console in your target Region (for example,
us-west-2). - In the left navigation, choose Administration → Data Catalog settings.
- Uncheck both options:
- Use only IAM access control for new databases
- Use only IAM access control for new tables in new databases
- Choose Save.
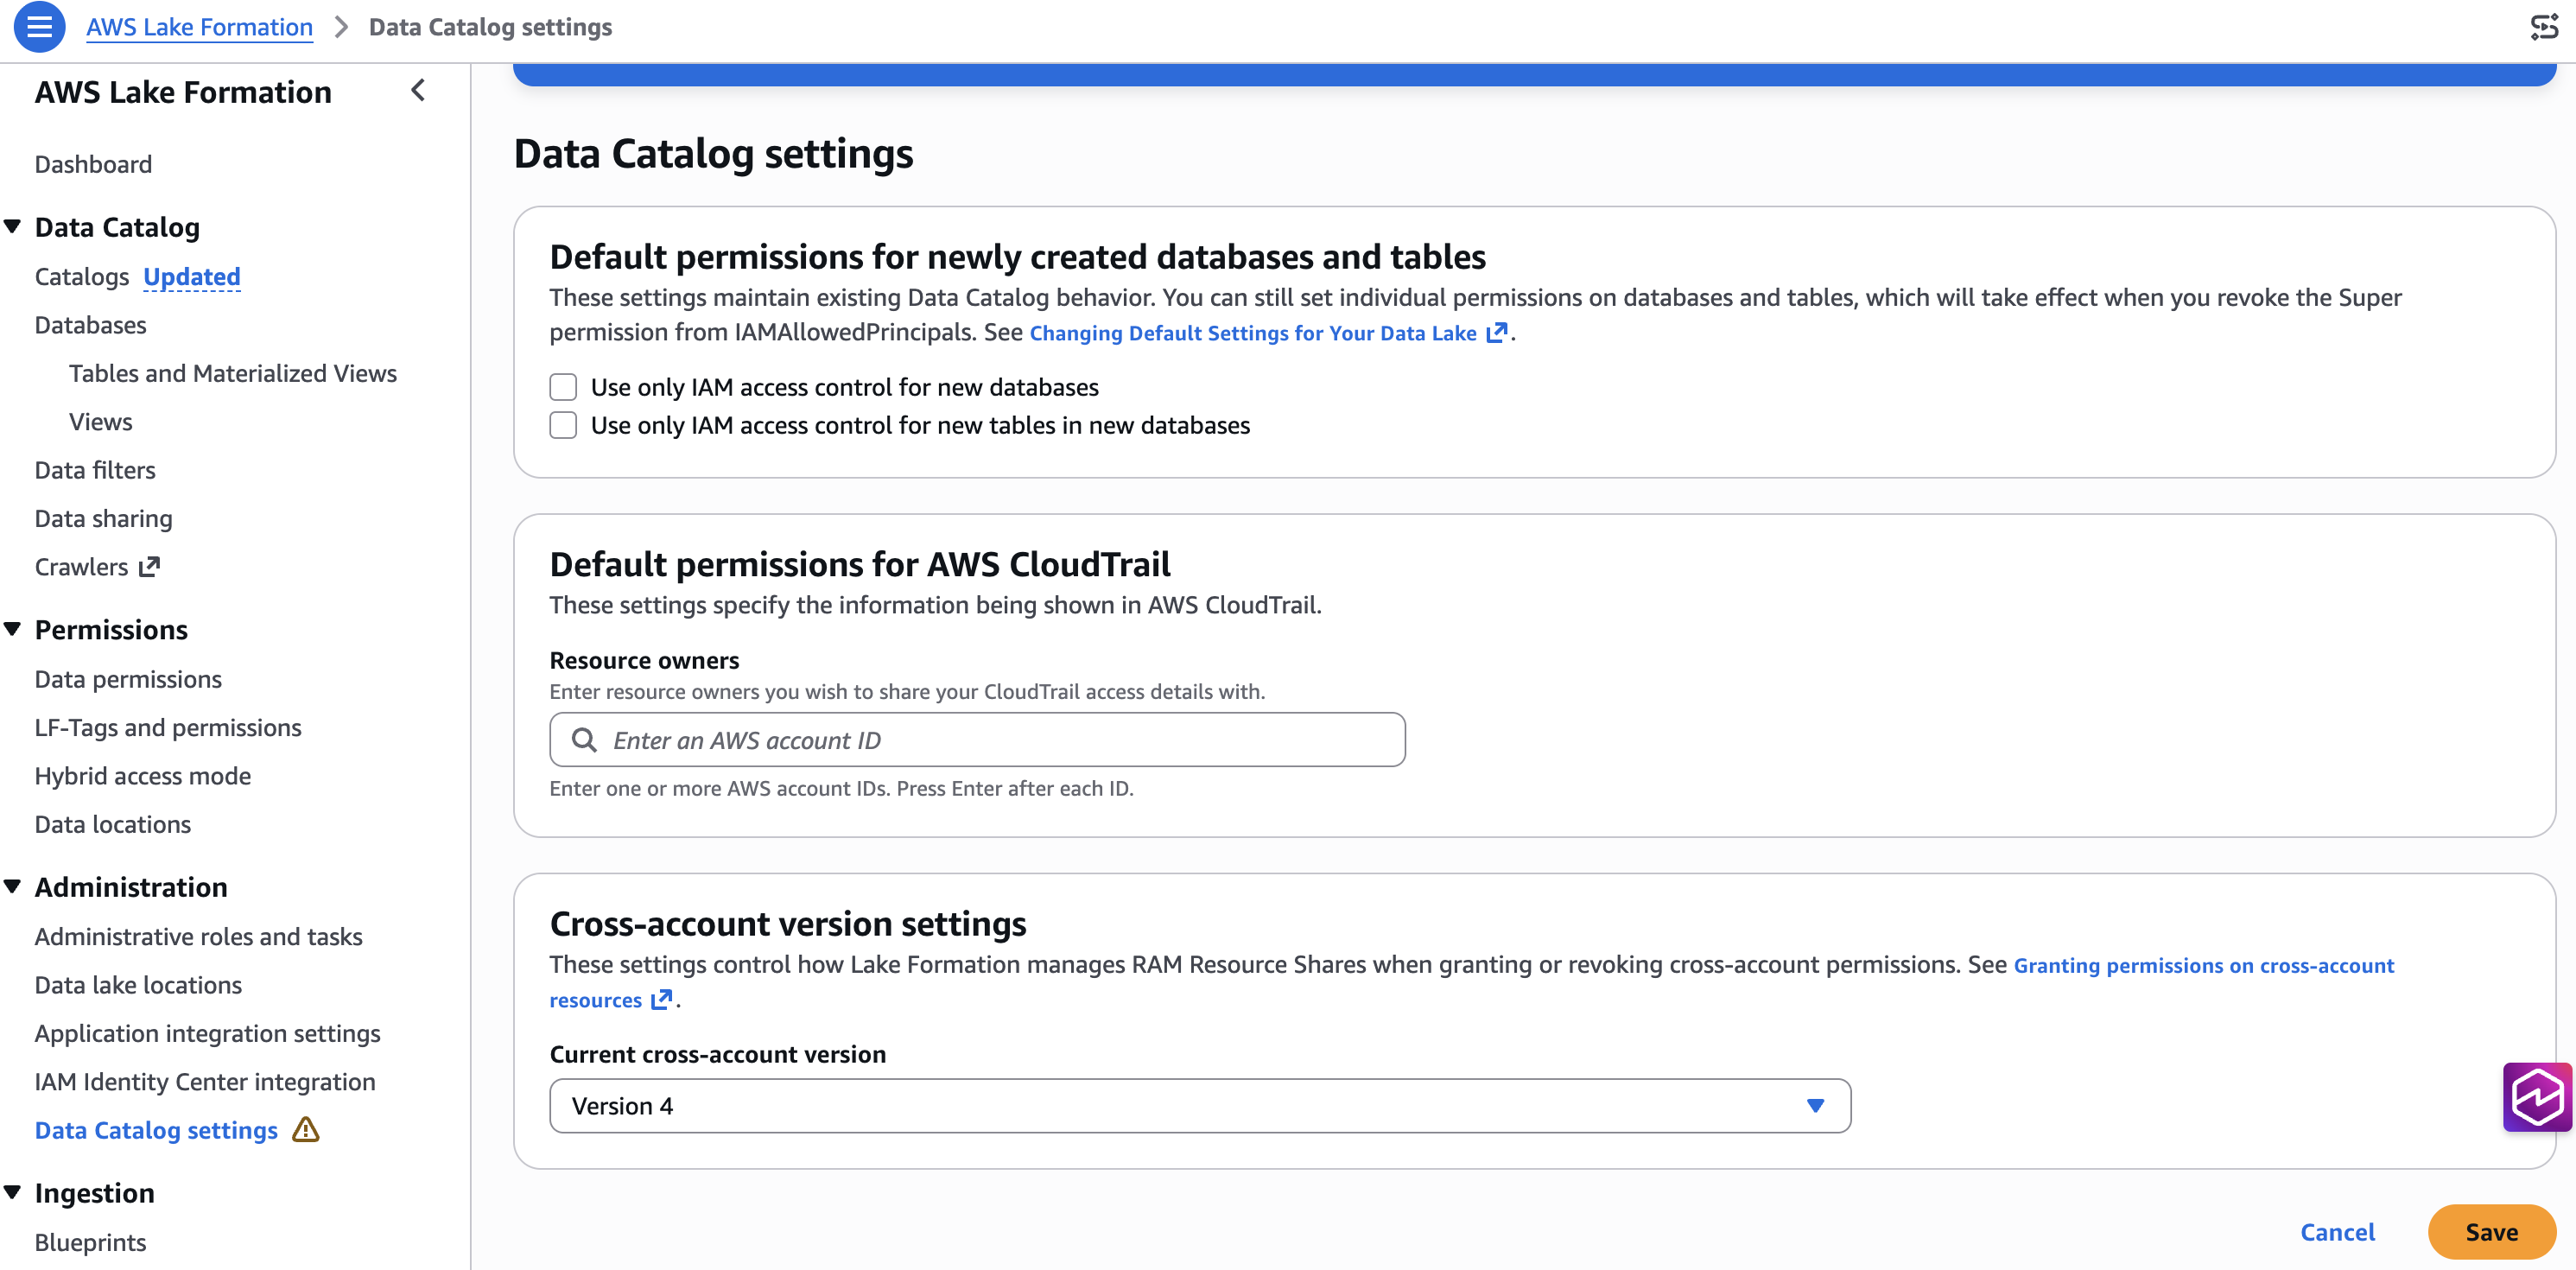
Figure 7: Lake Formation Data Catalog settings with default IAM access control disabled.
Optional: Verify Lake Formation default permissions through the AWS CLI
Confirm both CreateDatabaseDefaultPermissions and CreateTableDefaultPermissions are empty arrays ([]).
Add AWSServiceRoleForRedshift as a read-only admin
If you plan to query S3 Tables from Amazon Redshift Query Editor V2, you must add the Amazon Redshift service-linked role as a Read-Only Admin in Lake Formation. Complete the following steps:
- In the Lake Formation console, go to Administration → Administrative roles and tasks.
- Under Data lake administrators, choose Add. Choose Read only administrator.
- From the menu, choose
AWSServiceRoleForRedshift. - Choose Confirm.
Important: Without this, Amazon Redshift Query Editor V2 doesn’t display external databases from s3tablescatalog. The Amazon Redshift service-linked role needs read-only admin access to browse the Data Catalog on behalf of users.
Step 2.2: Create the Lake Formation data access role for S3 Tables
Create an IAM role that Lake Formation assumes to generate temporary, scoped credentials on behalf of users requesting access to S3 Tables data. Lake Formation uses this role (instead of its service-linked role) because Trusted Identity Propagation requires sts:SetContext in the trust policy, which is not available on the service-linked role. Without a custom role with this permission, Lake Formation cannot propagate the user’s IAM Identity Center identity when accessing S3 Tables.
Create the role with the trust policy
Attach the S3 Tables permissions policy
Step 2.3: Register S3 Tables with Lake Formation
Register the S3 Tables resource with Lake Formation using the data access role. This step lets Lake Formation manage access to S3 Tables through the Data Catalog and creates the s3tablescatalog federated catalog automatically.
Open the Lake Formation console and complete the following steps:
- Choose Catalogs in the navigation pane and choose Enable S3 Table integration.
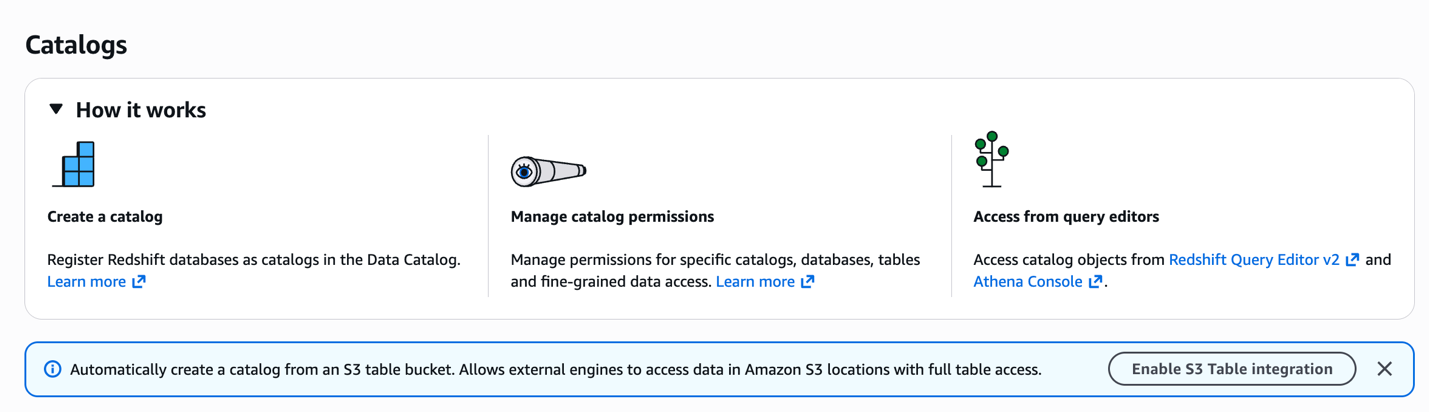
Figure 8: Lake Formation Catalogs page with the Enable S3 Table integration option.
- Select the IAM role and select Allow external engines to access data in Amazon S3 locations with full table access. Choose Enable.
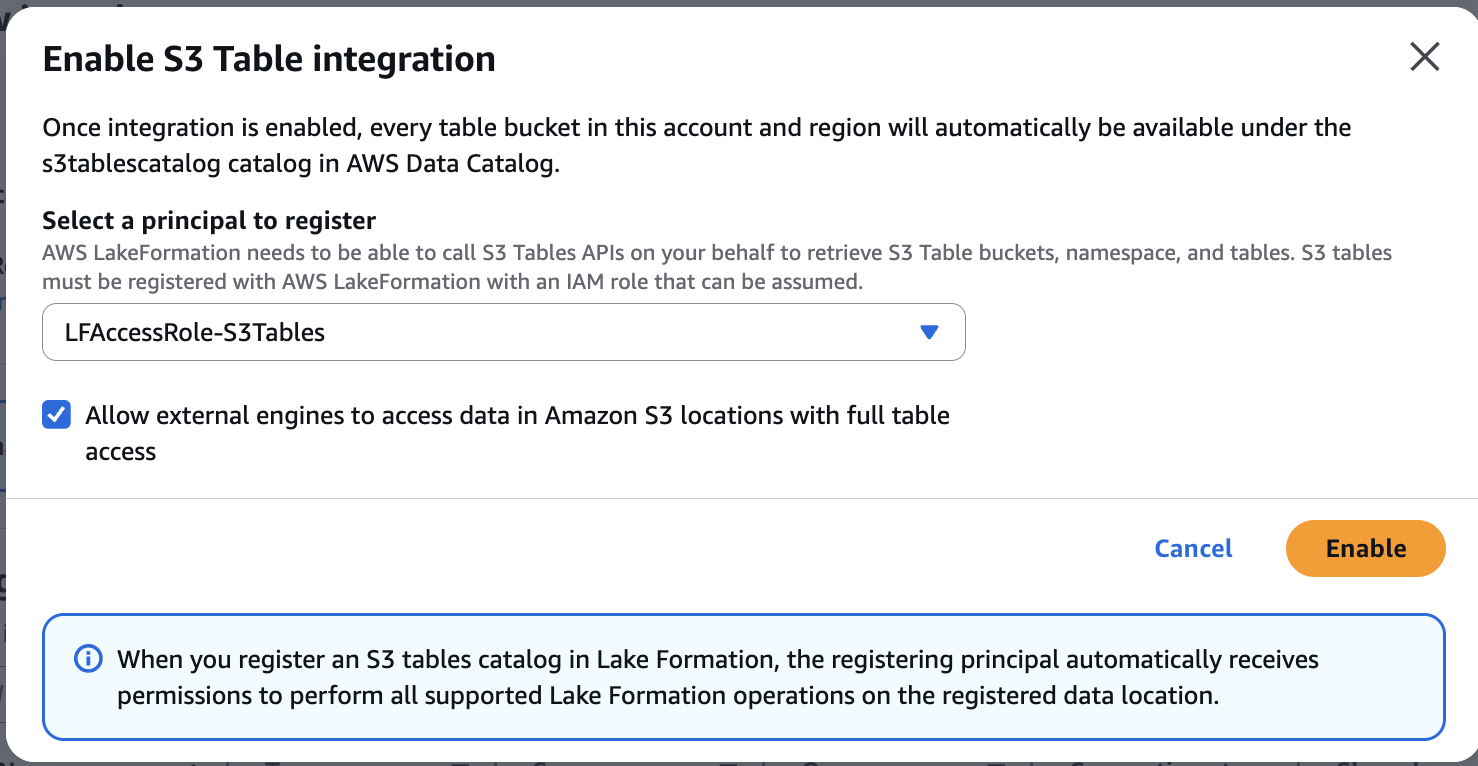
Figure 9: Enable S3 Table integration dialog with the IAM role and external-engine access configured.
Alternative: Register through the AWS CLI
Important: Verify that the --role-arn matches the exact ARN of the role created in Step 2.2 (including the path). A mismatch (e.g., role/service-role/LFAccessRole-S3Tables vs role/LFAccessRole-S3Tables) will cause credential vending failures later.
Optional: Verify the registration
Confirm the S3 Tables entry shows WithFederation: true and the correct role ARN.
Step 2.4: Create the S3 table bucket and namespace
Create an S3 table bucket and a namespace. Complete the following steps on the Amazon S3 console:
- In the navigation pane, choose Table buckets.
- Choose Create table bucket.
- On the next page, enter the bucket name as
<TABLE_BUCKET_NAME>. - Keep the other options as default and choose Create table bucket.
- After you create it, the AWS Management Console redirects you to the list of table buckets. Choose the table bucket
<TABLE_BUCKET_NAME>. - Choose Create table with Athena.
- Create a namespace in S3 Tables (equivalent to a database in AWS Glue Data Catalog). Enter the namespace (database) name as
<NAMESPACE_NAME>and choose Create namespace.
You can also perform these steps using the AWS Command Line Interface (AWS CLI). Refer to Creating a table bucket using the AWS CLI for equivalent commands.
Step 2.5: Grant admin role access
After you remove default permissions, you need to give your Admin role explicit Lake Formation permissions to create tables. Because your Admin role is a Data Lake Admin, you can already see s3tablescatalog in the Amazon Athena console, but creating tables requires an explicit grant.
From the console
- Open the Lake Formation console in your Region.
- Choose Data permissions → Grant.
- Under Principals, select IAM users and roles and choose your Admin role.
- Under LF-Tags or catalog resources, select Named Data Catalog resources.
- For Catalogs, choose
<Account ID>:s3tablescatalog/<Table_Bucket_Name>. - For Databases, select your database (for example,
customer_ns_db). - Select Super for Database permissions and Grantable permissions.
- Choose Grant.
After this grant, you can create and insert data into tables from the Athena console.
Note: Your Admin role must be a Data Lake Admin (configured in Step 2.1) to browse s3tablescatalog in Athena. You need the explicit database grant for write operations (CREATE TABLE, INSERT).
Step 2.6: Create a table from the Athena console
- Open the Amazon Athena console in your Region.
- In the Data source menu, select AwsDataCatalog.
- For Catalog, choose
s3tablescatalog/<Table_Bucket_Name>. - For Database, choose your namespace.
- Run a
CREATE TABLEstatement. For example:
Step 2.7: Grant permissions to the IAM Identity Center group
Give your IAM Identity Center group access to query tables. This step enables Trusted Identity Propagation (TIP) for this group. When users in the group access data through TIP-integrated services like Amazon Redshift, Lake Formation evaluates their IAM Identity Center group membership and enforces table-level and column-level permissions accordingly.
From the console
Grant DESCRIBE on the database:
- Open the Lake Formation console in your Region.
- Choose Data permissions → Grant.
- Under Principals, select IAM Identity Center and choose your IAM Identity Center group (for example,
awssso-sales). - Under LF-Tags or catalog resources, select Named Data Catalog resources.
- For Catalogs, choose
<Account ID>:s3tablescatalog/<Table_Bucket_Name>. - For Databases, select your database (for example,
customer_ns_db). - For Database permissions, select Describe.
- Choose Grant.
Grant SELECT and DESCRIBE on tables:
- Choose Data permissions → Grant.
- Under Principals, select IAM Identity Center and choose your IAM Identity Center group (for example,
awssso-sales). - Under LF-Tags or catalog resources, select Named Data Catalog resources.
- For Catalogs, choose
<Account ID>:s3tablescatalog/<Table_Bucket_Name>. - For Databases, select your database (for example,
customer_ns_db). - For Tables, select All tables (or a specific table).
- For Table permissions, select Select and Describe.
- Choose Grant.
Tip: You can also configure column-level or row-level permissions for fine-grained access control. When granting on a specific table, additional options for Column permissions and Data filters become available.
Step 2.8: Optional: Verify the Lake Formation permissions
Confirm database-level permissions
Confirm table-level permissions
You should see:
- Your Admin role with
ALLpermissions at the database level. - Your IAM Identity Center group with
DESCRIBEpermissions at the database level. - Your IAM Identity Center group with
DESCRIBEonALL_TABLESandSELECTonALL_TABLES(withColumnWildcard) at the table level. - No
IAM_ALLOWED_PRINCIPALSentries.
Step 2.9: Create Amazon Redshift tables and grant permissions
Connect to the Amazon Redshift cluster in us-west-2 as an admin user and create Redshift local tables. Grant permissions on those local resources to IAM Identity Center groups.
Create a schema and table
Grant permissions to the IAM Identity Center group
Step 3: Test the solution
In the management account, navigate to the IAM Identity Center console and copy the AWS access portal URL (for example, https://d-1234560789.awsapps.com/start) from the dashboard.
- Log out from the management account and paste the AWS access portal URL in a new browser window.
- A pop-up redirects you to your IdP login page. Enter Ethan’s IdP credentials.
- After successful authentication, you’re logged into the AWS console as a federated user. Select the QEV2 permission set for the secondary Region (us-west-2).
- In Query Editor V2, open the context (right-click) menu on your Amazon Redshift instance, choose Create connection, and for Authentication, select IAM Identity Center.
- Because your IdP credentials are already cached, the browser reuses them automatically. You’re now connected to Amazon Redshift.
Pattern A: Query the S3 table catalog using Lake Formation permissions
Query the customer profile data through s3tablescatalog. Lake Formation enforces access based on Ethan’s IAM Identity Center group membership:
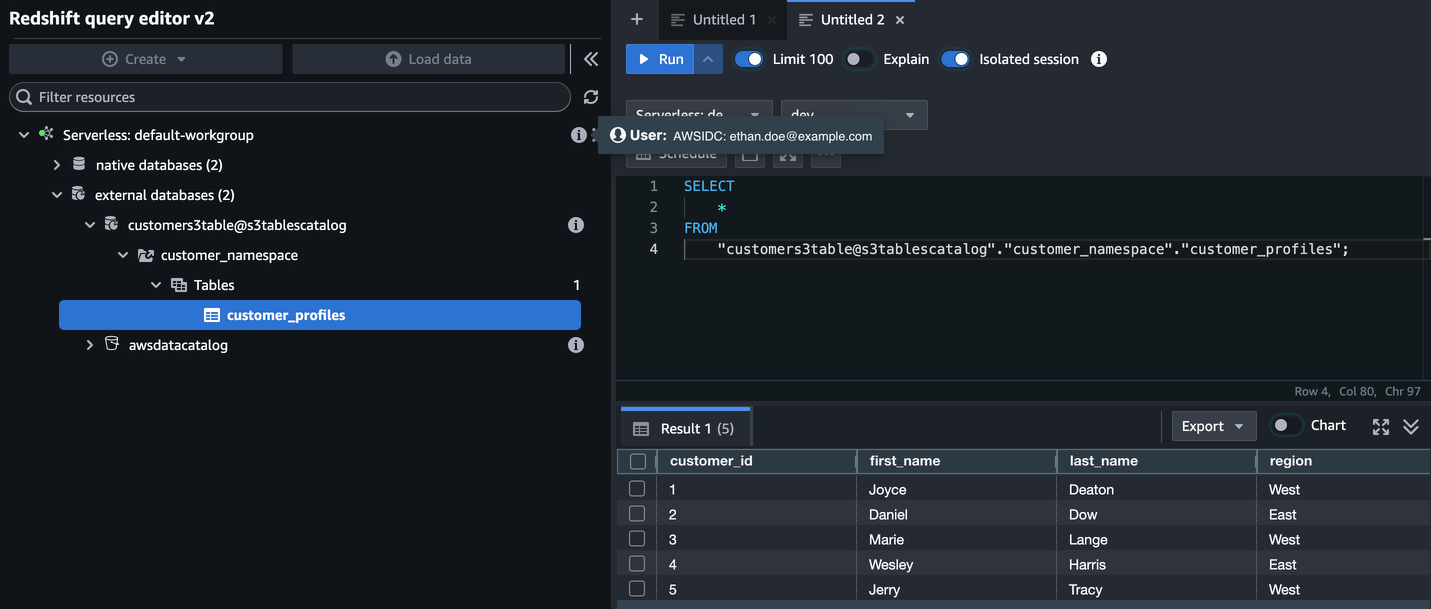
Figure 10: Query results from s3tablescatalog returned through Lake Formation in Amazon Redshift Query Editor V2.
This query reads customer profile data from Amazon S3 through Amazon Redshift Spectrum, with Lake Formation controlling who can access which tables and columns.
Pattern B: Unload data to Amazon S3 using S3 Access Grants
Run the UNLOAD command to write data from Amazon Redshift to the S3 bucket:
You don’t need an IAM role ARN in the command. S3 Access Grants handles authorization based on Ethan’s IAM Identity Center identity and group membership, propagated across Regions using IAM Identity Center Multi-Region support.
Verify the data in Amazon S3
On the Amazon S3 console, navigate to s3://west-idc-amzn-s3-demo-bucket/awssso-sales/ and verify that the unloaded data files are present.
Join Lake Formation data with locally loaded Amazon Redshift data
Combine customer profile data (queried via Lake Formation) with sales data (loaded via S3 Access Grants) using the shared customer_id column:

Figure 11: Joined results from S3 Tables and Amazon Redshift local data, ordered by sales amount.
This shows that you can join S3 Tables data with Amazon Redshift using the same IAM Identity Center identity.
Verify access control
To confirm that S3 Access Grants is enforcing access, try accessing a folder Ethan does not have a grant for:
This should return an access denied error, confirming that S3 Access Grants is controlling access based on the user’s identity and group membership.
Step 4: Verify with AWS CloudTrail
You can verify that Amazon Redshift used both S3 Access Grants and Lake Formation for authorization by checking AWS CloudTrail:
- On the CloudTrail console, choose Event history.
- Filter by Event source:
s3.amazonaws.com. Look forGetDataAccessevents (S3 Access Grants). - Filter by Event source:
lakeformation.amazonaws.com. Look forGetDataAccessevents (Lake Formation).
Both event types show Ethan’s IAM Identity Center user identity, confirming trusted identity propagation works end-to-end for both access patterns.
Other related integration guides
The following table lists related blog posts and integration guides covering additional identity-based access patterns with Amazon Redshift. Although many of these were written for single-Region deployments, you can extend them to multi-Region environments by first enabling IAM Identity Center Multi-Region as described in Step 1 of this post. Use the table to find the guide that matches your identity provider and tooling:
| Integration / use case | Identity provider | What it covers | Blog link |
| Amazon Redshift federated permissions | Any | Centralize permission management across multiple Amazon Redshift clusters within a Region using IAM Identity Center-linked database roles. | Simplify multi-warehouse data governance with Amazon Redshift federated permissions |
| Amazon Redshift Query Editor V2, DbVisualizer, DBeaver | Any | Foundational Amazon Redshift and IAM Identity Center setup, role-based access control (RBAC), JDBC single sign-on (SSO) with PKCE. | Integrate IdP with Query Editor V2 and SQL client |
| Amazon Redshift and S3 Access Grants (single Region and cross-account) | Any | Amazon S3 data access through UNLOAD/LOAD with identity-based permissions. |
Simplify data access with S3 Access Grants |
| Amazon SageMaker Unified Studio with Athena and Amazon Redshift | Any | SQL analytics with Lake Formation governance. | Configure SSO with SageMaker Unified Studio |
| Amazon QuickSight with Lake Formation | Any | Cross-account Glue Data Catalog, business intelligence dashboards. | Cross-account Glue and Lake Formation |
| Tableau (Desktop, Server, Prep) | Okta | TTI plus OIDC setup, Tableau OAuth XML configuration. | Integrate Tableau with Okta |
| Tableau (Desktop, Server, Prep) | PingFederate | TTI plus OIDC setup, JWT access token manager. | Integrate Tableau with PingFederate |
| Tableau (Desktop, Server, Prep) | Microsoft Entra ID | TTI plus OIDC setup, Entra app registration. | Integrate Tableau with Entra ID |
| ThoughtSpot | Okta / Microsoft Entra ID | Native OIDC integration, supports both IdPs. | Integrate ThoughtSpot |
Key considerations
When implementing this multi-Region architecture, keep the following operational and configuration considerations in mind. These reflect common challenges and design decisions encountered during deployment:
- IAM Identity Center Multi-Region requires a customer-managed multi-Region AWS KMS key replicated to each additional Region before you can add the Region to Identity Center.
- S3 Access Grants instances are regional. You need a separate instance in each Region where your users access data. A bucket must be in the same Region as the Access Grants instance that manages it.
- IAM Identity Center Multi-Region provides the same user and group identities across Regions, so you can use the same group IDs in grants across Regions.
- You must register Lake Formation data locations with a customer-managed role that includes
sts:SetContextin its trust policy. For S3 Tables, useaws lakeformation register-resourcewith the--with-federationflag and the resource ARN formatarn:aws:s3tables:<REGION>:<ACCOUNT_ID>:bucket/*. Using the service-linked role causes the error:Cannot vend credentials from service-linked role to Identity Center principal. - SELECT and UNLOAD use different permission models. Lake Formation controls query-time access to cataloged data (
SELECTthrough Spectrum). S3 Access Grants controls direct Amazon S3 access (COPY/UNLOAD). Both use the same IAM Identity Center identity. - The Amazon Redshift managed application IAM role must include
sts:SetContextin its trust policy and have both Lake Formation/Glue and S3 Access Grants permissions. - Cross-account setup requires AWS RAM resource sharing for S3 Access Grants and proper IAM Identity Center application configuration in the analytics account.
- Scoped vs object-level permissions in Amazon Redshift. When granting permissions with
GRANT ... FOR TABLES IN SCHEMA, useREVOKE ... FOR TABLES IN SCHEMAto remove them. TheREVOKE ... ON ALL TABLES IN SCHEMAsyntax only removes object-level permissions, not scoped permissions. - The Lake Formation data access role for S3 Tables requires
sts:SetContextin its trust policy (for TIP) ands3tables:*permissions on the table bucket resources. AWSServiceRoleForRedshiftmust be a Read-Only Admin in Lake Formation for Amazon Redshift Query Editor V2 to display external databases froms3tablescatalog.- Federated catalog CatalogId format. When using CLI commands for S3 Tables resources in Lake Formation, use the full path format:
<ACCOUNT_ID>:s3tablescatalog/<TABLE_BUCKET_NAME>. Using the account ID alone returns empty results.
Clean up
To avoid ongoing charges, clean up the resources created in this post:
- Delete the S3 table bucket (delete tables → namespaces → bucket using
aws s3tablesCLI commands). - Deregister the S3 Tables resource from Lake Formation (
aws lakeformation deregister-resource --resource-arn "arn:aws:s3tables:<REGION>:<ACCOUNT_ID>:bucket/*"). - Delete
s3tablescatalogfrom Glue (aws glue delete-catalog --catalog-id "s3tablescatalog"). - Delete the
LFAccessRole-S3TablesIAM role and associated policies. - Delete the S3 Access Grants instance and grants in us-west-2.
- Delete the S3 bucket used for
UNLOAD/COPYin us-west-2. - Delete the
iamidcs3accessgrantIAM role and associated policies. - Deregister the S3 data location from Lake Formation.
- Delete the Lake Formation IAM Identity Center integration.
- Delete the Amazon Redshift cluster in us-west-2 if you created one for testing.
- Remove us-west-2 from IAM Identity Center Multi-Region (if no longer needed).
- Schedule deletion of the AWS KMS replica key in us-west-2 (minimum 7-day waiting period).
Conclusion
In this post, we extended the Amazon Redshift and S3 Access Grants integration to a multi-Region setup using IAM Identity Center Multi-Region replication. We demonstrated two complementary data access patterns: SELECT through Lake Formation for fine-grained access control on S3 Tables data, and UNLOAD/COPY through S3 Access Grants for direct Amazon S3 access. Both patterns use the same IAM Identity Center identity for access control. We also showed how to set up a customer-managed multi-Region AWS KMS key, enable IAM Identity Center in an additional Region, configure Amazon S3 Tables with Lake Formation for identity-based access control using Trusted Identity Propagation, and replicate the complete S3 Access Grants setup in a different Region and account.
With this approach, AnyCompany Global’s analysts authenticate once and access data in any enabled Region while Lake Formation and S3 Access Grants enforce per-user, per-group access policies.
For additional guidance, refer to the following resources:
- Simplify enterprise data access using the Amazon Redshift integration with Amazon S3 Access Grants(Part 1)
- IAM Identity Center Multi-Region
- Creating multi-Region replica keys
- AWS IAM Identity Center now supports customer-managed AWS KMS keys for encryption at rest
- S3 Access Grants documentation
- Simplify external object access in Amazon Redshift using automatic mounting of the AWS Glue Data Catalog
- Querying data through AWS Lake Formation