AWS Big Data Blog
Navigating multi-account deployments in Amazon SageMaker Unified Studio: a governance-first approach
Amazon SageMaker Unified Studio brings together data engineering, analytics, and machine learning (ML) workflows into a cohesive, governed environment. This unified approach reduces traditional silos between data teams and ML practitioners, so organizations can advance their AI and ML initiatives with greater collaboration and efficiency.
As enterprises begin their SageMaker Unified Studio adoption, they must determine the best practices for implementing data federation principles when using SageMaker Unified Studio across the organization. The way that you structure your SageMaker Unified Studio deployment is more than a technical decision. It directly impacts your governance framework, security posture, operational scalability, and day-to-day team collaboration.
In this post, we explore SageMaker Unified Studio multi-account deployments in depth: what they entail, why they matter, and how to implement them effectively. We examine architecture patterns, evaluate trade-offs across security boundaries, operational overhead, and team autonomy. We also provide practical guidance to help you design a deployment that balances centralized control with distributed ownership across your organization.
The multi-account challenge: why organizations struggle
If you’re working in a large enterprise, a multi-account AWS environment is often your starting position. If you’re starting from scratch, consider whether to use a single-account for all SageMaker Unified Studio components or dedicate separate accounts for governance and business units. A multi-account architecture aligns with AWS best practices and proves valuable if you have:
- Distributed teams with independent operations: multi-account architecture accommodates multiple teams or business units that maintain separate operations so that each team can manage their projects autonomously within isolated environments. Each unit can deploy and manage resources independently, implement team-specific security controls, and scale infrastructure without impacting others. This is achieved through a shared, unified integrated development environment (IDE) for collaboration and standardized tools across the organization.
- Compliance and data governance requirements: For regulatory mandates like GDPR, HIPAA, or data sovereignty needs, you will benefit from this setup, because sensitive data remains segregated in business-unit specific accounts. This reduces risk exposure, streamlines audits, and maintains compliance boundaries without compromising access to centralized collaboration tools.
- Centralized governance: A multi-account architecture maintains visibility across all projects and business units from a single control plane. The Domain account can enforce security policies and compliance requirements across the entire organization and provide centralized monitoring, audit logging, and user access management.
- Clear cost visibility and accountability: Multi-account architecture enables granular billing tracking, with each account generating separate bills that clearly attribute costs to specific teams or business units. This transparency streamlines budgeting and financial accountability, removing the complexity of cost allocation tags and manual reporting that’s typically required in single-account models where multiple teams share the same infrastructure and resources.
Overall, this approach improves efficiency, security, and scalability for you, whether you’re managing a few teams or coordinating across a larger organizational structure.
Understanding the core constructs of SageMaker Unified Studio
Before diving into multi-account strategies, it’s important to understand the foundational constructs of SageMaker Unified Studio. Each is elaborated in greater detail in the Administrator Guide.
- Domain: The top-level administrative boundary where governance lives. In a multi-account setup, this is your centralized control plane for catalog, policies, and user access.
- Project: A collaborative workspace for developing data, AI, and ML initiatives. In multi-account deployments, a Project’s metadata lives in the Domain account and compute and data resources deploy into associated business unit accounts. This separation is central to the pattern that we explore.
- Project Profile: A template that standardizes how Projects are created. For multi-account setups, this is where administrators define which accounts and AWS Regions Projects can target.
- Blueprints: Infrastructure as code (IaC) components that define what gets provisioned inside a Project. Each associated account must enable its relevant Blueprints before Projects can deploy there.
The following diagram illustrates how these key constructs interact. Within a Domain, users create Projects organized through a single Project Profile. The Project Profile defines and configures a collection of Blueprints. When a project is created, the infrastructure specified in those Blueprints is automatically provisioned and becomes available within the project workspace.
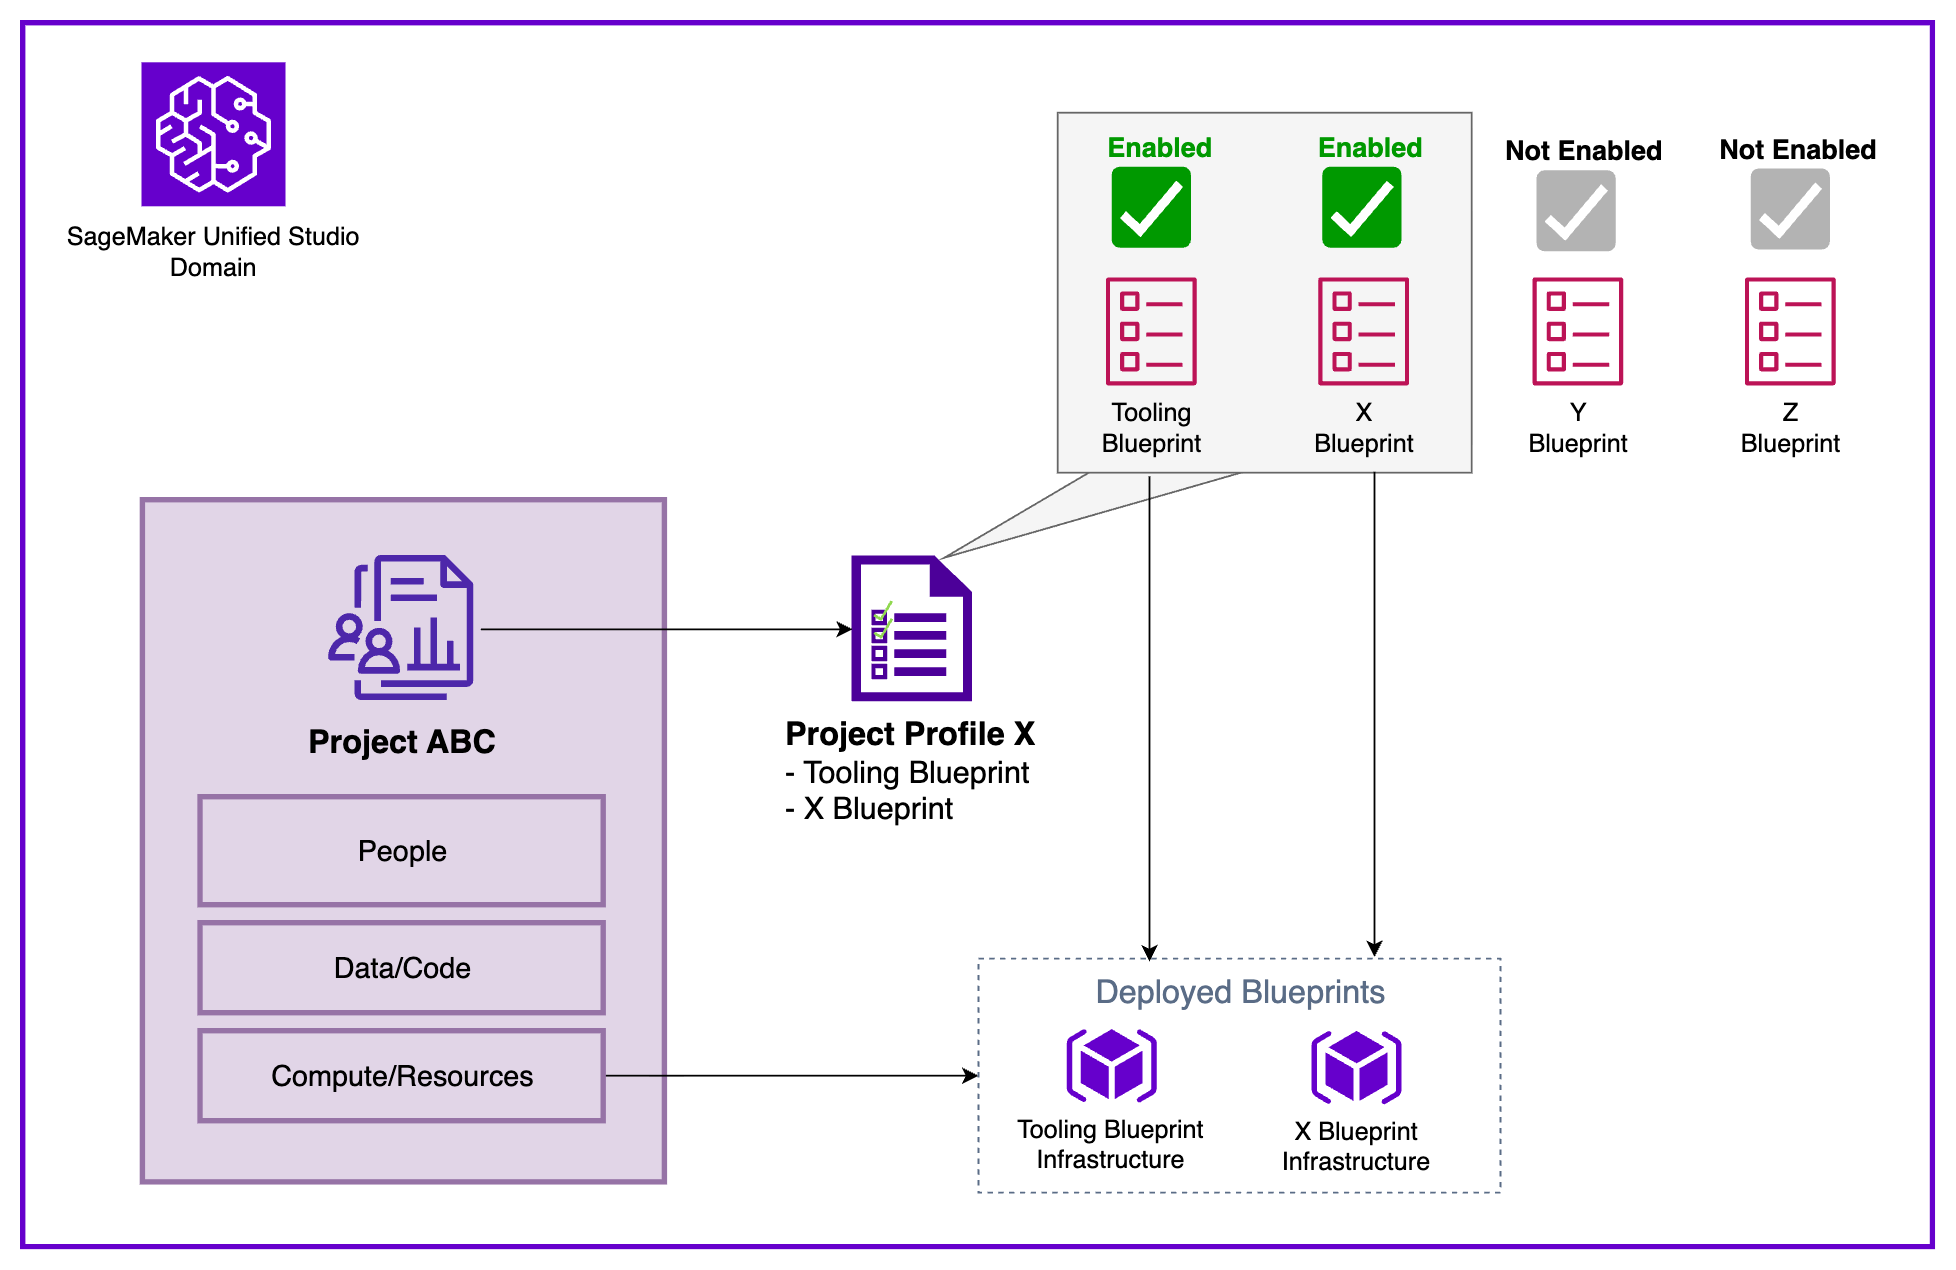
Figure 1: Amazon SageMaker Unified Studio Core Constructs
Multi-account setup in SageMaker Unified Studio
To illustrate these concepts in practice, we demonstrate with a sample enterprise organization that exemplifies enterprise environments with several AWS accounts belonging to different business units:
- Central Data Governance team: Owns and manages governance and access control across the organization. They plan to build a data solution in a dedicated AWS account using SageMaker Unified Studio. The platform must provide an integrated development environment (IDE) to work with data and ML use cases and connect to multiple business unit’s AWS accounts (Finance and Marketing).
- Finance Business Unit: Owns datasets for fraud analysis and churn prediction in their own AWS account.
- Marketing Business Unit: Maintains customer sentiment data and campaign analytics in their own AWS account.
In the following diagram we show the Data platform constructs provided by SageMaker Unified Studio in each AWS account showing the clear separation between centralized governance and distributed resource deployment.
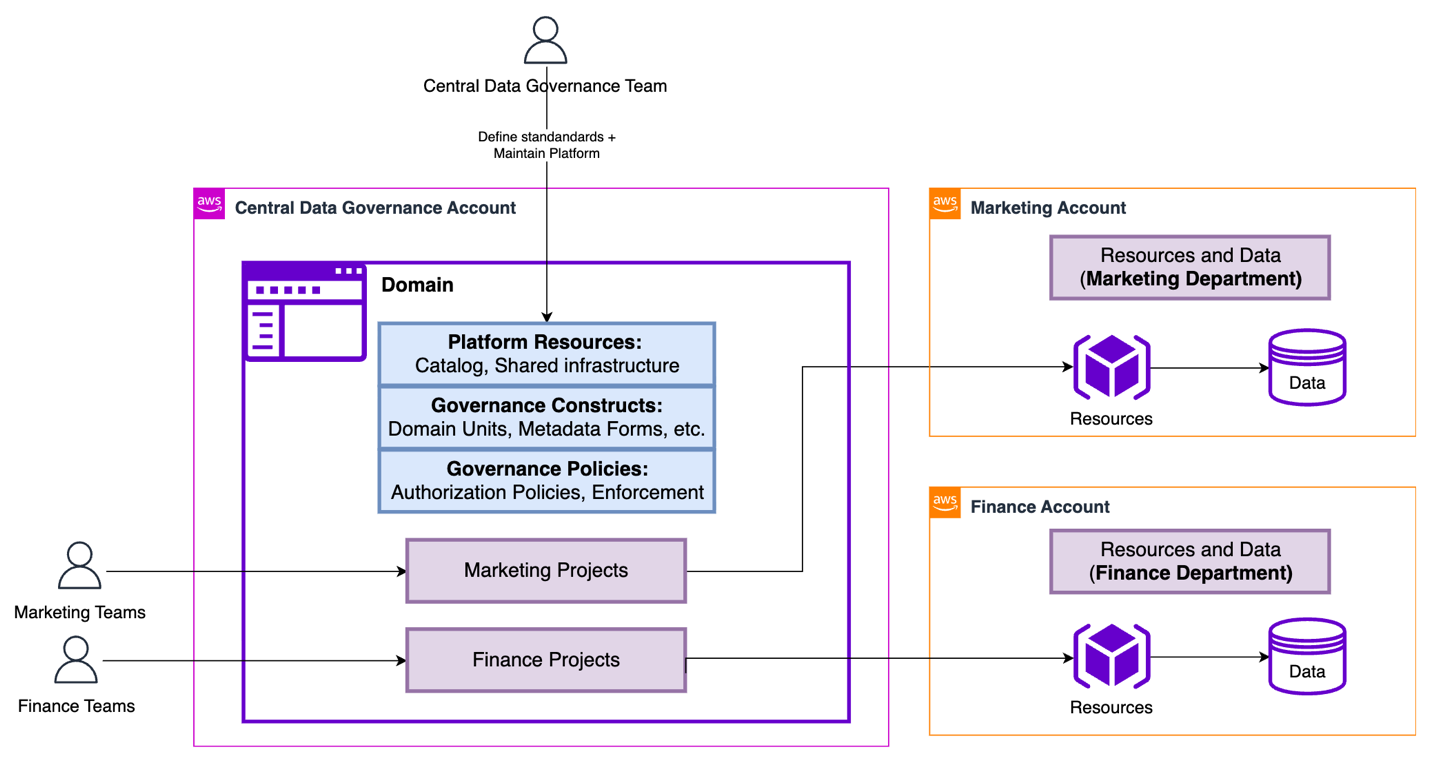
Figure 2: Sample organization architecture in Amazon SageMaker Unified Studio
The Central Data Governance Account contains the SageMaker Unified Studio Domain. This contains the shared platform resources (Catalog, shared infrastructure), governance constructs (Domain units, metadata forms), and governance policies (authorization policies, enforcement rules). These configuration elements define the standards and capabilities available across the organization. They’re the Service-level configuration data: Metadata, policies, and governance rules that define how resources should be provisioned.
In contrast, the Associated Accounts (Marketing and Finance) contain the actual AWS infrastructure, compute/storage (purple cubes) and data stores (cylinders), provisioned when Projects are created. The diagram shows how Marketing Projects and Finance Projects ultimately deploy their runtime resources into their respective business unit accounts. The separation keeps the governance centralized and consistent while allowing business unit dependent resources to be isolated, billed separately, and managed according to each business unit’s specific requirements.
To understand the core constructs of SageMaker Unified Studio, we listed the core components of SageMaker Unified Studio and explained how they relate to each other. Taking the same diagram as the basis, we will now represent how these constructs are created in our multi-account sample scenario.
| Construct | Deployment Location | Deployed Resources |
| Domain | Central Data Governance Account |
|
| Project | Central Data Governance Account + Associated Account | In Central Data Governance Account:
In Associated Account:
|
| Project Profile | Central Data Governance Account |
|
| Blueprint | Associated Account |
|
Core construct deployment locations and resources in SageMaker Unified Studio
Implementing multi-account deployments
To enable production-ready data science and analytics workflows across multiple AWS accounts governed by a SageMaker Unified Studio Domain, organizations must establish a structured cross-account configuration. This setup allows each business unit (BU) to retain ownership of its Projects and AWS resources while using centralized governance provided by the Domain. The process involves four key steps: account association, Blueprint enablement, Project Profile configuration, and Project creation.
Note: The following steps provide a high-level overview of the multi-account deployment process. For a more detailed, step-by-step guide, refer to How to associate an account when using Amazon SageMaker Unified Studio.
Step 1: Account association to a domain
The Domain administrator associates each AWS account with the SageMaker Unified Studio Domain for seamless cross-account functionality by providing the AWS account number for the targeted accounts. This association lets the Domain publish and consume data from associated accounts, create resources within them, maintain cross-account access for the SageMaker Catalog, and deploy Projects directly into business unit accounts. Account association is a critical prerequisite for cross-account Project deployment. Behind the scenes, SageMaker Unified Studio uses AWS Resource Access Manager (AWS RAM) to make this cross-account functionality happen.
Step 2: Enabling blueprints
Each associate account administrator must enable the relevant Blueprints before creating Project Profiles. This important step verifies that Projects can provision the necessary tools and resources that users need to run their workloads. Blueprints serve as standardized infrastructure templates that administrators can use to enforce organizational standards, security controls, and best practices across all Projects. Through Blueprints, administrators configure essential resources including AWS Identity and Access Management (IAM) roles, AWS Key Management Service (AWS KMS) keys, Amazon Simple Storage Service (Amazon S3) buckets, Amazon Virtual Private Cloud (Amazon VPC) settings, and security groups. This centralized approach helps maintain consistency, compliance, and governance at scale while preventing users from creating Projects with misconfigured or non-compliant infrastructure.
Step 3: Configuring project profile
With the accounts successfully associated and the Blueprints enabled, the next step is to configure a Project Profile that determines where your Project resources will be deployed. Your choice of Project Profile strategy impacts both operational flexibility and governance.
Domain administrators control which Blueprints are included in each Project Profile and can specify the target AWS Regions and accounts for deployment, providing the governance foundation to standardize Project creation. Administrators can use pre-created Project Profiles like “All Capabilities” or “SQL Analytics”, or create custom Project Profiles tailored to specific organizational needs.
When configuring Project Profiles, you can choose between two deployment models:
- Static (Pre-Defined): Profile specifies a fixed account and Region. Projects by default deploy to the same location. This is recommended for strict governance controls and compliance requirements where production resources must remain in designated accounts or Regions.
- Dynamic (Parameterized): Users select from available associated accounts and Regions during Project creation (configured through Account Pools). This is recommended for multi-environment workflows (Dev/Test/Prod) and reducing administrative overhead by maintaining fewer profile templates.
Dynamic profiles balance governance with agility: Administrators define standards once, while users retain deployment flexibility aligned with their business needs.
Step 4: Project creation
With Project Profiles configured, you can now create a new Project from any of the associated accounts using the profile created in the previous step.
Defining project boundaries: when to create a new project
One of the common challenges that you will face is determining when to create a new Project. The answer significantly impacts collaboration effectiveness, resource isolation, cost tracking, and governance. Here’s a practical framework to guide your decision-making.
A Project should represent a distinct business initiative with a defined scope, a dedicated team, and measurable outcomes. Think of Projects as team workspaces organized around business outcomes, not technical components.
Create a new Project when you need clear separation across multiple dimensions: cost allocation, access control, and data governance. If Finance and Marketing teams require separate budget tracking, distinct data access policies, and different governance controls, they should have separate Projects. For example, “Customer Churn Prediction” and “Fraud Detection” might use similar tools, but if they have different stakeholders, budget owners, and data sensitivity requirements, so they warrant separation. Similarly, create separate Projects when facing different compliance or regulatory requirements (like HIPAA versus PCI-DSS) or when initiatives have independent deployment lifecycles. Experimental ML research Projects shouldn’t share workspaces with production recommendation engines that require stricter change controls and availability guarantees.
However, avoid fragmenting related work into unnecessary silos:
- Don’t create separate Projects for individual workflows or pipelines, a single “Marketing Campaign Optimization” Project should contain audience segmentation, propensity modeling, and campaign attribution workflows together.
- Don’t separate different data processing stages; keep data ingestion, transformation, and analysis within one Project to maintain clear lineage and enable seamless collaboration.
- Projects are team workspaces, not personal sandboxes, so use shared Projects with role-based access control rather than creating individual Projects per team member.
- Small proof of concepts (POC) or temporary experiments should be conducted within the parent Project, with successful initiatives promoted to dedicated production Projects only when they mature into full-scale capabilities requiring independent governance.
Conclusion
Throughout this post, we explored how the separation of governance and working accounts forms the foundation of a scalable, secure, and compliant data and AI platform.
With centralized governance in the Domain account, organizations can enforce consistent security policies, compliance requirements, and cost management, while allowing sub-accounts the autonomy over their own resources. This approach enhances security and compliance, and fosters collaboration and innovation within teams by providing them with the flexibility that they need to operate effectively. Ultimately, this governance-first strategy supports keeping data remains protected and accessible in a controlled manner, empowering teams to drive business outcomes efficiently. To implement a multi-account deployment for your organization, get started by creating your first SageMaker Unified Studio Domain and follow the step-by-step guidance to establish your governance-first architecture.