AWS Compute Blog
Enabling high availability of Amazon EC2 instances on AWS Outposts servers (Part 3)
This post is part 3 of the three-part series ‘Enabling high availability of Amazon EC2 instances on AWS Outposts servers’. We provide you with code samples and considerations for implementing custom logic to automate Amazon Elastic Compute Cloud (EC2) relaunch on Outposts servers. This post focuses on guidance for using Outposts servers with third party storage for boot and data volumes, whereas part 1 and part 2 focus on automating EC2 relaunch between standalone servers. Outposts servers support integration with Dell PowerStore, HPE Alletra Storage MP B10000 systems, NetApp on-premises enterprise storage arrays, and Pure Storage FlashArray.
Outposts servers provide compute and networking services that are designed for low-latency, local data processing needs for on-premises locations such as retail stores, branch offices, healthcare provider locations, or environments that are space-constrained. Outposts servers use EC2 instance store storage to provide non-durable block-level storage to the instances running stateless workloads. For applications that require persistent storage, you can create a three-tier architecture by connecting your Outposts servers to a third-party storage appliance. In this post, you will learn how to implement custom logic to provide high availability (HA) for your applications running on Outposts servers using two or more servers for N+1 fault tolerance. The code provided is meant to help you get started, and can be modified further for your unique workload needs.
Overview
In the following sections we will show how custom logic can be used to automate EC2 instance relaunch between two or more Outposts servers using boot and data volumes on third party storage. If your EC2 instance fails while using this solution, an Amazon CloudWatch alarm monitoring the EC2 StatusCheckFailed_Instance metric of your source EC2 instance will be triggered, and you will receive an Amazon Simple Notification Service (Amazon SNS) notification. An AWS Lambda function will then relaunch your EC2 instance onto the destination Outposts server that you’ve set up for resiliency. This is done using a launch template created during setup, and the script will connect your relaunched instance to the existing boot and data volumes on your third party storage appliance. This storage device provides shared storage for your Outposts servers. If a single server fails, new instances can connect to existing volumes on the array. This allows for a zero data loss Recovery Point Objective (RPO) and a Recovery Time Objective (RTO) equaling the time it takes to launch your EC2 instance. Take advantage of the features on your storage appliance for configuring data durability and resiliency to hardware failures, and make sure that you are regularly backing up your SAN volumes.
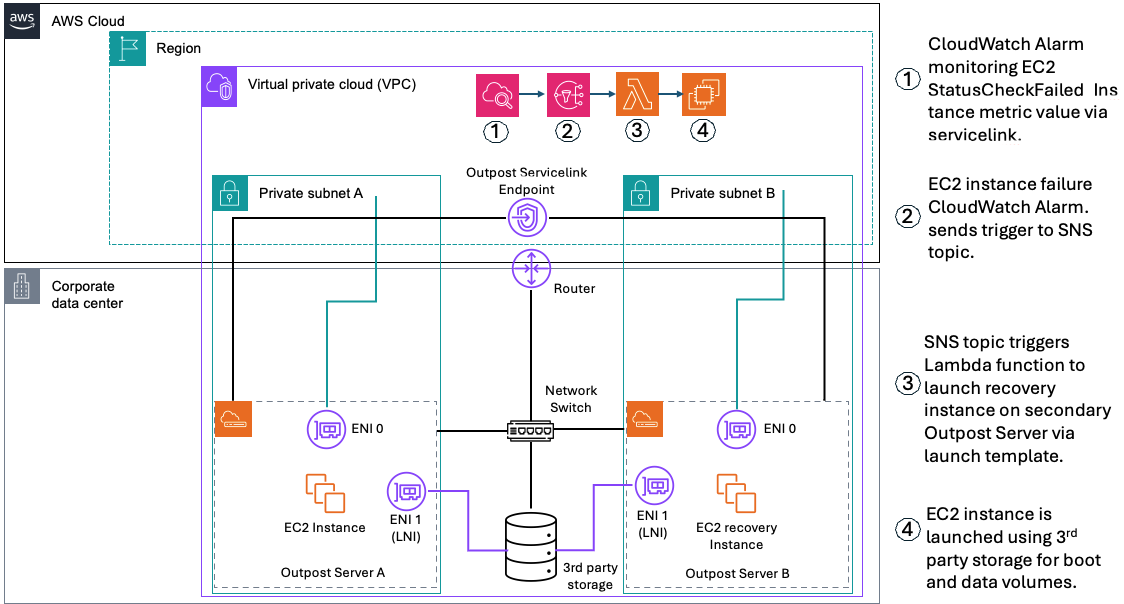
Figure 1 – Solution Architecture for automated EC2 Relaunch
Prerequisites
The following prerequisites are required to complete the walkthrough:
- Two Outposts servers that can be set up as an active-active or active-passive resilient pair.
- For workloads with a low threshold for downtime, ensure that your secondary Outpost server that’s used for recovery has a unique service link connection.
- Outposts servers must be colocated within the same Layer 2 (L2) network.
- Network latency between the Outposts servers must not exceed 5ms round trip time (RTT).
- A storage appliance that supports the iSCSI protocol. Credentials to manage the storage appliance initiator/target mappings. See Simplifying the use of third-party block storage with AWS Outposts for more information.
- If you’re setting this up from an Outposts consumer account, you must configure Amazon CloudWatch cross-account observability between the consumer account and the Outposts owning account to view Outposts metrics in your consumer account.
- Create launch templates for the EC2 instances that you want to protect, the launch wizard will help you create these.
- Credentials with permissions for AWS CloudFormation, Amazon EC2, and (optional) AWS Secrets Manager if authentication is required. IAM Permission Examples.md is provided in the repository.
- A Windows or Linux host that can access the storage appliance and your AWS account (management computer).
- AWS Outposts iPXE Amazon Machine Image (AMI) from the AWS Marketplace.
- Python 3.8 or later (recommended) is used to run the init.py script that dynamically creates a CloudFormation stack in the account specified as an input parameter.
- AWS SDK for Python (Boto3) version 1.26.0 or later recommended.
- Operating system with iSCSI boot support (Windows Server 2022 and Red Hat Enterprise Linux 9 AMIs are provided).
- Internet access to AWS service endpoints for the private subnet hosting the recovery Lambda function.
- Download the repository ec2-outposts-autorestart_3Pstorage.
Walkthrough
The first step is to deploy an EC2 instance configured to boot from a volume on the third-party storage that is prepared with an OS boot image. This step uses the launch wizard portion of the solution.
- Download and extract the OutpostServer_Recovery_3Pstorage repository to the management computer that has the AWS SDK for Python (Boto3) and Python installed.
- Run launch_wizard from the sample-outposts-third-party-storage-integration directory. You can run interactively or provide arguments for region, subnet, iPXE AMI, storage vendor, storage management ip, and credentials.
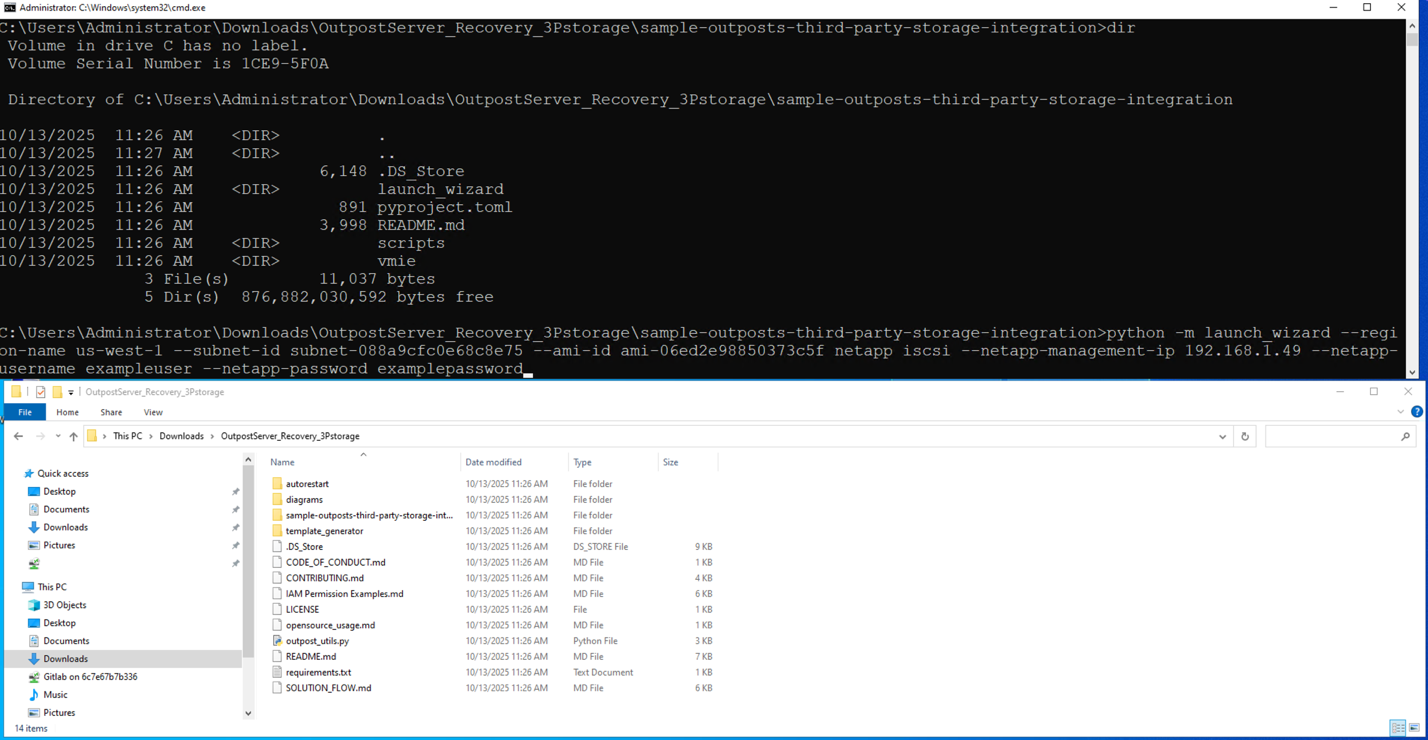
Figure 2 – Running launch wizard
- When prompted for a feature name, enter sanboot.
- For Guest OS type, enter in Linux or Windows.
- When prompted “Do you want to continue with this unverified AMI?”, select Y.
- The launch wizard will provide a list of instance types available on the Outpost server associated with the subnet you specified. Enter the instance type that you want to use.
- The launch wizard will now prompt you for optional EC2 Key Pair, Security Group, and Instance Profile settings for the EC2 instance that you are launching.
- Next, the launch wizard prompts you to specify an instance name. Note that specifying an instance name is required to set up automated instance recovery because the instance name is used as part of the recovery process.

Figure 3 – Taking user input for variable values
- The launch wizard prompts for root volume size. This is the root volume that the iPXE AMI boots from. The default is a 1GB volume on the Outpost server instance storage.
- Next, the launch wizard prompts you to select which third party storage controller you want to use based on the management ip that you specified. In this example, we are using NetApp, so I select a NetApp Storage Virtual Machine (SVM) named outpost_iscsi.
- If the connection to the storage array is successful and the protocol is available (iSCSI or NVMe over TCP) you are provided additional storage options for initiator group and logical unit number (LUN).
- In this example, we are using NetApp with iSCSI, so I can select an existing initiator group or create a new one.
- You can specify an existing initiator qualified name (IQN), or the launch wizard can generate a new one. IMPORTANT: Make sure that IQNs are unique to each instance because duplicates can cause data corruption.
- Next the launch wizard prompts which LUN’s you want to connect to this instance. For this example, I am going to use a Windows Server 2022 boot volume that I already created on the NetApp storage array.
- You are now asked which storage array target interface you want to use for connecting to these LUNs.
- The launch wizard provides the capability to specify guest OS scripts to customize the OS after sanboot. Combining this capability with storage array cloning provides a streamlined process for deploying new instances.
- The launch wizard now displays the EC2 user data template that it generated for use with the iPXE AMI and asks if you want to proceed with launching the instance.
- After the EC2 instance is launched, select yes to proceed with automated instance recovery setup.

Figure 4 – Running launch template creation script
Generating EC2 launch templates for recovery and failback
In the second step, we are generating EC2 launch templates for the EC2 instance launched in step 1. Launch templates can be generated for the primary and secondary Outpost servers. The launch template for the secondary Outpost server can be used for automated or manual recovery of the EC2 instance. Failback to the primary Outpost server is manual using the primary launch template.
- Select the instance that you want automated recovery for and select the subnet that you launched the instance in. This subnet represents the primary Outpost server that the instance is running on.
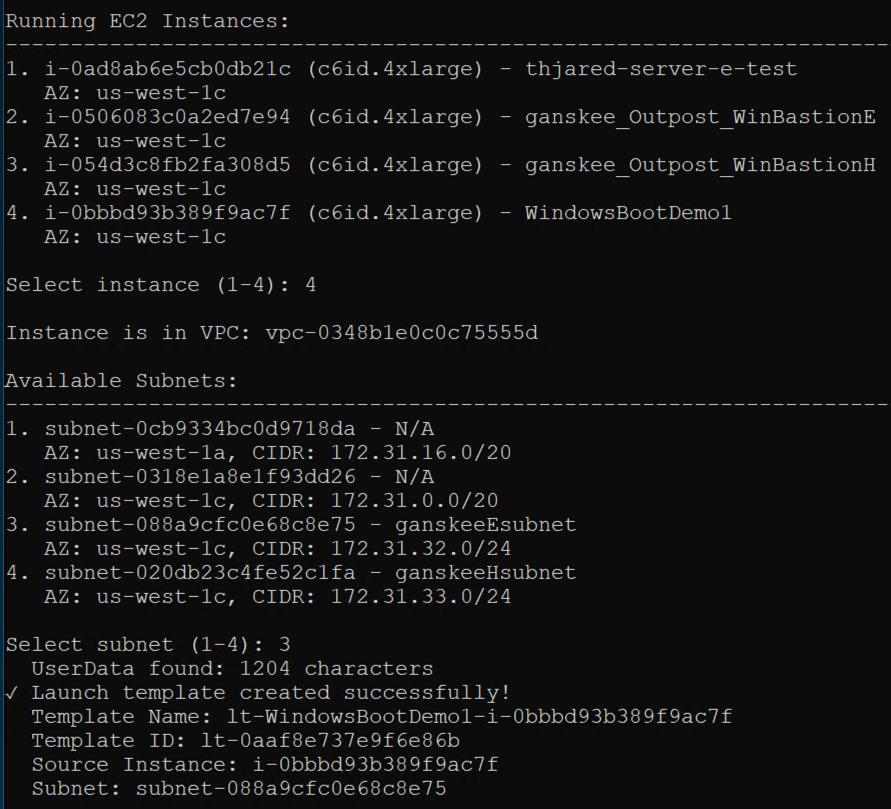
Figure 5 – Selecting subnets for EC2 instance relaunch
- When prompted to create a second launch template for Outpost server recovery, select yes, and then select to use the same instance (for recovery on different Outpost server).
- When you get a list of available subnets, select the subnet that’s associated with your secondary Outpost server. This is the server that the EC2 instance will be launched on in the event of the EC2 StatusCheckFailed_Instance metric triggers the CloudWatch alarm.
- You will see both launch templates created successfully.
Deploying automated EC2 instance recovery
The third step creates a CloudFormation template for monitoring, notifications, and automated recovery of the EC2 instance deployed in step 1. The CloudFormation template automatically captures the instance and secondary launch template information necessary for automatic recovery.
- Select Y to set up automated recovery. This will create a CloudFormation stack.
- Provide a name and description for the CloudFormation stack.
- Select whether you want automated recovery or notification only. This provides flexibility to choose manual or automatic recovery based on whether you want to verify the primary Outpost server is down before initiating recovery.
- In the AWS CloudFormation console, monitor the CloudFormation stack creation process.

Figure 6 – CloudFormation stack creation in progress
- After the CloudFormation Stack is complete, you have successfully deployed an EC2 instance using third party storage for boot and data volumes on a primary Outpost server. You also created instance recovery capabilities by using the Amazon Outpost server automated recovery solution for third party storage.
- You can verify whether the EC2 StatusCheckFailed_Instance is healthy under the Alarms section in the Amazon CloudWatch console.
Considerations
The logic discussed in this post relies on the secondary destination Outposts server having a connected service link. For more information about how to create a highly available service link connection for your Outpost servers, see the Networking section of AWS Outposts High Availability Design and Architecture Considerations whitepaper.
Clean up
Confirm whether it is safe to terminate the Amazon EC2 instance that you launched with this walkthrough. The operating system and data volumes are on the third party storage, so EC2 instance termination only removes the iPXE AMI from the Outposts server instance storage. To clean up, complete the following steps.
- Terminate the Amazon EC2 instance. Then, verify that the Instance state is Terminated to ensure that the instance is not using Outposts server resources.
- Delete the Amazon EC2 Launch Templates associated with the Amazon EC2 instance that you terminated. The names of the launch templates that were automatically generated will start with ‘lt-‘, followed by the instance name and the instance id. If you generated a recovery launch template, it will have a ‘-recovery’ suffix in the name.
- Delete the AWS CloudFormation Stack. The Stack name will start with ‘autorestart-‘ followed by the Amazon EC2 instance name.
- Clean up your initiators, initiator group, and LUNs on the third party storage array.
Conclusion
With the use of custom logic through AWS tools such as CloudFormation, CloudWatch, Amazon SNS, and AWS Lambda, you can architect for HA for stateful workloads on Outposts server. By implementing the custom logic in this post, you can automatically relaunch EC2 instances running on a source Outposts server to a secondary destination Outposts server if an instance fails, and connect to existing volumes on a shared storage appliance for recovery. This also reduces the downtime of your applications in the event of a hardware or service link failure. The code provided in this post can be further expanded upon to meet the unique needs of your workload.
While the use of infrastructure-as-code (IaC) can improve your application’s availability and be used to standardize deployments across multiple Outposts servers, it’s crucial to do regular failure drills to test the custom logic in place. This is to make sure that you understand your application’s expected behavior on relaunch in the event of a failure. To learn more about Outposts servers, visit the Outposts servers User Guide. Reach out to your AWS account team, or fill out this form to learn more about Outposts servers.