AWS Compute Blog
Using serverless to load test Amazon API Gateway with authorization
This post was written by Ashish Mehra, Sr. Solutions Architect and Ramesh Chidirala, Solutions Architect
Many customers design their applications to use Amazon API Gateway as the front door and load test their API endpoints before deploying to production. Customers want to simulate the actual usage scenario, including authentication and authorization. The load test ensures that the application works as expected under high traffic and spiky load patterns.
This post demonstrates using AWS Step Functions for orchestration, AWS Lambda to simulate the load and Amazon Cognito for authentication and authorization. There is no need to use any third-party software or containers to implement this solution.
The serverless load test solution shown here can scale from 1,000 to 1,000,000 calls in a few minutes. It invokes API Gateway endpoints but you can reuse the solution for other custom API endpoints.
Overall architecture
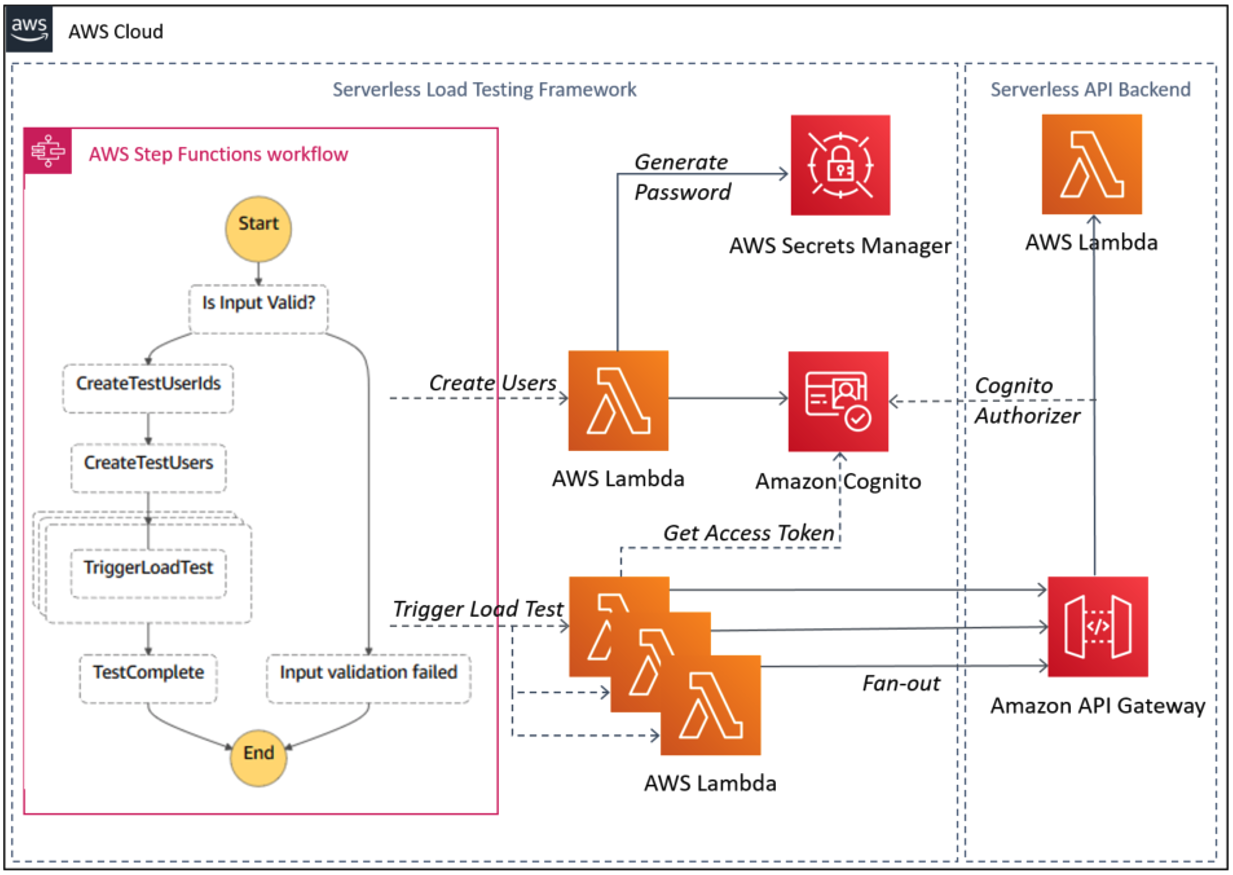
Overall architecture diagram
Solution design
The serverless API load test framework is built using Step Functions that invoke Lambda functions using a fan-out design pattern. The Lambda function obtains the user specific JWT access token from Amazon Cognito user pool and invokes the API Gateway authenticated route..
The solution contains two workflows.
1. Load test workflow
The load test workflow comprises a multi-step process that includes a combination of sequential and parallel steps. The sequential steps include user pool configuration, user creation, and access token generation followed by API invocation in a fan-out design pattern. Step Functions provides a reliable way to build and run such multi-step workflows with support for logging, retries, and dynamic parallelism.
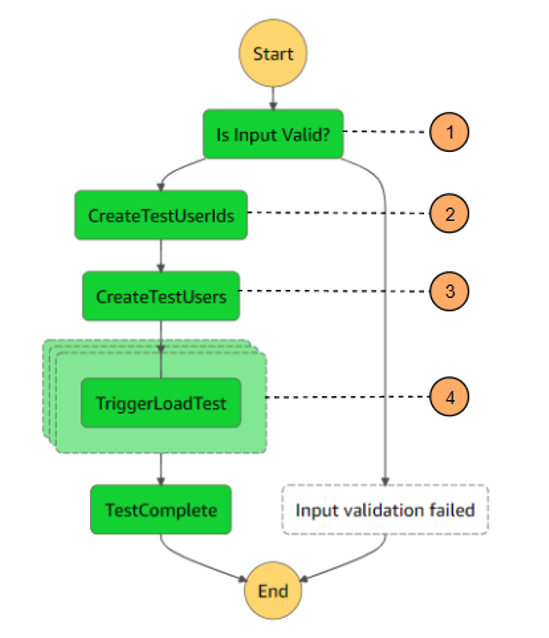
Step Functions workflow diagram for load test
The Step Functions state machine orchestrates the following workflow:
- Validate input parameters.
- Invoke Lambda function to create a user ID array in the series loadtestuser0, loadtestuser1, and so on. This array is passed as an input to subsequent Lambda functions.
- Invoke Lambda to create:
- Amazon Cognito user pool
- Test users
- App client configured for admin authentication flow.
- Invoke Lambda functions in a fan-out pattern using dynamic parallelism support in Step Functions. Each function does the following:
- Retrieves an access token (one token per user) from Amazon Cognito
- Sends an HTTPS request to the specified API Gateway endpoint by passing an access token in the header.
For testing purposes, users can configure mock integration or use Lambda integration for the backend.
2. Cleanup workflow

Step Functions workflow diagram for cleanup
As part of the cleanup workflow, the Step Functions state machine invokes a Lambda function to delete the specified number of users from the Amazon Cognito user pool.
Prerequisites to implement the solution
The following prerequisites are required for this walk-through:
- AWS account
- AWS SAM CLI
- Python 3.7
- Pre-existing non-production API Gateway HTTP API deployed with a JWT authorizer that uses Amazon Cognito as an identity provider. Refer to this video from the Twitch series #SessionsWithSAM which provides a walkthough for building and deploying a simple HTTP API with JWT authorizer.
Since this solution involves modifying API Gateway endpoint’s authorizer settings, it is recommended to load test non-production environments or production comparable APIs. Revert these settings after the load test is complete. Also, first check Lambda and Amazon Cognito Service Quotas in the AWS account you plan to use.
Step-by-step instructions
Use the AWS CloudShell to deploy the AWS Serverless Application Model (AWS SAM) template. AWS CloudShell is a browser-based shell pre-installed with common development tools. It includes 1 GB of free persistent storage per Region pre-authenticated with your console credentials. You can also use AWS Cloud9 or your preferred IDE. You can check for AWS CloudShell supported Regions here. Depending on your load test requirements, you can specify the total number of unique users to be created. You can also specify the number of API Gateway requests to be invoked per user every time you run the load test. These factors influence the overall test duration, concurrency and cost. Refer to the cost optimization section of this post for tips on minimizing the overall cost of the solution. Refer to the cleanup section of this post for instructions to delete the resources to stop incurring any further charges.
- Clone the repository by running the following command:
git clone https://github.com/aws-snippets/sam-apiloadtest.git - Change to the sam-apiloadtest directory and run the following command to build the application source:
sam build - Run the following command to package and deploy the application to AWS, with a series of prompts. When prompted for apiGatewayUrl, provide the API Gateway URL route you intend to load test.
sam deploy --guided
Example of SAM deploy
- After the stack creation is complete, you should see UserPoolID and AppClientID in the outputs section.
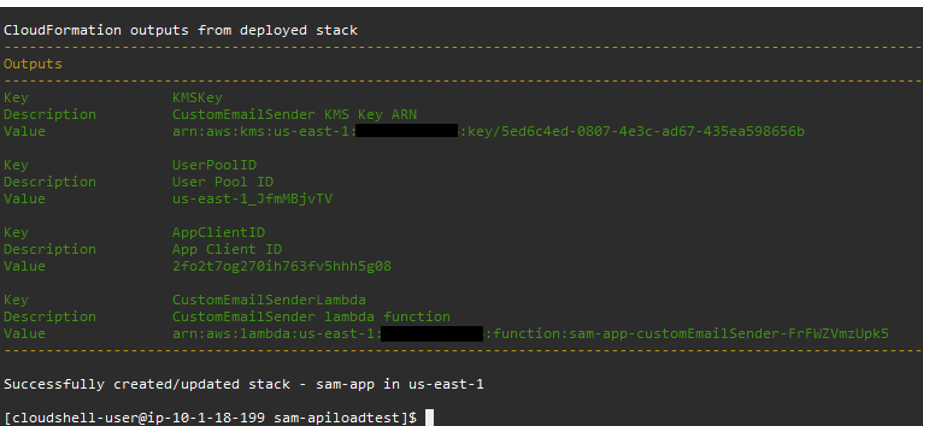
Example of stack outputs
- Navigate to the API Gateway console and choose the HTTP API you intend to load test.
- Choose Authorization and select the authenticated route configured with a JWT authorizer.

API Gateway console display after stack is deployed
- Choose Edit Authorizer and update the IssuerURL with Amazon Cognito user pool ID and audience app client ID with the corresponding values from the stack output section in step 4.
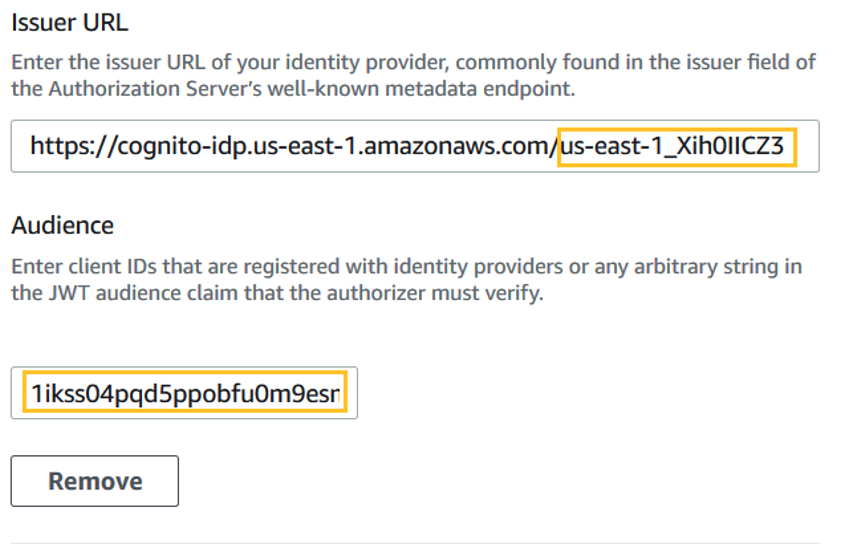
Editing the issuer URL
- Set authorization scope to aws.cognito.signin.user.admin.
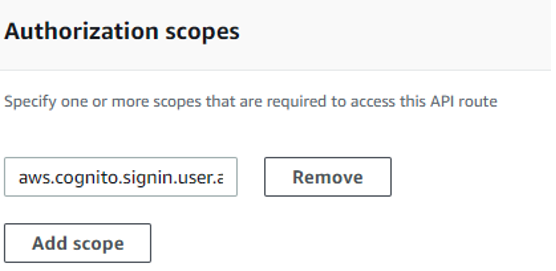
Setting the authorization scopes
- Open the Step Functions console and choose the state machine named apiloadtestCreateUsersAndFanOut-xxx.
- Choose Start Execution and provide the following JSON input. Configure the number of users for the load test and the number of calls per user:
{ "users": { "NumberOfUsers": "100", "NumberOfCallsPerUser": "100" } } - After the execution, you see the status updated to Succeeded.

Checking the load test results
The load test’s primary goal is to achieve high concurrency. The main metric to check the test’s effectiveness is the count of successful API Gateway invocations. While load testing your application, find other metrics that may identify potential bottlenecks. Refer to the following steps to inspect CloudWatch Logs after the test is complete:
- Navigate to API Gateway service within the console, choose Monitor → Logging, select the $default stage, and choose the Select button.
- Choose View Logs in CloudWatch to navigate to the CloudWatch Logs service, which loads the log group and displays the most recent log streams.
- Choose the “View in Logs Insights” button to navigate to the Log Insights page. Choose Run Query.
- The query results appear along with a bar graph showing the log group’s distribution of log events. The number of records indicates the number of API Gateway invocations.

Histogram of API Gateway invocations
- To visualize p95 metrics, navigate to CloudWatch metrics, choose ApiGateway → ApiId → Latency.
- Choose the “Graphed metrics (1)” tab.

Addig latency metric
- Select p95 from the Statistic dropdown.
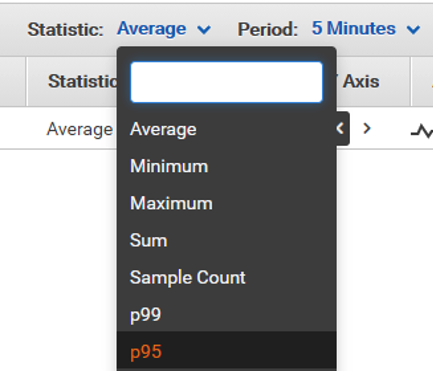
Setting the p95 value
- The percentile metrics help visualize the distribution of latency metrics. It can help you find critical outliers or unusual behaviors, and discover potential bottlenecks in your application’s backend.

Example of the p95 data
Cleanup
- To delete Amazon Cognito users, run the Step Functions workflow apiloadtestDeleteTestUsers. Provide the following input JSON with the same number of users that you created earlier:
{
“NumberOfUsers”: “100”
} - Step Functions invokes the cleanUpTestUsers Lambda function. It is configured with the test Amazon Cognito user pool ID and app client ID environment variables created during the stack deployment. The users are deleted from the test user pool.
- The Lambda function also schedules the corresponding KMS keys for deletion after seven days, the minimum waiting period.
- After the state machine is finished, navigate to Cognito → Manage User Pools → apiloadtest-loadtestidp → Users and Groups. Refresh the page to confirm that all users are deleted.
- To delete all the resources permanently and stop incurring cost, navigate to the CloudFormation console, select aws-apiloadtest-framework stack, and choose Delete → Delete stack.
Cost optimization
The load test workflow is repeatable and can be reused multiple times for the same or different API Gateway routes. You can reuse Amazon Cognito users for multiple tests since Amazon Cognito pricing is based on the monthly active users (MAUs). Repeatedly deleting and recreating users may exceed the AWS Free Tier or incur additional charges.
Customizations
You can change the number of users and number of calls per user to adjust the API Gateway load. The apiloadtestCreateUsersAndFanOut state machine validation step allows a maximum value of 1,000 for input parameters NumberOfUsers and NumberOfCallsPerUser.
You can customize and increase these values within the Step Functions input validation logic based on your account limits. To load test a different API Gateway route, configure the authorizer as per the step-by-step instructions provided earlier. Next, modify the api_url environment variable within aws-apiloadtest-framework-triggerLoadTestPerUser Lambda function. You can then run the load test using the apiloadtestCreateUsersAndFanOut state machine.
Conclusion
The blog post shows how to use Step Functions and its features to orchestrate a multi-step load test solution. I show how changing input parameters could increase the number of calls made to the API Gateway endpoint without worrying about scalability. I also demonstrate how to achieve cost optimization and perform clean-up to avoid any additional charges. You can modify this example to load test different API endpoints, identify bottlenecks, and check if your application is production-ready.
For more serverless learning resources, visit Serverless Land.