AWS Contact Center
How to authenticate customers during chat with Amazon Connect Customer
Authentication during chat is a balancing act: require it too early and you lose customers who need quick answers; skip it entirely and you face compliance challenges when conversations shift to account-specific topics. When customers start a chat in Amazon Connect Customer, they might begin with a simple question but then need account-specific assistance that requires identity verification.Consider these scenarios:
- A banking customer starts with a general question about loan rates but then wants to check their specific application status.
- An e-commerce shopper asks about return policies but needs to process a return for a recent purchase.
- A SaaS user begins with product questions but requires help with account billing or subscription changes.
Many chat implementations offer a binary choice: authenticate everyone immediately, or handle everything anonymously. Progressive authentication provides a third option that lets customers who need quick, anonymous help get it instantly, while those requiring account-specific assistance authenticate only when the conversation requires it.
The Authenticate Customer flow block in Amazon Connect Customer supports this approach, allowing organizations to start with anonymous support and transition to authenticated interactions when the conversation requires it without breaking the chat flow.
Use this flow block in the following scenarios:
- Prompt customers to sign in and authenticate during a chat. For example, unauthenticated customers can be prompted to sign in:
- When engaged with a chatbot, before being routed to an agent.
- To perform a transaction, such as making a payment.
- To validate their identity before providing account status or allowing them to update their profile information.
- Authenticate customers during chats over Apple Messages for Business.
In this post, you will learn how to:
- Create and associate an Amazon Cognito user pool for Amazon Connect Customer chat authentication.
- Add and configure the Authenticate Customer flow block in your contact flows.
- Implement progressive authentication that prompts customers to sign in only when needed.
- Configure output branches with routing logic for success, timeout, opt-out, and error scenarios.
Getting started
The Authenticate Customer block integrates into existing Amazon Connect Customer contact flows. It supports identity providers (SAML, OIDC, or the Amazon Cognito built-in user directory) and custom authentication systems. Many organizations use progressive authentication strategies that match their specific customer journey requirements, reducing sign-in friction for simple inquiries while maintaining security for sensitive transactions.
Solution overview
The chat authentication feature integrates three AWS services to deliver a smooth authentication experience:
- Amazon Connect Customer — Provides the contact center infrastructure and the Authenticate Customer flow block that orchestrates the authentication process during live chat.
- Amazon Cognito — Manages the user directory, identity provider (IdP) federation, and the managed login pages for customer sign-in.
- Amazon Connect Customer Profiles — Automatically maps authenticated customers to their profile for personalized routing and agent context.
How it works
The authentication flow follows these steps:
- A customer initiates a chat and reaches the Authenticate Customer block in the contact flow.
- The chat widget presents a sign-in link to the customer.
- A pop-up window opens with the Amazon Cognito managed login page (or the configured IdP login page).
- The customer authenticates with their credentials.
- Amazon Cognito redirects to your configured redirectUri and includes code and state URL parameters.
- Your redirect page calls the UpdateParticipantAuthentication API with the code and state.
- The pop-up closes, the chat resumes, and the flow block routes through the Success branch.
After successful authentication, Amazon Connect Customer updates an existing customer profile or creates a new one. If the customer profile contains a First Name field, the display name updates to that name automatically.
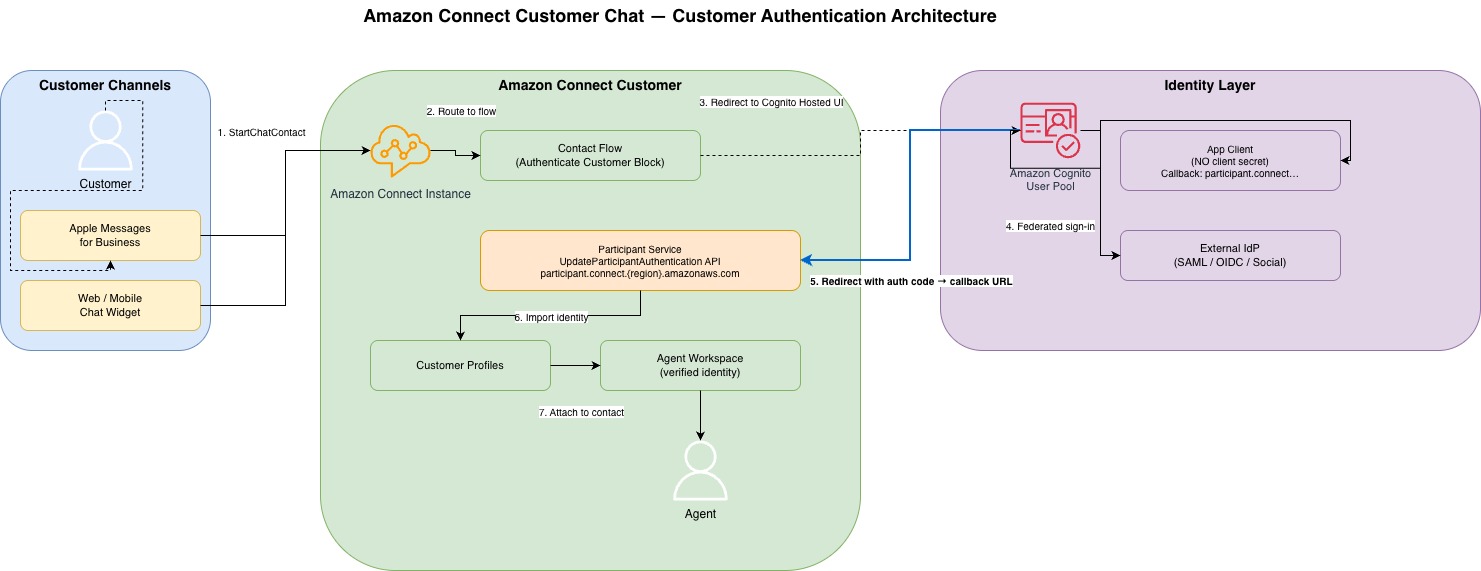
Figure 1: Chat authentication mechanism
Prerequisites
Before you begin, confirm that you have the following:
- An active Amazon Connect Customer instance with Customer Profiles turned on.
- An identity provider (IdP) ready to configure in Amazon Cognito (SAML, OIDC, or the Cognito built-in user directory).
- Access to the Amazon Connect Customer console and Amazon Cognito console with appropriate AWS Identity and Access Management (IAM) permissions.
- A hosted communication widget configured for your instance.
- Your Amazon Connect Customer instance in a supported Region.
Note: There is no additional charge for using Amazon Connect Customer Profiles as part of this authentication setup. For information about Amazon Cognito pricing, see the Amazon Cognito pricing page.
When to trigger authentication
The most important design decision is when to authenticate. Progressive authentication only delivers value if you place the trigger at the right point in your flow.
Authenticate when the conversation requires it:
- Before routing to a live agent who needs account context.
- When a customer needs to execute a transaction (payment, cancellation, account change).
- Prior to disclosing personally identifiable information (PII) or account status.
Don’t authenticate for:
- General product questions, FAQs, or public information.
- Initial chatbot interactions that don’t require identity.
- Scenarios where the customer has already authenticated through a pre-chat mechanism.
Design pattern: Place the Authenticate Customer block immediately before the branch where identity is required. Do not place it at the start of the flow. This verifies that customers who only need anonymous help never encounter a sign-in prompt.
Walkthrough
This section walks you through the complete setup process. Each step builds on the previous one, starting with turning on required services and ending with configuring how your flow handles authentication outcomes.The setup consists of seven steps:
- Turn on Customer Profiles.
- Create an Amazon Cognito user pool.
- Associate the user pool with Amazon Connect Customer.
- Turn on the authentication message.
- Register a callback for state validation (optional).
- Add the Authenticate Customer block to your flow.
- Configure the output branches.
Step 1: Turn on Customer Profiles
You must turn on Customer Profiles before you can configure the authentication feature. Amazon Connect Customer selects this service by default when you create a new instance.To verify or turn on Customer Profiles:
- Open the Amazon Connect Customer console.
- Select your instance alias.
- Navigate to Instance settings, then choose Customer Profiles.
- Confirm that Customer Profiles is turned on. If it is not, toggle it on.
Note: Activate Customer Profiles before proceeding if you created your instance with it disabled.
Step 2: Create an Amazon Cognito user pool
Amazon Cognito provides the user directory and identity federation layer for authentication.
- In the Amazon Connect Customer console, select your instance alias.
- In the left navigation panel, go to Applications, then choose Customer Authentication.
- Choose Create user pool in Amazon Cognito. This opens the Amazon Cognito console in a new tab.
- In the Amazon Cognito console, create a new user pool and configure your identity provider (IdP).
When configuring the Amazon Cognito app client, use the following settings:
Important: Select a public client application type (which does not generate a client secret). Only app clients without client secrets are supported by Amazon Connect Customer. If you create a confidential client with a secret, the association fails or authentication does not work.
For detailed instructions, refer to Getting started with user pools in the Amazon Cognito Developer Guide.
Step 3: Associate the user pool with Amazon Connect Customer
After creating the Amazon Cognito user pool, associate it with your Amazon Connect Customer instance:
- Return to the Customer Authentication page in the Amazon Connect Customer console.
- Choose Associate User Pool.
- In the dropdown, select the user pool you created in Step 2.
- Choose Confirm.
After association, the user pool Amazon Resource Name (ARN) appears on the Customer Authentication page. The Authenticate Customer flow block can then access the user pool. You can associate multiple user pools if your contact center supports multiple identity providers.
Step 4: Turn on the authentication message
Add the authentication parameters to your hosted communication widget JavaScript snippet. This tells the chat widget to present the sign-in prompt to customers during a chat session. Locate your existing hosted communication widget snippet and add the following code block:
amazon_connect('authenticationParameters', { redirectUri: 'https://example.com/auth-callback', identityProvider: 'your_identity_provider_name'});
Step 5: Register a callback for state validation (optional)
Register a callback function on the AUTHENTICATION_INITIATED event to capture and store the state value locally. This is important for cross-site request forgery (CSRF) protection. The following code shows how to register the callback:
amazon_connect('registerCallback', { 'AUTHENTICATION_INITIATED': (eventName, data) => { console.log(data.state); sessionStorage.setItem('auth_state', data.state); },});
As a security best practice, validate the state parameter on your redirect URI page to prevent CSRF issues:
- Store data.state when AUTHENTICATION_INITIATED fires.
- On your redirect URI page, read the state URL parameter.
- Compare it with the stored value before calling UpdateParticipantAuthentication. The state parameter matches the value provided in the AuthenticationUrl from the GetAuthenticationUrl API response.
- Reject the authentication if the values do not match.
Step 6: Add the Authenticate Customer block to your flow
The Authenticate Customer block orchestrates the authentication process during a live chat. You can configure the block using the Amazon Connect Customer admin website or by using the AuthenticateParticipant action in the Amazon Connect Customer Flow language.Add and configure it in your inbound contact flow:
- Open the Amazon Connect Customer console and navigate to your contact center instance.
- Go to Routing, then choose Flows and open your inbound contact flow in the flow designer.
- From the block palette, drag and drop the Authenticate Customer block (under the Integrate category) into the flow.
- Connect it to the appropriate point in your flow (for example, after the initial chat greeting).
- Choose the block to open its configuration panel.
Configuration options:
Amazon Cognito
- Select an Amazon Cognito User Pool: After you associate the user pool on the console page, choose the name of the user pool from the drop-down list.
- Select an Amazon Cognito App Client: After you select the user pool, choose the name of the app client from the drop-down list.
Amazon Connect Customer Profiles configuration
- Store by default template: By choosing the default template, Amazon Connect Customer Profiles ingests Amazon Cognito standard attributes into a unified standard profile object. This object is based on the predefined Customer Profile object type, which uses phone number and email to map the customer to a profile.
- Enter a unique identifier: You can customize how Customer Profiles ingests data by creating an object type mapping. Create your own object type mapping in advance, then select “Enter a unique identifier” and enter the mapping name.
Timeout
- Minimum (default): 3 minutes.
- Maximum: 15 minutes.
Step 7: Configure the output branches
The Authenticate Customer block provides four output branches. Connect each branch to an appropriate next step in your contact flow:
- Success —The customer authenticated successfully. Route to a queue with agents who can access the customer’s profile, or proceed to a Lambda function that retrieves account-specific data.
- Timeout —The customer remained inactive and did not sign in within the allocated time. Offer to continue with limited (anonymous) support, or loop back to the Authenticate Customer block to re-prompt.
- Opted out — The customer chose not to sign in. Route to an agent who can assist without requiring PII disclosure, or continue with the chatbot for non-sensitive queries.
- Error — An error occurred (for example, Customer Profiles not turned on, unsupported chat subtype, incorrect authentication code, Amazon Cognito token endpoint error, or unsupported Region). Provide a clear message and offer an alternative channel such as phone or email.
Save and publish your flow to make it active.
Upon successful setup, you should see the below authentication mechanism while handling a chat contact.
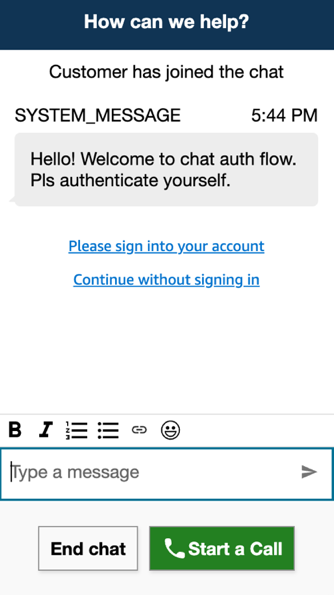
Fig 2 : Customer prompted to authenticate
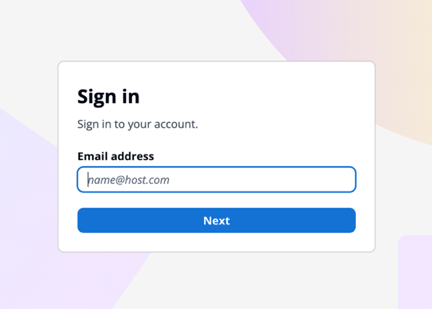
Fig 3 : Enter your email address
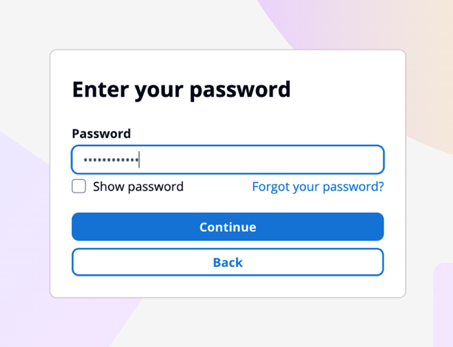
Fig 4 : Enter the password
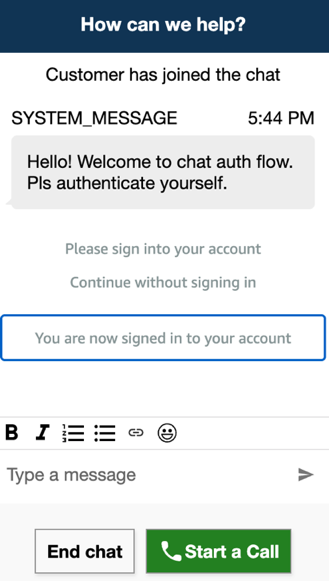
Fig 5 : Successful authentication
Security best practices
Validate the state parameter (CSRF prevention)
The state parameter is your primary defense against CSRF issues. If you did not implement state validation in Step 5, do so now. On your redirect URI page, compare the state URL parameter with the value you stored from the AUTHENTICATION_INITIATED callback before calling UpdateParticipantAuthentication. The state value must match the one provided in the AuthenticationUrl from the GetAuthenticationUrl API response. Reject the authentication if the values do not match.
Secure your redirect URI
- Use HTTPS exclusively. Amazon Cognito does not support HTTP redirects for production use
- Restrict Amazon Cognito app client callback URLs to only the exact URIs used in your widget snippets. Avoid wildcard patterns.
- Host the redirect page on a domain you control with proper Content Security Policy (CSP) headers.
Credential management
- Rotate Amazon Cognito credentials regularly.
- Review IAM policies for least-privilege access.
- Never expose app client IDs or authentication parameters in client-side code beyond what’s required by the widget snippet.
Operational best practices
Timeout configuration
Set the authentication timeout based on your customer demographics and sign-in complexity:
- Simple username and password: 3–5 minutes is sufficient.
- Federated sign-in with MFA: Consider 7–10 minutes to allow for multi-step flows.
- Maximum: 15 minutes. Avoid setting this too high — long timeouts hold contact flow resources unnecessarily.
Monitoring and debugging
- Turn on Amazon Connect Customer flow logs in an Amazon CloudWatch log group for real-time monitoring of authentication flow execution.
- Create CloudWatch alarms on authentication error rates and timeout rates to detect configuration drift or integration issues.
- Log the state value from the AUTHENTICATION_INITIATED callback for security auditing and incident investigation.
Handling authentication failures gracefully
Design your flow so that every branch leads to a meaningful outcome:
- Timeout: Offer to continue with limited (anonymous) support or re-prompt.
- Opted out: Route to an agent who can assist without requiring PII disclosure, or continue with the chatbot for non-sensitive queries.
- Error: Provide a clear message and offer an alternative channel (phone or email) rather than a dead end.
Customer experience best practices
- Explain the why — Before prompting sign-in, display a brief message explaining why authentication is needed (for example, “To check your order status, we need to verify your identity”).
- Minimize friction — If your IdP supports single sign-on (SSO), most customers complete authentication in seconds. Use the identityProvider parameter to skip the Amazon Cognito managed login page selector.
- Respect opt-out — Not every customer will authenticate. Build flows that degrade gracefully; even without authentication, you can still provide value through general support paths.
- Test the end-to-end experience — Verify the pop-up behavior across browsers, mobile devices, and pop-up blockers before going live.
Clean up resources
If you created resources for testing and want to remove them:
- Delete or unpublish the test contact flow in Amazon Connect Customer.
- Remove the Amazon Cognito user pool association from the Customer Authentication page.
- Delete the Amazon Cognito user pool. This removes all user data.
Note: You must explicitly delete customer profile data to remove the solution.
Conclusion
In this post, you learned how to implement progressive authentication for Amazon Connect Customer chat using the Authenticate Customer flow block, Amazon Cognito, and Customer Profiles.This solution allows customers to start with anonymous support and authenticate only when the conversation requires identity verification, without restarting the chat or switching channels.
To learn more, see Set up customer authentication for chat contacts and the Authenticate Customer flow block reference in the Amazon Connect Customer Administrator Guide.
Additional resources
- Set up customer authentication in Amazon Connect Customer for chat contacts
- Authenticate Customer flow block reference
- Turn on customer authentication for hosted communication widgets
- Amazon Cognito Developer Guide
- Amazon Connect Customer Profiles
- Customer authentication availability by Region
- What’s New: Amazon Connect Customer Built-In Customer Authentication for Chats
About the authors

Naga Bhargav is a Technical Account Manager (TAM) with AWS, specializing in Contact Center and generative AI solutions with a focus on Amazon Connect Customer. Drawing on extensive enterprise experience, he partners with organizations to drive strategic cloud initiatives, helping them build secure, scalable, and cost-effective solutions. Outside work, he enjoys spending time with the family and has a passion for home gardening.

Mahima Chaturvedi is a Solutions Architect (SA) at Amazon Web Services, based in Gurugram, India. With expertise in Amazon Connect and contact center solutions, she partners with customers to design secure, scalable, and well-architected cloud solutions that drive business outcomes. Mahima is passionate about helping organizations modernize their customer experience through innovative cloud strategies and hands-on technical guidance. Outside work, she enjoys spending time catching up on Animes.

Sidhartha Kotha is a Technical Account Manager (TAM) at Amazon Web Services, based in Hyderabad, India. With deep expertise in Containers, Generative AI, and Analytics, he partners with enterprise customers to accelerate cloud adoption, optimize workloads, and implement cutting-edge AI/ML solutions. Sidhartha is passionate about enabling customers to unlock business value through well-architected cloud strategies and hands-on technical guidance.