Containers
Forensic container checkpointing on Amazon Elastic Kubernetes Service (Amazon EKS)
When a container in your Amazon Elastic Kubernetes Service (Amazon EKS) cluster exhibits suspicious behavior, the runtime evidence is time sensitive. Kubernetes routinely reschedules and replaces workloads, so the moment Kubernetes terminates or evicts a container with unintended access, your runtime state is lost: in-memory credentials, active network connections, injected processes, and ephemeral file system changes.
According to the SANS 2024 Incident Response Survey, organizations that can’t preserve volatile evidence during container security events might face investigation delays of hours to days and risk compliance gaps with frameworks like PCI DSS and SOC 2 that require forensic evidence retention. Without a way to capture this state, you might face a choice between terminating the container to contain the issue (destroying evidence) or leaving it running to preserve evidence (extending your exposure window).
Forensic container checkpointing with the Kubelet Checkpoint API addresses this tradeoff. You can capture the container’s runtime state (memory pages, file descriptors, network sockets, and process metadata) typically in seconds, without stopping the workload. In our testing with typical microservice containers (200–400 MB resident memory) on m5.xlarge nodes, the CRIU capture typically completes in under 10 seconds and adds less than 5% CPU overhead on the node during the capture, and the full end-to-end flow, including packaging and pushing the checkpoint to Amazon Elastic Container Registry (Amazon ECR), typically completes in under 30 seconds. Larger containers (1–2 GB resident memory) might take 30–60 seconds to capture. Checkpoint time typically scales roughly linearly with memory size.
Kubernetes v1.25 introduced the Kubelet Checkpoint API (KEP-2008), and v1.30 promoted it to beta. It delegates to CRIU (Checkpoint/Restore In Userspace) through containerd’s CheckpointContainer CRI RPC. With Amazon EKS 1.34, the underlying container runtime (containerd 2.x, at the time of this writing) implements this RPC, making the capability available on Amazon EKS.
In this blog post, you deploy a checkpoint agent on Amazon EKS 1.34+ that calls the Kubelet Checkpoint API, packages the resulting CRIU checkpoint as an OCI image, and stores it in Amazon ECR for forensic analysis. You also see how kro (Kube Resource Orchestrator) can simplify deployment across multiple clusters.
Version note: We tested this walkthrough on Amazon EKS 1.34 with containerd 2.2.1 and CRIU 3.17.1 on AL2023 worker nodes. Newer Amazon EKS versions ship with updated containerd and CRIU releases. Check the Amazon EKS release notes for the versions included in your cluster’s AMI.
Note on restore: This walkthrough focuses on the forensic checkpoint-and-store workflow. Container restore is a capability under active development. containerd 2.1+ includes restore support (containerd PR #10365), and the Kubernetes community is actively working on restore APIs. You can find restore options in the Forensic analysis and restore section later in this post.
Overview of solution
The Kubelet Checkpoint API provides an HTTP endpoint on each node for creating container checkpoints:
POST https://<node>:10250/checkpoint/<namespace>/<pod>/<container>
When you call this endpoint, the kubelet delegates to containerd through the CRI CheckpointContainer RPC, which invokes CRIU (Checkpoint/Restore In Userspace) to capture the container’s full runtime state (memory, file descriptors, network connections, and process metadata). You initiate the checkpoint process, and CRIU then writes the checkpoint tar archive to /var/lib/kubelet/checkpoints/ on the node as your container continues running.
Because the kubelet handles credential verification (with service account tokens) and delegates to containerd through the standard CRI interface, the checkpoint agent doesn’t need privileged access to the container runtime socket. Earlier approaches required you to mount the containerd socket directly, which granted full host access to the container runtime.
Architecture: DaemonSet with node-aware routing
Your checkpoint agent targets a specified container on the node by specifying its namespace, pod name, and container name in the kubelet URL. It runs independently of your applications, not as a sidecar. Instead, you deploy it as a DaemonSet with one unprivileged agent per node.
- No application changes required: You run your applications unmodified with no sidecar injection.
- Node-wide coverage: You can checkpoint pods on the node from a single agent.
- Simpler operations: You manage one DaemonSet instead of sidecars in every deployment.
The kubelet checkpoint API is node-local. CRIU writes the checkpoint tar archive to the local node’s disk, and your agent reads it from there, packages it, and pushes it to Amazon ECR. When the Application Load Balancer (ALB) routes a request to an agent on a different node than the target pod, the receiving agent handles this transparently: it queries the Kubernetes API for the target pod’s spec.nodeName, looks up the checkpoint agent pod running on that node using a label selector (app=checkpoint-agent), and forwards the request to that agent’s pod IP on port 8080. The forwarded request includes the original payload, and the target agent processes it as if it received the request directly from the ALB. This routing means you use a single ALB endpoint without needing to manage pod-to-node affinity.
Your agent packages the tar archive into an OCI image with go-containerregistry (pure Go, no external tools) and pushes it to Amazon ECR. AWS Identity and Access Management (IAM) Roles for Service Accounts (IRSA) provides the Amazon ECR credentials.
The following diagram illustrates the request flow from the ALB through the checkpoint agent to CRIU and Amazon ECR.
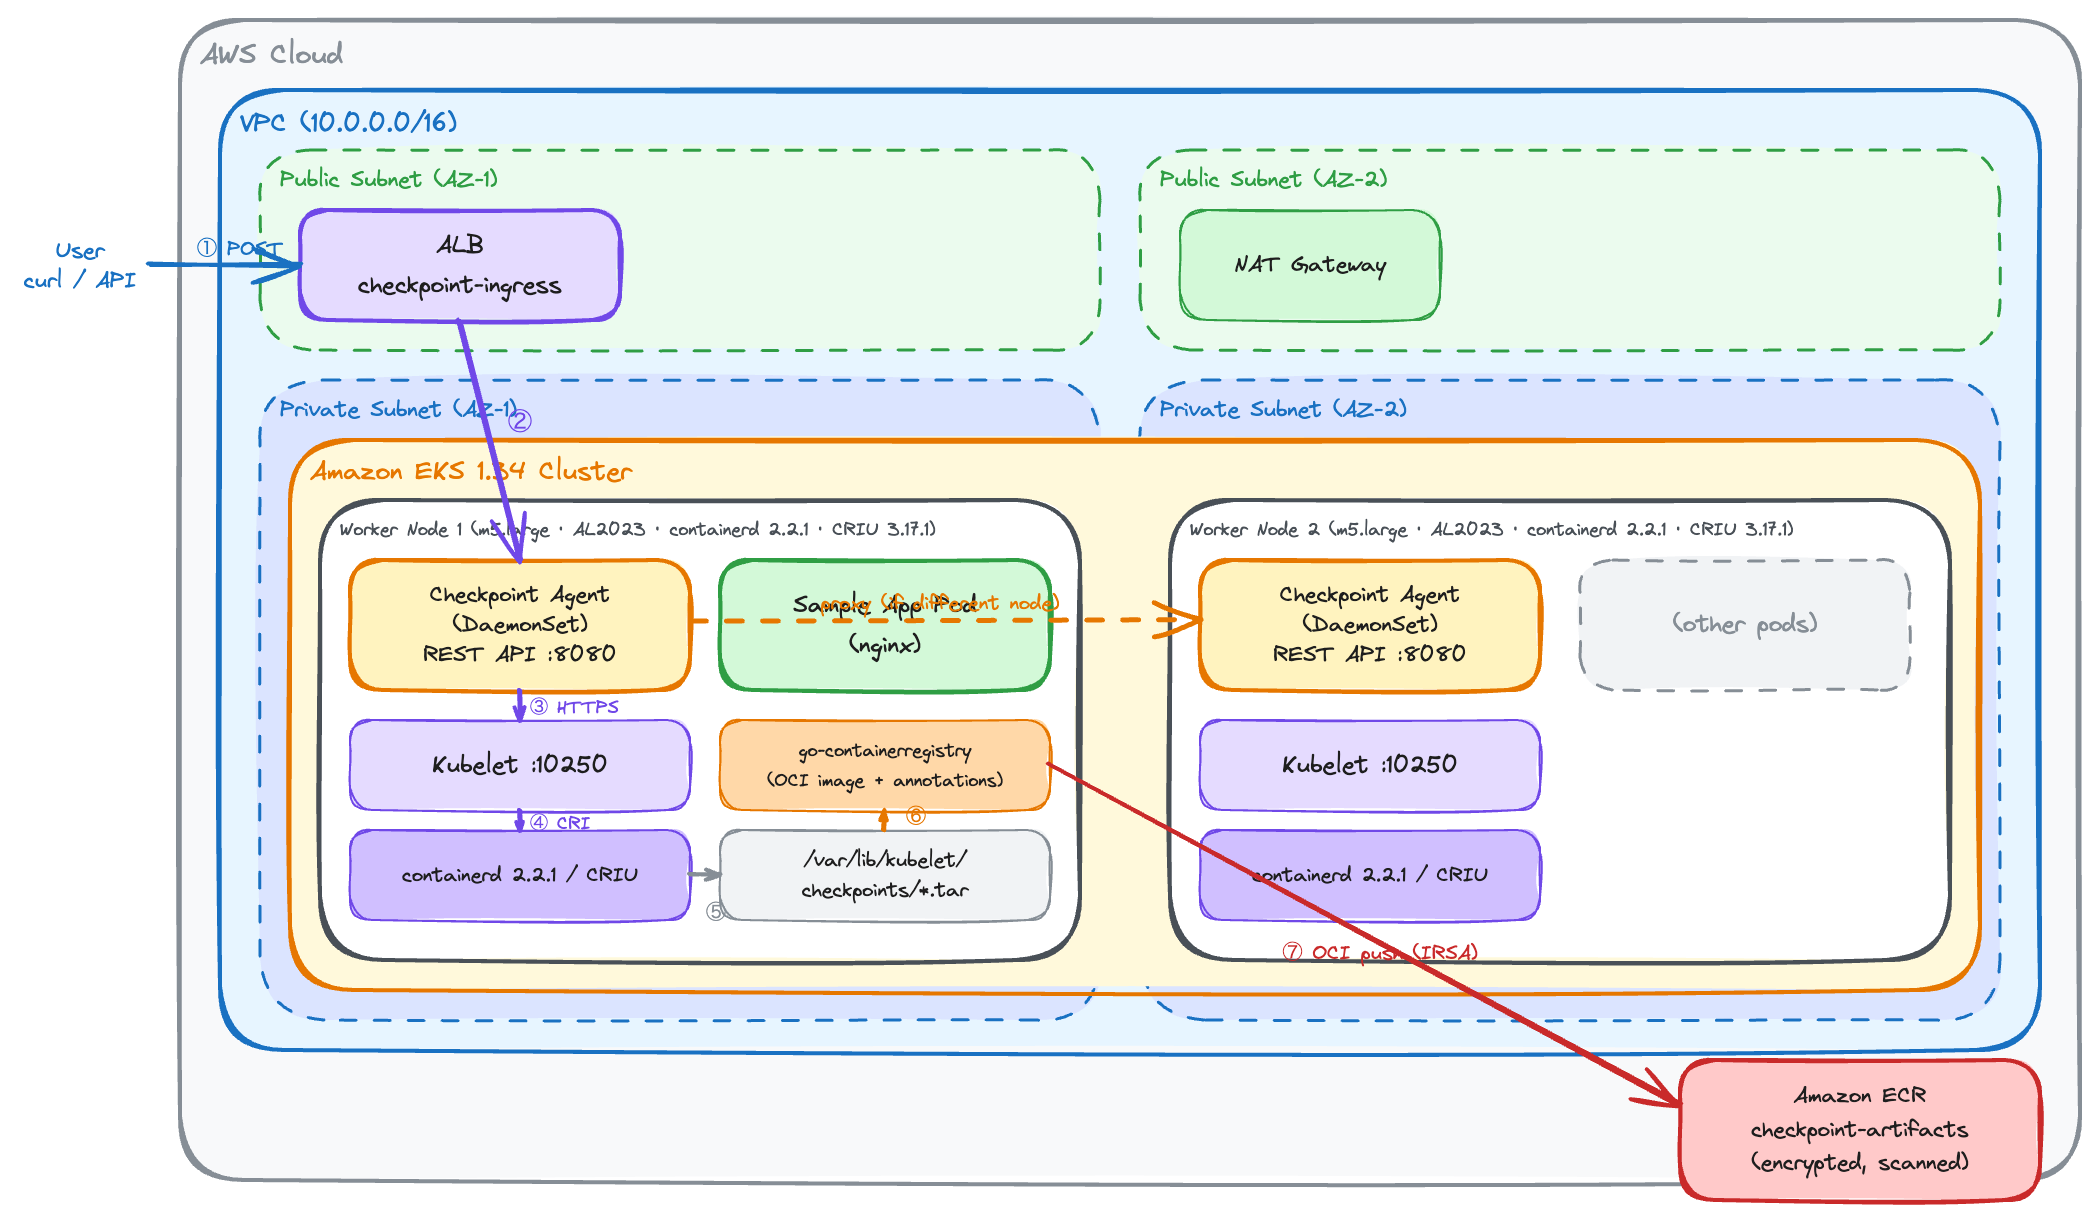
Figure 1: Checkpoint DaemonSet architecture using the Kubelet Checkpoint API
- Checkpoint agent receives the request through the ALB. If the target pod is on a different node, the agent proxies to the correct agent automatically.
- On the target pod’s node, the agent calls the kubelet Checkpoint API over HTTPS with a service account token.
- Kubelet delegates to containerd through the CRI
CheckpointContainerRPC. - containerd invokes CRIU to freeze the container and capture its state.
- When you initiate the checkpoint process, CRIU writes the checkpoint tar archive to
/var/lib/kubelet/checkpoints/on the node while your container continues running. - After reading the tar, the agent builds an OCI image with
go-containerregistry, adding theorg.criu.checkpoint.container.nameannotation. - The agent pushes the annotated OCI image to Amazon ECR with IRSA.
Walkthrough
The following steps walk you through deploying the checkpoint agent on your Amazon EKS cluster. Confirm that you have the following prerequisites, then proceed through each step in order.
- Install CRIU on worker nodes using a CRIU installer DaemonSet.
- Build and publish the checkpoint agent container image to Amazon ECR.
- Configure RBAC for kubelet checkpoint API access.
- Deploy the checkpoint agent as a DaemonSet.
- Expose the checkpoint API with an ALB.
- Create and store container checkpoints in Amazon ECR.
- (Optional) Simplify deployment with kro.
Prerequisites
Before you begin, confirm you have the following:
- An AWS account with administrator access.
- An Amazon EKS cluster running Kubernetes 1.34 or later (ships with containerd 2.x and the
ContainerCheckpointfeature gate enabled by default). - The AWS Command Line Interface (AWS CLI) with appropriate permissions.
- An Amazon ECR repository for storing checkpoint images.
- A kubectl installation with access to your cluster.
- A Docker installation for building the agent image locally.
Understanding the Kubelet Checkpoint API
The checkpoint process involves a chain of delegation from the Kubernetes API layer down to the CRIU userspace tool. Here’s what happens when you call the checkpoint endpoint:
- The kubelet receives the HTTP POST request and verifies the caller’s identity using the service account token.
- The kubelet calls the CRI
CheckpointContainerRPC on containerd. - containerd invokes CRIU to freeze the container process and capture its runtime state.
- After you trigger the checkpoint, CRIU writes the checkpoint data as a tar archive to
/var/lib/kubelet/checkpoints/checkpoint-<pod>_<namespace>-<container>-<timestamp>.taron the node. - The container typically continues running.
Important: While restoration on the same host can work without issues, migrating checkpoints to different hosts requires careful consideration. TCP connections typically don’t survive migration. Your application must re-establish database connections, and different host environments might not preserve hardware-specific states.
Verifying your environment
Verify that your Amazon EKS 1.34+ worker nodes have containerd 2.x and CRIU installed:
To connect to a worker node, use AWS Systems Manager Session Manager.
Amazon EKS 1.34 AMIs ship with containerd 2.x by default. However, Amazon EKS AL2023 AMIs don’t include CRIU, so you must install it separately. Step 1 covers this with a CRIU installer DaemonSet.
If you’re running an earlier Amazon EKS version, you must upgrade. containerd 1.7.x (shipped with Amazon EKS 1.30–1.33) doesn’t implement the CheckpointContainer RPC.
Implementing checkpointing on Amazon EKS
Follow these steps to deploy the checkpoint agent and create your first checkpoint.
Step 1: Install CRIU on worker nodes
Amazon EKS AL2023 AMIs don’t ship with CRIU, but the containerd runtime requires CRIU to be present on the host for the CheckpointContainer CRI RPC. Deploy a CRIU installer DaemonSet that runs once per node at startup:
The init container uses chroot to install CRIU into the host’s file system. It’s idempotent. If CRIU is already present, it skips installation. You need the privileged init container only for this one-time host-level package installation. The checkpoint agent itself runs unprivileged.
Step 2: Review the checkpoint agent
A Go HTTP server powers the checkpoint agent, exposing two endpoints:
POST /checkpoint: Triggers a checkpoint through the kubelet API, packages the result as an OCI image, and pushes to Amazon ECR.GET /healthz: Returns 200 OK for health checks.
Each request payload identifies the target container:
The core logic calls the kubelet’s HTTP endpoint on the local node. The agent authenticates with the mounted service account token, and verifies the kubelet’s certificate against the cluster CA that Kubernetes projects into every pod:
Don’t disable certificate verification. You might see checkpoint examples that set InsecureSkipVerify: true to get past the kubelet’s certificate, and it’s a common shortcut to leave in place. Don’t ship it: the bearer token proves your identity to the kubelet, but without verification you never confirm the kubelet’s identity, so anything answering on port 10250 can collect that token and hand you back a forged response. Because a checkpoint is a full memory dump, a spoofed endpoint is a direct path to exfiltrating process memory. Verify against the projected CA bundle as shown above. If verification fails with a hostname mismatch, make sure the kubelet’s serving certificate covers the address you’re dialing (NODE_IP); don’t disable the check. For more information, see kubelet TLS bootstrapping and serving certificates.
After you trigger the checkpoint through the kubelet API, your agent packages it into an OCI image using go-containerregistry, a pure Go library that builds and pushes OCI images without external tools like buildah or podman:
Amazon ECR authorization uses the AWS SDK for Go v2, which automatically picks up the credentials that IRSA provides from the pod’s projected service account token. config.LoadDefaultConfig resolves the credential chain, and every v2 API call takes a context.Context as its first argument, so the request carries the caller’s cancellation and timeout:
SDK version note: Use the AWS SDK for Go v2 (github.com/aws/aws-sdk-go-v2) for new work. Version 1 entered maintenance mode on July 31, 2024 and reached end-of-support on July 31, 2025. If you’re porting v1 code, note that v2 replaces the session.NewSession concept entirely with config.LoadDefaultConfig, constructs clients with ecr.NewFromConfig(cfg) instead of ecr.New(sess), and requires a context.Context on every operation.
Step 3: Build and publish the agent image
The Dockerfile uses a multi-stage build. It builds the final image FROM scratch, containing a static Go binary and CA certificates, with no shell, no package manager, and no external tools:
The GOPROXY=direct setting fetches Go modules directly from their source repositories. go mod tidy runs inside the build to keep dependencies consistent. Because the binary is statically compiled (CGO_ENABLED=0), the scratch base image provides the necessary runtime environment.
GOOS=linux GOARCH=amd64 targets x86_64 worker nodes, which is what the AWS Cloud Development Kit (AWS CDK) stack in this post deploys. The agent binary’s architecture must match your worker nodes’ architecture. A scratch image has no dynamic loader to give you a useful error, so an architecture mismatch surfaces as an exec format error crash loop. If you run AWS Graviton nodes, build for arm64 instead:
If you switch to Graviton nodes, also update the platform property on the DockerImageAsset in the CDK stack from Platform.LINUX_AMD64 to Platform.LINUX_ARM64, and confirm that CRIU is available for arm64 in your node AMI’s package repositories.
Build and push the agent image:
Step 4: Configure RBAC
This RBAC configuration requires namespace-scoped pod read access and cluster-scoped permission to call the kubelet checkpoint API. You annotate the service account for IRSA to provide Amazon ECR push credentials:
The nodes/checkpoint permission authorizes calls to POST /checkpoint/... on the kubelet. IRSA (IAM Roles for Service Accounts) provides the AWS credentials for Amazon ECR authorization. You don’t need static AWS credentials.
Step 5: Deploy the checkpoint agent as a DaemonSet
The DaemonSet runs one checkpoint agent per node. It mounts the kubelet checkpoints directory (read-only) and receives the node IP from the downward API. The agent container runs unprivileged:
This DaemonSet doesn’t require a privileged security context, SYS_ADMIN capability, or containerd socket mount. The agent communicates with the kubelet over HTTPS using its service account token and reads checkpoint archives from a read-only hostPath volume. The NODE_IP environment variable (from the downward API’s status.hostIP) tells the agent which kubelet to call, while NODE_NAME (from spec.nodeName) identifies which node this agent instance runs on, which the agent uses for node-aware proxy routing as described in the previous section.
Step 6: Expose the checkpoint API
Create a Service and Ingress using the AWS Load Balancer Controller:
Note: The community ingress-nginx controller was deprecated in March 2026 and no longer receives security updates. Use the AWS Load Balancer Controller with
ingressClassName: albfor Amazon EKS workloads. For in-cluster proxies, consider Envoy Gateway or the Kubernetes Gateway API.
Note the use of ingressClassName: alb in the spec rather than the deprecated kubernetes.io/ingress.class annotation.
Step 7: Create a checkpoint
Deploy a sample application and trigger a checkpoint:
The ALB routes the request to a healthy checkpoint agent. If that agent is on a different node than the target pod, it automatically discovers the correct agent through the Kubernetes API and proxies the request. You don’t need manual node selection or port-forwarding.
Successful response:
Whichever agent instance receives the ALB request handles the checkpoint, proxying to the correct node if needed.
You can verify the checkpoint image in Amazon ECR and inspect its annotations:
The manifest shows the checkpoint annotation that containerd uses for restore detection:
The org.criu.checkpoint.container.name annotation is what containerd 2.1+ uses to detect checkpoint images during CreateContainer and trigger the restore code path through CRIU.
Forensic analysis and restore
After you store a checkpoint image in Amazon ECR, you can pull it for offline analysis or restore it in an isolated forensic cluster. The following sections cover both workflows.
Pulling and inspecting a checkpoint
Pull the checkpoint image from Amazon ECR and extract the tar for offline analysis:
Analyzing checkpoint contents
The extracted checkpoint tar contains several key components:
criu.work/: CRIU working directory with dump logs.checkpoint/: Memory pages, file descriptors, process metadata.rootfs-diff.tar: File system changes since container start.bind.mounts: Bind mount information.config.dumpandspec.dump: Container runtime configuration.
Two tools are particularly useful for analysis:
crit(CRIU Image Tool): Inspects individual CRIU checkpoint data files (memory pages, file descriptors, process trees). Part of the CRIU project.checkpointctl: Provides high-level analysis of checkpoint archives, including process tree summaries and resource usage. Part of the checkpoint-restore project.
Restoring to a forensic cluster
You can restore a checkpoint on a separate forensic/sandbox Amazon EKS cluster for live analysis. Follow these steps:
A. Set up a forensic Amazon EKS 1.34+ cluster. Keep this cluster fully isolated with no production access: separate Amazon Virtual Private Cloud (Amazon VPC), no peering to production networks, and restricted IAM roles.
B. Pull the checkpoint image from Amazon ECR to the forensic cluster. Verify that the forensic cluster’s nodes have Amazon ECR pull permissions for the checkpoint-artifacts repository.
C. The checkpoint image can be used in two ways:
Option A: Direct tar restore with crictl (recommended for forensics):
Option B: Kubernetes Pod spec restore (containerd 2.1+ with PR #10365):
Note: This approach requires containerd to detect the checkpoint annotation and trigger restore. containerd 2.1+ supports this capability. Test it in your environment before relying on it for production workflows.
Restore safety guidelines
- Restore in an isolated cluster/namespace with no production access.
- Apply network policies to prevent the restored container from making outbound connections.
- Assume the restored container is untrusted. It has the exact memory state from checkpoint time, including unintended code.
- Analyze but don’t trust the restored container. Treat it as an untrusted workload and never promote it to production.
Simplifying deployment with kro
The previous walkthrough involves several Kubernetes resources: Namespace, ServiceAccount, ClusterRole, ClusterRoleBinding, CRIU installer DaemonSet, checkpoint agent DaemonSet, Service, and Ingress. If you manage multiple clusters, you can use kro (Kube Resource Orchestrator) to package these resources behind a single custom API.
Define a ResourceGraphDefinition (RGD) once:
The checkpoint agent provides an HTTP API for capturing container state across your Amazon EKS nodes.
kro creates the underlying resources, manages their lifecycle, and reconciles drift automatically.
Security and forensic analysis applications
Container checkpointing per KEP-2008 strengthens security event response so you can capture a container’s full runtime state before taking remediation actions. The workflow: checkpoint the suspicious container, store the checkpoint image in Amazon ECR, then analyze it offline in an isolated environment. The checkpoint preserves evidence that you would otherwise lose the moment you terminate or restart a container.
A checkpoint archive gives you access to the container’s memory contents at the exact moment of capture, including in-memory data structures, cached credentials, and runtime variables that reveal unintended activity. Network connection state shows active sockets and their endpoints, which helps trace communication with command-and-control infrastructure. The file system diff captures files modified since the container started: dropped payloads, configuration changes, and temporary artifacts. Process metadata reveals the full process tree, including processes injected by an unintended entity that wouldn’t appear in container logs.
While security forensics is the primary use case, container checkpointing also supports broader operational workflows.
Operational benefits
Beyond forensics, container checkpointing supports several operational workflows. For disaster recovery, checkpoints preserve memory state and process execution points, so recovery can resume closer to where operations stopped rather than restarting without prior state. You can capture application states at specific points during testing cycles, creating reproducible starting points for debugging complex issues. Live migration (capturing and restoring container state between hosts) is a use case under active development. containerd 2.1+ includes restore support (PR #10365), though your application must re-establish TCP connections and database sessions after migration.
Security considerations
The kubelet checkpoint API approach avoids the security risks of direct containerd socket access:
- No privileged containers: The checkpoint agent runs without
privileged: trueorSYS_ADMINcapabilities. It communicates with the kubelet over HTTPS using a service account token. - RBAC-controlled access: The
nodes/checkpointClusterRole permission controls can trigger checkpoints. Scope this to specific service accounts. - IRSA for Amazon ECR authorization: The agent uses IAM Roles for Service Accounts to push checkpoint images to Amazon ECR. The agent doesn’t store static AWS credentials in the cluster.
- Minimal container image: You build the agent image
FROM scratchwith only static Go binary and CA certificates. No shell, no package manager, minimal attack surface. - Dedicated namespace: The checkpoint agent runs in its own namespace (checkpoint-system) with network policies restricting access. Define ingress rules that allow traffic only from the ALB and deny all other inbound connections to the agent pods. On Amazon EKS, NetworkPolicy enforcement requires enabling network policy support in the Amazon VPC CNI plugin. Without it, the policies are accepted by the API server but never enforced.
- Audit logs Amazon EKS control plane logging capture checkpoint operations when enabled. These logs are delivered to Amazon CloudWatch Logs, where you can query them with CloudWatch Logs Insights to audit who triggered checkpoints and when.
- Checkpoint data protection: Checkpoint archives contain sensitive data including memory contents. Amazon ECR provides encryption at rest. Apply repository policies to restrict access. Because every checkpoint is a full memory dump, don’t keep them indefinitely. Apply an ECR lifecycle policy to expire old images and bound both your storage costs and the window in which sensitive data sits in the registry. The CDK stack in this post sets
maxImageCount: 50. Tune this to whatever your incident response and data retention requirements allow, and if an investigation needs a checkpoint preserved beyond that window, copy it to a separate repository or archive rather than relaxing the policy. - Pod Security Standards label: Apply the baseline Pod Security Standard to the checkpoint-system namespace to help you prevent privilege escalation beyond what the agent requires. Add the label
pod-security.kubernetes.io/enforce: baselineto the namespace manifest. The CRIU installer’s privileged init container runs in a separate namespace or requires an exemption.
Note: The agent requires a read-only hostPath volume mount to
/var/lib/kubelet/checkpoints/. This carries less risk than mounting the containerd socket but consider restricting it with Pod Security Standards. The CRIU installer DaemonSet does require a privileged init container for the one-time host-level package installation.
For broader guidance on securing your Amazon EKS clusters, see the Amazon EKS Best Practices Guide for Security.
Cleaning up
Conclusion
Amazon EKS 1.34 brings containerd 2.x to worker nodes, which makes the Kubelet Checkpoint API with CRIU available for forensic container checkpointing on Amazon EKS. This Kubernetes-native approach per KEP-2008 eliminates the need for privileged containers with containerd socket access. The checkpoint agent runs as an unprivileged DaemonSet that calls the kubelet’s verified HTTP endpoint, packages checkpoints as OCI images using go-containerregistry, and pushes them to Amazon ECR through IRSA. In our test environment, the end-to-end flow (from API call to checkpoint image stored in Amazon ECR) completes in under 30 seconds for a typical microservice container. This breaks down roughly as: ~8–10 seconds for the CRIU checkpoint (freezing the process and writing memory pages to disk), ~5 seconds for OCI image packaging with go-containerregistry, and ~10–15 seconds for the ECR push (varies with image size and network throughput).
If you deploy across multiple clusters, kro’s ResourceGraphDefinition abstracts the DaemonSet, RBAC, CRIU installation, and networking configuration into a single custom API, so you can deploy checkpoint capabilities across your fleet.
To begin, clone the sample-container-checkpoint-for-amazon-eks repository and deploy the CRIU installer and checkpoint agent in a development cluster running Amazon EKS 1.34+. Target a minimal stateless application and verify the checkpoint-to-Amazon ECR pipeline before deploying production workloads. If you have questions or feedback, open an issue on the AWS Containers GitHub.
To learn more about Amazon EKS security best practices, see the Amazon EKS Best Practices Guide for Security.
Related resources
- KEP-2008: Forensic Container Checkpointing
- Kubernetes Forensic Container Checkpointing
- Kubelet Checkpoint API Reference
- CRIU — Checkpoint/Restore In Userspace
- containerd Restore Support (PR #10365)
- go-containerregistry
- kro — Kube Resource Orchestrator
- AWS Load Balancer Controller
- Amazon EKS Release Notes
- Amazon ECR User Guide