AWS Database Blog
Converting an RDS for SQL Server instance from license included to Bring Your Own Media (BYOM)
Amazon Relational Database Service (Amazon RDS) for SQL Server recently launched Bring Your Own Media (BYOM), so you can use your existing SQL Server licenses with fully managed RDS instances (see Unlock license mobility with Bring Your Own Media on fully managed Amazon RDS for SQL Server). This is particularly valuable if you have existing Microsoft licensing agreements and want to optimize your cloud spending by using those investments on AWS.
If you’re already running RDS for SQL Server with the license-included (LI) model, you can now convert those instances to BYOM in place, no database migration required. With this feature, you can transition your RDS for SQL Server instances from licensing provided by AWS to using your own SQL Server media while retaining the benefits of fully managed RDS infrastructure. To use BYOM, SQL Server Enterprise or Standard Edition with license mobility is required. For more information about license mobility, refer to License Mobility.
To simplify the setup process, we have also streamlined the BYOM engine version experience. You upload your SQL Server installation media to Amazon Simple Storage Service (Amazon S3) and register it as a BYOM engine version. Amazon RDS automatically creates new BYOM engine versions when minor version upgrades become available, so you can stay up to date. When you choose to upgrade, the new version is ready for you without additional manual steps.
In this post, we walk you through the end-to-end conversion process: preparing your installation media, creating a BYOM engine version, and performing the in-place license model change.
Solution overview
Follow these steps to convert your existing license-included RDS for SQL Server instance to BYOM:
- Prepare and upload your SQL Server installation files to Amazon S3.
- Create a BYOM engine version that Amazon RDS uses to build your specific database engine configuration.
- Modify your existing license-included instance to use the BYOM licensing model with the BYOM engine version.

Prerequisites
Before you begin, verify that you meet the following prerequisites:
- An AWS Identity and Access Management (IAM) principal (role or user) with
AmazonRDSFullAccess(AWS managed policy for RDS operations) ands3:GetObject,s3:CreateBucket, ands3:PutObjectpermissions to create, upload, and access SQL Server installation files in Amazon S3. - An S3 bucket to store installation files. All installation files must be stored in the same S3 bucket and in the same AWS Region where your RDS instance resides.
- An existing RDS for SQL Server instance with the license-included model that you want to convert.
- SQL Server installation media (ISO file) that matches the engine version of your existing instance.
Important considerations before you begin
- Converting from BYOM back to license-included isn’t supported. Plan your conversion carefully because this change isn’t reversible.
- BYOM engine versions can’t be shared across Regions or AWS accounts. However, the installation media can be shared. You must create a BYOM engine version in each Region and AWS account where you want to use BYOM.
- BYOM is supported on Enterprise and Standard editions of SQL Server 2019 and 2022.
- Option groups that include SQL Server Reporting Service (SSRS) or SQL Server Analysis Service (SSAS) aren’t supported with BYOM.
- If your instance is configured for Multi-AZ, the conversion applies to both the primary and standby instances.
- During the conversion, the instance enters a modifying state. For Multi-AZ instances, a rolling in-place conversion is performed where the standby is modified first, then a failover occurs (typically 30–60 seconds of failover time), and the old primary is updated. For Single-AZ instances, the instance shuts down during the conversion and restarts when the conversion is complete. Schedule the conversion during a maintenance window for production workloads.
- If your instance has read replicas, remove them before converting, then recreate them after. The new replicas will automatically inherit the BYOM licensing model.
- After conversion, you are no longer charged for the SQL Server license through AWS. You’re responsible for confirming compliance with your own Microsoft licensing agreements.
- To create a cross-Region read replica, the BYOM engine version must be created in the target Region first.
- If you want to upgrade the minor version as part of your license-included to BYOM conversion, you must first create a BYOM engine version for the target higher minor version.
Step 1: Prepare and upload installation files
To get started, you need the SQL Server installation media file that matches the engine version running on your existing RDS instance. You can obtain this from your Microsoft Volume Licensing Service Center (VLSC) or Visual Studio subscription.
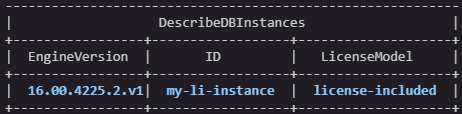
Identify your current engine version
First, check the engine version of your existing license-included instance:
Sample output:
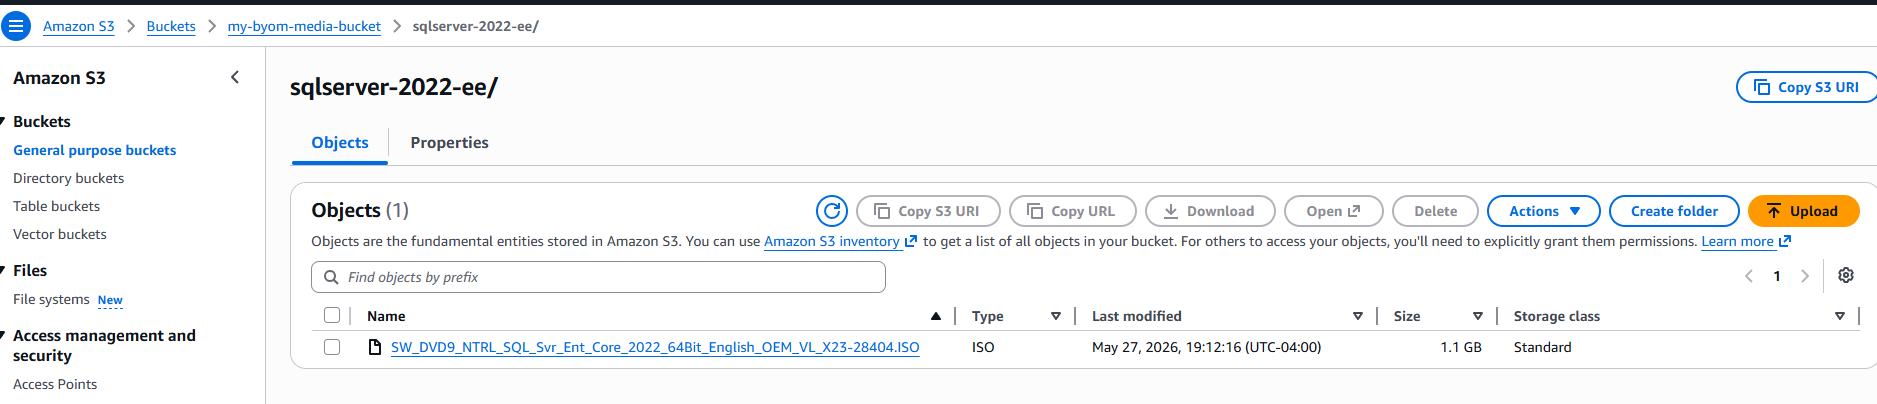
Create an S3 bucket and upload your installation files
- Create an S3 bucket in the same Region as your RDS instance:
- Upload your SQL Server ISO file (replace the following media file name and S3 bucket name according to your environment):
Cross-account setup: Sharing installation media across accounts in your organization
If you manage multiple AWS accounts, you can store the SQL Server installation media in a central S3 bucket and allow access to all accounts within your AWS Organization. This avoids uploading the same ISO file to each account individually.
Add the following bucket policy to your central S3 bucket to allow access from all accounts in your organization: Refer Adding a bucket policy by using the Amazon S3 Console.
Replace the placeholders with your actual values: o-xxxxxxxxxxxx with your AWS Organizations ID, TARGET-ACCOUNT-ID with the AWS account ID that needs access, YOUR-IAM-ROLE with the IAM role used to access the installation media, and YOUR-BUCKET-NAME with your S3 bucket name.
Each account still needs to create its own BYOM engine version (since BYOM engine versions can’t be shared across accounts) but can reference the installation media from the central bucket.
Note: The S3 bucket must be in the same Region as the RDS instance where you’re creating the BYOM engine version.
Step 2: Create a BYOM engine version
Amazon RDS uses BYOM engine version to validate and register your SQL Server installation files packaged into a reusable template. The BYOM engine version must use the same engine version as your existing instance.
Create the BYOM engine version using the AWS CLI
Execute the following command to create the BYOM engine version using the uploaded media file:
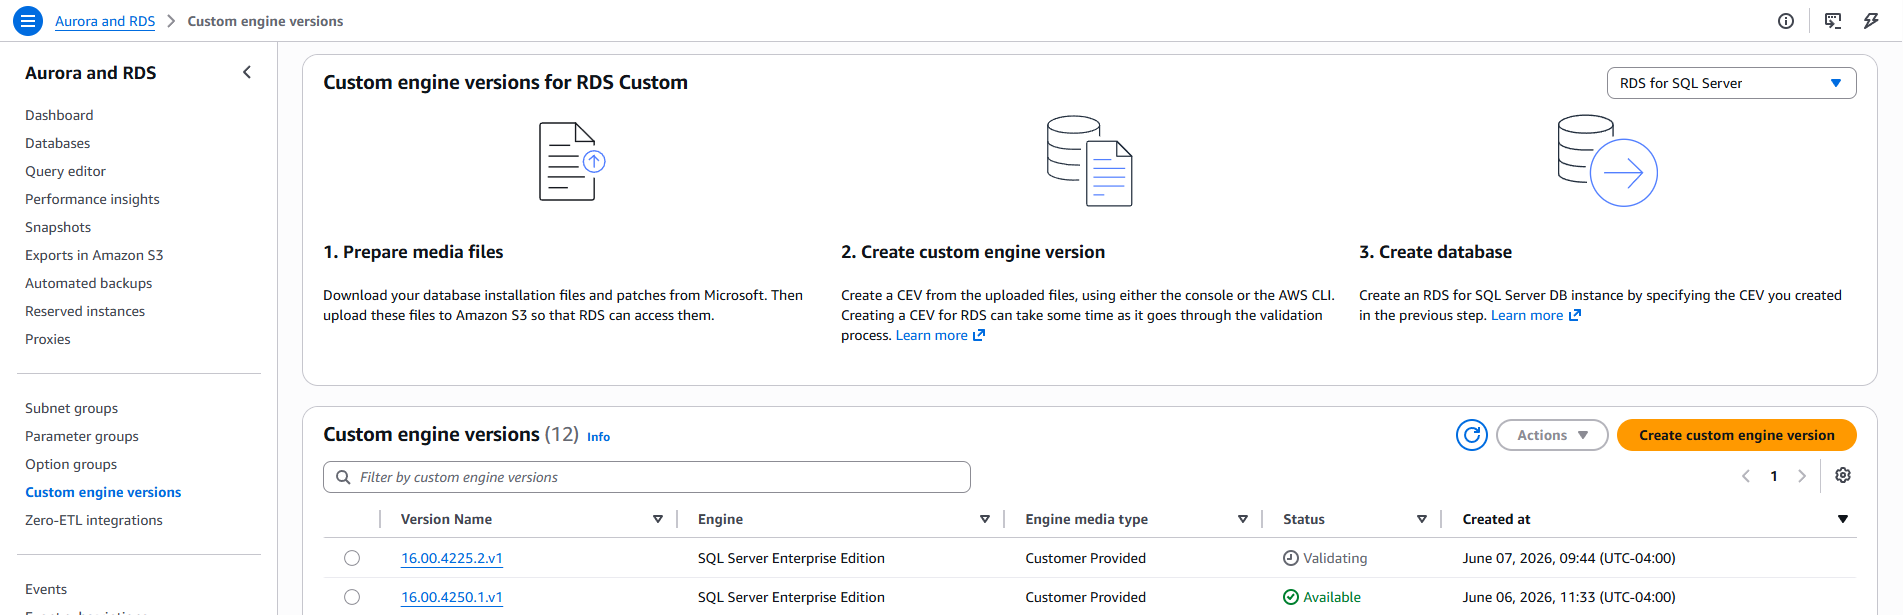
You can also create the BYOM engine version using the RDS Console, as shown in the following screenshot.

Monitor BYOM engine version creation status
BYOM engine version creation typically takes a few minutes. Monitor the status until it shows available:
Sample output:
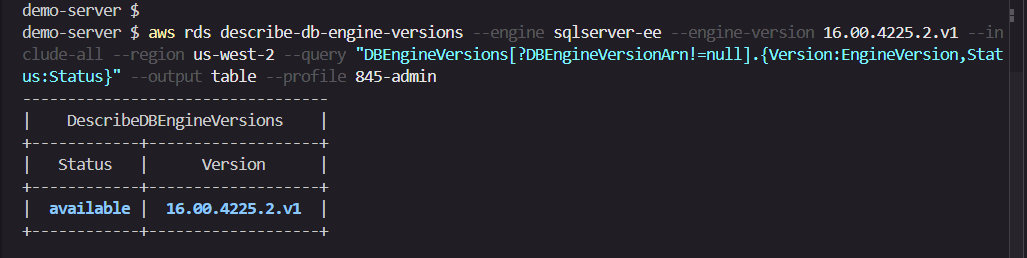
Note: You must wait until the status changes from Validating/Creating to Available before proceeding to Step 3.
Step 3: Convert the instance from license-included to BYOM
After your BYOM engine version reaches available status, you can modify your existing license-included instance to use the BYOM licensing model. This operation changes the licensing model in place without requiring you to recreate the instance or migrate data.
If your instance is a Multi-AZ instance, a rolling in-place conversion is performed to minimize downtime. For a Single-AZ instance, downtime is required. We recommend performing this task during your maintenance window.
Note: Converting from BYOM back to license-included isn’t supported. Plan your conversion carefully.
Use the AWS CLI to modify the instance
You can also convert the license model by modifying the instance using the RDS Console, as shown in the following screenshots.
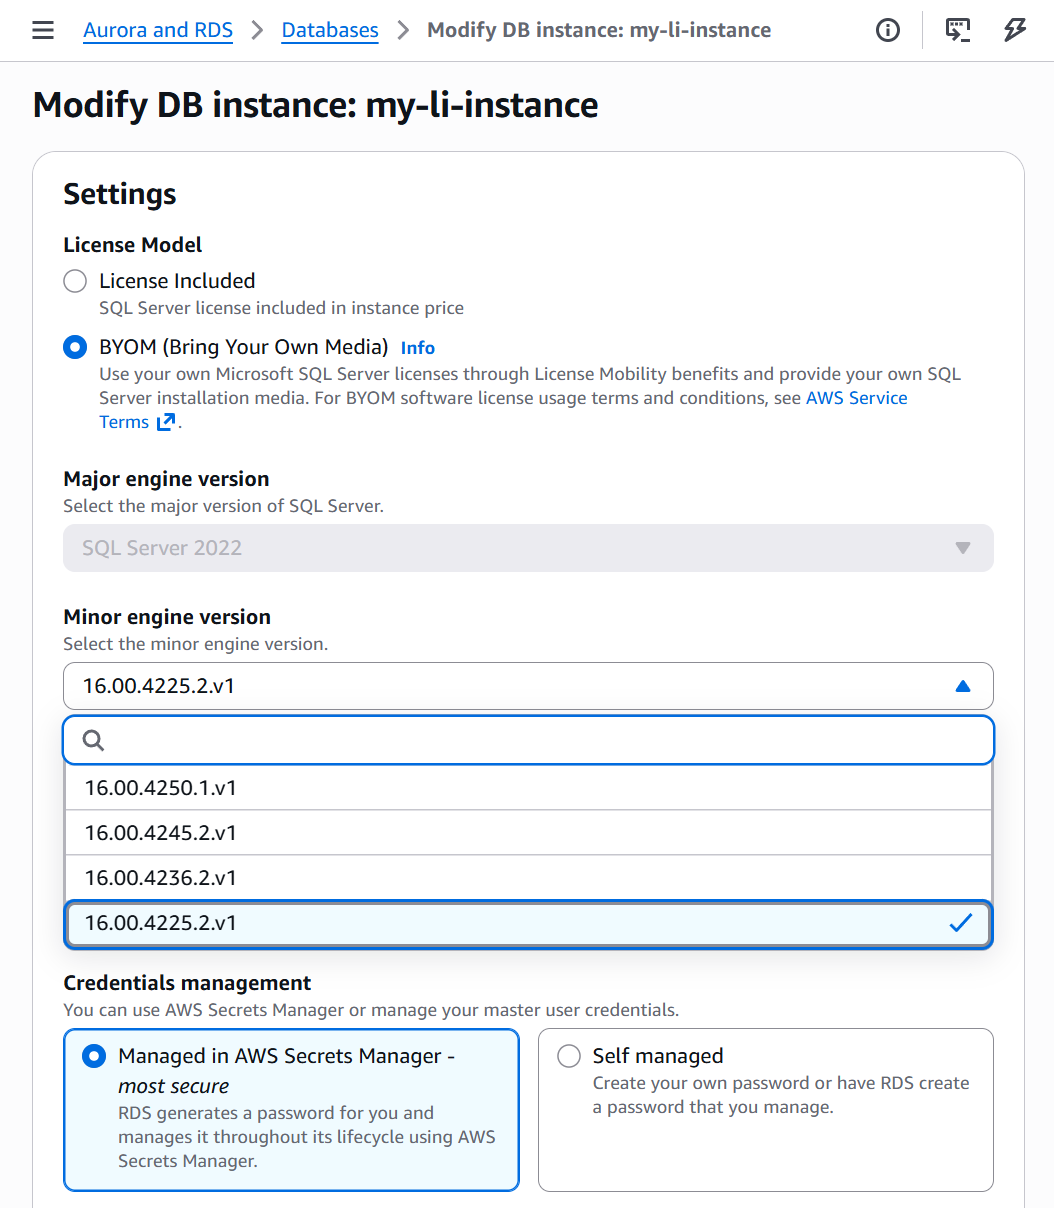
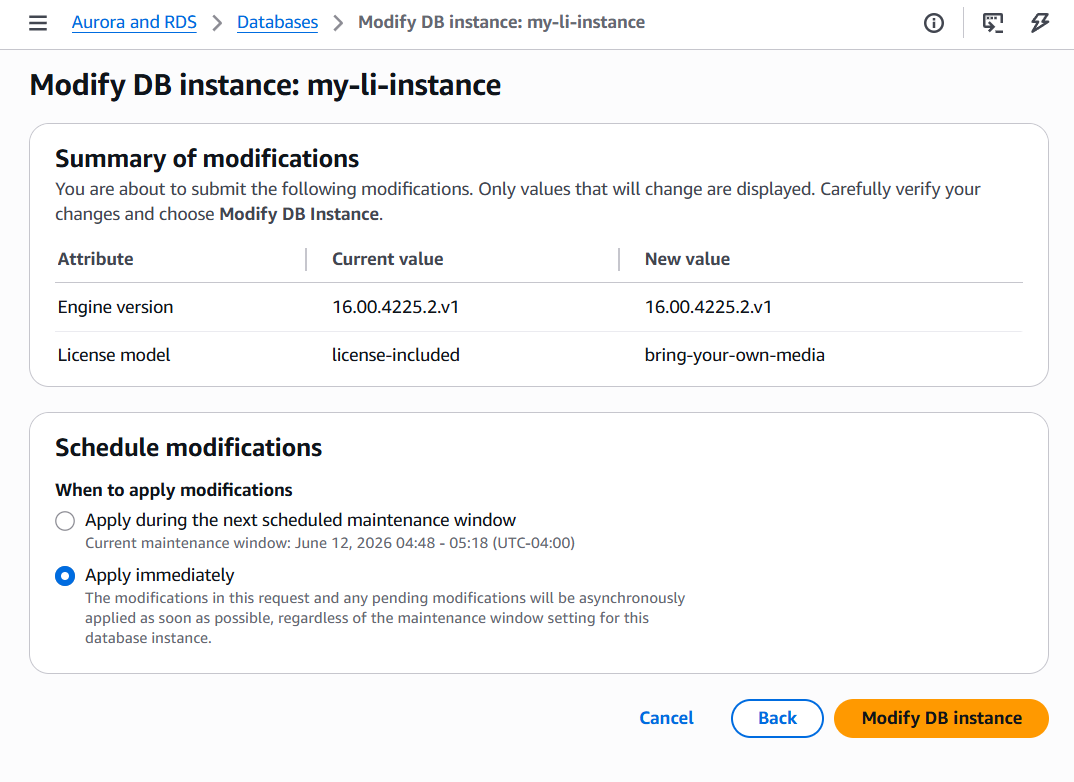
Note: If your selected BYOM engine version has a higher minor version than the instance’s current version, RDS performs the minor version upgrade along with the license model change in a single operation.
Verify the conversion
After the modification is complete, verify that the license model has changed:
List existing DB instances and license model
To list all existing SQL Server instances still using the license-included model:
Track license consumption
You can track the license consumption of your RDS instances using AWS License Manager. Follow these steps to enable and track your license usage:
Step 1: Onboard AWS License Manager
Before you can track the instances, License Manager needs a service-linked role that gives it permission to read your account’s resource inventory. If you’ve opened the License Manager console before and allowed the one-time setup, this role already exists and you can move straight to Step 2.
If this is your first time, the AWS Management Console creates it automatically the moment you visit the service page, or you can create it explicitly using the AWS CLI:
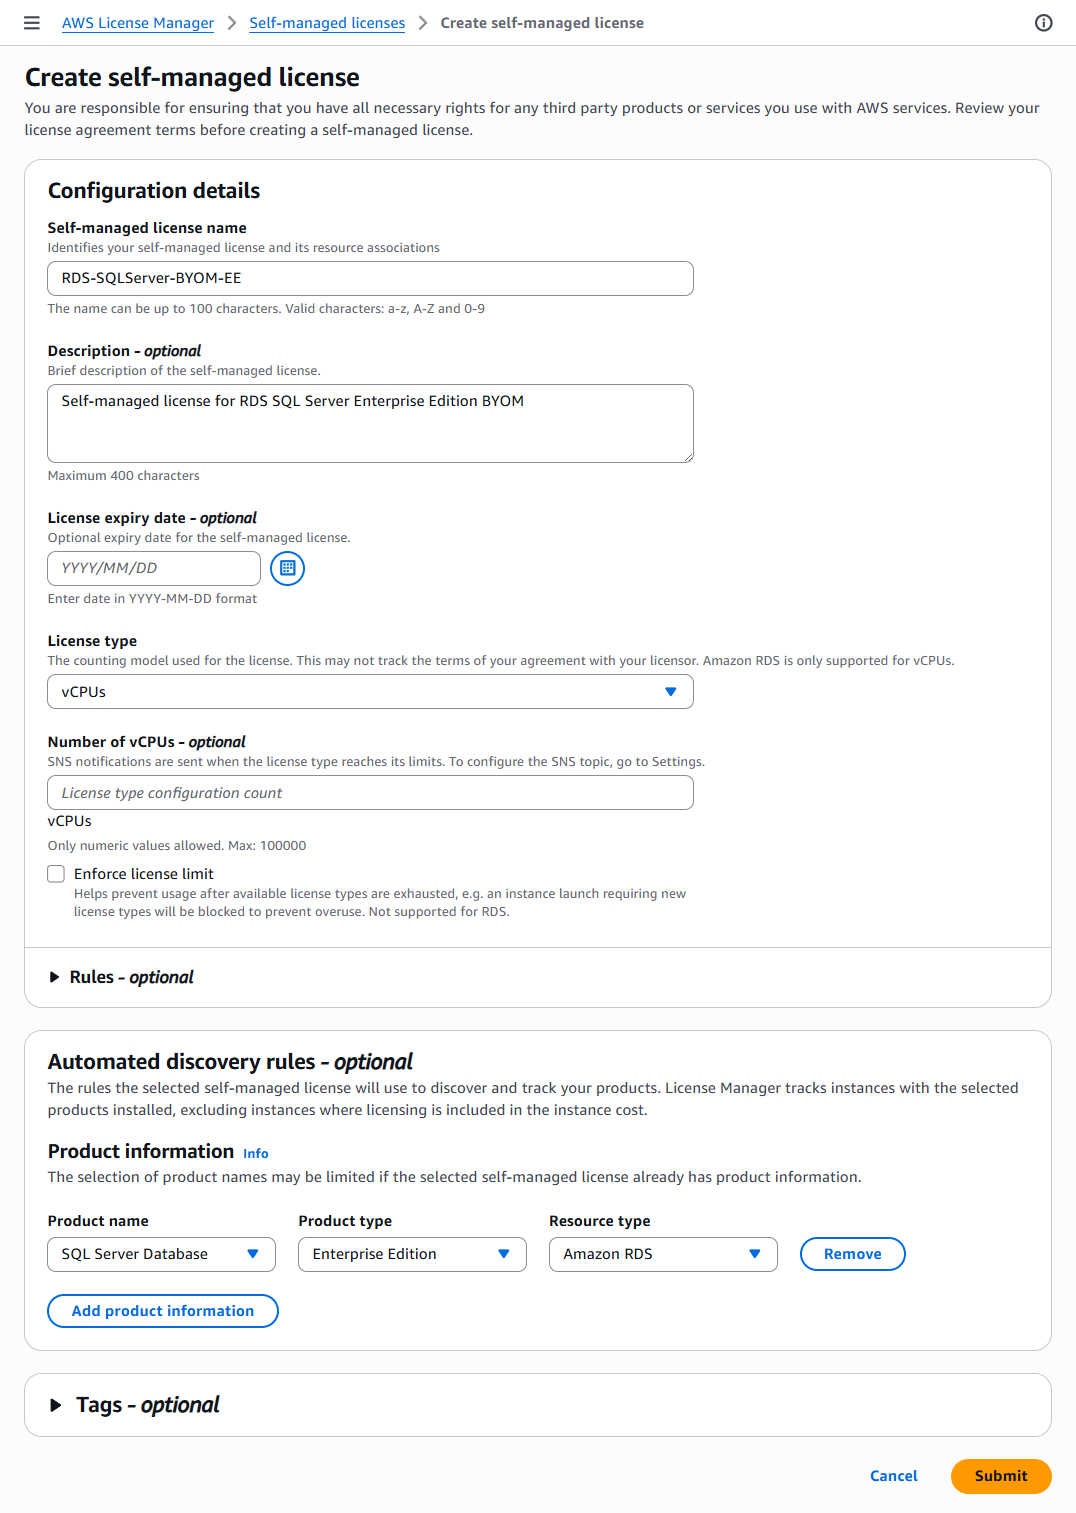
Step 2: Create a self-managed license for your RDS BYOM instances
A self-managed license tells License Manager what to look for and how to count it. You will point it at Amazon RDS resources running SQL Server and choose vCPU as the counting unit. Create a JSON file called rds-byom-license-config.json and the following content. This example tracks a self-managed SQL Server Enterprise Edition license for Amazon RDS. To track SQL Server Standard Edition license, create a similar JSON file and change the value of ProductInformationFilterValue to sqlserver-se.
Run the following command to create the license configuration using the JSON file.
Sample output:
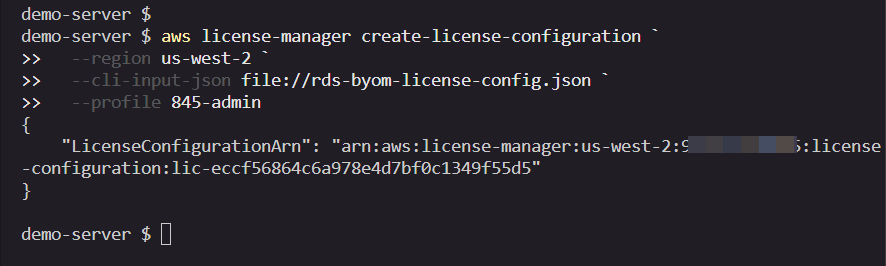
Note the license configuration ARN in the output. You will need it in the next step.
You can also create the license configuration through the AWS License Manager console by navigating to Self-managed licenses and choosing Create self-managed license.
Step 3: Verify that your RDS instances are being tracked
With the license in place, it will take some time to discover and report your BYOM instances. You can either inspect the tracked resources using the command below:
Considerations
- License Manager tracks usage per Region. For multi-Region RDS BYOM deployments, configure License Manager independently in each Region.
- Cross-Region read replicas are tracked by License Manager in the Region where the replica resides.
Clean up
To avoid ongoing charges, clean up the resources you created when you no longer need them.
- Delete the RDS instance:
- Delete the BYOM engine version (only after all associated instances and snapshots are removed):
- Delete the S3 bucket:
- License configuration can’t be deleted while resources are still associated with it. The RDS BYOM instances it tracks must be deleted first.
Conclusion
In this post, we showed you how to convert an existing license-included RDS for SQL Server instance to the Bring Your Own Media (BYOM) licensing model. The process involves uploading your SQL Server installation media to Amazon S3, creating a BYOM engine version, and modifying your existing instance to use the new licensing model.
If you want to optimize your SQL Server licensing costs on AWS, this conversion gives you flexibility. By using existing Microsoft licensing agreements through BYOM, you can reduce your overall cloud spending while maintaining the fully managed benefits of Amazon RDS, including automated backups, patching, monitoring, and high availability.
For more information about BYOM on Amazon RDS for SQL Server, see Amazon RDS for SQL Server documentation.