AWS Database Blog
Data masking in Amazon RDS for Oracle
As organizations migrate their Oracle databases to Amazon Relational Database Service (Amazon RDS) for Oracle, one critical operational practice that must be re-established in the cloud is safely refreshing non-production environments with production-like data. On-premises, this was a standard process: clone production, mask sensitive data, and hand it off to developers and testers. Data masking permanently replaces sensitive information with realistic fictitious values, so your test environments retain the same structure, patterns, and scale that production has. This makes testing meaningful without inadvertent access to customer information.
On Amazon RDS for Oracle, you don’t have the same level of infrastructure control you had on-premises, but the overall data masking approach remains similar. Data masking using the Oracle Data Masking and Subsetting Pack works with Amazon RDS for Oracle, letting you maintain the same data governance workflow in the cloud that you used in your on-premises environment.
In this post, we walk through how to use the Oracle Data Masking and Subsetting Pack with Amazon RDS for Oracle. We cover setting up Data Masking in Oracle Enterprise Manager (OEM) and automation options.
Why data masking matters in the cloud
- Compliance doesn’t change in the cloud: GDPR, HIPAA-eligible, and PCI DSS-compliant requirements apply equally to RDS as they did on-premises.
- RDS DB snapshot: Restoring an RDS DB snapshot to a lower environment without masking exposes sensitive data in non-production environments. Additionally, development and test databases typically have relaxed security groups, more AWS Identity and Access Management (IAM) roles, and shared credentials. Masking helps prevent real data exposure even if these environments allow inadvertent access.
- Third-party development needs safe data: Outsourced development teams need realistic data to work with. Masked RDS clones let you share production-quality datasets without exposing actual customer information.
- Preserving on-premises workflows: If you already use Oracle Enterprise Manager for masking on-premises data, you can use a similar approach with RDS for Oracle.
Oracle Data Masking and Subsetting Pack
Oracle licenses the Data Masking and Subsetting Pack as an add-on to Oracle Enterprise Manager (OEM) Cloud Control. It provides data masking capabilities including referential integrity preservation, sensitive data discovery, and flexible deployment. The pack understands Oracle data types, constraints, and relationships natively, making it suited for complex Oracle workloads.
How it works with RDS for Oracle
The Oracle Data Masking and Subsetting Pack operates through Oracle Enterprise Manager (OEM) Cloud Control, connecting to your RDS for Oracle DB instance as managed targets. OEM runs on a separate Amazon Elastic Compute Cloud (Amazon EC2) instance and communicates with RDS over the network. It requires no OS-level access to the RDS host.
- RDS DB snapshot and restore: Take an RDS DB snapshot of the production RDS for Oracle DB instance and restore it as a new RDS for Oracle DB instance (the target/clone).
- OEM connectivity: OEM Cloud Control on Amazon EC2 connects to the RDS for Oracle DB instance (target/clone). The masking script is generated and downloaded from OEM.
- Masking: The masking script is run manually on the target/clone RDS for Oracle DB instance, replacing sensitive data in-place.
- Result: The target/clone RDS for Oracle DB instance now contains masked data, ready to be shared with the development and test environments.
Prerequisites
Cost consideration: Consider the cost of running multiple RDS for Oracle DB instances (Enterprise Edition).
- Amazon RDS for Oracle: Enterprise Edition (source/production).
- Amazon RDS for Oracle: Enterprise Edition (target/clone, restored from production RDS DB snapshot).
- Oracle Enterprise Manager Cloud Control (13.5 or 24ai): Installed on an on-prem/Amazon EC2 instance with network connectivity to target/clone RDS for Oracle DB instance. Connectivity via Oracle client to run the masking script on the target/clone RDS for Oracle DB instance.
- Oracle Data Masking and Subsetting Pack license.
- RDS admin user access on the target RDS for Oracle DB instance.
Step 1: Deploy Oracle Enterprise Manager on EC2
- Launch an Amazon EC2 instance in the same virtual private cloud (VPC), or a peered VPC, as your RDS for Oracle DB instances. Recommended: m5.xlarge or larger, 100GB+ Amazon Elastic Block Store storage, Oracle Linux 8 or Red Hat Enterprise Linux (RHEL) 8. Note: Running an m5.xlarge EC2 instance with 100GB+ EBS storage will incur ongoing charges. Use the AWS pricing calculator to determine the compute and storage costs.
- Install and configure Oracle Enterprise Manager Cloud Control 24ai (or 13.5).
Step 2: Create and restore RDS DB snapshot
- Create a RDS DB snapshot of the RDS DB instance that you want to mask. Alternatively use an automated backup.
- Restore the RDS Snapshot as a clone/target RDS DB instance.
- Wait for the clone/target restored RDS DB instance status to become ‘available’.
Step 3: Register RDS DB instances as targets in OEM
Set up OEM integration with RDS for Oracle as discussed in Oracle Management Agent for Enterprise Manager Cloud Control using option groups.
You need to register the clone/target RDS for Oracle DB instance as a monitored target in OEM.
Note: If you are using multi-tenant or single-tenant configuration of RDS for Oracle, verify that the tenant database is discovered as a target in OEM and all database related activities must be carried out on the tenant database in the step-by-step instructions.
All the following steps use the Enterprise Manager 24ai console, refer to Data Masking and Subsetting for the steps to follow on Enterprise Manager 13.5.
Step 4: Create an Application Data Model (ADM)
The Application Data Model is the foundation for all masking operations. It maps your schema structure, table relationships, and identifies sensitive columns.
- Navigate to Enterprise > Quality Management > Application Data Models.
- Select Create.
- In the Create Application Data Model screen, specify the following properties:
- Enter the Name for the ADM.
- Enter the Description for the ADM.
- For Target Type, select Database Instance.
- For Target Database, select the target/clone RDS for Oracle DB instance.
- Select the Database Named Credentials (admin user with role:normal).
- Select the Schemas to include.
- For Relation Discovery Type, select either Dictionary-Based or Non-Dictionary.
- Select Create.
- Wait for the job status to change to succeeded. OEM discovers tables, views, primary key/foreign key relationships, and column metadata.
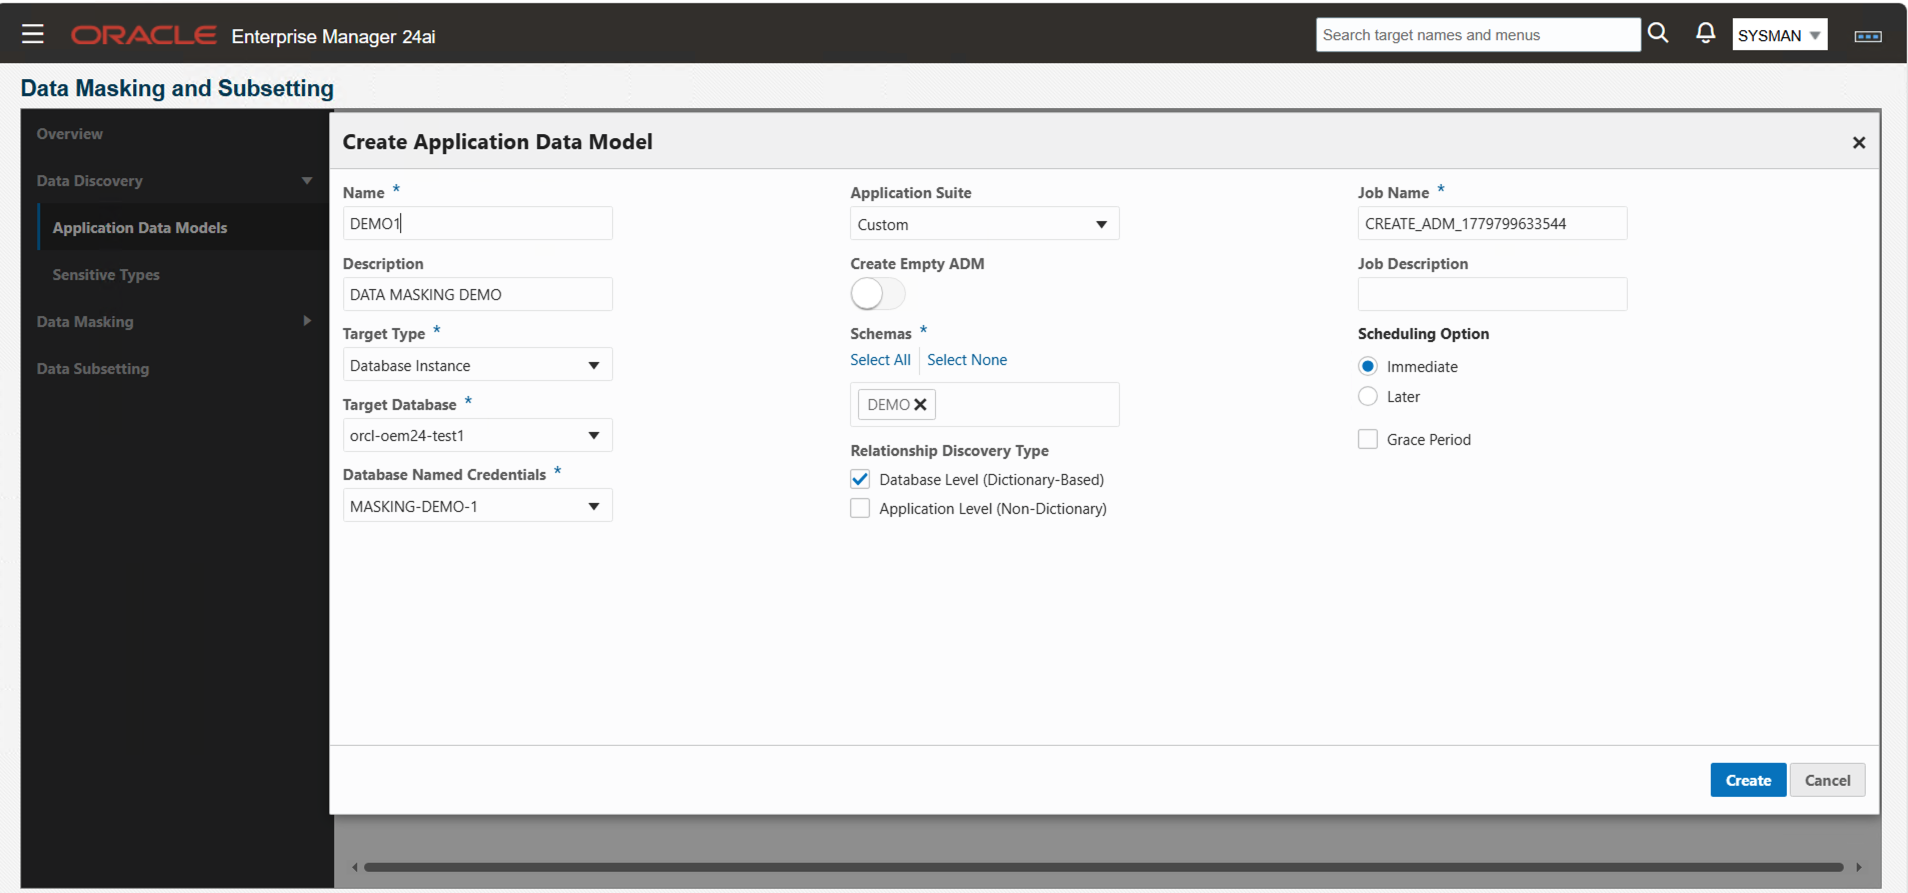
Screenshot of Oracle Enterprise Manager 24ai showing the Create Application Data Model
Step 5: Discover sensitive data
- Select the ADM that you created in the previous step.
- Select Discover Sensitive Columns and select Schedule.
- In the Create Sensitive Column Discovery Job screen, specify the following properties:
- Select Database Named Credentials.
- For Applications, select the schema.
- Select the Sensitive Types (such as Age, Credit Card Number, Date of Birth, and Email ID).
- Specify Data Sample Size.
- Select Submit.
- Wait for the status of the job to change from scheduled to succeeded.
- Review the results of the discover sensitive columns job.
- Review each discovered column and adjust its sensitivity status as needed by choosing Mark Sensitive, Mark Not Sensitive, or Mark Undefined.
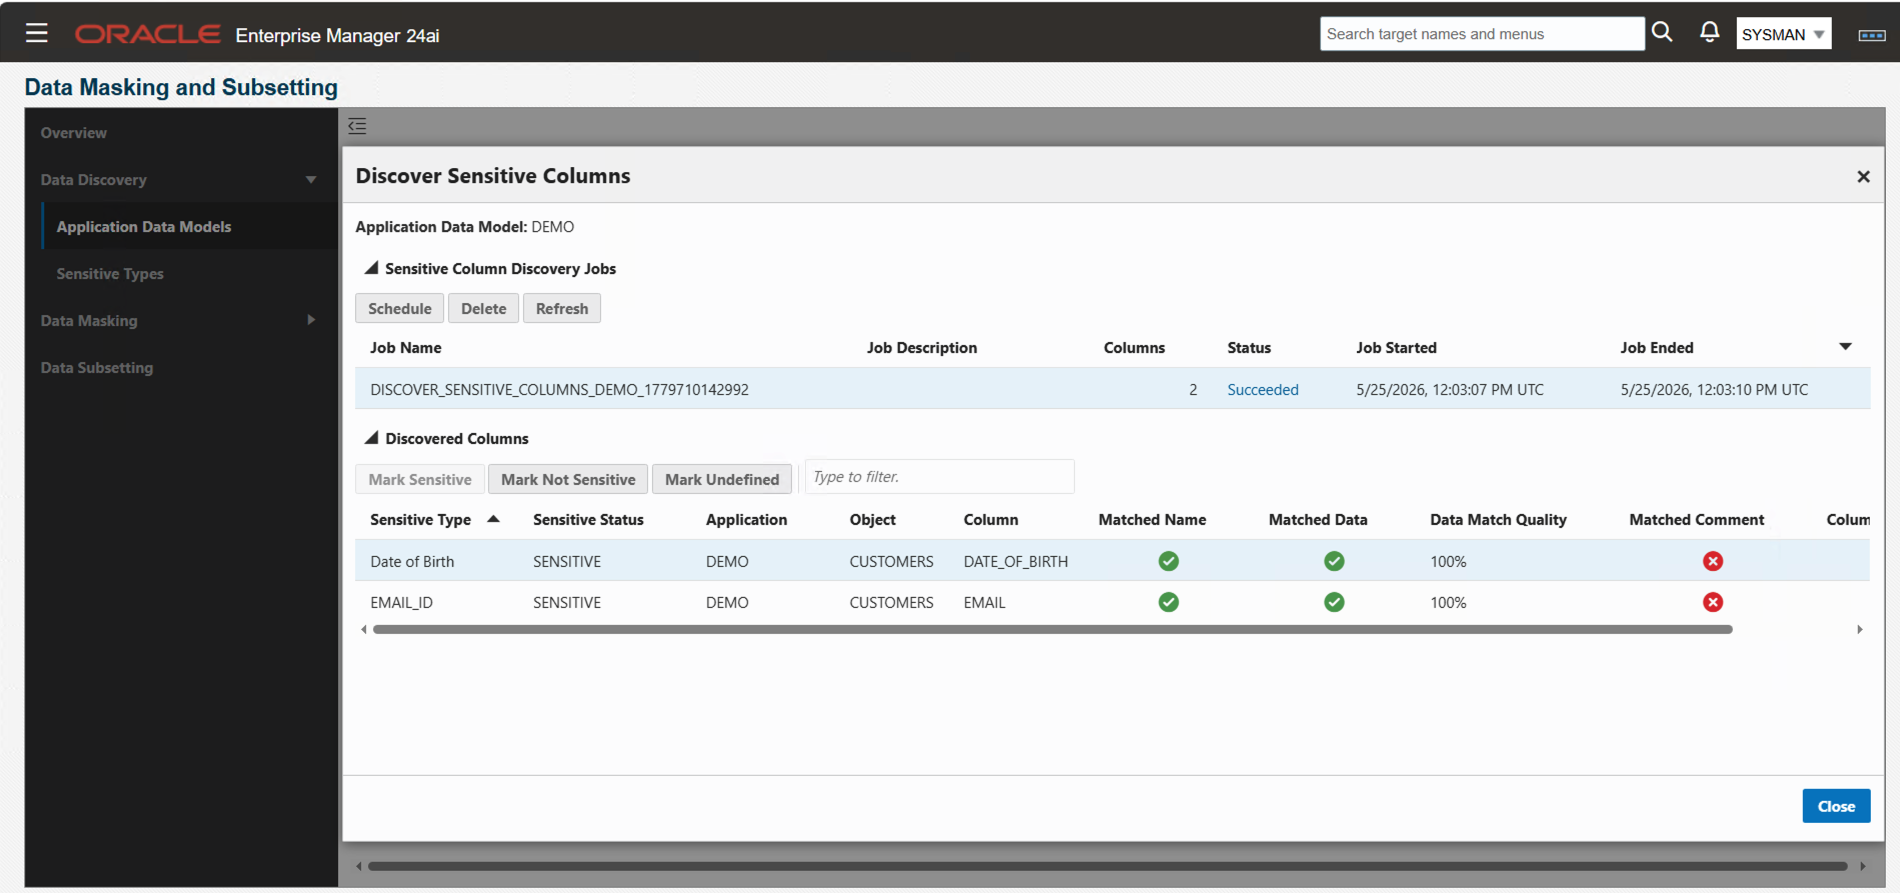
Screenshot of Oracle Enterprise Manager showing the Discover Sensitive Columns results.
Step 6: Create a masking definition
- Navigate to Enterprise > Quality Management > Data Masking Definitions.
- Select Create.
- In the Create Masking Definitions screen, specify the following properties:
- Enter the Name for the definition.
- Select the Application Data Model.
- Select the Associated Database.
- Select the Database Named Credentials.
- Select Next.
- For each sensitive column, complete the following steps:
- Select Define Format and Add.
- Select or define the masking format.
- Select Add Format Entry.
- Select Add.
- Select Next.
- In the Advanced Options screen, select the options that you would like to use.
- Select Next.
- In the Review screen, select Create.
Step 7: Generate and download the script
Since Amazon RDS for Oracle is a managed service, OEM cannot schedule masking jobs directly against the RDS for Oracle DB instance. The OEM job scheduler requires OS-level credentials on the target host, which are not available on RDS. Instead, you generate and download the masking script from OEM, then run it manually (or through automation) against the target RDS for Oracle clone.
- From the Masking Definition page, select the masking definition.
- Select Actions.
- Select Manage Masking Script.
- Select Generate Masking Script.
- In the Generate Masking Script screen, specify the following properties:
- Select the In-Data Masking Option.
- Select the Associated Database.
- Select the Database Named Credentials.
- Select Generate.
- Wait for the status of the job to change to Script Generated.
- Select the Masking Definition.
- Select Actions.
- Select Manage Masking Script.
- Select Download In-Database Masking Script.
- Review the generated script.
Amazon RDS for Oracle restricts direct ALTER SYSTEM commands for managed service security. The OEM-generated script includes these commands, which will fail on RDS. Replace them with NULL placeholders and use the RDS-specific rdsadmin utility package equivalents at the end of the script. This approach helps the masking script to complete successfully while achieving the same flush and checkpoint operations through RDS-approved methods.
Add the RDS equivalent commands at the end of the script, before “spool off”.
Step 8: Run the script on the target clone
Since the OEM job scheduler cannot run directly on RDS, run the downloaded masking script manually against the target RDS clone using a SQL client (SQL*Plus, SQLcl, or SQL Developer):
- Connect to the target (clone) RDS for Oracle DB instance using SQL*Plus or SQLcl from the OEM/EC2 instance.
- Run the downloaded masking script:
@/path/to/downloaded/masking_script.sql - Monitor execution progress by reviewing the status messages output as the script processes each table.
- For large databases, run the script in a screen or nohup session to avoid disconnection issues.
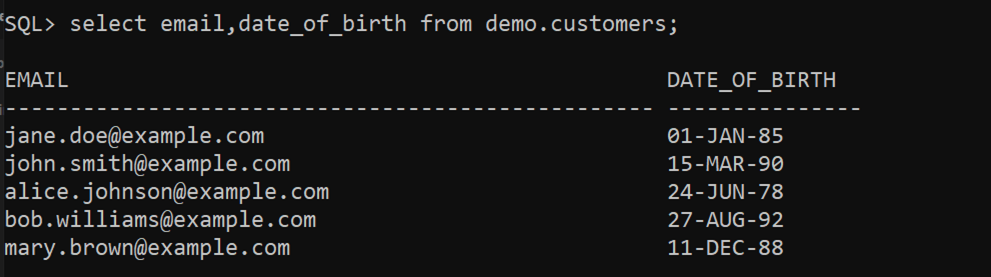
Example
Before:
SQL query result showing data from demo.customers table with columns EMAIL and DATE_OF_BIRTH, before data masking is applied.
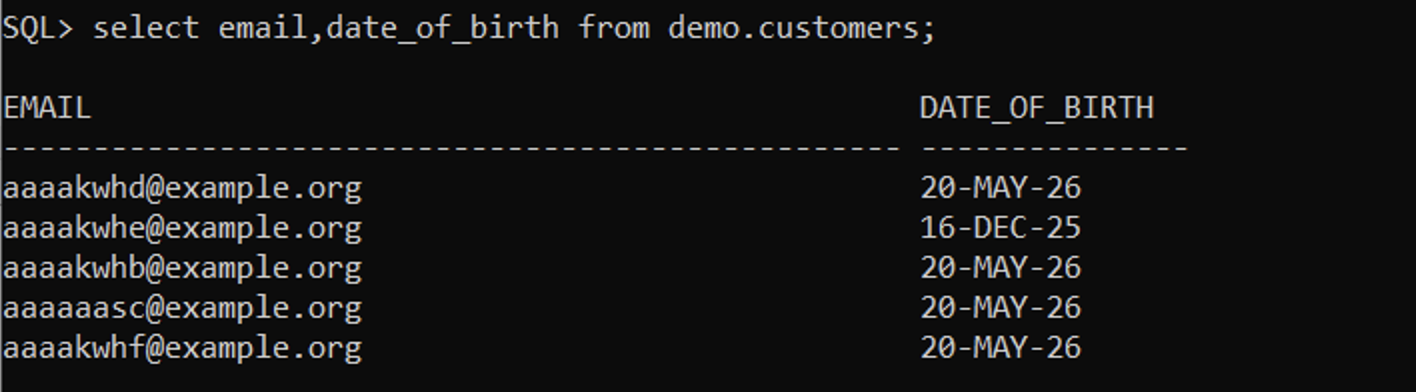
After:
SQL query result showing masked data from demo.customers table with columns EMAIL and DATE_OF_BIRTH, displaying masked email addresses and birth dates.
Automation considerations
OEM Data Masking scripts are interactive by default, requiring manual user input during execution. To automate, wrap the masking script in a shell script that uses SQL*Plus or SQLcl with input redirection. To get an idea of the input that the script requires, first run it manually before implementing the automation.
Example approach
Warning: The script provided is only for demo purposes. Develop the script according to your organization’s coding and security best practices.
run_masking.sh script:
Running the script in the background.
For an automated workflow, use Amazon EventBridge Scheduler to start an AWS Step Functions state machine execution. AWS Step Functions orchestrate the workflow end-to-end.
Automation Flow
Architecture diagram showing the automated masking workflow.
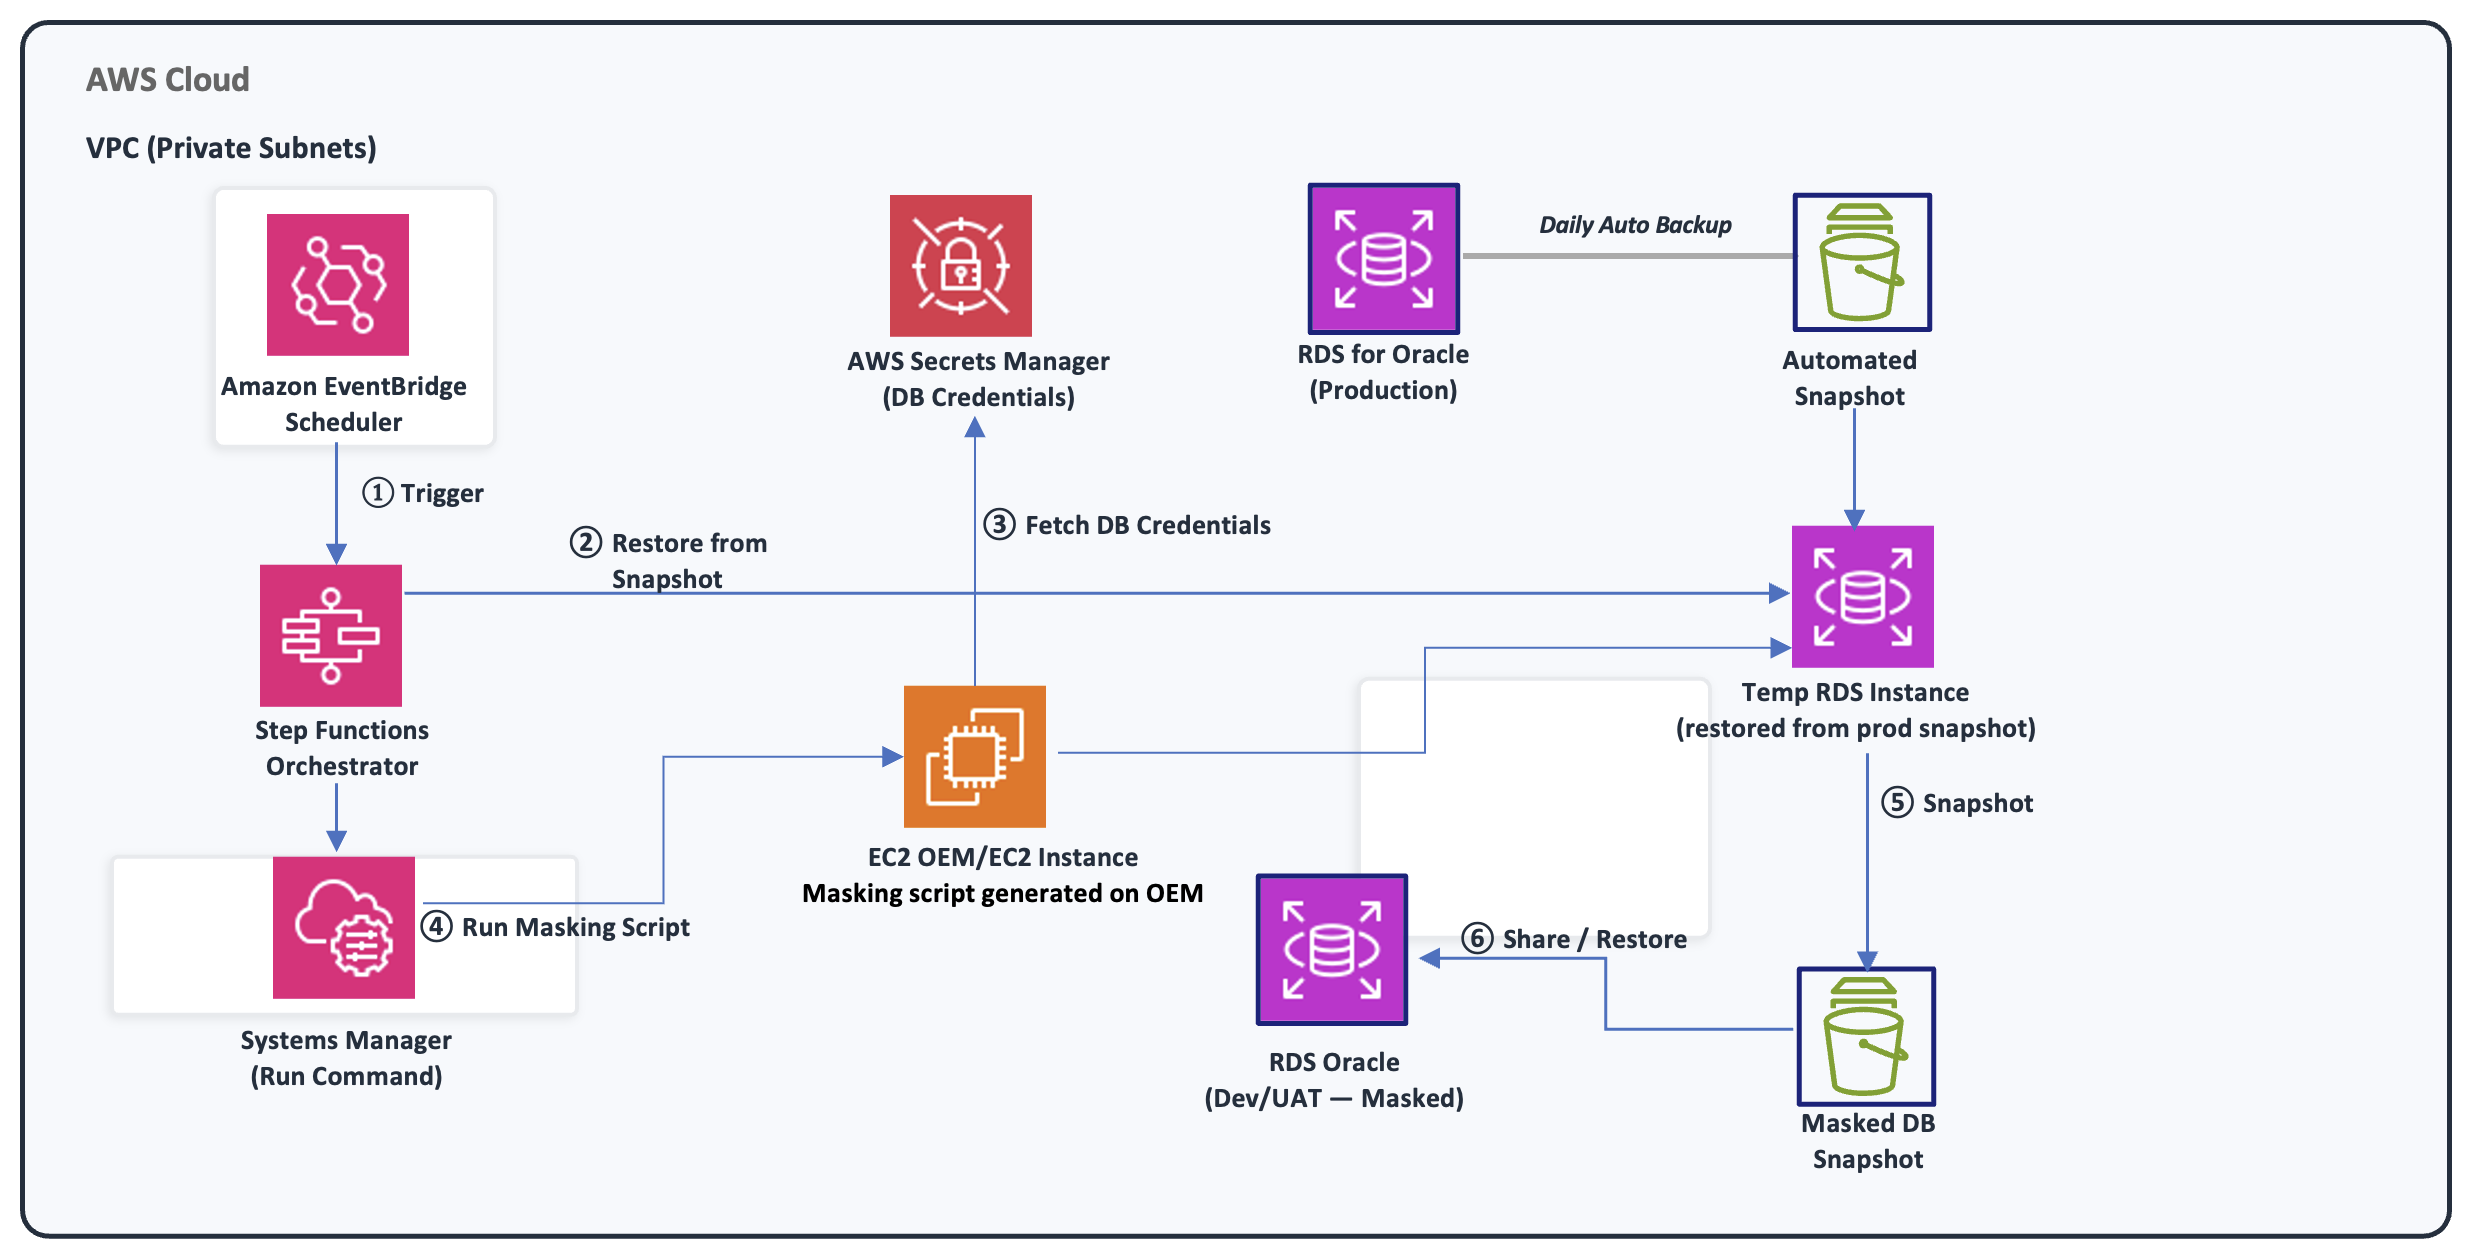
1. Trigger: Amazon EventBridge scheduler starts the AWS Step Functions state machine.
2. Restore RDS DB snapshot: Restore production RDS DB snapshot to a temporary RDS for Oracle DB instance. Poll restored RDS for Oracle DB instance status until available.
3. Fetch credentials: Amazon EC2 retrieves Oracle username and password from AWS Secrets Manager.
4. Run masking: Run Command, a capability of AWS Systems Manager, runs the masking script via SQL*Plus/SQLcl on Amazon EC2 against the restored RDS for Oracle DB instance.
5. Create masked RDS DB snapshot: Take RDS DB snapshot of the masked database.
6. Cross-account sharing/restore: Share masked RDS DB snapshot with Dev/UAT accounts and restore RDS DB snapshot.
7. Cleanup: Refer to the cleanup section in step 10.
Additional Considerations:
- Implement Amazon Simple Notification Service (Amazon SNS) notifications for success/failure states.
- Verify RDS DB snapshot encryption keys are accessible to target accounts.
Step 9: Validate the masked data
1. Connect to the target RDS for Oracle DB instance.
2. Verify that sensitive columns are properly masked, referential integrity is preserved, and row counts match production.
Step 10: Clean up
Warning: Before deleting any resources, verify that:
- The masked data in the target RDS for Oracle DB instance meets your requirements.
- You are deleting the correct temporary RDS for Oracle DB instance (not production).
- Create an optional final snapshot of the RDS for Oracle DB instance.
- Delete the temporary RDS for Oracle DB instances that are no longer required.
- Delete RDS DB snapshots that are no longer required.
AWS-native alternatives (brief overview)
It’s worth noting that AWS provides cloud-native options for data masking that don’t require the additional Oracle Data Masking and Subsetting Pack:
- AWS Glue Visual ETL: The Detect Sensitive Data transform can identify and mask over 250 types of personally identifiable information (PII) during ETL operations between RDS databases. Serverless, no-code, and designed to work with RDS for Oracle editions. For details, see: Copy and mask PII between Amazon RDS databases using visual ETL jobs in AWS Glue Studio
- AWS Database Migration Service (AWS DMS) data masking: When replicating data from one RDS for Oracle DB instance to another while protecting sensitive information, AWS DMS provides a streamlined approach. Starting with version 3.5.4, you can use data masking transformation rule actions in your table mapping to obfuscate or alter column values. This applies as data moves from your source RDS for Oracle DB instance to the target. This allows you to produce a sanitized copy of your database which is ideal for non-production environments like Dev or QA, without the overhead of separate masking scripts or tools. For details, see: Using data masking to hide sensitive information
You’ll find these approaches are ideal for straightforward PII redaction scenarios. However, when you need referential integrity preservation, application-aware masking, deterministic masking, or format-preserving transformations, Oracle offers the Data Masking and Subsetting Pack as an add-on to Oracle Enterprise Manager (OEM) Cloud Control.
Best practices
- Always mask a copy, never production: Masking is irreversible. Only mask non-production environments.
- Test your masking rules first: Make sure masked data doesn’t break your application logic.
- Build a complete Application Data Model: A well-defined ADM automatically preserves foreign key relationships and referential integrity.
- Use deterministic masking for consistency: If the same customer appears across multiple databases, deterministic masking supports consistent masked values.
- Disable triggers before masking: Turn off triggers and materialized view refreshes before you start, then re-enable them after masking completes.
- Monitor your tablespace: Masking generates redo and undo. Make sure your temp and undo tablespaces have enough space. Masking operations also require additional storage. Calculate the space requirements for masking operations.
- Document what you mask: Keep a record of which columns are masked and how. You’ll need this for audits.
- Automate the workflow: Use Amazon EventBridge and Step Functions to automatically trigger masking after RDS DB snapshot restores, creating a repeatable refresh pipeline.
- Cleanup: Remove temporary RDS for Oracle DB instances, and RDS DB snapshots that are no longer required.
- Protect the unmasked RDS DB snapshot. The RDS DB snapshot contains a full copy of production data. Restrict who can restore or share snapshots using IAM policies and use AWS Key Management Service (AWS KMS) on your RDS DB instance to protect data at rest. Consider using Service Control Policies (SCPs) to help prevent snapshot sharing outside your AWS organization.
- Minimize the masking window. Between snapshot restore and masking completion, unmasked production data exists in your target environment. To reduce this risk:
- Automate the end-to-end workflow (restore → register → mask → validate) so it completes without human delay.
- Block non-admin access to the clone RDS DB instance until masking validation passes.
- Use a dedicated security group that only allows connections from the OEM EC2 instance until masking is confirmed.
- Secure the OEM EC2 instance. This instance holds stored database credentials and has admin-level connectivity to your RDS DB instances. Harden it by:
- Restricting its security group to only the necessary ports.
- Applying OS patches regularly.
- Turn on IMDSv2 to help prevent inadvertent credential disclosure from server-side request forgery (SSRF) attacks.
- Use AWS Systems Manager Session Manager instead of SSH.
- Don’t store database credentials in scripts. The downloaded masking script needs database connectivity, but credentials should come from AWS Secrets Manager at runtime. Don’t hardcode them in the script file. Configure automatic rotation for RDS credentials.
- Encrypt connections in transit. Use Oracle native network encryption or Oracle Secure Sockets Layer for all connections between the OEM EC2 instance, SQL client, and RDS DB instances. This helps prevent inadvertent credential or data disclosure within the VPC.
Conclusion
In this post, you learned how to use the Oracle Data Masking and Subsetting Pack with Amazon RDS for Oracle through OEM Cloud Control. You walked through creating an Application Data Model and discovering sensitive data to generating and executing masking scripts on a cloned RDS for Oracle DB instance.
Combining RDS DB snapshot and restores with OEM’s masking capabilities can help you meet compliance requirements when provisioning lower environments. This approach allows you to deliver production-quality test data to development teams safely and automate the pipeline using EventBridge and Step Functions.
If you use RDS for Oracle Standard Edition or lack the Data Masking and Subsetting Pack license, AWS-native alternatives such as AWS Glue and AWS DMS provide cloud-native masking options without requiring the additional Data Masking and Subsetting Pack license.