AWS Database Blog
Set up a cross-region disaster recovery site for Amazon RDS for SQL Server
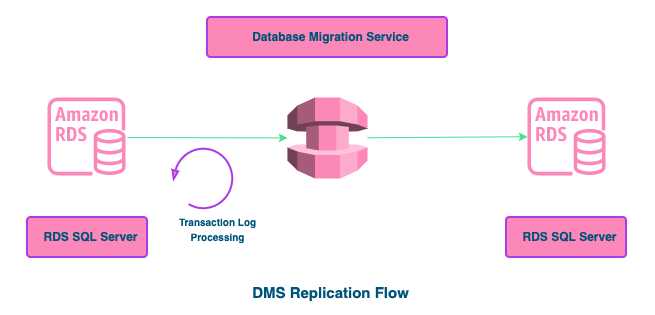
A common use case for Enterprise workloads is to have a reliable and effective disaster recovery (DR) strategy that keeps your database applications in operation with little or no disruption even if an entire Region is unavailable. Amazon Relational Database Service (Amazon RDS) for SQL Server is a fully managed database that makes it easy to set up, operate, and scale SQL Server deployments in the AWS Cloud. You can use the replication feature in AWS Database Migration Service (AWS DMS) to stream ongoing changes from an Amazon RDS for SQL Server source in your primary Region to another Amazon RDS for SQL Server target in a secondary Region.
AWS DMS performs this ongoing replication activity using SQL Server’s MS-CDC feature. MS-CDC in SQL Server is an Enterprise edition-only feature until SQL Server 2016 RTM. Starting with SQL Server 2016 SP1, MS-CDC is also supported in standard editions of SQL Server.
In this post, we provide step-by-step instructions for setting up a cross-Region DR site for Amazon RDS for SQL Server. You can use these same instructions for other use cases that need cross-Region read replicas for Amazon RDS for SQL Server.
Prerequisites
For this walkthrough, you should have familiarity with the following concepts:
- SQL Server Management Studio
- AWS services:
- AWS CloudFormation
- AWS Command Line Interface (AWS CLI)
- AWS DMS
- AWS Identity and Access Management (IAM)
- Amazon Relational Database Service (Amazon RDS)
- Amazon Virtual Private Cloud (Amazon VPC)
Before getting started, complete the following prerequisites:
- Create an AWS account with the appropriate IAM privileges to launch resources under AWS DMS, Amazon RDS, and Amazon S3.
- Set up the AWS CLI on your system.
- Create a source RDS DB instance in the primary Region and a target RDS DB instance in the secondary DR Region. Make sure that the primary Amazon RDS for SQL Server version and secondary version are the same.
- Establish cross-Region connectivity between the VPCs in the primary Region and secondary Region via VPC peering. For instructions, see Create a VPC peering connection with another VPC in your account.
- Create Amazon Simple Storage Service (Amazon S3) buckets in the primary and secondary Regions to store the RDS database backup.
- Enable the Amazon RDS for SQL Server native backup and restore feature on both the source and target RDS instances.
Limitations
This solution has the following limitations:
- The target database is used for read-only queries. Although the target instance is capable of allowing write activity, we recommend that you don’t perform write activity on the target, because it breaks the sync between the source and target instances.
- During the initial sync, the backup and restore procedure ensures that both the source and target database instances are fully synchronized. However, new database objects created on the source after the initial sync are not automatically replicated to the target. Such objects include triggers, foreign keys, indexes, functions, stored procedures, and constraints. You need to manually run DDL on the target instances.
For more information, review the limitations of SQL Server as a source and as a target.
Solution overview
This solution involves a source RDS DB instance running in the primary Region in its own VPC and subnet. The target RDS DB instance is running in a separate DR Region in its own VPC and subnet. Both the VPCs are accessible via VPC peering. The target database is created from a backup of the source database. The ongoing changes are then replicated from the source using MS-CDC. AWS DMS runs the database migration jobs that continuously replicate data from source to target. AWS DMS runs in a separate Amazon Elastic Compute Cloud (Amazon EC2) instance in the same VPC in the secondary Region.
The following diagram shows the architecture of this solution, which sets up multi-Region DR on Amazon RDS for SQL Server using AWS DMS.
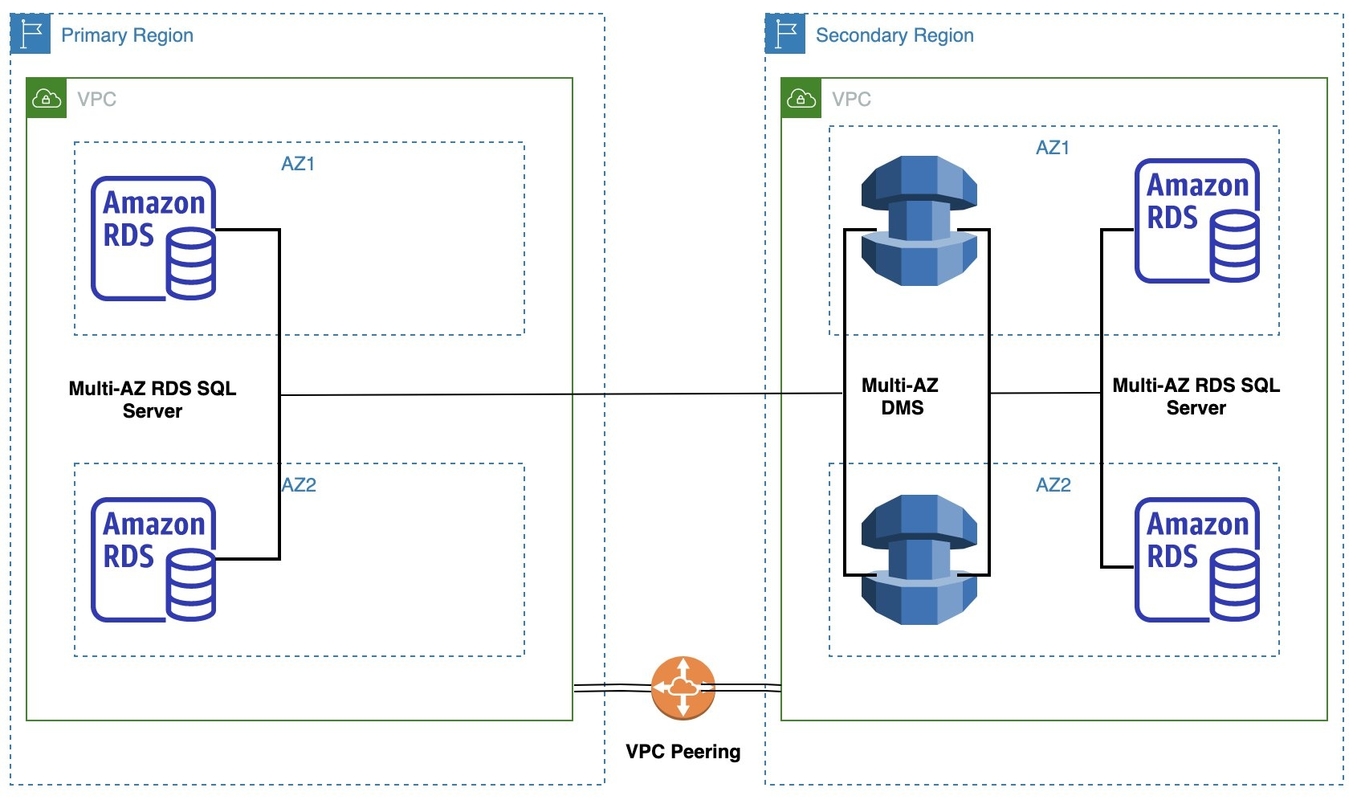
The RDS DB instances in each of the VPCs are hosted in a private subnet. Security best practices dictate that the DB instance is not available to the public internet, which provides greater security. The CloudFormation template mentioned in this post allows AWS DMS to communicate with Amazon RDS over default SQL Server port 1433.
AWS DMS provides three different migration options: full load migration, change data capture (CDC), or a full load migration with CDC. To set up an RDS database instance for DR, we recommend pre-loading the target instance using Amazon RDS backup and restore prior to creating the AWS DMS replication instance. This reduces costs because your replication instance doesn’t need to do a full load migration. Also, it reduces load on the source database. If we use AWS DMS, the full load task performs full table scans for each table in the source database. This might overburden the source database, especially if the database size is too large.
The walkthrough includes the following steps:
- Enable CDC on the source database.
- Perform source database backup.
- Copy source database backup.
- Perform database restore.
- Enable CDC on the target database.
- Disable triggers.
- Create an AWS DMS replication instance.
- Create AWS DMS endpoints.
- Create a database migration task.
- Start the database migration task.
Enable CDC on the source database
Enable CDC on the source database and all tables (namely, on the RDS for SQL Server database in the primary Region). Run the queries in order as listed in this section.
- Run the following query to enable MS-CDC at the database level:
The following screenshot shows our output.

- Run the following query to create CDC capture and cleanup jobs:
- Run the following query to enable MS-CDC for each table that has a primary key:
- Run the following query to enable MS-CDC for each table that has a unique key but no primary key:
- Run the following query to enable MS-CDC for each table that has no unique key and no primary key but has other constraints:
- Run the following query to enable MS-CDC for each table that has no constraints:
- Set the retention period for changes to be available on the source using the following query:
The following screenshot shows the output.

The parameter @pollinginterval is measured in seconds with a recommended value set to 86399. This means that the transaction log retains changes for 86,399 seconds (1 day) when @pollinginterval = 86399.
Perform source database backup
In this step, we perform the initial database backup on the primary RDS instance and store it an S3 bucket in the primary Region.
- Run the following query on the primary RDS for SQL Server instance to back up the source database to Amazon S3:
- After you run the query, note the
task_id. - Use the following query along with the
task_idto track the backup job completion status:
The task lifecycle shows as SUCCESS when the backup is complete.
Copy the source database backup
Copy the backup from the source S3 bucket to the target S3 bucket. Use the following AWS CLI command to copy the backup file from the primary Region to the secondary (DR) Region:
For instructions on manually copying files from one S3 bucket to another, see Copying objects.
Perform database restore
Perform a database restore from the target S3 bucket to the RDS instance in the secondary Region with the following steps:
- Run the following query on the secondary RDS for SQL Server instance to restore the backup to the RDS DB instance in the secondary Region:
- When the query is complete, note the
task_id. - Use the following query along with the
task_idto track the restore job completion status:
The task lifecycle shows as SUCCESS when the backup is complete.
Enable CDC on the target database
As an optional step, you can enable CDC and create CDC capture and cleanup jobs on the target database and its tables (on the RDS for SQL Server database in the secondary Region).
Having CDC enabled on the target database keeps it ready to be switched to a new source database after a disaster happens.
Repeat the steps in the Enable CDC on the source database section earlier in this post to enable CDC and create CDC capture and cleanup jobs on the target database.
Use the following queries to check if CDC is enabled at the database and table level on the source and the target database.
- Check at database level:
This script outputs a return value 1. If you see a value 0, it means CDC is not enabled on the target database. Repeat Step 1 in the Enable CDC on the source database section to enable CDC at the database level.
- Check at table level:
The script prints the name of tables that don’t have CDC enabled, if any. If the script identifies any tables, you can repeat the steps 2-7 in the Enable CDC on the source database section.
Disable triggers
Use the following query to disable triggers at the table and database level on the target database:
Create an AWS DMS replication instance
Complete the following steps to create an AWS DMS replication instance in the secondary Region to stream all ongoing changes from the source database to the target database. You can create a replication instance by using the AWS DMS console, the AWS CLI, the AWS DMS API reference, or AWS CloudFormation. The following example uses the AWS DMS console.
- On the AWS DMS console, choose Replication instances in the navigation pane.
- Choose Create replication instance.
- For Name, enter a name.
- For Description, enter a description.
- For Instance class, choose the instance class.
For more information, see Selecting the right AWS DMS replication instance for your migration.
- For Allocated storage, AWS DMS doesn’t use a significant amount of storage because storage is primarily consumed by log files and cached transactions.
For more information about allocated storage, see the entry for allocated storage in the table in Create a replication instance.
- For VPC, choose the VPC where you have the target RDS instance.
- For Multi-AZ, choose Yes or No.
For more information, see Working with an AWS DMS replication instance.
- For Publicly accessible, choose No.
- Under Advanced security and network configuration, for Replication subnet group, choose the replication subnet group for this AWS DMS replication instance.
- For Availability Zone, choose the EC2 Availability Zone where the replication instance is created.
- For VPC security group(s), choose the VPC security group that you want to assign to the replication instance to manage the outbound traffic.
- For KMS master key, choose the encryption key to use to encrypt replication storage and connection information.
You can choose the default key with an alias (aws/dms) or a customer managed key (CMK). For more information, see Key policies in AWS KMS.
- Expand the Maintenance section to manage when modification and software updates occur on the replication instance:
- Auto minor version upgrade – Choose this option to apply minor engine upgrades to the replication instance automatically during the maintenance window.
- Maintenance window – Choose this option to designate a weekly time range during which system maintenance can occur, in Universal Coordinated Time (UTC).
- Choose Create.
Create AWS DMS endpoints
As part of this setup, you create two endpoints: a source and a target for AWS DMS.
Complete the following steps to configure an RDS for SQL Server instance in the primary Region as a source endpoint for AWS DMS:
- On the AWS DMS console, choose Endpoints.
- Choose Create endpoint.
- Select Source endpoint.
- Don’t select Select RDS DB Instance because AWS DMS isn’t in the same Region as the source RDS DB instance.
- For Endpoint identifier, enter the endpoint of the source RDS for SQL Server instance.
- For Source engine, choose Microsoft SQL Server.
- For Access to endpoint database, choose Provide access information manually.
- For Server name, enter the primary RDS for SQL Server name.
- Provide information for Server name, Port, User name, Password, and Database name.
- Choose Create endpoint.
You can now configure an RDS for SQL Server instance in the secondary Region as a target endpoint for AWS DMS.
- On the AWS DMS console, choose Endpoints.
- Choose Create endpoint.
- Select Target endpoint and enter the target endpoint information.
- Select Select RDS DB Instance and under RDS Instance, choose the RDS DB instance in the secondary Region.
- Endpoint identifier and Target engine are automatically populated with the appropriate values.
- Enter the target endpoint information and test the connection.
- Choose Create endpoint.
- Access to endpoint database is automatically populated with the secondary RDS for SQL Server instance name.
- Enter values for Port, User name, Password, and Database name.
- Choose Create endpoint.
Create a database migration task
To create your database migration task, complete the following steps:
- On the AWS DMS console, in the navigation pane, choose Tasks.
- Choose Create task.
- Under Task configuration, enter the value for Task Identifier.
- For Replication instance, choose the instance you created.
- For Source database endpoint and Target database endpoint, choose the endpoints you created.
- For Migration type, select Replicate data changes only.
- Under Task settings, for Editing mode, choose Wizard.
- For Target table preparation mode, choose Do nothing.
- Choose Include LOB columns in replication accordingly if LOB/BLOB data exists in the database.
You can also use a JSON editor to specify task settings. For more information, see Specifying task settings for AWS Database Migration Service tasks.
- No changes are needed in Advanced task settings.
- Under Table Mappings, for Editing Mode, choose Wizard and keep all the default values.
- Under Selection rules, for Schema, choose Enter a schema.
- Enter the schema and table name as %.
- For Action, choose Include.
- No changes are needed in the Transformation rules section.
- Leave Premigration assessment unchecked.
- Under Migration task startup configuration, for Start migration task, choose Manually later.
- Choose Create task.
Starting the task manually makes sure that the AWS DMS setup is fully ready before we start streaming the data from the source to target instance.
Start the database migration task
Navigate to the AWS DMS console and open your database migration task. The status of the migration task shows as Ready with Progress as 0%.
Start the task manually. After it starts, the status of the task changes to Replication ongoing.
As soon as the primary RDS for SQL Server database and the secondary RDS for SQL Server databases are in sync, the progress of the migration task changes to 100%, and the status of the task remains as Replication ongoing.
Test the solution
To test if your replication is working, you can choose an existing table and insert sample rows on the source. Then connect to the target DB instance and verify that these rows are replicated to the secondary Region.
Trigger disaster recovery
In case of a disaster, the main objective is to get the target RDS for SQL Server instance up and running in the secondary Region.
To do so, complete the following steps:
- Stop issuing DML statements and other write operations to the source RDS for SQL Server instance in the primary Region.
- Contact the application team to make sure everything on the application side is stopped.
After the AWS DMS task loses connectivity with the primary RDS instance, the progress shows as 100% but the status changes to Failed.

The AWS DMS task continuously attempts to connect to the source RDS instance. Because the source instance is down, the task status changes from Failed to Replication ongoing and back to Failed.

- While the task is in
Replication ongoingstatus, on the Actions menu, choose Stop.
You can’t stop the task if it’s in a Failed state. If the task is in a Failed state, wait for it to change back to Replication ongoing before attempting to stop it.

- Verify that you can connect to the target RDS DB instance.
At this point, you have successfully completed the failover to the DR site and you can redirect your application to the DR site’s RDS DB instance.
You can repeat the same steps mentioned in this post to reestablish DR by reversing the role of the RDS DB instances (considering the previous secondary Region as the primary Region and the previous primary Region as the secondary Region).
Clean up
To avoid incurring future charges, delete the resources you created in this walkthrough:
- RDS DB instance in primary and secondary Regions
- AWS DMS replication instance in the secondary Region
- Database backups from Amazon S3
Summary
In this post, we provided you with step-by-step instructions to set up a cross-Region disaster recovery database instance for your primary RDS for SQL Server instance. You can use this solution for other use cases, such as:
- Setting up a target instance in the secondary Region as a cross-Region read replica
- Migrating your RDS SQL Server database from one Region to another without downtime
We encourage you to try this solution and take advantage of all the benefits of using AWS DMS with Amazon RDS for SQL Server. For more information, visit Getting started with AWS Database Migration Service and Best Practices for AWS Database Migration Service.
About the Authors
 Ananth Avadhanam is a Senior Technical Account Manager at AWS and specializes in AWS Databases. Ananth enjoys working with customers to help them deploy their solutions using AWS best practices.
 Vikash Singh is a Database Consultant with the Professional Services team at Amazon Web Services. He works as a database migration consultant to provide Amazon customers with technical guidance to migrate their on-premises databases to AWS.