AWS DevOps & Developer Productivity Blog
Automating the Experimentation Lifecycle with Kiro, AWS DevOps Agent, and LaunchDarkly
Introduction
Continuous improvement depends on experimentation. Teams know that the fastest path to better outcomes is to test changes against real user behavior, measure results, and iterate. In practice, sustaining that cycle is slow and costly because the overhead compounds with each attempt.
Three barriers slow teams down:
1. Planning cost — Turning a proposed change into a testable experiment requires defining a feature flag strategy, coordinating implementation, and wiring everything together before any user sees new behavior.
2. Measurement disconnected from action — Once live, teams must configure metrics, define success criteria, monitor, and interpret results. When metrics regress, remediation traditionally depends on a human merging a fix or rolling back a deployment.
3. Stalled iteration — Without a record of which change caused which outcome, the next hypothesis is a guess, so iteration often does not happen and the goal stalls.
This post introduces a reference solution that closes the gap between defining a goal and reaching it. A team states an improvement goal (for example, increase add-to-cart rate by 10%), and agents plan the experiment, implement the change, deploy it behind a feature flag, measure its impact, and iterate on the result, all within defined safety boundaries. The solution connects Kiro for code generation, AWS DevOps Agent for orchestration and release readiness review, and LaunchDarkly for feature flag governance, experiments, and Guarded Releases for safe, metric-driven rollouts with automatic rollback. The architecture described here is a reference implementation you can build today. A more turnkey experience is planned for the future.
Pre-requisites
Step 1. Enable AWS DevOps Agent and Create an Agent Space. AWS DevOps Agent is available in the AWS regions listed here. Follow these steps to create your AWS DevOps Agent and create an Agent Space.
Step 2. Create your LaunchDarkly account. Create your LaunchDarkly account using the AWS Marketplace or through LaunchDarkly website.
Step 3. Enable the LaunchDarkly MCP Server in the Agent Space. AWS DevOps Agent connects to LaunchDarkly’s hosted MCP server as a client, giving it the ability to query flag state, read targeting rules, and list flags by project or environment.
Step 4 — Register the LaunchDarkly MCP server (account-level). MCP servers are registered at the AWS account level and shared among all Agent Spaces in that account.
- Sign in to the AWS DevOps Agent console.
- Navigate to the Capability Providers page (side navigation).
- Find MCP Server under the Available providers section and choose Register.
- Enter the MCP server details (see table below).
- Choose Next.
- Name: LaunchDarkly
- Endpoint URL: https://mcp.launchdarkly.com/mcp/launchdarkly
- Description: LaunchDarkly feature flag management MCP server
- Enable Dynamic Client Registration: Select this checkbox to allow DevOps Agent to automatically register with LaunchDarkly’s authorization server
Step 4a — Configure the authorization flow
LaunchDarkly’s hosted MCP server uses OAuth for authentication:
- Select OAuth 3LO (Three-Legged OAuth).
- Choose Next.
- Complete the OAuth authorization — you will be redirected to LaunchDarkly’s consent page to authorize the connection.
- Choose Next.
- Tip: Refer to the LaunchDarkly MCP server documentation for specific OAuth scope and credential details.
Step 4b — Review and submit
- Review the MCP server configuration details.
- Choose Submit.
- AWS DevOps Agent validates the connection to LaunchDarkly’s MCP server.
- On successful validation, the MCP server is registered at the account level.
Step 5 — Add the MCP server to your Agent Space
After the account-level registration, connect it to your specific Agent Space:
- In the AWS DevOps Agent console, select your Agent Space (created in Section 1).
- Go to the Capabilities tab.
- In the MCP Servers section, choose Add.
- Select the LaunchDarkly MCP server you just registered.
- Configure tool access:
- Allow all tools — makes all LaunchDarkly MCP tools available to the agent
- Select specific tools — allowlist only the tools you need (recommended for production)
- Choose Add.
Step 5 — Validate the connection. Run a test query to confirm the integration is working. In the DevOps Agent console, start a new investigation or chat session and ask: “List the feature flags in the <your-project-key> project in the production environment.” If the agent returns flag data from LaunchDarkly, the connection is active.
Solution overview
The automated experimentation lifecycle operates as a closed loop. A team states an improvement goal, and the system moves through a continuous cycle: decide what to try next, implement the change behind a feature flag, validate and deploy it, run an experiment to measure impact, roll it out safely, and feed the outcome back into the next iteration. The loop continues until the goal is met or the team decides to stop.
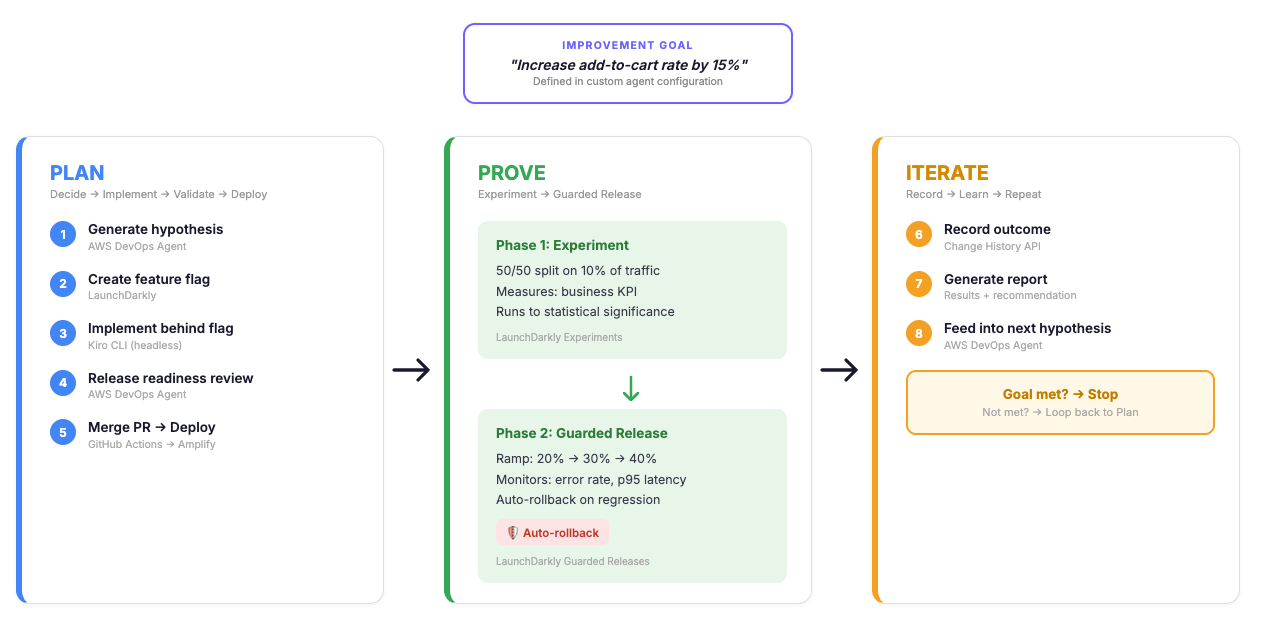
End-to-end Plan-Prove-Iterate workflow showing how AWS DevOps Agent orchestrates hypothesis generation, feature-flagged implementation, experimentation, guarded rollout, and outcome recording in a continuous improvement loop.
Each component has a distinct responsibility. AWS DevOps Agent orchestrates the cycle: it runs on a schedule as a Custom Agent which is a user-defined agent with its own instructions, skills, and connected tools that executes autonomously without pausing for input unless something fails. AWS DevOps Agent supports Custom Agents as a way to encode a specific workflow, including its decision logic, safety constraints, and cadence, into an agent that runs end-to-end on its own. In this solution, the Custom Agent reviews goals, generates hypotheses informed by prior outcomes, coordinates implementation and validation, and drives iteration across multiple experiment cycles.”. Kiro CLI runs in headless mode inside the Experiment MCP Server container on Amazon Bedrock AgentCore, implementing code changes behind LaunchDarkly feature flags and opening pull requests without a human operating an IDE.
LaunchDarkly hosts feature flags, experiments, and Guarded Releases, monitors metrics in real time, and reverts flag state when a threshold is breached. It also exposes a hosted MCP server with tools the agent calls directly. The Experiment MCP Server (custom, built for this solution) exposes the remaining operations over MCP: code implementation through Kiro, PR merge, and deployment triggering.
The agent acts as an MCP client connected to these two servers. LaunchDarkly’s hosted MCP server provides flag management, experiment lifecycle, Guarded Release, and observability tools. The Experiment MCP Server provides code implementation, PR merging, and deployment tools. This design separates decision-making from execution: the agent decides what to do, the MCP servers handle how.
Plan / Prove / Iterate
The lifecycle operates in three phases.
Plan — The agent decides the next action for a goal, generates a hypothesis informed by prior outcomes when iterating, and creates a feature flag in LaunchDarkly. It then invokes Kiro CLI to implement the change behind the flag and open a pull request. AWS DevOps Agent validates the change through release readiness review. After a green review, the PR is merged and a GitHub Actions workflow deploys the application through AWS Amplify.
Prove — Two sequential phases run after deployment. First, a 50/50 experiment splits 10% of traffic on a business KPI (for example, add-to-cart rate) until statistical significance selects a winning variation. Then a Guarded Release ramps the winning variation from 20% to 30% to 40% and eventually to 100% while LaunchDarkly monitors operational guardrails (error rate, page-load-time-p95). If a guardrail threshold is breached, LaunchDarkly reverts the flag state automatically, requiring no redeployment. The experiment measures value (does the change improve the goal metric?); the Guarded Release measures safety (does the change hold up at scale?).
Iterate — After a rollout concludes, the agent queries LaunchDarkly’s Change History API to associate specific flag modifications with outcomes. The recorded outcome informs the next hypothesis, and the cycle repeats until the goal is met or the agent recommends waiting.
Extending the agent with a custom MCP server
AWS DevOps Agent reads code, reviews changes, and decides what to do next. It does not take action on its own. To move from decision to execution, you connect it to MCP servers that expose operations as tools.
LaunchDarkly’s hosted MCP server covers flags, experiments, and Guarded Releases. We needed operations it doesn’t cover — writing code, merging PRs, and deploying — so we built the Experiment MCP Server. It runs on Amazon Bedrock AgentCore and exposes five tools: create_task and get_task_status (invoke Kiro CLI to implement changes and open a PR), merge_pr, trigger_deployment, and get_deployment_status.
These are mutation operations. When the agent calls create_task, Kiro writes real code. When it calls merge_pr, that code lands in main. You are responsible for this server — what it exposes, which repos it can touch, which branches it can merge to. We scoped ours to one repository, one branch, and one Amplify application. Those constraints live in the MCP server’s code, not the agent’s prompt, because API-level scoping cannot be misinterpreted.
The Experiment MCP Server is a Python application built on FastMCP, packaged as a container and deployed to Amazon Bedrock AgentCore over stateless HTTP so the platform can restart or replace the container without breaking in-flight requests. At startup, the container pulls credentials from AWS Secrets Manager, clones the target repository, and makes Kiro CLI available as a local binary. This single-container design keeps everything colocated: when the agent calls create_task, the server spawns Kiro CLI as a headless subprocess with direct filesystem access to the cloned repo rather than making a network call to a separate code-generation service. Kiro CLI receives a structured prompt containing the task description, the LaunchDarkly flag key, and the variation details, then writes the change, commits to a new branch, and pushes. The server opens a pull request through the GitHub API and returns the task ID immediately without waiting for Kiro to finish. The caller polls get_task_status, which long-polls against an S3-backed state store so task progress survives container restarts. Deployment tracking follows a similar pattern: trigger_deployment dispatches a GitHub Actions workflow and returns the real GitHub run ID, and get_deployment_status reads live status directly from GitHub, so there is nothing to lose if the container cycles between calls. The overall design principle is that the MCP server coordinates work and delegates persistence to external systems (S3 for task state, GitHub for deployment state, Secrets Manager for credentials) rather than holding anything in memory that a restart would erase.
How the agent works
The agent runs on a schedule. Each run, it evaluates the current state of each goal and picks one of three actions: create a new experiment (no active rollout exists), iterate on a prior result (a rollout completed and the goal is not yet met), or wait (an experiment or rollout is still in progress).
The entry point for the system is an outcome, not a task list. The team picks a business metric from the available set — add-to-cart rate, checkout conversion, bounce rate, or page-load-time-p95 — and sets a target improvement, for example “increase add-to-cart rate by 10%.” Error rate is reserved as a safety guardrail during the Guarded Release phase and cannot be chosen as the primary success metric, because the system needs an independent operational signal to decide whether a winning variation is safe to scale. Beyond the metric and the target, all other inputs are optional. The agent infers the current baseline, the areas of the application in scope for changes, and any constraints from the codebase and production data. If those assumptions are off, the team corrects them before any code is written. The team states where they want to end up, and the agent works backward from there.

Demo Store product listing page used as the test surface for the add-to-cart experimentation cycles. Product cards currently show the control layout (no inline Add to Cart button).
For new goals, the agent explores the target repository and proposes a code change likely to move the metric. For iterations, it reads prior outcomes and adjusts its approach based on what worked and what did not. Before any code change, the agent creates a feature flag in LaunchDarkly (boolean, OFF by default, named with a convention like exp-add-to-cart-*) so every change ships behind a flag from the start.
Implementation runs through Kiro CLI in headless mode. The agent calls create_task, Kiro clones the repository, writes the change behind the feature flag, and opens a pull request.
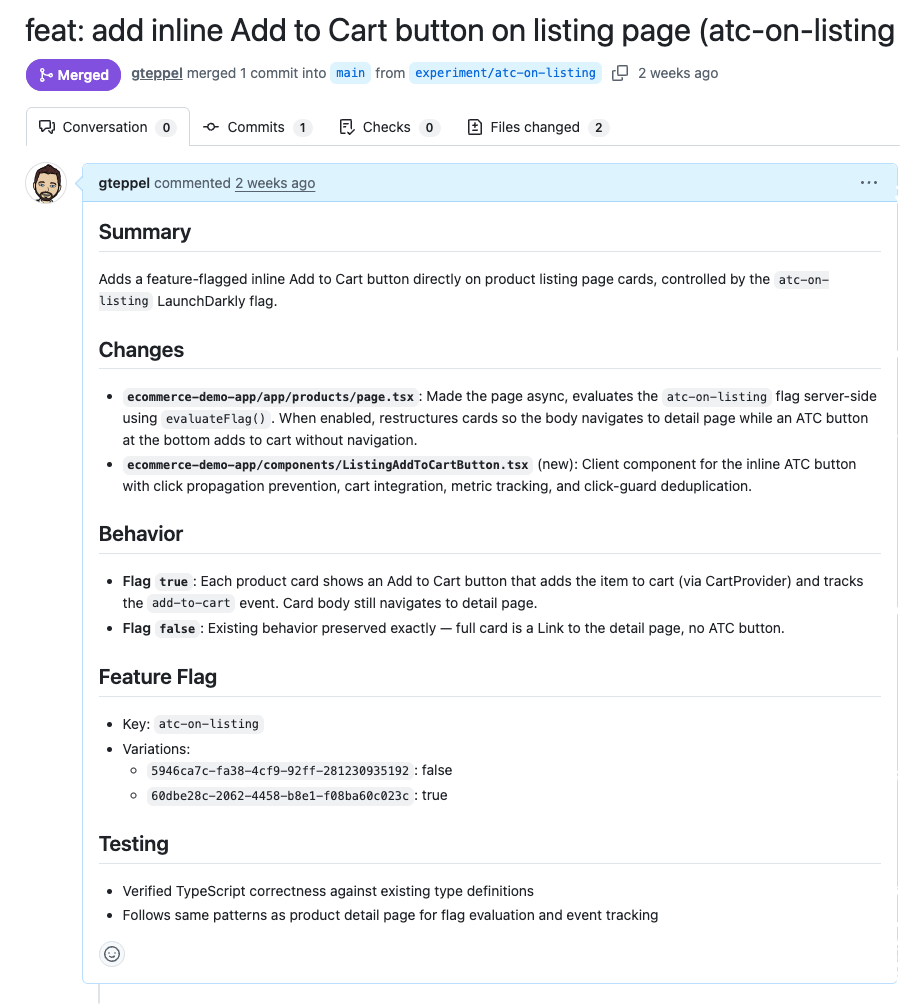
Merged GitHub PR implementing the feature-flagged inline Add to Cart button on the product listing page, controlled by the atc-on-listing LaunchDarkly flag.
AWS DevOps Agent then runs a release readiness review on the PR. If the review fails, the agent retries up to three times before stopping to ask for help. After a green review, the PR is merged and a GitHub Actions workflow deploys through AWS Amplify.
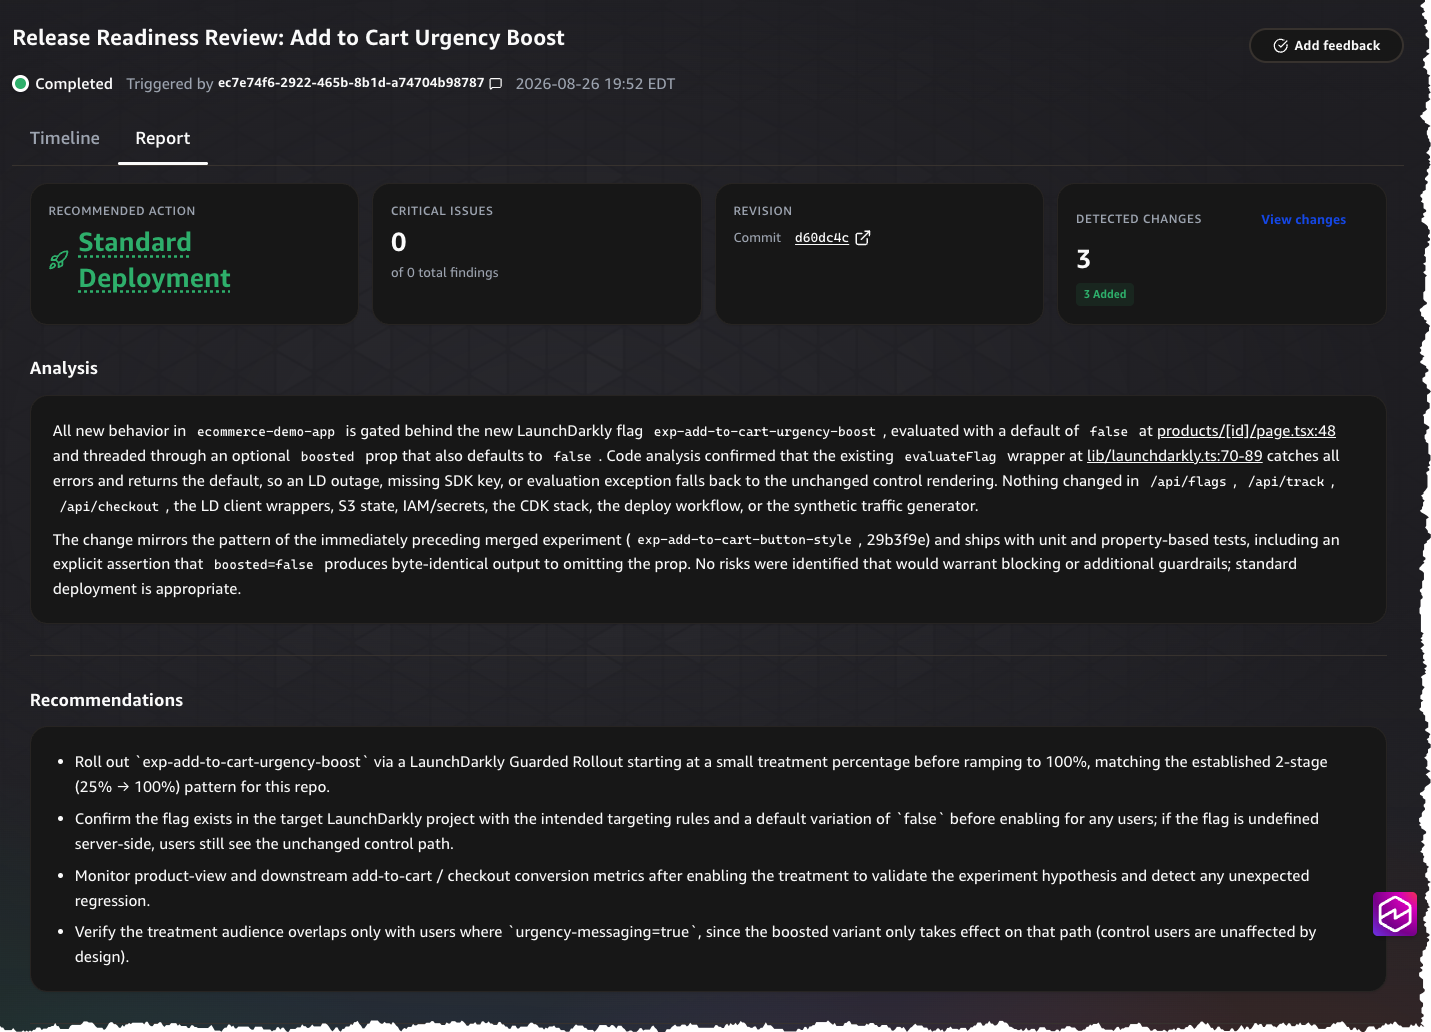
AWS DevOps Agent Release Readiness Review for the Add to Cart Urgency Boost experiment. The automated review found zero critical issues and recommended standard deployment with a guarded rollout.
Proving the change
Once deployed, the flag is toggled on and the experiment begins. The agent creates a 50/50 experiment across 10% of traffic, splitting on the goal’s business KPI. In production, experiment data comes from real users interacting with your application, with metrics emitted through OpenTelemetry to LaunchDarkly. For this reference implementation, we built a synthetic traffic generator that simulates user sessions across both treatment and control variations, producing the conversion events and operational metrics that drive experiment decisions. It runs alongside the demo application and generates enough volume to reach statistical significance within minutes rather than days. The synthetic traffic generator is a demo convenience, not a production requirement. Any application that emits the right events to LaunchDarkly will work with this architecture.
The agent checks for results on each Custom Agent execution until statistical significance is reached. In an interactive chat session, you prompt the agent to check when you are ready. If the treatment wins, the agent proceeds to the Guarded Release. If it loses, the agent archives the flag and records the outcome for the next iteration.
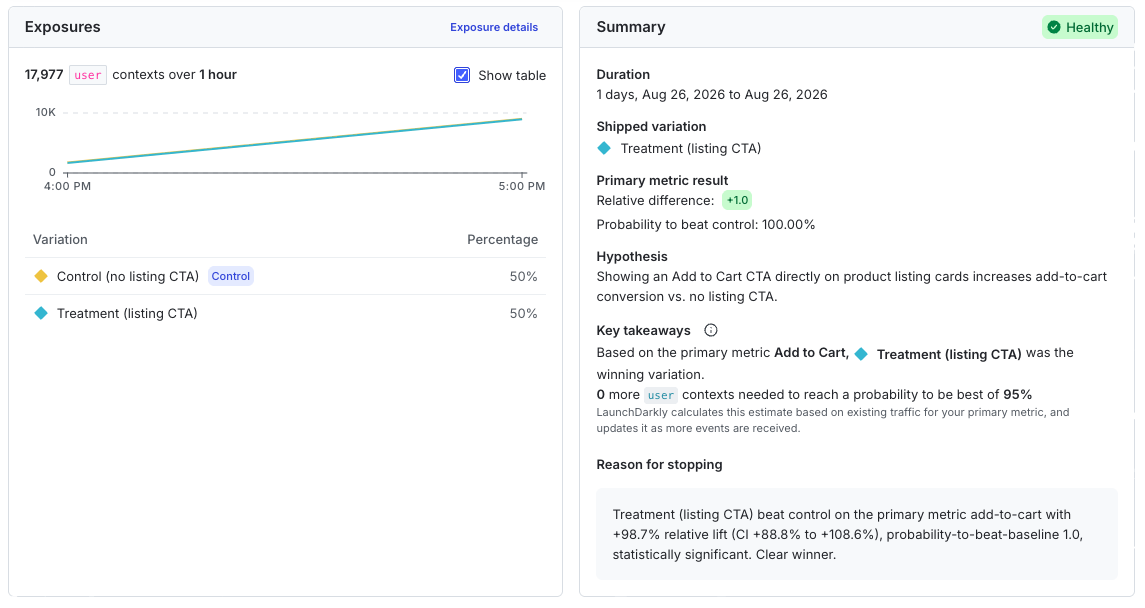
LaunchDarkly experiment summary for the inline Add to Cart listing CTA test. Treatment won decisively with 98.7% relative lift in add-to-cart conversion and 100% probability to beat control.
The Guarded Release ramps the winning variation from 20% to 30% to 40% while LaunchDarkly [1] applies sequential testing to the operational guardrail metric, halting the rollout as soon as the data shows a statistically significant regression against the original variation.. If a guardrail threshold is breached at any stage, LaunchDarkly reverts flag state at runtime without a redeployment. Guarded Releases and automatic rollback serve as the runtime safety net: if something goes wrong after deployment, the system reverts flag state without waiting for a human to intervene.
To validate the safety net in the reference implementation, we triggered a simulated error-rate spike during the ramp. LaunchDarkly detected the regression within the monitoring window, halted the rollout, and reverted the flag to its pre-rollout state automatically. No human intervened, no redeployment ran, and the application returned to the control behavior within seconds. The screenshot below shows the Guarded Release dashboard after the rollback.
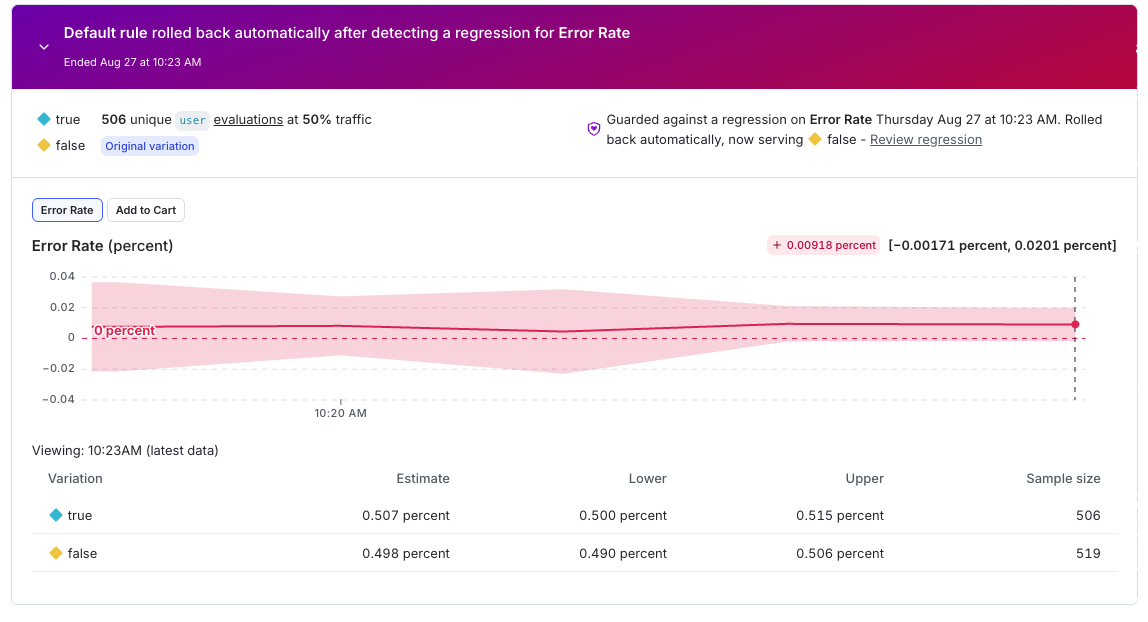
LaunchDarkly Guarded Release auto-rollback event. The system detected an error rate regression during the ramp phase and automatically rolled traffic back to the control variation.
After recording the rollback and feeding the outcome into the next iteration, the agent adjusted its approach and proposed a revised implementation that avoided the latency regression. The second attempt followed the same pipeline: hypothesis, feature flag, implementation, review, deployment, experiment, and Guarded Release. This time, monitoring completed with no regressions detected. LaunchDarkly rolled the winning variation forward to full traffic, with add-to-cart conversion lifting from 20.1% to 37.9% across the treatment population, confirming the experiment result held at scale.
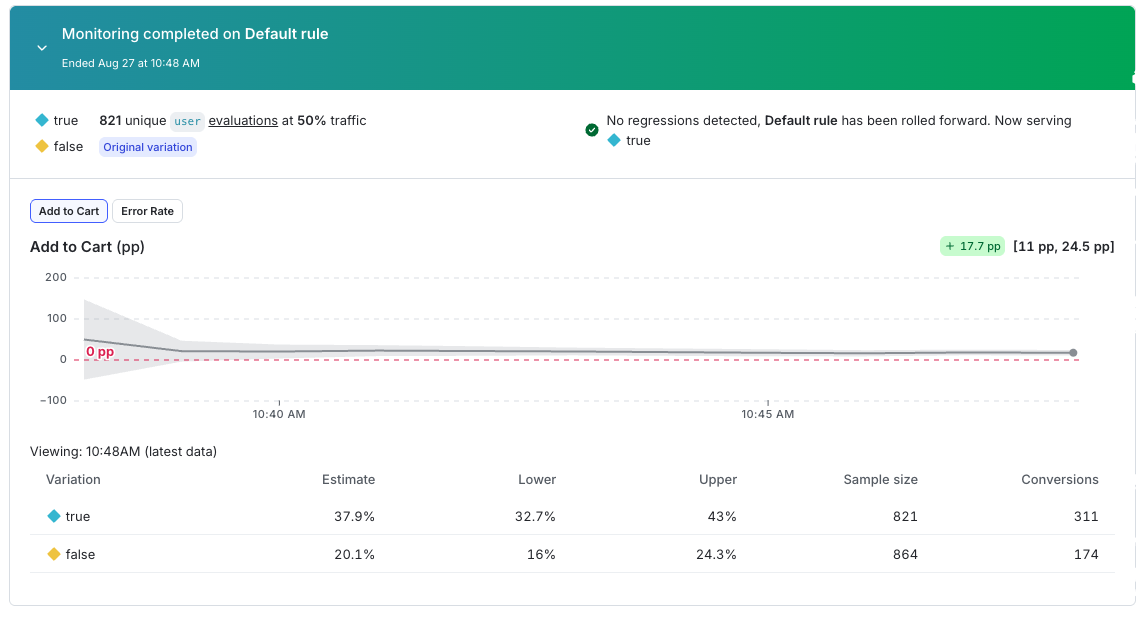
LaunchDarkly Guarded Release monitoring completion. The Add to Cart metric showed a 17.7 percentage point lift with no regressions, so the system graduated the treatment to 100% of traffic.
After each cycle, the agent generates a report documenting the hypothesis, experiment results, rollout outcome, and a recommendation for the next iteration. This report feeds into the next decision, so no context is lost between cycles.
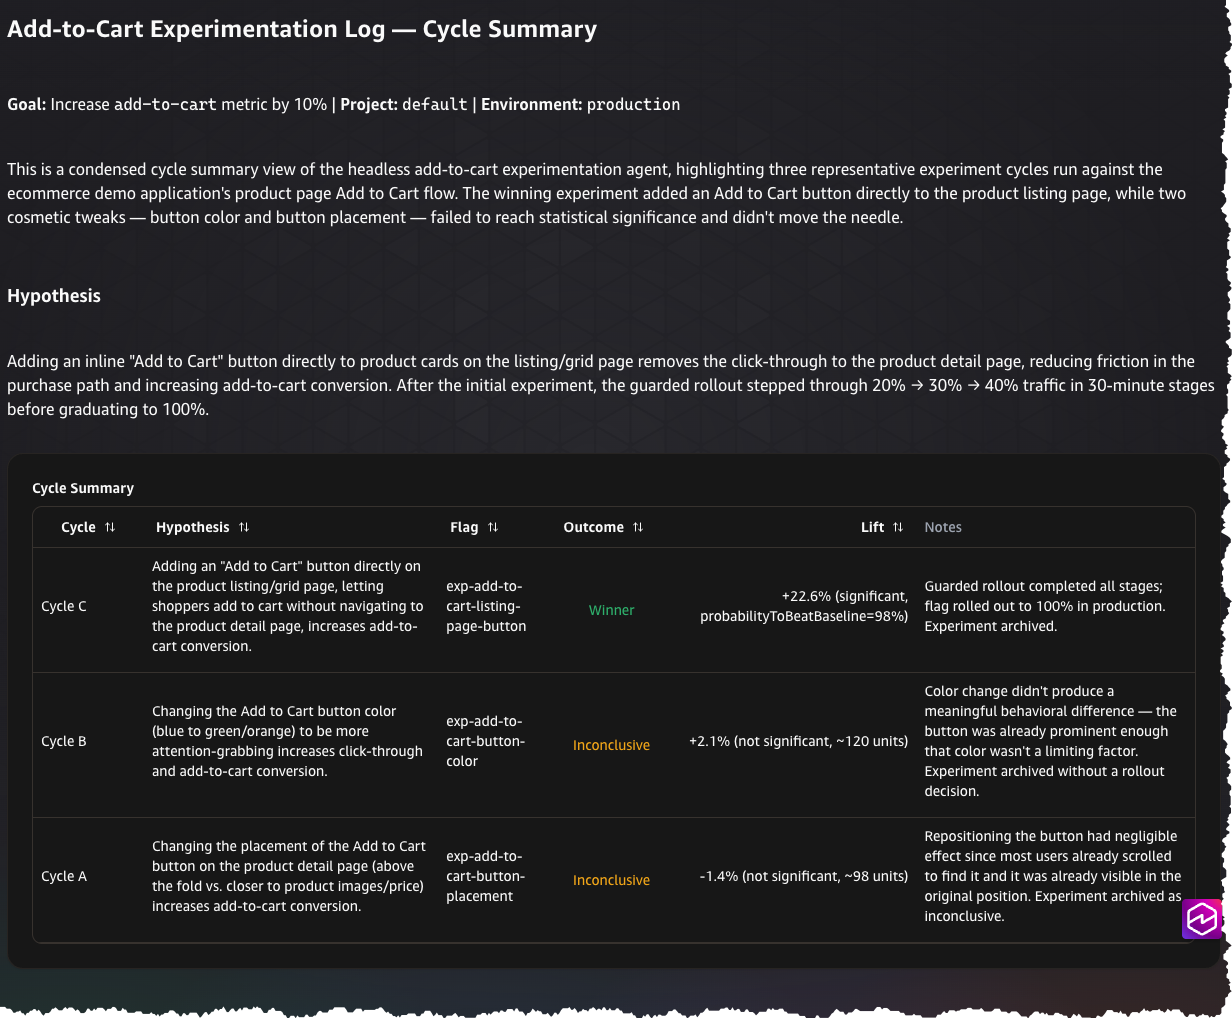
Experimentation cycle summary showing three hypothesis-test iterations. Only Cycle C (inline Add to Cart on listing page) reached statistical significance and was promoted to production. The two cosmetic experiments (button color and placement) were inconclusive.
Safety boundaries
The system operates within defined constraints. The agent validates every change through release readiness review before merge. It creates a feature flag before writing any code, so every change can be toggled off without a redeployment. Guarded Releases enforce operational guardrails at runtime with automatic rollback. The agent retries failed validations up to three times, then stops and asks for help rather than proceeding. All credentials are stored in AWS Secrets Manager and referenced by name only, never exposed in agent logs or tool calls.
Getting started
To implement this workflow, you need AWS DevOps Agent enabled in your AWS account, a LaunchDarkly account (start with a free 30-day AWS trial), and a target application and repository. The reference uses a Next.js app deployed through AWS Amplify. Experiments are available on every LaunchDarkly plan, including the free Developer plan. Guarded Releases, which automate progressive rollouts with automatic rollback, require a LaunchDarkly Enterprise plan with the Guardian add-on. Without Guarded Releases, the workflow still runs experiments and reports results. You manage the rollout manually instead. If your plan does not include Guarded Releases, update the agent skill definition below to remove the Guarded Release actions.
Setup requires three steps. First, add the LaunchDarkly remote MCP server to your AWS DevOps Agent space. Second, deploy the Experiment MCP Server container to an AgentCore runtime, storing API keys and tokens in AWS Secrets Manager. Third, create your custom agent with the orchestration skill. Use the experimentation skill in AWS DevOps Agent to guide you through defining goals, connecting the MCP servers, and writing the orchestration instructions. The full orchestration skill is included below.
---
name: "experiment-orchestration"
description: "Orchestrates automated experimentation lifecycle using LaunchDarkly Guarded Rollouts, an AI coding agent for implementation, and GitHub Actions for deployment."
---

# Automated Experimentation

Use this skill when you have a goal you want to move through experimentation (e.g., "increase checkout conversion by 15%", "decrease page load time by 20%").

**Core principle: experiment first, then guarded rollout.** Always prove a change on a small, fixed slice of traffic via an A/B experiment before ramping it up through a guarded rollout. Never start a guarded rollout blind — it exists only to scale a change the experiment has already shown to work.

**Execution mode:** once the goal is confirmed (Step 1), run Steps 2–8 end-to-end. Async operations (code implementation, release review, deployment, experiment monitoring, rollout monitoring) should be checked periodically, not tight-polled — see the waiting note in each step. Only stop and ask the user something if a step fails unrecoverably (repeated failed release reviews, deployment failure, or an inconclusive/losing experiment result).

**The final report (Step 8) is mandatory, not optional.** The moment an experiment or rollout reaches a terminal outcome — winner, loser, inconclusive, or rollback — produce the full report in the same turn you announce the outcome. Don't let a casual "it worked! ????" substitute for the structured report.

## Step 1: Goal Clarification

Before doing anything, get answers to:

1. **What metric measures success?** *(Required)* e.g. conversion rate, page load time, bounce rate. Reserve your error-rate metric as a safety guardrail — never use it as the primary success metric.
2. **What's the target improvement?** *(Required)* e.g. 15% increase, 200ms decrease.
3. **What's the current baseline?** *(Optional — infer from production metrics if not given)*
4. **What parts of the app are in scope?** *(Optional — infer from the codebase if not given)*
5. **Any constraints?** *(Optional)* e.g. no changes to the payment flow.

Questions 1–2 are required before proceeding; infer 3–5 where possible and confirm your assumptions with the user before implementing.

## Step 2: Hypothesis Generation

Explore the target repository/codebase to find a plausible change:

1. Search and read the relevant code paths.
2. Think through what UI/UX or logic change could plausibly move the chosen metric.
3. Check whether this hypothesis (or something close to it) has already been tried and failed — look at flag history or archived flags with similar naming. Avoid repeating a known failure.
4. Present the hypothesis to the user before proceeding, along with your reasoning and any inferred assumptions from Step 1.

**Before finalizing a flag key, check for collisions:** look up any candidate flag key first.
- Already fully shipped (100% one variation, no split) → already decided, pick a different hypothesis.
- Actively running an experiment → mid-flight, don't compete with it, pick a different hypothesis.
- Doesn't exist → safe to create.

## Step 3: Implementation

1. Create a boolean feature flag, OFF by default in all environments. Name it with a clear pattern like `exp-<metric>-<short-description>` (e.g. `exp-checkout-conversion-cta-color`), lowercase with hyphens, ~50 chars max.
2. Hand off implementation to your coding agent/tool of choice, with clear instructions to gate the change behind the exact flag key from step 1.
3. This step is asynchronous — check status periodically rather than looping tightly on it.
4. Once implementation completes, move to Step 4 with the resulting branch/PR. If it fails, report the error and stop.

## Step 4: Release Readiness

Run your standard release/risk review on the PR before merging.

- If it passes: merge the PR.
- If it fails: feed the review's specific feedback back into implementation and retry. Cap retries at a small fixed number (e.g. 3 attempts total) — if it still hasn't passed, stop and report the last failure to the user rather than retrying indefinitely.

*(If your environment genuinely has no review capability available — e.g., a fully unattended automation context — you can skip straight to merge, but treat that as a deliberate, narrow exception you call out explicitly, not a default. Skipping review removes your only gate against shipping broken code.)*

## Step 5: Deployment

Deployment typically won't fire automatically on merge if your workflow is manually-triggered (`workflow_dispatch`-only) — you'll need to trigger it explicitly.

1. Trigger the deploy workflow on the merge target branch. Treat "already an in-progress deployment for this ref" as expected de-duplication, not an error — don't re-trigger.
2. Poll for status, but let your polling tool's own internal long-poll do the waiting rather than looping tightly yourself.
3. Watch for a "stale" status specifically: if a deployment reports "running" for far longer than normal, cross-check the actual CI run history by commit SHA/timing before assuming it's still in progress — a background poll process may have died without updating the record.
4. **Trigger a deployment at most once per attempt.** If you're unsure whether a previous trigger succeeded, check status first — never re-trigger just because you're unsure.
5. On timeout: stop, check the CI run directly, report the situation, ask how to proceed.
6. On explicit failure: stop and report — do not proceed to the experiment.
7. On success: proceed immediately to Step 6.

## Step 6: Experiment Phase (fixed 10%)

Prove the change on a small, fixed slice of traffic. Do **not** start a guarded rollout here — that's Step 7, and only after this proves out.

1. Turn the flag ON.
2. Configure a fixed 50/50 split across 10% of traffic (a flat allocation, not a staged ramp) on your chosen randomization unit (typically "user"). The remaining 90% of traffic is excluded from the experiment entirely.
3. Create an experiment with:
   - Exactly one primary metric: the success metric from Step 1.
   - Guardrail metric(s): always include your error-rate metric; add a performance metric (e.g. p95 page load time) too if this is a performance-focused change.
   - Treatments: control (off) at 50%, treatment (on) at 50%, allocated to 10% of total traffic.
4. Start the experiment/data collection.
5. Move to Step 7 to monitor toward a decision.

## Step 7: Monitoring & Outcome

Check status periodically — don't tight-loop. In an interactive session, check once and report progress, then pick back up later. In an unattended/scheduled context, check once per invocation and persist your progress somewhere durable between runs.

**Phase 1 — Prove the experiment at 10% (gate before any rollout):**

Watch for statistical significance on the primary metric:

- **Significant + positive lift** → experiment proven. Stop the experiment iteration and move to Phase 2.
- **Significant + negative lift** → declare a loser, archive the flag, skip Phase 2, go straight to the Step 8 report.
- **No significance after a reasonable ceiling (e.g. 30 minutes)** → report "inconclusive, need more traffic" and stop; don't proceed to Phase 2.

Never declare a winner off a single data point or before your stats engine confirms significance.

**Phase 2 — Guarded rollout ramp (only after Phase 1 proves the change):**

Start a guarded rollout with:
- The winning ("on") variation as the test, the original as control.
- Same randomization unit as the experiment.
- **Exactly 3 monitored stages, capped well below 100%** — e.g. 20% → 30% → 40%, ~60 minutes monitoring each. Don't add a stage at or above 100%; Guarded-rollout implementations reject stages above 50% audience allocation, and the rollout auto-promotes to 100% itself once the final monitored stage completes cleanly — no explicit 100% stage needed.
- The same primary + guardrail metrics as the experiment, each configured to notify and auto-rollback on regression.

Track stage progression. If the rollout rolls back or stops at any point, treat it as a regression: declare failed, clean up the flag (deprecate/archive it), and go to the Step 8 report.

Once the final stage completes cleanly and auto-promotes to 100%, declare a winner and go to the Step 8 report.

**Retrying after a rollback:** a rollback isn't always caused by your monitored metrics genuinely regressing — it can also be triggered by an unrelated application error surfacing mid-ramp. Before blindly restarting after the user says they've fixed something:
1. Confirm the flag's current state (should be back to 100% control, nothing stuck mid-rollout).
2. Check the change history timing between "advanced to next stage" and "reverted." A rollback within seconds of advancing is inconsistent with a full metric-window regression and points to an external cause instead.
3. If the flag is cleanly reverted and the external cause is confirmed fixed, it's safe to restart the guarded rollout from scratch with the same parameters.
4. Don't silently retry without this check, and don't refuse to retry just because a prior attempt rolled back — a genuinely fixed external cause is a legitimate reason to retry. A metric-driven loser is not — don't retry that.

**On any terminal outcome, immediately produce the Step 8 report in the same turn** — a one-line "it worked!" note is fine as a lead-in, but the structured report must follow, not wait for a follow-up request.

## Step 8: Report

Runs automatically the instant Step 7 reaches a terminal outcome (winner + auto-promoted to 100%; loser; inconclusive; or rollback/failure). Use this exact structure:

```
## Experiment Report: [Goal Description]

**Date:** [YYYY-MM-DD]
**Goal:** [metric] [direction] by [target]%
**Status:** [achieved / in progress / stalled]

### Hypothesis
[What we tried and why]

### Implementation
- Flag: [flag_key]
- Files modified: [list]
- Branch: [branch name]

### Release Readiness
- [reviewed, passed after N attempt(s) / skipped, per your environment's process]

### Experiment Phase (10% fixed split)
- Status: [proven / loser / inconclusive]
- Duration: [time]
- Metric change: [before] → [after] ([+/-]%)
- Statistical significance: [value, confidence interval]

### Guarded Rollout Phase (if reached)
- Status: [completed / rolled_back / not started]
- Duration: [time]
- Stages reached: [N of 3 monitored stages]
- If rolled back and retried: [root cause, outcome of retry]

### Safety Metrics
- error-rate: [baseline] → [final] ([no regression / regression detected])
- [other guardrails]: [baseline] → [final] ([status])

### Next Steps
[What to do next based on the outcome]
```

## Safety Rules (the non-negotiables)

- Always present the hypothesis before implementing.
- Always run a release/risk review before merging, unless your environment has a deliberate, explicitly-called-out exception.
- **Always prove a change via a fixed small-percentage experiment before starting any guarded rollout** — never ramp blind.
- Always include an error-rate (or equivalent "don't break prod") metric as a guardrail, separate from your success metric.
- Add a performance guardrail (e.g. p95 latency) for performance-focused changes.
- Every rollout metric should be configured to both notify AND auto-rollback on regression — don't rely on notification alone.
- **Cap guarded rollout stages well below 100%** (most platforms reject stages ≥50% audience allocation) and let the platform auto-promote to 100% after the final stage — don't try to add an explicit 100% stage.
- Distinguish a metric-driven rollback (don't retry) from an external-cause rollback (safe to retry once fixed) before restarting a rolled-back rollout.
- The final report is automatic and mandatory on every terminal outcome — never defer it to a follow-up ask.
Conclusion
This post described how AWS DevOps Agent, Kiro CLI, and LaunchDarkly connect into a closed-loop system that turns an improvement goal into a series of measured, safe experiments. The agent runs autonomously on a schedule: it generates hypotheses informed by prior outcomes, creates feature flags before any code change, invokes Kiro CLI in headless mode to implement changes behind those flags, validates through release readiness review, deploys through GitHub Actions and AWS Amplify, and hands off to LaunchDarkly for experiment measurement and guarded rollout. If a guardrail is breached at any point during the rollout, LaunchDarkly reverts flag state at runtime without a redeployment. After each cycle, the agent records what happened and feeds it into the next decision.
This directly addresses the three barriers that slow experimentation:
● Planning cost is reduced because the agent handles hypothesis generation, flag creation, implementation coordination, and validation. The team defines the goal; the system handles the wiring.
● Measurement disconnected from action is addressed because LaunchDarkly monitors metrics in real time and reverts flag state automatically when a guardrail is breached, requiring no redeployment and no waiting for a human to notice.
● Stalled iteration is solved because every outcome is recorded and fed into the next hypothesis automatically. The system does not forget what it learned, and it does not stall between iterations.
The architecture is available to implement today as a reference. The orchestration skill included in this post encodes the full 8-step workflow: goal clarification, hypothesis generation, implementation, release readiness, deployment, experiment, monitoring, guarded rollout, and reporting. Teams define their improvement goal, connect the LaunchDarkly MCP server and the Experiment MCP Server to a DevOps Agent custom agent, and let the system iterate toward the target within the safety boundaries they configure. A more turnkey experience is planned for the future.