AWS DevOps & Developer Productivity Blog
Get more from your Kiro investment with credit pooling: A guide for admins
You’ve turned on credit pooling, or you’re about to, and now the decisions are yours: how many seats to keep, how many additional credits to buy, and what limit each developer gets. Set limits too tight and developers get blocked in the middle of a task. Set them too loose and one runaway automation job can drain the pool and pause Kiro for everyone. The data to make these calls is already in your AWS account, in your Kiro user activity reports. This post shows you how to read it.
The launch post, Share Kiro credits across your team with credit pooling, published November 4, 2026, introduced credit pooling: a shared pool of Kiro credits that every user in the pool draws from. Credits one developer doesn’t need automatically become available to a teammate who does.
Credit pooling is for organizations. It works with Kiro profiles that use AWS IAM Identity Center, Okta, or Microsoft Entra ID. Individual Kiro subscriptions, such as a personal account with a social login, can’t share credits through a pool, and credit pooling isn’t available in AWS GovCloud (US).
This post is a hands-on guide for admins. It describes how the credit pool behaves day to day and how to size it and dial in your limit settings from your own usage data. It also covers the best practices that keep it running smoothly.
How credit pooling works
In credit pooling, a seat is one user’s access to the pool, and each seat adds 500 monthly credits. When someone leaves, removing them frees their seat for someone else. For details, see Manage seats.
The following diagram shows how each seat’s 500 monthly credit inclusion flows into one shared pool, together with any additional credits you buy, and how every user draws from that pool. It also compares pooling with per-user credits.
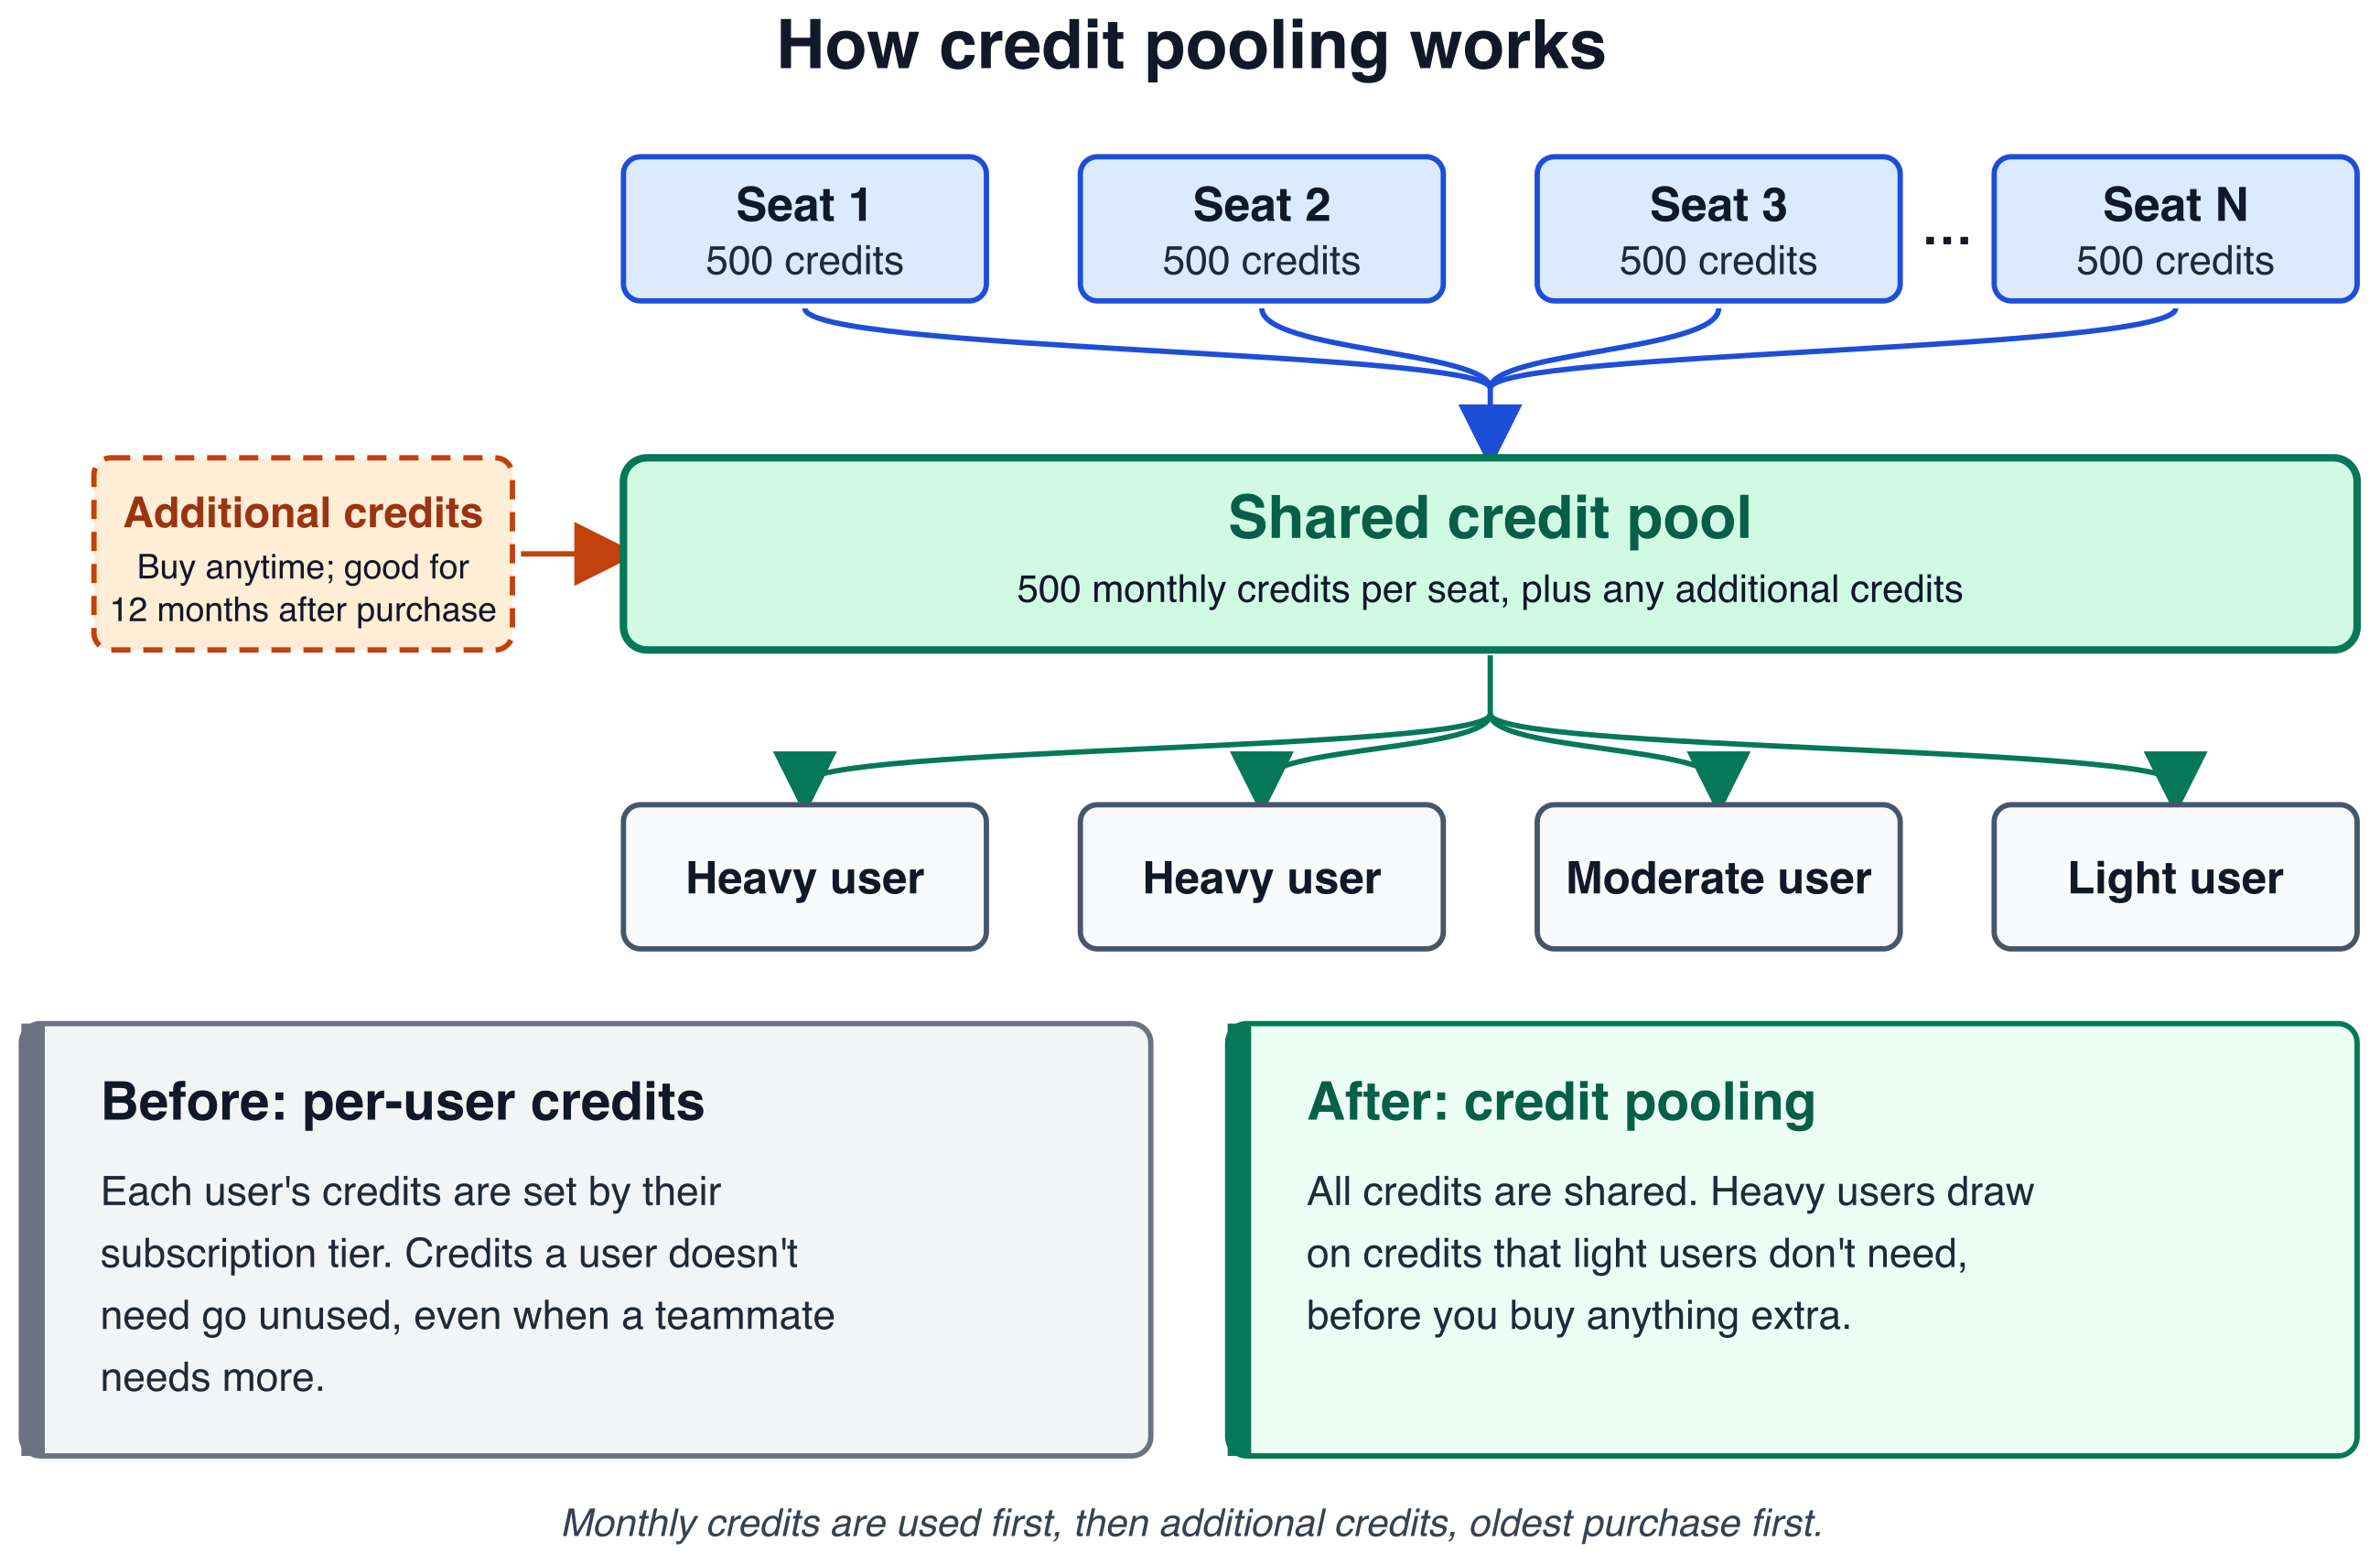
Figure 1: How each seat’s 500 monthly credits flow into one shared pool that every user draws from, compared with per-user credits
Here’s a short summary of the core mechanics and how they play out once your pool is running. Each billing cycle, every $20 seat adds 500 credits to the pool, so 100 seats add 50,000. Every seated user draws from the pool, including users that run Kiro in headless mode, such as continuous integration and continuous delivery (CI/CD) pipelines. These credits continue to reset at the end of each billing cycle, but now they’re available for anyone in the pool to use.
When the pool runs out
Admins can buy additional credits at any time in the Kiro console. Additional credits roll over and are good for 12 months after purchase.
Which credits are used first
Monthly credits are used first because they reset at the end of each billing cycle. After the monthly credits run out, Kiro draws from additional credits, starting with the oldest purchase.
Where the savings come from
Credit pooling can help you save in three ways:
- Shared credits absorb uneven usage. Your heaviest users draw on credits teammates don’t need before you buy anything extra.
- Seats follow your team. Add seats as people join, and remove a user to release their seat when they leave.
- Additional credits only when you need them. Buy them at any time, and they roll over for 12 months.
Walkthrough
Today, all you have is a daily report of each user’s consumption. This walkthrough turns that report into a plan in four steps. Step 1 loads the reports into Amazon Athena. Step 2 shows how each month used the pool. Step 3 recommends a seat count and a buffer of additional credits. Step 4 suggests a limit for each user.
Prerequisites
Before you start, confirm that the following are in place.
- User activity reports turned on for your Kiro profile. The analysis in this post is based on the daily user activity CSV reports that Kiro writes to an Amazon Simple Storage Service (Amazon S3) bucket. To set them up, including the bucket policy Kiro needs to write to the bucket, see Turn on the CSV report.
- Access to Amazon Athena, with permission to read the report location and write query results. For example, attach the AWS managed policy AmazonAthenaFullAccess, and allow
s3:GetObjectands3:ListBucketon your report bucket. - The number of seats you bought for a prepaid pool, or the number of users in a postpaid pool. You manage seats under Access management > Credit sharing in the Kiro console. The activity report can’t give you this number.
- An administrator role with the credit pooling permissions, so you can change seats, limits, and additional credits after the analysis.
Right-size your pool from your usage data
Your per-user activity reports record each user’s consumption.
Where to start depends on whether you already have data. If your team already uses Kiro, the activity report has recorded every user’s consumption all along, and the following queries run on that history as-is. Run Steps 2 and 3 now, before you pick a seat count. Step 3 tells you what that count needs to be.
If you are new to Kiro, there is nothing to analyze. Buy one seat for each person who needs access. That is the license, and the pool follows from it at 500 credits per seat. Keep a small buffer of additional credits (best practice 4), and start with generous limits (best practice 2). Either way, run one full billing cycle on pooling and come back to Step 2.
Step 1: Create the table and view
In the LOCATION line, replace the four capitalized placeholders. Use the Amazon S3 location you chose when you turned on the CSV report.
YOUR-BUCKET: the bucket name from your Amazon S3 location, for exampleamzn-s3-demo-bucket.YOUR-PREFIX: the folder after the bucket name, for exampleuser-activity-reports.ACCOUNT-ID: the 12-digit AWS account where your users are subscribed.REGION: the Region where you installed your Kiro profile, for example the US East (N. Virginia) Region (us-east-1).
For example, if your S3 location is s3://amzn-s3-demo-bucket/user-activity-reports/, the LOCATION line becomes s3://amzn-s3-demo-bucket/user-activity-reports/AWSLogs/111122223333/KiroLogs/user_report/us-east-1/. Keep the AWSLogs/.../KiroLogs/user_report/ part exactly as written. Kiro creates those folders itself.
Then create the view that the queries in the next steps read from:
Three details in that setup are worth knowing:
- OpenCSVSerde, not ROW FORMAT DELIMITED. Kiro quotes some fields, and the simpler row format leaves the quote marks on, which breaks any join on user id.
- The view finds columns by name, not position. Kiro has added columns to the report over time, so a position can hold a different column in an older file. The view reads each file’s header row and picks values by name. A column a file doesn’t have, like
usage_limitin older reports, comes back empty. - The table reads the first 20 columns, all as text. They must be text, because the first row of each file holds column names. Everything the queries use is within the first 14 columns, and anything past 20 is ignored. If a column the queries need ever moves past 20, add c21 and up to both the table and the view.
Confirm it worked before going further:
For an example 100-seat team with six months of reports, that returns:
If that returns zero users, the LOCATION prefix is wrong. If user_id values come back wrapped in quote marks, the table was created with ROW FORMAT DELIMITED.
Step 2: Re-run every cycle and let the data correct your estimate
This is the query you come back to each cycle. It returns one row per closed month at today’s seat count, so one run shows your whole history. Change only the seat count. It answers the right-sizing question directly: at the seats I pay for now, which months overflow the pool, and how much sat unused?
Sample output for the same team, one column per closed month. The current month is left out because it isn’t a full cycle:
For this team, credits that light users didn’t need covered 7,654 to 13,816 credits of heavier users’ demand every month, so it never bought additional credits. That’s how pooling can work. Even so, 2,000 to 11,700 credits went unused each month and 11 to 21 seats sat idle, which Step 3 turns into a plan.
Read it across, not down. If pool_credits_unused stays large for a couple of cycles, the seats behind it are not a one-off. Reclaim them from people who no longer need access and re-run next month to confirm.
If additional_credits_needed is climbing, buy additional credits earlier in the cycle rather than adding seats (see best practice 7). credits_covered_by_sharing, multiplied by $0.04, estimates what sharing saved you each month. When p90_credits_per_user and max_credits_per_user settle into a stable range, that is your signal to set limits with headroom above them.
seats_never_used counts seats with no activity that month, and cost_if_never_used_seats_reclaimed is your cost if you reclaimed them all. Treat it as a bound, not a target. Step 3 looks across several months before it recommends cuts.
The percentiles are your starting point for limits. p90_credits_per_user reflects your heavy users, and max_credits_per_user is the person who reaches a limit first. With fewer than a few dozen active users, lean on max. Step 4 suggests a limit for each person.
Step 3: Turn the numbers into a resizing plan
Step 2 shows what happened. This query turns that into a plan: seats to keep and reclaim, additional credits to hold, and what the change saves. In the EDIT ME block, set your seat count and how many closed months to look back over. Three months is a sensible default, because one quiet month doesn’t mean a seat is unneeded.
Sample output for the same team at 100 seats, looking back over July through September:
recommended_seats is one seat for everyone who used Kiro in the lookback or so far this month, however lightly, and seats_to_reclaim is the rest. The report can’t tell you who joined last week or is on leave, so check the names in the Kiro console before you reclaim anything.
additional_credits_to_keep is how far your busiest month ran past the recommended pool. Keep at least that many additional credits on hand going into each cycle (best practice 4). That’s a balance to hold, not an amount to buy every month, so check what’s already in your pool on the Kiro dashboard and buy only the difference. If Step 2 shows consumption climbing, keep more than this.
The cost columns compare the lookback months at your current seats with their cost at the recommended seats, averaged per month. Each month costs $20 per seat plus $0.04 per credit used beyond the pool, counted in the month it’s used. For this example team, reclaiming 14 idle seats would save about $213.30 a month on average, roughly $2,600 a year if the pattern holds. In July, the busiest month, about $200 of the $280 in seat savings came back as additional credits, which is why the buffer matters.
Step 4: Find users whose limits need to change
Seats and the pool are half of right-sizing. Per-user limits are the other half. This query lists the people whose limit is out of step with what they use. It flags anyone whose busiest month in the lookback reached 80% of their limit, anyone who stayed under 25% of their limit every month, and anyone with no limit set. For each one it suggests a new limit: their busiest month plus 25%, rounded up to the nearest 100 and never below the 500 credits a seat adds to the pool. It only lowers limits for people active in every month of the lookback, so a new joiner isn’t cut after one quiet month. Adjust the thresholds in the EDIT ME block.
Sample output for the same team, looking back over July through October so far:
The raise rows are the people closest to being blocked. In their busiest month, user021 used 994 of their 1,000 credits, so one heavy week might stop them. Raising it to 1,300 gives them room. A higher limit adds no cost until the credits are used.
The lower rows are people who use a small share of their limit, like user006, whose busiest month was 513 credits against a 3,000-credit limit. Lowering a limit doesn’t save money, because a credit costs the same whoever uses it. It limits the impact of a runaway automation job, so one person is less likely to drain the pool and block everyone. new_limit is never below what the user has already used this month, so lowering it doesn’t block them right away.
The limit when pooled rows are people still on a Pro, Pro+, Pro Max, or Power subscription. Their usage_limit is the tier’s monthly allowance, so above 100% means they need more than their tier includes, like user091. new_limit is the individual limit to allocate when you add them to the pool. Their usage is already counted in Step 3’s additional_credits_to_keep, so the buffer covers them too.
If several people in one group need the same change, change the group’s limit.
For the exceptions, set new_limit as an individual limit in the Kiro console. It takes priority over group and profile limits (best practice 2). Re-run this query each cycle to catch limits that need to move again.
Best practices for making credit pooling effective
These practices build on the numbers from the walkthrough and help you keep the pool sized without blocking anyone.
1. Learn your usage pattern first
Collect several months of data before you fine-tune anything. A couple of billing cycles show you who your heavy and light users are, how usage rises and falls through a sprint, and how quickly the pool draws down. Once you can see the trend, use the preceding analysis to size the pool and set limits.
2. Use the limit hierarchy strategically
With credit pooling, you can set per-user limits at three levels:
| Level | Priority | Use it for |
| Individual | Highest | Setting a per-user limit that applies to a specific user (for example, a user that runs automations, or someone testing heavily) |
| Group | Medium | Setting a per-user limit that applies to all members of a group |
| Profile | Lowest | Setting a default limit applicable to all users |
All limits are per-user. There are no aggregate caps at the group or profile level. A group limit sets the per-user cap for everyone in that group.
Where to start: If your team already uses Kiro, start from the limits Step 4 suggests. If you are new to Kiro, start with generous group and profile limits and tighten them after your first billing cycle, only where the data shows you need to. Over-constraining on day one creates friction and support tickets.
3. Group users by usage pattern
Consider grouping users by how they consume credits rather than only by org chart. For example, put heavy users (senior developers, machine learning engineers) in a group with a higher per-user limit, and light users (managers, reviewers) in a group with a lower one.
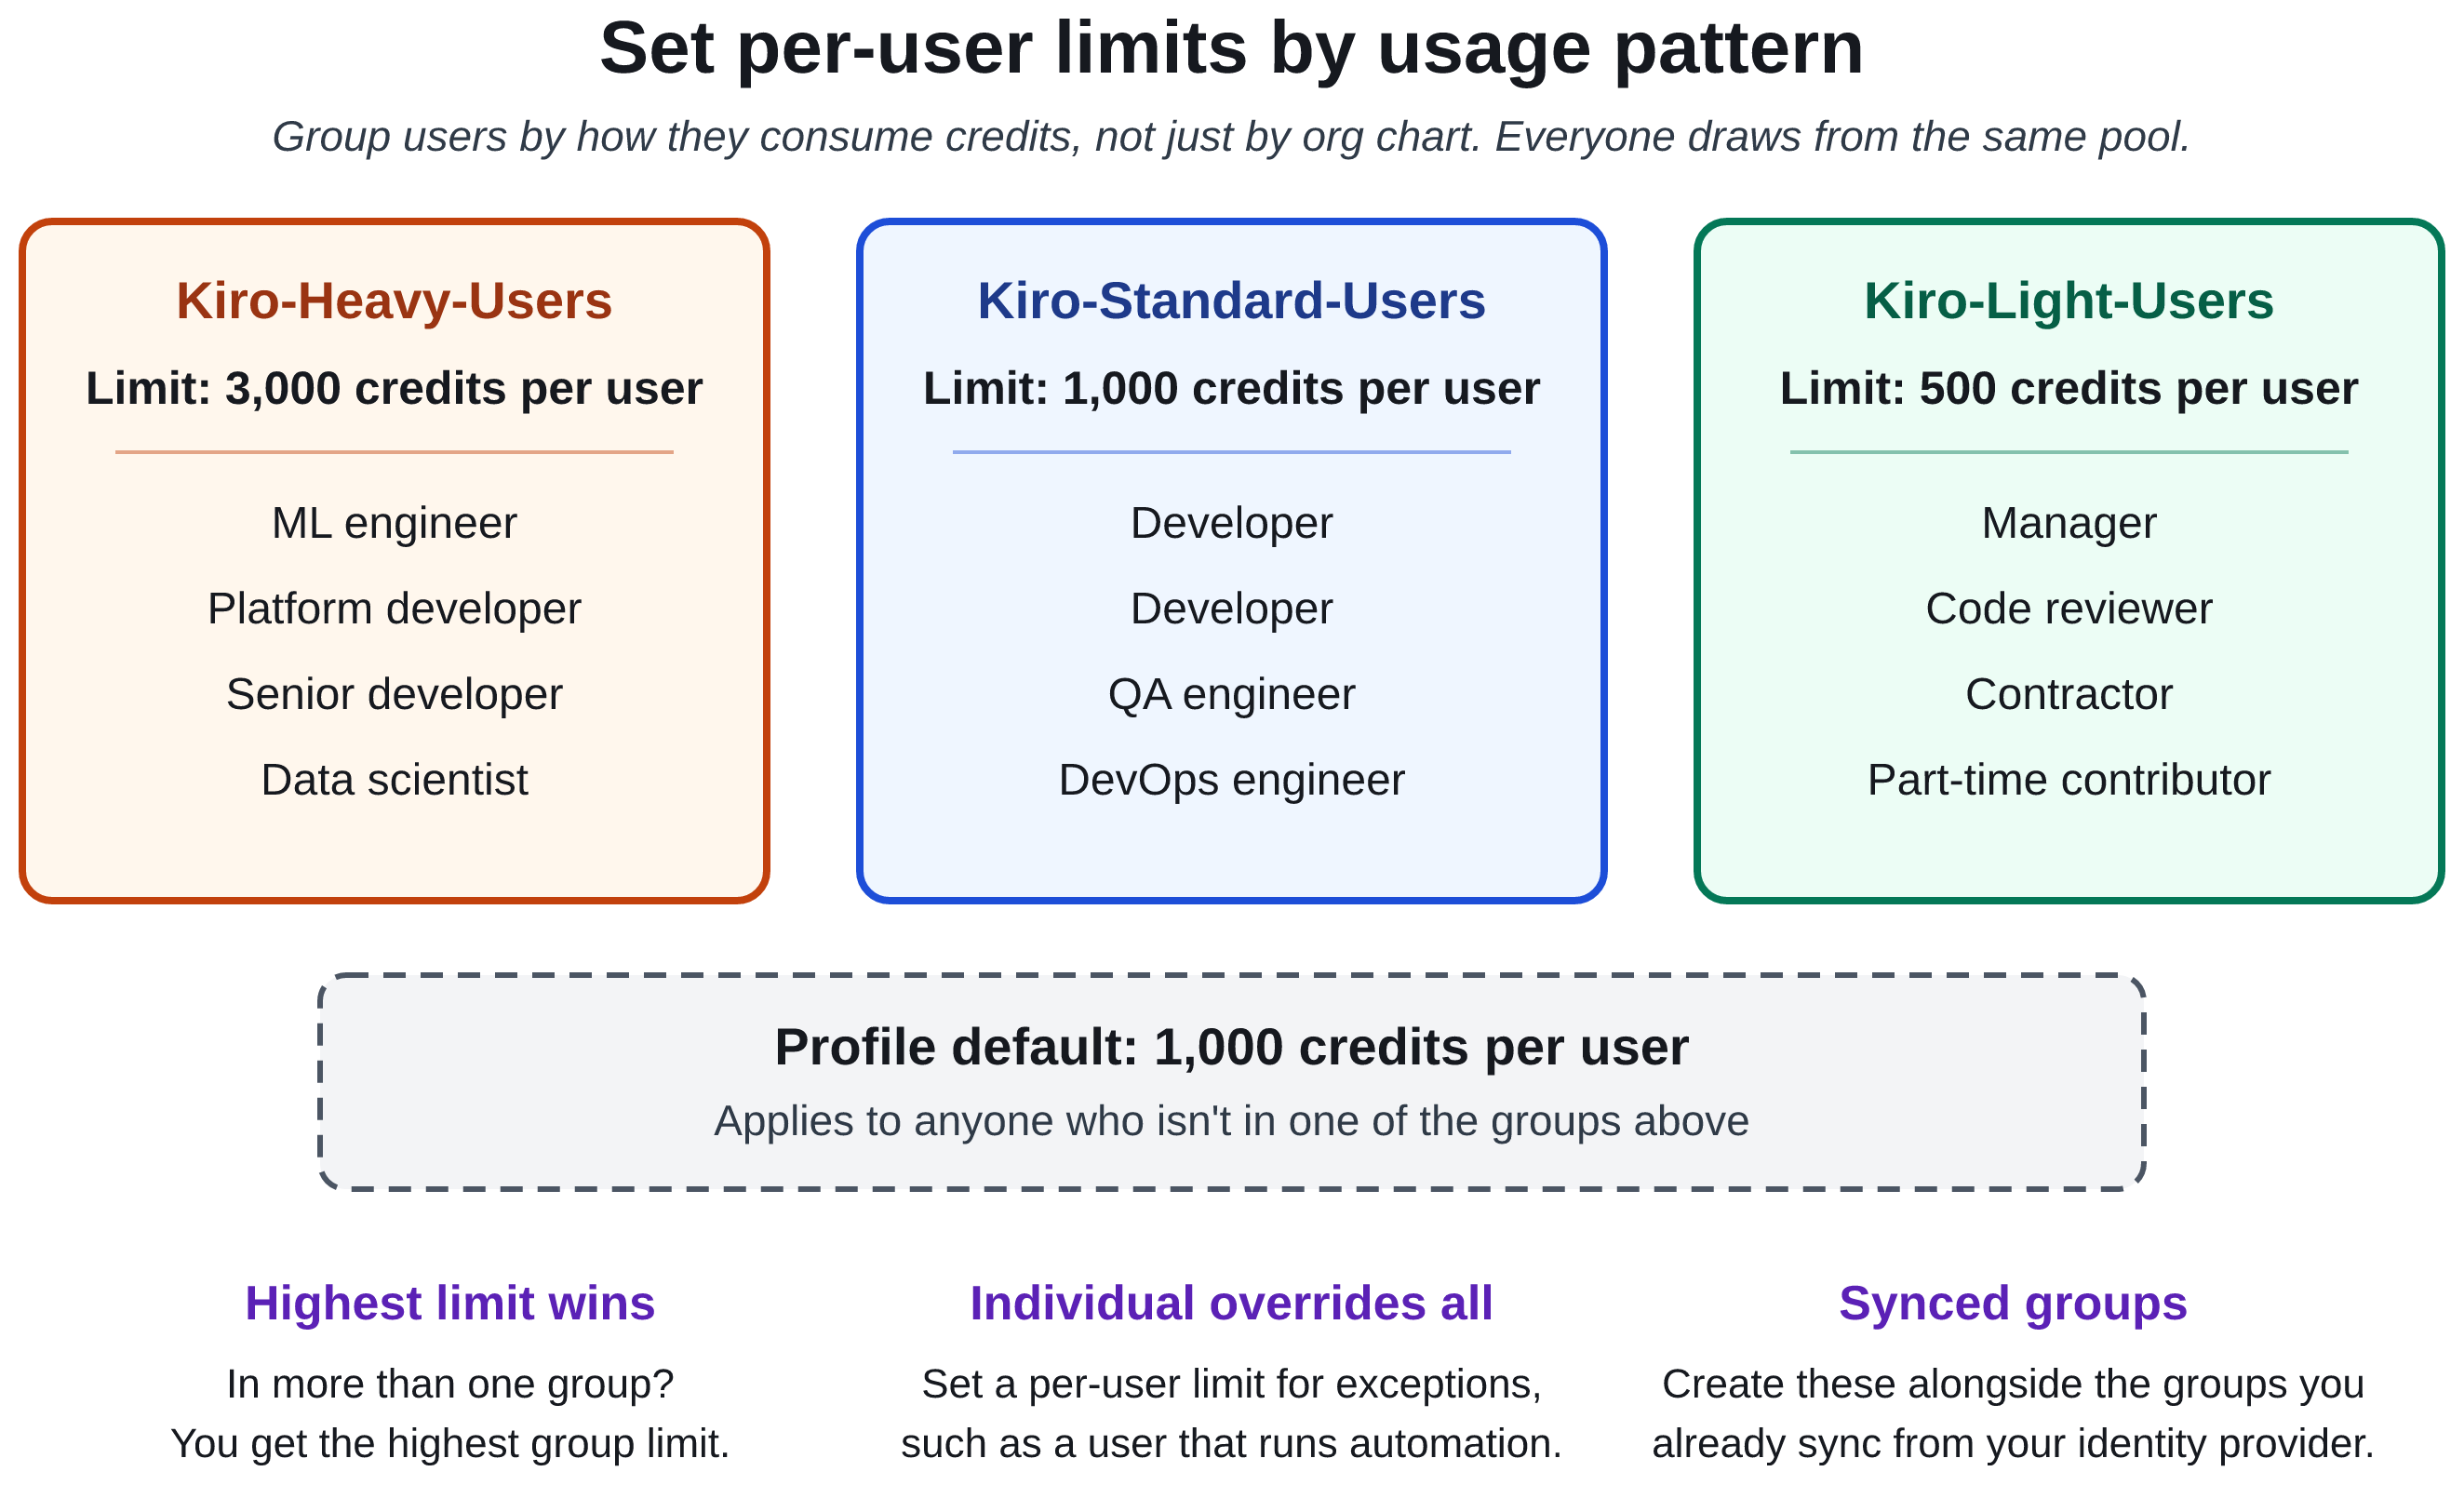
Figure 2: Grouping users by usage pattern to apply different per-user limits
If you sync groups from your identity provider: Your existing synced groups likely mirror your org chart. Create groups for credit pooling. For example, keep your synced “Engineering” group for access management, but create separate “Kiro-Heavy-Users” and “Kiro-Standard-Users” groups to apply different per-user limits. Users can belong to multiple groups, and the highest limit wins.
4. Keep a buffer of additional credits
When the pool is empty, everyone stops. Watch your pool threshold alerts and buy additional credits before the pool runs low. Because additional credits roll over for 12 months, buying early doesn’t waste them. Step 3’s additional_credits_to_keep shows how many to hold, based on your busiest month.
5. Review and adjust monthly
The Kiro dashboard gives you three views for this:
- Daily projected consumption with run-out date predictions.
- Credit usage breakdown (monthly compared to additional credits).
- Users sharing credits, credits left, and additional credits at a glance.
If you exhaust the monthly pool early, buy additional credits earlier in the cycle. If credits go unused, check whether some seats are inactive (best practice 7).
6. Use notifications to stay ahead
Credit pooling includes built-in alerts that notify admins at 80% and 100% by default:
- Pool threshold alerts: Get notified when the pool drops below configured levels.
- User usage alerts: Know when individual users approach their limits.
- Seat utilization alerts: Know when assigned seats near the number you bought.
Send these to the people who can act on them.
7. Right-size seats, and use credits rather than seats for headroom
A seat is an access license first and a credit contribution second. Treat them as two separate questions.
Seats with zero usage are the first place to look. You pay $20/month for a seat whether anyone signs in or not, and the seats_to_reclaim figure from Step 3 shows how many have gone unused for the whole lookback. Reclaim those from people who no longer need access.
Lightly used seats are a different matter. Don’t cut a license from someone who uses Kiro occasionally because their consumption is low. Their unused credits already go to the pool.
For headroom, buy credits rather than seats. If demand runs ahead of your pool, buy additional credits. Monthly credits reset at the end of the cycle. Additional credits last 12 months.
Things to keep in mind
- When the pool runs out, usage stops for everyone in it. Kiro blocks further usage, whatever each user’s limit, until you add credits.
- Mid-cycle limit changes take effect immediately. If you lower a user’s limit below their current consumption, they’re blocked right away. If you increase their limit, they can immediately resume their AI use. Plan limit changes at the start of a billing cycle when possible.
- In a prepaid pool, seats are billed whether occupied or not. Every seat contributes credits and costs $20/month. Factor in your idle seats when calculating return on investment.
Getting started
If you have a Kiro profile with users signing in through single sign-on (SSO), you’re ready to go:
- In the Kiro console, go to Access management.
- On the Subscriptions tab, choose Switch to credit sharing.
- Follow the wizard to select users or groups.
Switching is irreversible: a user you move can’t go back to an individual subscription. Have each user’s Step 4 limit ready to apply once they’re in the pool.
Key details at a glance
The following table summarizes the numbers and rules covered in this post.
| Item | Detail |
| Credits per seat | 500/month (shared) |
| Cost per seat | $20/month |
| Additional credits | $0.04 per credit, good for 12 months |
| Monthly credit reset | End of billing cycle |
| Consumption order | Monthly → Additional (oldest purchase first) |
| Limit hierarchy | Individual > Group > Profile |
Start sharing
Credit pooling turns unused individual capacity into a shared resource. Teams with uneven usage can get more from the same spend, and limits at every level help you stay in control.
Ready to try it? Head to the Kiro console and turn on credit sharing under Access management. For details on seats, limits, and monitoring, see Credit pooling in the Kiro documentation.