AWS DevOps & Developer Productivity Blog
How to Enable Caching for AWS CodeBuild
AWS CodeBuild is a fully managed build service. There are no servers to provision and scale, or software to install, configure, and operate. You just specify the location of your source code, choose your build settings, and CodeBuild runs build scripts for compiling, testing, and packaging your code.
A typical application build process includes phases like preparing the environment, updating the configuration, downloading dependencies, running unit tests, and finally, packaging the built artifact.
Downloading dependencies is a critical phase in the build process. These dependent files can range in size from a few KBs to multiple MBs. Because most of the dependent files do not change frequently between builds, you can noticeably reduce your build time by caching dependencies.
In this post, I will show you how to enable caching for AWS CodeBuild.
Requirements
- Create an Amazon S3 bucket for storing cache archives (You can use existing s3 bucket as well).
- Create a GitHub account (if you don’t have one).
Create a sample build project:
1. Open the AWS CodeBuild console at https://console.aws.amazon.com/codebuild/.
2. If a welcome page is displayed, choose Get started.
If a welcome page is not displayed, on the navigation pane, choose Build projects, and then choose Create project.
3. On the Configure your project page, for Project name, type a name for this build project. Build project names must be unique across each AWS account.

4. In Source: What to build, for Source provider, choose GitHub.
- For Repository, select Use a public repository
- For Repository URL, type https://github.com/jenkinsci/aws-codebuild-plugin

5. In Environment: How to build, for Environment image, select Use an image managed by AWS CodeBuild.
- For Operating system, choose Ubuntu.
- For Runtime, choose Java.
- For Version, choose aws/codebuild/java:openjdk-8.
- For Build specification, select Insert build commands.
Note: The build specification file (buildspec.yml) can be configured in two ways. You can package it along with your source root directory, or you can override it by using a project environment configuration. In this example, I will use the override option and will use the console editor to specify the build specification.

6. Under Build commands, click Switch to editor to enter the build specification.
Copy the following text.
version: 0.2

phases:
  build:
    commands:
      - mvn install

cache:
  paths:
    - '/root/.m2/**/*'
Note: The cache section in the build specification instructs AWS CodeBuild about the paths to be cached. Like the artifacts section, the cache paths are relative to $CODEBUILD_SRC_DIR and specify the directories to be cached. In this example, Maven stores the downloaded dependencies to the /root/.m2/ folder, but other tools use different folders. For example, pip uses the /root/.cache/pip folder, and Gradle uses the /root/.gradle/caches folder. You might need to configure the cache paths based on your language platform.
7. In Artifacts: Where to put the artifacts from this build project:
- For Type, choose No artifacts.

8. In Cache:
- For Type, choose Amazon S3.
- For Bucket, choose your S3 bucket.
- For Path prefix, type cache/archives/

9. In Service role, the Create a service role in your account option will display a default role name. You can accept the default name or type your own.
If you already have an AWS CodeBuild service role, choose Choose an existing service role from your account.
10. Choose Continue.
11. On the Review page, to run a build, choose Save and build.
Review build and cache behavior:
Let us review our first build for the project.
In the first run, where no cache exists, overall build time would look something like below (notice the time for DOWNLOAD_SOURCE, BUILD and POST_BUILD):

If you check the build logs, you will see log entries for dependency downloads. The dependencies are downloaded directly from configured external repositories. At the end of the log, you will see an entry for the cache uploaded to your S3 bucket.
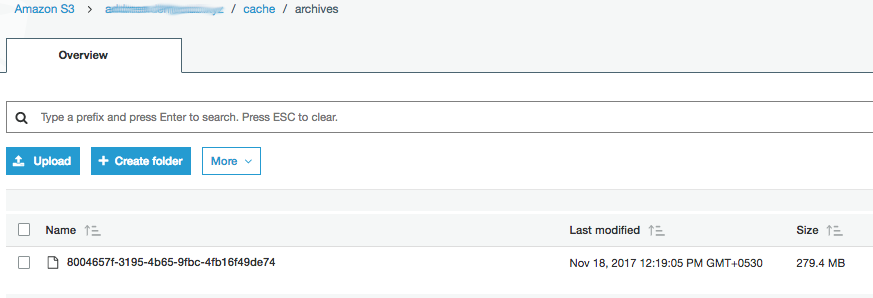
Let’s review the S3 bucket for the cached archive. You’ll see the cache from our first successful build is uploaded to the configured S3 path.
Let’s try another build with the same CodeBuild project. This time the build should pick up the dependencies from the cache.
In the second run, there was a cache hit (cache was generated from the first run):

You’ll notice a few things:
- DOWNLOAD_SOURCE took slightly longer. Because, in addition to the source code, this time the build also downloaded the cache from user’s s3 bucket.
- BUILD time was faster. As the dependencies didn’t need to get downloaded, but were reused from cache.
- POST_BUILD took slightly longer, but was relatively the same.
Overall, build duration was improved with cache.
Best practices for cache
- By default, the cache archive is encrypted on the server side with the customer’s artifact KMS key.
- You can expire the cache by manually removing the cache archive from S3. Alternatively, you can expire the cache by using an S3 lifecycle policy.
- You can override cache behavior by updating the project. You can use the AWS CodeBuild the AWS CodeBuild console, AWS CLI, or AWS SDKs to update the project. You can also invalidate cache setting by using the new InvalidateProjectCache API. This API forces a new InvalidationKey to be generated, ensuring that future builds receive an empty cache. This API does not remove the existing cache, because this could cause inconsistencies with builds currently in flight.
- The cache can be enabled for any folders in the build environment, but we recommend you only cache dependencies/files that will not change frequently between builds. Also, to avoid unexpected application behavior, don’t cache configuration and sensitive information.
Conclusion
In this blog post, I showed you how to enable and configure cache setting for AWS CodeBuild. As you see, this can save considerable build time. It also improves resiliency by avoiding external network connections to an artifact repository.
I hope you found this post useful. Feel free to leave your feedback or suggestions in the comments.