AWS DevOps & Developer Productivity Blog
Securely connect AWS DevOps Agent to private services in your VPCs
AWS DevOps Agent is your always-available operations teammate that resolves and proactively prevents incidents, optimizes application reliability and performance, and handles on-demand SRE tasks across AWS, multicloud, and on-premises environments. It integrates with your existing observability tools to correlate telemetry, code, and deployment data to reduce Mean Time To Repair (MTTR) and drive operational excellence.
Many organizations extend AWS DevOps Agent with custom Model Context Protocol (MCP) tools and other integrations that give the agent access to internal systems such as private package registries, self-hosted observability platforms, internal documentation APIs, and source control instances like GitHub Enterprise and GitLab. These services often run inside an Amazon Virtual Private Cloud (Amazon VPC) with no public internet access, which means AWS DevOps Agent can’t reach them by default.
Private connections for AWS DevOps Agent let you securely connect your Agent Space to services running in your VPC, or internal network, without exposing them to the public internet. Private connections work with any integration that needs to reach a private endpoint, including MCP servers, self-hosted Grafana or Splunk instances, and source control systems.
In this post, we dive into how private connections work, what makes them secure, and how to set one up using the AWS Management Console and the AWS Command Line Interface (AWS CLI).
How private connections work
A private connection creates a secure network path between AWS DevOps Agent and a target resource in your VPC. Under the hood, AWS DevOps Agent uses Amazon VPC Lattice to establish this secure and private connectivity path. VPC Lattice is an application networking service that lets you connect, secure, and monitor communication between applications across VPCs, accounts, and compute types, without managing the underlying network infrastructure.
When you create a private connection, the following occurs:
- You provide the VPC, subnets, and (optionally) security groups that have network connectivity to your target service.
- AWS DevOps Agent creates a service-managed resource gateway and provisions its elastic network interfaces (ENIs) in the subnets you specified.
- The agent uses the resource gateway to route traffic to your target service’s IP address or DNS name over the private network path.
The resource gateway is fully managed by AWS DevOps Agent and appears as a read-only resource in your account. You don’t need to configure or maintain it. The only resources created in your VPC are ENIs in the subnets you specify. These ENIs serve as the entry point for private traffic and are managed entirely by the service. They don’t accept inbound connections from the internet, and you retain full control over their traffic through your own security groups.
Security
Private connections are designed with multiple layers of security:
- No public internet exposure: All traffic between AWS DevOps Agent and your target service stays on the AWS network. Your service never needs a public IP address or internet gateway.
- Service-controlled resource gateway: The service-managed resource gateway is read-only in your account. It can only be used by AWS DevOps Agent, and no other service or principal can route traffic through it. You can verify this in AWS CloudTrail logs, which record all VPC Lattice API calls.
- Your security groups, your rules: You control outbound traffic from the ENIs through security groups that you own and manage. Traffic from the DevOps Agent is subject to the outbound rules of the security group you associate with the private connection resource gateway ENIs, and the inbound rules of your target.
- Service-linked roles with least privilege: AWS DevOps Agent uses a service-linked role to manage the resource gateway. This role is scoped to resources tagged with AWSAIDevOpsManaged and cannot access any other resources in your account.
- DNS support: You can reference your services by their DNS names. Note that the DNS names need to be publicly resolvable.
If you plan on managing your own resource configurations, make sure your organization allows VPC Lattice actions in service control policies (SCPs).
Architecture
The following diagram (figure-1) shows the network path for a private connection:
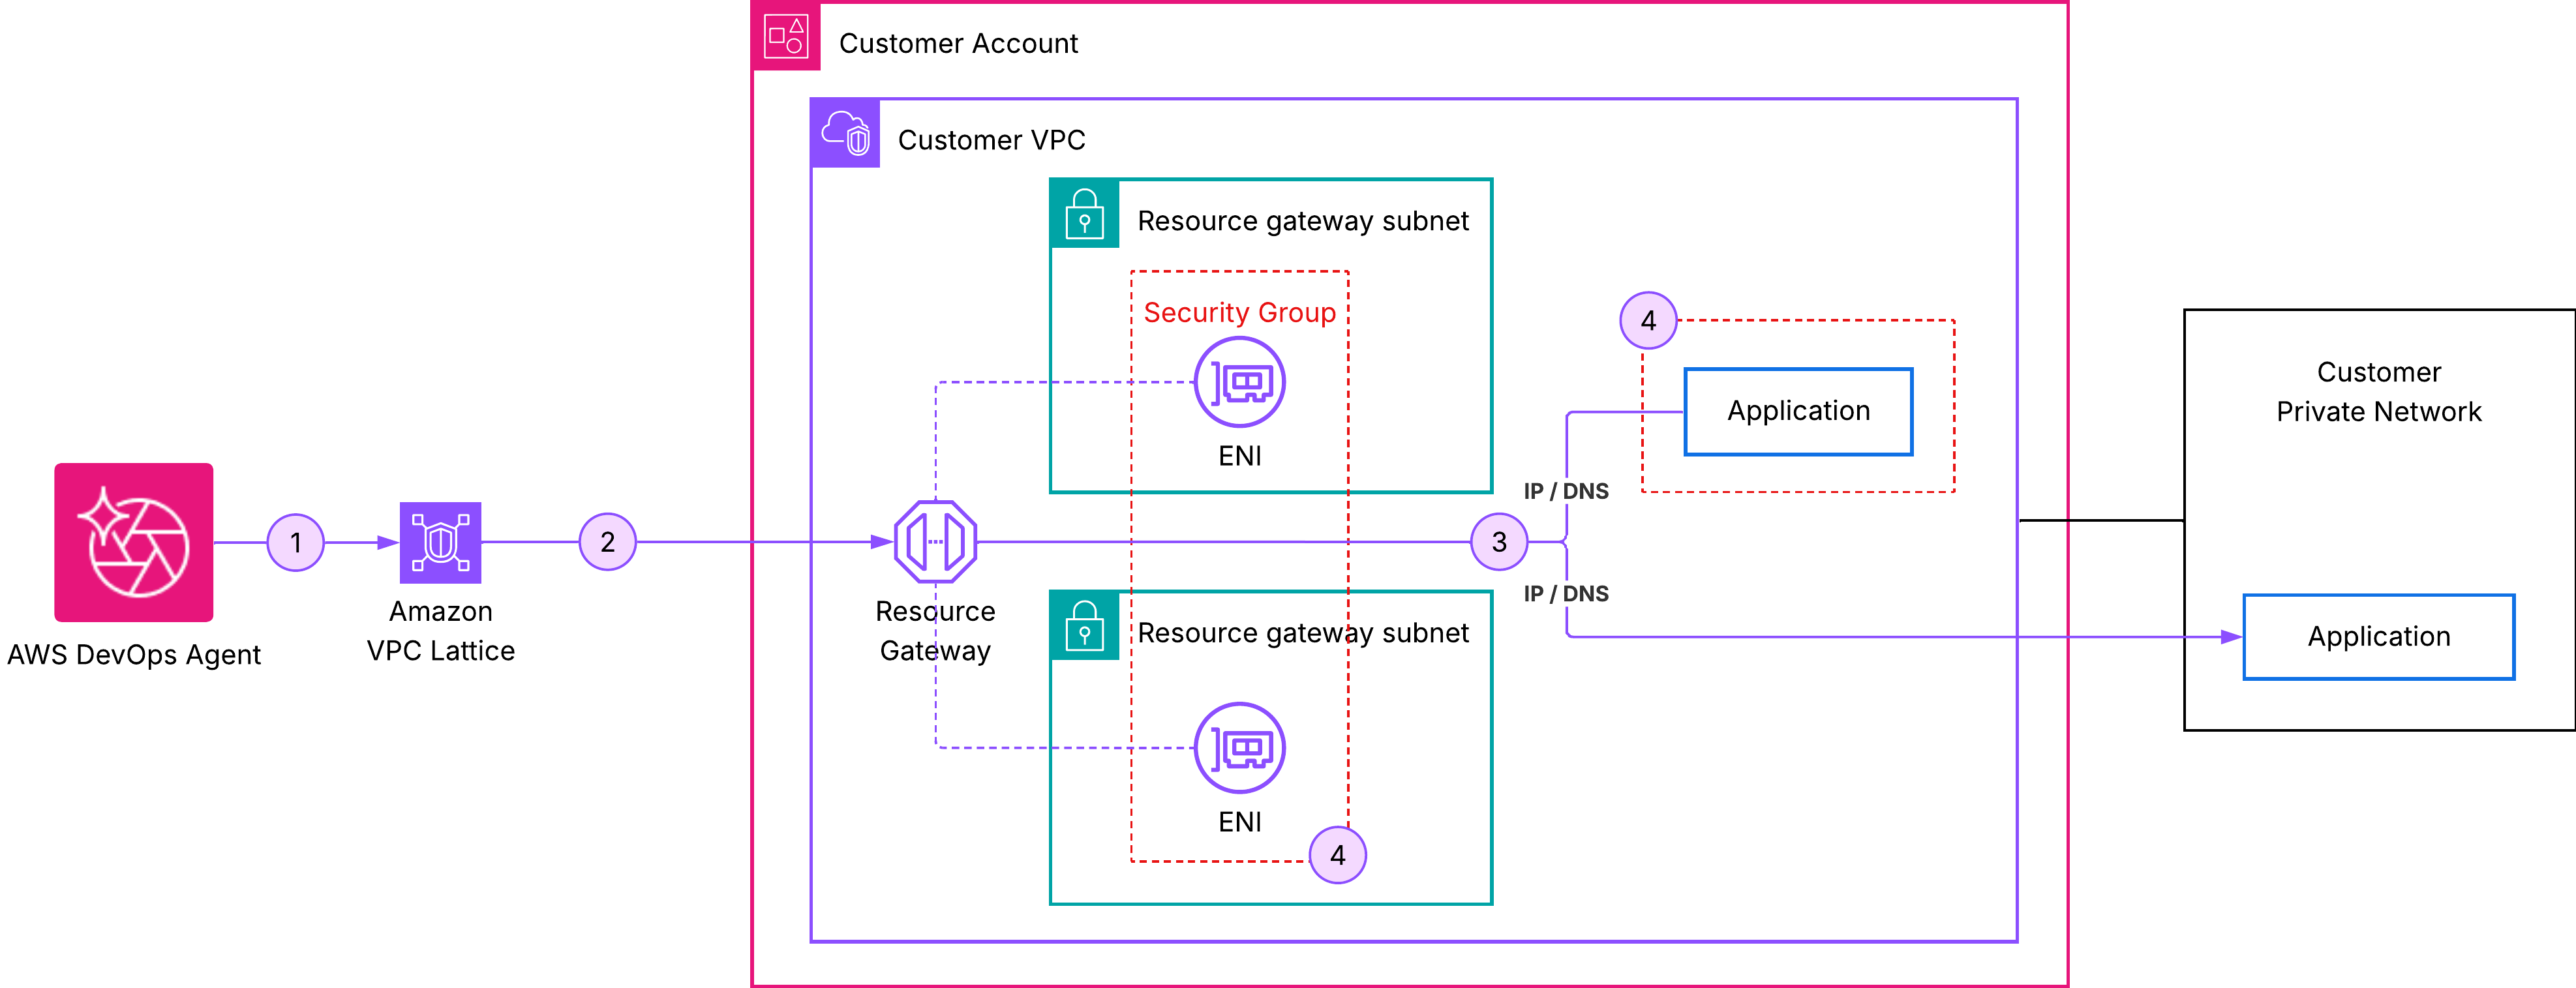
Figure 1: AWS DevOps Agent private connections
In this architecture:
- AWS DevOps Agent initiates a request to your target service.
- The request is routed through the service-managed resource gateway.
- An ENI in your VPC receives the traffic and forwards it to your target service’s IP address or DNS name.
- Your security groups govern which traffic is allowed through the ENIs.
- From your target service’s perspective, the request originates from private IP addresses of ENIs within your VPC.
Prerequisites
Before creating a private connection, verify that you have the following:
- An active Agent Space: You need an existing Agent Space in your account. If you don’t have one, see Getting started with AWS DevOps Agent.
- A privately reachable target service: Your MCP server, observability platform, or other service must be reachable at a known private IP address or DNS name from the VPC where the resource gateway is deployed. The service can run in the same VPC, a peered VPC, or on-premises, as long as it’s routable from the resource gateway subnets. The service must be listening on a TCP port that you can specify when creating the connection.
- Subnets in your VPC: Identify one subnet per Availability Zone where the Resource Gateway ENIs will be created. We recommend selecting subnets in multiple Availability Zones for high availability. These subnets must have network connectivity to your target service.
- (Optional) Security groups: If you want to control traffic with specific rules, prepare up to five security group IDs to attach to the ENIs. If you omit security groups, AWS DevOps Agent uses the VPC default security group.
Private connections are account-level resources. After you create a private connection, you can reuse it across multiple integrations and Agent Spaces that need to reach the same host.
Create a private connection
You can create a private connection using the AWS Management Console or the AWS CLI.
Using the AWS Console
Step 1: Open the AWS DevOps Agent console. In the navigation pane, choose Capability providers:
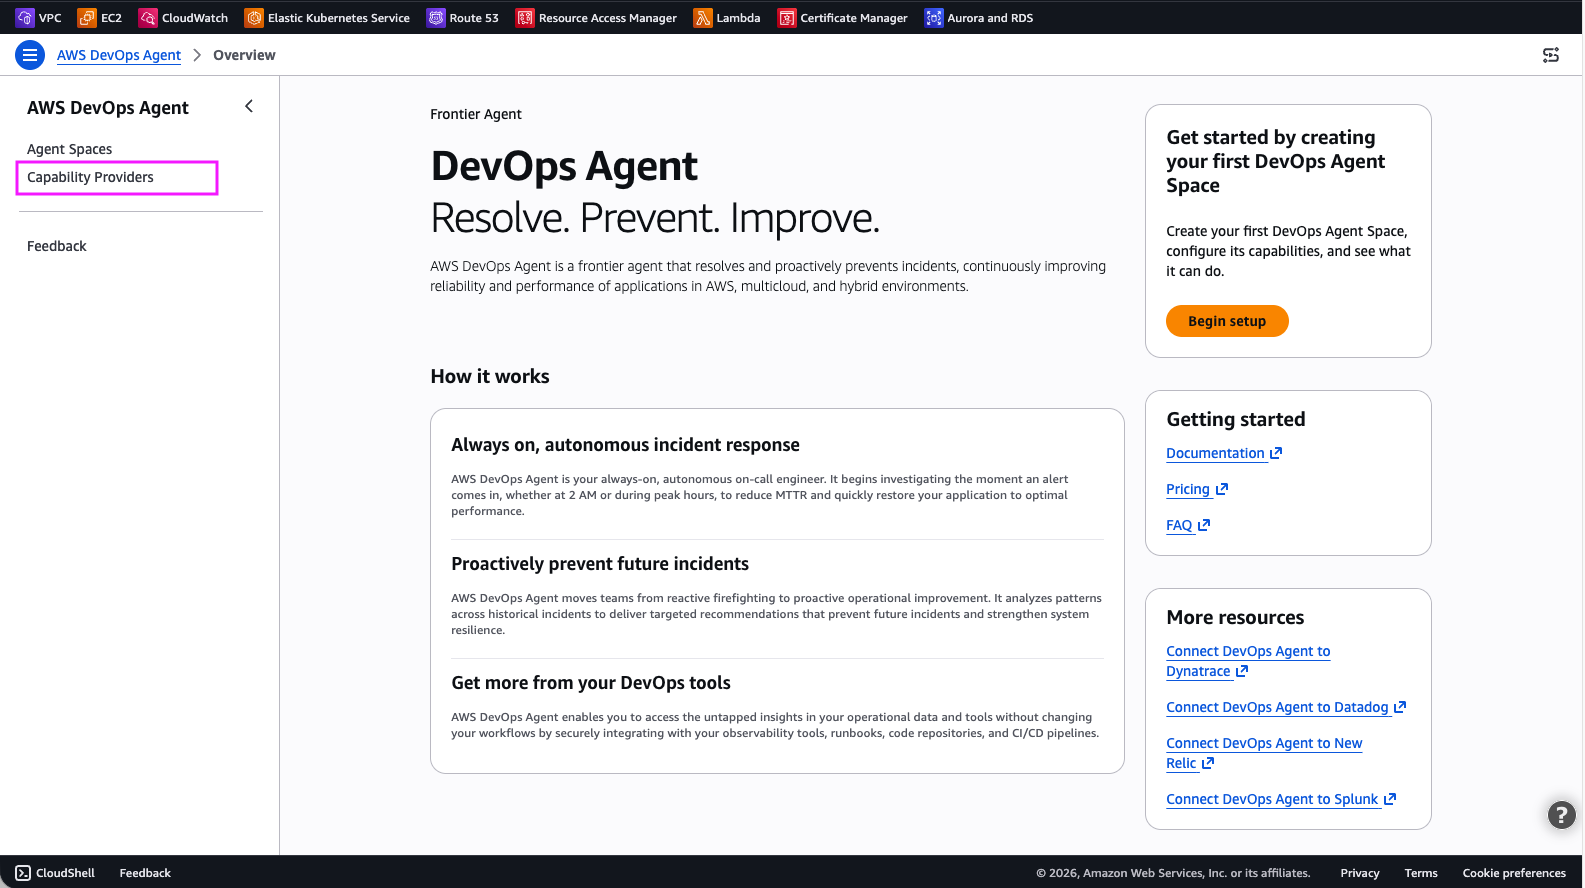
Figure 2: DevOps Agent Capability Providers
Step 2: Select Private connections.
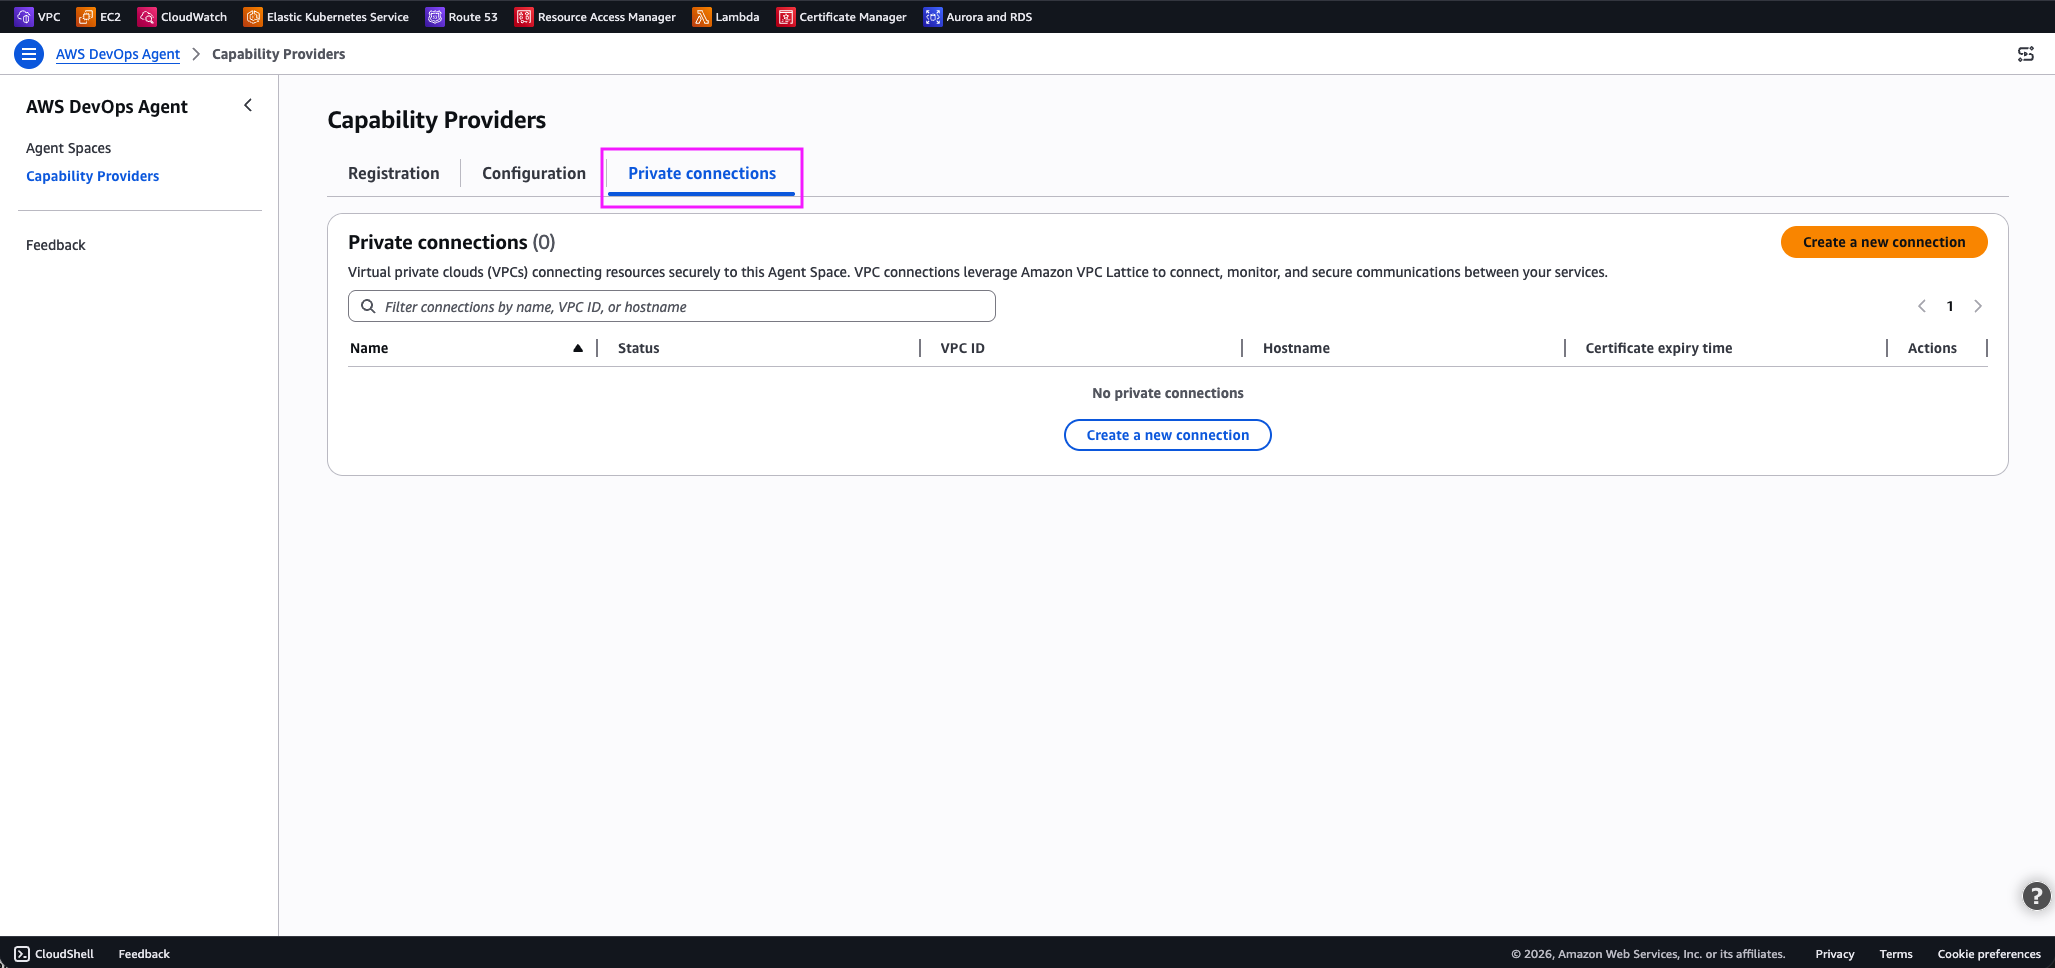
Figure 3: DevOps Agent private connections
Step 3: Choose Create a new connection.
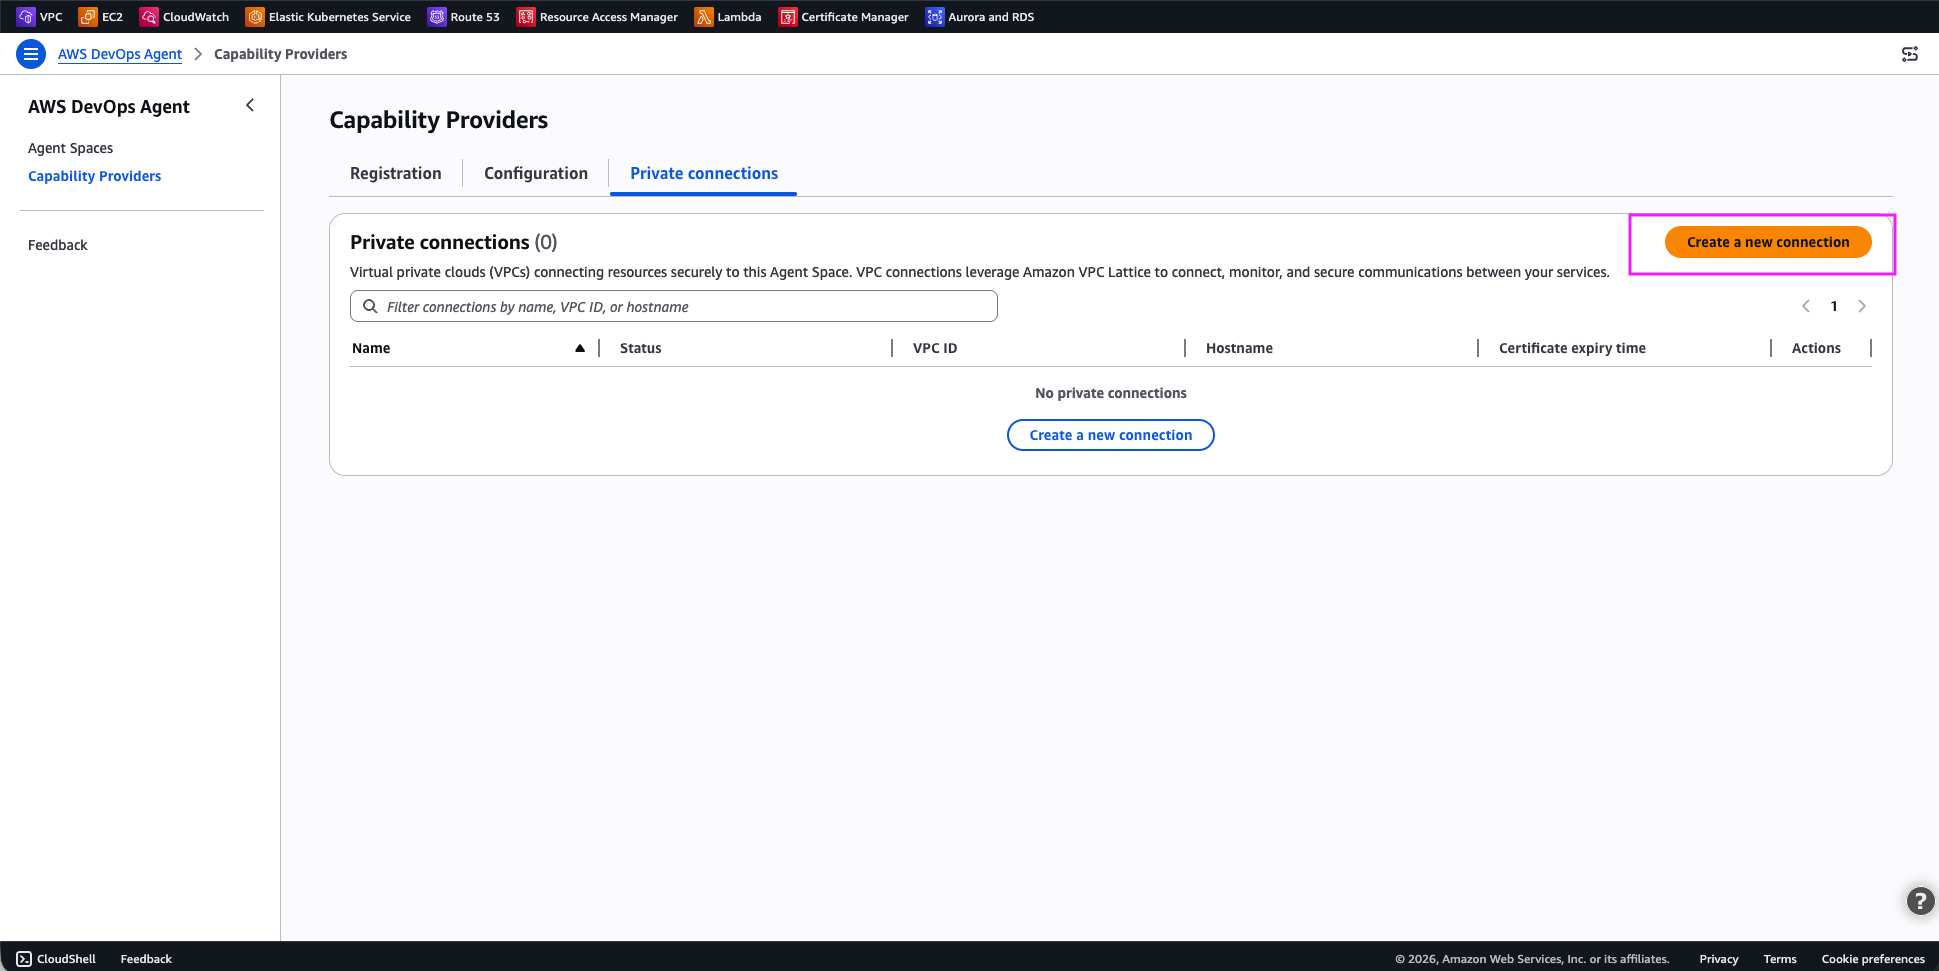
Figure-4: DevOps agent – Create a new connection
Step 4: Configure the private connection:
For Connection details:
- Name: Enter a descriptive name for the connection
For Resource location:
- VPC where your resource is located: Select the VPC where your resource is located, or a VPC that has access to your resource
- Subnets: One subnet per availability zone in your VPC to host the managed resource gateway ENIs.
- IP address type: IPv4, IPv6 or dual stack, representing IP address family your private connection should use. I selected dual stack.
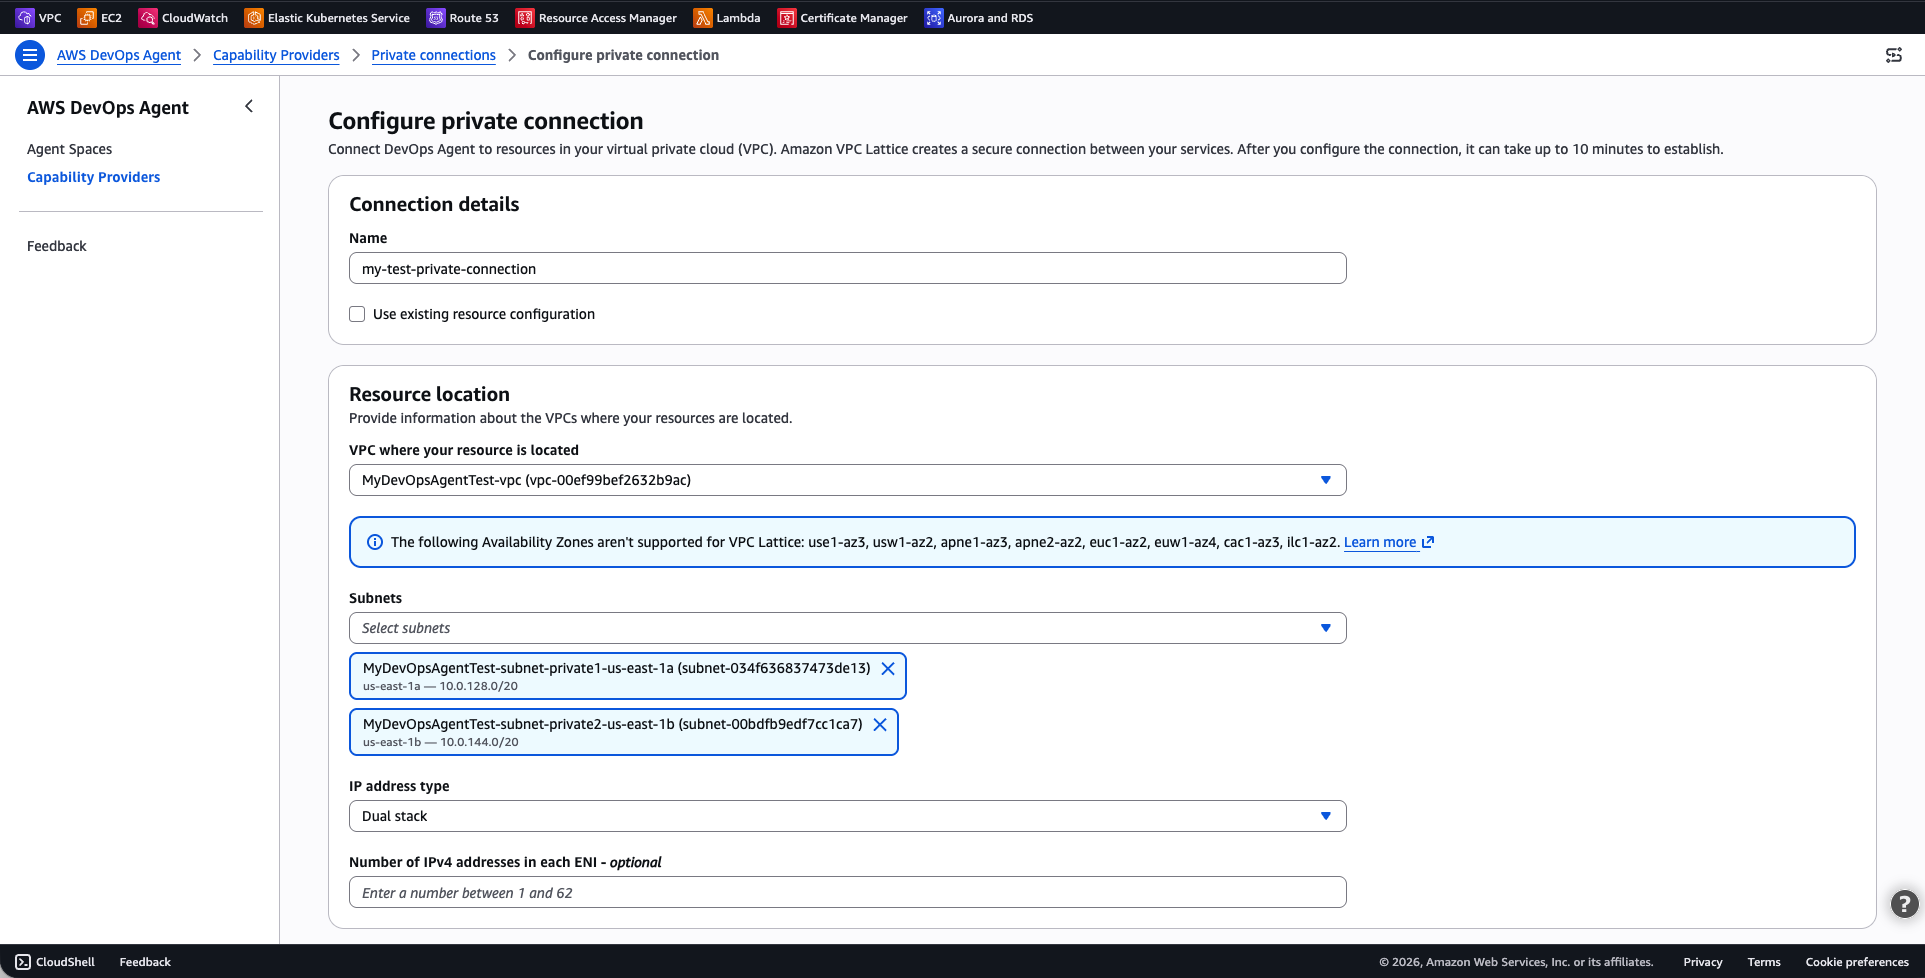
Figure-5: DevOps agent – Configure private connection
For Access control:
- Security groups: Select the security group to be used by DevOps Agent to target your private resources
- (Optional) TCP port ranges: Optionally restrict the port ranges DevOps Agent can use to connect to your resources. If you don’t specific this, all ports are allowed.
For Service target details:
- Host address: The DNS name or IP address of your target resource or service. I used
mymcpserver.test.skipv5.net. The service IPs must be reachable from the selected VPC. If you choose a DNS name, it must be publicly resolvable. - (Optional) Certificate public key: The certificate public key DevOps Agents uses to securely connect to your target.
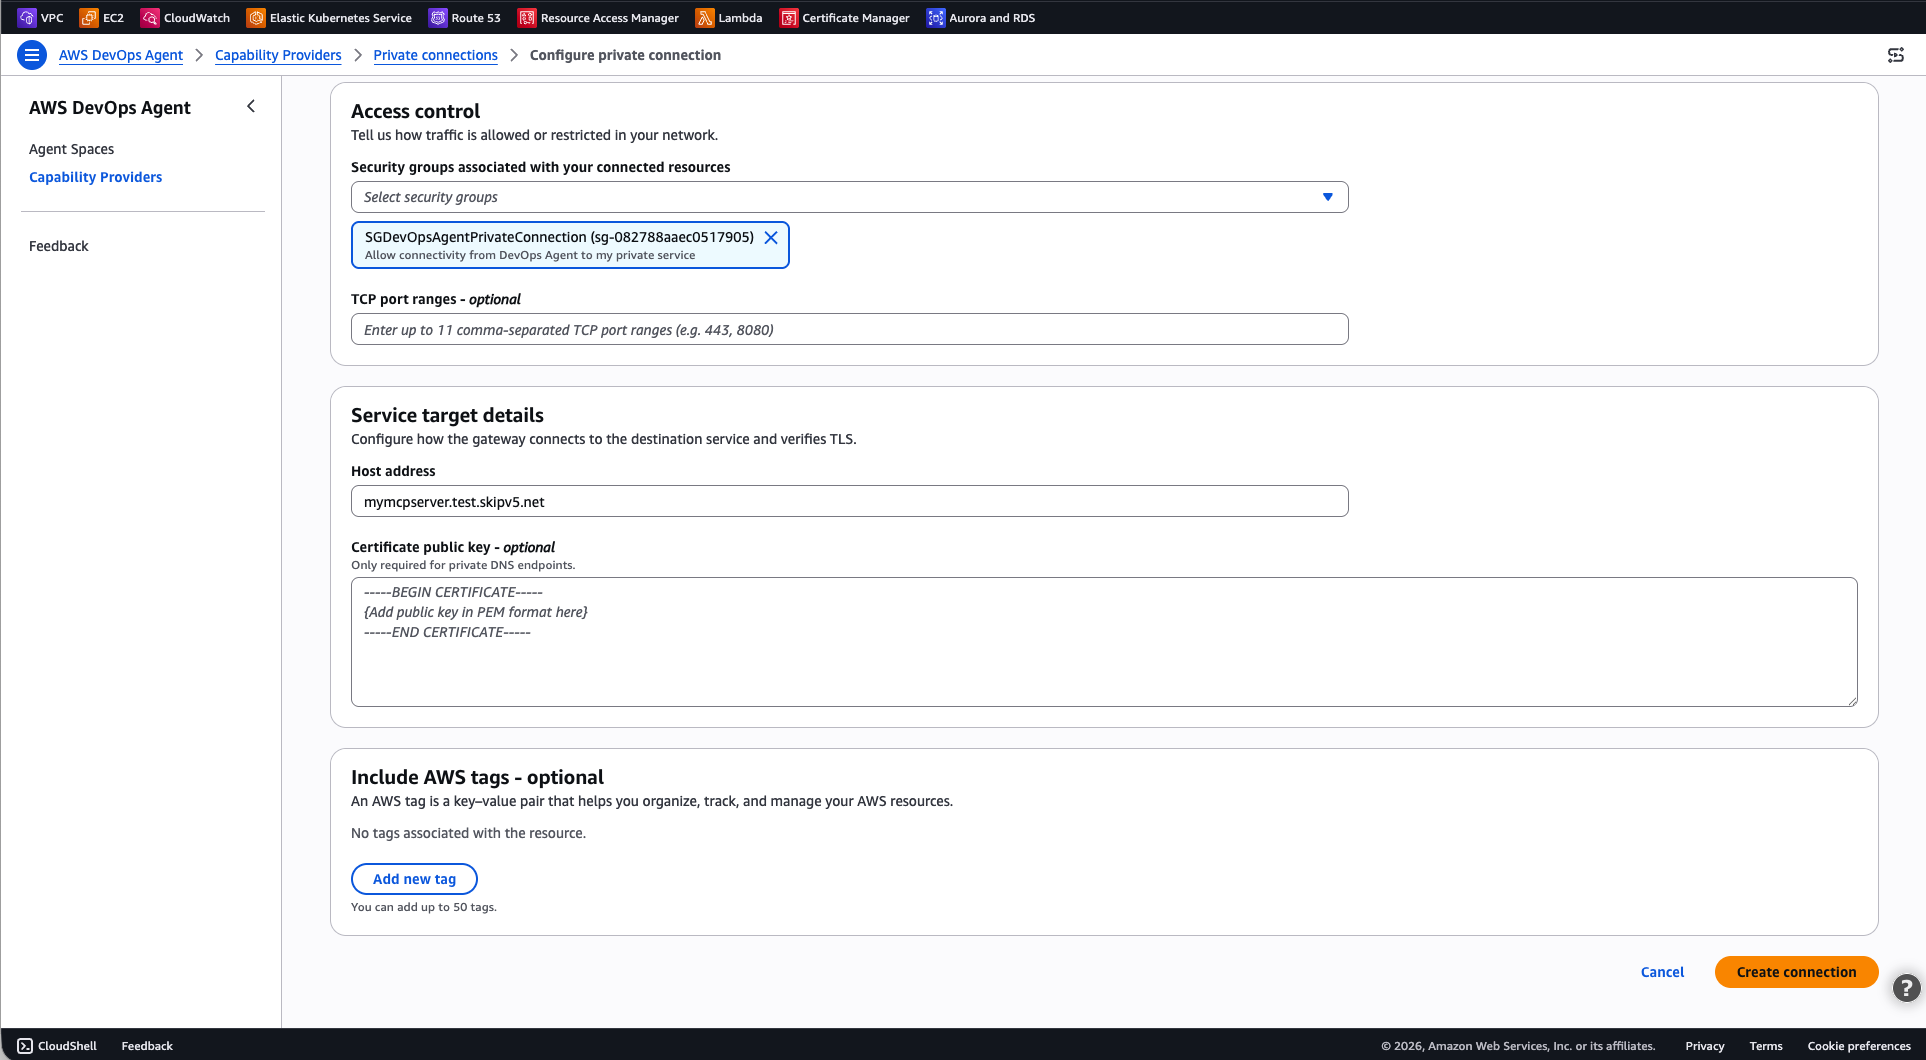
Figure-6: DevOps agent – Configure private connection (continued)
Select Create Connection.
The connection status changes to Create in progress. This process can take up to 10 minutes. When the status changes to Completed, the network path is ready.
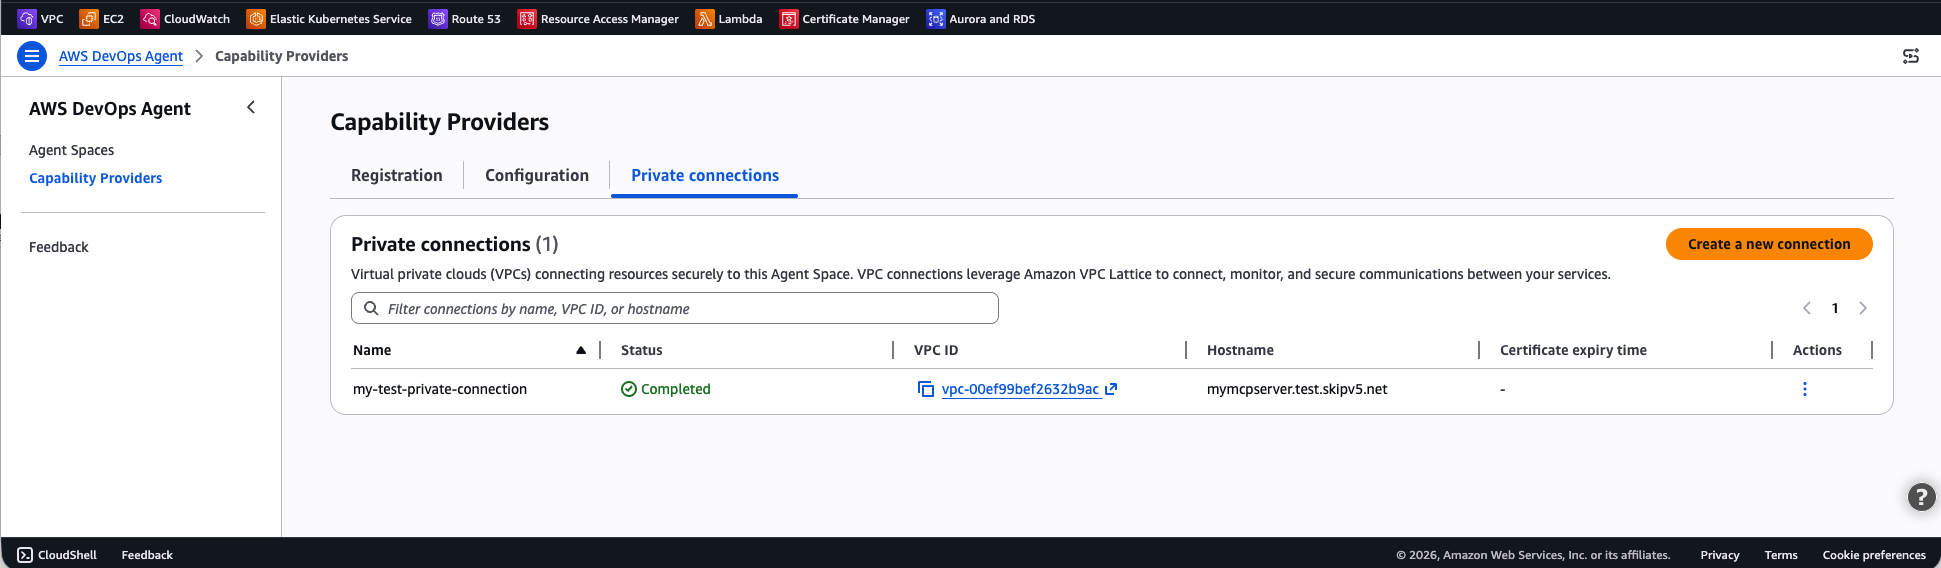
Figure-7: Private connection successfully created
If the status changes to Create failed, verify that the subnets you specified have available IP addresses, that your account has not reached VPC Lattice service quotas, and that no restrictive IAM policies are preventing the service-linked role from creating resources.
Using the AWS CLI
Run the following command to create a private connection. Replace values with your own.
aws devops-agent create-private-connection \
    --name my-test-private-connection \
    --mode '{
        "serviceManaged": {
            "hostAddress": "mymcpserver.test.skipv5.net",
            "resourceGatewayConfig": {
                "create": {
                    "vpcId": "vpc-00ef99bef2632b9ac",
                    "subnetIds": [
                        "subnet-034f636837473de13",
                        "subnet-00bdfb9edf7cc1ca7"
                    ],
                    "securityGroupIds": [
                        "sg-082788aaec0517905"
                    ]
                }
            }
        }
    }'
The response includes the connection name and a status of CREATE_IN_PROGRESS:
{
    "name": " my-test-private-connection",
    "status": "CREATE_IN_PROGRESS",
    "resourceGatewayId": "rgw-0f7415325b107a945",
    "hostAddress": "mymcpserver.test.skipv5.net",
    "vpcId": "vpc-00ef99bef2632b9ac"
}
To check the connection status, use the describe-private-connection command:
aws devops-agent describe-private-connection \
    --name my-test-private-connection
When the status is Completed, your private connection is ready to use.
Verify the connection
After the private connection reaches the Completed state, verify that AWS DevOps Agent can reach your target service:
- Open the AWS DevOps Agent console and navigate to your Agent Space.
- Start a new chat session.
- Invoke a command that uses the integration backed by your private connection. For example, if your MCP tool provides access to an internal knowledge base, ask the agent a question that requires that knowledge base.
- Confirm that the agent returns results from the private service.
If the connection fails, verify the following:
- Security group rules: Verify that the security groups attached to the ENIs allow outbound traffic on the port your service listens on. Also verify that your service’s security group allows inbound traffic from the ENI security group.
- Subnet connectivity: Verify that the subnets you selected have reachability to your service. If the service runs in a different subnet, confirm that the route tables allow traffic between them.
- Service availability: Confirm that your service is running and accepting connections on the expected port.
Example: Connect to a self-hosted Grafana instance
One of the most common use cases for private connections is connecting AWS DevOps Agent to a self-hosted Grafana instance. Many teams run Grafana inside a VPC with no public endpoint to visualize metrics, logs, and traces. With the built-in Grafana integration and a private connection, you can give the agent read-only access to your dashboards, alerts, and data sources, the same observability data your on-call engineers rely on during incidents.
AWS DevOps Agent provides a dedicated Grafana integration that hosts the official open-source Grafana MCP server on your behalf, so you don’t need to deploy or manage any MCP server infrastructure yourself. The integration supports Grafana Cloud, Grafana Enterprise, and self-hosted Grafana OSS (v9.1 and later).
For self-hosted instances that aren’t publicly accessible, pair the Grafana integration with a private connection so the agent can reach your instance over the private network.
Step 1: Create a Grafana service account
In your Grafana instance, create a service account with Viewer role permissions. This gives AWS DevOps Agent read-only access to your dashboards, alert rules, and data sources. Generate an access token for the service account and save it for the next step.
Step 2: Create a private connection to your Grafana instance
Because your Grafana instance runs in a private subnet, create a private connection first so that AWS DevOps Agent can reach it.
Using the AWS Console:
Follow the steps in the Create a private connection section of this blog, using your Grafana instance’s address as the host address.
Using the AWS CLI:
aws devops-agent create-private-connection \
    --name grafana-connection \
    --mode '{
        "serviceManaged": {
            "hostAddress": "grafana.internal.example.com",
            "resourceGatewayConfig": {
                "create": {
                    "vpcId": "vpc-0123456789abcdef0",
                    "subnetIds": [
                        "subnet-0123456789abcdef0",
                        "subnet-0123456789abcdef1"
                    ],
                    "portRanges": ["443"]
                }
            }
        }
    }'
Wait for the connection status to reach Completed state before proceeding.
Step 3: Add the Grafana integration to your Agent Space
Register and associate the Grafana service so the agent knows how to connect.
Using the AWS Console:
- Open the AWS DevOps Agent console and navigate to your Agent Space.
- In the Integrations section, choose Add integration.
- Select the Grafana tile.
- Enter your Grafana instance URL (for example, https://grafana.internal.example.com).
- Paste the service account access token you generated in Step 1.
- Choose Save.
Using the AWS CLI:
First, register the Grafana service with your instance URL and service account token:
aws devops-agent register-service \
    --service mcpservergrafana \
    --private-connection-name grafana-connection \
    --service-details '{
        "mcpservergrafana": {
            "name": "grafana",
            "endpoint": "https://grafana.internal.example.com",
            "authorizationConfig": {
                "bearerToken": {
                    "tokenName": "grafana-sa-token",
                    "tokenValue": "<SERVICE_ACCOUNT_TOKEN>"
                }
            }
        }
    }' \
    --region us-east-1
Save the returned serviceId, then associate the Grafana service with your Agent Space:
aws devops-agent associate-service \
    --agent-space-id <AGENT_SPACE_ID> \
    --service-id <SERVICE_ID> \
    --configuration '{
        "mcpservergrafana": {
            "endpoint": "https://grafana.internal.example.com"
        }
    }' \
    --region us-east-1
The response includes webhook information that you can use in Step 4 to configure alert notifications. The agent routes traffic to your Grafana instance through the private connection you created in Step 2, matching on the host address.
To verify the integration, start a chat in your Agent Space and ask the agent something like “Summarize my recent Grafana alerts.” If the agent returns alert data from your dashboards, the private connection and Grafana integration are both working.
Step 4: Enable Grafana webhook notifications (optional)
To let AWS DevOps Agent automatically start investigations when Grafana fires an alert, configure a webhook contact point in your Grafana instance. Point the webhook to your Agent Space’s webhook URL and provide the authentication secret from the integration settings. When an alert triggers, Grafana sends a notification to the agent, which begins an investigation using your Grafana data alongside the other resources in your Agent Space.
For details on the AWS DevOps Agent Grafana integration, and details on how you can also use this integration with AWS Managed Grafana (AMG), check the AWS DevOps Agent Grafana integration documentation.
How DNS resolution and host routing work
When you create a private connection, the host address you provide (for example, my-alb.us-east-1.elb.amazonaws.com) is the DNS name that VPC Lattice resolves to route traffic to your target. This DNS name must be publicly resolvable, even if it resolves to private IP addresses. When you register a service integration and specify an endpoint URL (for example, https://my-grafana.internal.corp), that URL is used for the Host header and Service Name Indicator (SNI) on the TLS connection, it is not used for DNS resolution. This separation means you can point multiple service integrations at the same private connection (and therefore the same target, such as an Application Load Balancer), each with a different endpoint hostname. The target can then use the Host header to route requests to different backends.
For example, you could create a single private connection with your ALB’s DNS name as the host address, and register separate Grafana and MCP server integrations, each with their own endpoint URL. The ALB receives both through the same private connection and uses host-based routing rules to direct each request to the correct target group.
Advanced setup using existing VPC Lattice resources
If your organization already uses Amazon VPC Lattice and manages your own resource configurations, you can create a private connection in self-managed mode. Instead of having AWS DevOps Agent create a resource gateway for you, you provide the Amazon Resource Name (ARN) of an existing resource configuration that points to your target service.
This approach is useful when you:
- Want full control over the resource gateway and resource configuration lifecycle.
- Need to share resource configurations across multiple AWS accounts or services.
- Require VPC Lattice access logs for detailed traffic monitoring.
- Run a hub-and-spoke network architecture.
- Require zero trust fine grained access controls for access to your resources or services.
To create a self-managed private connection using the AWS Console, click on Create a new connection, and select Use existing resource configuration, as shown in the following screen capture (figure-8). Then select your existing resource configuration for the drop-down list.
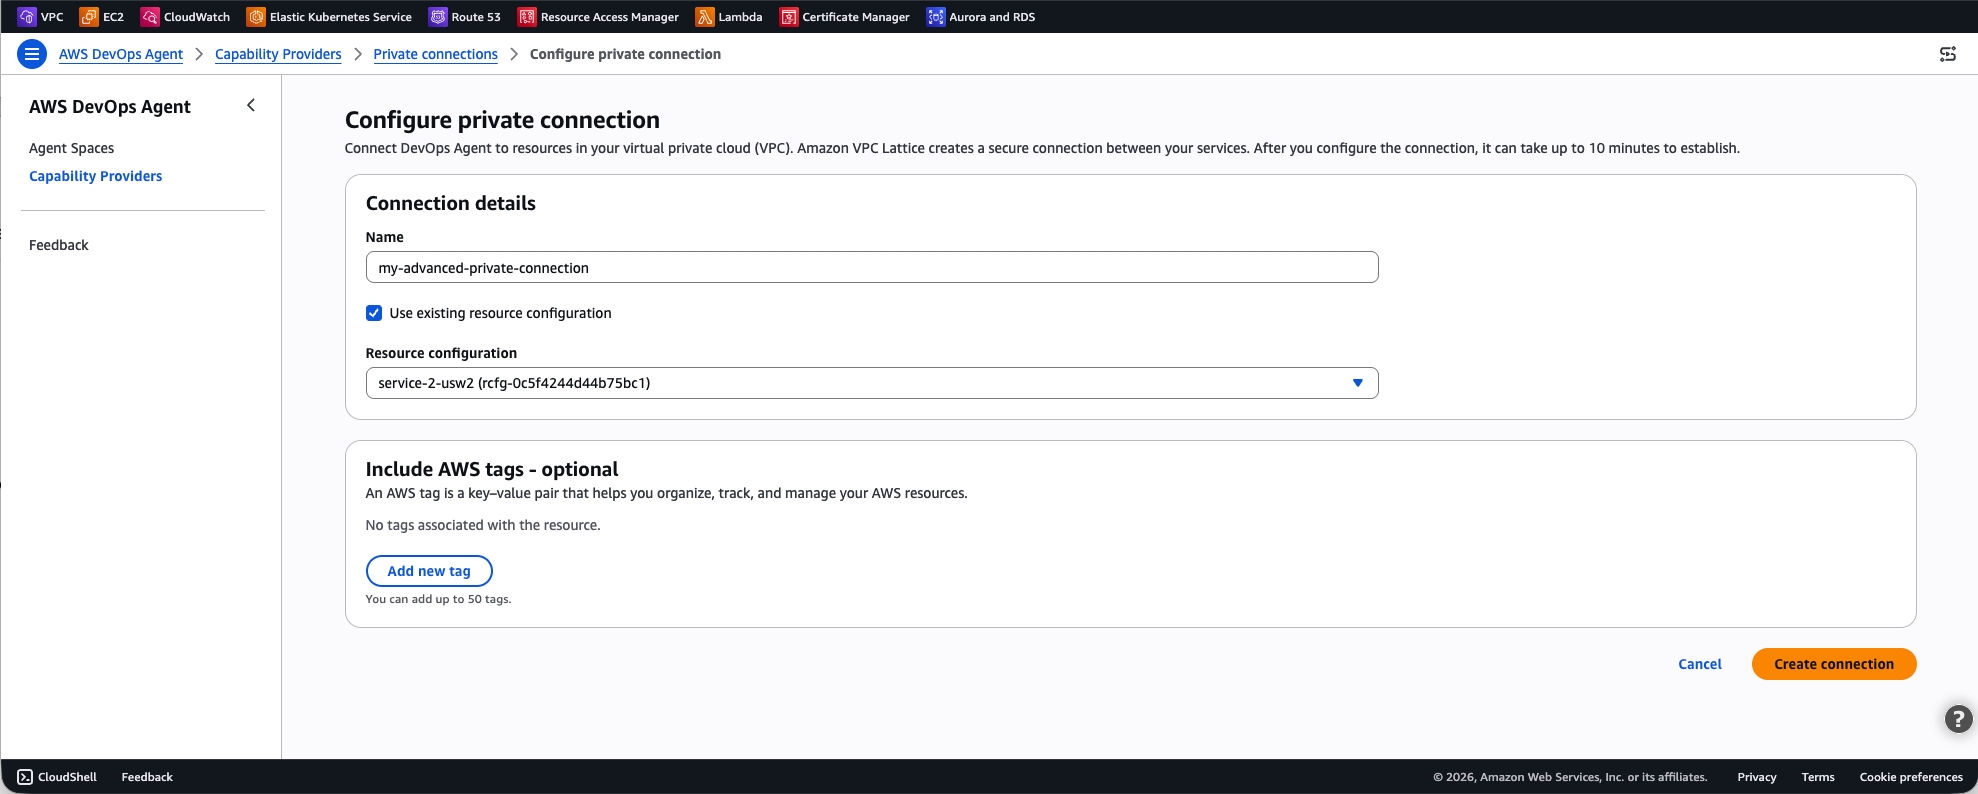
Figure-8: Advanced setting using existing VPC Lattice resources
To create a self-managed private connection with the AWS CLI:
aws devops-agent create-private-connection \
    --name my-advanced-connection \
    --mode '{
        "selfManaged": {
            "resourceConfigurationId": "rcfg-0123456789abcdef0"
        }
    }'
For more details on setting up VPC Lattice resource gateways and resource configurations, see the Amazon VPC Lattice User Guide.
Clean up
To avoid ongoing charges, delete private connections that you no longer need.
Using the AWS Console
- Open the AWS DevOps Agent console.
- In the navigation pane, choose Capability providers, then choose Private connections.
- Select the private connection you want to delete.
- Choose Delete.
- Confirm the deletion.
Using the AWS CLI
aws devops-agent delete-private-connection \
    --name my-test-private-connection
The response returns a status of DELETE_IN_PROGRESS. AWS DevOps Agent removes the managed resource gateway and ENIs from your VPC. After deletion completes, the connection no longer appears in your list of private connections.
Conclusion
Private connections for AWS DevOps Agent provide a secure, managed way to connect your Agent Space to services running inside your VPC. By using Amazon VPC Lattice, private connections keep all traffic off the public internet while your existing security control remain in place, giving you full control over network access through your own security groups.
To get started, open the AWS DevOps Agent console and create your first private connection. For more details, see Private connections in the AWS DevOps Agent User Guide.
About the authors

Alexandra Huides
Alexandra Huides is a Principal Networking Specialist Solutions Architect in the AWS Networking Services product team at Amazon Web Services. She focuses on helping customers build and develop networking architectures for highly scalable and resilient AWS environments. Alex is also a public speaker for AWS, and is helping customers adopt IPv6. Outside work, she loves sailing, especially catamarans, traveling, discovering new cultures, running and reading.

Tipu Qureshi
Tipu Qureshi is a Senior Principal Technologist in AWS Agentic AI, focusing on operational excellence and incident response automation. He works with AWS customers to design resilient, observable cloud applications and autonomous operational systems.

Jordan Merrick
Jordan Merrick is a Senior Software Engineer in AWS Agentic AI, where he works on observability and identity. He builds secure, scalable agentic systems for AWS customers.

Mohak Kohli
Mohak Kohli is a Software Development Engineer at Amazon Web Services. He works across various domains with focus on VPC Lattice and PrivateLink.