AWS for Games Blog
Adding persistent game saves to Amazon GameLift Streams
When you stream a game using Amazon GameLift Streams, one of the challenges is that the instance it runs on is temporary, so local files such as save files and configuration preferences don’t persist between sessions.
To help solve this, Amazon GameLift Streams now supports using a dedicated AWS Identity and Access Management (IAM) role that can grant your streaming game sessions access to AWS resources in your account. In this blog post, we show you how to use that role with a lightweight launcher script to persist game saves from your player’s streaming sessions to Amazon Simple Storage Service (Amazon S3) without needing to make any changes to your game code.
Prerequisites
To complete the steps described in this post, you must have the following prerequisites:
- An AWS account
- An Amazon GameLift Streams application with a game binary uploaded
- An S3 bucket to store save files
- The AWS Command Line Interface (AWS CLI) installed locally
- A stream group configured in Amazon GameLift Streams
Solution overview
Figure 1 shows an overview of the solution presented in this post.
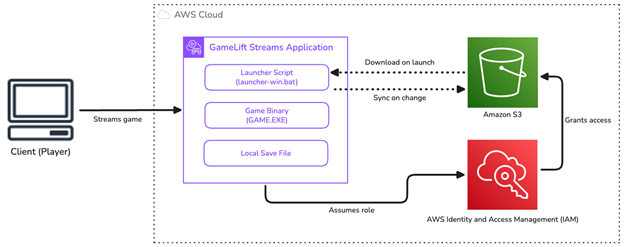
Figure 1: Solution overview.
Configure the IAM role
To get started, create an IAM role.
- Go to the AWS Management Console for IAM and choose Roles in the navigation pane.
- Choose Create role.
- Select Custom trust policy as the Trusted entity type.
- Enter the following as the Custom trust policy, replacing
[CUSTOMER_ACCOUNT_ID]with your account ID.
{
  "Version": "2012-10-17",
  "Statement": [
    {
      "Effect": "Allow",
      "Principal": {
        "Service": "gameliftstreams.amazonaws.com"
      },
      "Action": "sts:AssumeRole",
      "Condition": {
        "StringEquals": {
          "aws:SourceAccount": "[CUSTOMER_ACCOUNT_ID]"
        },
        "ArnLike": {
          "aws:SourceArn": "arn:aws:gameliftstreams:*:[CUSTOMER_ACCOUNT_ID]:streamsession/*"
        }
      }
    }
  ]
}
5. Choose Next.
6. On the Add permissions page, choose Create inline policy.
7. Add the necessary permissions for the role. For this example, you’ll be reading and writing files to Amazon S3, so you you need to create a custom policy that allows this role to perform s3:PutObject, s3:GetObject and s3:DeleteObject.
The following is an example policy statement that will permit Amazon GameLift Streams to interact with Amazon S3. Replace [YOUR_BUCKET_NAME] with your actual bucket name.
{
    "Version": "2012-10-17",
    "Statement": [
        {
            "Effect": "Allow",
            "Action": [
                "s3:PutObject",
                "s3:GetObject",
                "s3:DeleteObject"
            ],
            "Resource": "arn:aws:s3:::[YOUR_BUCKET_NAME]"
        }
    ]
}
- Choose Next.
- Enter a Role name. The name for your role must begin with
GameLiftStreams-. - (Optional) Enter a Description for your role.
- Review your inputs and choose Create role.
Create a launcher script
Next, configure a launcher script to use for the application source instead of the game’s binary. This script will download an existing save file from Amazon S3 at launch of the Amazon GameLift Streams session. It will also monitor the local save file for changes and syncs updates back to S3 when the file is changed. We focus on Windows for this example; for Proton or Linux (Ubuntu), modify the script as needed.
Note: Your launcher script can interact with any AWS resource if the IAM role that you created grants Amazon GameLift Streams permission to do so.
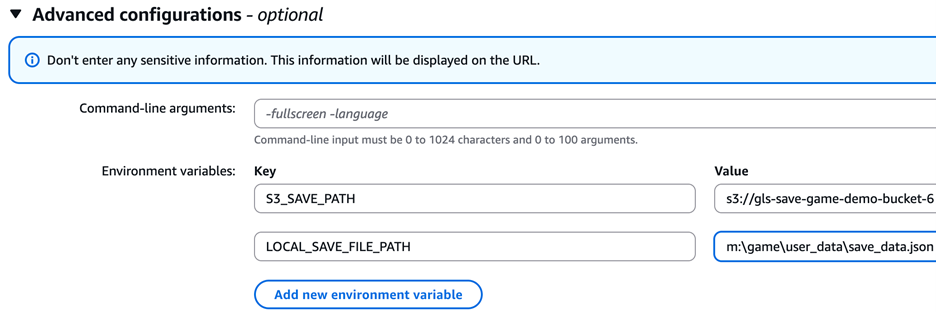
Your launcher script expects two environment variables. To pass these required variables to the launcher script, you can use the AdditionalEnvironmentVariables property of StartStreamSession in your backend service.
S3_SAVE_PATHLOCAL_SAVE_FILE_PATH
The first is the full Amazon S3 URI for the save file, which must be unique. Your backend service that calls StartStreamSession needs to identify the player from their authenticated session (for example, by using their login session or another platform-specific player ID) and dynamically construct a per-player S3 URI. This can look like s3://your-bucket/saves/{player-id}/save.dat.
The second environment variable that the launcher script expects is the local file path where the S3 file will be stored on the Amazon GameLift Streams instance.
Here’s the full launcher script:
@echo off
setlocal

REM Downloads save from S3, watches for changes, syncs back, and runs the game

set SCRIPT_DIR=%~dp0
set PACKAGE_ROOT=%SCRIPT_DIR%

if not defined LOCAL_SAVE_FILE_PATH (
    echo WARNING: LOCAL_SAVE_FILE_PATH not set, skipping file watcher
    goto :start_app
)

if not defined S3_SAVE_PATH (
    echo WARNING: S3_SAVE_PATH not set, skipping file watcher
    goto :start_app
)

set LOG_FILE=%SCRIPT_DIR%file_watcher.log

set REGION_ARG=
if defined AWS_REGION set REGION_ARG=-Region "%AWS_REGION%"

REM Download existing save from S3
powershell -NoProfile -ExecutionPolicy Bypass -File "%SCRIPT_DIR%download-save-file.ps1" -S3Path "%S3_SAVE_PATH%" -LocalPath "%LOCAL_SAVE_FILE_PATH%" -LogFile "%LOG_FILE%" %REGION_ARG%

REM Start file watcher as background process
start "" /b powershell -NoProfile -WindowStyle Hidden -ExecutionPolicy Bypass -File "%SCRIPT_DIR%watch-save-file.ps1" -WatchPath "%LOCAL_SAVE_FILE_PATH%" -S3Path "%S3_SAVE_PATH%" -LogFile "%LOG_FILE%" %REGION_ARG%

:start_app

REM Add your game executable below:
GAME.EXE -f
The download-save-file.ps1 script downloads the file (if it exists) and saves it at the local path.
param(
    [Parameter(Mandatory=$true)][string]$S3Path,
    [Parameter(Mandatory=$true)][string]$LocalPath,
    [Parameter(Mandatory=$true)][string]$LogFile,
    [Parameter(Mandatory=$false)][string]$Region
)

$ts = Get-Date -Format 'yyyy-MM-dd HH:mm:ss'
Add-Content -Path $LogFile -Value "$ts - Checking for existing save at: $S3Path"

$regionArgs = @()
if (-not [string]::IsNullOrWhiteSpace($Region)) {
    $regionArgs = @('--region', $Region)
}

# Ensure local directory exists
$localDir = Split-Path $LocalPath -Parent
if (-not (Test-Path $localDir)) {
    New-Item -ItemType Directory -Path $localDir -Force | Out-Null
}

try {
    $result = & aws s3 cp $S3Path $LocalPath @regionArgs 2>&1
    if ($LASTEXITCODE -eq 0) {
        Add-Content -Path $LogFile -Value "$(Get-Date -Format 'yyyy-MM-dd HH:mm:ss') - Downloaded save from S3"
    } else {
        Add-Content -Path $LogFile -Value "$(Get-Date -Format 'yyyy-MM-dd HH:mm:ss') - No save found in S3: $result"
    }
} catch {
    Add-Content -Path $LogFile -Value "$(Get-Date -Format 'yyyy-MM-dd HH:mm:ss') - Exception: $_"
}Thewatch-save-file.ps1file creates a file watcher to sync changes while the game is running. Note that this can result in a large number ofPUTrequests to Amazon S3. If possible, you might want to take a different approach (for example, saving on a time-based schedule) in production to save costs.param( [Parameter(Mandatory=$true)][string]$WatchPath, [Parameter(Mandatory=$true)][string]$S3Path, [Parameter(Mandatory=$true)][string]$LogFile, [Parameter(Mandatory=$false)][string]$Region ) $timestamp = Get-Date -Format 'yyyy-MM-dd HH:mm:ss' Add-Content -Path $LogFile -Value "$timestamp - Watcher starting for: $WatchPath" $regionArgs = @() if (-not [string]::IsNullOrWhiteSpace($Region)) { $regionArgs = @('--region', $Region) } if ([string]::IsNullOrWhiteSpace($WatchPath)) { Add-Content -Path $LogFile -Value "$timestamp - ERROR: WatchPath is empty" exit 1 } $folder = Split-Path $WatchPath -Parent $fileName = Split-Path $WatchPath -Leaf if (-not (Test-Path $folder)) { New-Item -ItemType Directory -Path $folder -Force | Out-Null } try { $watcher = New-Object System.IO.FileSystemWatcher $watcher.Path = $folder $watcher.Filter = $fileName $watcher.NotifyFilter = [System.IO.NotifyFilters]::LastWrite -bor [System.IO.NotifyFilters]::Size -bor [System.IO.NotifyFilters]::FileName $watcher.EnableRaisingEvents = $true while ($true) { $result = $watcher.WaitForChanged([System.IO.WatcherChangeTypes]::All, 1000) if (-not $result.TimedOut) { $ts = Get-Date -Format 'yyyy-MM-dd HH:mm:ss' Add-Content -Path $LogFile -Value "$ts - [$($result.ChangeType)] $folder\$($result.Name)" # Sync to S3 try { $s3Result = & aws s3 cp $WatchPath $S3Path @regionArgs 2>&1 if ($LASTEXITCODE -eq 0) { Add-Content -Path $LogFile -Value "$(Get-Date -Format 'yyyy-MM-dd HH:mm:ss') - Synced to S3" } else { Add-Content -Path $LogFile -Value "$(Get-Date -Format 'yyyy-MM-dd HH:mm:ss') - Sync failed: $s3Result" } } catch { Add-Content -Path $LogFile -Value "$(Get-Date -Format 'yyyy-MM-dd HH:mm:ss') - Sync exception: $_" } } } } catch { Add-Content -Path $LogFile -Value "$(Get-Date -Format 'yyyy-MM-dd HH:mm:ss') - EXCEPTION: $_" }Starting a game session
To test your solution, you need to create a stream session and test that the file was retrieved from and persisted back to Amazon S3.
- Create a new Amazon GameLift Streams stream group.
- Create a Amazon GameLift Streams application using the
launcher-win.batfile as the Executable launch path.- After your application is created, associate the newly created stream group.
- Choose Test Stream in the console navigation pane using the newly created stream group and application.
- Add the
S3_SAVE_PATHandLOCAL_SAVE_PATHenvironment variables and populate them according to the bucket you have created in your account for this test.
Figure 2: Add environment variables.
- Choose the IAM role you created in the preceding Configure the IAM role section.
- Choose Test stream and verify that the save files are being persisted to S3.
- Terminate the session and start a new session to test that the persisted save file is properly loaded.
If you need to troubleshoot the launcher script, you can use
CreateStreamSessionAdminShellto connect to the live runtime environment of your stream session.Start a stream session using the API
When you’re ready to integrate this into your game streaming platform you can update your backend service to include the
AdditionalEnvironmentVariablesandRoleArnto yourStartStreamSessionAPI call.import { GameLiftStreamsClient, StartStreamSessionCommand } from "@aws-sdk/client-gameliftstreams"; const client = new GameLiftStreamsClient(); const command = new StartStreamSessionCommand({ Identifier: "sg-1234567890abcdef0", ApplicationIdentifier: "a-1234567890abcdef0", Protocol: "WebRTC", SignalRequest: "YOUR_SIGNAL_REQUEST_BASE64", Locations: [{ Location: "YOUR_REGION" }], AdditionalEnvironmentVariables: { LOCAL_SAVE_FILE_PATH: "M:\\game\\save.txt", S3_SAVE_PATH: "s3://your-bucket/saves/player-123/save.txt", }, RoleArn: "arn:aws:iam::111122223333:role/GameLiftStreams-S3AccessRole", }); try { const response = await client.send(command); console.log("Stream session started:", response.Arn); } catch (error) { if (error.name === "AccessDeniedException") { console.error("Access denied. Verify your IAM role permissions:", error.message); } else if (error.name === "ResourceNotFoundException") { console.error("Resource not found. Check your stream group or application identifier:", error.message); } else { console.error("Failed to start stream session:", error.message); } }Clean up
To avoid ongoing charges, clean up the resources you created:
- Delete the stream group in the Amazon GameLift Streams console.
- Delete the Amazon GameLift Streams application.
- Remove the save files from your S3 bucket or delete the bucket if it was created for this example.
- Delete the IAM role (
GameLiftStreams-S3AccessRole) and its associated policy from the IAM console.Conclusion
In this post, you learned how to add persistent game saves to Amazon GameLift Streams using a dedicated IAM role and a lightweight launcher script with no game code changes required. Passing an IAM role to your stream instance also unlocks automation for player configurations and save data. Remember to always apply the least-privilege principle to your IAM roles and observe the IAM security best practices.
To learn more, visit the Amazon GameLift Streams documentation. If you have questions or feedback, leave a comment below or reach out through the AWS Game Tech forums.