AWS for Games Blog
Troubleshoot game session placement with Amazon GameLift Servers
When a game session placement fails or times out, players notice right away: they’re stuck waiting in a lobby, and many give up. On launch day, or after a regional capacity shift, that can happen to thousands of players at once. With Amazon GameLift Servers, a managed service for deploying, operating, and scaling dedicated game servers, game session queues have long reported the outcome of each placement (fulfilled, timed out, or failed). But troubleshooting meant working backward from that outcome. The queue’s reasoning wasn’t visible. You couldn’t tell which locations it considered, why it skipped the one closest to your players, or whether it was waiting on capacity or on a game server that was slow to start.
In this post, we introduce game session placement insights, which make that reasoning visible. We show how to turn insights on for an existing queue and then walk through three questions you can now answer with a single query: why placements time out, why a placement was slow, and why a placement landed where it did.
How game session placement insights work
In Amazon GameLift Servers, a game session queue places each new game session on the best available location across one or more fleets, weighing player latency, cost, and capacity. Game session placement insights are detailed logs that describe how the queue processes each placement request. You opt in per queue and choose where the logs go:
- Amazon CloudWatch Logs, the log storage and search feature of Amazon CloudWatch. It’s a straightforward place to start, and the examples in this post use it.
- Amazon Simple Storage Service (Amazon S3), object storage for low-cost, long-term retention and analysis.
- Amazon Data Firehose, which streams the logs to other analytics and observability tools.
The logs are delivered to your own account asynchronously after each placement finishes, so they don’t slow down or change the placement.
Each placement produces a short series of records that follow it from start to finish. The first captures the request, including the number of players and their latency to each Region. Next, the queue ranks the candidate fleet locations and notes the ones it ruled out, then records each attempt to create a game session and whether it worked. If the queue’s player latency limit relaxes while the placement waits, that change gets its own record. A final record shows the outcome: the placement’s status, where the game session landed, and how the time was spent.
For each location it considers, the queue records why it was or wasn’t used. For example, player latency was too high, the location was out of capacity, or a higher-priority location succeeded first. Each record also includes a plain-language summary, so you can often understand a placement just by reading its timeline. The examples that follow show the actual records and fields.
Prerequisites
To follow along, you need:
- An AWS account with an existing Amazon GameLift Servers game session queue that places onto at least one fleet.
- The AWS Command Line Interface (AWS CLI), configured for your account.
- Permission to configure log delivery. Amazon GameLift Servers sets up log delivery in your account using your credentials, so the role you use needs permissions for the following APIs for the resources used. The delete permissions are required to turn insights off cleanly and to let Amazon GameLift Servers roll back a setup that fails partway through, so grant them together. The last two permissions are for running Amazon CloudWatch Logs Insights queries.
Turn on insights for an existing queue
You can turn on insights for a queue that is already running, with no changes to your game servers or game client. To turn on insights for an existing queue, complete the following steps:
- Add a CloudWatch Logs destination to your queue. If you omit a destination Amazon Resource Name (ARN), Amazon GameLift Servers creates a log group named
gameliftservers/queueplacementfor you. - Confirm the configuration. The response includes the resolved destination ARN, which you need later to turn insights off.
The output looks similar to the following. The
DestinationArnis the log group that Amazon GameLift Servers created for you:
You can also set a log configuration when you create a queue and send logs to up to three destinations at once. New placements on the queue now produce insights. Each query in the following sections runs in CloudWatch Logs Insights, the interactive query feature of CloudWatch Logs, against the gameliftservers/queueplacement log group. Queues that use the default destination share this log group, so each query starts by filtering on the queue’s ARN. Replace my-game-queue with the name of your queue. The $ anchor keeps a queue named my-game-queue from also matching one named my-game-queue-2. Logs are delivered shortly after each placement ends and can take a minute or two to appear.
Why are my game session placements timing out?
Suppose players report long waits, and some placements hit the queue’s timeout. Start by finding the timed-out placements and how their time was spent:
In our test, a queue with a 45-second timeout returned a placement with a total time of 44,968 ms. Of that, 42,958 ms was spent waiting for capacity and 0 ms waiting for a game server to activate. To see why, list that placement’s game session creation attempts alongside its final outcome:
Replace <placement-id> with the placement ID from the previous query’s results.
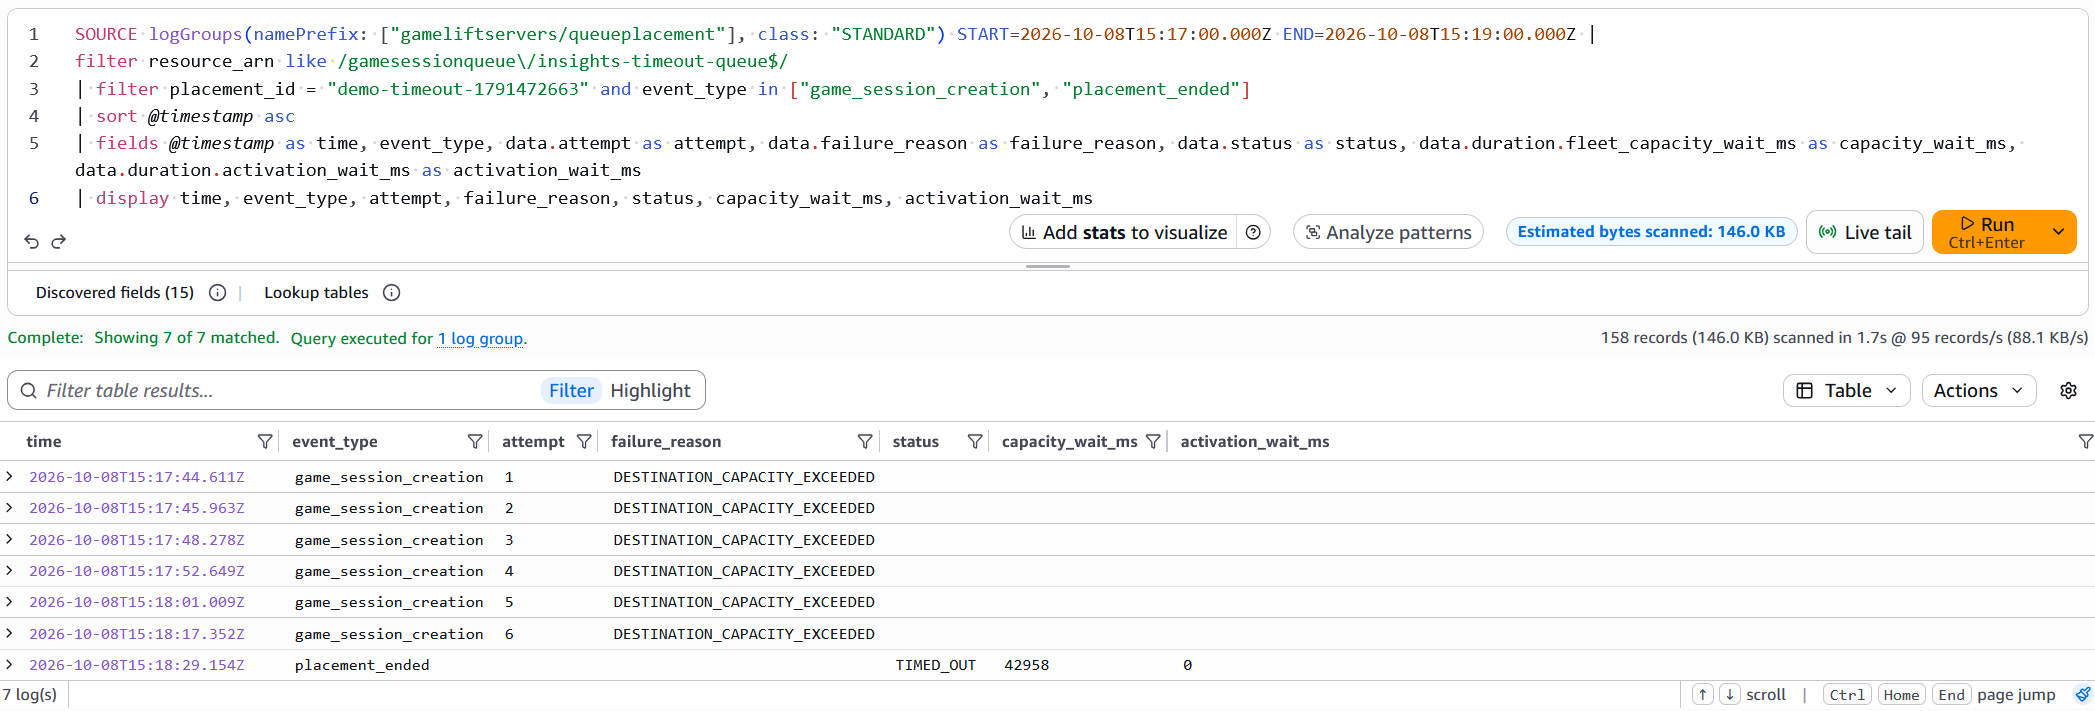
Figure 1: A timed-out placement. Each creation attempt failed for lack of capacity, and no measurable time was spent waiting for a server to activate.
The results show the queue trying its only destination six times, backing off between attempts, and failing each time with DESTINATION_CAPACITY_EXCEEDED. The fleet location was active, but it had no idle game server process available for the new game session. A game session can only be placed after an instance is running and a game server process on it has reported that it’s ready to host.
Here the wait was capacity, not activation. The remedy is to keep a larger buffer of idle game server processes, for example by raising the target for available game sessions in your target-based scaling policy. If activation_wait_ms had been the large number instead, the bottleneck would be your game server’s own startup. In that case, shorten the time between the process launching and it reporting ready to Amazon GameLift Servers, which is in your control.
Why was my game session placement slow?
Slow placements can frustrate players, and even successful placements can take 20 seconds or more. Find the slow ones by filtering fulfilled placements on their total time:
In our test, the queue had a fleet with locations in US East (N. Virginia) Region (us-east-1) and US West (Oregon) Region (us-west-2). Its player latency policy started strict and relaxed over time: a maximum of 50 ms for the first 20 seconds, then 100 ms. The player reported 40 ms to us-east-1 and 80 ms to us-west-2, but us-east-1 had no available game server processes. The query returned a placement that took 21,930 ms, with 18,324 ms of that spent waiting for capacity. To see what happened, list the placement’s latency policy changes and creation attempts:
Replace <placement-id> with the placement ID from the previous query’s results.
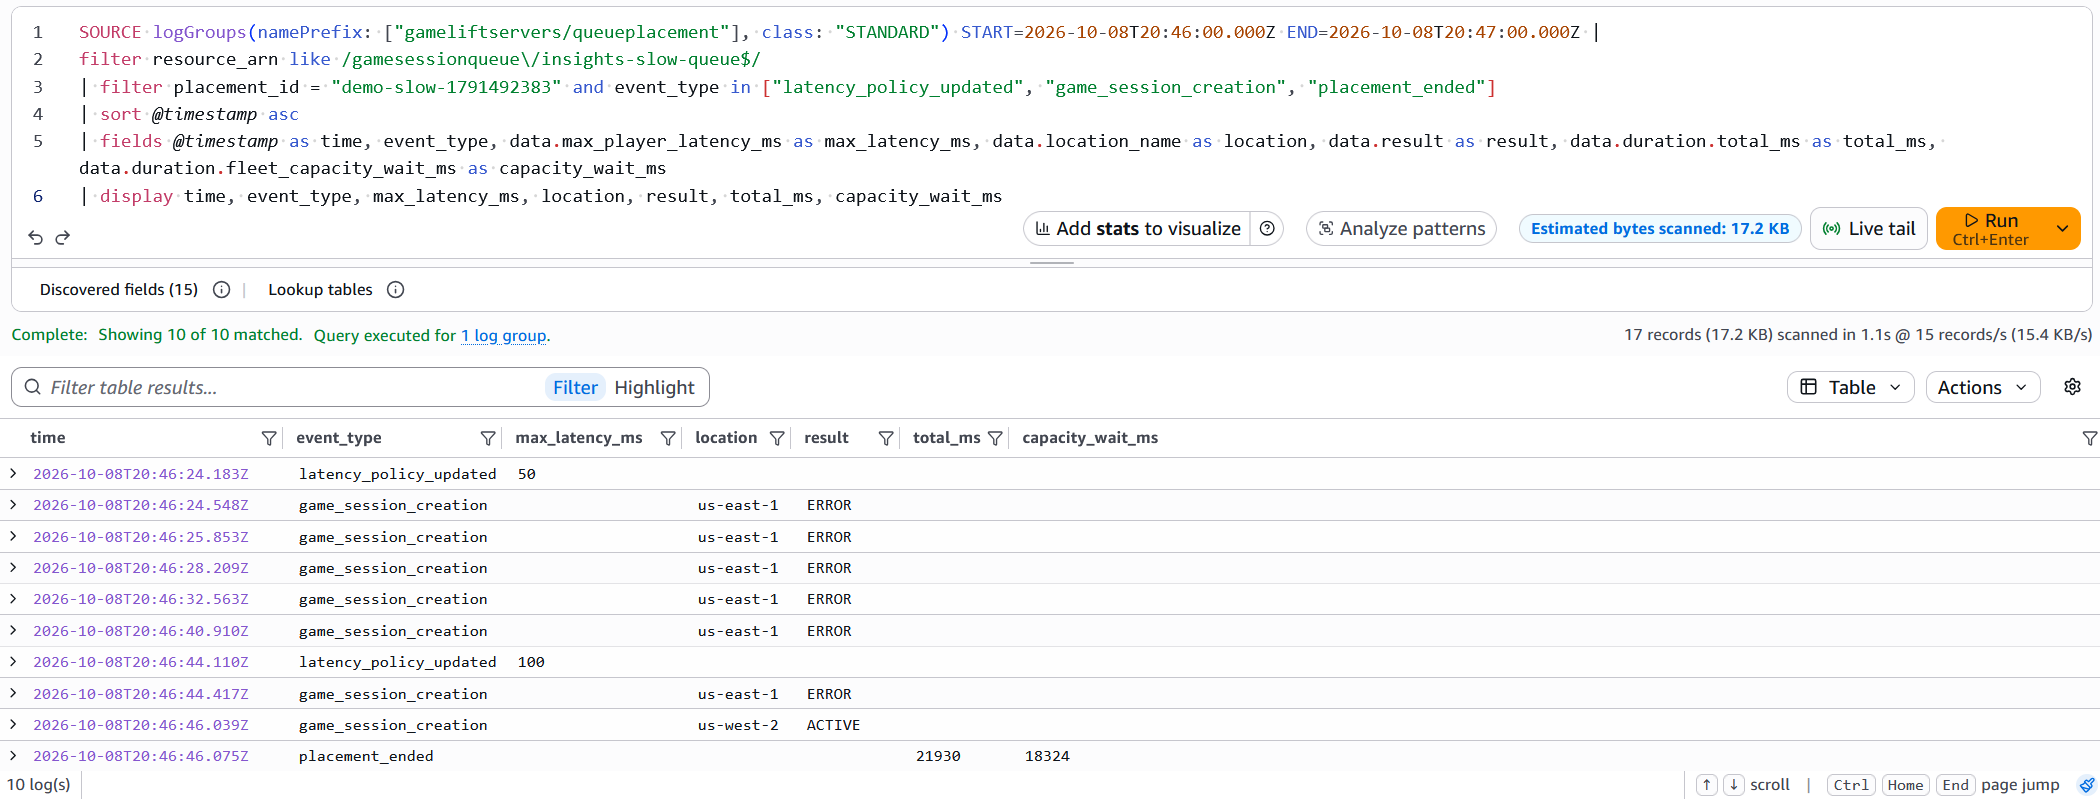
Figure 2: A slow placement. The queue held out for the lowest-latency location until its latency policy relaxed 20 seconds in, then placed the game session in us-west-2.
For the first 20 seconds, the strict 50 ms policy left us-east-1 as the only acceptable location, and each of the five attempts there failed for lack of capacity. At exactly 20 seconds, the queue relaxed the policy to 100 ms, which let us-west-2 through. After one more attempt in us-east-1, the queue placed the game session in us-west-2.
Your players waited 20 seconds because the queue held out for the lowest-latency location, and that location had no capacity. You have two levers. If the closer location matters, keep more idle game server processes there. If 80 ms is an acceptable experience for your game, shorten the duration of the strict policy so the queue widens its search sooner.
Why did my game session placement land there?
Sometimes a placement succeeds quickly but lands somewhere you didn’t expect. In this test, the queue used a single player latency policy of 100 ms over the same fleet, and the player reported 40 ms to us-east-1 and 250 ms to us-west-2. To see what the queue considered and where the game session landed, compare the player’s reported latencies, the evaluation, and the outcome:
Replace <placement-id> with the ID of the placement you’re investigating.
Region names contain hyphens, so wrap any field path that includes one in backticks, as shown for the regional latencies.
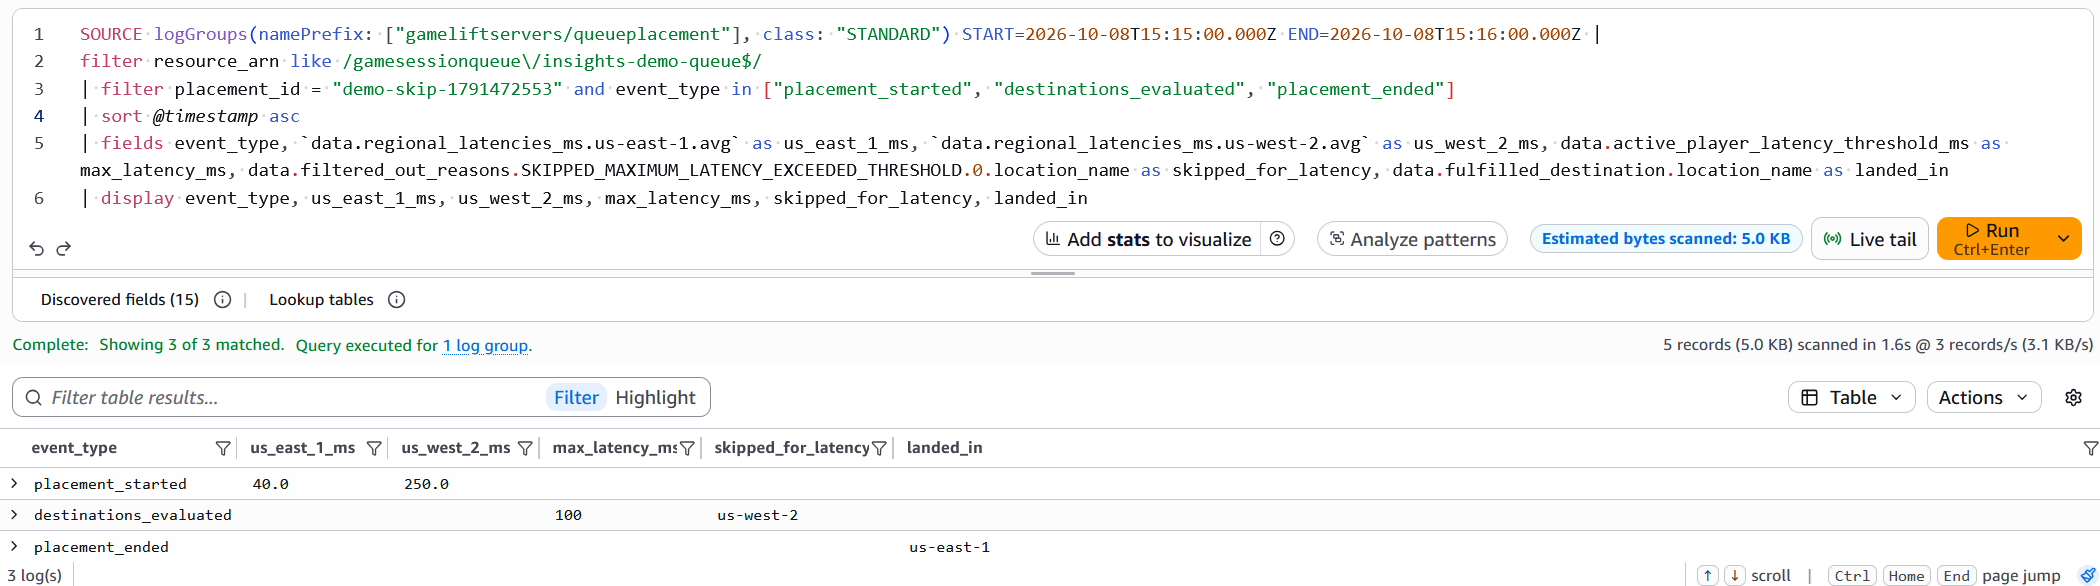
Figure 3: Why a placement landed in us-east-1. The player’s latency to us-west-2 exceeded the queue’s 100 ms limit, so the queue skipped that location.
The player’s 250 ms to us-west-2 exceeded the 100 ms policy, so the queue filtered that location out and placed the game session in us-east-1. If one location is taking far more or far fewer placements than you expect, records like these show you why. To see where your placements land across the whole queue, count them by location:
The same approach explains other outcomes, each with its own viability_reason: a Spot location skipped because its viability rating was too low (SKIPPED_SPOT_INSTANCE_VIABILITY_BELOW_THRESHOLD), a location skipped after repeated recent failures (SKIPPED_RECENTLY_NOT_AVAILABLE), or a location left out of a request-level location override (DESTINATION_NOT_IN_PRIORITY_CONFIGURATION_OVERRIDE_LOCATION_ORDER). For the full list, see Event data fields in the Amazon GameLift Servers Developer Guide.
Pair insights with queue metrics
Amazon GameLift Servers already publishes queue metrics to CloudWatch. These metrics are the right place to set alarms, because they tell you quickly and cheaply that something has changed. Insights tell you why. When an alarm fires, run the matching queries from this post for the alarm’s time window:
PlacementsTimedOutorPlacementsFailedis rising: follow the steps in Why are my game session placements timing out? For failed placements, filter on a status ofFAILEDinstead ofTIMED_OUT.AverageWaitTimeorQueueDepthis rising while placements still succeed: follow the steps in Why was my game session placement slow?LowestLatencyPlacementis dropping, orFirstChoiceOutOfCapacityis rising: placements are landing somewhere other than your players’ best location. Follow the steps in Why did my game session placement land there?
Clean up
If you turned on insights only to investigate an issue, remove the log destination. Use the destination ARN returned by describe-game-session-queues:
Removing a destination requires the logs:DeleteDelivery, logs:DeleteDeliveryDestination, and logs:DeleteDeliverySource permissions from the prerequisites. Without them, the call can still succeed but leave the delivery resources behind in your account. Removing the destination stops delivery, but the log group and its logs remain. Delete the log group, or set a retention period, to avoid ongoing storage charges. If you created fleets or queues to follow along, delete those too.
Conclusion
In this post, we showed how to turn on game session placement insights for an existing Amazon GameLift Servers queue. We also showed how one CloudWatch Logs Insights query can explain a timed-out, slow, or unexpectedly placed game session that you’d otherwise need to reason backward from. Together with the queue metrics you already have in CloudWatch, insights take you from knowing that something is wrong to knowing why.
Because the logs are structured and delivered to your own account, you can also route them to Amazon S3 for long-term analysis with Amazon Athena, or stream them through Firehose to your existing observability tools.
To get started, see Game session placement insights in the Amazon GameLift Servers Developer Guide. Contact an AWS Representative to learn how we can help your game scale. If you have questions or feedback, leave a comment.