Microsoft Workloads on AWS
Add Microsoft Office to an existing image using EC2 Image Builder
If you want to use software available from the AWS Marketplace, it can be challenging to use multiple software offerings on a single server because each offering is specific to a different Amazon Machine Image (AMI).
For example, if your users needed Microsoft Office and Visual Studio, it would require two different Amazon Elastic Compute Cloud (Amazon EC2) instances: one created from the Microsoft Office AMI and one created from the Visual Studio AMI. This can double the infrastructure costs and operational overhead, while also creating a poor user experience having to switch between instances.
In this blog, we’ll show you how to address this problem by using EC2 Image Builder to add Microsoft Office to an existing image. This solution can be used to combine multiple AWS Marketplace offerings onto the same AMI or to add AWS Marketplace software to an existing server instead of having to use the AWS Marketplace AMIs as a starting point.
Introduction
EC2 Image Builder is a fully managed service that simplifies customization, testing, distribution, and lifecycle management of AMIs and container images. You own the customized images that Image Builder creates in your account and can configure pipelines to automate updates and system patching for the images that you own.
EC2 Image Builder has integration with AWS Marketplace, allowing you to see supported products you’ve subscribed to as additional build components. User-based subscription licenses are available for Microsoft Office and Microsoft Visual Studio through integration between AWS Marketplace and AWS License Manager. These AWS Marketplace build components can be added to your existing pipelines and/or mixed with other build components.
While this blog focuses primarily on Microsoft Office, the same process can be used for other AWS Marketplace offerings.
Prerequisites
- Follow the License Manager getting started guide to set up all required permissions if you are on-boarding for the first time.
- If you are using Microsoft Office or Visual Studio products where AWS Managed Microsoft Active Directory is needed, then verify its running in your AWS account or shared with your account where you want to create/deploy images.
- Verify that you have a subnet with auto-assign public IPv4 address enabled.
- Verify you have active AWS Marketplace subscriptions to user-based products with their associated prerequisites:
(Option 1) Add Microsoft Office to an existing EC2 instance
To add Microsoft Office to an existing instance, we will first create an AMI from the existing server. Then we will use EC2 Image Builder to create a pipeline to add the build component for Microsoft Office to the new AMI. Running the pipeline will add Microsoft Office and specify an output image.
If you create an AMI for an existing server and turn it on inside your network, it will create a conflict by having two identical servers with the same hostname and security ID (SID) online at the same time. You can use Sysprep to generalize an image by removing the unique identifiers, making it ideal for creating a golden image. While using Sysprep isn’t mandatory, please be aware that EC2 Image Builder will bring AMIs online inside your VPC to add build components. This could cause conflicts for servers which haven’t been through the Sysprep process.
Create an AMI
- Browse to the EC2 console.
- Select your server, then select Actions, then Images and templates, then Create image.
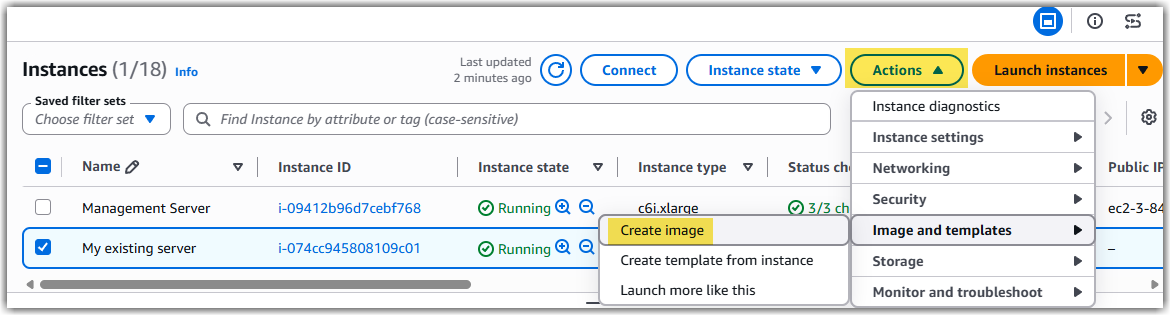 Figure 1: Creating an AMI within the AWS EC2 console.
 - Add an image name, adjust volume size as needed, then select Create image.
- In the navigation pane, select AMIs.
- Select Owned by me from the drop down, then search for the AMI you created.
- Copy the AMI ID, it will be used in the next section.
- Select EC2 Image Builder in the top right to open a window.
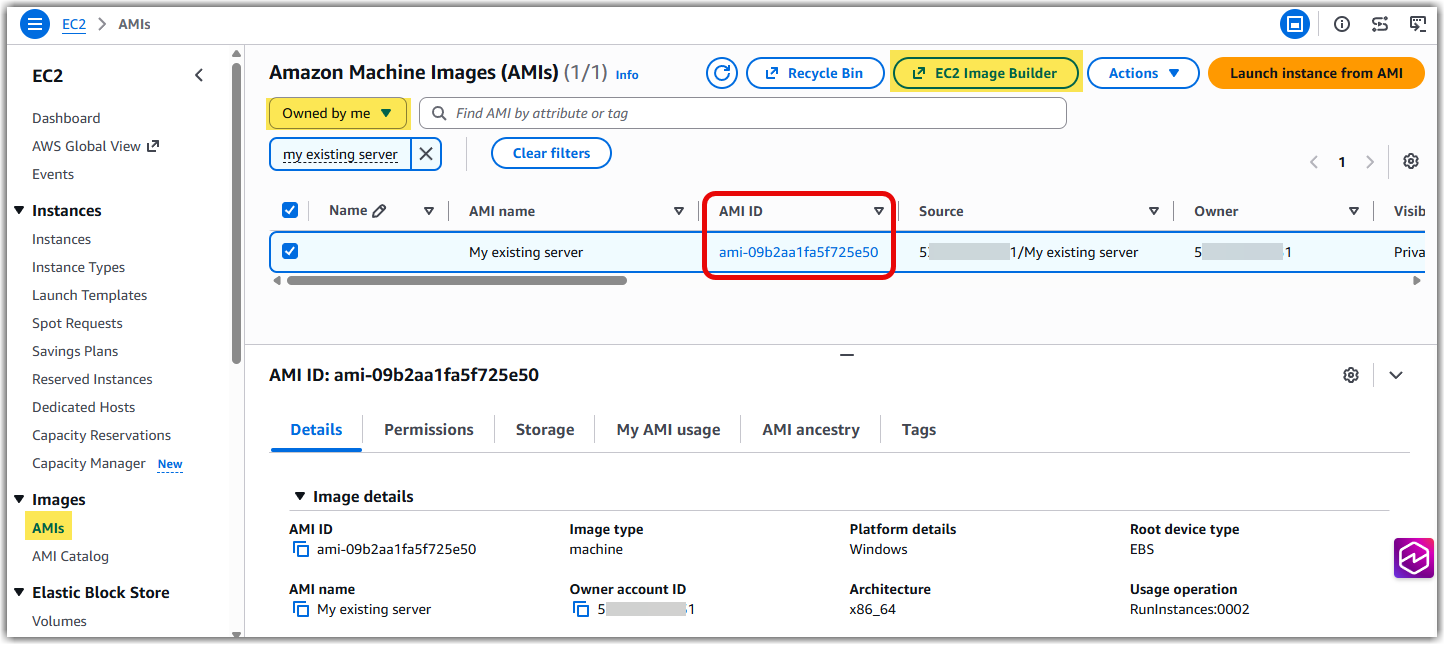 Figure 2: Finding the AMI ID
Create an EC2 Image pipeline
- Select Create image pipeline
- Add a pipeline name
- In the Build schedule section, choose a schedule which works best for you or choose Manual if you want to start the pipeline manually, then select Next.
- Under the Recipe configuration section, Create new recipe.
- In the Recipe details section, add a name.
- In the Base image section, select Use custom AMI. For the AMI Source, select AMI ID, then paste the ID copied from the previous step.
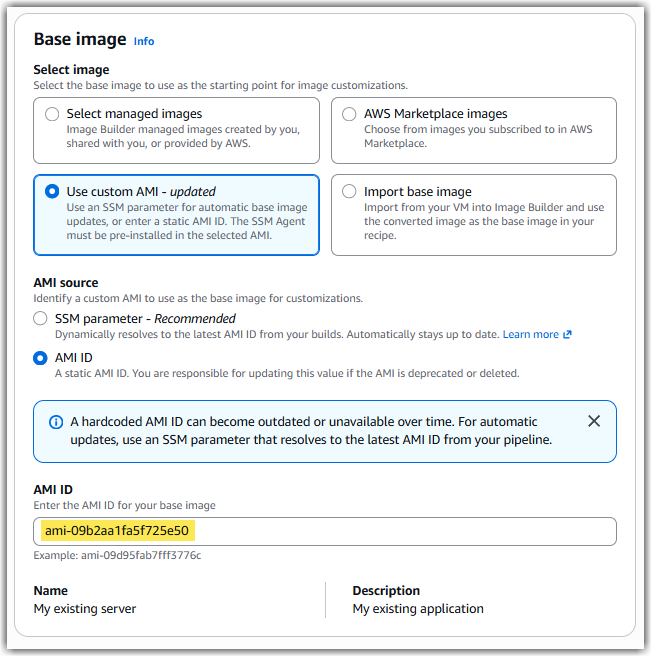 Figure 3: Using a custom AMI for the base image
 - Scroll down to the Components section.
- Select Add build components, then
A. Select AWS Marketplace.
B. Search for “Office”
C. Select either Microsoft Office LTSC Professional Plus or Microsoft Office LTSC Standard
D. Select Add to recipe.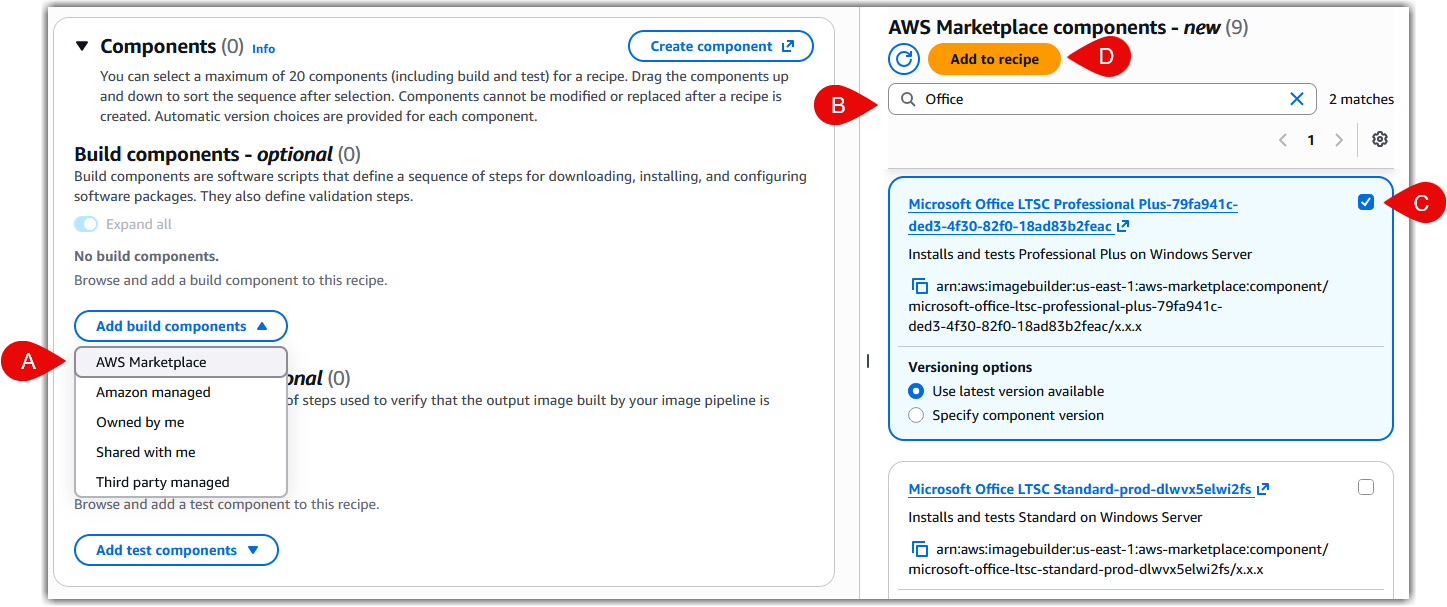 Figure 4: Adding the Microsoft Office build component
 - By default, the latest 64-bit version of Office 2024 will be selected. If you need to use a different version, you can input those attributes in the Value column to specify 32- or 64-bit architecture, or the Office version by year (2021 or 2024).
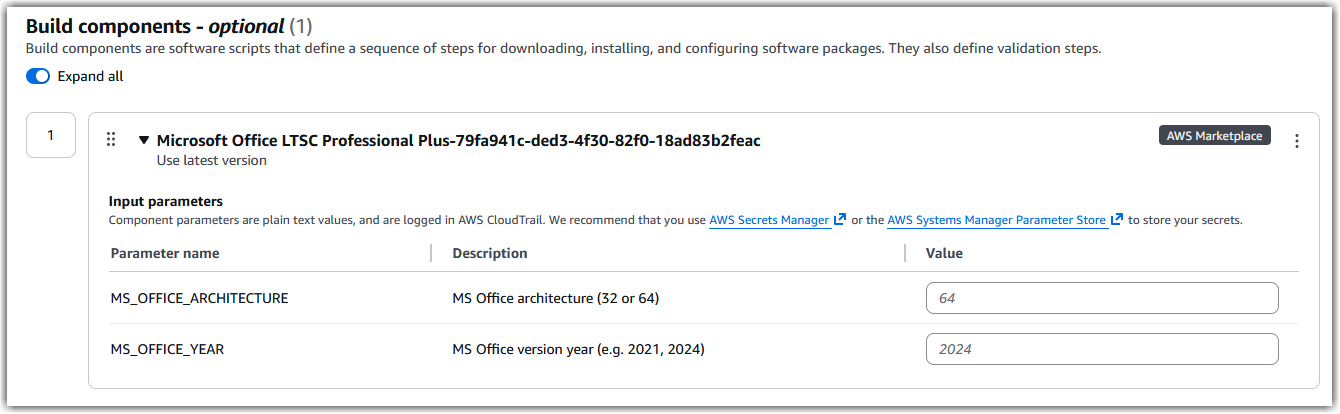 Figure 5: Specifying the Microsoft Office version parameters
 - If you would like to add more build components, they can be added to the pipeline now.
- Scroll down to the Storage (volumes) section. Increase the default for EBS volume size to 100 GB or greater. If the default volume size is too small, the software installation might not have enough free space, causing the pipeline to fail.
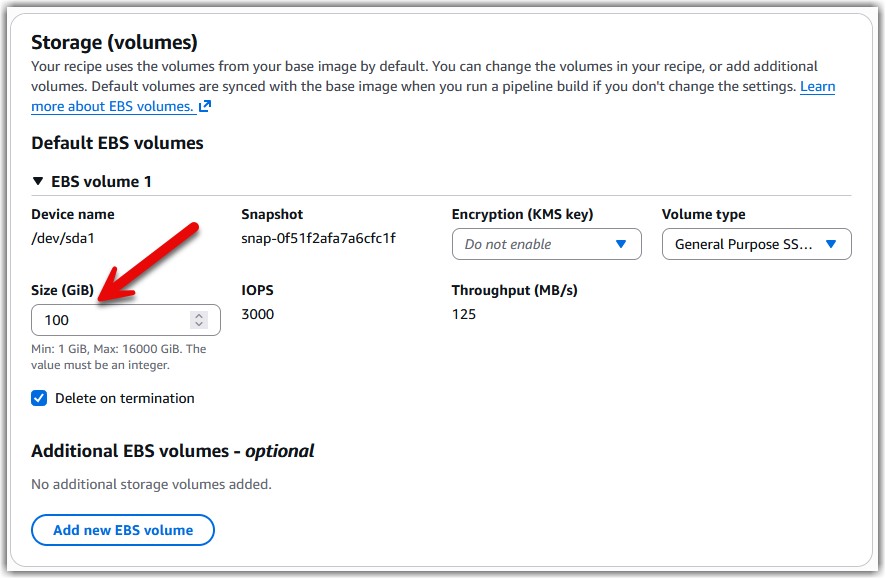 Figure 6: Increase the EBS volume size to 100 GiB
 - If you’re ready to proceed, select Next until you get to Define Infrastructure Configuration.
Create an infrastructure configuration
This configuration is necessary for automation to bring the server online in a VPC to add the Office components.
Recommendation: We recommend running Sysprep before creating the AMI. If you didn’t run Sysprep, launch the new server in a VPC or subnet that’s isolated from your network. Otherwise, if the original server is still online, the two could conflict with each other or with Active Directory.
- Select Create a new infrastructure configuration, then give it a meaningful name.
- For the IAM role, select EC2InstanceProfileForImageBuilder.
- In the AWS infrastructure section, don’t select an instance type. The service default prevents conflicts that could fail the pipeline. It’s only used temporarily to add components while bringing the server online, not the instance type you’ll use to run your application.
- Expand VPC, subnet and security groups. Choose a VPC and a subnet which has auto-assign public IPv4 address enabled from the drop-down lists. For the Security groups, specify a security group which has full outbound access.
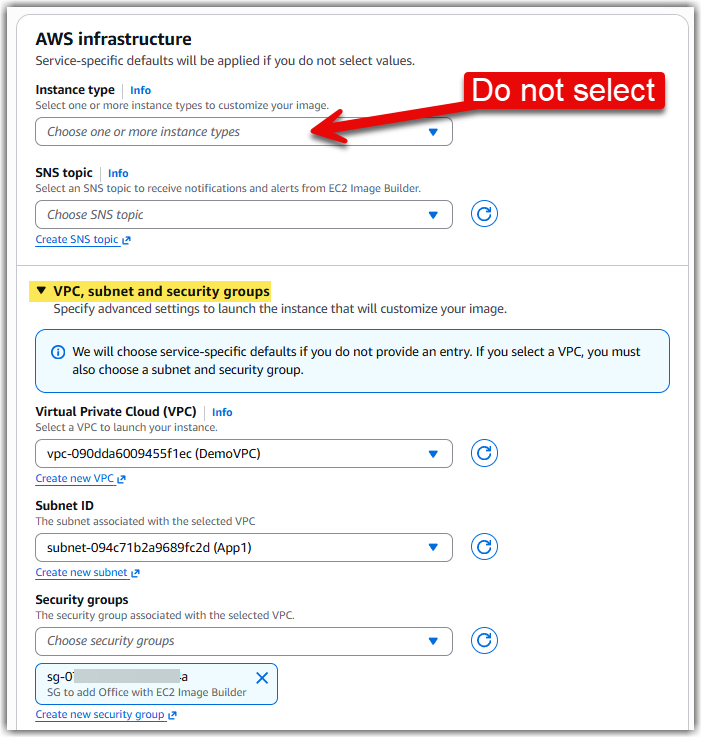 Figure 7: Specifying the VPC settings in the Infrastructure Configuration
 - Continue to select Next on each page, then select Create pipeline.
Run the EC2 Image pipeline
- From the EC2 Image Builder console select Image pipelines from the navigation pane.
- Select the pipeline you created by clicking the link of the Pipeline name.
- From the Actions drop down menu, select Run pipeline.
- The Output images tab will show the status changes from Building -> Testing -> Available. If you select the link under the Log stream column, it will open a new window to CloudWatch where you can see the process in greater detail.
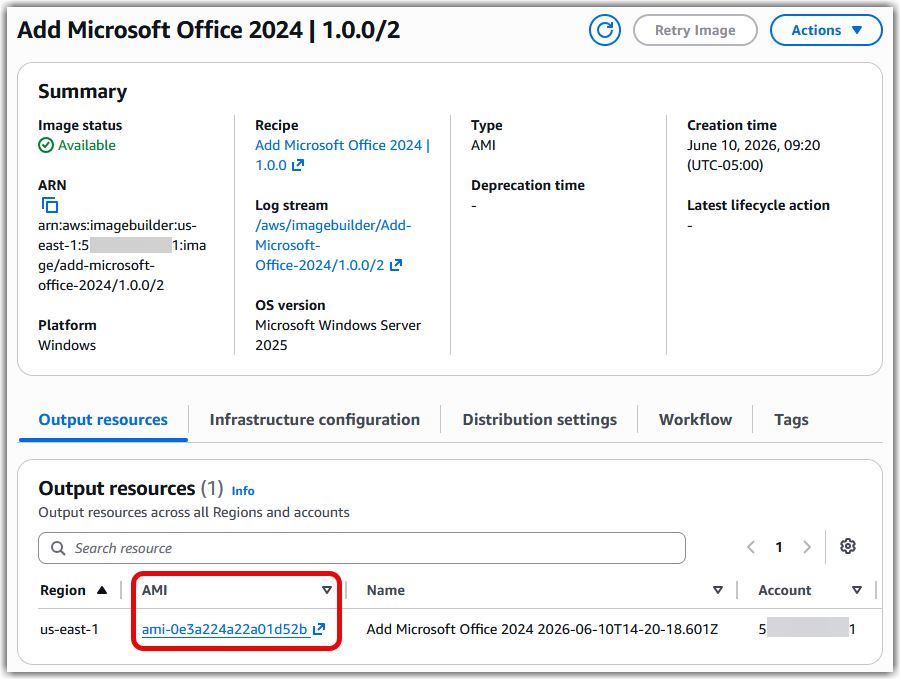
Figure 8: Finding the AMI ID in the Output resources
Once the status changes to Available (timing may vary; it approximately takes 30 minutes), select the link under the Version column. This will open a new window to get more information on the AMI created from the pipeline. You can use this AMI ID to create a new EC2 instance containing Microsoft Office from your existing image.
(Option 2) Combine Microsoft Office and Visual Studio on the same server
This process does not use your existing AMI. Instead, it will add Microsoft Office to the Visual Studio base image using EC2 Image Builder pipelines.
Create an EC2 Image pipeline
- Browse to the EC2 Image Builder console.
- Select Create image pipeline.
- Add a pipeline name.
- In the Build schedule section, select Manual, then select Next.
- Under the Recipe configuration section, select Create new recipe.
- In the Recipe details section, add a name.
- In the Build image section, select AWS Marketplace images, then select Visual Studio.
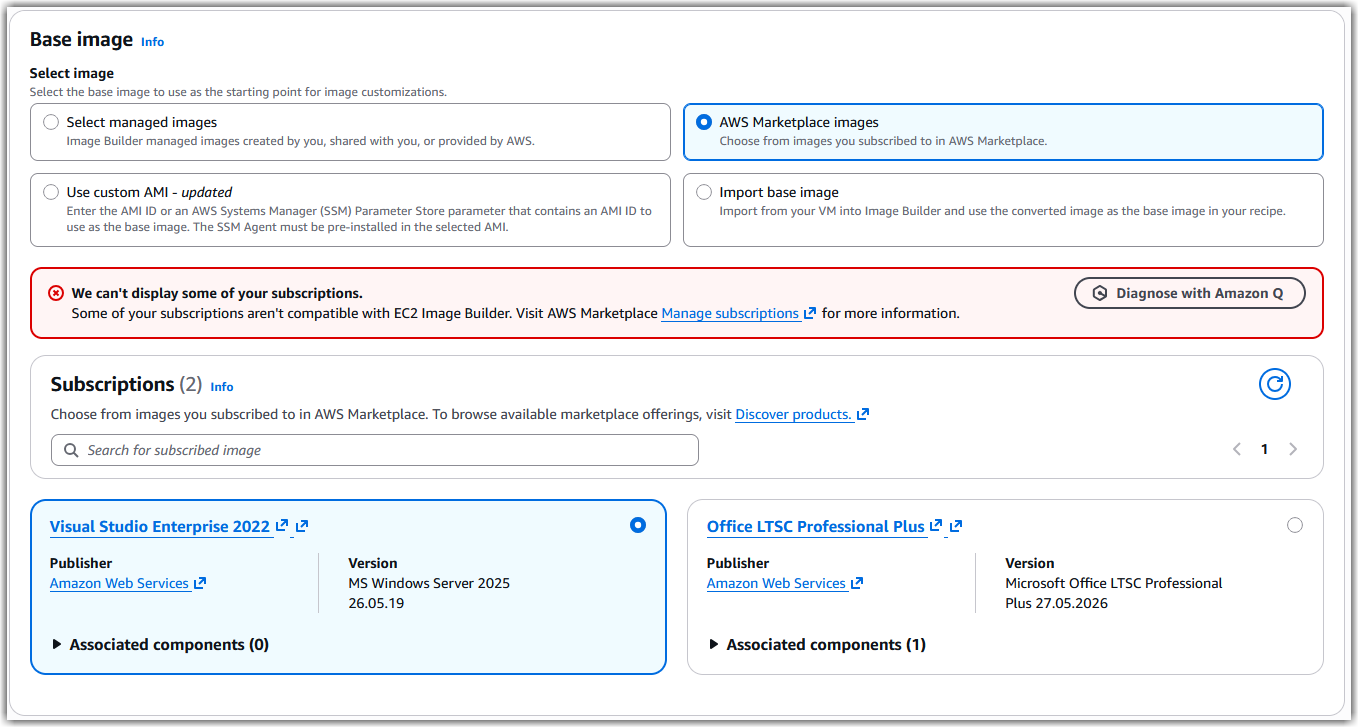 Figure 9: Selecting the Visual Studio Enterprise 2022 base image
 - Scroll down to the Components section.
- Select Add build components, then select AWS Marketplace.
- Search for “Office”, then select either Microsoft Office LTSC Professional Plus or Microsoft Office LTSC Standard, then select Add to recipe.
- By default, the latest 64-bit version of Office 2024 will be selected. If you need to use a different version, you can input those attributes in the Value column to specify 32- or 64-bit architecture, or the Office version by year.
- Select Next until you get to Define Infrastructure Configuration.
Continue following steps in sections Create an infrastructure configuration and Run the EC2 Image pipeline listed above to configure the remainder of the EC2 image pipeline and create the AMI.
Rollback
If you want to revert configuration changes created in these processes, these steps will remove the image pipelines and infrastructure configurations from EC2 Image Builder. Removing these settings will not delete any images created from the pipelines.
Remove image pipelines
- Browse to the EC2 Image Builder console.
- From the navigation pane, select Image pipelines.
- Select the pipeline created previously in Create an EC2 Image Pipeline.
- Select the Actions drop down button, then select Delete pipeline and follow the directions in the pop-up window to confirm.
Remove infrastructure configurations
- Browse to the EC2 Image Builder console.
- From the navigation pane, select Infrastructure configurations.
- Select the configuration created previously in Create an infrastructure configuration.
- Select Delete, then follow the directions in the pop-up window to confirm.
Conclusion
In this blog post, we have reviewed how EC2 Image Builder’s integration with AWS Marketplace allows you to add subscription products onto Amazon Machine Images to simplify adding Marketplace software to your existing instances and remove duplicate infrastructure costs. To get started, visit the AWS Marketplace page.