Microsoft Workloads on AWS
Containerize SQL Server on AWS to reduce licensing costs and simplify operations
This blog post shows you how to containerize Microsoft SQL Server databases using Linux containers on Amazon Web Services (AWS), reducing Windows and database licensing costs while maintaining the same performance and compatibility you rely on today.
Introduction
You can reduce licensing costs and simplify database operations by containerizing SQL Server on AWS. If you are running SQL Server on traditional Windows Server infrastructure today, you are paying for two layers of licensing on every host: the Windows Server operating system license and the SQL Server database license. Both add up quickly, especially as you scale. Here’s a breakdown:
Windows Server license overhead — Every server running Windows carries an OS license cost, regardless of whether your database workload needs the full Windows operating system capabilities.
SQL Server license overhead — Under the Per Core licensing model, when running SQL Server in a physical operating system environment (OSE), all physical cores on the server must be licensed, with a minimum of four core licenses per physical processor. Core licenses are sold in two-core packs. This means if you run SQL Server on a 16-core server, but your workload only needs 4 cores; you still pay for all 16 cores of SQL Server licenses. These expensive over-provisioning compounds across your fleet.
Containerization addresses both cost layers simultaneously. You run SQL Server in Linux containers on Amazon Elastic Kubernetes Service (Amazon EKS). This gives you two licensing advantages:
- Eliminate the Windows Server license — Linux-based container hosts have no Windows OS license requirement, immediately lowering infrastructure cost.
- License only the virtual cores allocated to the container — The SQL Server 2022 Licensing Guide specifies that when licensing individual containers under the Per Core model, you purchase a core license only for each virtual core (v-core) allocated to the container. A four-core minimum applies per container. On a 16-core host running a container with 4 allocated v-cores, you license 4 cores instead of 16. According to the SQL Server 2022 Licensing Guide, this configuration can reduce SQL Server licensing costs for this workload by up to 75% under the Bring Your Own License (BYOL) model. Actual savings vary depending on your existing license agreements, core counts, and Software Assurance status.
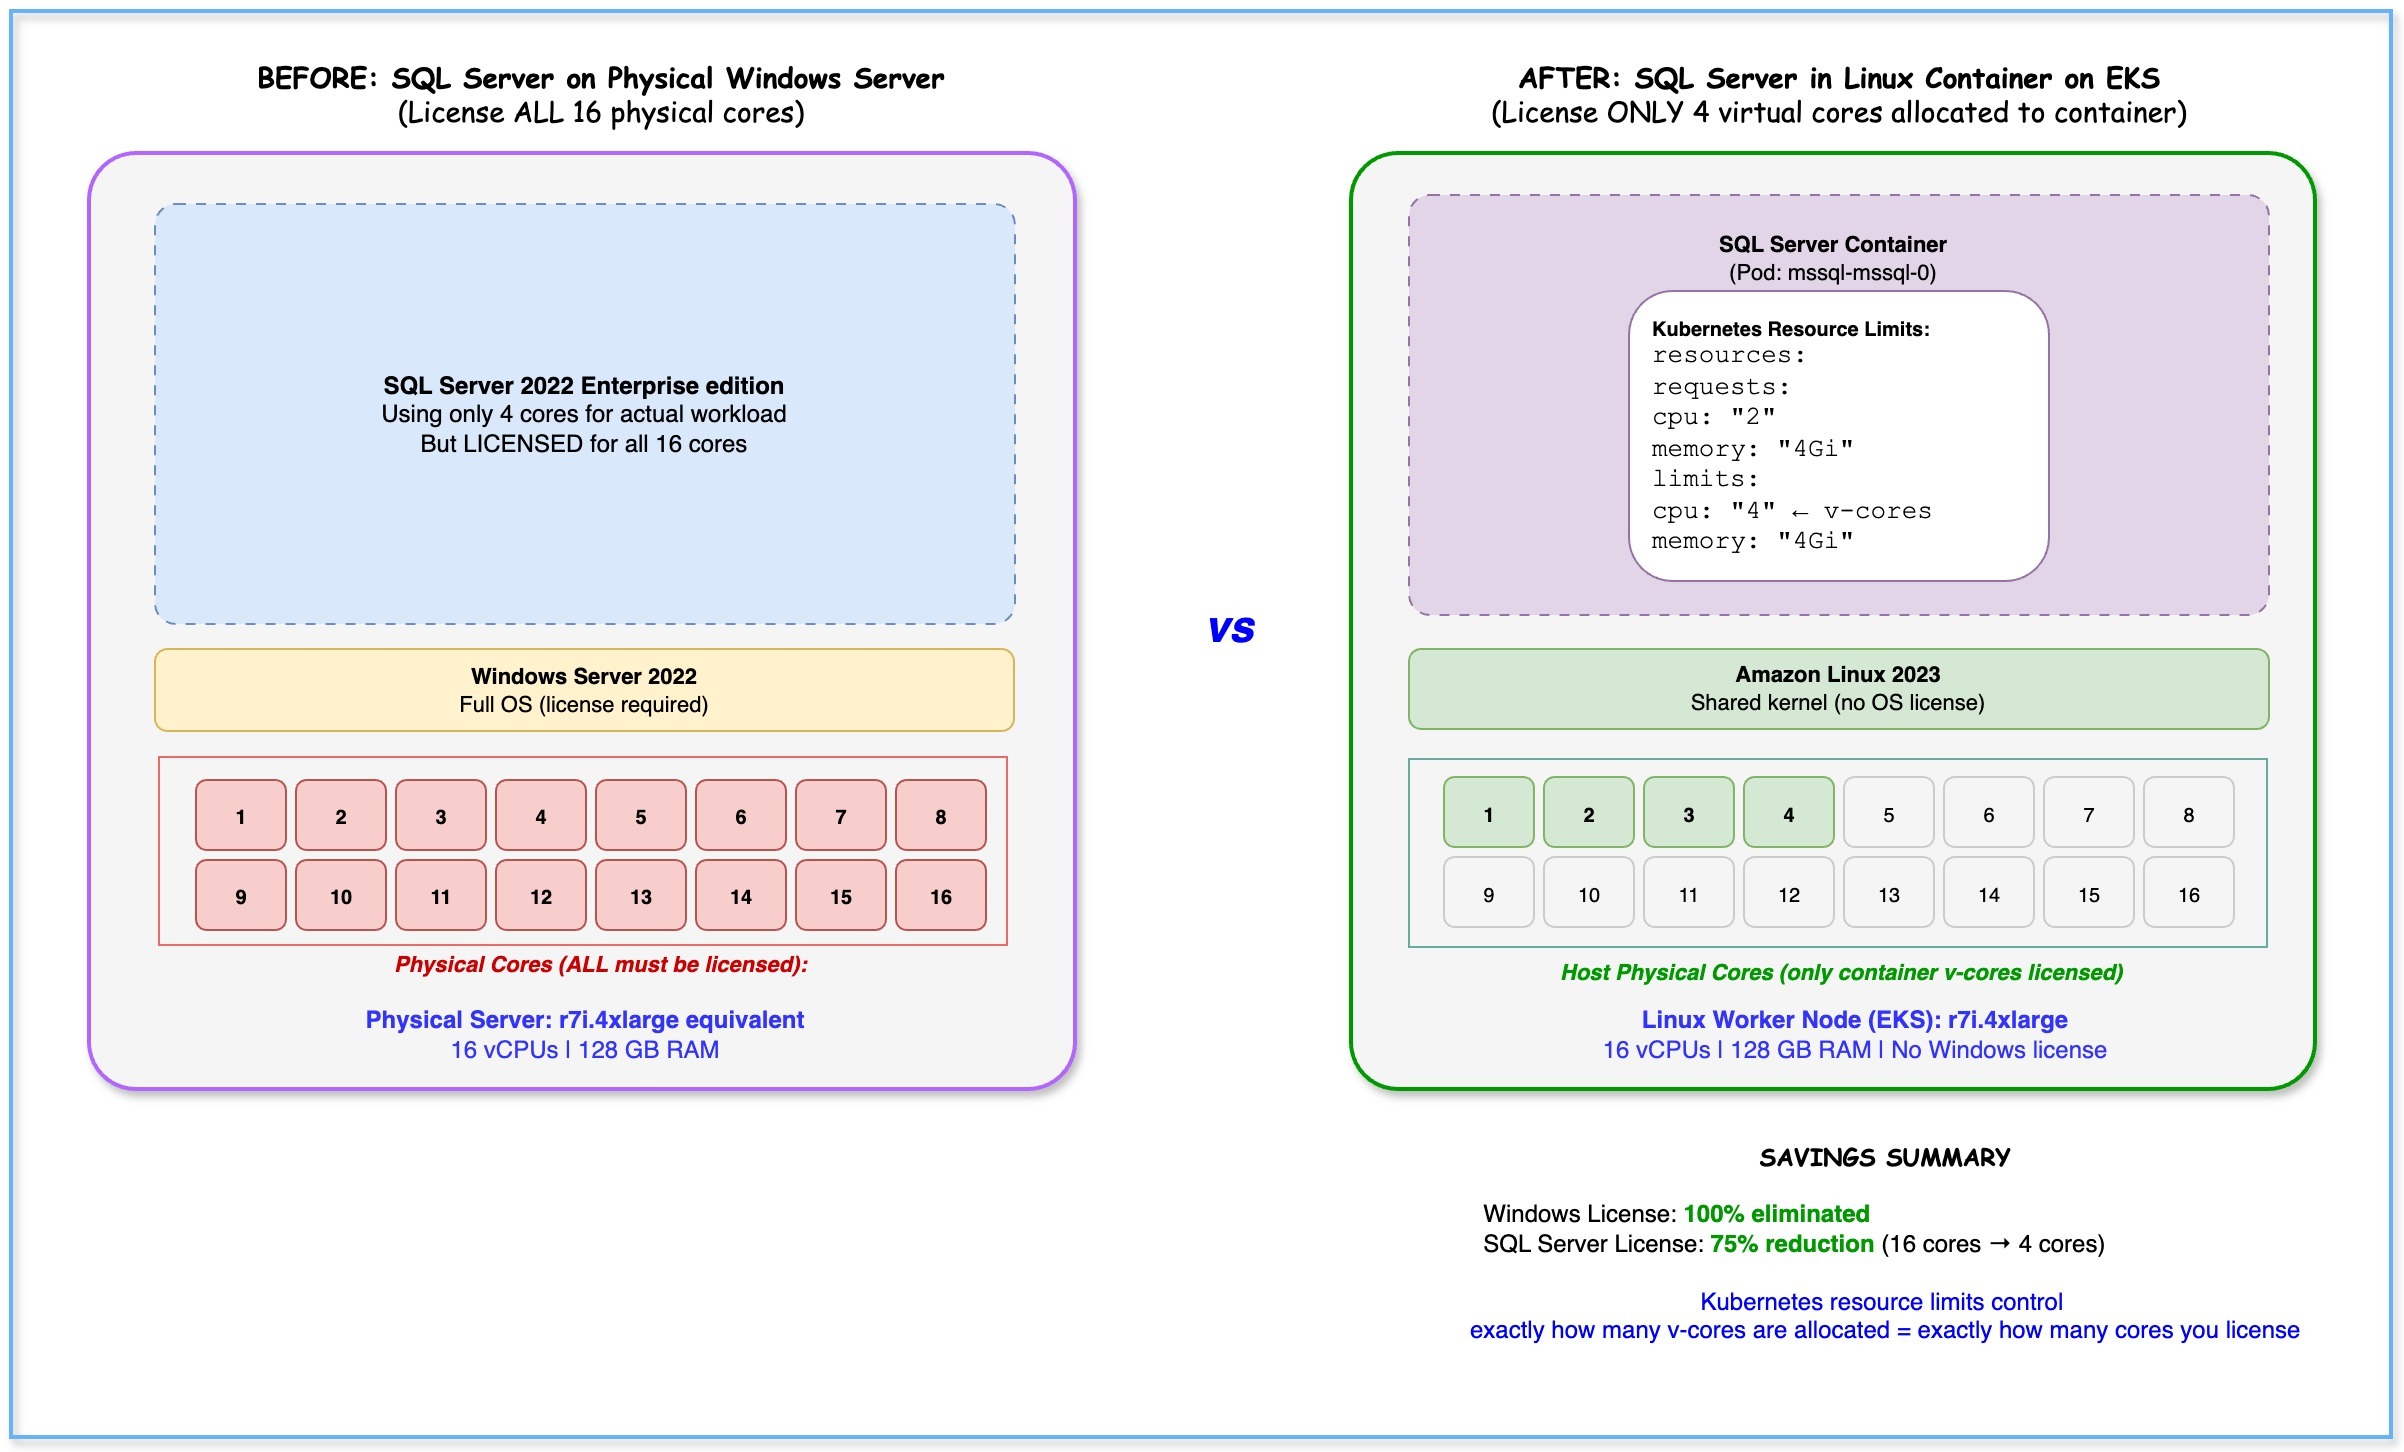
Figure 1: Example Microsoft licensing optimization based on typical enterprise deployment patterns.
For high-density deployments, the licensing guide provides further optimization paths:
- Enterprise edition with Software Assurance (SA) — Purchase core licenses for the physical cores on the server and run an unlimited number of containers, allowing maximum consolidation without incremental license cost per container.
- Standard or Enterprise edition with SA — Cover the virtual cores on a virtual OSE to run containers within that virtual OSE, regardless of the cores allocated to each individual container.
Consider two changes: removing the Windows Server license and right-sizing SQL Server core licenses through containerization. Their combined effect can reduce total licensing and compute costs by 40–60% under the Bring Your Own License (BYOL) model, depending on workload density and edition choice. These figures are based on the licensing math described above and typical enterprise deployment patterns. (Figure 1 – Example)
Now, Let’s walk you through the operational benefits of containerization beyond cost savings, the architecture and deployment of SQL Server on Amazon EKS, and the best practices for running containerized databases in production.
Solution overview
With this solution, you can deploy SQL Server 2022 as a Linux container on Amazon EKS, packaged as a Helm chart for repeatable deployments with persistent storage, secret management, network policies, and health monitoring (Figure 2). The SQL Server pod runs on Linux-based worker nodes managed by EKS. Amazon Elastic Block Store (Amazon EBS) provides persistent gp3 volumes for database data, transaction logs, and backups.
The solution stores credentials securely in AWS Secrets Manager and injects them into the pod at runtime. It uses the Secrets Store CSI Driver with AWS Identity and Access Management (IAM) Roles for Service Accounts (IRSA) for least-privilege access. A Network Load Balancer (NLB) managed by the AWS Load Balancer Controller exposes SQL Server on port 1433. It provides connectivity from applications in other Amazon VPCs, on-premises networks, or AWS services like AWS Database Migration Service (AWS DMS).
With the Helm chart in this solution, you can implement several SQL Server best practices recommended by Microsoft for production container deployments:
- Storage Separation (same as standalone install):
-
- Data files (/var/opt/mssql/data) — separate volume
- Transaction logs (/var/opt/mssql/log) — separate volume
- Backups (/var/opt/mssql/backup) — separate volume
- In a standard install, you’d use separate physical disks. In containers, separate PVCs with gp3 EBS give the same I/O isolation.
2. SQL Configuration
-
- Memorylimitmb = 3072— explicitly cap SQL Server memory usage, same as setting Max Server Memory in SSMS. Prevents SQL from consuming all available RAM and starving other processes.
- TLS/Encryption
forceencryption = 1— all connections encrypted, same as enabling “Force Encryption” in SQL Server Configuration Manager
tlsprotocols = 1.2— disables older TLS versions (same as disabling TLS 1.0/1.1 via registry on Windows)
-
- SQL Agent
enabled = true— same as enabling SQL Server Agent service on Windows for scheduled jobs, maintenance plans – Security (equivalent to Windows hardening)
3. Security:
-
- Non-root user (UID 10001) — same as running SQL service under a low-privilege service account on Windows
- NetworkPolicy restricts port 1433 — same as Windows Firewall rules
- Secrets in AWS Secrets Manager — same as using a password vault instead of plain text config files
The deployment uses the following Kubernetes resources:
- StatefulSet — Deploys SQL Server with stable pod identity and ordered startup/shutdown, verifying persistent storage is re-attached on restarts.
- Headless Service (ClusterIP: None) — Provides stable DNS-based pod discovery within the cluster.
- LoadBalancer Service — Provisions the external NLB for SQL Server access on port 1433.
- PersistentVolumeClaims (PVCs) — Three separate claims for data, transaction log, and backup volumes, dynamically provisioned via the StorageClass.
- StorageClass — Defines EBS gp3 volume parameters (IOPS, throughput, encryption) with Retain reclaim policy and WaitForFirstConsumer binding.
- ConfigMap — Supplies the SQL Server configuration file (mssql.conf) with settings like TLS protocols, trace flags, and memory limits.
- SecretProviderClass — Defines how the Secrets Store CSI Driver fetches the SA password from AWS Secrets Manager and mounts it as a file.
- ServiceAccount — Annotated with the IRSA role ARN, granting the pod scoped IAM permissions to access Secrets Manager.
- NetworkPolicy — Restricts ingress to the SQL Server pod on port 1433, allowing only namespaces with the label access-mssql=true.
- PodDisruptionBudget (PDB) — Helps maintain at least one replica available during voluntary disruptions like node drains or upgrades.
Architecture:
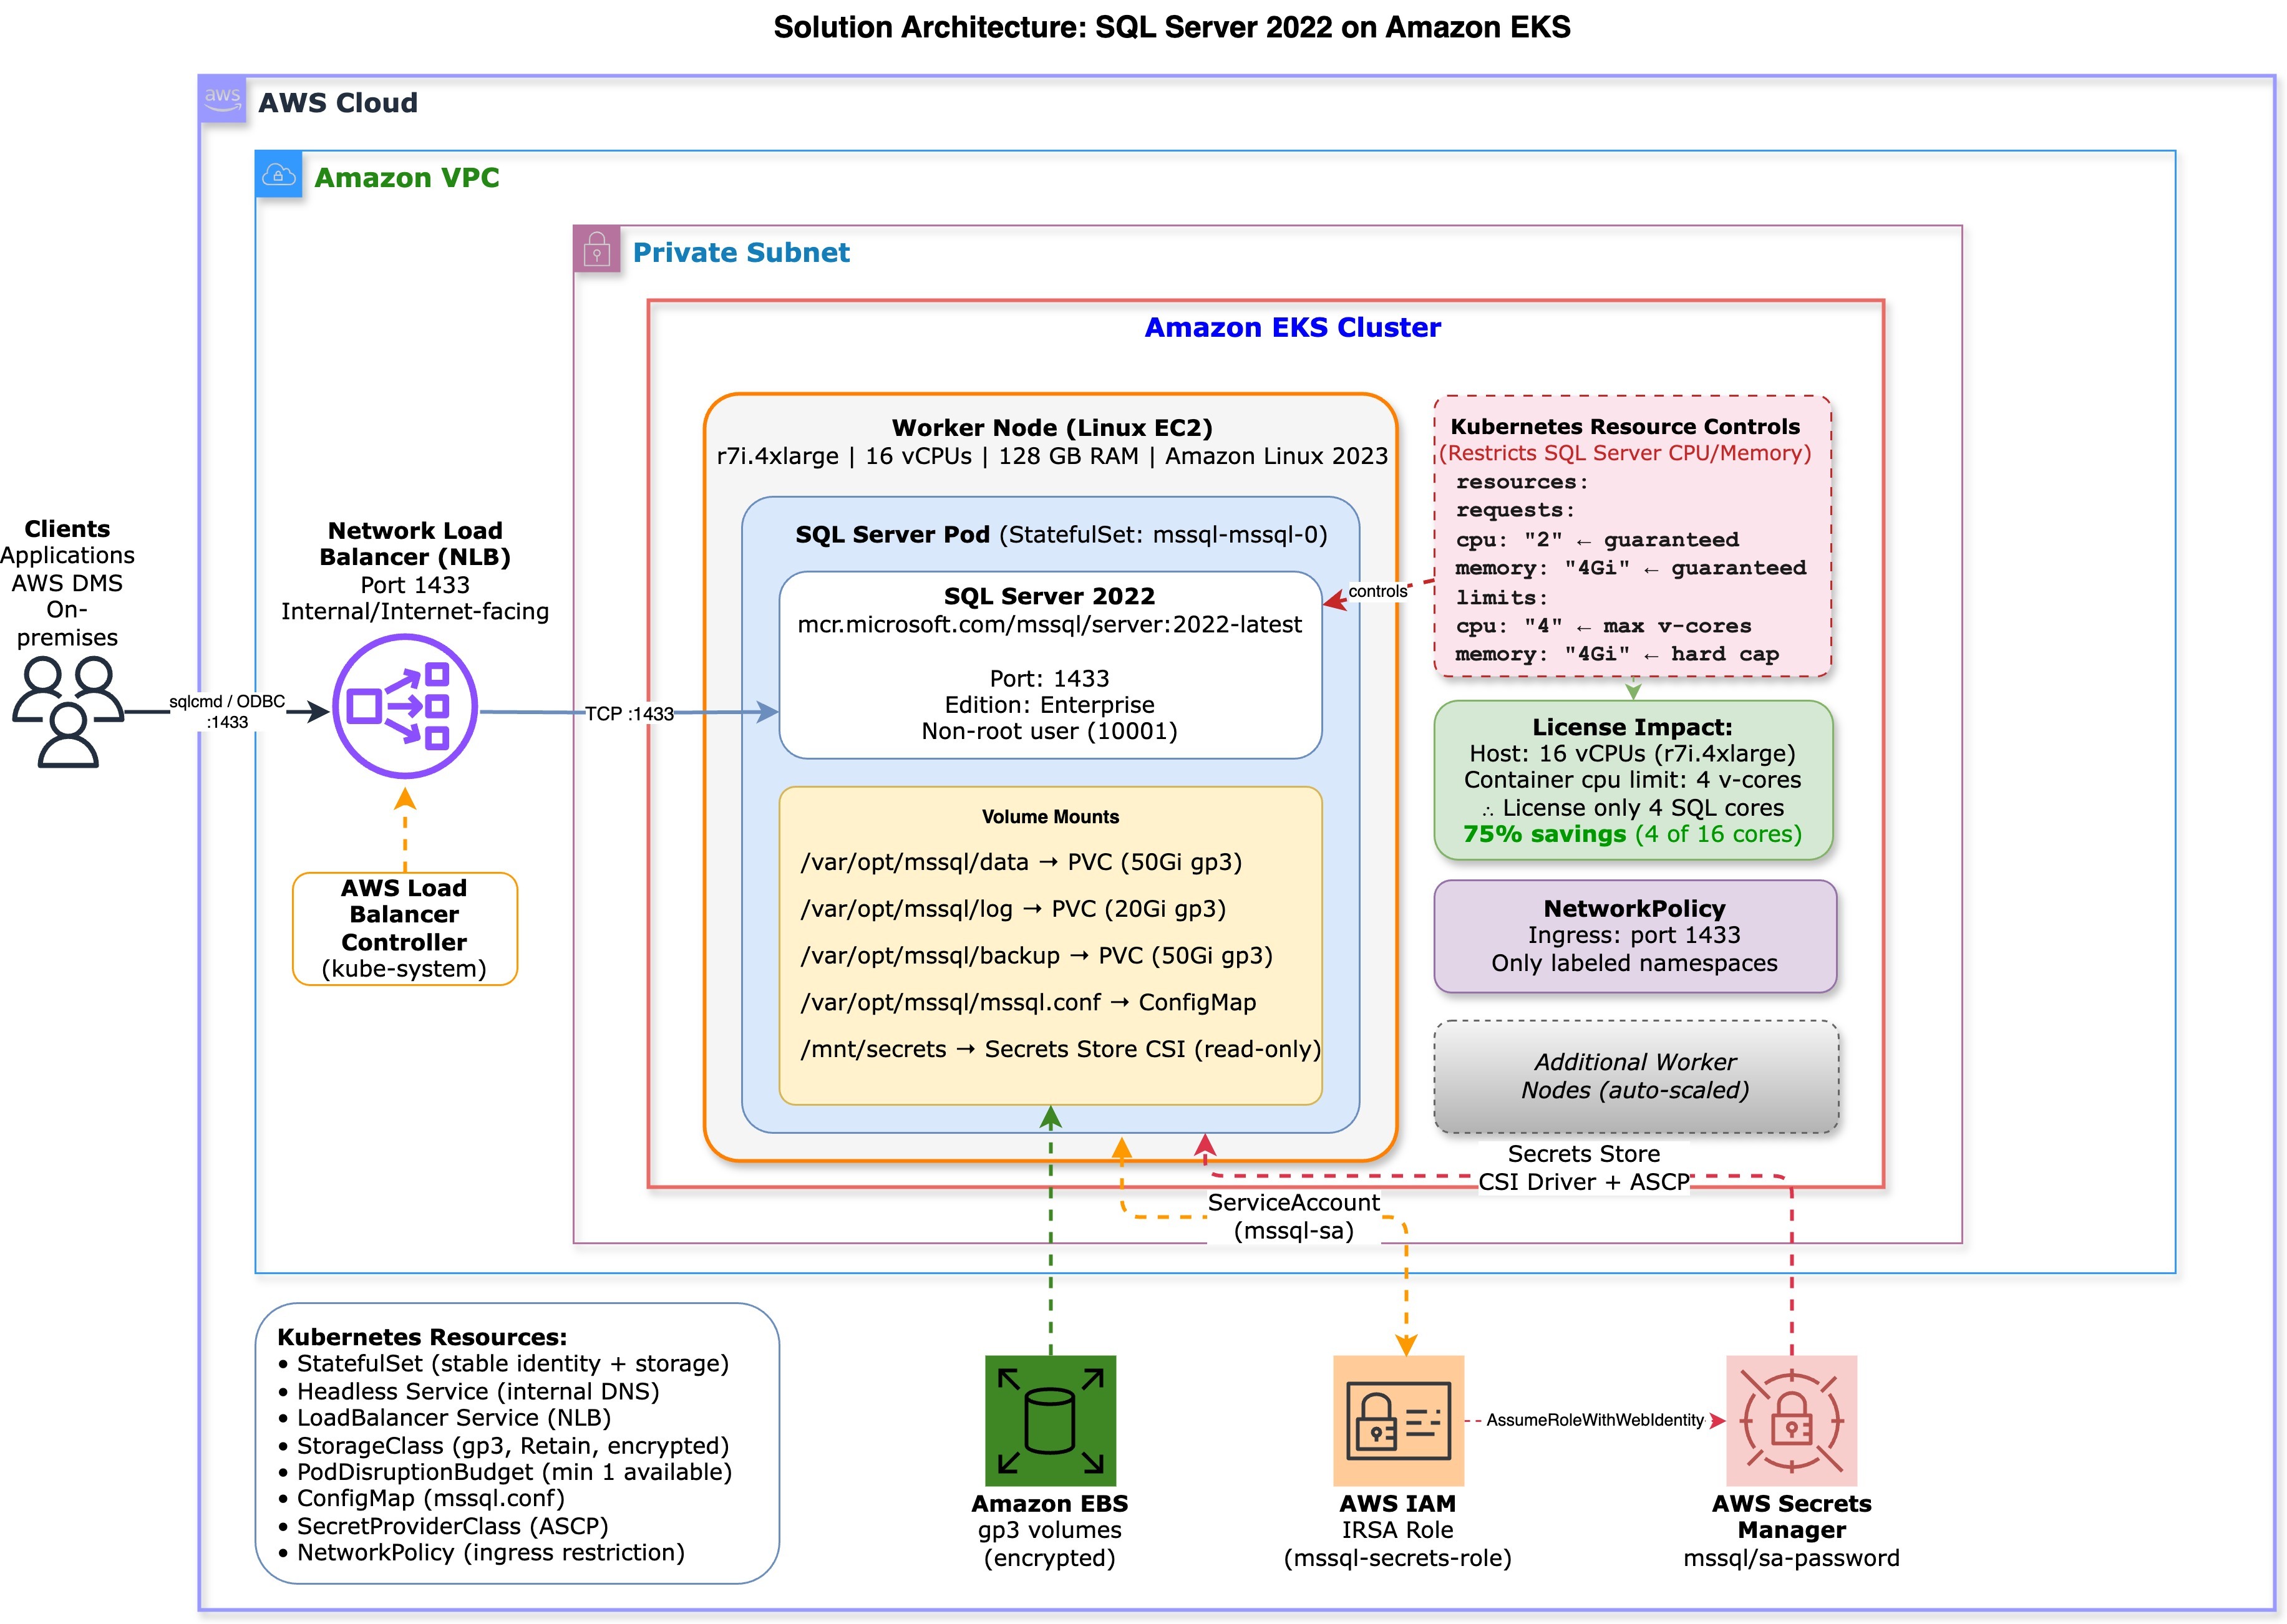
Figure 2: Solution architecture – SQL Server 2022 on Amazon EKS.
Prerequisites
- An active AWS account with permissions to create EKS clusters, IAM roles, and Secrets Manager secrets
- Basic familiarity with Docker and Kubernetes concepts
- AWS Command Line Interface (AWS CLI) installed and configured
- kubectl installed locally
- eksctl installed for Amazon EKS cluster management
- Helm v3 installed for deploying the Kubernetes manifests
- A valid SQL Server license (Developer, Standard, or Enterprise edition) or use of the SQL Server Developer edition container image for non-production workloads
Walkthrough
Step 1: Create a workstation and install prerequisites
Launch an Amazon Elastic Compute Cloud (Amazon EC2) linux instance to serve as your workstation for managing the deployment. You can use a t3.micro instance (free tier eligible for 12 months) running Amazon Linux 2023. This instance type provides enough resources to run CLI tools like eksctl, kubectl, and Helm. Once the instance is running, SSH into it.
Install the following tools on your workstation before proceeding:
- eksctl — Installation guide
- kubectl — Installation guide
- Helm — Installation guide
Step 2: Configure AWS CLI
Configure the AWS CLI With credentials that have sufficient permissions to create EKS clusters, IAM roles, and Secrets Manager secrets:
aws configure
You will be prompted for:
AWS Access Key ID [None]: <your-access-key-id>
AWS Secret Access Key [None]: <your-secret-access-key>
Default region name [None]: us-east-1
Default output format [None]: json
Note: If your workstation EC2 instance has an IAM instance profile attached with the required permissions, you can skip aws configure — the CLI will automatically use the instance role credentials.
Step 3: Clone the Git repository
Clone the solution repository that contains the cluster configuration, setup scripts, and Helm chart:
git clone <repo-link>
Step 4: Navigate to the Kubernetes resource directory
Change to the directory containing the EKS cluster configuration:
cd SQLonContainers/k8-resource
Step 5: Create an Amazon EKS cluster
Update the cluster.yaml file that defines your EKS cluster configuration with the required name,instance types and desired capacity.
apiVersion: eksctl.io/v1alpha5kind: ClusterConfig
metadata:name: sqlekscluregion: us-east-1
managedNodeGroups:- name: sqlekscluinstanceTypes: ["r7i.4xlarge", "r6i.4xlarge"]desiredCapacity: 2
Create the cluster using eksctl tool:
eksctl create cluster -f cluster.yamlThis creates an AWS CloudFormation stack that provisions the EKS control plane, VPC resources, and a managed node group with 2 worker nodes.
Once complete, verify the nodes are ready:
Stack name: eksctl-<cluster-name>-cluster
Once the cluster is created, verify the worker nodes are ready by running:
kubectl get nodesExpected output:

Step 6: Attach the EBS CSI Driver IAM policy
Add the AmazonEBSCSIDriverPolicy to the IAM role associated with your node group. This policy allows the EBS CSI Driver to create and manage EBS volumes for persistent storage.
Step 7: Install drivers, configure IRSA, and set up the Load Balancer Controller
Run the setup script to install the EBS CSI Driver, Secrets Store CSI Driver, configure IRSA, and install the AWS Load Balancer Controller:
Navigate to the sql-server-k8s folder which contains the setup scripts and modify the file as per your account ID, region and cluster details:
cd SQLonContainers/sql-server-k8s
chmod +x aws-setup.sh
./aws-setup.sh
This script performs the following: – Associates the OIDC provider with the EKS cluster – Installs the EBS CSI Driver add-on for persistent volume provisioning – Installs the Secrets Store CSI Driver and AWS Secrets Manager Provider (ASCP) – Creates the SQL Server SA password in AWS Secrets Manager – Creates an IAM policy scoped to the secret – Creates the mssql namespace and an IRSA-annotated service account (mssql-sa) – Installs the AWS Load Balancer Controller for managing Network Load Balancers
Verify the drivers and controllers are running:
kubectl get pods -n kube-system
Output: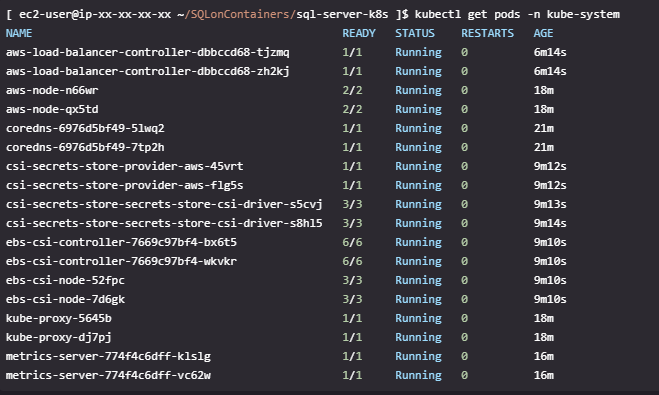
You should see pods for ebs-csi-controller, ebs-csi-node, csi-secrets-store-provider-aws, csi-secrets-store-secrets-store-csi-driver, and aws-load-balancer-controller all in Running state.
Step 8: Deploy SQL Server using Helm
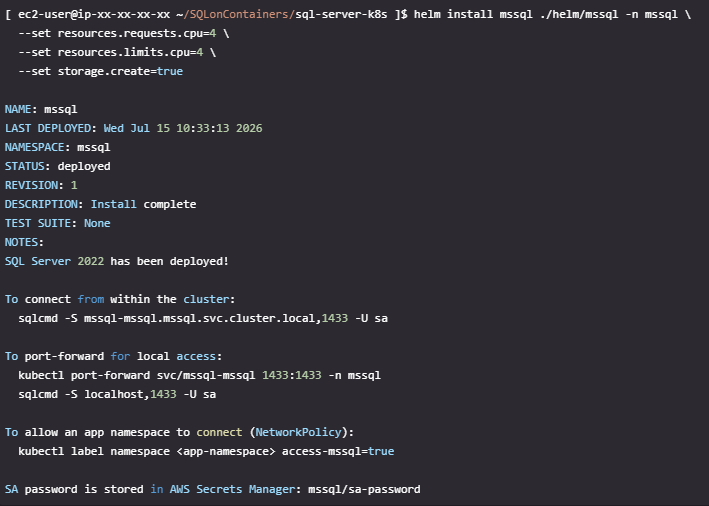
Deploy the SQL Server container using the Helm chart:
Note: Use storage.create=true on the first deployment to create the StorageClass. On subsequent deployments, set it to false.
Output:
SQL Server configuration (mssql.conf)
The Helm chart deploys a ConfigMap that mounts a custom mssql.conf file into the SQL Server container. This configuration file controls key runtime settings without requiring manual post-deployment changes:
You can fully configure these settings through the Helm values.yaml file under the config section. This lets you adjust them per environment without rebuilding the container image. The Helm chart renders these values into a ConfigMap (configmap.yaml), which is then mounted as /var/opt/mssql/mssql.conf inside the SQL Server container. This is the default location where SQL Server on Linux reads its configuration. To customize, update values.yaml before deployment or override values at install time using –set:
Verify the deployment:
List all pods in the mssql namespace and check their status (Running, Pending, CrashLoopBackOff)
kubectl get pods -n mssql
Output:

Show detailed information about the SQL Server pod including events, volume mounts, and conditions
kubectl describe pod mssql-mssql-0 -n mssql
View the last 20 lines of SQL Server container logs to confirm the engine started successfully
kubectl logs mssql-mssql-0 -n mssql --tail=20
Check that the NLB service is provisioned:

Step 9: Connect to SQL Server
From inside the cluster (exec into the pod):
kubectl exec -it mssql-mssql-0 -n mssql – bash
export PATH="$PATH:/opt/mssql-tools18/bin"
sqlcmd -S localhost -U sa -P '<YourPassword>' -C
Output: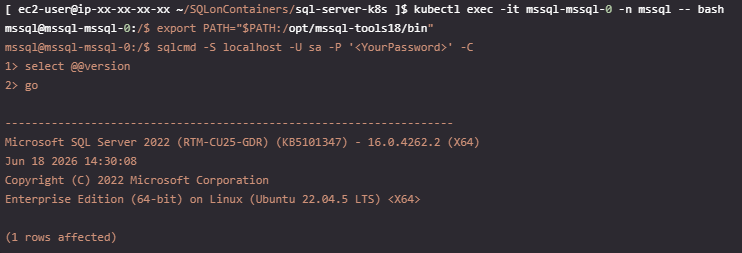
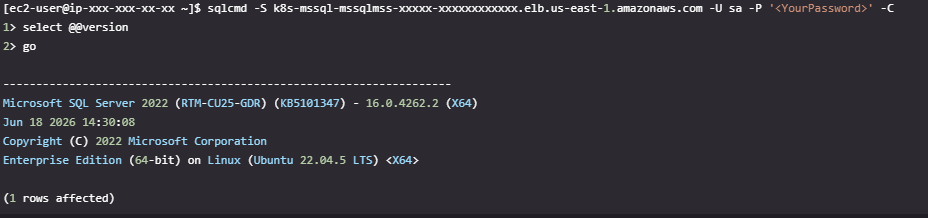
From outside the cluster (using the NLB endpoint):

Container security best practices:
This deployment follows container security best practices to protect your SQL Server workload at multiple layers:
Credential management — SQL Server SA passwords are stored in AWS Secrets Manager and injected into the pod at runtime using the Secrets Store CSI Driver, keeping sensitive credentials out of deployment manifests, environment variables, and version control entirely. Never hardcode passwords in Kubernetes YAML files.
Non-root execution — The SQL Server container runs as a non-root user (UID 10001), limiting the scope of potential damage from a container escape or privilege escalation issue.
Network isolation — Kubernetes network policies restrict ingress to the SQL Server pod on port 1433, allowing connections only from namespaces explicitly labeled with access-mssql=true. SQL Server pods run in private subnets within your Amazon VPC, with external access routed through AWS PrivateLink or VPN rather than public internet exposure.
Encryption at rest — Amazon EBS volumes are provisioned with encryption enabled (encrypted: “true” in the StorageClass), so that all database data, transaction logs, and backup files are encrypted on disk without application-level changes.
Cleanup resources:
To avoid ongoing charges, delete the resources created during this walkthrough:
Tip: Deleting the namespace removes all Kubernetes resources within it. However, PersistentVolumeClaims with a Retain reclaim policy preserve the underlying Amazon EBS volumes. Manually delete these volumes from the Amazon EC2 console if you no longer need the data.
Conclusion
In this post, we showed you how to deploy SQL Server 2022 in a Linux container on Amazon EKS using a Helm chart that provisions the entire database stack — persistent EBS storage for data, log, and backup files, secure credential injection from AWS Secrets Manager via IRSA, network connectivity through a Network Load Balancer, and production-hardened configuration through a declarative mssql.conf. The deployment runs as a StatefulSet with network policies, non-root execution, TLS enforcement, and pod disruption budgets built in from the start.
From a cost perspective, this approach delivers savings on two fronts. First, you eliminate the Windows Server license entirely by running SQL Server on Linux-based container hosts. Second, you reduce SQL Server licensing costs by using the container-specific licensing model under the Per Core model; you license only the virtual cores allocated to the container (minimum four) rather than all physical cores on the host. On a 16-core server where your SQL Server container uses 4 v-cores, that translates to a 75% reduction in SQL Server license cost for that workload. Combined, these savings typically reduce total licensing and compute costs by 40–60%.
To get started, explore the Amazon EKS documentationAmazon EKS documentation and review the SQL Server on Linux container imagesSQL Server on Linux container images available from Microsoft. If you are planning a migration from existing Windows-based SQL Server instances, consider using AWS DMS to replicate data with minimal downtime during the transition.