Microsoft Workloads on AWS
How to automate an in-place upgrade of SQL Server on Amazon EC2
In this blog post, we will show you how to perform an automated in-place upgrade of your standalone Microsoft SQL Server instances installed on Amazon Elastic Compute Cloud (Amazon EC2). This solution supports upgrades to SQL Server 2016, SQL Server 2017, SQL Server 2019, and SQL Server 2022.
Introduction
As new versions of SQL Server are released every few years and older versions reach end of support, customers are faced with the need to periodically upgrade their SQL Server installations. Microsoft provides ample upgrade documentation for in-place upgrades, side-by-side upgrades, and rolling upgrades—including the supported upgrade paths for each version of SQL Server.
SQL Server upgrades, however, require several pre-checks and manual steps that are time consuming and error prone. To simplify and speed up the SQL Server upgrade process, Amazon Web Services (AWS) provides automated solutions for SQL Server deployments on Amazon EC2. For example, for side-by-side upgrades, you can use the AWS Database Migration Service (refer to this blog post). Or you can clone an Amazon EC2 instance running SQL Server and upgrade it to a later version of SQL Server.
But what if you want to do an in-place upgrade of SQL Server? In this blog post, we will walk you through the steps of creating a custom document that automates an in-place upgrade of SQL Server on Amazon EC2. It’s just one more way AWS is helping customers with their SQL Server upgrade options.
Solution overview
As compared to a side-by-side upgrade, this in-place upgrade solution will require downtime and additional effort to rollback, but it will be faster because it is upgrading SQL Server on the same instance. You can use this solution to upgrade your SQL Server databases to any supported upgrade version, which is currently SQL Server 2016, SQL Server 2017, SQL Server 2019, and SQL Server 2022. This solution also upgrades SQL Server Integration Services (SSIS) and SQL Server Analysis Services (SSAS) to the target version.
This solution can be used for your non-production SQL Server workloads or for any production workload that is not used 24/7. For SQL Server deployments that need to run 24/7 and cannot afford any downtime, you will want to look into the rolling upgrade method.
Figure 1 shows an architectural overview of this in-place upgrade solution:
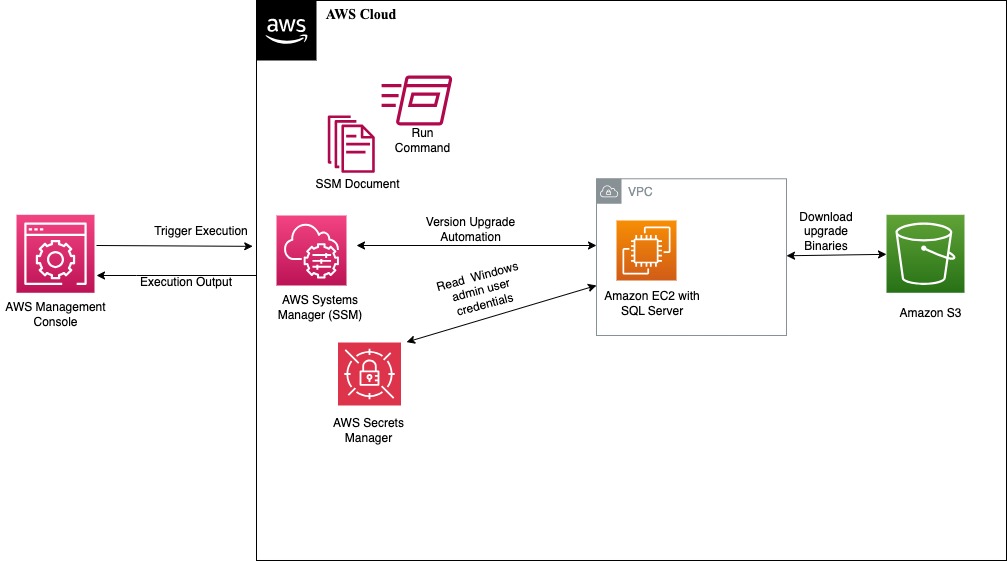
Figure 1. Architecture for SQL Server in-place upgrade using custom automation document
Prerequisites
Before you get started, make sure you have the following ready to go:
- An Amazon Simple Storage Service (Amazon S3) bucket
- 5 GB of free space on C drive of Amazon EC2 instance
- AWS Systems Manager Agent running on Amazon EC2 instance
- Access to SQL Server Management Studio
One-time setup
In this section, we will walk you through the one-time process of creating a custom automation document and setting up your Amazon EC2 environment for upgrade:
- Step 1: Create custom document
- Step 2: Upload SQL Server new version binary files in Amazon S3
- Step 3: Create a secret in AWS Secrets Manager
- Step 4: Attach read-only IAM role to Amazon EC2
- Step 5: Confirm Amazon EC2 instance is listed in Fleet Manager
In the section Using the custom document later in the post, we’ll show you how to run the custom document, validate the results, and apply the latest updates.
Step 1: Create custom document
First, you will need to download the SQLServer_Inplace_Upgrade.yaml file. You will be importing this YAML script as source code when you create your custom document.
To create the document, go to the AWS Management Console and navigate to AWS Systems Manager > Documents > Create document > Automation, as shown in Figure 2. Note that in AWS Systems Manager (SSM), documents of type “automation” are called automation runbooks.

Figure 2. Create custom document
In the NewRunbook form (Figure 3), YAML is the default value for source. You don’t need to change this. Under Actions, select Import runbook.
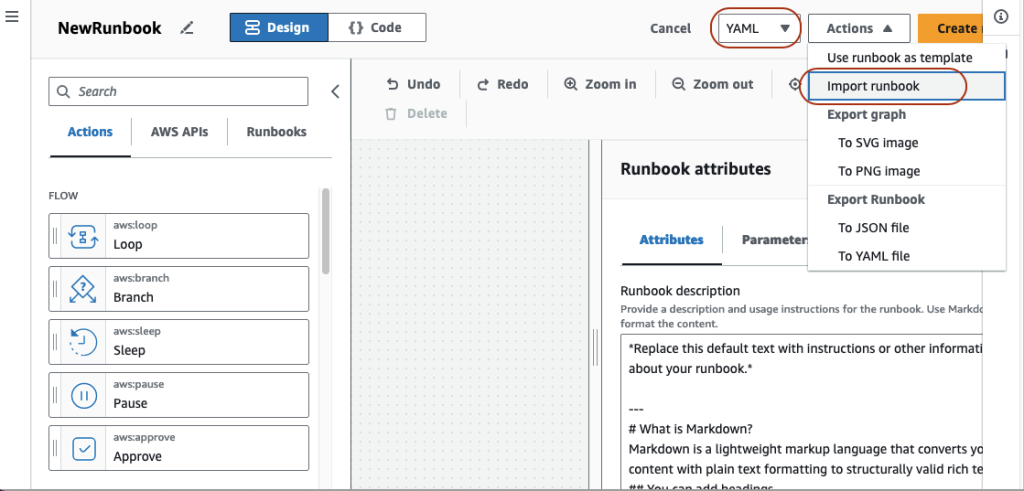
Figure 3. Import YAML script
When prompted, select the SQLServer_Inplace_Upgrade.yaml file you downloaded earlier, then select Create document. There will be one recommendation pop-up regarding assumeRole, as shown in Figure 4. We are using the EC2 Instance Profile role with required permissions to run this custom document, so this can be ignored.
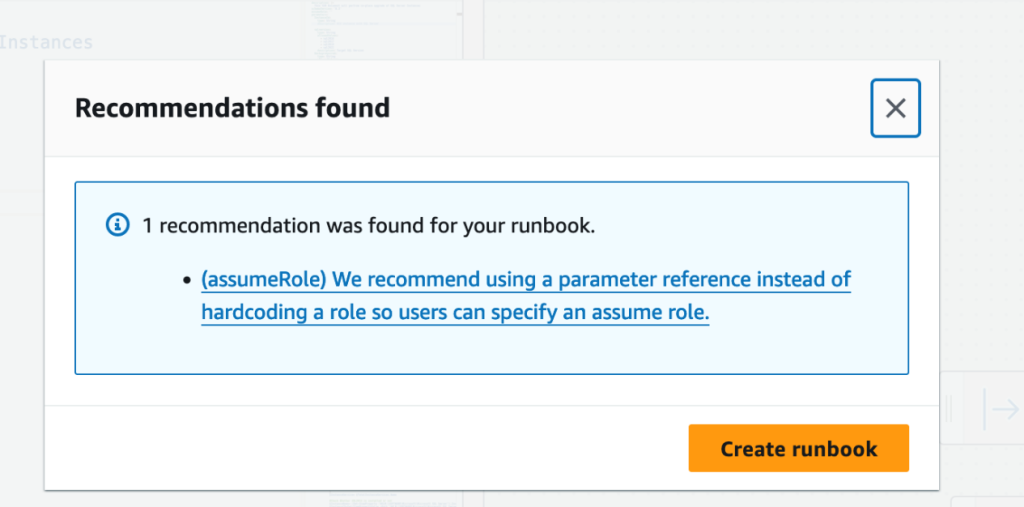
Figure 4. Create runbook recommendation
Your new custom document can now be found by navigating to AWS Systems Manager > Documents > Owned by me, as shown in Figure 5:
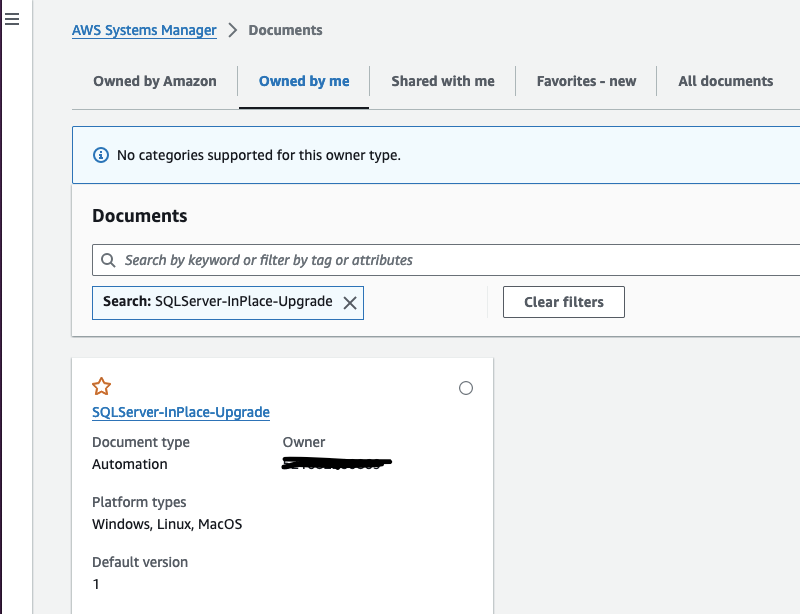
Figure 5. Custom document listed in AWS Systems Manager
If you need additional guidance on setting up a custom document, refer to this blog post.
Step 2: Upload SQL Server new version binary files in Amazon S3
In this step, you will be uploading the SQL Server new version binary files into an Amazon Simple Storage Service (Amazon S3) bucket. When you run your custom document, the automation process will be copying these binary files to your local drive to perform the upgrade.
NOTE: This automation process only supports in-place upgrades for the same edition; for example, you can upgrade from SQL Server 2014 Standard to SQL Server 2022 Standard.
In your Amazon S3 bucket, create a new folder in the format “sqlXXXX” where XXXX needs to be the new version; for example, sql2016, sql2017, sql2019, or sql2022. You will now retrieve and store the new SQL Server installation media in the new folder.
If your SQL Server instance is licensed through AWS (known as license included), you will need to set up a new Amazon EC2 instance with the target SQL Server version Amazon Machine Image (AMI) from the AWS Marketplace. You can then upload the SQL Server installation media stored in the C drive of the new instance to your Amazon S3 bucket.
If you are using your own licensed SQL Server software (known as BYOL), you will need to locate and upload the extracted SQL Server installation media for the new version into the Amazon S3 bucket.
Figure 6 displays an example of the SQL Server 2022 binaries in a sql2022 folder in an Amazon S3 bucket:
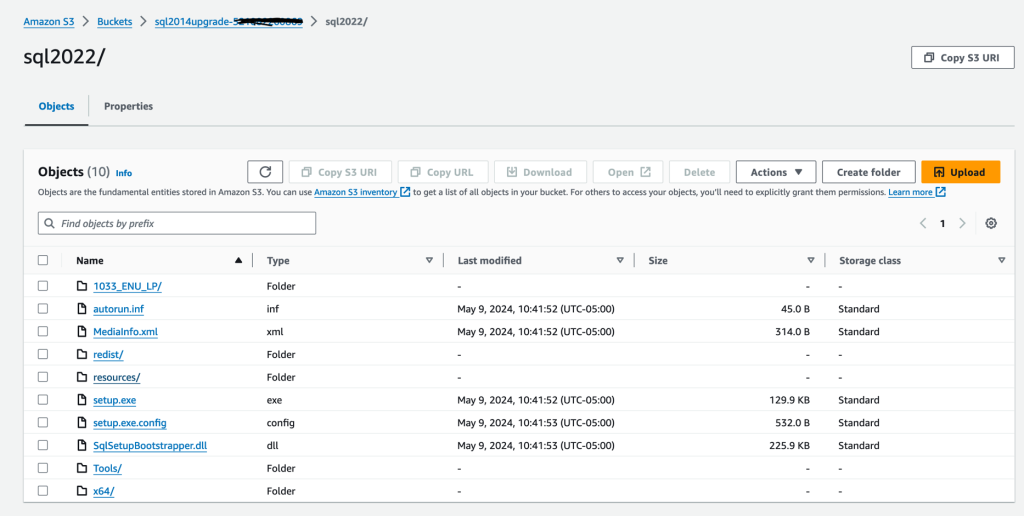
Figure 6. Binary files for SQL Server 2022
Step 3: Create a secret in AWS Secrets Manager
You will need to create a secret in AWS Secrets Manager to store the Windows Active Directory (AD) username and password of an account that has (1) administrator permissions on the Amazon EC2 instance and (2) the system administrator role for SQL Server (e.g., domain\sqladmin).
To create the secret, go to the AWS Management Console, navigate to AWS Secrets Manager
- Choose to store a new secret.
- Choose secret type as key/value pairs and enter your secret in Key/Value tab.
- Add the Windows AD username and password as secret.
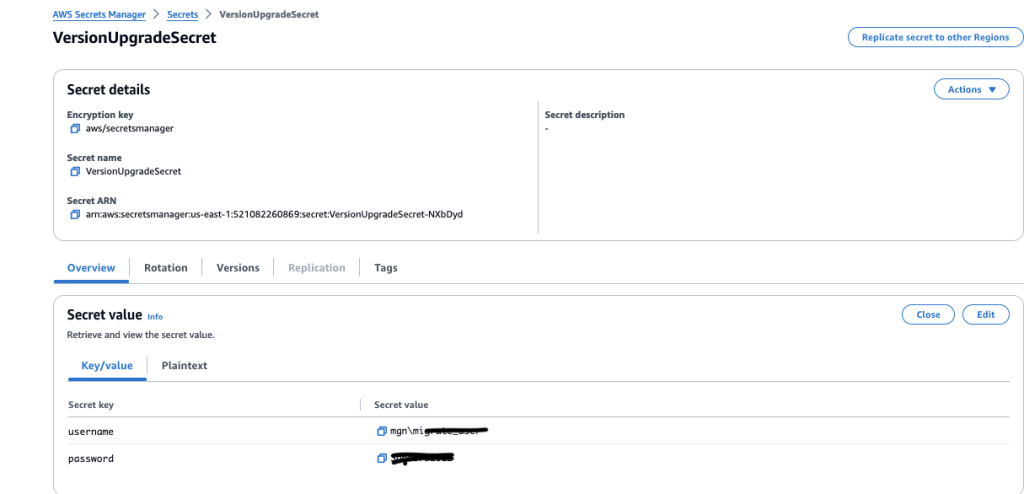
Figure 7. Creating secret for Windows user credentials
For additional help on creating secrets, refer to the AWS Secrets Manager user guide.
Step 4: Attach read-only IAM role to Amazon EC2
Create a new AWS Identity and Access Management (IAM) role with the proper read permissions for Amazon S3 and AWS Secrets Manager. First, download the IAM policy template and make the following modifications:
- For the Sids named ListObjectsInBucket and GetObjectActions, update the Resource bucket-name value according to your setup; for example, “arn:aws:s3:::my-sql-server-upgrade-bucket”.
- For the ReadSecret Sid, update the Resource [Account] and ReplaceSecretName values according to your setup. Here’s an example: “arn:aws:secretsmanager:*: :secret: exampleVersionUpgradeSecret”.
Next, create an IAM role with this new policy and attach it to your Amazon EC2 instance.
Step 5: Confirm Amazon EC2 instance is listed in Fleet Manager
Confirm that the SQL Server instance(s) you want to upgrade is in a state that can be managed programmatically. You can use the Fleet Manager capability of AWS Systems Manager to determine this.
Sign into the AWS Management Console in the AWS Region and account that hosts the SQL Server instance to be upgraded. To confirm that your instance(s) is in a manageable state, navigate to AWS Systems Manager > Fleet Manager > Managed Nodes. In our example (Figure 8), we have three managed nodes:
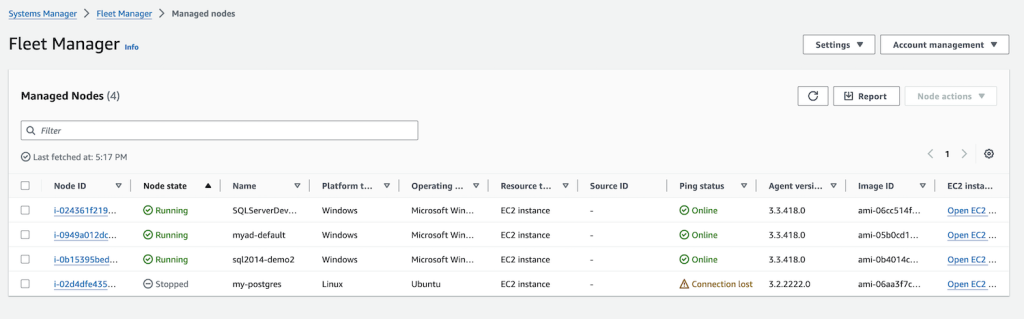
Figure 8. Managed nodes in AWS Systems Manager Fleet Manager
If your instance is not listed, make sure that the AWS Systems Manager Agent is running on your Amazon EC2 instance. This requirement was noted in the prerequisites.
Using the custom document
In this section, we’ll show you how to run the custom document to upgrade SQL Server (step 6), validate the results (step 7), and apply the latest updates (step 8).
Recommended: Take a snapshot and/or perform a backup
Since this is an in-place upgrade, AWS strongly recommends one or more of the following options:
- Take a snapshot. Right before you run your custom automation document, take a snapshot of your Amazon EC2 instance. If the upgrade fails, this snapshot can then be used to rollback the instance. Note that you can only rollback by reinstalling the previous version of SQL Server and restoring/attaching databases or by building a new Amazon EC2 instance from a snapshot taken prior to the upgrade.
- Perform a manual backup. Before you run your custom automation document, manually take a combination of full, differential, and transactional log backups of your SQL Server database(s). By doing this manual backup, you will reduce the downtime when you run your custom document.
- Opt-in for automatic backup. You will have the option to request a backup when you run your custom document. If you opt-in for backup, ensure you don’t have any further writes to the database(s) and that you have enough space available for the total size of all full database backups. If the backup fails for any database, the custom document will terminate, return an error, and quit the process without upgrading.
Step 6: Run custom document
When you run the custom automation document created in step 1, it will perform the following tasks:
- Download new version binaries from Amazon S3 (from step 2);
- Run pre-checks (if a pre-check fails, automation process terminates);
- Optionally, back up the current SQL Server user and system databases; and
- Perform the upgrade.
You have the option to run your custom document from the AWS Management Console or through AWS CLI using start-automation-execution.
In the AWS Management Console, you will find your custom document under AWS Systems Manager > Documents > Owned by me. Select the SQLServer-InPlace-Upgrade document, then select the Execute automation button, as shown in Figure 9:
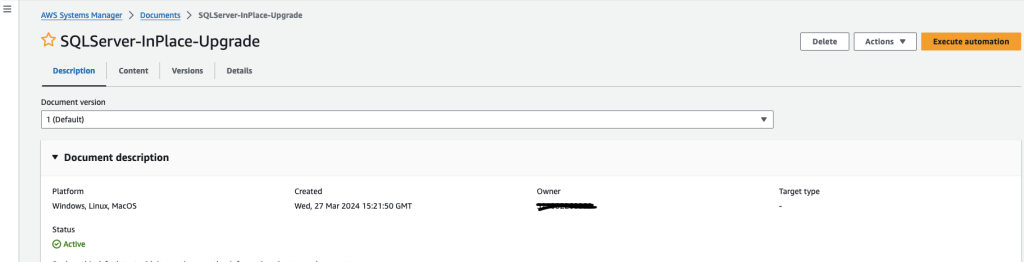
Figure 9. Start the custom automation document
Step 6.1: Enter input parameter values
The automation will display the Input parameters form, as shown in Figure 10:
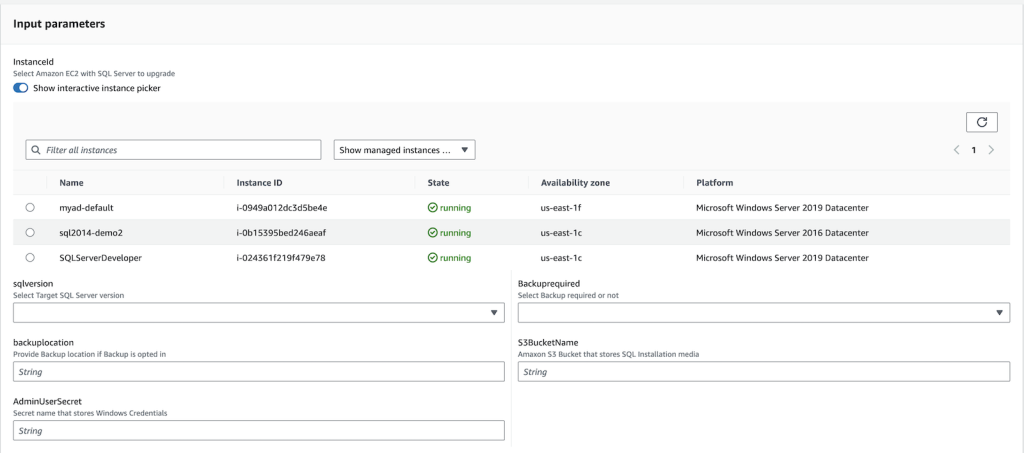
Figure 10. Input parameters for custom document
Select or enter the following parameter values:
- InstanceId: The Amazon EC2 instance with the SQL Server instance to be upgraded. Use the interactive instance picker to find your instance more easily.
- sqlversion: The new version to which SQL Server will be upgraded. Permitted values are sql2016, sql2017, sql2019, and sql2022.
- Backuprequired: Specify whether you want backups taken for the SQL Server user and system databases. Permitted values are Backuprequired and Nobackup. If you have already performed a manual backup and/or taken an Amazon EC2 snapshot, select Nobackup.
- backuplocation: If you selected Backuprequired, specify the location to store backups (e.g., D:\MSSQL\Backup). Make sure you have enough space to store the backup files; otherwise, the automation process will terminate and the upgrade will not be performed.
- S3BucketName: This is the Amazon S3 bucket name where you stored the new version binary files in step 2.
- AdminUserSecret: This is the name of the secret you set up in step 3 that stores the Windows AD username and password.
After you enter all the parameter values, select EXECUTE button at the end of the page.
Step 6.2: Automation performs pre-checks
The custom automation document will now perform the following pre-checks before it initiates the upgrade. If any of these pre-checks fail, the automation process will terminate, and an error message will be displayed:
- There can be no pending reboot(s) from past installation(s)
- SQL Server instance service needs to be running on Amazon EC2
- Multiple SQL Server instances cannot be installed on the same Amazon EC2 server
- 5 GB of free space must be available on the C drive to download binaries and create log files
- SQL Server instance needs to be standalone, not clustered. Clustered instances need to be upgraded by the rolling upgrade method.
Step 6.3: Automation backs up user and system databases [optional]
NOTE: This step only runs if you indicated that a backup was required in step 6.1.
If you opted in for a backup, the automation process will begin backing up all the user and system databases to the location you specified in step 6.1, as shown in Figure 11:
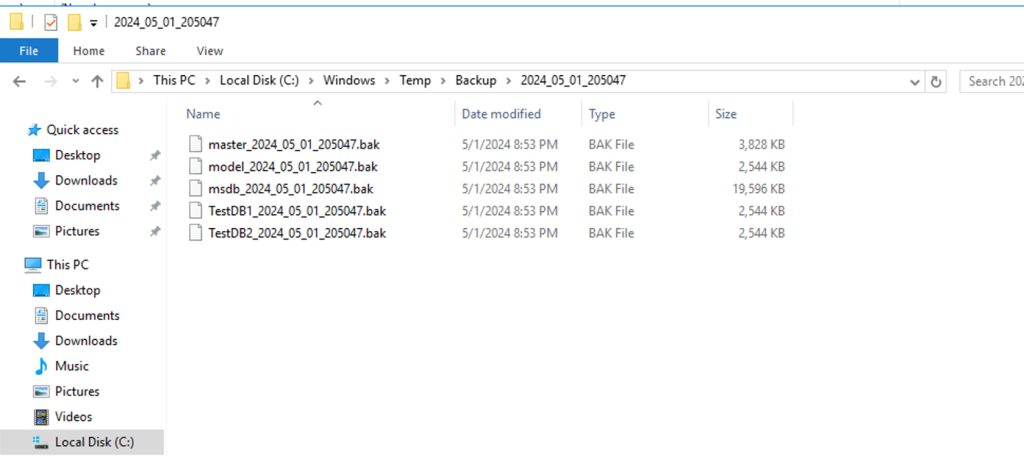
Figure 11. Sample backup files
The automation process will create a log file in C:\Windows\Temp. Once all the database backups are completed, the automation process will stop the SQL Server service and copy the master and msdb files to the Temp directory. Figure 12 shows the log file and a copy of the master and msdb database files:
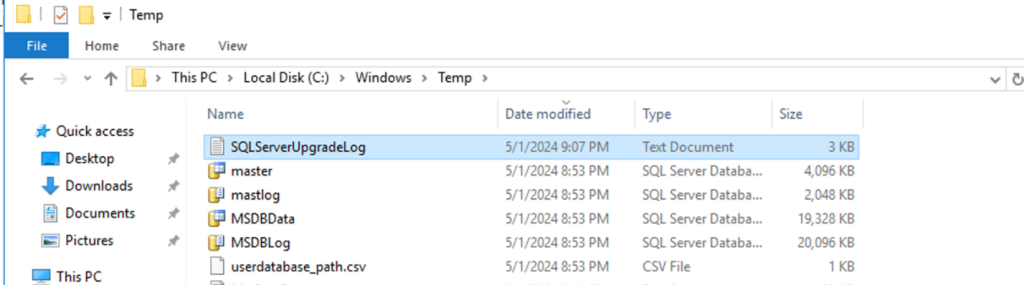
Figure 12. Backup files and log file in Temp folder
Step 7: Validate the results
After the completion of step 6, the automation process will start performing an in-place upgrade of the SQL Server instance. This process can take up to 30 minutes.
Step 7.1: View the custom document log file
As previously mentioned, the automation log file, SQLServerUpgradeLog.txt, is stored in C:\Windows\Temp. Figure 13 shows a sample log file:
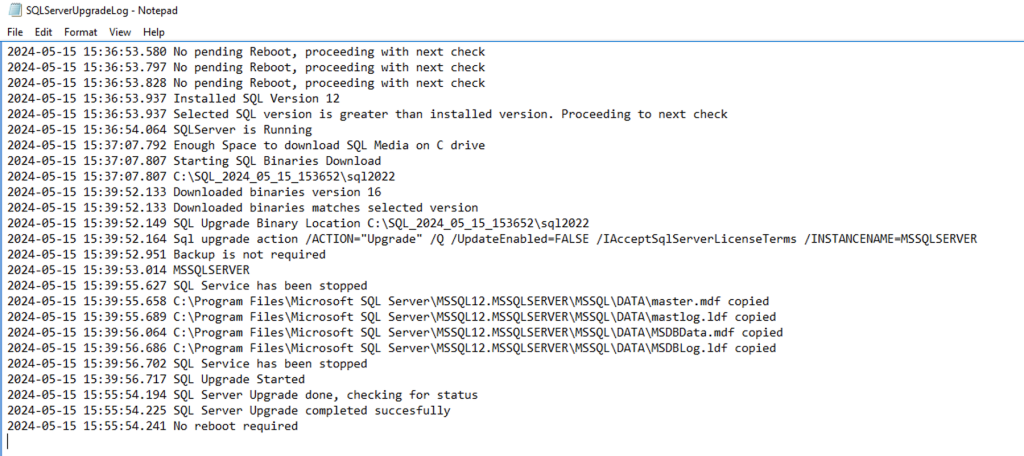
Figure 13. Sample custom automation document log file
Step 7.2: View the SQL Server upgrade log results
The SQL Server upgrade log file, Summary.txt, is stored in C:\program files\Microsoft SQL Server\1xx\Setup Bootstrap\Log. This log file will contain the summary details for the upgrade process, as shown in Figure 14:
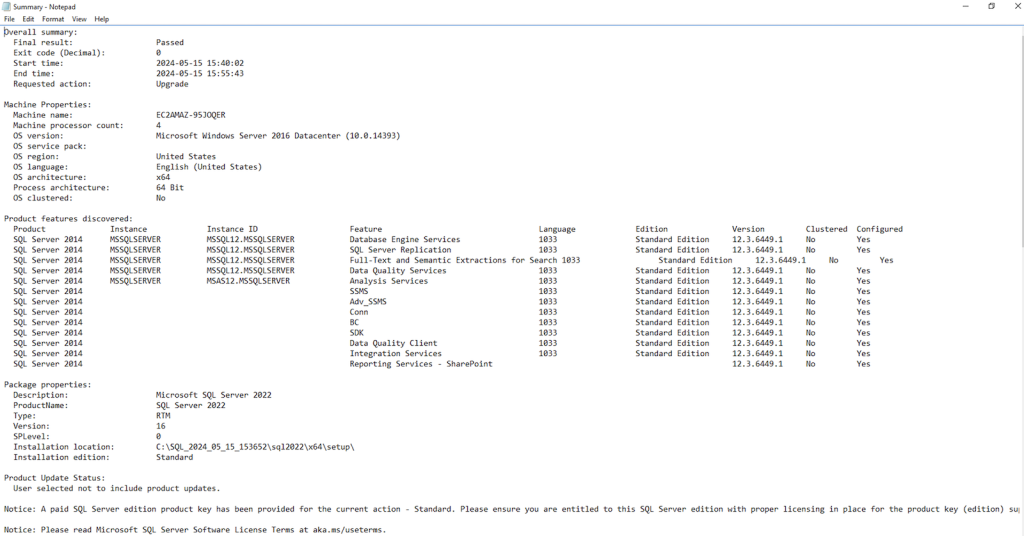
Figure 14. Summary.txt file
The automation process will validate the results in the Summary.txt file and output the result. Figure 15 shows the successful completion of an in-place upgrade:
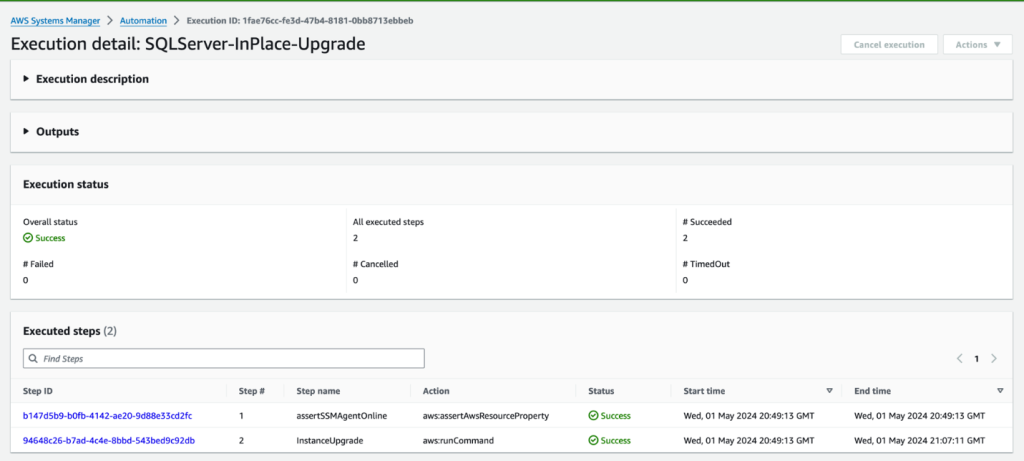
Figure 15. Successful completion displayed in AWS Systems Manager
Step 7.3: Validate SQL Server version
You can validate the SQL Server version by running select @@servername, @@version using SQL Server Management Studio. Verify that it shows the upgraded version. Figure 16 shows the SQL Server instance version before upgrade:
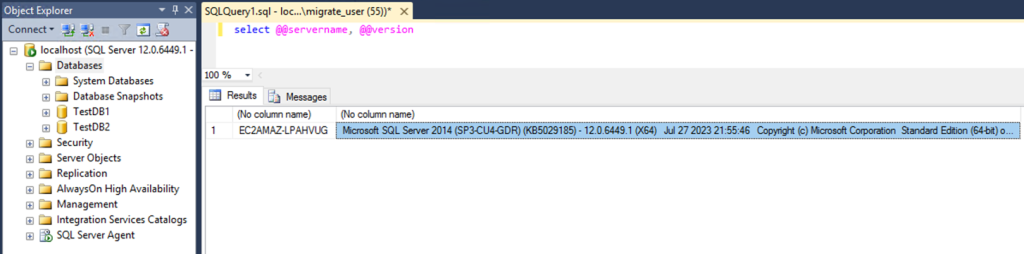
Figure 16. SQL Server Instance version before upgrade
Figure 17 shows the SQL Server instance version after upgrade:
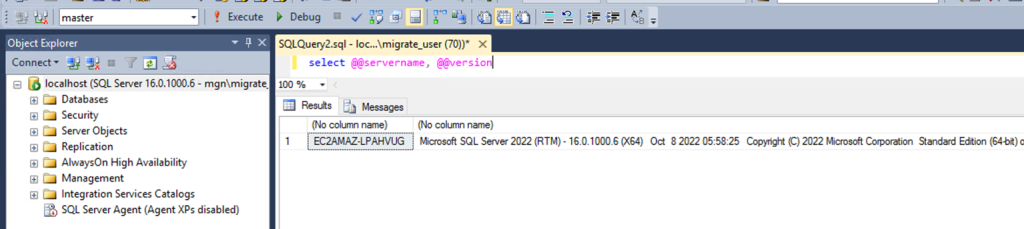
Figure 17. SQL Server Instance version after upgrade
Step 8: Apply latest updates
As a final step, AWS also recommends that you install the latest cumulative updates to maintain the security, stability, and performance of your upgraded instance. Refer to Microsoft’s documentation for the latest updates.
Cleanup
After you have completed your in-place SQL Server upgrades, you will want to delete the Amazon S3 bucket with the binary files to avoid incurring future charges.
Conclusion
In this blog post, we walked you through an automated way to perform in-place upgrades of SQL Server installed on Amazon EC2 to newer versions using AWS Systems Manager documents. Automating helps reduce the manual effort with the upgrade process and allows you to upgrade from previous versions of SQL Server at scale and reliability.
AWS has significantly more services, and more features within those services, than any other cloud provider, making it faster, easier, and more cost effective to move your existing applications to the cloud and build nearly anything you can imagine. Give your Microsoft applications the infrastructure they need to drive the business outcomes you want. Visit our .NET on AWS and AWS Database blogs for additional guidance and options for your Microsoft workloads. Contact us to start your migration and modernization journey today.