AWS Cloud Operations Blog
Manage third party applications in Windows Server nodes using AWS System Manager and Chocolatey
System Administrators face a never-ending list of tasks in IT organizations, with one of the most critical being the installation and updating of software packages. This process is essential for maintaining a secure posture across systems. However, as the number of servers grows, manually managing updates becomes increasingly time-consuming and inefficient.
The challenge we’re addressing is the centralization of software installation and update management for Windows servers, particularly in environments with multiple workloads and large server fleets. While updating a few servers manually may be manageable, the task becomes daunting when dealing with thousands of nodes. The question arises: How can we reduce the significant number of system administrator hours required for software management in large-scale deployments?
There are several alternatives for configuration management systems with big fleet environments, commercial and open source. Systems that centralize the configuration, update and deployment of software along a massive set of servers.
In this article, we’ll explore an innovative solution to this problem by leveraging AWS Systems Manager (SSM) in conjunction with the package manager Chocolatey. This approach offers a streamlined method for installing and updating software packages on Windows Server systems, regardless of fleet size.
In AWS, we have AWS System Manager distributor, where administrators can define custom packages and specify deployment procedure. This is very useful to define specific custom installations, however, each package installation and update scripts needs to be implemented. The purpose here is to leverage the already existing installations and update procedures of existing Chocolatey packages.
By the end of this post, you’ll have a clear understanding of how to efficiently manage software installations and updates across your Windows server environment, saving valuable system administrator time and improving overall security posture.
Overview of solution
The solution leverages AWS CloudFormation StackSets for centralized management across multiple accounts in the AWS Management or Delegated Administrator Account. Configuration data is stored centrally in AWS Systems Manager (SSM) Parameter Store. In each account within the StackSet, an SSM Association is deployed to manage and execute actions on the targeted servers. This architecture allows for consistent and scalable management of resources across the organization.
The following diagram shows the architecture of use a SSM parameter store in one account and sharing the parameter across your organization, using AWS Resource Access Manager. The parameter store is used to indicate the software packages being managed with the solution and their versions, and how to handle them from the update perspective. The solution will use the Run Command to install the application on the target managed nodes on specified schedule.
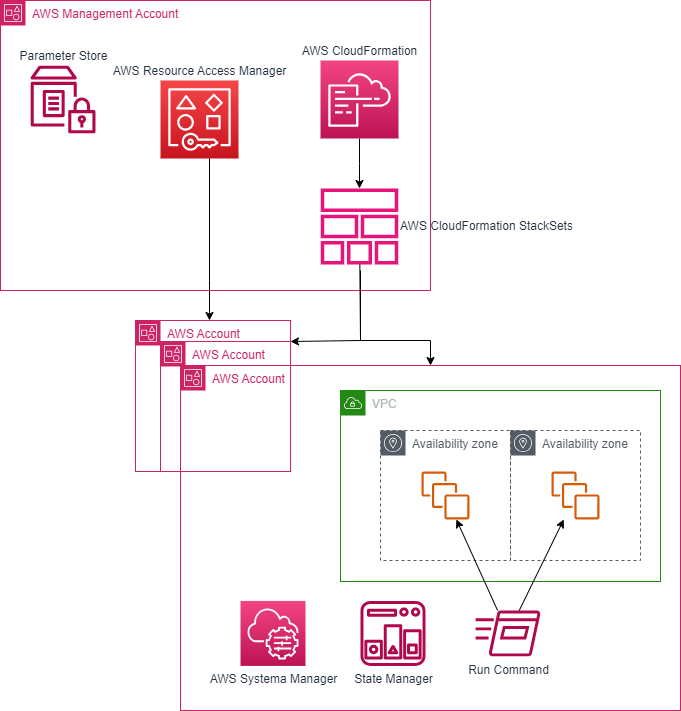
Figure 1 – Architectural diagram
Prerequisites
- EC2 instances managed by Systems Manager.
- A Parameter Store parameter to store the software settings, to be able to share it with multiple accounts, it must be in the advanced parameter tier.
This is an example of the JSON object in AWS Systems Manager Parameter Store.
{
    "Packages": [
        {
            "Name": "ChocoPackage1",
            "Version": "latest",
            "Upgrade": "yes",
            "Switches": ""
        },
        {
            "Name": "ChocoPackage2",
            "Version": "latest",
            "Upgrade": "no",
            "Switches": "-—ignore-checksums"
        },
        {
            "Name": "ChocoPackage3",
            "Version": "8.4.0",
            "Upgrade": "no",
            "Switches": ""
        },
        {
            "Name": "ChocoPackage4",
            "Version": "8.4.0",
            "Upgrade": "yes",
            "Switches": ""
        }
    ]
}
Each package has the following parameter:
- “Name”: Chocolatey software packages as named on the public Chocolatey package repository.
- “Version”: “latest” or a specific version number.
- “Upgrade”: “yes” or “no” to control whether to upgrade an existing installation
- “Switches”: Provide additional switches to the choco install command. e.g (exit-when-reboot-detected)
Using the proposed JSON example showed above, that is used to specify the behavior of the solution, we are indicating all the possibilities of how a package can be managed.
- Install the latest version of ChocoPackage1 and upgrade if it’s already installed without any switches for the Chocolatey software.
{ "Name": "ChocoPackage1", "Version": "latest", "Upgrade": "yes", "Switches": "" } - Install the latest version of ChocoPackage2 if it’s not installed, but don’t upgrade an existing installation. Tell Chocolatey to not do checksum validation of the package.
{ "Name": "ChocoPackage2", "Version": "latest", "Upgrade": "no", "Switches": "-—ignore-checksums" } - Install the specific version of ChocoPackage3 if it’s not installed, but don’t upgrade an existing installation.
{ "Name": "ChocoPackage3", "Version": "8.4.0", "Upgrade": "no", "Switches": "" } - Install the specific version of ChocoPackage4 if it’s not installed and upgrade an existing installation to the specified version.
{
    "Name": "ChocoPackage4",
    "Version": "8.4.0",
    "Upgrade": "yes",
    "Switches": ""
}
This JSON specification is provided by the system administrator in AWS Systems Manager Parameter Store. The ARN of this SSM parameter store is needed as an input parameter in the AWS CloudFormation template. In a multi account environment this parameter store can be shared using AWS Resource Access Manager.
Walkthrough
The deployment can be applied in a single account environment or an AWS Organizations environment, we will explain both options.
Method 1: AWS Organizations multi-account deployment
The deployment process for this solution follows a two-step implementation strategy. First, we’ll share the SSM Parameter Store across your organization or organizational unit (OU), while simultaneously setting up the necessary Run command and association within your Management or Delegated Administrator Account. Once that’s established, we’ll move to the second step, where we’ll leverage CloudFormation StackSets to efficiently deploy the solution across all your target accounts.
For organizations requiring more flexibility in their Parameter Store sharing configuration, there’s also the option to bypass the first step and handle the SSM Parameter Store sharing manually.
Step 1: Configure CloudFormation in the Management or Delegated Administrator Account
- Download the CloudFormation template.
- Navigate to the CloudFormation console in the AWS account you would like to generate the stack.
- For Create Stack, choose With new resources (standard).
- For Template source, choose Upload a template file. Choose Choose file and select the template you downloaded in step a. Choose Next.
- For Stack name, enter a stack name (such as package-manager-chocolatey-multi-account).
- In the Parameters area, do the following:
- For PackageNameParameterArn, enter the arn of the parameter that includes the package names.
- For AssociationSchedule, enter the cron expression to use for the association in UTC. By default, automation runs daily at 01:00 AM UTC.
- For TargetAllManagedInstances, select true or false. When true, The association will target all instances managed my AWS Systems Manager in the Region. If you select false, TargetTagKey and TargetTagValue must be used.
- For TargetTagKey, enter The Tag key for the target instances managed my AWS Systems Manager in the Region. If selected, the TargetAllManagedInstances must set to false.
- For TargetTagValue, enter The Tag value for the target instances managed my AWS Systems Manager in the Region. If selected, the TargetAllManagedInstances must set to false.
- Choose Next.
- For ResourceSharePrincipal, specify the arn of an organization or organizational unit (OU) in AWS Organizations to associate with the resource share.
- In the Configure stack options page, choose Next.
- Select I acknowledge that AWS CloudFormation might create IAM resources with custom names, then choose Submit.
The CloudFormation template creates a Systems Manager command document, State Manager association and shares the parameter with the ResourceSharePrincipal. After the template has deployed, choose Outputs as shown in Figure 2 and note the values of the AWSSystemsManagerStateManagerAssociation, and SystemsManagerCommandDocument outputs.
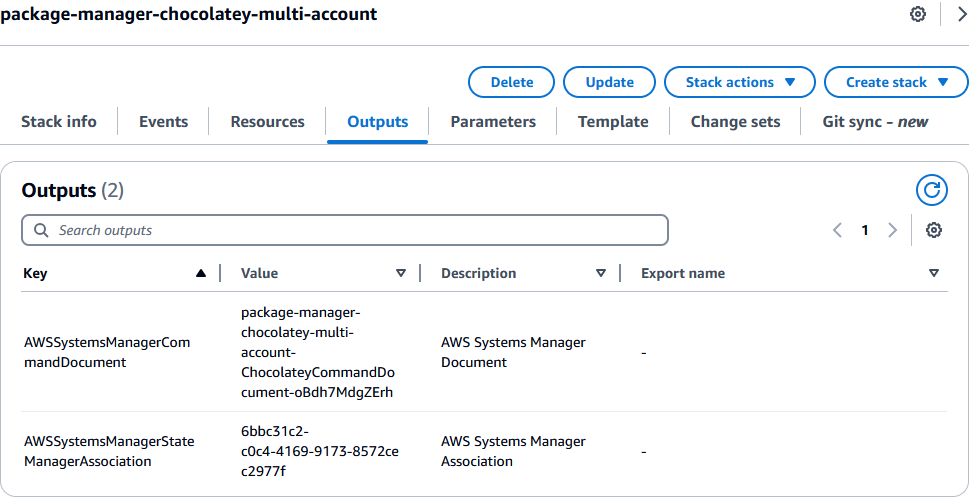
Figure 2 – CloudFormation outputs
Step 2: Configure CloudFormation StackSets in the Management or Delegated Administrator Account
- Download the CloudFormation template.
- Navigate to the CloudFormation console.
- Select StackSets.
- If you haven’t used StackSets before, complete the CloudFormation StackSets prerequisites.
- Choose Create StackSet.
- In the Specify template area, choose Upload a template file. Choose Choose file and select the template you downloaded. Leave all other parameters at their default values. Choose Next.
- In the Specify StackSet details page, do the following:
- For Stack name, enter a stack name such as package-manager-chocolatey-multi-account-stackset).
- For PackageNameParameterArn, enter the arn of the parameter that includes the package names.
- For AssociationSchedule, enter the cron expression to use for the association in UTC. By default, automation runs daily at 01:00 AM UTC.
- For TargetAllManagedInstances, select true or false. When true, The association will target all instances managed my AWS Systems Manager in the region. If you select false, TargetTagKey and TargetTagValue must be used.
- For TargetTagKey, enter The Tag key for the target instances managed my AWS Systems Manager in the region. If selected, the TargetAllManagedInstances must set to false.
- For TargetTagValue, enter The Tag value for the target instances managed my AWS Systems Manager in the region. If selected, the TargetAllManagedInstances must set to false. Choose Next.
- For ResourceSharePrincipal, leave it empty.
- Choose Next.
- In the Configure StackSet options page, choose Next.
- In the Set deployment options page:
- Select Deploy new stack.
- For Deployment locations, select Deploy stacks in organizational units (OUs) or Deploy to accounts.
- Based on your selection enter AWS OU ID, Account numbers or Organization numbers.
- (Optional) For Account filter type, select None.
- For Specify regions, select the current region.
- Choose Next.
- Select I acknowledge that AWS CloudFormation might create IAM resources with custom names, then choose Submit.
After these steps, the StackSet will now create the necessary resources in each target account. To check the deployment status, navigate back to the CloudFormation StackSet console, select the package-manager-chocolatey-multi-account-stackset, and select Stack instances. Each target account should be listed with a Detailed Status value of SUCCEEDED as shown in Figure 3.
The setup for multi-account is now complete and packages are going to be install\upgrade on the target instances as per the schedule mentioned during solution deployment.
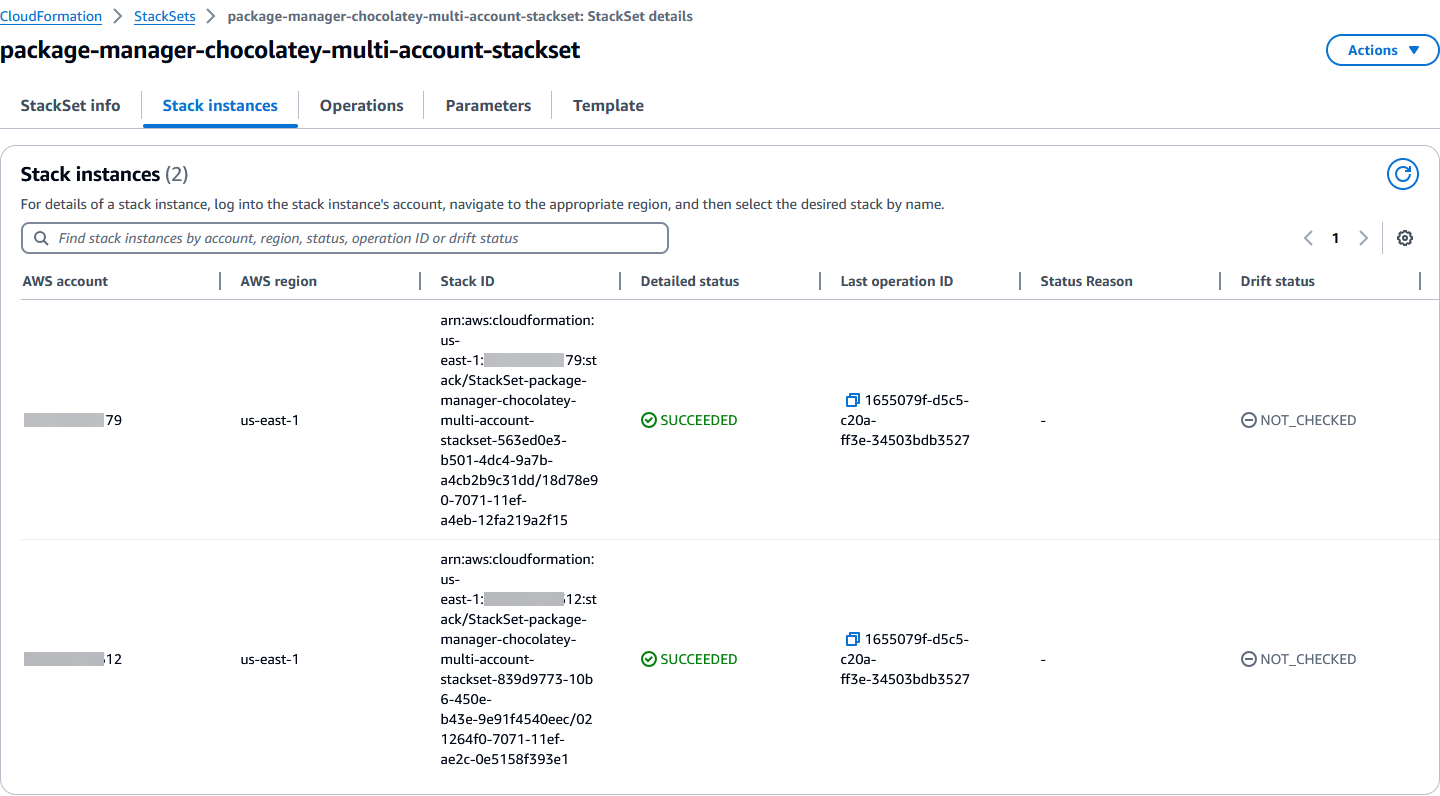
Figure 3 – CloudFormation stackset deployment status from Central Account
Method 2: Single account deployment
If you are looking to gather this information within a single AWS account, follow these steps to deploy the solution.
- Download the CloudFormation template.
- Navigate to the CloudFormation console in the AWS account you would like to generate the report in.
- For Create Stack, choose With new resources (standard).
- For Template source, choose Upload a template file. Choose Choose file and select the template you downloaded in step 1. Choose Next.
- For Stack name, enter a stack name (such as package-manager-chocolatey-single-account).
- In the Parameters area, do the following:
- For PackageNameParameterArn, enter the arn of the parameter that includes the package names.
- For AssociationSchedule, enter the cron expression to use for the association in UTC. By default, automation runs daily at 01:00 AM UTC.
- For TargetAllManagedInstances, select true or false. When true, The association will target all instances managed my AWS Systems Manager in the region. If you select false, TargetTagKey and TargetTagValue must be used.
- For TargetTagKey, enter The Tag key for the target instances managed my AWS Systems Manager in the region. If selected, the TargetAllManagedInstances must set to false.
- For TargetTagValue, enter The Tag value for the target instances managed my AWS Systems Manager in the region. If selected, the TargetAllManagedInstances must set to false. Choose Next.
- For ResourceSharePrincipal, leave it empty.
- In the Configure stack options page, choose Next.
- Select I acknowledge that AWS CloudFormation might create IAM resources with custom names, then choose Submit.
The CloudFormation template creates a Systems Manager Command document and an SSM State Manager association. The setup for single account and single Region is now completed, and packages are going to be installed and upgraded on the target instances as per the schedule mentioned during solution deployment.
After deployment, as an alternative for manual execution, you can run the State Manager association outside of the selected schedule by navigate to the Systems Manager console, select State Manager, filter using the value of AWSSystemsManagerStateManagerAssociation as shown in Figure 2. Select the association and and choice Apply association now as should in Figure 4
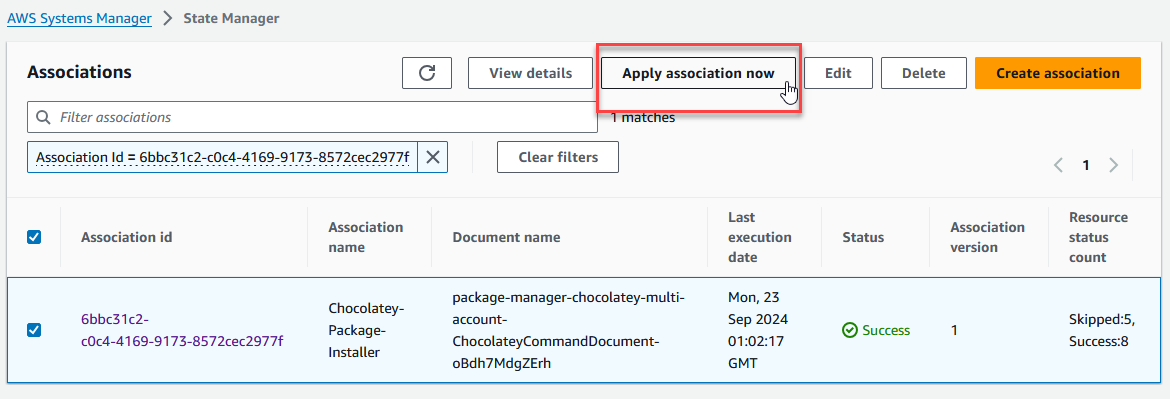
Figure 4 – Running state manager association on demand
Check the status of the association executions and every nodes status using the steps here.
Cleaning up
Deploying this solution will provision AWS resources and incur costs. Once you complete testing and no longer need the scaling mechanism, there are two steps that you would need to follow to cleanup your resources.
- Remove the provisioned resources by deleting the AWS CloudFormation stack created as a part of this example. Navigate to the CloudFormation console and select the stack created as part of this walkthrough. Choose Delete, and then choose Confirm when prompted. All resources originally created by the AWS CloudFormation template will be deleted.
- Delete SSM Parameter that host the package configuration.
Conclusion
Using AWS Systems Manager, we are using as an orchestration tool to deploy and upgrade packages using Chocolatey in a large fleet of Windows nodes machines. A centralized AWS SSM Parameter store object is used to indicate centralized point where the packages name, versions and upgrade options are store. We did the test using the open-source version of Chocolatey, so if the software was manually installed Chocolatey will try to reinstall it. If the commercial version is used this solution could be extended to make Chocolatey to recognize the software already installed in the server.
With this solution, we deployed a mechanism that allows to centrally specify how different software packages could be managed in a fleet of Windows Server nodes, in a single AWS account or in a multi account landing zone. Leveraging Chcocolatey and its already existing database of software packages and its installation and upgrade features.