Networking & Content Delivery
Use Amazon VPC Lattice to streamline and secure TCP resource connectivity across multiple AWS Accounts
This guide demonstrates how to use Amazon VPC Lattice to establish secure TCP resource connectivity across multiple AWS accounts in an Amazon Web Services (AWS) Organizations environment. We show how to create a service network in a centralized networking account and share it with other accounts to enable secure cross-account database access.
Prerequisites
For this post we use multiple AWS accounts within an Organization and assume basic familiarity with the following services:
- Amazon Virtual Private Cloud (Amazon VPC)
- AWS Organizations
- AWS Resource Access Manager (AWS RAM)
- Amazon Relational Database Service (Amazon RDS)
- AWS Command Line Interface (AWS CLI)
- AWS CloudShell
- Security Groups
Furthermore, the following preconfigurations are needed to successfully complete the setup:
- Enable VPC DNS attributes—DNS hostnames and DNS resolution
- Enable Resource Access Manager at the Organization level
VPC Lattice components for cross-account access
The following sections outline the key components that enable cross-account access in VPC Lattice.
Service networks
A service network is the foundational component that enables cross-account connectivity at scale. It acts as a logical container for your resources. Its key characteristics include the following:
- A service network helps you group related services or resource configurations.
- A service network provides consistent security policies.
- A service network can be shared with other AWS accounts using AWS RAM.
There are two ways that a VPC can be connected to a service network:
- Service network VPC association (SN-A): Allows clients deployed in a VPC to access the service network. The service network cannot be accessed from outside of the associated VPC. A VPC can have only one service network association.
- Service network VPC endpoint (SN-E): Allows clients deployed in a VPC to access the service network in more ways than SN-A. It also allows clients outside of the VPC to access the respective service network endpoint, if they have network connectivity to the VPC. For example, clients can access a service network VPC endpoint from a peered VPC through AWS Cloud WAN or AWS Transit Gateway, or from on-premises through AWS Direct Connect or AWS Site-to-Site VPN.
VPC Lattice services
A VPC Lattice service consists of listeners (protocol and port number), routing rules that allow you to control application flows (for example, path, method, header-based, or weighted routing), and one or more target groups, which define your application infrastructure.
VPC Lattice services represent your applications and APIs that need to be accessed across accounts. Key characteristics include the following:
- Multiple protocols supported: HTTP, HTTPS, gRPC, and TLS.
- Configurable routing rules.
- Shareable across accounts using AWS RAM.
- Has built-in authentication and authorization.
VPC resources
A resource can be an IP address, a domain name (DNS) target, or an Amazon Resource Name (ARN) of an RDS database that is encapsulated in a resource configuration and connected through a resource gateway using TCP protocol. Using ARN in the resource configuration of an RDS database has the benefit that the database can be accessed by clients in consumer VPCs using its actual endpoint.
A resource gateway is a point of ingress into the VPC in which resources reside. Resource configurations define how your TCP resources are exposed and accessed within the VPC Lattice network. Key characteristics include the following:
- Supported protocol is TCP.
- Multiple resource configurations can be attached to a single resource gateway.
- Resource configurations can be shared across accounts using AWS RAM. Alternatively, if you share a service network, then all resources configurations within the service network are shared with the other AWS account.
In the next section we show SN-E endpoint connectivity to a resource in a VPC Lattice service network by using resource configuration and resource gateway.
Architecture overview
The following diagram shows a high-level architecture example of cross account network connectivity that you are building out in this post.
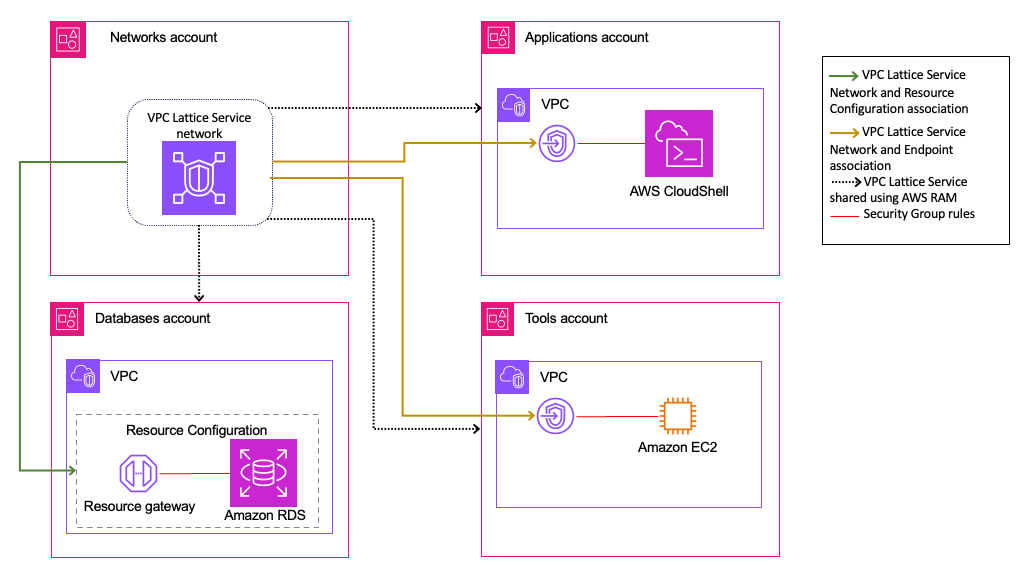
Figure 1: High level architecture of VPC Lattice service network sharing across multiple accounts in an AWS Region.
Setting up cross-account access: step-by-step guide
In this section we provide a step-by-step procedure using AWS CLI to securely access an RDS database present in the “Databases” account from multiple accounts, namely, “Applications” and “Tools”. For centralized management of the VPC Lattice service network, you create the service network in a dedicated “Networks” account and share it with the other accounts.We also show steps to create an RDS database for the sake of completeness. The database should not be publicly accessible and should be using the database subnet group created with private subnets only.
Step 1: Check that DNS settings are enabled for all AWS accounts
You can check VPC level DNS settings: EnableDnsSupport and EnableDnsHostnames are enabled using the following commands. Set the correct value for “VPC_ID” for your account in the following code block. Check this for all the accounts that you are going to use this demonstration.
List VPC’s in your account
aws ec2 describe-vpcs --query "Vpcs[].[VpcId,CidrBlock]" \
    --output text vpc-04d98b8b24aab7e20 172.31.0.0/16
Set the vpc id in a variable VPC_ID=”vpc-04d98b8b24aab7e20″
Print if DNS support is enabled
aws ec2 describe-vpc-attribute \
    --vpc-id ${VPC_ID} --attribute enableDnsSupport \
    --output text vpc-04d98b8b24aab7e20
ENABLEDNSSUPPORT False
Print if DNS Hostnames is enabled
aws ec2 describe-vpc-attribute \
    --vpc-id ${VPC_ID} --attribute enableDnsHostnames \
    --output text vpc-04d98b8b24aab7e20
ENABLEDNSHOSTNAMES False
If DNS resolution settings are not enabled, then enable them using the following AWS CLI commands.
Run these commands only if the DNS attributes not in the enabled state.
Save your vpc id in a variable
VPC_ID="vpc-04d98b8b24aab7e20"Enable DNS hostnames
aws ec2 modify-vpc-attribute \
    --vpc-id ${VPC_ID} \
    --enable-dns-hostnames "{\"Value\":true}"
Enable DNS resolution
aws ec2 modify-vpc-attribute \
    --vpc-id ${VPC_ID} \
    --enable-dns-support "{\"Value\":true}"
Step 2: Set up service network in the networks account
We are using some variables so that you can consistently use important attribute values across all commands in this section. In this example, we are using DB_ACCT_ID to specify the account ID of the database account where the RDS resource is present. The APP_ACCT_ID and TOOLS_ACCT_ID are two variables that we specify specify for the account IDs where the client applications that need to access the RDS resource is present.
Specify your database account
DB_ACCT_ID=1234567890Specify your application account id
APP_ACCT_ID=3456789012Specify your tools account id
TOOLS_ACCT_ID=5678901234Name of the service network you want to create
SVC_NW_NAME="prod-services"Name of the RAM resource share
RAM_SHARE_NAME="prod-services-share"Create the service network in the network account.
Create the service network and save the service network ARN in SVC_NW_ARN variable.
SVC_NW_ARN=$(aws vpc-lattice create-service-network  /
    --name ${SVC_NW_NAME} /tags Key=Environment,Value=Production /
    query 'arn' --output text)
Share the service network with other accounts: databases, applications, and tools.
Share service network with the required accounts
aws ram create-resource-share \
    --name ${RAM_SHARE_NAME} \
    --resource-arns ${SVC_NW_ARN} \
    --principals ${DB_ACCT_ID} ${APP_ACCT_ID} ${TOOLS_ACCT_ID}
Step 3: Create RDS Resource and Resource Configuration in Databases Account
Before you create a resource configuration, you need an RDS database. For this post, create a new RDS database with its own database subnet group and security group.First we set some important variables that you can consistently use across all of your commands.You should use your private subnets for your database subnet group.Specify the variables for the RDS subnet IDs and VPC ID.
List VPC subnets you can use for your database subnet group
aws ec2 describe-subnets \
    --query 'Subnets[].[VpcId,SubnetId,CidrBlock,AvailabilityZone]' \
	--output table
---------------------------------------------------------------------------------------
|                                   DescribeSubnets                                   |
+------------------------+----------------------------+-----------------+-------------+
| vpc-054a89f1743629a5a  | subnet-00e9566065f274aa0   | 172.31.32.0/20  | us-east-1a  |
| vpc-054a89f1743629a5a  | subnet-0265a446d8838de07   | 172.31.48.0/20  | us-east-1e  |
| vpc-054a89f1743629a5a  | subnet-02bd22ba455d2b292   | 172.31.80.0/20  | us-east-1c  |
| vpc-054a89f1743629a5a  | subnet-062da40b8991dc44e   | 172.31.64.0/20  | us-east-1f  |
| vpc-054a89f1743629a5a  | subnet-0f40c436b91246b36   | 172.31.16.0/20  | us-east-1d  |
| vpc-054a89f1743629a5a  | subnet-0d2d7b6f1e0dcc563   | 172.31.0.0/20   | us-east-1b  |
+------------------------+----------------------------+-----------------+-------------+
Set a variable to list private subnet identifiers you want to use for the database subnet group
RDS_SUBNET_IDS="subnet-00e9566065f274aa0 subnet-0265a446d8838de07"Specify the VPC id for subnets
DB_VPC_ID=vpc-0fcf941a64cbb74e7Set the remaining variables that we use for the remaining commands in this section.
Set name of RDS subnet group you will create
RDS_SUBNET_GRP_NAME=rds-subnet-groupSet name of RDS security group you will create
RDS_SECURITY_GROUP=rds-security-groupSet name of RDS parameter group you will create
RDS_PARAM_GROUP_NAME=mysql-paramsSet name of RDS database you will create
RDS_NAME=mysql-prodSet a name for resource gateway’s security group you will create
RESGW_SECGRP_NAME=resource-gw-sec-grpSet a name for the resource gateway you will create
RESOURCE_GATEWAY=prod-resource-gatewaySet name of resource configuration you will create
RES_CONFIG_NAME=rds-configSet name of service network that was shared by networking account
SERVICE_NETWORK_NAME=prod-servicesCreate a security group for the database with an inbound rule for the database destination port. For the CidrIp attribute for the following inbound rule, make sure that you use a valid source IP address range applicable to your VPC in the databases account.
Create security group and save returned security group id in a variable
RDS_SG_ID=$(aws ec2 create-security-group \
--group-name ${RDS_SECURITY_GROUP} \
    --description "Security group for RDS instance" \
    --vpc-id ${DB_VPC_ID} \
    --query 'GroupId' --output text)
Add inbound rule to the security group
aws ec2 authorize-security-group-ingress \
    --group-id ${RDS_SG_ID} \
    --ip-permissions '[{"IpProtocol": "tcp", "FromPort": 3306, "ToPort": 3306, "IpRanges": [{"CidrIp": "172.31.0.0/16"}], "Ipv6Ranges": []}]
Create the database subnet group.
Create DB subnet group
aws rds create-db-subnet-group \
    --db-subnet-group-name "${RDS_SUBNET_GRP_NAME}" \
	--db-subnet-group-description "Subnet group for RDS" \
	--subnet-ids ${RDS_SUBNET_IDS}
Create the database parameter group.
Create RDS parameter group
aws rds create-db-parameter-group \
    --db-parameter-group-family mysql8.0 \
    --db-parameter-group-name "${RDS_PARAM_GROUP_NAME}" \
    --description "MySQL parameter group"
You can create the RDS instance using the RDS security group, subnet group, and parameter group that you just created.
Create MySQL RDS instance
aws rds create-db-instance \
    --db-instance-identifier ${RDS_NAME} \
    --db-instance-class db.t3.medium \
    --engine mysql \
    --engine-version "8.0" \
    --master-username admin \
    --master-user-password "YourSecurePassword123!" \
    --allocated-storage 20 \
    --storage-type gp3 \
    --vpc-security-group-ids ${RDS_SG_ID} \
    --db-subnet-group-name "${RDS_SUBNET_GRP_NAME}" \
    --db-parameter-group-name "${RDS_PARAM_GROUP_NAME}" \
    --backup-retention-period 7 \
    --no-multi-az \
    --port 3306 \
    --no-publicly-accessible \
    --tags Key=Environment,Value=Production
Wait for RDS instance to be available and see its ARN identifier
aws rds describe-db-instances \
    --db-instance-identifier ${RDS_NAME} \
	--query "DBInstances[].DBInstanceArn" \
	--output textarn:aws:rds:us-east-1:1234567890:db:mysql-prod
Wait a few minutes for the RDS instance to become available.
Now that the RDS instance has been created, you can follow the VPC Lattice configuration steps.
Create a security group for the resource gateway. To demonstrate strict security, we remove the default outbound rule and add a strict outbound rule from the resource gateway to the database’s security group ID only. This limits traffic only to the RDS database from the resource gateway. In the following code block, replace the cidr IP address range to match what is in your resource gateway security group that was created.
Create security group for Resource Gateway and save the security group id in a variable.
RESGW_SG_ID=$(aws ec2 create-security-group \
    --group-name ${RESGW_SECGRP_NAME} \
	--description "Security group for RDS instance" \
	--vpc-id ${DB_VPC_ID} \
	--query 'GroupId' \
    --output text)
Delete the default outbound rule from the resource gateway security group
aws ec2 revoke-security-group-egress \
    --group-id ${RESGW_SG_ID} \
    --protocol all\
    --port all \
    --cidr 172.31.0.0/16
Add a restrictive outbound rule to RDS security group
aws ec2 authorize-security-group-egress \
--group-id ${RESGW_SG_ID} \
 --ip-permissions '[{"IpProtocol": "tcp", "FromPort": 3306, "ToPort": 3306, "UserIdGroupPairs": [{"GroupId": "'${RDS_SG_ID}'"}], "Ipv6Ranges": []}]'
Create a resource gateway and save gateway id in a variable
RES_GW_ID=$(aws vpc-lattice create-resource-gateway \
    --name "${RESOURCE_GATEWAY}" \
    --vpc-identifier ${DB_VPC_ID} \
    --security-group-ids ${RESGW_SG_ID} \
    --subnet-ids ${RDS_SUBNET_IDS} \
    --tags Key=Environment,Value=Production \
    --query "id" \
    --output text)
Next, create the resource configuration using the resource gateway and ARN of the RDS security group just created.
Fetch RDS ARN identifier
RDS_ARN=$(aws rds describe-db-instances \
    --db-instance-identifier ${RDS_NAME} \
	--query "DBInstances[].DBInstanceArn" \
	--output text)
Create resource configuration using RDS arn and save resource config id in a variable.
RES_CFG_ID=$(aws vpc-lattice create-resource-configuration \
     --name ${RES_CONFIG_NAME} \
     --allow-association-to-shareable-service-network \
	 --resource-gateway-identifier ${RES_GW_ID} \
	 --type ARN \
	 --resource-configuration-definition "arnResource={arn=${RDS_ARN}}" \
	 --tags Key=Environment,Value=Production \
     --query 'id' \
     --output text)
Finally, add the resource configuration to the shared service network so that it is available to the consumer applications through the VPC endpoint that we create later in the tools account.
Get the shared service network id based on shared service network name specified in SERVICE_NETWORK_NAME variable.
SVC_NW_ID=$(aws vpc-lattice list-service-networks --query "items[?name=='$SERVICE_NETWORK_NAME'].id" --output text)Associate the shared service network with the resource configuration
aws vpc-lattice create-service-network-resource-association \
 --service-network-identifier ${SVC_NW_ID} \
 --resource-configuration-identifier

${RES_CFG_ID}{    "arn": "arn:aws:vpc-lattice:us-east-1:9012345678:servicenetworkresourceassociation/snra-004e578511aed83c0",    "createdBy": "9012345678",    "id": "snra-004e578511aed83c0",    "status": "CREATE_IN_PROGRESS"}
After a few seconds you can run following command to confirm that the resource configuration association is ACTIVE.
aws vpc-lattice list-service-network-resource-associations --query

"items[].{serviceNetworkName:serviceNetworkName,id:id,status:status,privateDnsEntry:privateDnsEntry}" --output text snra-004e578511aed83c0  None    prod-services   ACTIVEsnra-0c6221d3131abd168  {'domainName': 'mysql-prod.czqq4qaoegqb.us-east-1.rds.amazonaws.com'}   prod-services   ACTIVE
Step 4: Set up service network endpoint in applications account
In this step we set up some important variables needed for the commands in this section.
Get the VPC id for our consumer account and save in a variable
APP_VPC_ID=$(aws ec2 describe-vpcs --query "Vpcs[].VpcId" --output text)Print and confirm that the VPC id is correct
echo $APP_VPC_IDSet a name for the VPC endpoint’s security group you will create
ENDPT_SECGRP_NAME=endpt_secgrpGet the shared service network arn and save in a variable
SHARED_SVC_NW_ARN=$(aws vpc-lattice list-service-networks --query "items[].arn" --output text)# Verify service network arn is assigned to the variable
echo $SHARED_SVC_NW_ARN

arn:aws:vpc-lattice:us-east-1:9012345678:servicenetwork/sn-0c68c9e9d598dacd5
List all the subnets
aws ec2 describe-subnets --query "Subnets[].[VpcId,AvailabilityZoneId,SubnetId,CidrBlock]" --output text

use1-az3        172.31.48.0/20  subnet-008486d18c8ffb93f
use1-az5        172.31.64.0/20  subnet-0b66ff1bdd5755f78
use1-az4        172.31.16.0/20  subnet-0c2ca46dee76f4192
use1-az2        172.31.80.0/20  subnet-0ad4d61ccd3b1f7c6
use1-az6        172.31.32.0/20  subnet-07157df629136dd87
use1-az1        172.31.0.0/20   subnet-0d9da76ade9981c13
Set the private subnets we want to use for the endpoint.
ENDPT_SUBNET_IDS="subnet-0ad4d61ccd3b1f7c6 subnet-0b66ff1bdd5755f78 subnet-0c2ca46dee76f4192"First, we create the security group to control inbound access to the endpoint. For strict security, we remove the default outbound rule and add a restrictive inbound rule to the database port from only resources that also have the endpoint security group associated with them. Therefore, only client resources that also have resource gateway’s security group can connect on the database port on the VPC endpoint. This allows us to quickly enable or disable which clients in the VPC can connect to the RDS ARN through the endpoint by just adding or removing the endpoint security group from their security group settings.
Create a security group for endpoint and save the security group name in a variable
ENDPT_SG_ID=$(aws ec2 create-security-group \
    --group-name ${ENDPT_SECGRP_NAME} \
	--description "Secgrp for vpc lattice endpoint" \
	--vpc-id ${APP_VPC_ID} \
    --query 'GroupId' \
    --output text)
Delete the default outbound rule from the resource gateway security group
aws ec2 revoke-security-group-egress \
    --group-id ${ENDPT_SG_ID} \
    --protocol all\
    --port all \
    --cidr 0.0.0.0/0
Add a restrictive inbound rule to endpoint security group
aws ec2 authorize-security-group-ingress \
    --group-id ${ENDPT_SG_ID} \
    --ip-permissions '[{"IpProtocol": "tcp", "FromPort": 3306, "ToPort": 3306, "UserIdGroupPairs": [{"GroupId": "'${ENDPT_SG_ID}'"}], "Ipv6Ranges": []}]'
We can create the service network VPC endpoint using the security group just created.
Create vpc endpoint of type service network and private dns enabled
aws ec2 create-vpc-endpoint \
    --vpc-id ${APP_VPC_ID} \
    --subnet-ids ${ENDPT_SUBNET_IDS} \
    --security-group-ids ${ENDPT_SG_ID} \
    --vpc-endpoint-type ServiceNetwork \
    --service-network-arn ${SHARED_SVC_NW_ARN} \
    --private-dns-enabled \
    --tag-specifications "ResourceType=vpc-endpoint,Tags=[{Key=Name,Value=prod-rds-endpoint}]"

{    "VpcEndpoint":
{        "VpcEndpointId": "vpce-09f574bdc289d2c48",        "VpcEndpointType": "ServiceNetwork",
"VpcId": "vpc-0625d6567a455ba29",
"State": "Pending",
"SubnetIds": [
"subnet-0ad4d61ccd3b1f7c6",            "subnet-0b66ff1bdd5755f78",            "subnet-0c2ca46dee76f4192"        ],
 "Groups": [
{
 "GroupId": "sg-00b013fceee153870",                "GroupName": "endpt_secgrp"
 }        ],
"IpAddressType": "IPV4",        "PrivateDnsEnabled": true,        "CreationTimestamp": "2025-05-17T15:50:12.729000+00:00",
 "Tags": [
   {                "Key": "Name",                "Value": "prod-rds-endpoint"            }
   ],
  "OwnerId": "3456789012",
"ServiceNetworkArn": "arn:aws:vpc-lattice:us-east-1:9012345678:servicenetwork/sn-0c68c9e9d598dacd5"    }}
After a few seconds check the endpoint is in Available state.
Verify endpoint status
aws ec2 describe-vpc-endpoints --query "VpcEndpoints[?VpcEndpointType == 'ServiceNetwork'].{VpcEndpointId:VpcEndpointId,State:State}" --output textAvailable
vpce-09f574bdc289d2c48
If the endpoint status looks good, then print the endpoint details to verify if the private DNS name of the RDS endpoint is visible.
Set the VPC endpoint id in a variable
ENDPT_ID=$(aws ec2 describe-vpc-endpoints --query "VpcEndpoints[?VpcEndpointType == 'ServiceNetwork'].VpcEndpointId" --output text)Print that private DNS entry of RDS is listed and ‘Accessible’ for the endpoint.
aws ec2 describe-vpc-endpoint-associations --query "VpcEndpointAssociations[?VpcEndpointId == '${ENDPT_ID}'].{ServiceNetworkName:ServiceNetworkName,AssociatedResourceAccessibility:AssociatedResourceAccessibility,PrivateDnsEntry:PrivateDnsEntry.DnsName}" --output textAccessible
mysql-prod.czqq4qaoegqb.us-east-1.rds.amazonaws.com     prod-services
Finally, open a CloudShell in a VPC environment, as shown in the following screenshot, with the endpt_secgrp security group also attached to it so that you can connect to the VPC service network endpoint without being blocked by the endpoint’s security group.
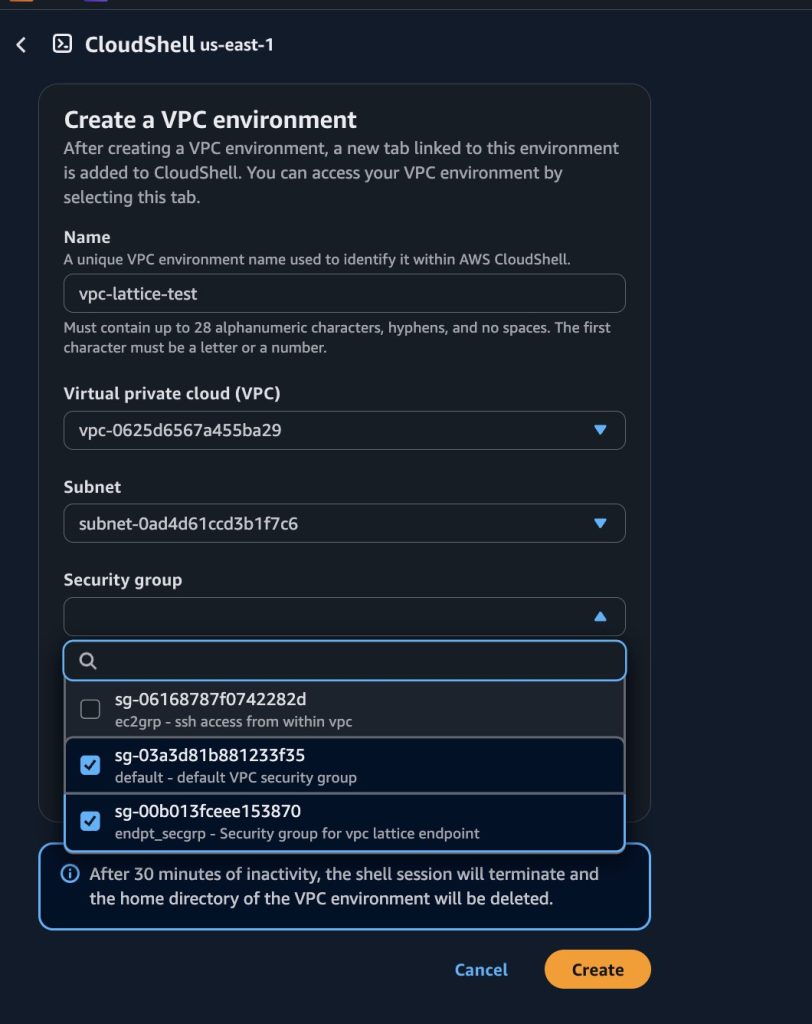
Figure 2: Launching CloudShell in VPC environment with the VPC endpoint’s security group also chosen
Use MySQL command as shown in the following screenshot with the private DNS entry of the RDS database.
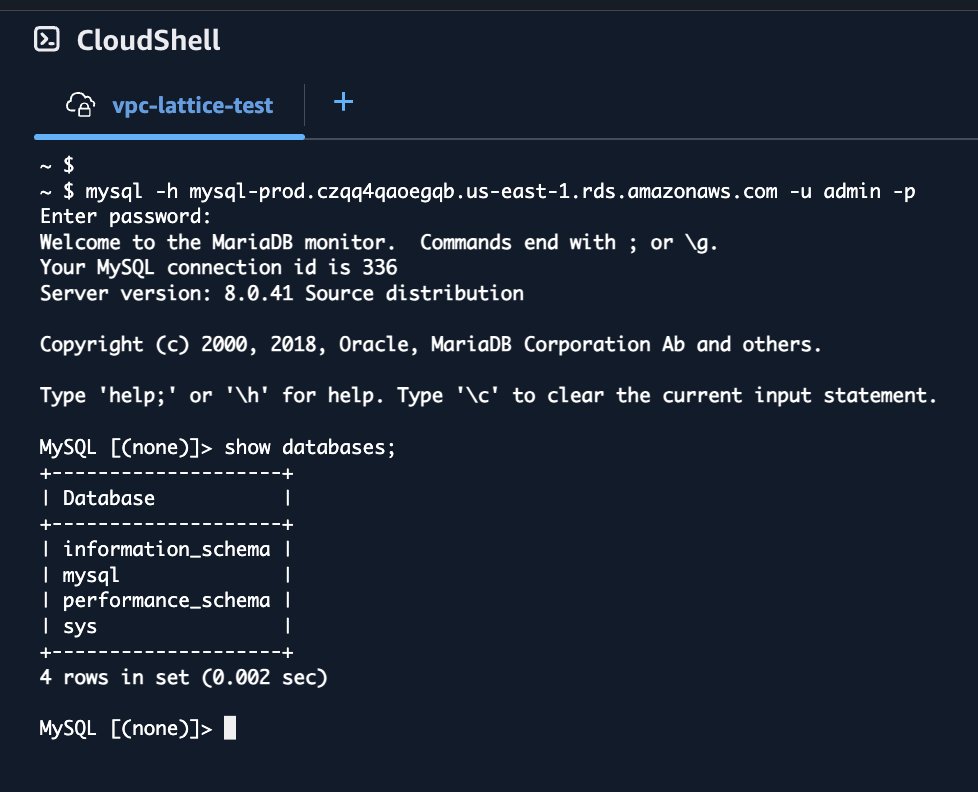
Figure 3: Connecting to the MySQL RDS database using its private DNS entry across accounts.
Optionally, repeat the same steps in this section in the Tools account as well to create a service network endpoint and connect from your application running on resources such as Amazon Elastic Compute Cloud (Amazon EC2), Amazon Elastic Kubernetes Service (Amazon EKS), or Amazon Elastic Container Service (Amazon ECS). This helps you confirm that the same RDS resource is accessible from Tools account, as well as the Applications account.
This brings us to the end of the setup process. You can delete all the resources you created as part of this post by following steps in the cleanup procedures in the next section.
Clean up procedures
We cleanup the resoures in all three AWS accounts.
Clean up the applications account
Delete the CloudShell created for testing.

Delete service network endpoint and security group from Applications account.
If necessary, confirm the vpc endpoint id of type service network
ENDPT_ID=$(aws ec2 describe-vpc-endpoints --query "VpcEndpoints[?VpcEndpointType == 'ServiceNetwork'].VpcEndpointId" --output text)Verify endpoint id
echo $ENDPT_IDDelete the endpoint by providing the correct endpoint id
aws ec2 delete-vpc-endpoints --vpc-endpoint-ids ${ENDPT_ID}After endpoint has been deleted, delete the security group
aws ec2 delete-security-group --group-name endpt_secgrpRepeat the same cleanup steps in the “Tools” account as well, if you have created an endpoint there.
Clean up the databases account
Delete the resource configuration and associated resources.
List resource configuration service network association identifier
SNRA_ID=$(aws vpc-lattice list-service-network-resource-associations --query "items[?resourceConfigurationName=='rds-config'].{id:id}" --output text)Verify snra id got set
echo $SNRA_IDsnra-004e578511aed83c0Delete service network association for the resource configuration. This may take a few seconds to complete.
aws vpc-lattice delete-service-network-resource-association --service-network-resource-association-identifier ${SNRA_ID}{ "arn": "arn:aws:vpc-lattice:us-east-1:1234567890:servicenetworkresourceassociation/snra-004e578511aed83c0", "id": "snra-004e578511aed83c0", "status": "DELETE_IN_PROGRESS"}Get resource configuration identifier to be deleted.
RES_CONFIG_ID=$(aws vpc-lattice list-resource-configurations --query "items[?name=='rds-config'].{id:id}" --output text)Print resource config id has been set
echo $RES_CONFIG_IDrcfg-0e7bfee3c5ef076b8Delete resource configuration for given identifier
aws vpc-lattice delete-resource-configuration --resource-configuration-identifier ${RES_CONFIG_ID}Get id of resource gateway to be deleted
RES_GW_ID=$(aws vpc-lattice list-resource-gateways --query "items[?name=='prod-resource-gateway'].{id:id}" --output text)Print resource gateway id
echo $RES_GW_IDrgw-0888984b57580c3b8Delete resource gateway for given identifier
aws vpc-lattice delete-resource-gateway --resource-gateway-identifier ${RES_GW_ID}{ "arn": "arn:aws:vpc-lattice:us-east-1:1234567890:resourcegateway/rgw-0888984b57580c3b8", "id": "rgw-0888984b57580c3b8", "name": "prod-resource-gateway", "status": "DELETE_IN_PROGRESS"}This is continued in the following.
List id of resource gateway security group to be deleted
RES_SEC_GRP=$(aws ec2 describe-security-groups --query "SecurityGroups[?GroupName=='resource-gw-sec-grp'].{GroupId:GroupId}" --output text)Print security group name got setecho $RES_SEC_GRPsg-000e5efb581214111
Delete security group of the resource gateway
aws ec2 delete-security-group --group-id ${RES_SEC_GRP}{ "Return": true, "GroupId": "sg-000e5efb581214111"}Delete RDS. This could take a few minutes to complete.
aws rds delete-db-instance --db-instance-identifier mysql-prod --skip-final-snapshotDelete RDS parameter groupaws rds delete-db-parameter-group –db-parameter-group-name mysql-params
Delete RDS subnet groupaws rds delete-db-subnet-group –db-subnet-group-name rds-subnet-group
Set id of RDS security group to be deleted
RDS_SEC_GRP=$(aws ec2 describe-security-groups --query "SecurityGroups[?GroupName=='rds-security-group'].{GroupId:GroupId}" --output text)Check security group id got setecho $RDS_SEC_GRPsg-09edb207c44bfc884
Delete security group of the RDSaws ec2 delete-security-group –group-id ${RDS_SEC_GRP}
Clean up the networks account
Delete the AWS RAM share and the service network.
Get resource share ARN if necessary
RAM_SHARE_ARN=$(aws ram get-resource-shares --resource-owner SELF --query "resourceShares[?name=='prod-services-share'].{resourceShareArn:resourceShareArn}" --output text)Print the ram share arn
echo $RAM_SHARE_ARNarn:aws:ram:us-east-1:9012345678:resource-share/ab2dab3f-f47c-4d0b-bfeb-ea23ca09d58fDelete resource share for given ARN
aws ram delete-resource-share --resource-share-arn ${RAM_SHARE_ARN}{ "returnValue": true}Get id of service network to be deletedSVC_NW_ID=$(aws vpc-lattice list-service-networks –query “items[?name==’prod-services’].{id:id}” –output text)
Verify the service network id got set
echo $SVC_NW_IDsn-0c68c9e9d598dacd5Delete service network for given id
aws vpc-lattice delete-service-network --service-network-identifier ${SVC_NW_ID}Conclusion
In this post, we showed how you can have an application running on a server or container and access a cross-account resource in a shared service network. This design pattern can be used to scale up cross-account sharing of more resources using a common service network.
About the authors

Rajesh Ambadi
Rajesh Ambadi is a Technical Account Manager in the Media & Entertainment (M&E) space. He enjoys solving customer problems through innovative AWS solutions.

Hammad Ausaf
Hammad Ausaf is a Principal Solutions Architect in the Media & Entertainment (M&E) space. He is a passionate builder and strives to provide the best solutions to AWS customers.