AWS Open Source Blog
Running APIs Written in Java on AWS Lambda
Java developers have a vast selection of open source frameworks to build server-side APIs at their disposal: from Spring and Spring Boot to Jersey to Spark. Normally, these frameworks embed a servlet container engine, such as Tomcat, in the built package to run on a server.
In the serverless world, AWS Lambda and Amazon API Gateway are the HTTP frontend and compute platform. Today, we announce the 1.0 release of our aws-serverless-java-container framework. Serverless Java Container makes it easy to take an application written in Java with frameworks such as Spring, Spring Boot, Jersey, or Spark and run it inside AWS Lambda with minimal code changes.
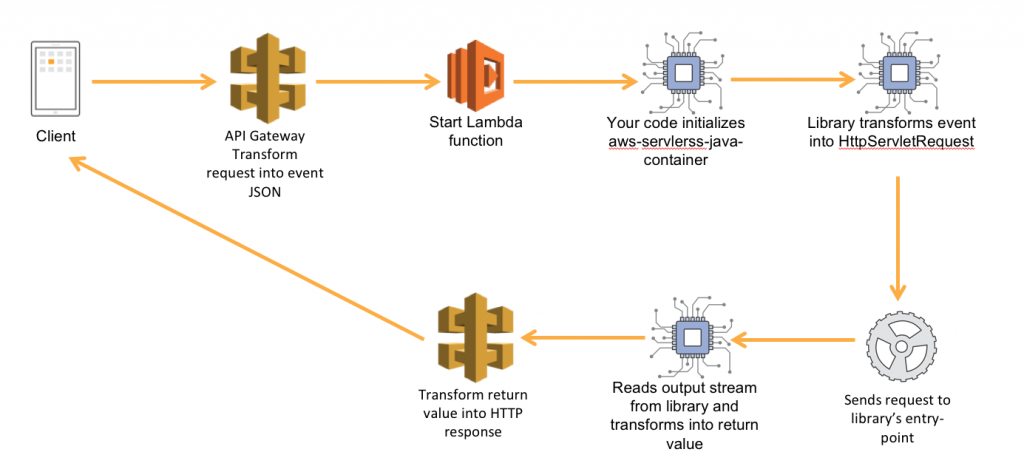
The Serverless Java Container library acts as a proxy between the Lambda runtime and the framework of your choice, pretends to be a servlet engine, translates incoming events to request objects that frameworks can understand, and transforms responses from your application into a format that API Gateway understands.
The Serverless Java Container library is available on Maven. We have different flavors of the library depending on which framework you are using: Spring, Spring Boot, Jersey, or Spark.
For this blog post, we will build a Jersey application. Other implementations of the library have a very similar structure, take a look at the quick start guides on GitHub.
Using the Maven archetypes
We have published basic Maven archetypes for all of the supported frameworks. To run through this tutorial, you will need Apache Maven installed on your local machine.
Using a terminal, open your workspace directory and run the maven command to generate a new project from an archetype. Make sure to replace the groupId and artifactId with your preferred settings:
The mvn client asks you to confirm the parameters and then generates the project structure. In this sample, we used the aws-serverless-jersey-archetype – we have similar artifacts for spring, springboot, and spark. Let’s step through the generated code structure. If you just want to get going and test your basic application, skip straight to the local testing section.
The Jersey application
Using your favorite IDE, open the archetype project. The simple application included in the Jersey archetype, defines a /ping path that returns a JSON hello world message.
In your code package, in my case under my.service, you will find a resource package with a PingResource class. The ping class is annotated with JAX-RS’ @Path annotation and defines a single @GET method.
@Path("/ping")
public class PingResource {

    @GET
    @Produces(MediaType.APPLICATION_JSON)
    @Consumes(MediaType.WILDCARD)
    public Response createPet() {
		// return a basic map. This will be marshalled automatically into a
		// json object with a single property
        Map<String, String> pong = new HashMap<>();
        pong.put("pong", "Hello, World!");
        return Response.status(200).entity(pong).build();
    }
}
The Lambda handler
In the main package of our application, the archetype also generated a StreamLambdaHandler class. Let’s go through the code in this class:
public class StreamLambdaHandler implements RequestStreamHandlerOur class implements Lambda’s RequestStreamHandler interface. This class is the main entry point for AWS Lambda in our application: the “handler” in Lambda’s jargon. We use a stream handler instead of the POJO-based handler because our event models rely on annotations for marshalling and unmarhsalling, but Lambda’s built-in serializer does not support annotations.
private static final ResourceConfig jerseyApplication = new ResourceConfig()
                                                            .packages("com.sapessi.jersey.resource")
                                                            .register(JacksonFeature.class);
First, we declare a static ResourceConfig, Jersey’s Application implementation, object. We configure this object to scan our resource package for annotated classes and load the JacksonFeature class to handle JSON content types.
private static final JerseyLambdaContainerHandler<AwsProxyRequest, AwsProxyResponse> handler
            = JerseyLambdaContainerHandler.getAwsProxyHandler(jerseyApplication);
Next, we declare a second static instance of the JerseyLambdaContainerHandler object. We initialize this object using the getAwsProxyHandler static method with our ResourceConfig object. The getAwsProxyHandler method automatically creates an instance of our library configured to handle API Gateway’s proxy integration events. You can create custom implementations of the RequestReader and ResponseWriter objects to support custom event types.
You will notice that both these variables are declared as static class members. They are class members because we only need a single instance of these objects. AWS Lambda tries to re-use containers across invocations. Our handler class is held by the runtime as a singleton and the handleRequest method is invoked each time. We can re-use both the ResourceConfig and JerseyLambdaContainerHandler. Static variables are instantiated by the Java runtime as Lambda starts it; this gives us better performance for the heavy introspection operations.
public void handleRequest(InputStream inputStream, OutputStream outputStream, Context context)
            throws IOException {
    handler.proxyStream(inputStream, outputStream, context);
Our implementation of the handler method is the main entry point for Lambda. Inside the handler method we make a single call, to the proxyStream method of our container handler. The proxyStream method takes care of reading our input stream into and creating an HttpServletRequest from its data. The HttpServletResponse generated by your application is automatically written to the output stream in the format Amazon API Gateway expects.
The project root
In the project root, the archetype generates three files: pom.xml, sam.yaml, and README.md.
The pom file declares our project and defines the Maven dependencies. You will see that it includes the serverless-java-container library.
<dependency>
    <groupId>com.amazonaws.serverless</groupId>
   <artifactId>aws-serverless-java-container-jersey</artifactId>
   <version>1.0</version>
</dependency>
The pom file also uses the Maven Shade plugin to generate an “uber-jar” that we can upload to AWS Lambda. Take a look at the <build> section.
The sam.yaml file is a Serverless Application Model (SAM) template we can use to deploy our application to AWS or test it locally with SAM Local. SAM is an abstraction on top of CloudFormation that makes it easier to define your serverless stacks in code. The SAM file defines a single resource, our AWS::Serverless::Function. The function is configured to use the “uber-jar” produced by the build process and points to our handler class. The API frontend is defined in the Events section of the function resource. An API Gateway RestApi, Stage, and Deployment are implicitly created when you deploy the template.
The README.md file contains a generated set of instructions to build, deploy and test the application.
Testing the application in local
You can use AWS SAM Local to start your service on your local machine. For SAM Local to work, you need Docker (community or enterprise) installed and running.
First, install SAM Local (if you haven’t already):
Next, using a terminal, open the project root folder and build the jar file.
Still in the project root folder – where the sam.yaml file is located – start the API with the SAM Local CLI.
$ sam local start-api --template sam.yaml

...
Mounting com.sapessi.jersey.StreamLambdaHandler::handleRequest (java8) at http://127.0.0.1:3000/{proxy+} [OPTIONS GET HEAD POST PUT DELETE PATCH]
...
We now have a local emulator of API Gateway and Lambda up and running. Using a new shell, you can send a test ping request to your API:
Deploying to AWS
You can use the AWS CLI to quickly deploy your application to AWS Lambda and Amazon API Gateway.
You will need an S3 bucket to store the artifacts for deployment. Once you have created the S3 bucket, run the following command from the project’s root folder – where the sam.yaml file is located:
As the command output suggests, you can now use the cli to deploy the application. Choose a stack name and run the aws cloudformation deploy command from the output of the package command.
$ aws cloudformation deploy --template-file output-sam.yaml --stack-name ServerlessJerseyApi --capabilities CAPABILITY_IAMOnce the application is deployed, you can describe the stack to show the API endpoint that was created. The endpoint should be the ServerlessJerseyApikey of the Outputs property:
Copy the OutputValue into a browser or use curl to test your first request:
Cold start notes
Java is a large runtime; we would be remiss if we didn’t include a section about cold starts. A cold start is the first invocation of your Lambda function, when AWS Lambda needs to spin up the infrastructure, launch the runtime, and start your code. Multiple factors can affect the speed at which your function starts for the first time:
- Memory and CPU allocation: AWS Lambda allocates a proportional number of CPU cycles to the memory you allocate to your functions. You will see that the generated SAM templates use 512MB of memory by default. If your code is CPU-bound, increase this parameter to improve performance.
- Code package size: Every time a Lambda function starts for the first time, it needs to download and unzip your code package. The size of your “uber-jar” matters. Be careful when importing dependencies, and use the Maven Shade plugin to strip out unnecessary transitive dependencies. For example, in the Spark implementation of this library, we exclude the embedded Jetty container.
- Code lifecycle: Starting your function for the first time, AWS Lambda creates an instance of your handler object and will re-use it for future invocations as a singleton, addressing your handleRequest method directly. This means you can use class members to cache metadata, objects, and connections that you want to re-use across invocation. Avoid caching confidential data: there is no guarantee which Lambda instance will be used, and someone, someday, will inevitably forget to clean their cached data between invocations.
- Frameworks have different features and performance characteristics. Spring and Spring Boot are extremely powerful when it comes to dependency injection and automatically wiring your application. However, you pay for all this flexibility with the cold start time – reflection is slow. Jersey only performs limited reflection to find its providers and resources. Spark, where everything is “statically linked,” is by far the fastest framework to start.
Given all these parameters, how do we pick the correct framework? If you don’t have strict latency requirements, pick the framework you are most comfortable with. In the real world, with production traffic, you will find that cold starts only impact your 99th if not 99.9th percentile metrics.
Conclusion
Serverless Java Container makes it easy to create scalable APIs with the Java framework of your choice. In this blog post we used Jersey, the library also offers archetypes for Spring, Spring Boot, and Spark. Projects created using the archetypes come pre-packaged with a working Lambda handler, a sample /ping resource, and a SAM template that allows you to quickly test your application in local and deploy it to AWS.
If you run into issues with the Serverless Java Container library, report them on our GitHub repository. For additional AWS Lambda or Amazon API Gateway questions, use the AWS forums.