AWS Security Blog
Role-based access control using Amazon Cognito and an external identity provider
September 8, 2023: It’s important to know that if you activate user sign-up in your user pool, anyone on the internet can sign up for an account and sign in to your apps. Don’t enable self-registration in your user pool unless you want to open your app to allow users to sign up.
Amazon Cognito simplifies the development process by helping you manage identities for your customer-facing applications. As your application grows, some of your enterprise customers may ask you to integrate with their own Identity Provider (IdP) so that their users can sign-on to your app using their company’s identity, and have role-based access-control (RBAC) based on their company’s directory group membership.
For your own workforce identities, you can use AWS Single Sign-On (SSO) to enable single sign-on to your cloud applications or AWS resources.
For your customers who would like to integrate your application with their own IdP, you can use Amazon Cognito user pools’ external identity provider integration.
In this post, you’ll learn how to integrate Amazon Cognito with an external IdP by deploying a demo web application that integrates with an external IdP via SAML 2.0. You will use directory groups (for example, Active Directory or LDAP) for authorization by mapping them to Amazon Cognito user pool groups that your application can read to make access decisions.
Architecture
The demo application is implemented using Amazon Cognito, AWS Amplify, Amazon API Gateway, AWS Lambda, Amazon DynamoDB, Amazon Simple Storage Service (S3), and Amazon CloudFront to achieve a serverless architecture. You will make use of infrastructure-as-code by using AWS CloudFormation and the AWS Cloud Development Kit (CDK) to model and provision your cloud application resources, using familiar programming languages.
The following diagram shows an overview of this architecture and the steps in the login flow, which should help clarify what you are going to deploy.
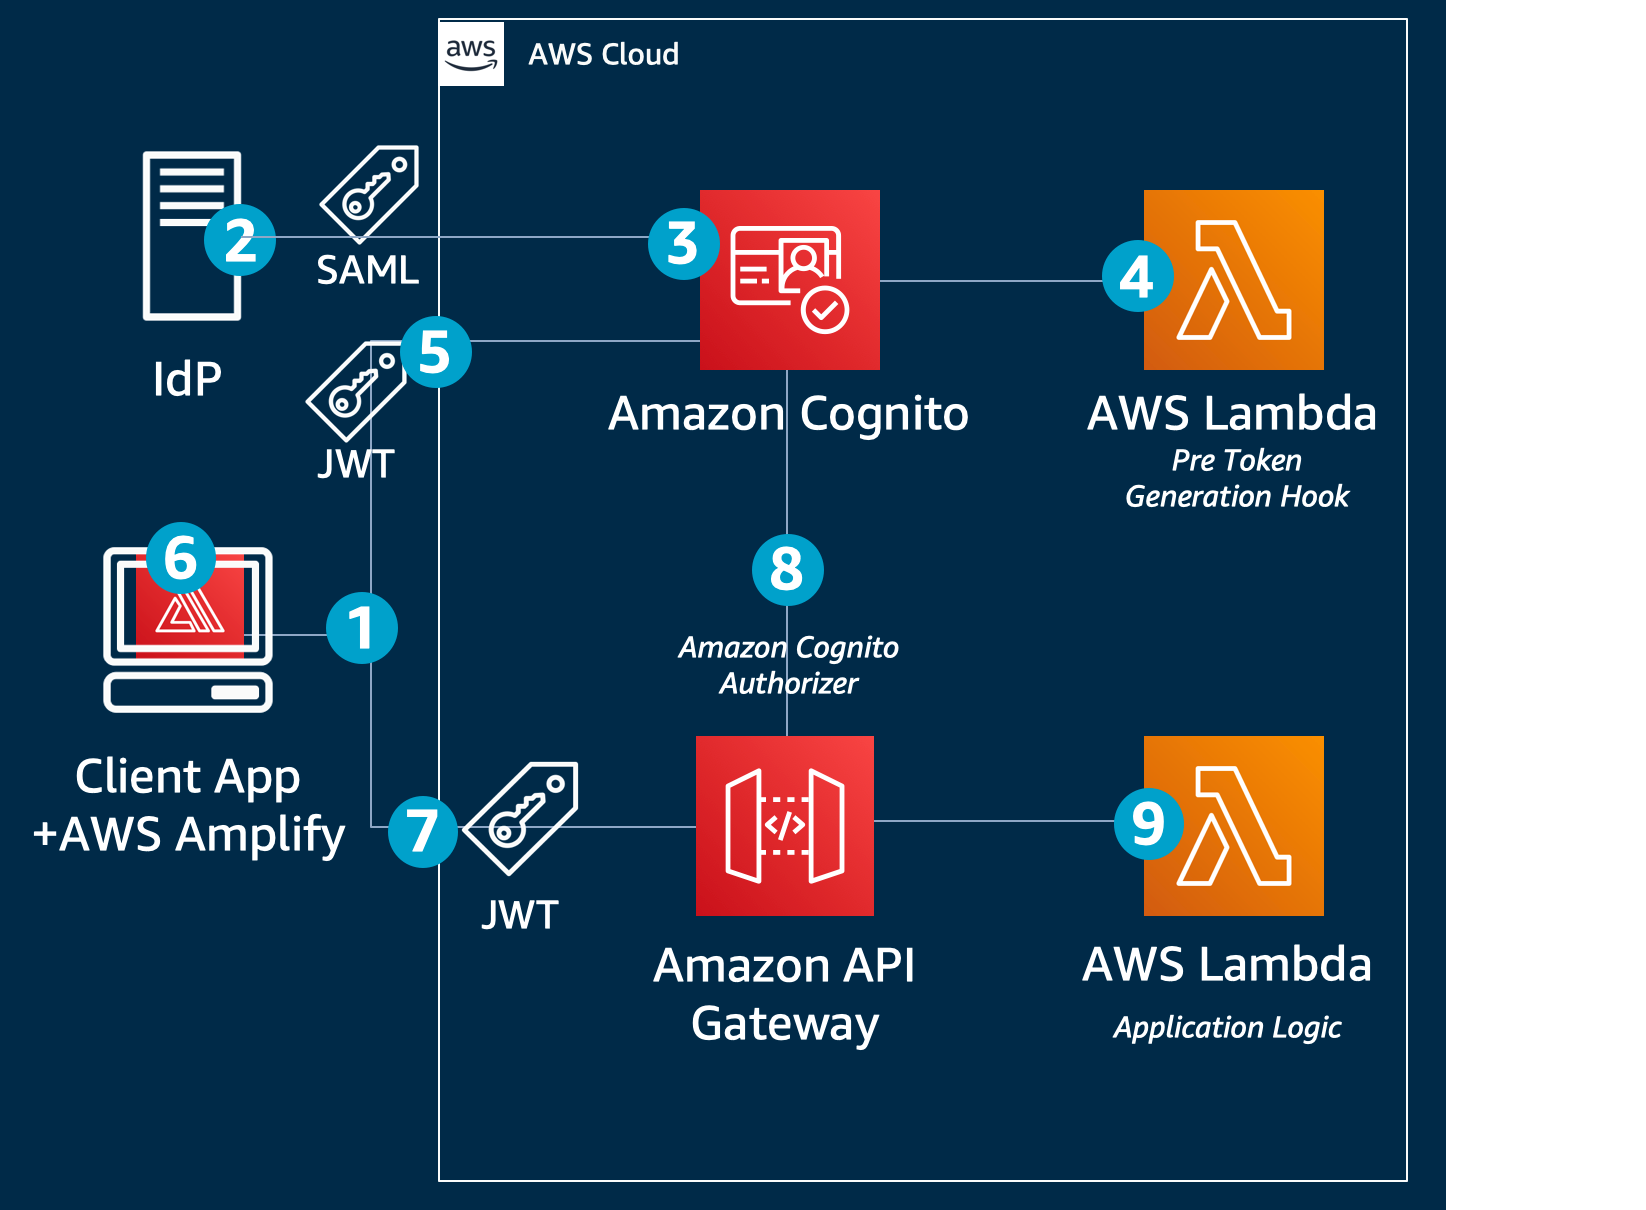
Figure 1: Architecture Diagram
First visit
When a user visits the web application at the first time, the flow is as follows:
- The client side of the application (also referred to as the front end) uses the AWS Amplify JavaScript library (Amplify.js) to simplify authentication and authorization. Using Amplify, the application detects that the user is unauthenticated and redirects to Amazon Cognito, which then sends a SAML request to the IdP.
- The IdP authenticates the user and sends a SAML response back to Amazon Cognito. The SAML response includes common attributes and a multi-value attribute for group membership.
- Amazon Cognito handles the SAML response, and maps the SAML attributes to a just-in-time user profile. The SAML groups attribute is mapped to a custom user pool attribute named custom:groups.
- An AWS Lambda function named PreTokenGeneration reads the custom:groups custom attribute and converts it to a JSON Web Token (JWT) claim named cognito:groups. This associates the user to a group, without creating a group.This attribute conversion is optional and implemented to demo how you can use Pre Token Generation Lambda trigger to customize your JWT token claims, mapping the IdP groups to the attributes your application recognizes. You can also use this trigger to make additional authorization decisions. For example, if user is a member of multiple groups, you may choose to map only one of them.
- Amazon Cognito returns the JWT tokens to the front end.
- The Amplify client library stores the tokens and handles refreshes.
- The front end makes a call to a protected API in Amazon API Gateway.
- API Gateway uses an Amazon Cognito user pools authorizer to validate the JWT’s signature and expiration. If this is successful, API Gateway passes the JWT to the application’s Lambda function (also referred to as the backend).
- The backend application code reads the cognito:groups claim from the JWT and decides if the action is allowed. If the user is a member of the right group then the action is allowed, otherwise the action is denied.
We will go into more detail about these steps after describing a bit more about the implementation details.
For more information about JWT tokens and claims, see Introduction to JSON Web Tokens.
Prerequisites
The following are the prerequisites for the solution described in this post:
- A Git client.
- Node.js JavaScript runtime.
- An AWS account.
- AWS Command Line Interface (AWS CLI) installed and configured.
- For Linux and Mac users: Any bash-compatible terminal.
For Windows users: Git for Windows, Windows Subsystem for Linux, Cygwin or other ways of running BASH scripts.
Cost estimate
For an account under the 12-month Free Tier period, there should be no cost associated with running this example. However, to avoid any unexpected costs you should terminate the example stack after it’s no longer needed. For more information, see AWS Free Tier and AWS Pricing.
Running the demo application
In this part, you will go over the steps to setup and run the demo application. All the example code in this solution can be found on the amazon-cognito-example-for-external-idp code repository on GitHub.
To deploy the application without an IdP integration
- Open a bash-compatible command-line terminal and navigate to a directory of your choice. For Windows users: install Git for Windows and open Git BASH from the start menu.
- To get the code from the GitHub repository, enter the following:
- The template env.sh.template contains configuration settings for the application that you will modify later when you configure the IdP. To copy env.sh.template to env.sh, enter the following:

Figure 2: Cloning the example repository and copying the template configuration file
- The install.sh script will install the AWS CDK toolkit with the dependencies and will configure and bootstrap your environment:

Figure 3: Installing dependencies
You may get prompted to agree to sending Angular analytics. You will also get notified if there are package vulnerabilities. If this is the case run npm audit –fix –prod in all subdirectories to resolve them.
- Once the environment has been successfully bootstrapped you need to deploy the CloudFormation stack:

Figure 4: Deploying the CloudFormation stack
- You will be prompted to accept the IAM changes. These changes will allow API gateway service to call the demo application lambda function (APIFunction), Amazon Cognito to invoke Pre-Token Generation lambda function, demo application lambda function to access DynamoDB user’s table (used to implement user’s global sign out), and more. You’ll need to review these changes according to your current security approval level and confirm them to continue.Under Do you wish to deploy these changes (y/n)?, type y and press Enter.

Figure 5: Reviewing and confirming changes
- A few moments after deploying the application’s CloudFormation stack, the terminal displays the IdP settings, which should look like the following:

Figure 6: IdP settings
Make a note of these values; you will use them later to configure the IdP.
Configure the IdP
Every IdP is different, but there are some common steps you will need to follow. To configure the IdP, do the following:
- Provide the IdP with the values for the following two properties, which you made note of in the previous section:
- Single sign on URL / Assertion Consumer Service URL / ACS URL:
- Audience URI / SP Entity ID / Entity ID:
- Configure the field mapping for the SAML response in the IdP. Map the first name, last name, email, and groups (as a multivalue attribute) into SAML response attributes with the names firstName, lastName, email, and groups, respectively.
Recommended: Filter the mapped groups to only those that are relevant to the application (for example, by a prefix filter). There is a 2,048-character limit on the custom attribute, so filtering avoids exceeding the character limit, and also avoids passing irrelevant information to the application.
- In the IdP, create two demo groups called pet-app-users and pet-app-admins, and create two demo users, for example, pet-app-user@example.com and pet-app-admin@example.com, and then assign one to each group, respectively.
See the following specific instructions for some popular IdPs, or see the documentation for your customer’s specific IdP:
- Active Directory Federation Services (ADFS):
- Auth0: How do I set up Auth0 as a SAML identity provider with an Amazon Cognito user pool?
- Azure Active Directory: Setup Amazon Cognito User Pool with an Azure AD identity provider to perform single sign-on (SSO) authentication in mobile app
- Centrify: Adding and configuring a Custom SAML application
- G-Suite: Set up your own custom SAML application
- Okta: Integrating IdP Sign In with Amazon Cognito
- OneLogin: How do I set up OneLogin as a SAML identity provider with an Amazon Cognito user pool?
- PingFederate: PingOne for Enterprise Administration Guide: Add or update a SAML application
Get the IdP SAML metadata URL or file
Get the metadata URL or file from the IdP: you will use this later to configure your Cognito user pool integration with the IdP. For more information, see Integrating Third-Party SAML Identity Providers with Amazon Cognito User Pools.
To update the application with the SAML metadata URL or file
The following will configure the SAML IdP in the Amazon Cognito User Pool using the IdP metadata above:
- Using your favorite text editor, open the env.sh file.
- Uncomment the line starting with # export IDENTITY_PROVIDER_NAME (remove the # sign).
- Uncomment the line starting with # export IDENTITY_PROVIDER_METADATA.
- If you have a metadata URL from the IdP, enter it following the = sign:
Or, if you downloaded the metadata as a file, enter $(cat path/to/downloaded-metadata.xml):

Figure 7: Editing the identity provider metadata in the env.sh configuration file
To re-deploy the application
- Run ./diff.sh to see the changes to the CloudFormation stack (added metadata URL).

Figure 8: Run ./diff.sh
- Run ./deploy.sh to deploy the update.
To launch the UI
There is both an Angular version and a React version of the same UI, both have the same functionality. You can use either version depending on your preference.
- Start the front end application with your chosen version of the UI with one of the following:
- React: cd ui-react && npm start
- Angular: cd ui-angular && npm start
- To simulate a new session, in your web browser, open a new window in private browsing or incognito mode, then for the URL, enter http://localhost:3000. You should see a screen similar to the following:

Figure 9: Private browsing sign-in screen
- Choose Single Sign On to be taken to the IdP’s sign-in page, where you will sign in if needed. After you are authenticated by the IdP, you’ll be redirected back to the application.If you have multiple IdPs, or if you have both internal and external users that will authenticate directly with the user pool, you can choose the Sign In / Sign Up button instead. This redirects you to the Amazon Cognito hosted UI sign in page, rather than taking you directly to the IdP. For more information, see Using the Amazon Cognito Hosted UI for Sign-Up and Sign-In.
- Using a new private browsing session (to clear any state), sign in with the user associated with the group pet-app-users and create some sample entries. Then, sign out. Open another private browsing session, and sign in with the user associated with the pet-app-admins group. Notice that you can see the other user’s entries. Now, create a few entries as an admin, then sign out. Open another new private browsing session, sign in again as the pet-app-users user, and notice that you can’t see the entries created by the admin user.

Figure 10: Example view for a user who is only a member of the pet-app-users group

Figure 11: Example view for a user who is also a member of the pet-app-admins group
Implementation
Next, review the details of what each part of the demo application does, so that you can modify it and use it as a starting point for your own application.
Infrastructure
Take a look at the code in the cdk.ts file—a sample CDK file that creates the infrastructure. You can find it in the amazon-cognito-example-for-external-idp/cdk/src directory in the cloned GitHub repo. The key resources it creates are the following:
- A Cognito user pool (
new cognito.UserPool…). This is where the just-in-time provisioning created users who federate in from the IdP. It also creates a custom attribute named groups, which you can see as custom:groups in the console.
Figure 12: Custom attribute named groups
- IdP integration which provides the mapping between the attributes in the SAML assertion from the IdP and Amazon Cognito attributes. For more information, see Specifying Identity Provider Attribute Mappings for Your User Pool.
(new cognito.CfnUserPoolIdentityProvider…). - An authorizer (
new apigateway.CfnAuthorizer…). The authorizer is linked to an API resource method (authorizer: {authorizerId: cfnAuthorizer.ref}).It ensures that the user must be authenticated and must have a valid JWT token to make API calls to this resource. It uses Lambda proxy integration to intercept requests. - The PreTokenGeneration Lambda trigger, which is used for the mapping between a user’s Active Directory or LDAP groups (passed on the SAML response from the IdP) to user pool groups (
const preTokenGeneration = new lambda.Function…). For the PreTokenGeneration Lambda trigger code used in this solution, see the index.ts file on GitHub.
The application
Backend
The example application in this solution uses a serverless backend, but you can modify it to use Amazon Elastic Compute Cloud (Amazon EC2), Amazon Elastic Container Service (Amazon ECS), Amazon Elastic Kubernetes Service (Amazon EKS), AWS Fargate, AWS Elastic Beanstalk, or even an on-premises server as the backend. To configure your API gateway to point to a server-based application, see Set up HTTP Integrations in API Gateway or Set up API Gateway Private Integrations.
Middleware
Take a look at the code in the express.js sample in the app.ts file on GitHub. You’ll notice some statements starting with app.use. These are interceptors that are invoked for all requests.
Some explanation:
- eventContext: the example application in this solution uses AWS Serverless Express which allows you to run the Express framework for Node.js directly on AWS Lambda.
- authorizationMiddleware is a helper middleware that does the following:
- It enriches the express.js request object with several syntactic sugars such as req.groups and req.username (a shortcut to get the respective claims from the JWT token).
- It ensures that the currently logged in user is a member of at least one of the supportedGroups provided. If not, it will return a 403 response.
Endpoints
Still in the Express.js app.ts file on GitHub, take a closer look at one of the API’s endpoints (GET /pets).
With the groups claim information, your application can now make authorization decisions based on the user’s role (show all items if they are an admin, otherwise just items they own). Having this logic as part of the application also allows you to unit test your authorization logic, and run it locally, or offline, before deploying it.
Front end
The front end can be built in your framework of choice. You can start with the sample UIs provided for either React or Angular. In both, the AWS Amplify client library handles the integration with Amazon Cognito and API Gateway for you. For more information about AWS Amplify, see the Amplify Framework page on GitHub.
Note: You can use AWS Amplify to create the infrastructure in a wizard-like way, without writing CloudFormation. In our example, because we used the AWS CDK for the infrastructure, we needed a configuration file to point Amplify to the created infrastructure.
The following are some notable files, and explanations of what they do:
- generateConfig.ts reads the CloudFormation stack output parameters, and creates a file named autoGenConfig.js, which looks like the following:
The file generateConfig.ts is triggered after calling ./deploy.sh, or ./config-ui.sh.
- APIService.ts: calls the backend API, passing the user’s token. For example, calling the GET/pets API:
Step-by-step example
Now that you have an understanding of the solution, we will take you through a step-by-step example. You can see how everything works together in sequence, and how the tokens are passing between Cognito, your demo application, and the API gateway.
- Create a new browser session by starting a private/incognito session.
- Launch the UI by using the Angular example from the To launch the UI section:
- Open the developer tools in your browser. In most browsers, you can do this by pressing F12 (in Chrome and FireFox in Windows), or Option+Command+i (Chrome, Firefox, or Safari on a Mac).
- In the developer tools panel, navigate to the Network tab, and ensure that it is in recording mode and logs are persisting. For more details for various browsers, see How to View a SAML Response in Your Browser for Troubleshooting.
- When the page loads, the following happens behind the scenes in the front end (example code available for either Angular or React):
- Using Amplify.js, AWS Amplify checks if the user is currently logged in
Because this is a new browsing session, the user is not logged in, and the Sign In / Sign Up and Single Sign On buttons will appear.
- Choose Single Sign On, and AWS Amplify will redirect the browser to the IdP.
- Using Amplify.js, AWS Amplify checks if the user is currently logged in
- In the IdP sign-in page, sign in as one of the users created earlier (e.g. pet-app-user@example.com or pet-app-admin@example.com).
- In the Network tab of your browser’s developer tools panel, locate the request to Amazon Cognito’s /saml2/idresponse endpoint.
- The following is an example using Chrome, but you can do it similarly using other browsers. In the Form Data section, you can see the SAMLResponse field that was sent back from the IdP after you authenticated.

Figure 13: Inspecting the SAML response
- Copy the SAMLResponse value (drag to select the area marked in green above, and make sure you don’t include the RelayState field).
- At the command line, use the following example to decode the SAMLResponse value. Be sure to replace SAMLResponse by pasting the text copied in the previous step:
- Open the saml_response.xml file, and look at the part that starts with <saml2:Attribute Name=”groups”. This is the attribute that contains the groups that your user belongs to, according to the IdP. For more ways to inspect and troubleshoot the SAML response, see How to View a SAML Response in Your Browser for Troubleshooting.
- Amazon Cognito applies the mapping defined in the CloudFormation stack to these attributes. For example, the IdP SAML response attribute named groups is mapped to the user pool custom attribute named custom:groups.
- In order to modify the mapping, edit your local copy of the cdk.ts file.
- In order to view the mapped attribute for a user, do the following:
- Sign into the AWS Management Console using the same account you used for the demo setup.
- Select Manage User Pools.
- Select the pool you created for this demo and choose Users and groups.
- Search for the user account you just signed in with, and choose its username.As you can see in the following example, the custom:groups claim is set automatically. (the custom: prefix is added to all custom attributes automatically):

Figure 14: Mapped user attributes
- The PreTokenGeneration Lambda function then reads the mapped custom:groups attribute value, parses it, and converts it to an array; and then stores it in the cognito:groups claim. In order to customize the mapping, edit the Lambda function’s code in your local copy of the index.ts file and run ./deploy.sh to redeploy your application.
- Now that the front end has the JWT token, when the page loads, it will request to load all the items (a call to a protected API, passing the token in the form of an authorization header).
- Look at the Network tab again, under the GET request that starts with pets.Under Request Headers, look at the authorization header. The long value you see is the encoded token passed as part of the request. The following is an example of how the decoded JWT will look:
- Optionally, if you’d like to modify or add new requests to a new API paths, edit your local copy of the APIService.ts file by using one of the following examples.
- Sending the request with the authorization header:
- The authorization header is obtained using this helper function:
- After the previous request is sent to Amazon API Gateway, the Amazon Cognito user pool authorizer validated the JWT token based on the token signature, to ensure that it was not tampered with, and that it was still valid. You can see the way the authorizer is setup in the cdk.ts file on GitHub.
- Based on which user you signed-in with previously, you’ll either see all items, or only items you own. How does it work? As mentioned earlier, the backend application code reads the groups claim from the validated token and decides if the action is allowed. If the user is a member of a specific group or has a specific attribute, allow; else, deny. The relevant code that makes that decision can be seen in the Express.js example app file in the app.ts file on GitHub.
Customizing the application
The following are some important issues to consider when customizing the app to your needs:
- If you modify the app client, do not add the aws.cognito.signin.user.admin scope to it. The aws.cognito.signin.user.admin scope grants access to Amazon Cognito User Pool API operations that require access tokens, such as UpdateUserAttributes and VerifyUserAttribute. The demo application makes authorization decisions based on the custom:group attribute populated from the IdP. Because the IdP is the single source of truth for its users, they should not be able to modify any attribute, particularly the custom:groups attribute.
- We recommend that you do not change the mapped attribute after the stack is deployed. The reason is that the attribute gets persisted in the user profile after it is mapped. For example, if you first map groups to custom:groups, and a user signs in, then later you change the mapping of groups to custom:groups2, the next time the user signs in, their profile will have both attributes: custom:groups (with the last value it was mapped to it) as well as custom:groups2 (with the current value). To avoid having to clear old mapped attributes, we recommend not changing the mapping after it is created.
- This solution utilizes Amazon Cognito’s OAuth 2.0 flows to provide federated sign-in from an external IdP (and optionally also sign-in directly with the user pool via the hosted UI in case you would like to support both use cases). It is not applicable for non OAuth 2.0 flows (e.g. the custom UI), for example, using InititateAuth/SRP.
Conclusion
You can integrate your application with your customer’s IdP of choice for authentication and authorization for your application, without integrating with LDAP, or Active Directory directly. Instead, you can map read-only, need-to-know information from the IdP to the application. By using Amazon Cognito, you can normalize the structure of the JWT token, so that you can add multiple IdPs, social login providers, and even regular username and password-based users (stored in user pools). And you can do all this without changing any application code. Amazon API Gateway’s native integration with Amazon Cognito user pools authorizer streamlines your validation of the JWT integrity, and after it has been validated, you can use it to make authorization decisions in your application’s backend. Using this example, you can focus on what differentiates your application, and let AWS do the undifferentiated heavy lifting of identity management for your customer-facing applications.
For all the code examples described in this post, see the amazon-cognito-example-for-external-idp code repository on GitHub.
If you have feedback about this post, submit comments in the Comments section below. If you have questions about this post, start a new thread on the Amazon Cognito forum or contact AWS Support.
Want more AWS Security how-to content, news, and feature announcements? Follow us on Twitter.