AWS Storage Blog
Enabling AI-powered analytics on enterprise file data: Configuring S3 Access Points for Amazon FSx for NetApp ONTAP with Active Directory
In the past, data stored in a file system was inaccessible to analytical tools like Amazon Quick Suite and Amazon SageMaker. Now, Amazon FSx for NetApp ONTAP supports Amazon Simple Storage Service (Amazon S3) Access Points, so you can access your file data stored on FSx for NetApp ONTAP file systems as if it were in Amazon S3. With this capability, data scientists, analysts, and machine learning (ML) experts can use the Amazon S3 API and a broad set of integrations with generative AI, machine learning, and analytics services against enterprise file data that you store on AWS services.
With this capability, you can use your enterprise file data to augment generative AI applications with Amazon Bedrock Knowledge Bases for Retrieval Augmented Generation (RAG), train ML models with SageMaker, generate insights with Amazon S3 integrated third-party services, use comprehensive research capabilities in AI-powered business intelligence (BI) tools such as Amazon Quick Suite, and run analyses using Amazon S3-based cloud-native applications, all while your file data continues to reside in your FSx for NetApp ONTAP file system.
Amazon S3 Access Points for FSx for NetApp ONTAP provide a robust set of mechanisms for secure data access through S3. Access control operates at two distinct layers: AWS Identity and Access Management (IAM) permissions and file system-level permissions. This dual-layer security model helps ensure that only authorized users and applications can access your data, respecting both cloud-native AWS security controls and traditional file system permissions. In this post, we walk you through how these layers work together and how to configure them for your environment.
Additionally, we show you how to configure S3 access points for an FSx for NetApp ONTAP file system integrated with Windows Active Directory and how to control access for different users working with AI-powered applications such as Amazon Quick Suite. This example illustrates how organizations can use their existing Active Directory infrastructure while enabling modern cloud-native workflows.
Solution overview
Let’s look at how Amazon S3 access points can be configured to allow secure data access with Amazon Quick Suite, an AI-powered business intelligence and analytics platform.
Consider a scenario involving Organization XYZ, a global manufacturing and retail company with finance and support business units, each with years of operational data.
Organization XYZ has migrated their enterprise data from an on-premises environment to a single FSx for NetApp ONTAP file system with a Storage Virtual Machine (SVM) called SVM1 that hosts data for multiple departments. The file system is integrated with Windows Active Directory for centralized identity and access management.
The finance department maintains critical financial data spanning more than 10 years of operational history. This data is stored in a dedicated volume named Finance on SVM1, organized into two primary folders:
/financial_records/: Contains historical financial records, invoice archives, and audit documents./quarterly_reports/:Stores quarterly financial reports and analysis documents.
The finance department uses Active Directory groups to manage permissions:
- FinanceAdmin group: Full read/write permissions on all financial data.
- FinanceAnalysts group: Read-only access to /
financial_records/ and read/write access to /quarterly_reports/
In the first use case, Alice, a member of the Finance Analysts group, works on the analytics team and needs to perform deep research on spending patterns using the AI-powered research capabilities of Amazon Quick Suite. She wants to create comprehensive reports and interactive dashboards showing cost optimization opportunities by analyzing years of financial data.
When configuring an Amazon S3 access point for FSx for NetApp ONTAP, the file system identity you associate with the access point should reflect who or what will be using it. For human-in-the-loop use cases—such as giving an individual user S3-based access to the files they already have permissions to through Active Directory—a user account identity is the natural fit, ensuring that the same AD-enforced permissions governing their file access are consistently applied through the S3 access point. Conversely, for automated workflows, scheduled jobs, or S3 applications that need to read or write data programmatically, a service account identity is more appropriate, providing a stable, non-interactive credential with scoped permissions tailored to the application’s specific needs. The right choice ultimately depends on your use case and access requirements: align the access point identity with the type of principal—human or system—that will be consuming it.
The customer support department stores their operational data in a separate volume named Support on the same SVM1. This volume contains valuable customer interaction data organized into three folders:
/support_tickets/: Historical support ticket records./transcripts/: Customer service call transcripts and chat logs./feedback_docs/: Product feedback and customer satisfaction surveys.
Access to customer support data is managed through dedicated Active Directory groups:
- SupportAdmin group: Full read/write permissions on all support data.
- SupportAnalysts group: Read-only access to all folders for analysis purposes.
In the second use case, Bob, a member of the support team, uses a service account, SupportSvc, to access support data to analyze customer sentiment and identify common product issues. The service account is used here because this is an existing support team workflow that’s also used to run extract, transform, and load (ETL) jobs with other software products in their environment. This demonstrates flexibility in credentialing between standard users and service accounts.
Lastly, there’s an Admin user with broader permissions across both departments’ data for system management and cross-functional analysis purposes.
To enable Alice, Bob, and the Admin user to access their respective FSx data through Amazon Quick Suite while maintaining the existing Active Directory security model, you will create four dedicated Amazon S3 access points:
- Finance S3 access point for Alice: This access point will be configured to map to Alice’s Active Directory identity, so she can access the Finance volume data through S3 APIs. The access point will respect her FinanceAnalysts group permissions, providing read-only access to financial records and read/write access to quarterly reports.
- Support S3 access point for Bob: This access point will map to the support service account, SupportSvc, so he can access the customer Support volume data. The configuration will honor the SupportAnalysts group permissions, granting read-only access to all support folders.
- Two S3 access points for Admin: These access points will be configured for the Admin user with broader access across, one for each the Finance and Support volumes, enabling cross-functional analysis and system management tasks.
Each Amazon S3 access point will enforce security at two layers: IAM policies will control which AWS principals can use the access point, while FSx for NetApp ONTAP will enforce file system-level permissions based on the mapped Active Directory identities. This dual-layer approach helps ensure that users can only access data they’re authorized to see, even when accessing it through Amazon Quick Suite S3-based integrations.
Solution walkthrough
In the following sections, you will walk through the process of creating and configuring these Amazon S3 access points, setting up the appropriate IAM policies, and demonstrating how Alice and Bob can securely access their data through Amazon Quick Suite.
Figure 1 illustrates the solution architecture and workflow.
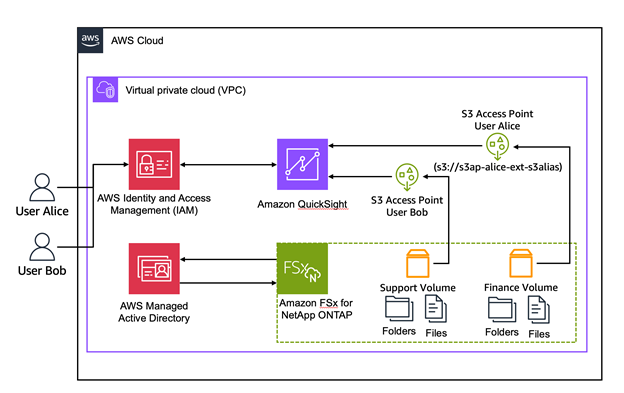
Figure 1: User authentication to the S3 access point
Key components:
- Amazon FSx for NetApp ONTAP File System: Single-Availability Zone deployment with SSD storage, hosting multiple volumes containing departmental data.
- Windows Active Directory: Self-managed Active Directory providing user authentication and authorization.
- Storage Virtual Machines (SVMs): Isolated file servers within the FSx file system, joined to Active Directory.
- FSx volumes: Separate volumes for finance and support data with NTFS security.
- S3 access points: Four access points, two per volume, each associated with a specific Active Directory user identity.
- IAM policies: Access point policies controlling which AWS principals can use each access point.
- Amazon Quick Suite knowledge base: AI-powered application consuming data through S3 access points.
- Users: Organization members accessing their authorized data through Quick Suite.
Prerequisites
For this walkthrough, you need the following prerequisites:
- An AWS account.
- An FSx for ONTAP filesystem deployed with Active Directory integration. If you don’t have an existing file system, you can deploy one by following the steps in Getting started with Amazon FSx for NetApp ONTAP.
- A self-managed Active Directory environment with groups (<group names>) and users <user names> created as described previously
- Client workstation instances
- Amazon Quick setup with policies, roles, and users
Create and configure the access points and permissions
In this section we will cover the setup of our environment to show we have created all the prerequisite components including volumes, users, groups, and file shares. Additionally, we will show the permissions as they have been configured for the shares, groups, and users
Step 1: Verify that the volumes have been pre-created and are online
- From the ONTAP CLI, run the command
volume showto verify the volumes are created and online as in Figure 2.
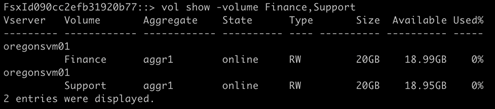
Figure 2: Command output showing a list of volumes
- Or from the AWS Management Console, navigate to Amazon FSx and choose Volumes in the navigation pane. Look for the volumes in the list as in Figure 3.
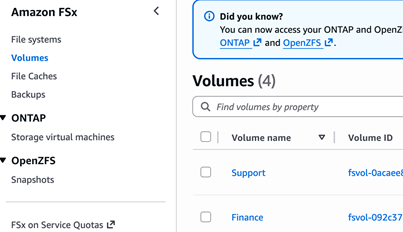
Figure 3: List of volumes in the Amazon FSx console
Step 2: Validate the CIFS shares are created and the permissions are set properly
Note: This doesn’t apply to S3 access points, because only the file and folder NTFS (ACL) permissions are enforced for S3 access.
- From the ONTAP CLI, execute the command
cifs share showto view the details of the share on the file system as in Figure 4.
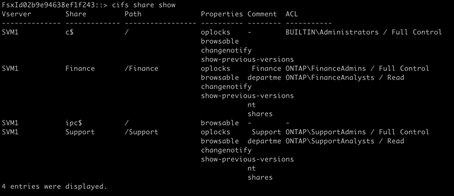
Figure 4: Details of the share obtained by using the ONTAP CLI
- Or from the Windows client, navigate to fsmgmt.msc and find the shares on SVM1. (Figure 5).
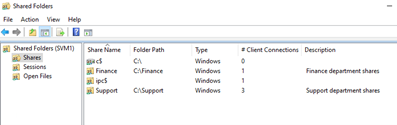
Figure 5: Locate the shares on SVM2
- Open the shares to view the properties of each as in Figure 6.
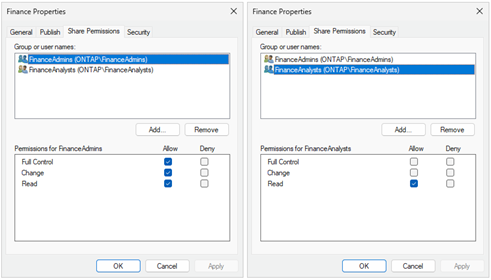
Figure 6: Permissions page of the share properties
Step 3: Verify the file and folder level NTFS (ACL) permissions
From Windows Explorer, right-click on the mounted file share and select Properties. Choose the Security tab to view the security settings of the file share. Make note of the difference in security settings between the group that has full-control compared to the read-only access level group as in Figure 7.
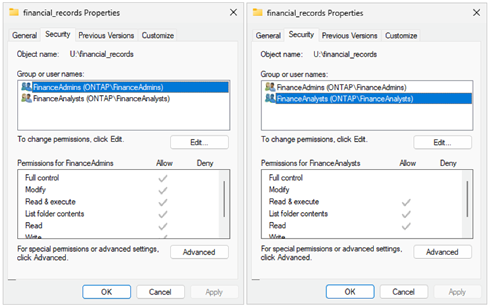
Figure 7: Security page of the share properties
Step 4: Verify access by user
Verify the user account has access to open and view files in the volumes as in Figure 8. Using the credentials of a user from each group, connect to the file shares and verify that their access is correctly applied. Read-only users should only be able to read files, and full-control users should be able to edit and delete files.
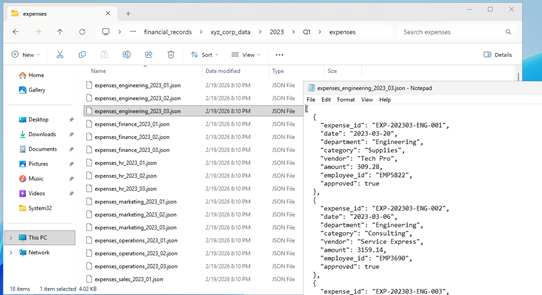
Figure 8: A financial record file is opened for editing
Step 5: Create the S3 access points
a. In the Amazon FSx console, choose Volumes from the navigation pane and choose the S3 tab of the volume you want to add an access point to. Choose Create S3 access point as in Figure 9.
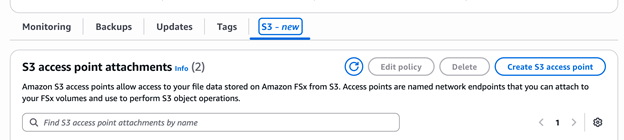
Figure 9: Create an S3 access point
b. Enter the Access point name and File system user identity, select your preferred Network configuration, and choose Create S3 access point as in Figure 10.
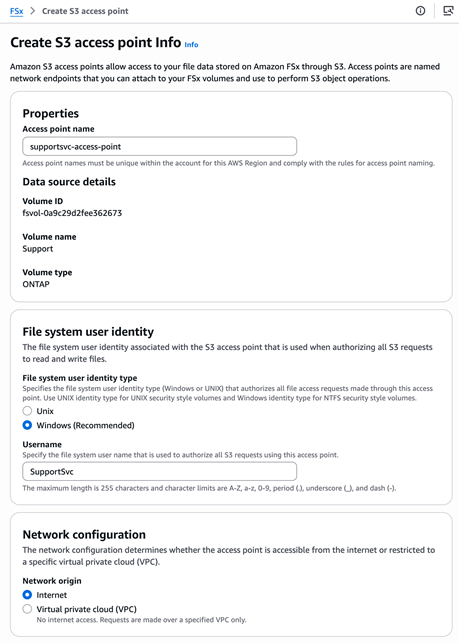
Figure 10: Configure the S3 access point
Step 6: Repeat steps 1 through 5 to create a total of four access points
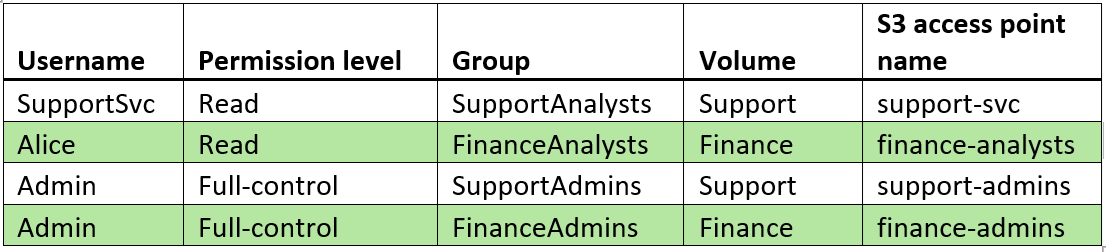
a. Repeat the preceding steps to create four access points: One for the SupportSvc service account to access the Support volume using the information in the following table. One for the user Alice to access the Finance volume, and one for each volume for the Admin user to access each share as in the following table.
b. To confirm the access points, go to the Amazon S3 console and choose Access Points for FSx in the navigation pane, as in Figure 11.
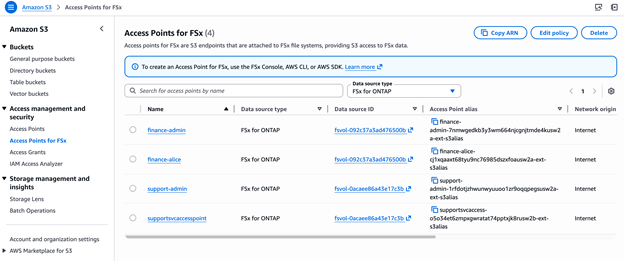
Figure 11: Access points for FSx
Step 7: Copy the Access Point alias
- Copy the Access Point alias of full-control user and save to your clipboard as in Figure 12.
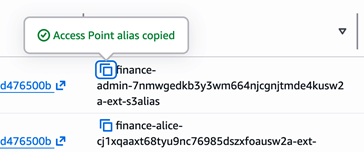
Figure 12: Copy the Access Point alias from the console
Step 8: Verify access to the data using the access point:
- From a CloudShell or a terminal, run the command
aws s3 ls s3://<access point alias>/<path to folder>
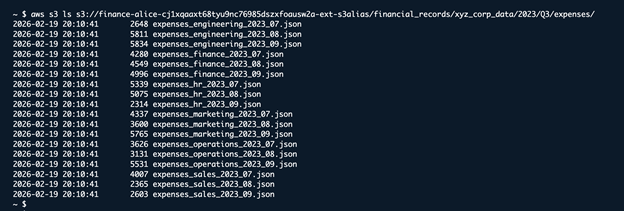
Figure 13: Use the CLI to verify access to the data through the access point
Step 9: Ensure the access point has read access to a file in the volume
- From CloudShell or a terminal, run the command
aws s3 cp s3://<access point alias>/<path to folder>/<filename>

Figure 14: Use the CLI to the access point has read access
Demonstrate an Amazon Quick Suite use case and how access is allowed or denied
With the access points, users, and permissions configured, you’re ready to test the configuration.
In this section we will configure Amazon Quick to use the S3 access point to populate a knowledge base. Afterward, we’ll query the knowledge base to see what insights can be learned from the data set we’ve discovered.
- Navigate to the Amazon Quick console in your AWS account as in Figure 15.
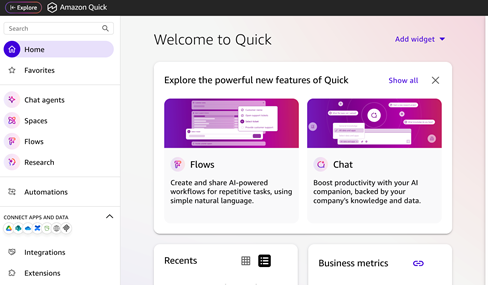
Figure 15: The Amazon Quick web page console
- Verify the Region: From the top right corner of the Amazon Quick web page console, click the account name drop down arrow. From the list, select the region name, and check to make sure that the correct region is chosen as in Figure 16.
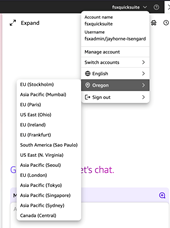
Figure 16: Select the Amazon Quick region
Note: Amazon Quick Suite role permissions by selecting Manage Accounts, then Permissions, and selecting AWS resources. Verify that the selected role has the appropriate Amazon S3 permissions configured in IAM.
- Choose Integrations from the navigation panel (at the time of this writing, available in Virginia, Oregon, Sydney, and Dublin) as in Figure 17.
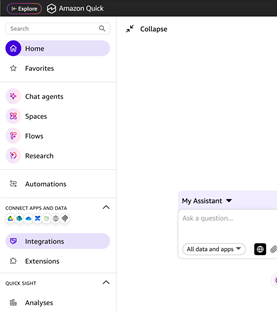
Figure 17: The Amazon Quick navigation bar highlighting the Integrations button
- In Integrations, choose Knowledge bases, and select Amazon S3, as in Figure 18.
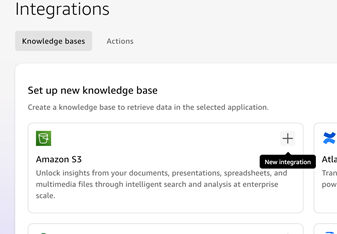
Figure 18: Integrations, choose Knowledge bases
- On the Create integration page, enter a name for the integration, select the appropriate account. For the S3 bucket URL, paste the S3 Access Point alias copied previously. Add
S3://as a prefix to the alias as in Figure 19.
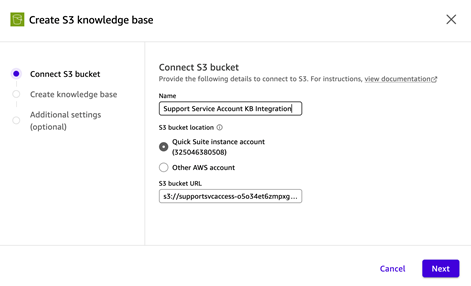
Figure 19: Enter integration name
- Enter a Name for the knowledge base. Under Content, select Add all content and choose Create, as in Figure 20.
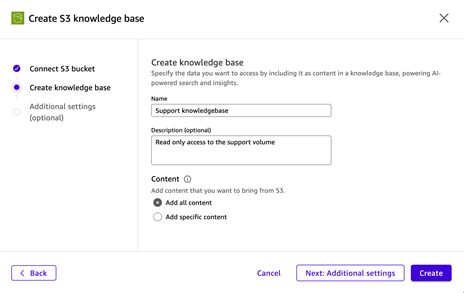
Figure 20: Enter a name for the Knowledge Base
- Large volumes of data might take some time to fully ingest and synchronize. When complete, the status will change from Syncing to Available, as shown in Figure 21.

Figure 21: Status is synching/available
- When the integration is complete, you can choose Chat agents from the navigation pane and query the data using natural language, as in Figure 22.
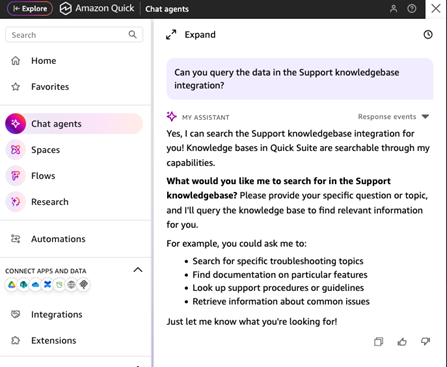
Figure 22: Choose Chat agents
Example of a failed integration attempt
In this example, Bob attempts to create an access point connected to the Support volume with his user account. Following the steps above, but now using his own credentials instead of the admin user.
He starts by signing in in to the Amazon console and navigating to the FSx service page, selecting the FSx for ONTAP file system, and clicking the create S3 Access Point button on the S3 tab of the Support volume. He uses his own username to create the Access Point and then copies the S3 Access Point alias to his clipboard (Figure 23).
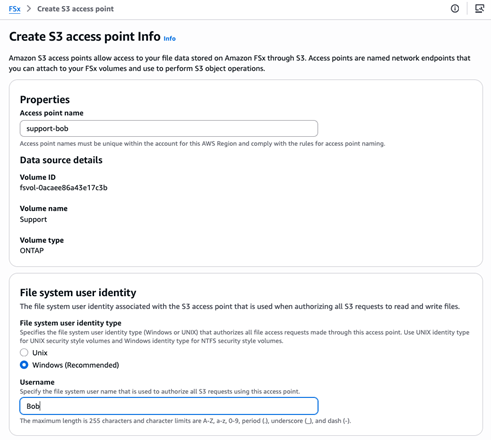
Figure 23
- Bob then creates an integration by navigating to the Amazon Quick console, selecting the Integration option, choosing S3, and then entering an access point name, selecting the correct Quick Suite instance account, and filling in the S3 bucket URL with the S3 Access Point alias from the FSx for ONTAP configuration page (Figure 24).
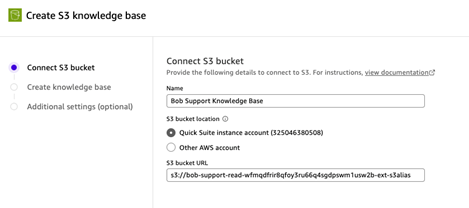
Figure 24
- The integration fails with a status of Completed with issues and Sync status of Failed because Bob’s user account doesn’t have read permissions to the Support volume (Figure 25).

Figure 25
Because Bob isn’t a member of the SupportAnalysts security group and he doesn’t have access to the volume with his user account, he needs to sign in using the SupportSvc service account, which is a member of the SupportAnalysts security group, to create an integration.
Example of using an integration with the Quick Suite chat agent
Alice has properly configured both the S3 Access point and the Quick Suite knowledge base integration. Using the chat agent, she can query the unstructured data in the Finance volume using natural language.
Query: Can you read the data in the Alice Financial Knowledge Base?
Response: Yes, I can access the Alice Financial Knowledge Base! . . .
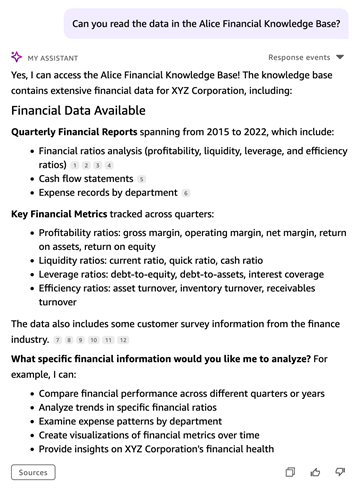
Figure 26
The agent will make some recommendations based on its understanding that this is financial transaction data and returns a list of possible queries (Figure 26). Following the prompt, the agent can create useful visualizations in addition to summarized reports for broad sets of data (Figure 27).
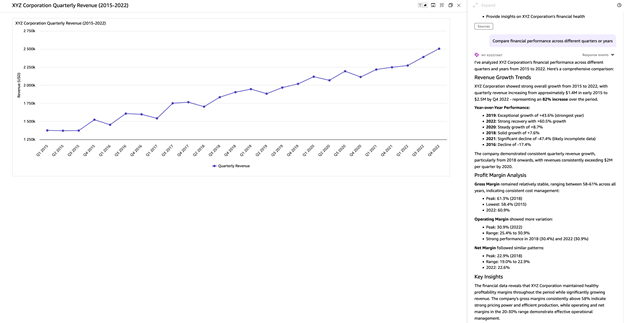
Figure 27:
The agent can also be prompted to dive deeper into the results to gain even more insights (Figure 28).
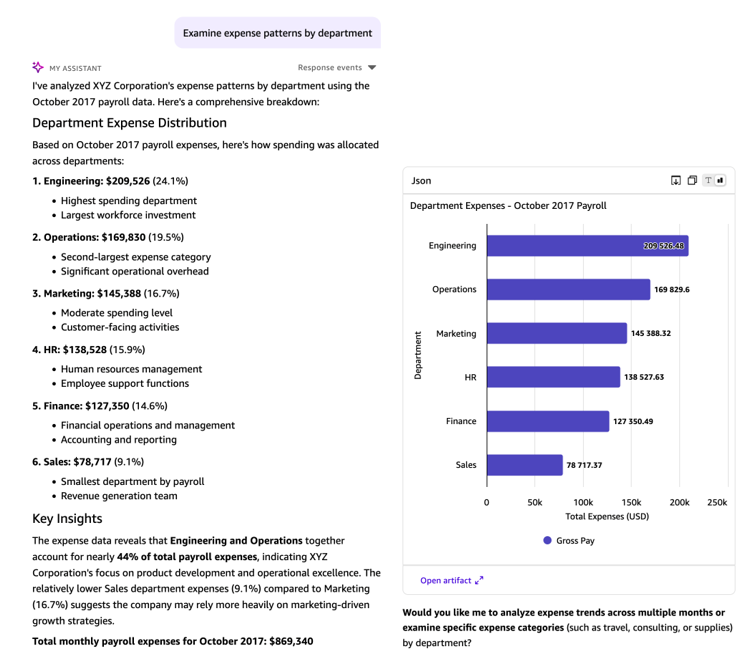
Figure 28
Bob can access the Support volume data by signing in using the SupportSvc account so that he has access to the SupportSvc knowledge base and SupportSvc S3 access point. He can then query the data using natural language and can test the limits of the agent (Figure 29).
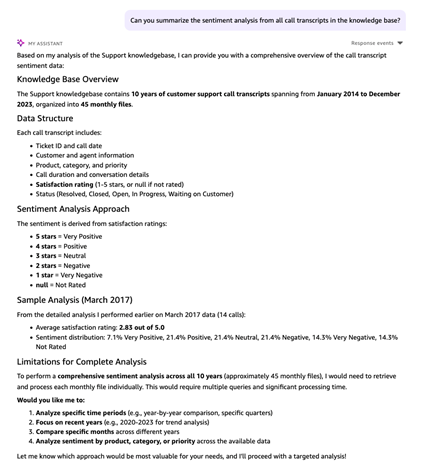
Figure 29
Additional prompts will reveal that there are more data sets that the agent considers relevant, but the prompts must be specific if the query needs to be limited to the call transcripts (Figures 30/31).
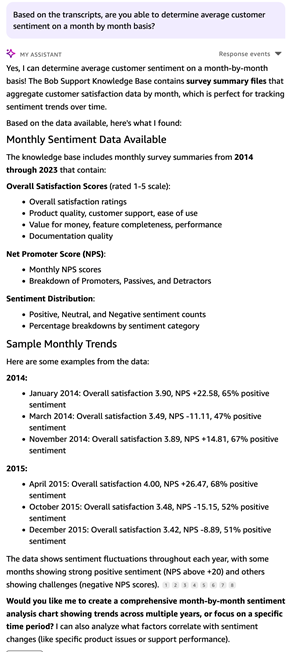
Figure 30
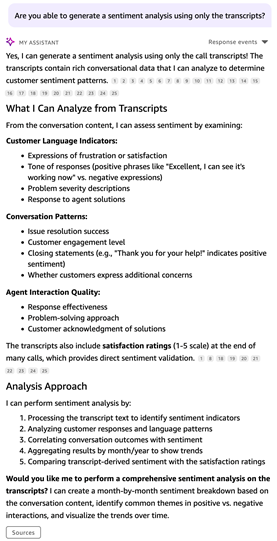
Figure 31:
Ultimately, you can obtain valuable insights from the pure text data that would otherwise be impossible to gather without using the Quick Suite chat agent. For example, you can ask the chat agent to return a month-by-month analysis of the data.
Conclusion
In this post, you saw how using Amazon S3 Access Points with FSx for NetApp ONTAP file systems in a Windows Active Directory environment gives you a powerful and flexible way to extend your existing enterprise file data to cloud-native AI and analytics services without compromising your security posture. By mapping S3 access points to specific Active Directory identities, you can enforce granular, per-user and per-department access controls at both the IAM and file system levels, helping to ensure that users can only access the data they’re authorized to see. Whether you’re enabling a finance analyst to run AI-powered research on quarterly reports or configuring a service account to safely feed support transcripts into a generative AI pipeline, you can use this dual-layer security model to meet your compliance requirements while unlocking the full potential of your unstructured file data. As your organization continues to migrate enterprise workloads to AWS, S3 Access Points for FSx for NetApp ONTAP provide the bridge between your legacy file infrastructure and the modern AI services—such as Amazon Bedrock Knowledge Bases, Amazon SageMaker, and Amazon Quick Suite—that your teams need to drive faster, smarter business decisions.