AWS Storage Blog
Monitor your AWS DataSync migrations using Amazon CloudWatch
Customers who have a large on-premises footprint of storing special types of data, like images for medical bills, audio files for customer interactions, and scanned objects, often run out of on-premises storage capacity. This is exacerbated by perpetual increases in business demand to store and maintain these images and files. It quickly becomes operationally challenging to maintain the storage system on premises, not to mention the storage costs become expensive and the infrastructure becomes complex and challenging. In order to minimize such expensive storage costs and for ease of maintenance, customers often express interest to migrate to Amazon S3 with online monitoring and alerting capabilities.
At AWS, we are continuously working on ways to simplify and accelerate data migrations for customers between on premises and the AWS Cloud. We regularly launch new features to the AWS DataSync service to make your data migration as easy and streamlined as possible. AWS DataSync makes it simple and fast to move large amounts of data online between on-premises storage and Amazon S3, Amazon EFS, or Amazon FSx for Windows File Server. DataSync eliminates or automatically handles many manual tasks related to data transfers, including scripting copy jobs, scheduling and monitoring transfers, validating data, and optimizing network utilization.
In this blog post, I walk through how easy it is to set up AWS DataSync, and I recommend steps for migrating data from on-premises file storage to AWS. I also discuss how Amazon CloudWatch Logs Insights can help you more efficiently monitor your DataSync data transfers. Furthermore, I show you how to set up Amazon CloudWatch alarms for DataSync metrics, useful for optimizing DataSync task network bandwidth for DataSync data transfers.
DataSync architecture

Prerequisites and assumptions
For this blog tutorial, you should have a valid AWS account with access to AWS services. For DataSync agent requirements, check out this documentation.
Configure the AWS DataSync agent near your on-premises source file system
It takes just few minutes to easily set up your DataSync agent in your AWS account. You need a source location, target location, and a task for migration. Check out the DataSync getting started guide for more info, alternatively you can refer to this blog – ‘Move to managed file storage in minutes with AWS DataSync.’
Using AWS DataSync, you can now enable detailed logging on DataSync tasks for files and objects copied between your source and target locations. Logging individual files enables you to identify what was transferred at a given time and provides DataSync data integrity verification results. This simplifies monitoring, reporting, and troubleshooting while enabling you to provide timely updates to stakeholders.
To enable detailed logging on DataSync, you can choose your existing CloudWatch Log group when you configure the DataSync task:

Get insights into DataSync data transfers with CloudWatch Logs Insights
With DataSync task execution activity being logged with CloudWatch Logs, you can run CloudWatch Logs Insights for collecting and monitoring data transfer metrics once the task completes its execution.
CloudWatch Logs Insights enable you to interactively search and analyze your log data in Amazon CloudWatch Logs. You can perform queries to help you more effectively respond to operational issues. If an issue occurs, you can use CloudWatch Logs Insights to identify and report failed file-level data transfers. CloudWatch Logs Insights includes a purpose-built query language with a few simple but powerful commands.
What follows are a few CloudWatch Logs Insight queries that are useful when working with logs from DataSync task executions to understand the data transfer patterns from source to target.
DataSync data transfers at the task level
Use the following CloudWatch Logs Insights query to view the cumulative data transferred for a given DataSync agent and task:
fields @logStream as task_exec_trnsfr | parse @message "[*] Transferred file *, * "
as level, file_name, numbytes,bytes |filter @message like /Transferred file/ ||stats sum(numbytes) as
totBytes_Transferred by task_exec_trnsfr

Visualize DataSync intraday data transfers
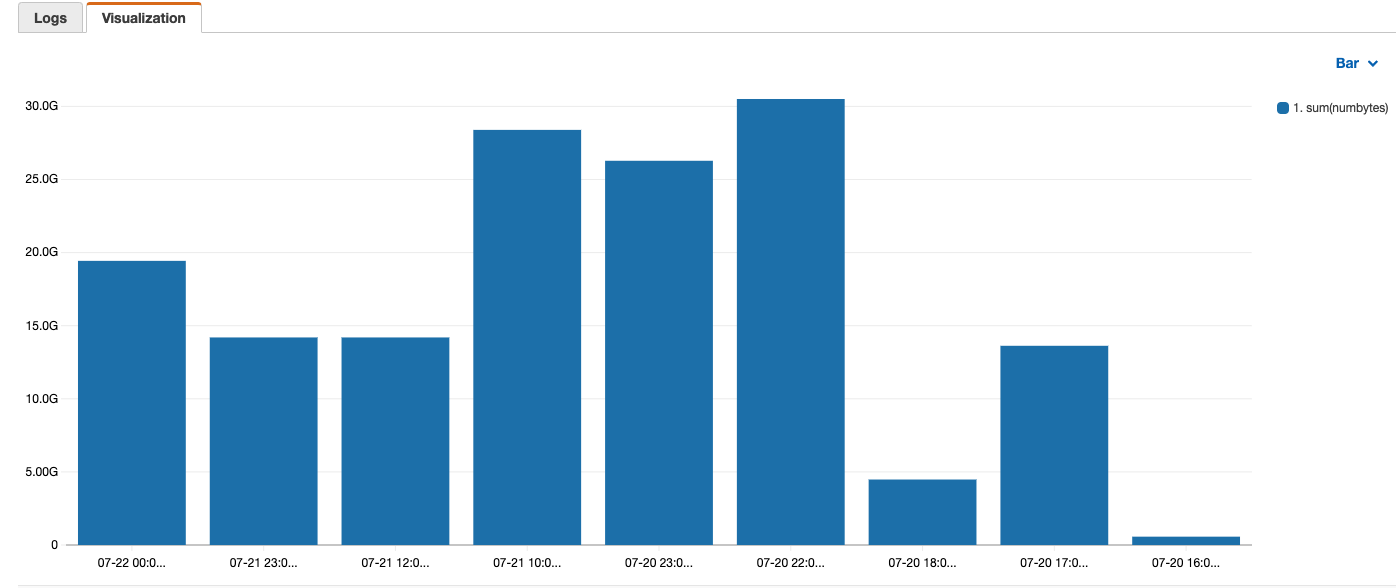
To view the intraday data transfer rate by hour, you can use the following CloudWatch Logs Insight query:
fields @logStream |  parse @logStream "*-exec-*" as agent,exec1| parse @message "[*] Transferred file *, * " as
level, file_name, numbytes,bytes  |filter @message like /Transferred file/ |stats @logStream ,sum(numbytes) by
bin(1h)
The results shown in the following screenshot are the DataSync data transfers for each 1-hour period from multiple tasks. This helps to identify data transfer patterns on an hourly basis.
Generate notifications for optimizing DataSync task network bandwidth using CloudWatch alarms
So far, I have shown how DataSync tasks integrate with CloudWatch Logs Insights. You can enhance this monitoring using CloudWatch alarms.
A metric alarm watches a single CloudWatch metric or the result of a math expression based on CloudWatch metrics. The alarm performs one or more actions based on the value of the metric or expression relative to a threshold over a number of time periods. The metric can be a DataSync task “BytesTransferred” and action can be a notification to an Amazon SNS topic.
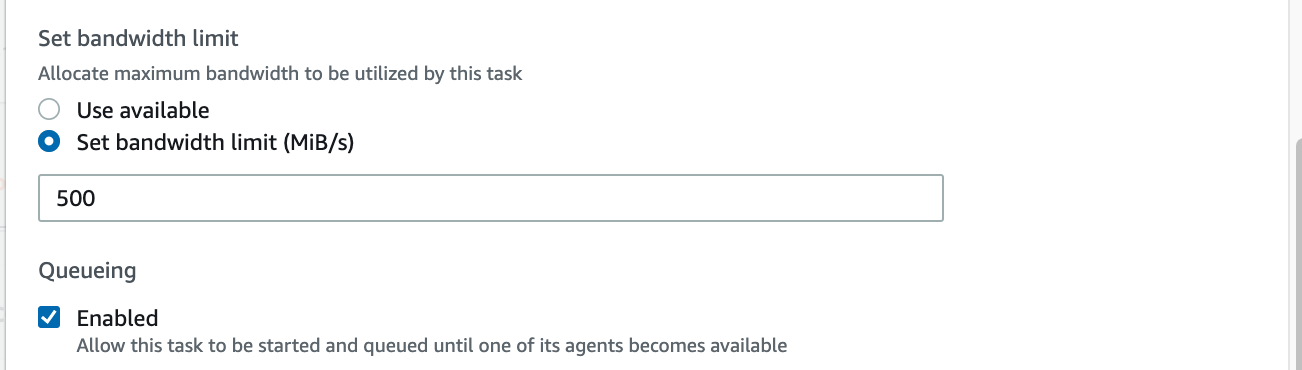
In the following example, I am going to create a DataSync task for a data transfer. For Set bandwidth limit (MiB/s), I set the limit at 500 MiB/s, or 30 GB per minute, as shown in the following screenshot. I define the scheduling alarm to alert me if the transfer rate is less than 1/4th of the allocated bandwidth for the given task (you can configure limits for bandwidth as per your processing needs while configuring a task). This kind of alerting mechanism helps customers understand the data transfer patterns to fine-tune network bandwidth more accurately based on metrics. Also, this helps to identify bottlenecks from the source to target during data transfer. While configuring a task, define bandwidth as shown in the following screenshot.
From the CloudWatch alarms console, create an alarm for your DataSync task. Here, I have selected my existing task (“task-0e1d127e377933362”), used the metric BytesTransferred, and used the Statistic parameter Sum. As shown in the following screenshot, the threshold value for the alarm is set to 7 GB per minute, or roughly 1/4th of the allocated bandwidth of 30 GB per minute.

Next, configure an SNS notification to be sent to “SNS_Optimize_bandwidth_for_task” when the sum of the “BytesTransferred” rate is less than 1/4th the available network bandwidth (500MiB/s or 30 GB per minute). Afterward, the subscribers of the SNS topic are notified about task performance.

Validation
When the transfer rate for the task I set up is less than 1/4th of the allocated network bandwidth, for three consecutive data points as specified in the preceding alarm, a CloudWatch alarm triggers the following SNS email notification. This is for the given SNS topic “SNS_Optimize_bandwidth_for_task”:

Cleaning up
When you no longer need AWS DataSync or the associated alarms and metrics you created, you should delete the following components to avoid incurring any unwanted charges:
- For DataSync, delete your source and target locations, tasks, and your agent.
- Delete the SNS topic, the IAM role for your DataSync agent, and your CloudWatch Logs.
Conclusion
In this blog post, I walked through a sample implementation of how you can easily set up AWS DataSync for data migrations. I also covered using Amazon CloudWatch Logs Insights with DataSync to enhance the monitoring capabilities of your end-to-end data transfer. In addition, I showed you how to optimize DataSync task network bandwidth based on CloudWatch metrics along with how to stay up to date with notifications.
With these capabilities, you can increase the efficiency of your data transfers through optimization and monitoring. If a data transfer is stalled for any reason, or if it falls below what is enabled by your network bandwidth, you can quickly be alerted to the problem and it can be fixed in a faster, more proactive manner. You no longer need to constantly check on the status of your transfers, as alarms enable you to be more at ease while your transfer is being completed. All in all, these capabilities save you time and enhance the visibility of your data transfer into the AWS Cloud.
Thanks for reading this blog post! If you have any comments or questions, please don’t hesitate to leave them in the comments section.