Amazon Elastic Inference (EI) はInvent 2018 で発表された新しいサービスです。Elastic Inference では、スタンドアローンの GPU インスタンスと比較して、深層学習実行コストを最大で 75% まで削減します。Elastic Inference を使えば、任意の Amazon SageMaker か Amazon EC2 インスタンスタイプにアクセラレーターをアタッチすることができ、TensorFlow、Apache MXNet、ONNX モデルでの推論を実行できます。Amazon ECS は、高度にスケーラブルかつ高性能なコンテナオーケストレーションサービスで Docker コンテナーをサポートしています。コンテナ化されたアプリケーションを、AWS の上で、容易に実行もしくはスケーリングすることが可能です。
このブログ記事では、Elastic Inference を利用して、Amazon ECS での深層学習推論ワークロードを高速化する方法を解説します。また、同じ ECS コンテナインスタンスで別々のワークロードを実行している可能性がある場合などに、複数のコンテナで 1 つの Elastic Inference アクセラレーターを共有する方法も示します。このように共有することで、アクセラレーターの利用率を高められます。
ECS では、2019 年 2 月 4 日時点で、 これらの GPU でのタスク実行をサポートしています。これは、トレーニング用ワークロードのためには良く機能するものです。しかし、推論ワークロードで ECS の Elastic Inference を利用すれば、これらの GPU の利用率が 100% ではない時に、コスト効率を高められます。
例として次の図には、p2/p3 インスタンスタイプと c5.large インスタンスタイプの間で、10 万回のシングルスレッド推論呼び出しごとに、各タイプの Elastic Inference アクセラレーターを備えた場合のコスト効率を (最低コストで統一し) 比較表示しています。
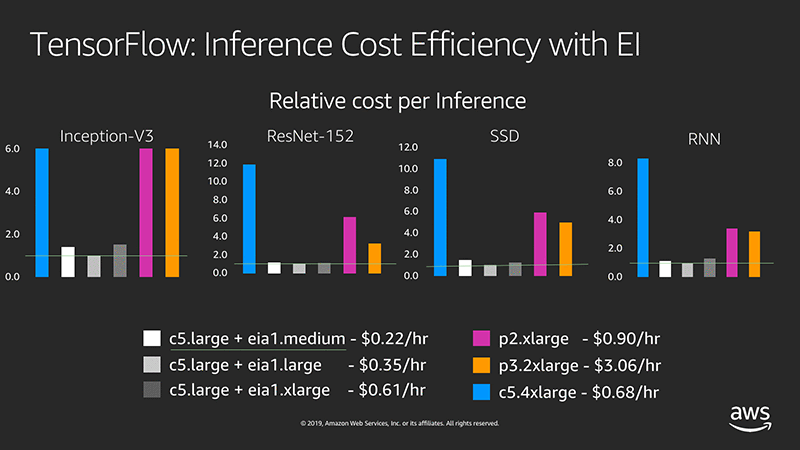
TensorFlow: EI での推論コスト効率
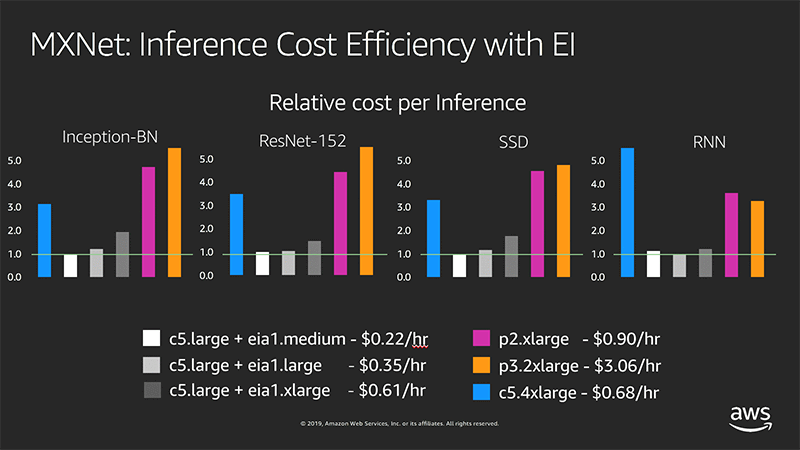
MXNet: EI での推論コスト効率
ECS での Elastic Inference の使用
この記事では、TensorFlow ModelServer コンテナを ECS タスクの一部として高速化する例を示します。一枚の画像に写された物体 (次のようなキリンのイメージ) を、SSD with ResNet-50 モデルを COCO データセットによってトレーニングし、特定させてみましょう。

その次に、標準型、および Elastic Inference を有効化した TensorFlow ModelServer について、推論レイテンシーの分析と比較検討を行います。 Elastic Inference with TensorFlow Serving の例に示すプロファイリングセットアップを基本に使います。記事の支持に従ってステップバイステップで実行するか、同じインフラストラクチャーにある AWS CloudFormation スタックを起動することも可能です。どちらの場合も、管理者としてAWS アカウントへのログインが必要です。AWS CloudFormation スタックを作成するためには、[Launch Stack] をクリックした後で次の指示を実行します。

選択したアベイラビリティゾーンで Elastic Inference がサポートされていない場合は、一度削除を行い、別のゾーンにスタックを再作成します。us-east-1 のリージョン以外でスタックを起動するには、テンプレートとテンプレート URL を統一します。必ず、適切なリージョンとアベイラビリティゾーンを選択しください。
[Launch Stack] をクリックすると、AWS CloudFormation Designer で AWS CloudFormation テンプレートの詳細を確認できるようになります。
AWS CloudFormation スタックには、以下のリソースがあります。
- VPC
- サブネット
- インターネットゲートウェイ
- Elastic Inference エンドポイント
- IAM のロールとポリシー
- セキュリティグループとルール
- 2 つの EC2 インスタンス
- この内 1 つは、TensorFlow ModelServer を実行するためのものです (このインスタンスには Elastic Inference アクセラレーターがアタッチされており、ECS コンテナインスタンスとして機能します) 。
- もう 1 つは、前出のインスタンスに対し推論呼び出しを行う、クライアントアプリケーションを実行させるためのものです。
- ECS タスク設定
AWS CloudFormation スタックを作成した後は次のことを行います。
- この記事にある、Elastic Inference を有効化した TensorFlow ModelServer の実行セクションに飛びます。
- 推論呼び出しを行うをスキップします。
- 結果の確認に飛びます。
第 2 のインスタンスでは、ブートストラップスクリプトの中で、この例に示すアプリケーションを実行します。
使用が終わった後は、必ずスタックを削除してください。
ECS コンテナインスタンスで使用する ecsInstanceRole の作成
このステップでは、関連するインスタンスプロファイルを用いて、ECS コンテナインスタンスで使用する ecsInstanceRole ロールを作成します。
IAM コンソールで、ecsInstanceRole ロールが存在するか確認します。このロールが見つからない場合は、ecsInstanceRole という名前の新しいロールに、AmazonEC2ContainerServiceforEC2Role というマネージドポリシーをアタッチして作成します。信頼ポリシーを次のコードに変更します。
{
  "Version": "2008-10-17",
  "Statement": [
    {
      "Sid": "",
      "Effect": "Allow",
      "Principal": {
        "Service": "ec2.amazonaws.com"
      },
      "Action": "sts:AssumeRole"
    }
  ]
}
ECS コンテナインスタンスで Elastic Inference をセットアップする
ここでの目的は、Elastic Inference エンドポイントがアタッチされ、次に示すプロパティが追加設定された ECS コンテナインスタンスを作成することです。
スタックを起動すると自動で設定が行われます。設定を手動で行うには、EC2 インスタンスで Elastic Inference の設定を行うに示す指示に従います。簡素化のため、この手順では次の変更を行います。
ECS タスクから Elastic Inference を呼び出すことが目的なので、タスクのロールに関連する権限を定義します。IAM コンソールを使い、次のプロパティで新しいロールを作成します。
- 信頼されたエンティティタイプ: AWS service
- このロールを使うサービス: Elastic Container Service
- ユースケースの選択: Elastic Container Service Task
- 名前: ecs-ei-task-role
Attach permissions policies のステップで、EC2 インスタンスで Elastic Inference の設定を行うで作成したポリシーを選択します。このポリシーには、次のような内容が含まれています。
{
    "Statement": [
        {
            "Effect": "Allow",
            "Resource": "*",
            "Action": [
                "elastic-inference:Connect",
                "iam:List*",
                "iam:Get*",
                "ec2:Describe*",
                "ec2:Get*"
            ]
        }
    ],
    "Version": "2012-10-17"
}
必須なのは、elastic-inference:Connect の権限だけです。その他の権限は、トラブルシューティングのアシストを行うものです。実稼働用の定義では、これらは削除することができます。
[Trust Relationships ] タブで [Show policy document] をクリックし、ロールの信頼関係を確認します。このポリシーは、以下のようになるはずです。
{
  "Version": "2012-10-17",
  "Statement": [
    {
      "Sid": "",
      "Effect": "Allow",
      "Principal": {
        "Service": "ecs-tasks.amazonaws.com"
      },
      "Action": "sts:AssumeRole"
    }
  ]
}
ECS タスクを実行する IAM ロールの作成
ECS コンテナインスタンスで動作する ECS エージェントは、 (例えば、ECR からコンテナイメージを取得する場合など) タスクに代わり API 呼び出しを行うための権限を必要とします。つまり、必要とされる正確な権限をキャプチャーする、IAM ロールを作成しなければならないということです。以前に、いずれかの ECS タスク を作成した経験があれば、これか同等のロールを作っていると思います。詳細については、「Amazon ECS タスク実行 IAM ロール」をご参照ください。
既に作成したロールがない場合は、IAM コンソールで [Roles] を選択し、次のプロパティを設定して新しいロールを作成します。
- 信頼されたエンティティタイプ: AWS service
- このロールでのサービス: Elastic Container Service
- ユースケースの選択: Elastic Container Service Task
- 名前: ecsTaskExecutionRole
- アタッチするマネージドポリシー: AmazonECSTaskExecutionRolePolicy
標準型、および Elastic Inference が有効化された TensorFlow ModelServer コンテナのためのタスク定義を作成する
このステップでは、2 つのコンテナを含む ECS タスク定義を作成します。
- その 1 つでは、TensorFlow ModelServer を実行させます。
- 別の 1 つでは、Elastic Inference が有効化された TensorFlow ModelServer を実行させます。
どちらのコンテナでも、tensorflow-inference: 1.13-cpu-py27-ubuntu16.04 イメージ (最近リリースされた Deep Learning Containers イメージの 1 つ) を使用します。既にこれらのイメージには、標準の TensorFlow ModelServer と、そのライブラリ依存関係が備わっています。2 つのコンテナ共に、関係するモデルの取得とセットアップを行います。
第 2 のコンテナでは、Elastic Inference が有効化された TensorFlow ModelServer のバイナリイメージをダウンロードします。また、環境変数の ECS_CONTAINER_METADATA_URI 設定を削除し、ECS コンテナインスタンスから、Elastic Inference エンドポイントのメタデータへのルックアップが行えるようにしています。
# install unzip
apt-get --assume-yes install unzip
# download and unzip the model
wget https://s3-us-west-2.amazonaws.com/aws-tf-serving-ei-example/ssd_resnet.zip -P /models/ssdresnet/
unzip -j /models/ssdresnet/ssd_resnet.zip -d /models/ssdresnet/1
# download and extract Elastic Inference enabled TensorFlow Serving
wget https://s3.amazonaws.com/amazonei-tensorflow/tensorflow-serving/v1.13/ubuntu/latest/tensorflow-serving-1-13-1-ubuntu-ei-1-1.tar.gz
tar xzvf tensorflow-serving-1-13-1-ubuntu-ei-1-1.tar.gz
# make the binary executable
chmod +x tensorflow-serving-1-13-1-ubuntu-ei-1-1/amazonei_tensorflow_model_server
# Unset the ECS_CONTAINER_METADATA_URI environment variable to force Elastic Inference endpoint metadata lookup from ECS container instance's metadata.
# Otherwise, Elastic Inference endpoint metadata would tried to be retrieved from container metadata, which would fail.
env -u ECS_CONTAINER_METADATA_URI tensorflow-serving-1-13-1-ubuntu-ei-1-1/amazonei_tensorflow_model_server --port=${GRPC_PORT} --rest_api_port=${REST_PORT} --model_name=${MODEL_NAME} --model_base_path=${MODEL_BASE_PATH}/${MODEL_NAME}
標準的な実稼働向けの設定では、関連するステップを Dockerfile RUN コマンドに変更しつつ、深層学習コンテナイメージから新しいイメージを作成することを推奨します。簡素化のため、この記事ではそういったステップは省きます。
このコンテナでは、最初にモデルのダウンロードを行い、修正されていない /usr/bin/tf_serving_entrypoint.sh を実行します。
#!/bin/bash

tensorflow_model_server --port=8500 --rest_api_port=8501 --model_name=${MODEL_NAME} --model_base_path=${MODEL_BASE_PATH}/${MODEL_NAME} "$@"
ECS コンソールで、[Task Definitions] の下にある [Create New Task Definitions] をクリックします。
[Select launch type compatibility] ダイアログボックスで [EC2] 選択します。
[Create new revision of Task Definition] ダイアログボックスをページの最後までスクロールし、[Configure via JSON] をクリックします。
開いたスペースに次の定義をペーストします。保存する前に、<replace-with-your-account-id> となっている 2 か所を、必ず自分の AWS アカウント ID で置き換えます。
{
    "executionRoleArn": "arn:aws:iam::<replace-with-your-account-id>:role/ecsTaskExecutionRole",
    "containerDefinitions": [
        {
            "entryPoint": [
                "bash",
                "-c",
                "apt-get --assume-yes install unzip; wget https://s3-us-west-2.amazonaws.com/aws-tf-serving-ei-example/ssd_resnet.zip -P ${MODEL_BASE_PATH}/${MODEL_NAME}/; unzip -j ${MODEL_BASE_PATH}/${MODEL_NAME}/ssd_resnet.zip -d ${MODEL_BASE_PATH}/${MODEL_NAME}/1/; /usr/bin/tf_serving_entrypoint.sh"
            ],
            "portMappings": [
                {
                    "hostPort": 8500,
                    "protocol": "tcp",
                    "containerPort": 8500
                },
                {
                    "hostPort": 8501,
                    "protocol": "tcp",
                    "containerPort": 8501
                }
            ],
            "cpu": 0,
            "environment": [
                {
                    "name": "KMP_SETTINGS",
                    "value": "0"
                },
                {
                    "name": "TENSORFLOW_INTRA_OP_PARALLELISM",
                    "value": "2"
                },
                {
                    "name": "MODEL_NAME",
                    "value": "ssdresnet"
                },
                {
                    "name": "KMP_AFFINITY",
                    "value": "granularity=fine,compact,1,0"
                },
                {
                    "name": "MODEL_BASE_PATH",
                    "value": "/models"
                },
                {
                    "name": "KMP_BLOCKTIME",
                    "value": "0"
                },
                {
                    "name": "TENSORFLOW_INTER_OP_PARALLELISM",
                    "value": "2"
                },
                {
                    "name": "OMP_NUM_THREADS",
                    "value": "1"
                }
            ],
            "mountPoints": [],
            "volumesFrom": [],
            "image": "763104351884.dkr.ecr.us-east-1.amazonaws.com/tensorflow-inference:1.13-cpu-py27-ubuntu16.04",
            "essential": true,
            "name": "ubuntu-tfs"
        },
        {
            "entryPoint": [
                "bash",
                "-c",
                "apt-get --assume-yes install unzip; wget https://s3-us-west-2.amazonaws.com/aws-tf-serving-ei-example/ssd_resnet.zip -P /models/ssdresnet/; unzip -j /models/ssdresnet/ssd_resnet.zip -d /models/ssdresnet/1; wget https://s3.amazonaws.com/amazonei-tensorflow/tensorflow-serving/v1.13/ubuntu/latest/tensorflow-serving-1-13-1-ubuntu-ei-1-1.tar.gz; tar xzvf tensorflow-serving-1-13-1-ubuntu-ei-1-1.tar.gz; chmod +x tensorflow-serving-1-13-1-ubuntu-ei-1-1/amazonei_tensorflow_model_server; env -u ECS_CONTAINER_METADATA_URI tensorflow-serving-1-13-1-ubuntu-ei-1-1/amazonei_tensorflow_model_server --port=${GRPC_PORT} --rest_api_port=${REST_PORT} --model_name=${MODEL_NAME} --model_base_path=${MODEL_BASE_PATH}/${MODEL_NAME}"
            ],
            "portMappings": [
                {
                    "hostPort": 9000,
                    "protocol": "tcp",
                    "containerPort": 9000
                },
                {
                    "hostPort": 9001,
                    "protocol": "tcp",
                    "containerPort": 9001
                }
            ],
            "cpu": 0,
            "environment": [
                {
                    "name": "GRPC_PORT",
                    "value": "9000"
                },
                {
                    "name": "REST_PORT",
                    "value": "9001"
                },
                {
                    "name": "MODEL_NAME",
                    "value": "ssdresnet"
                },
                {
                    "name": "MODEL_BASE_PATH",
                    "value": "/models"
                }
            ],
            "mountPoints": [],
            "volumesFrom": [],
            "image": "763104351884.dkr.ecr.us-east-1.amazonaws.com/tensorflow-inference:1.13-cpu-py27-ubuntu16.04",
            "essential": true,
            "name": "ubuntu-tfs-ei"
        }
    ],
    "memory": "2048",
    "taskRoleArn": "arn:aws:iam::<replace-with-your-account-id>:role/ecs-ei-task-role",
    "family": "ei-ecs-ubuntu-tfs-bridge-s3",
    "requiresCompatibilities": [
        "EC2"
    ],
    "networkMode": "bridge",
    "volumes": [],
    "placementConstraints": []
}
このタスク定義では ECS サービスの作成も可能ですが、この例ではタスクを実行させるだけで十分です。
Elastic Inference が有効化された TensorFlow ModelServer タスクの実行
先に作成した ECS コンテナインスタンスで、前出セクションでの定義によりタスクを実行していることを確認します。デフォルトのクラスターに、このインスタンスを登録します。
ECS コンソールで [Clusters] をクリックします。
[ECS Instances] タブに、自分の EC2 コンテナインスタンスが表示されていることを確認します。
[Tasks]、[Run new task] の順にクリックします。
[Launch type] で [EC2] を選択し、先に作成したタスク (CloudFormation で作成されたタスクの名前は ei-ecs-blog-ubuntu-tfs-bridge となっています) 選択した後、[Run Task] をクリックします。
推論呼び出しを実行する
このステップでは、ここまでで構築したインフラストラクチャーを使い複数の推論呼び出しをする、シンプルなクライアントアプリケーションの作成と実行を行います。また、クライアントアプリケーションが動作する Deep Learning AMI (DLAMI) で EC2 インスタンスの起動も行います。 この例の中で使用する TensorFlow ライブラリには、AVX2 インストラクションセットが必要です。
c5.large インスタンスタイプを選択します。十分なメモリー容量がある、最新世代の x86 ベース EC2 インスタンスタイプであれば、どれでも大丈夫です。DLAMI には、TensorFlow が必要とするライブラリがプリインストールされています。また、DLAMI は HVM 仮想化タイプ AMI であるので、c5.large で提供される AVX2 インストラクションセットの恩恵も受けられます。
推論を開始するために、ラベルとイメージのダウンロードを行います。
curl -O https://raw.githubusercontent.com/amikelive/coco-labels/master/coco-labels-paper.txt
curl -O https://s3.amazonaws.com/amazonei/media/3giraffes.jpg
Create a local file named ssd_resnet_client.py, with the following content:
from __future__ import print_function
import grpc
import tensorflow as tf
from PIL import Image
import numpy as np
import time
import os
from tensorflow_serving.apis import predict_pb2
from tensorflow_serving.apis import prediction_service_pb2_grpc

tf.app.flags.DEFINE_string('server', 'localhost:8500',
                           'PredictionService host:port')
tf.app.flags.DEFINE_string('image', '', 'path to image in JPEG format')
FLAGS = tf.app.flags.FLAGS

if(FLAGS.image == ''):
  print("Supply an Image using '--image [path/to/image]'")
  exit(1)

local_coco_classes_txt = "coco-labels-paper.txt"

# Setting default number of predictions
NUM_PREDICTIONS = 20

# Reading coco labels to a list
with open(local_coco_classes_txt) as f:
  classes = ["No Class"] + [line.strip() for line in f.readlines()]

def main(_):

  channel = grpc.insecure_channel(FLAGS.server)
  stub = prediction_service_pb2_grpc.PredictionServiceStub(channel)

  with Image.open(FLAGS.image) as f:
    f.load()

    # Reading the test image given by the user
    data = np.asarray(f)

    # Setting batch size to 1
    data = np.expand_dims(data, axis=0)

    # Creating a prediction request
    request = predict_pb2.PredictRequest()

    # Setting the model spec name
    request.model_spec.name = 'ssdresnet'

    # Setting up the inputs and tensors from image data
    request.inputs['inputs'].CopyFrom(
        tf.contrib.util.make_tensor_proto(data, shape=data.shape))

    # Iterating over the predictions.The first inference request can take several seconds to complete

    durations = []

    for curpred in range(NUM_PREDICTIONS):
      if(curpred == 0):
        print("The first inference request loads the model into the accelerator and can take several seconds to complete.Please standby!")

      # Start the timer
      start = time.time()

      # This is where the inference actually happens
      result = stub.Predict(request, 60.0)  # 60 secs timeout
      duration = time.time() - start
      durations.append(duration)
      print("Inference %d took %f seconds" % (curpred, duration))

    # Extracting results from output
    outputs = result.outputs
    detection_classes = outputs["detection_classes"]

    # Creating an ndarray from the output TensorProto
    detection_classes = tf.make_ndarray(detection_classes)

    # Creating an ndarray from the detection_scores
    detection_scores = tf.make_ndarray(outputs['detection_scores'])

    # Getting the number of objects detected in the input image from the output of the predictor
    num_detections = int(tf.make_ndarray(outputs["num_detections"])[0])
    print("%d detection[s]" % (num_detections))

    # Getting the class ids from the output and mapping the class ids to class names from the coco labels with associated detection score
    class_label_score = ["%s: %.2f" % (classes[int(detection_classes[0][index])], detection_scores[0][index])
                   for index in range(num_detections)]
    print("SSD Prediction is (label, probability): ", class_label_score)
    print("Latency:")
    for percentile in [95, 50]:
      print("p%d: %.2f seconds" % (percentile, np.percentile(durations, percentile, interpolation='lower')))

if __name__ == '__main__':
  tf.app.run()
ポート 8500~8501 と 9000~9001 を通じクライアントインスタンスの IP アドレスから届く TCP トラフィックを許可するように、ECS コンテナインスタンスのセキュリティグループを必ず修正してください。
クライアントインスタンスから、モデルへの接続および状況の確認を行います。
SERVER_IP=<replace-with-ECS-container-instance-IP-address>
for PORT in 8501 9001
do
  curl -s http://${SERVER_IP}:${PORT}/v1/models/ssdresnet
done
次のような 2 つのレスポンスが受信されるのを待ちます。
{
 "model_version_status": [
  {
   "version": "1",
   "state": "AVAILABLE",
   "status": {
    "error_code": "OK",
    "error_message": ""
   }
  }
 ]
}
その後、クライアントアプリケーションを実行します。
source activate amazonei_tensorflow_p27
for PORT in 8500 9000
do
  python ssd_resnet_client.py --server=${SERVER_IP}:${PORT} --image 3giraffes.jpg
done
結果の確認
結果は次のようになります。
The first inference request loads the model into the accelerator and can take several seconds to complete.Please standby!
Inference 0 took 12.923095 seconds
Inference 1 took 1.363095 seconds
Inference 2 took 1.338855 seconds
Inference 3 took 1.311022 seconds
Inference 4 took 1.305457 seconds
Inference 5 took 1.303680 seconds
Inference 6 took 1.297357 seconds
Inference 7 took 1.302721 seconds
Inference 8 took 1.299495 seconds
Inference 9 took 1.293291 seconds
Inference 10 took 1.305852 seconds
Inference 11 took 1.292999 seconds
Inference 12 took 1.300874 seconds
Inference 13 took 1.300001 seconds
Inference 14 took 1.297276 seconds
Inference 15 took 1.297859 seconds
Inference 16 took 1.305029 seconds
Inference 17 took 1.315366 seconds
Inference 18 took 1.288984 seconds
Inference 19 took 1.289530 seconds
4 detection[s]
SSD Prediction is (label, probability):  ['giraffe: 0.84', 'giraffe: 0.74', 'giraffe: 0.68', 'giraffe: 0.50']
Latency:
p95: 1.36 seconds
p50: 1.30 seconds
The first inference request loads the model into the accelerator and can take several seconds to complete.Please standby!
Inference 0 took 14.081767 seconds
Inference 1 took 0.295794 seconds
Inference 2 took 0.293941 seconds
Inference 3 took 0.311396 seconds
Inference 4 took 0.291605 seconds
Inference 5 took 0.285228 seconds
Inference 6 took 0.226951 seconds
Inference 7 took 0.283834 seconds
Inference 8 took 0.290349 seconds
Inference 9 took 0.228826 seconds
Inference 10 took 0.284496 seconds
Inference 11 took 0.293179 seconds
Inference 12 took 0.296765 seconds
Inference 13 took 0.230531 seconds
Inference 14 took 0.283406 seconds
Inference 15 took 0.292458 seconds
Inference 16 took 0.300849 seconds
Inference 17 took 0.294651 seconds
Inference 18 took 0.293372 seconds
Inference 19 took 0.225444 seconds
4 detection[s]
SSD Prediction is (label, probability):  ['giraffe: 0.84', 'giraffe: 0.74', 'giraffe: 0.68', 'giraffe: 0.50']
Latency:
p95: 0.31 seconds
p50: 0.29 seconds
AWS CloudFormation スタックを起動した場合は、クライアントインスタンスへは SSH を用いて接続し、/var/log/cloud-init-output.log に記述された上記の出力で、最後の数行を確認してください。
このモデルと入力に対し、Elastic Inference アクセラレーターを使うことにより、78% のレーテンシー改善が見られるはずです。
同じ ECS コンテナインスタンス上で、一つ以上のタスクとコンテナを起動することも可能です。タスクが同じポート番号を示している場合は、awsvpc ネットワークモードを利用できます。ブリッジモードであれば、タスクは個別のポート番号を示すはずです。
マルチタスク、マルチコンテナーのシナリオでは、アクセラレーターのメモリが、すべてのクライアントにより共有されることを憶えておいてください。AWS では、AWS/ElasticInference 名前空間の AcceleratorMemoryUsage として、Amazon CloudWatch にアクセラレーターのメモリ使用量メトリクスを公開しています。
また、同じアクセラレーターを使う Elastic Inference が有効化された全コンテナが、TensorFlow もしくは MXNet フレームワークのどちらかを使用します。フレームワークを切り替える際には、ECS コンテナインスタンスを一度停止し再起動します。
結論
ここで解説したセットアップ手法を使うと、ECS で動作する複数の深層学習推論ワークロードが、 Elastic Inference によっていかに効率的に高速化されるかを見ることができます。推論ワークロードタスクが、GPU インスタンスを使い切っていないのであれば、専用 GPU のコストの一部で利用できる Elastic Inference アクセラレーターの利用は、魅力的な代替手段となり得ます。単一のアクセラレーターの能力は、同一の EC2 コンテナインスタンスにある複数のコンテナで共有が可能であり、アタッチされたアクセラレーターの、さらなる有効活用が期待できます。
著者について
 Vladimir Mitrovic は、AWS AI Deep Learning のソフトウェアエンジニアです。彼は、フォールトトレラントな深層学習システムを配信することに情熱を傾けています。余暇には、楽しみながらプロジェクトオイラーの問題を解いています。