AWS for M&E Blog
Getting started with ultra-low latency using AWS Elemental Live – Part 2
The AWS Elemental Live encoder version 2.19.0 now supports chunk delivery to AWS Elemental MediaStore enabling a stable user experience of 3-4 seconds glass-to-glass latency using standard HLS/DASH packaged content and delivered through traditional CDNs. This blog post, the final of a two-part series, provides a step-by-step guide to building an ultra-low latency (ULL) workflow and best practices for ULL streaming.
See part 1: Getting Started with Ultra-Low Latency Using AWS Elemental Live — Part 1
Outline
The following items and steps are required to set up the ultra-low latency workflow with AWS Elemental Live publishing to MediaStore:
- Confirm that you are running AWS Elemental Live version 2.19.0 or later.
- Configure the MediaStore service.
- Create an IAM User in AWS console that gives write access to MediaStore.
- Configure the Live Encoder Event input.
- Determine the player that you are going to use.
- Test the ULL Workflow.
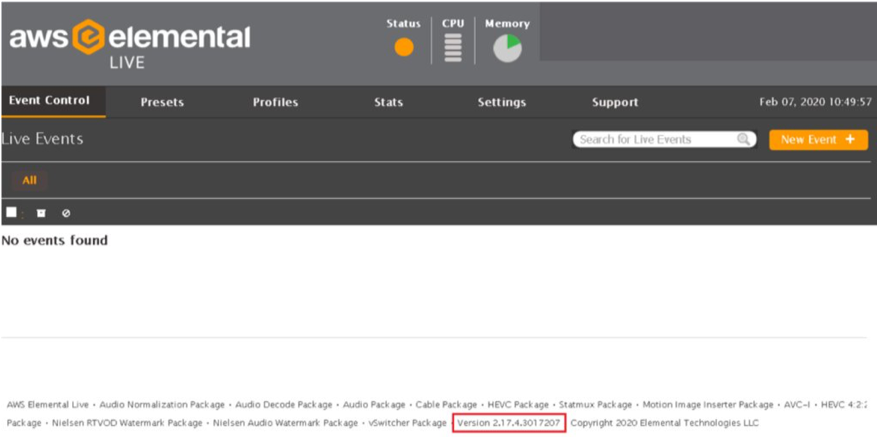
Step 1: Check your AWS Elemental Live version.
Connect the camera via HDMI or SDI and check that the version of AWS Elemental Live is at least 2.19.0 or later which is found at the bottom of the Live GUI shown below outlined in red. Consider upgrading your version if it is below this number.
Step 2: Configure the AWS MediaStore service.
To set up your MediaStore container see, How to Send Live Video to AWS Elemental MediaStore.
Step 3: Create an IAM User in AWS console that gives write access to MediaStore.
In the AWS Console, go to IAM.
- Create a new user that has programatic access. Click Next: Permissions.

- Click Attach Existing Policies directly, then search and select the AWSElementalMediaStoreFullAccess policy.

- Click through the next menus, then click review, and finally click Create User. You will be presented with an Access Key ID and a Secret Access Key. Copy both of these keys and keep them handy for step 4.

Step 4: Configure the AWS Elemental Live encoder event.
Log in to the interface of your AWS Elemental Live encoder. Create a new event by clicking the New Event button at the top right.
- Give a name to your channel and choose the input that you want to use. In the example below, SDI input is selected.

- Scroll down to Output Groups and select the DASH ISO settings. The following settings need to be selected: Chunked Encoding, and set HTTP Push Dialect to AWS Elemental MediaStore, and Chunked Transfer. Make sure to set the Fragment Length to 1 second. The recommended Segment Length is 2 to 4 seconds and can be set as high as 10 seconds. Lastly, set the destination to the Data Endpoint that you get from the MediaStore container in the AWS console. Following the Data Endpoint, you must have a base. This example uses /dash/ull/main after the Data Endpoint this will make a file main.mpd in the folder dash/ull in MediaStore.

- Click the lock icon by the browse button. Then add the Access Key ID and a Secret Access Key created in step 3, and use these as the Username and Password, respectively. Make sure there are no extra.

- This step has three actions:
- First, click the Add Output button two times to add two outputs for the video and audio of our DASH CMAF stream.
- Second, set the name modifiers to _video and _audio.
- Third, remove the audio track from Stream 1, and remove the video track from Stream 2.

- Now, click the Create button at the bottom right of the webpage.
- A new webpage will load and now click the Start Event button.
The event is started. Now, let’s view the stream that has been created.
Step 5: Select the video player to view your livestream
You will now be able to view your low latency live stream. If you used the same folder structure as the example your endpoint URL of your video stream will be in the format of: https://DataEndpoint/dash/ull/main.mpd
Use the open source DASH.JS player to view your newly created ULL stream: https://reference.dashif.org/dash.js/nightly/samples/dash-if-reference-player/index.html
Make sure to select show options and check Low Latency Mode in the player configuration. Search for Dash.JS demo player if you are unable to get to this url.
The NexPlayer video player tends to provide the lowest latency and the most stable viewing experience. If you don’t have access to NexPlayer, you can use the Chrome DASH plugin player or the DASH.js player.
If you are seeking the lowest-possible latency, use a single bit rate and set the video resolution and frame rate on the camera to match the outputs in the AWS Elemental Live encoder. You can play the video directly from the origin, but playing through CloudFront or another CDN will usually provide the most stable playout experience, and in many cases it provides lower latency than playing directly from the MediaStore origin does.
Below is a screen capture showing the DASH.JS player.
Troubleshooting
Make sure your MediaStore container has a CORS policy and access policy that allow for any user to view the MediaStore stream. This information is located in the How to Send Live Video to MediaStore blog post. Note the CORS policy and access policy can take up to ten minutes to take affect.

Step 6: Put the Amazon CloudFront CDN in front of your MediaStore stream.
For streaming to large audiences, you will need to put a CDN in front of your MediaStore stream. If you want additional information on that topic, read this blog post to learn about adding CloudFront in front of an endpoint.
You can make an Amazon CloudFront distribution, point it at your Data Endpoint. Then you will be able to use an endpoint in the form of this to view your stream. https://CloudFrontUrl/dash/ull/main.mpd
CloudFront will also give lower latency to global viewers since they will be able to view the stream from the newest CloudFront pop to their location.