AWS Storage Blog
How to move data from Azure Files SMB shares to AWS using AWS DataSync
UPDATE (3/26/2024): When deploying the AWS DataSync agent, this repository contains a script designed to convert the DataSync Agent VHDX to VHD on Amazon Linux 2 (AL2), and upload the generated disk to Azure and create an Azure Virtual Machine.
It’s not uncommon for organizations to have data located in multiple data centers, storage locations, or even cloud providers. Even if data resides in one cloud, workloads that operate in different locations may require that data is copied for reasons including performing low-latency data analysis, maintaining disaster recovery versions, archiving cold data to free up space at source locations, and migrating data to new locations. File data is a common data type within companies, and it can be difficult to transfer file data between disparate storage systems and protocols. This is often accomplished through the use of custom scripts and utilities. Writing, maintaining, monitoring, and troubleshooting these scripts that move large amounts of data can be a burden on your IT operations and slow down data migration projects.
In this blog, we cover how to use AWS DataSync to regularly copy file data from Server Message Block (SMB) shares in Azure Files to AWS storage services. At the time of this writing, there is no native DataSync agent available for Azure. We demonstrate how you can use the existing Hyper-V DataSync agent to accelerate moving your data from Azure Files to AWS. File data can be delivered to Amazon Simple Storage Service (S3), Amazon Elastic File System (EFS), and Amazon FSx. Finally, we demonstrate using Amazon S3 as your target data location.

Figure 1: DataSync cross-cloud architecture
Prerequisites
To complete the steps in this post, you need to have access to the following:
- AWS account
- Azure account subscription
- Amazon S3 bucket – Read how to provision and create an Amazon S3 bucket in the Amazon S3 User Guide.
- Azure Files SMB share – Read how to configure an SMB file share on Azure Files here. Alternatively, you could also configure SMB shares directly on a virtual machine for the purposes of this demonstration.
- PowerShell
- Azure Command Line Interface (CLI)
- AzCopy
- The following Windows features need to be enabled on your local Windows system
- Hyper-V Module for Windows PowerShell
- Hyper-V Services
DataSync agent location
While you can deploy a DataSync agent to run on an Amazon Elastic Compute Cloud (Amazon EC2) instance and access your Azure storage over the internet, it is beneficial to deploy the DataSync agent as a VM in Azure instead. Deploying the DataSync agent in Azure will decrease your network latency and negates the need to have a public endpoint for your Azure File SMB share. DataSync also performs network optimizations, including incremental transfers, in-line compression, and sparse file detection. These optimizations can potentially reduce your egress costs from Azure as data moves to AWS.
Whether you are running the AWS DataSync agent on AWS or in Azure, there are several security features enabled to secure your files and network traffic. AWS DataSync uses Transport Layer Security (TLS) encryption on all the data moved between the source and destination. With DataSync, your data is never persisted in AWS DataSync itself. The service supports using default encryption for S3 buckets as well as SMB v3 encryption.
Solution tutorial
Figure 1 highlights the solution architecture from the Azure Files SMB share to the S3 bucket destination location. The steps for configuration are as follows:
- Deploy and activate the DataSync agent as an Azure VM in the same Region as the Azure Files SMB share.
- Configure and initiate replication between the Azure Files SMB share and an S3 bucket in your AWS account.
We briefly cover each component and detail how to build out the end-to-end data replication solution. We also provide links to the applicable documentation if you are interested in modifying this solution to suit your particular use case. Let’s get started.
Deploying the DataSync agent
Step 1: Prepare the DataSync agent image for deployment
- Open the AWS DataSync console.
- On the Create agent page in the console, select Microsoft Hyper-V from the Hypervisor drop-down menu.
- Choose Download the image in the Deploy agent Doing this downloads the agent in a .zip file that contains a virtual hard disk v2 (VHDX) image file.
- Extract the VHDX image file to your local Windows system.
- The VHDX file needs to be converted to a fixed size virtual hard disk (VHD) file for compatibility with Azure. You can find more information on preparing a VHDX for upload to Azure here. Run the following command, making sure to update the path and file name to match your location:
Convert-VHD -Path .\<path to vhdx>\datasync-20210211-x86_64.vhdx -DestinationPath .\<path
to vhdx>\datasync-20210211-x86_64.vhd -VHDType Fixed
Step 2: Upload the VHD to a managed disk
- Determine the size of the VHD file so that you can create an empty managed disk that matches. Use the
ls -l. command in the directory containing the VHD file image. This provides you with the number of bytes for the VHD file. You will need this for the –upload-bytes-parameter later.

Figure 2: Identify byte size of the DataSync VHD file
- Ensure that you have the latest version of the Azure Command Line Interface (CLI) and AzCopy before running the following commands.
- Create the empty managed disk by running the following command. Make sure to update the following parameters with your information:
-
- manageddiskname – Provide the name of the Managed Disk that will be created.
- resourcegroupname – The resource group needs to be created before running this command.
- Region – Specify the Region that contains your Azure Files share.
az disk create -n <manageddiskname> -g <resourcegroupname> -l
<region> --for-upload --upload-size-bytes 85899346432 --sku standard_lrs
- Generate a writable shared access signature (SAS)
az disk grant-access -n <manageddiskname> -g <resourcegroupname> --access-level
Write --duration-in-seconds 86400
- Upload the DataSync VHD to the empty managed disk.
AzCopy.exe copy "c:\somewhere\datasync-20210211-x86_64.vhd" "sas-URI"--blob-type PageBlob
- Once the upload is complete, you can revoke the SAS to prepare the disk for mounting to the new VM.
az disk revoke-access -n <manageddiskname> -g <resourcegroupname>
Step 3: Create the DataSync agent VM
Create the DataSync VM using the managed disk that you previously created by running the following command. Update the newVMname parameter with a VM name that matches your organization’s naming conventions.
az vm create --resource-group <resourcegroupname> --location <region> --name <newVMname> –-size
Standard_E4as_v4 --os-type linux --attach-os-disk <manageddiskname>
Step 4: Activate the DataSync agent
You can activate your DataSync agent automatically or manually. The automated process requires you to temporarily open up port 80 inbound to the DataSync agent VM. After successful activation, DataSync closes the agent’s port 80. The required level of access to port 80 depends on your network configuration. You can read more about DataSync network requirements here.
Alternatively, you can use the manual activation method and obtain the activation key from the agent’s local console. This method does not require connectivity between the browser and your agent. The following steps outline the manual activation method and how to configure an DataSync agent:
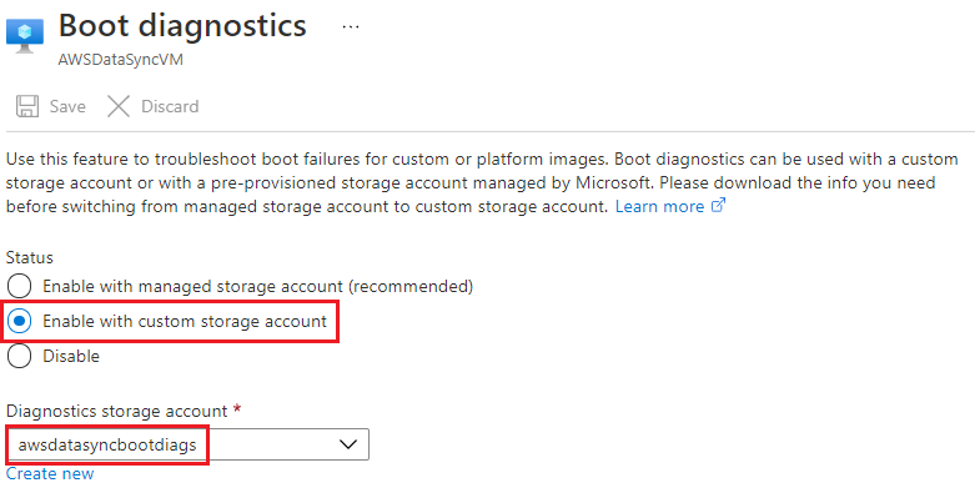
Figure 3: Enable boot diagnostics
- On the AWS DataSync Activation – Configuration main menu, enter “0” to get an activation key.
- Enter the AWS Region that your agent will be activated in.
- Enter the service endpoint type that your agent will be using. Options include public, FIPS, and VPC with AWS PrivateLink. We will use the public option for this example.
- The activation key is automatically generated and displayed on the screen. Select and copy this value.
Note: The activation key should be used within 30 minutes of being generated for activation.
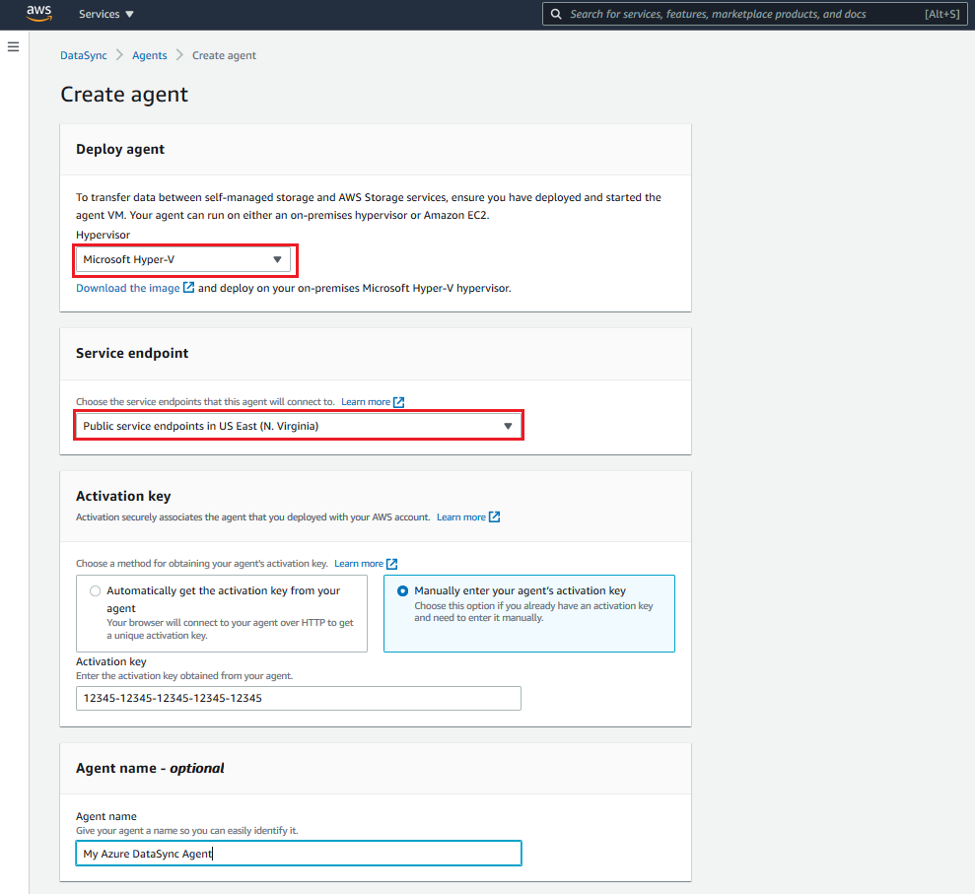
Figure 4: Create the DataSync agent
Next, you need to create a DataSync agent. To do this, complete the following these steps:
- Open the AWS DataSync console.
- On the Create agent page in the console, select Microsoft Hyper-V from the Hypervisor drop-down menu.
- In the Service Endpoint section, select the Public service endpoints option in the Region in which your agent will be activated.
- Under Activation key, select Manually enter your agent’s activation key and paste in the value that you copied from the agent’s local console.
- Provide a unique name for the agent if you’d like, and then select the Create agent.
Setting up data replication
Step 1: Configure the source SMB location
Configure the source Azure Files SMB file share as a DataSync SMB location. Choose the Locations option from the left navigation panel, and then select Create Location. Next, select Server Message Block (SMB) as your Location type. Make sure to select the agent you created in the previous steps.
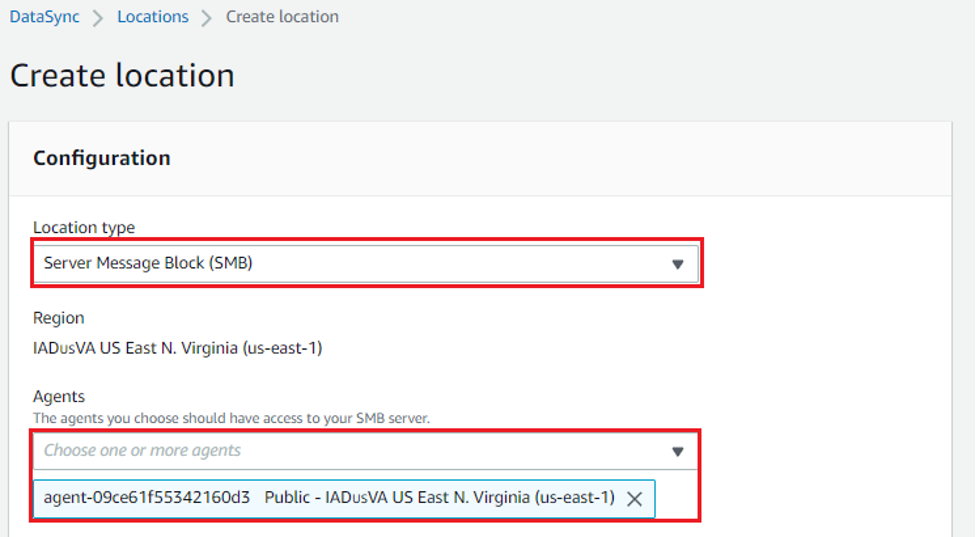
Figure 5: Create the SMB location
Next, you will need to input the SMB Server fully qualified domain name (FQDN) or IP address, Share name, and user credentials with appropriate permissions to access the SMB file shares. The preferred means of connecting to your Azure files share is with an Active Directory identity. At the time of this writing, neither Azure Active Directory Domain Services (AD DS) nor on-premises AD DS authentication for Azure file shares supports authentication from Linux VMs per this documentation. For admin access to the Azure file share, you can also use the storage account key. The Azure portal provides a script that contains the SMB server, share name, and user credentials that are required. Follow these steps to retrieve the storage account key connection information:
- Sign in to the Azure portal.
- Browse to the storage account that contains your file share.
- Select File shares.
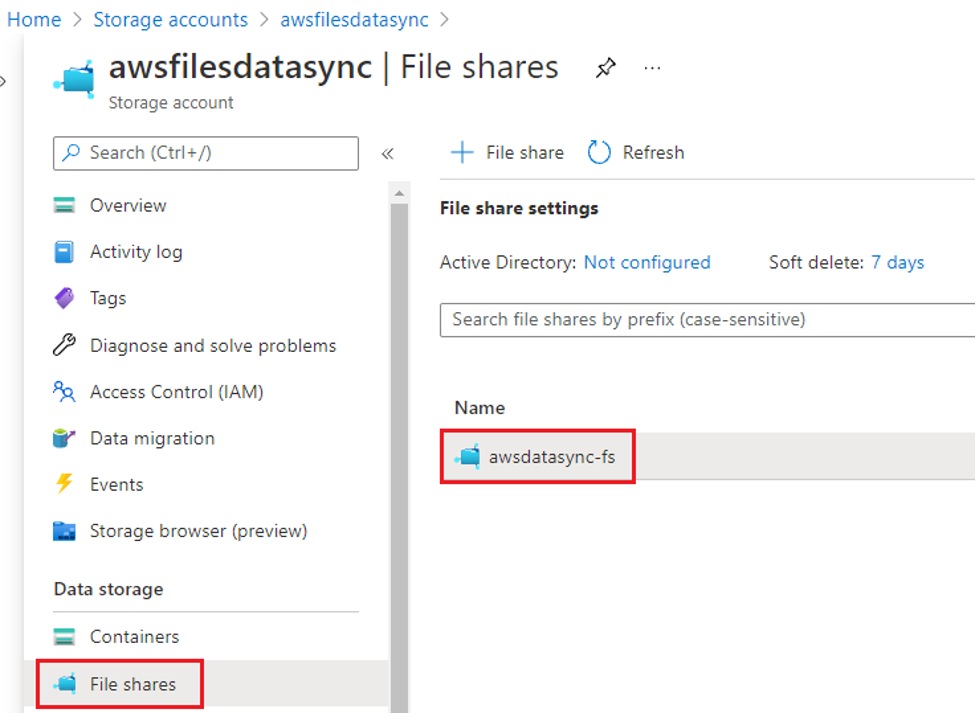
Figure 6: Identify the SMB file share settings
- Select the file share that you would like to migrate data from.
- Select Connect.

Figure 7: Retrieve the connection settings
- The connection information is provided within the script window, as shown in the following example.

Figure 8: SMB connection settings and credentials
- Input the SMB Server FQDN or IP address, Share name, and the user credentials retrieved from the Azure connection details window.
 Figure 9: Input the SMB connection settings and credentials
Step 2: Configure the destination location
Configure the destination location as Amazon S3. Select Locations from the left navigation menu, then select Create Location. Choose your target Amazon S3 bucket, S3 storage class, folder, and an IAM role with permission to access the Amazon S3 bucket. For more information on manually configuring an IAM role to access your Amazon S3 bucket, visit the DataSync User Guide. DataSync can move data directly into any S3 storage class, with the exception of the S3 Glacier Instant Retrieval storage class, without having to manage zero-day lifecycle policies. For each migration, you can select the most cost-effective S3 storage class for your needs. DataSync detects existing files or objects in the destination file system or bucket. To prevent accidental modification or loss of data, you can configure DataSync to never overwrite existing data.
Note that if you target Amazon S3, DataSync applies default POSIX metadata to the Amazon S3 object. This includes using the default POSIX user ID and group ID values. Refer to how DataSync handles metadata and special files to learn more. Please also review the Amazon S3 storage class considerations with DataSync documentation.
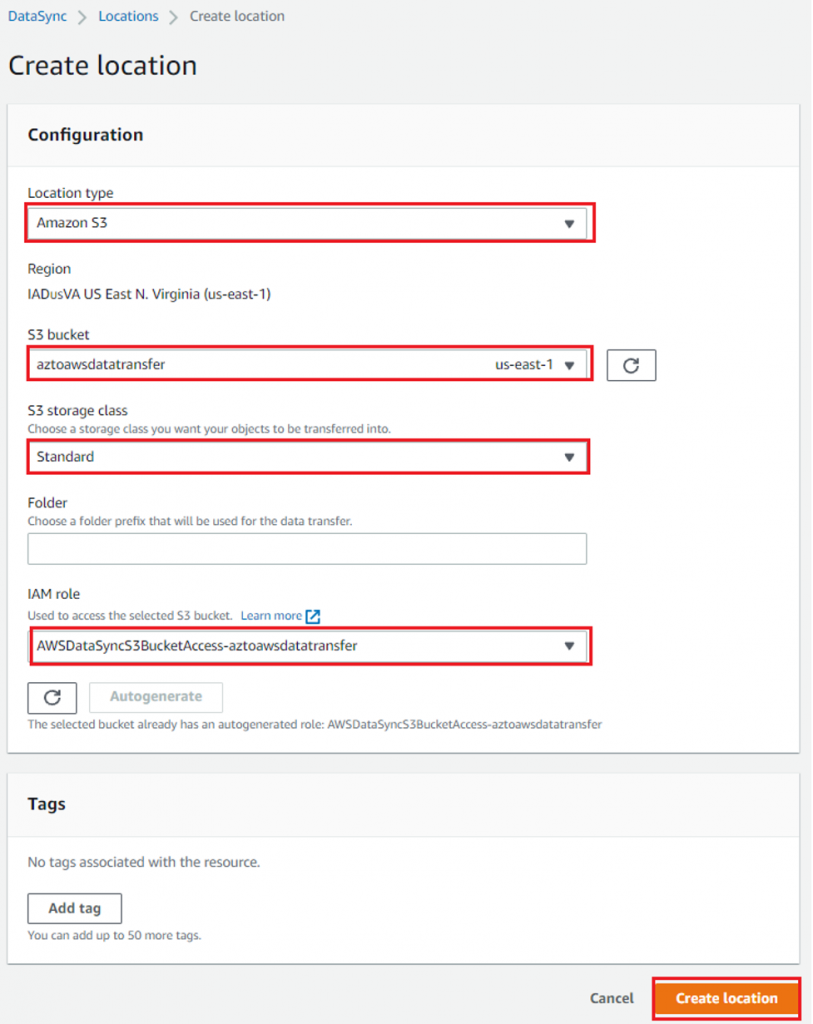
Figure 10: Create the S3 location
Step 3: Create the replication task
Configure task settings by using the existing source SMB location in Step 1 and the destination Amazon S3 bucket in Step 2. Refer to the task settings documentation to learn more about the task settings and options available.
Take note that if you want to periodically replicate new files, you’ll want to make sure to select your preferred schedule.
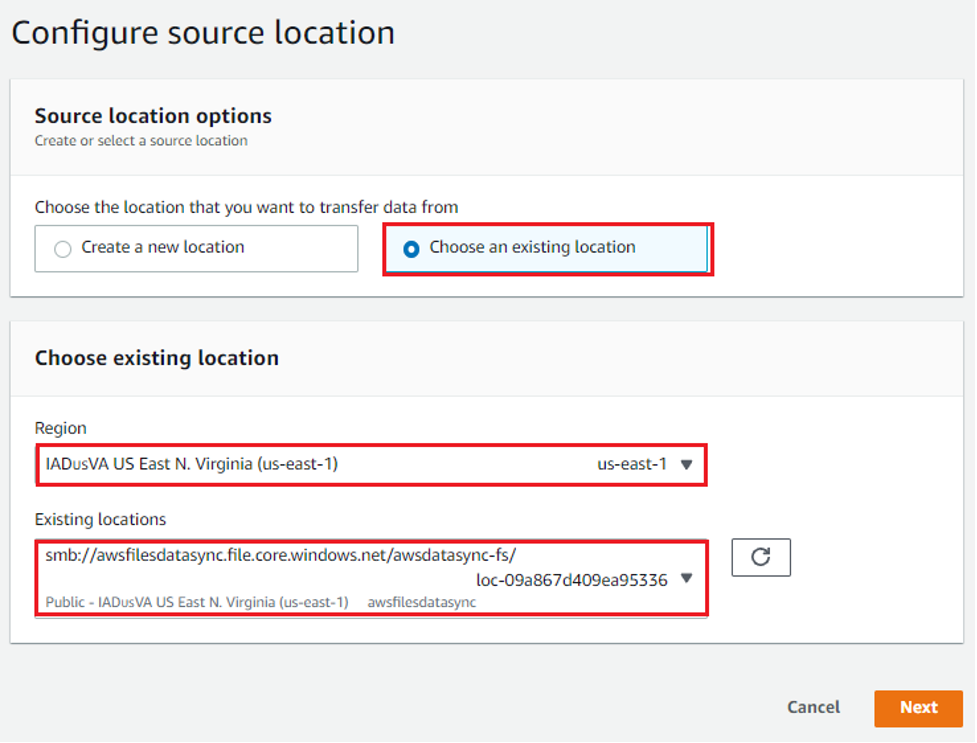
Figure 11: Configure the source location
After configuring the source location, do the same for the destination location. See Figure 12 for details:

Figure 12: Configure the destination location
Next, configure your DataSync task settings. The AWS Management Console displays the Configure settings page for the DataSync task. For our example, we’ve chosen to have the task settings configured to Verify only the data transferred, Transfer only data that has changed, require a daily task frequency, and log configuration. See Figure 13 for more detail:
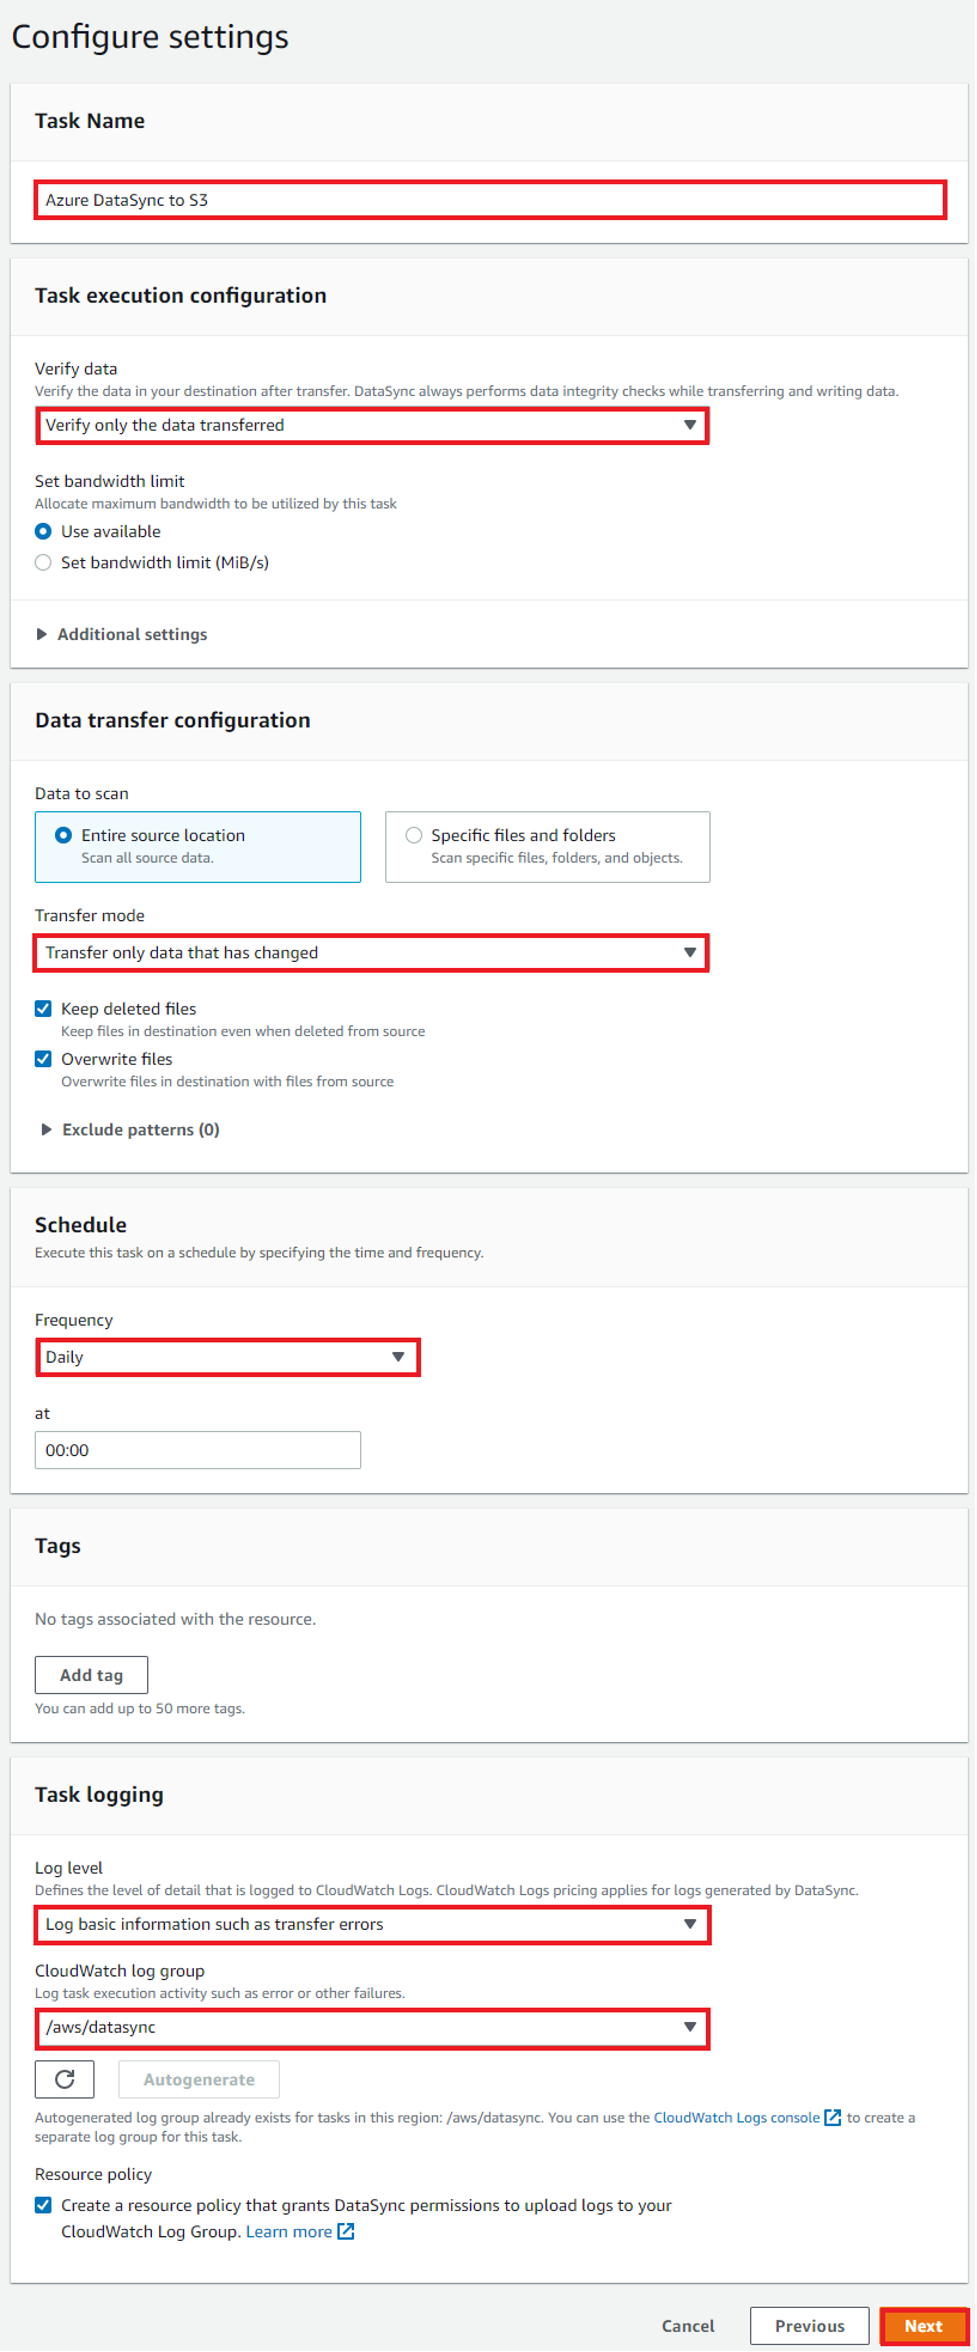
Figure 13: DataSync task settings
Step 4: Start the DataSync task
Start your task so DataSync can begin transferring the data by selecting Start from the task list or inside the task overview itself. If you set a schedule during the task setup, then the task will start at the time you specified. You can learn more about task execution and monitoring your DataSync task with Amazon CloudWatch in the linked documentation.
After completing the steps in this tutorial, you have a secure data pipeline to move your Azure Files SMB share data efficiently to Amazon S3. Each time your DataSync task runs, it scans the source and destination locations for changes and performs a copy of any data and metadata differences. There are several phases that a DataSync task goes through: launching, preparing, transferring, and verifying. The time spent in the preparing phase varies depending on the number of files in the source and destination locations. It usually takes between a few minutes to several hours. Refer to the DataSync User Guide for more information on the DataSync task phases.
Cleaning up
To avoid ongoing charges for the resources you created, follow these steps:
- Delete the DataSync task that you created in Step 3 of Setting up data replication.
- Delete the source and destination locations that you created in Step 1 and 2 of Setting up data replication.
- Delete the DataSync agent that you created in Step 3 of Deploying the DataSync
- Delete the Azure VM and attached resources that you created when Deploying the DataSync agent.
- Delete all objects in the S3 bucket from Step 1 of Setting up data replication. The bucket must be empty before it can be deleted following the steps found here.
Pricing information
DataSync pricing is simple. You pay a flat per-GB fee for data moved, with no upfront fees or minimums. The pricing model makes it affordable to migrate data into AWS. Note that AWS charges the destination account for the use of AWS DataSync since this is where you use the DataSync endpoint.
While there is no additional charge for inbound data migration, there may be data egress charges incurred against the source account in Azure. Refer to the vendor’s pricing site for up-to-date information related to Azure egress charges.
Conclusion
In this blog post, we explored how to configure an AWS DataSync Agent on Azure so that you can copy your data to AWS. In our step-by-step guide, we created and configured a task that copies file data from an Azure Files SMB share to an Amazon S3 bucket on AWS without managing customized scripts or utilities that can often be a burden on IT teams and slow down data migration projects.
With this solution, you can benefit from easily migrating data from SMB shares hosted on Azure to AWS storage services. This results in the ability to consolidate your data for processing and working with workloads operating in different locations. Taking advantage of a managed service like AWS DataSync removes the burden of managing additional infrastructure, saves operational time, and reduces the complexity of moving data at scale.
Use the following resources to help you get started with AWS DataSync:
- What’s New with AWS DataSync
- AWS DataSync User Guide
- AWS DataSync Forums
- AWS DataSync Primer, one-hour, self-paced online course available for free and on demand
Thank you for reading this post on using AWS DataSync to move your data easily and securely from Azure Files SMB shares to Amazon S3. We encourage you to try this solution, today. If you have any comments or questions, please don’t hesitate to leave them in the comments section.