AWS Big Data Blog
Getting started with Apache Iceberg write support in Amazon Redshift – Part 2
In Getting started with Apache Iceberg write support in Amazon Redshift – part 1, you learned how to create Apache Iceberg tables and write data directly from Amazon Redshift to your data lake. You set up external schemas, created tables in both Amazon Simple Storage Service (Amazon S3) and S3 Tables, and performed INSERT operations while maintaining ACID (Atomicity, Consistency, Isolation, Durability) compliance.
Amazon Redshift now supports DELETE, UPDATE, and MERGE operations for Apache Iceberg tables stored in Amazon S3 and Amazon S3 table buckets. With these operations, you can modify data at the row level, implement upsert patterns, and manage the data lifecycle while maintaining transactional consistency using familiar SQL syntax. You can run complex transformations in Amazon Redshift and write results to Apache Iceberg tables that other analytics engines like Amazon EMR or Amazon Athena can immediately query.
In this post, you work with customer and orders datasets that were created and used in the previously mentioned post to demonstrate these capabilities in a data synchronization scenario.
Solution overview
This solution demonstrates DELETE, UPDATE, and MERGE operations for Apache Iceberg tables in Amazon Redshift using a common data synchronization pattern: maintaining customer records and orders data across staging and production tables. The workflow includes three key operations:
- DELETE – Remove customer records based on opt-out requests
- UPDATE – Modify existing customer information
- MERGE – Synchronize order data between staging and production tables using upsert patterns
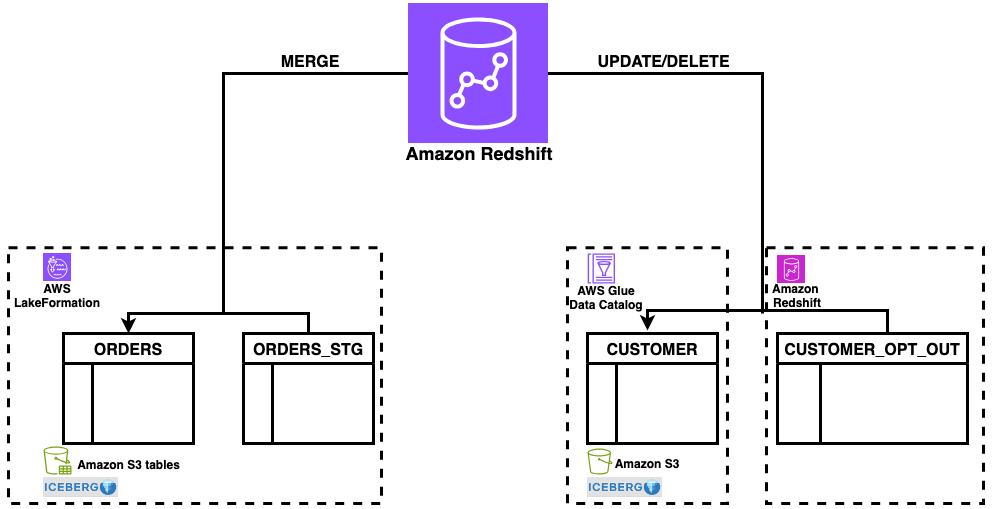
Figure 1: solution overview
The solution uses a staging table (orders_stg) stored in an S3 table bucket for incoming data and reference tables (customer_opt_out) in Amazon Redshift for managing data lifecycle operations. With this architecture, you can process changes efficiently while maintaining ACID compliance across both storage types.
Prerequisites
For this walkthrough, you should have completed the setup steps from Getting started with Apache Iceberg write support in Amazon Redshift – part 1, including:
- Create an Amazon Redshift data warehouse (provisioned or Serverless)
- Set up the required IAM role (
RedshifticebergRole) with appropriate permissions - Create an Amazon S3 bucket and S3 Table bucket
- Configure AWS Glue Data Catalog database and setting up access
- Set up AWS Lake Formation permissions
- Create the
customerApache Iceberg table in Amazon S3 standard buckets with sample customer data - Create the orders Apache Iceberg table in Amazon S3 Table buckets with sample order data
- Amazon Redshift data warehouse on p200 version or higher
Data preparation
In this section, you set up the sample data needed to demonstrate MERGE, UPDATE, and DELETE operations. To prepare your data, complete the following steps:
- Log in to Amazon Redshift using Query Editor V2 with the Federated user option.
- Create the
orders_stgandcustomer_opt_outtables with sample data:

Figure 2: orders_stg result set
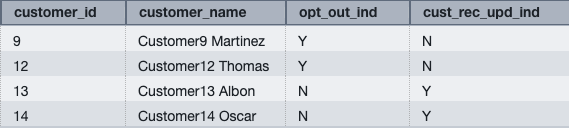
Figure 3: customer_opt_out result set
You can now use the orders_stg and customer_opt_out tables to demonstrate data manipulation operations on the orders and customer tables created in the prerequisite section.
MERGE
MERGE conditionally inserts, updates, or deletes rows in a target table based on the results of a join with a source table. You can use MERGE to synchronize two tables by inserting, updating, or deleting rows in one table based on differences found in the other table.
To perform a MERGE operation:
- Verify that the current data in the orders table for order IDs 1014, 1015, 1016, and 1017.You loaded this sample data in Part 1:

Figure 4: orders data for existing orders for orders in orders_stg
The orders table contains existing rows for order IDs 1014 and 1015.
- Run the following MERGE operation using order_id as the key column to match rows between the orders and orders_stg tables:
The operation updates existing rows (1014 and 1015) and inserts new rows for order IDs that don’t exist in the orders table (1016 and 1017).
- Verify the updated data in the orders table:

Figure 5: merged data on orders from orders_stg
The MERGE operation performs the following changes:
- Updates existing rows – Order IDs 1014 and 1015 have updated total_order_amt and total_order_tax_amt values from the orders_stg table
- Inserts new rows – Order IDs 1016 and 1017 are inserted because they don’t exist in the orders table
This demonstrates the upsert pattern, where MERGE conditionally updates or inserts rows based on the matching key column.
UPDATE
UPDATE modifies existing rows in a table based on specified conditions or values from another table.
Update the customer Apache Iceberg table using data from the customer_opt_out Amazon Redshift native table. The UPDATE operation uses the cust_rec_upd_ind column as a filter, updating only rows where the value is ‘Y’.
To perform an UPDATE operation:
- Verify the current
customer_namevalues for customer IDs 13 and 14 incustomer_opt_outandcustomer(loaded this sample data in Part 1) tables:

Figure 6: verify existing customer data for customers from customer_opt_out
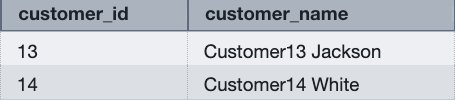
Figure 7: verify existing customer name for customers from customer_opt_out
- Run the following UPDATE operation to modify customer names based on the
cust_rec_upd_indfromcustomer_opt_out:
- Verify the changes for customer IDs 13 and 14:

Figure 8: updated customer names in customer table
The UPDATE operation modifies the customer_name values based on the join condition with the customer_opt_out table. Customer IDs 13 and 14 now have updated names (Customer13 Albon and Customer14 Oscar).
DELETE
DELETE removes rows from a table based on specified conditions. Without a WHERE clause, DELETE removes all the rows from table.
Delete rows from the customer Apache Iceberg table using data from the customer_opt_out Amazon Redshift native table. The DELETE operation uses the opt_out_ind column as a filter, removing only rows where the value is ‘Y’.
To perform a DELETE operation:
- Verify the opt-out indicator data in the
customer_opt_outtable:

Figure 9: verify customer records for opt out
- Verify the current customer data for customer IDs 9 and 12:

Figure 10: verify existing customers data in customer table for opt out
- Review the query execution plan:
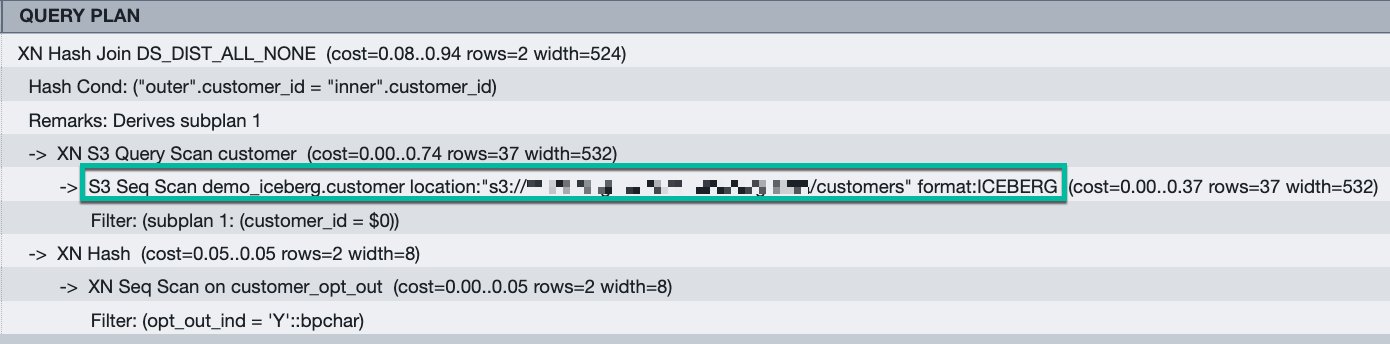
Figure 11: query plan for the DELETE query. The execution plan shows Amazon S3 scans for Apache Iceberg format tables, indicating that Amazon Redshift removes rows directly from the Amazon S3 bucket.
- Run the following DELETE operation:
- Verify that the rows were removed:

Figure 12: result set from customer table for opt out customer after delete
The query returns no rows, confirming that customer IDs 9 and 12 were successfully deleted from the customer table.
Best practices
After performing multiple UPDATE or DELETE operations, consider running table maintenance to optimize read performance:
- For AWS Glue tables – Use AWS Glue table optimizers. For more information, see Table optimizers in the AWS Glue Developer Guide.
- For S3 Tables – Use S3 Tables maintenance operations. For more information, see S3 Tables maintenance in the Amazon S3 User Guide.
Table maintenance merges and compacts deletion files generated by Merge-on-Read operations, improving query performance for subsequent reads.
Conclusion
You can use Amazon Redshift support for DELETE, UPDATE, and MERGE operations on Apache Iceberg tables to build data architectures that combine warehouse performance with data lake scalability. You can modify data at the row level while maintaining ACID compliance, giving you the same flexibility with Apache Iceberg tables as you have with native Amazon Redshift tables.
Get started:
- Review the Amazon Redshift Iceberg integration documentation for complete syntax reference
- Explore Writing to Apache Iceberg tables for detailed examples
- Learn about table maintenance best practices for AWS Glue tables
- Discover S3 Tables maintenance operations for improving query performance