AWS Big Data Blog
Modernize your data warehouse by migrating Oracle Database to Amazon Redshift with Oracle GoldenGate
In this post, we show how to migrate an Oracle data warehouse to Amazon Redshift using Oracle GoldenGate and DMS Schema Conversion, a feature of AWS Database Migration Service (AWS DMS). This approach facilitates minimal business disruption through continuous replication. Amazon Redshift is a fast, fully managed, petabyte-scale data warehouse service that makes it simple and cost-effective to efficiently analyze your data using your existing business intelligence tools.
Solution overview
Our migration approach combines DMS Schema Conversion for schema migration and Oracle GoldenGate for data replication. The migration process consists of four main steps:
- Schema conversion using DMS Schema Conversion.
- Initial data load using Oracle GoldenGate.
- Change data capture (CDC) for ongoing replication.
- Final cutover to Amazon Redshift.
The following diagram shows the migration workflow architecture from Oracle to Amazon Redshift, where DMS Schema Conversion handles schema migration and Oracle GoldenGate manages both initial data load and continuous replication through Extract and Replicat processes running on Amazon Elastic Compute Cloud (Amazon EC2) instances. The solution facilitates minimal downtime by maintaining real-time data synchronization until the final cutover.
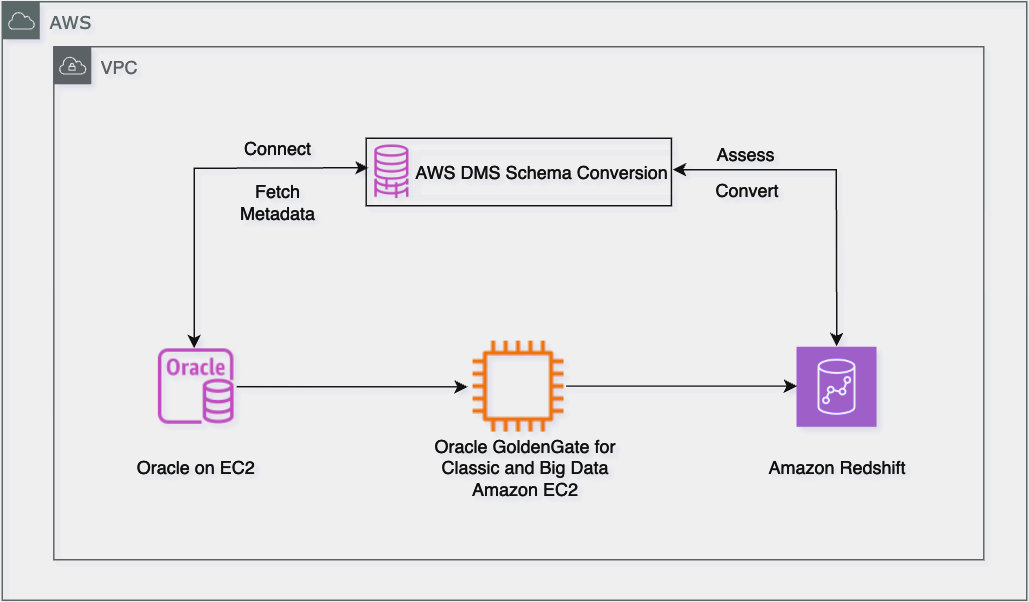
The solution comprises the following key migration components:
- Oracle Database as the source system (on-premises, Amazon EC2, or Amazon Relational Database Service (Amazon RDS) for Oracle)
- Amazon Redshift as the target system
- Oracle GoldenGate for data migration and replication
- DMS Schema Conversion for schema conversion
- Amazon Simple Storage Service (Amazon S3) to stage data before it’s loaded into Amazon Redshift
- An AWS Identity and Access Management (IAM) role with appropriate permissions
In the following sections, we walk through how to migrate an Oracle data warehouse to Amazon Redshift. For demonstration purposes, we use an Oracle data warehouse consisting of four tables:
Prerequisites
We recommend reviewing the licensing requirements for Oracle GoldenGate. For more information, refer to Oracle GoldenGate Licensing Information.
Run schema conversion using DMS Schema Conversion
DMS Schema Conversion automatically converts your Oracle database schemas and code objects to Amazon Redshift-compatible formats. This includes tables, views, stored procedures, functions, and data types.
Set up network for DMS Schema Conversion
DMS Schema Conversion requires network connectivity to both your source and target databases. To set up this connectivity, complete the following steps:
- Specify a virtual private cloud (VPC) and subnet where DMS Schema Conversion will run.
- Configure security group rules to allow traffic between the following:
- DMS Schema Conversion and your source Oracle database
- DMS Schema Conversion and your target Redshift cluster
- For on-premises databases, set up either:
For comprehensive information about network configurations, refer to Setting up a network for DMS Schema Conversion.
Store database credentials in AWS Secrets Manager
DMS Schema Conversion uses secrets stored in AWS Secrets Manager to connect to your database. For instructions to add source and target credentials to Secrets Manager, refer to Store database credentials in AWS Secrets Manager.
Create S3 bucket
DMS Schema Conversion saves items such as assessment reports, converted SQL code, and information about database schema objects in an S3 bucket. For instructions to create an S3 bucket, refer to Create an S3 bucket.
Create IAM policies and roles
To set up DMS Schema Conversion, you must create appropriate IAM policies and roles. This process makes sure AWS DMS has the necessary permissions to access your source and target databases, as well as other AWS services required for the migration.
Prepare DMS Schema Conversion
In this section, we go through the steps to configure DMS Schema Conversion.
Set up instance profile
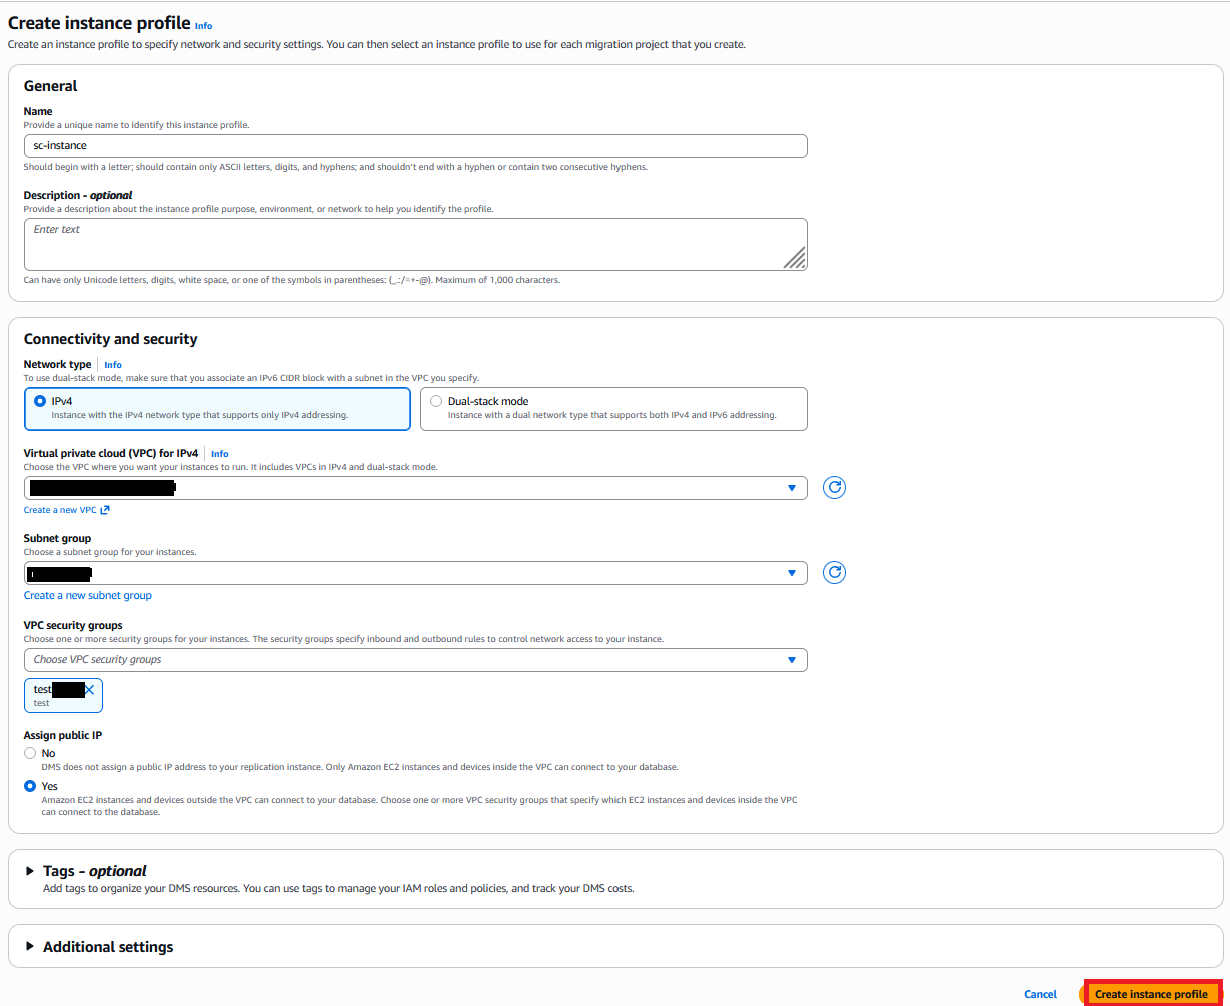
An instance profile specifies the network, security, and Amazon S3 settings for DMS Schema Conversion to use. Create an instance profile with the following steps:
- On the AWS DMS console, choose Instance profiles in the navigation pane.
- Choose Create instance profile.
- For Name, enter a name (for example, sc-instance).
- For Network type, we use IPv4. DMS Schema Conversion also offers Dual-stack mode for both IPv4 and IPv6.
- For Virtual private cloud (VPC) for IPv4, choose Default VPC.
- For Subnet group, choose your subnet group (for this post, default).
- For VPC security groups, choose your security groups. As previously stated, the instance profile’s VPC security group must have access to both the source and target databases.
- For S3 bucket, specify a bucket to store schema conversion metadata.
- Choose Create instance profile.
Add data providers
Data providers store database types and information about source and target databases for DMS Schema Conversion to connect to. Configure data providers for the source and target databases with the following steps:
- On the AWS DMS console, choose Data providers in the navigation pane.
- Choose Create data provider.
- To create your target, for Name, enter a name (for example, redshift-target).
- For Engine type, choose Amazon Redshift.
- For Engine configuration, select Choose from Redshift.
- For Redshift cluster, choose the target Redshift cluster.
- For Port, enter the port number.
- For Database name, enter the name of your database.
- Choose Create data provider.
- Repeat similar steps to create your source data provider.

Create migration project
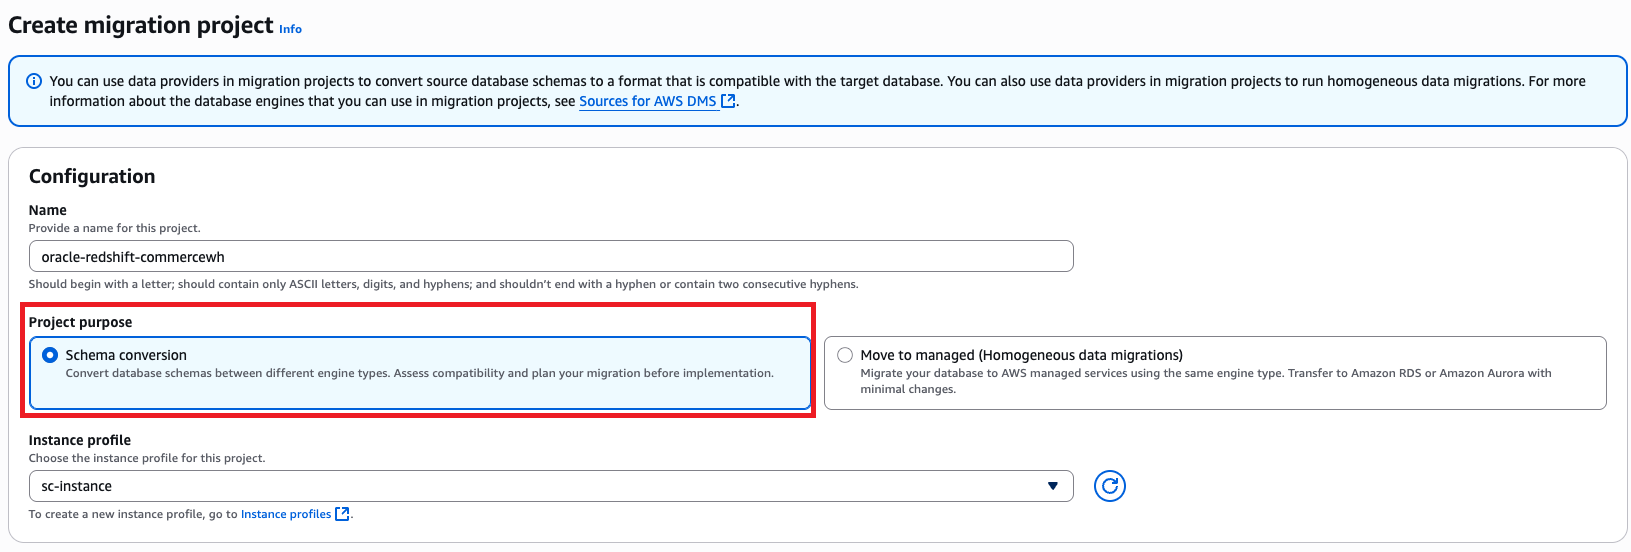
The DMS Schema Conversion migration project defines migration entities, including instance profiles, source and target data providers, and migration rules. Create a migration project with the following steps:
- On the AWS DMS console, choose Migration projects in the navigation pane.
- Choose Create migration project.
- For Name, enter a name to identify your migration project (for example, oracle-redshift-commercewh).
- For Instance profile, choose the instance profile you created.
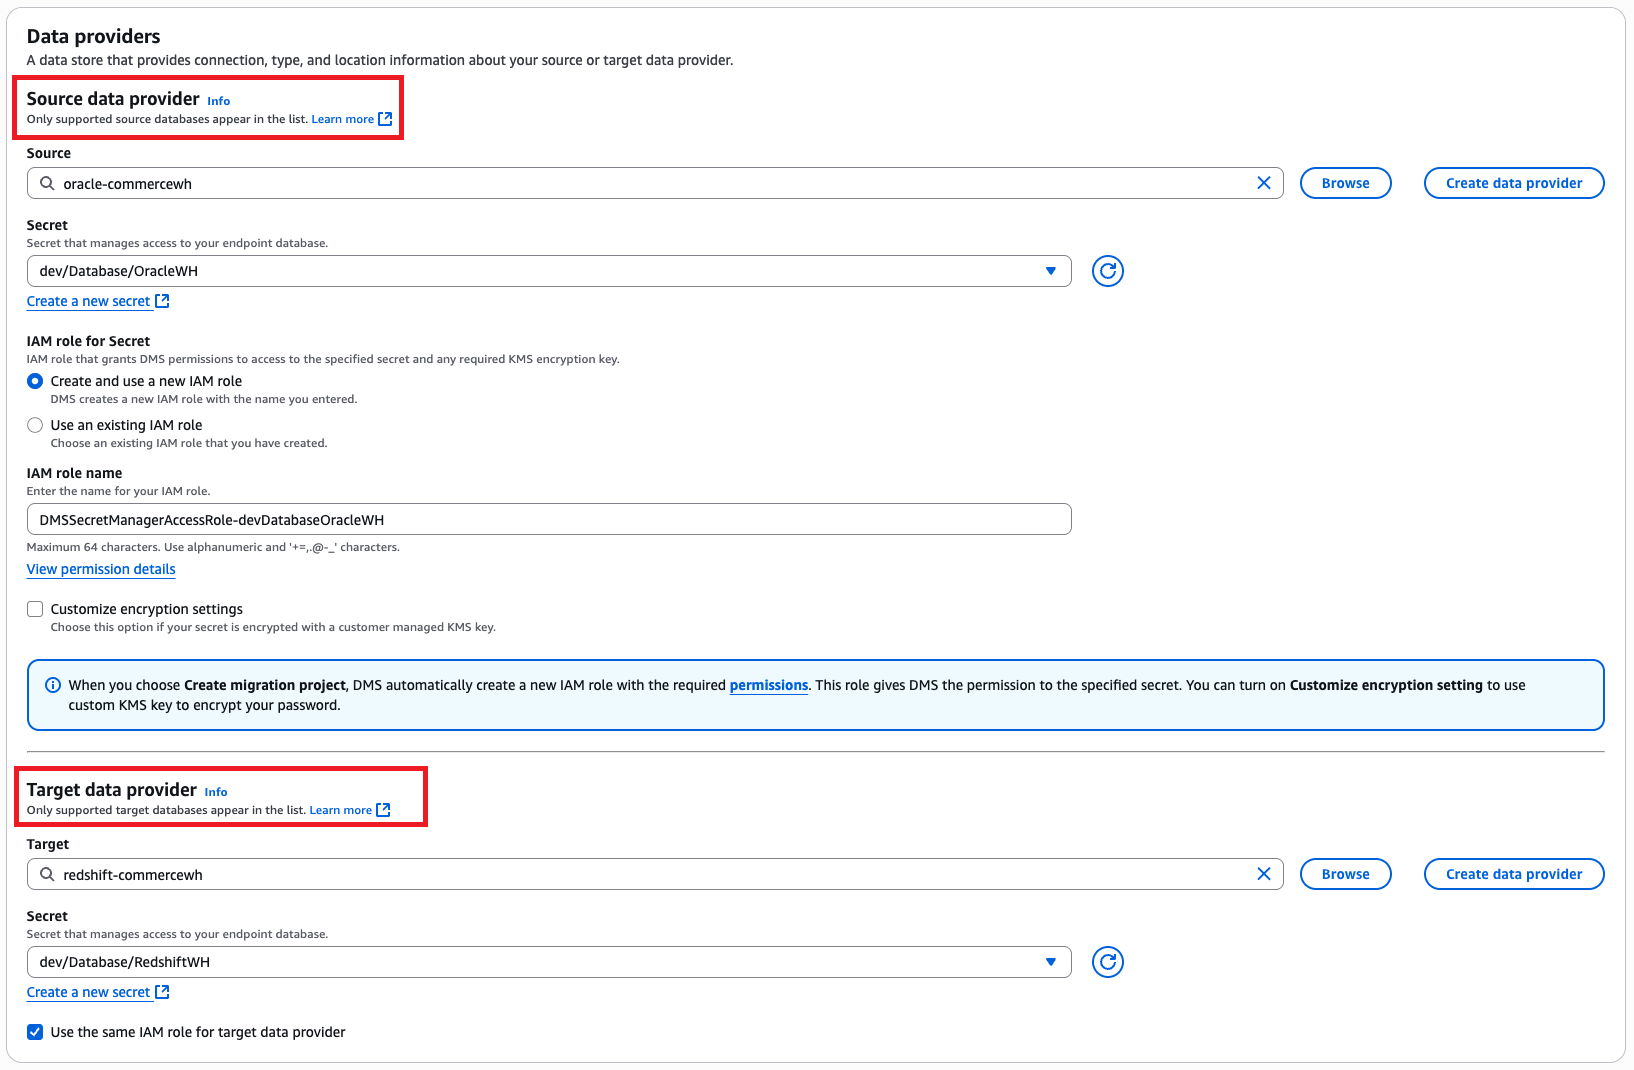
- In the Data providers section, enter the source and target data providers, Secrets Manager secret, and IAM roles.
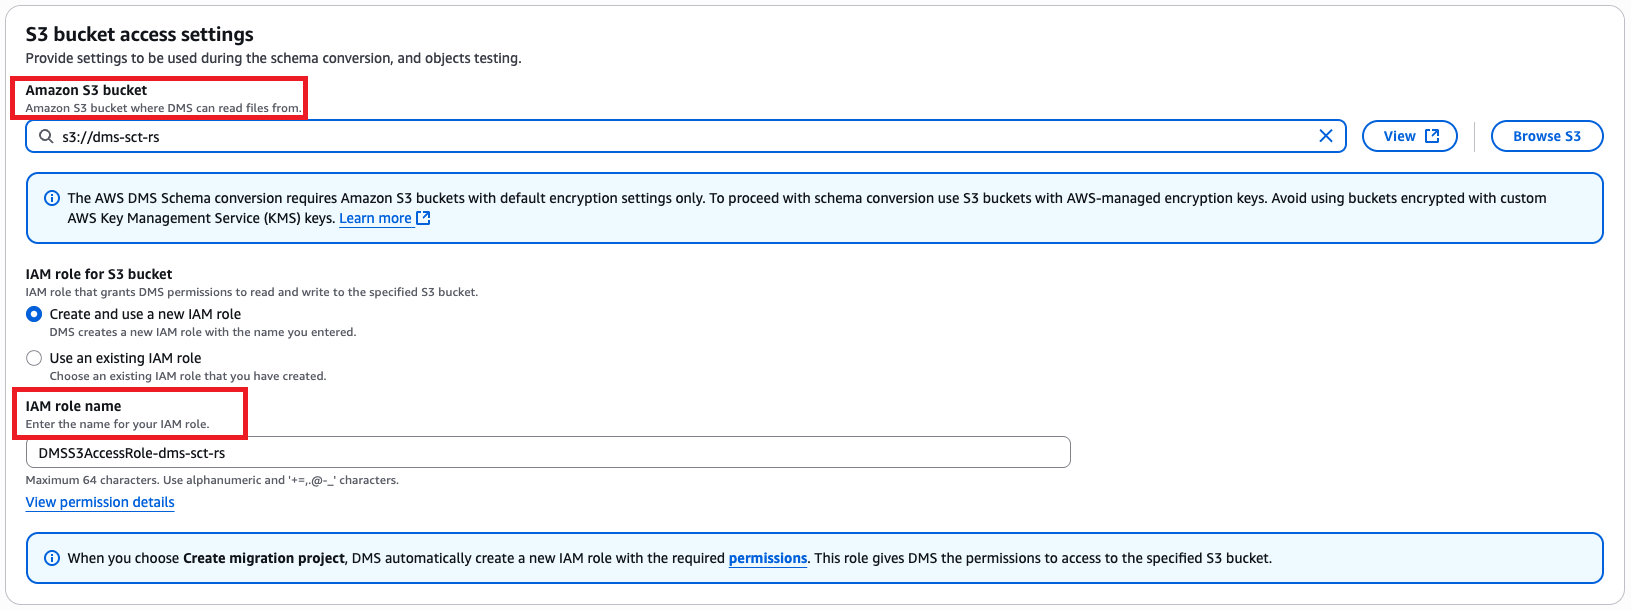
- In the Schema conversion settings section, enter the S3 URL and choose the applicable IAM role.
- Choose Create migration project.
Use DMS Schema Conversion to transform Oracle database objects
Complete the following steps to convert source database objects:
- On the AWS DMS console, choose Migration projects in the navigation pane.
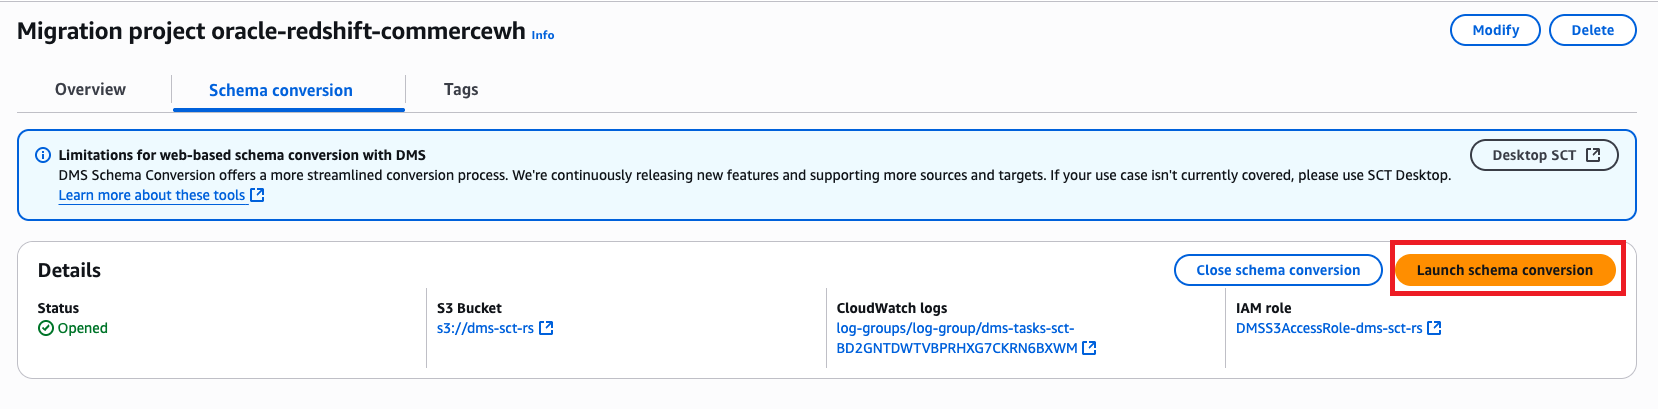
- Choose the migration project you created.
- On the Schema conversion tab, choose Launch schema conversion.
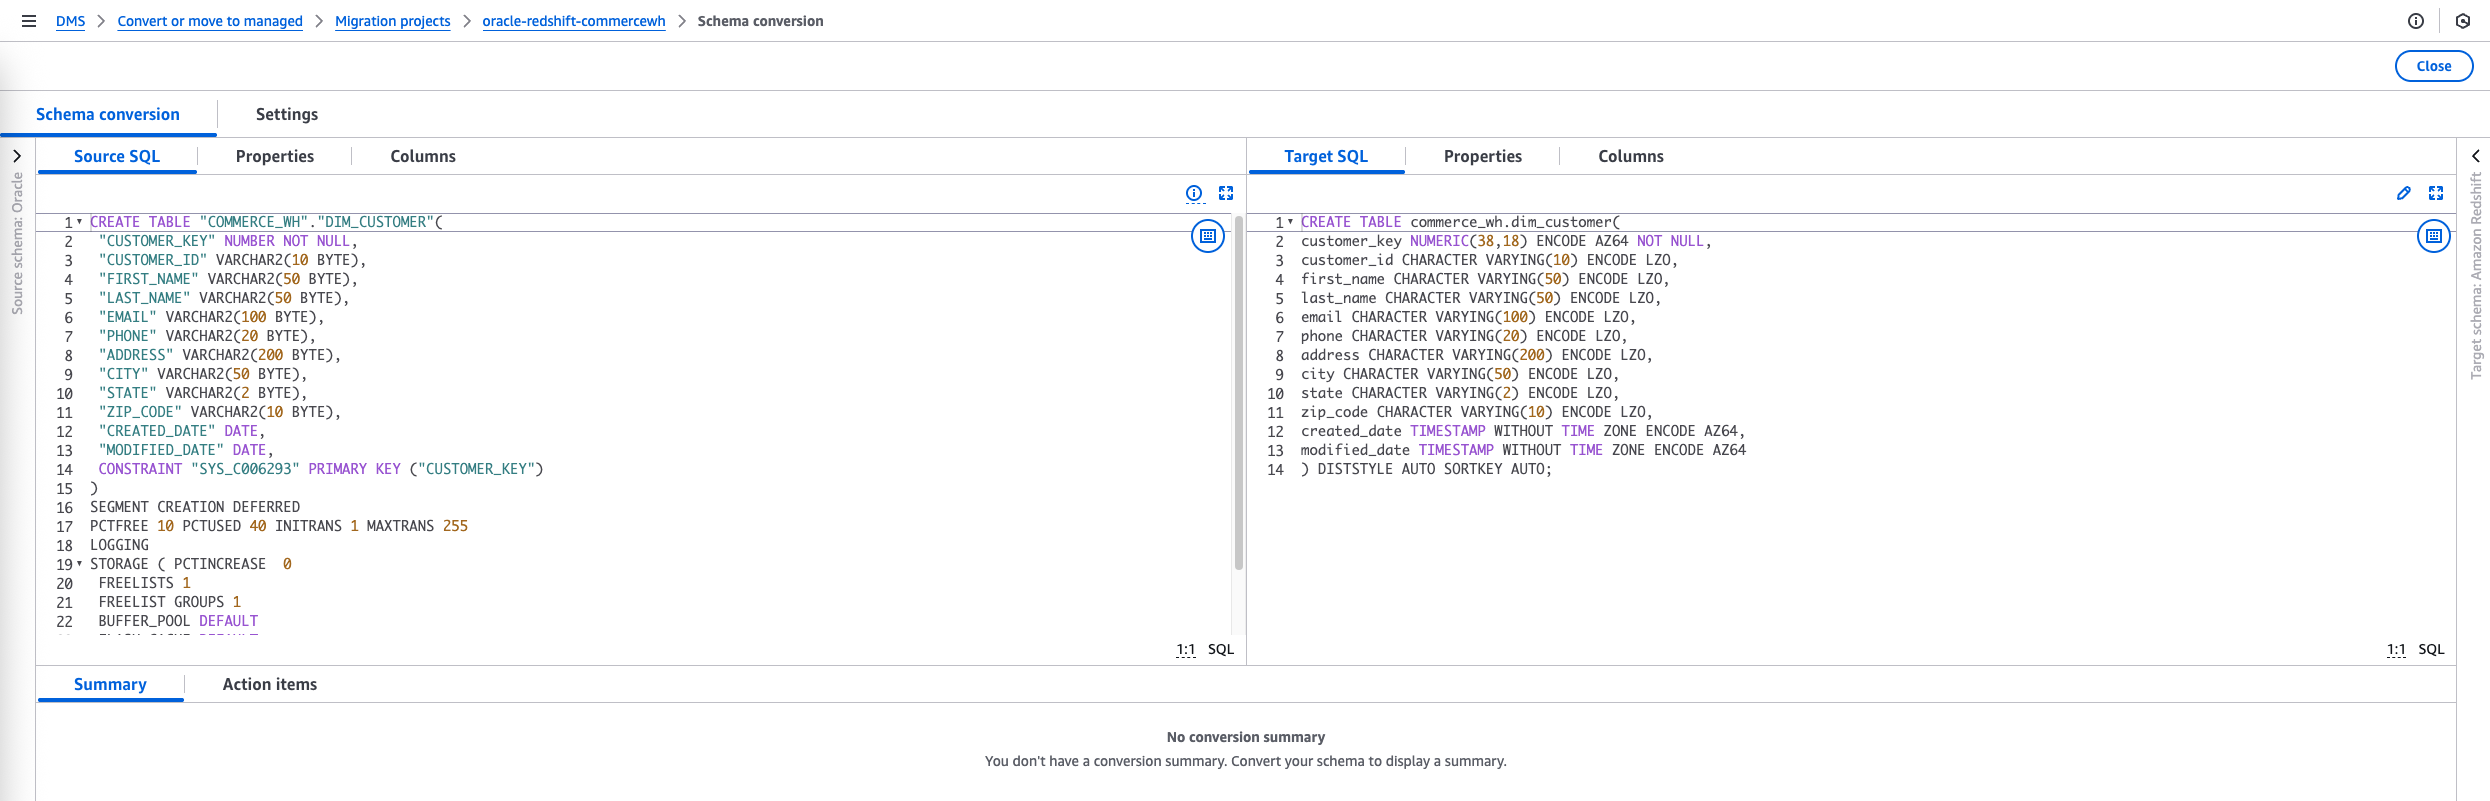
The schema conversion project will be ready when the launch is complete. The left navigation tree represents the source database, and the right navigation tree represents the target database.
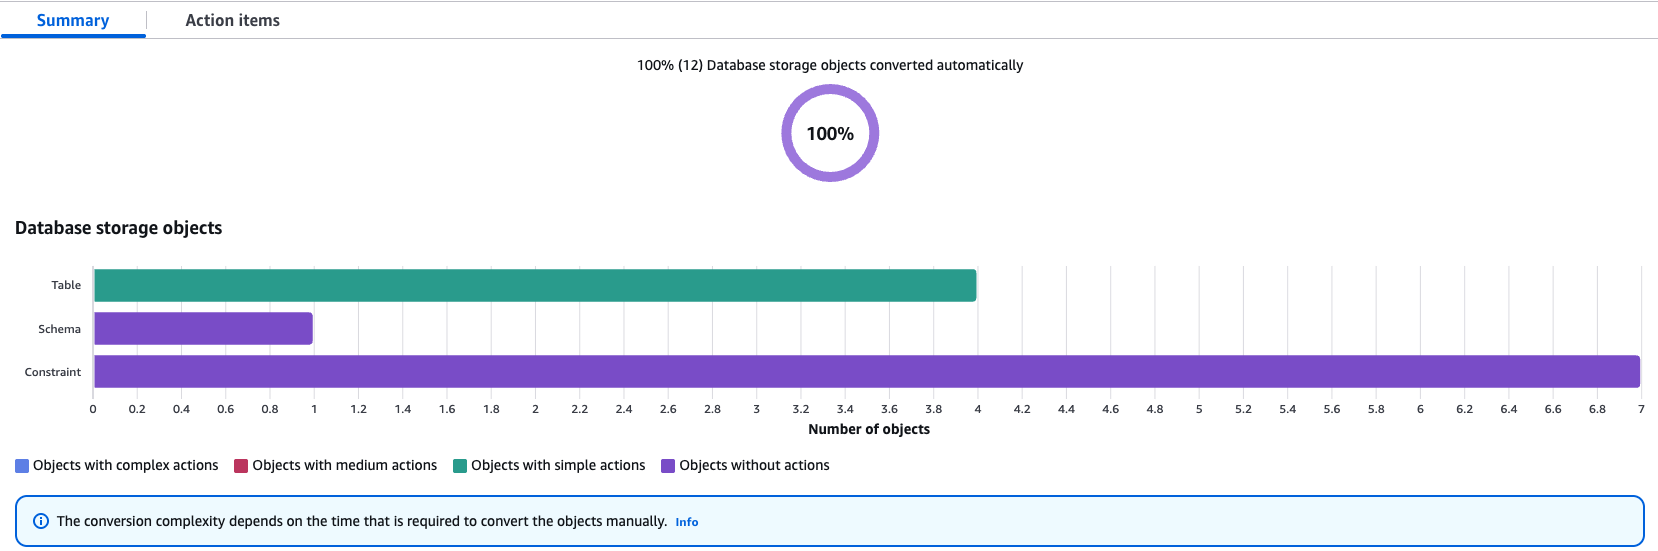
- Generate and view the assessment report.
- Select the objects you want to convert and then choose Convert on the Actions menu to convert the source objects to the target database.
The conversion process might take some time depending on the number and complexity of the selected objects.
You can save the converted code to the S3 bucket that you created earlier in the prerequisite steps.
- To save the SQL scripts, select the object in the target database tree and choose Save as SQL on the Actions menu.
- After you finalize the scripts, run them manually in the target database.
- Alternatively, you can apply the scripts directly to the database using DMS Schema Conversion. Select the specific schema in the target database, and on the Actions menu, choose Apply changes.
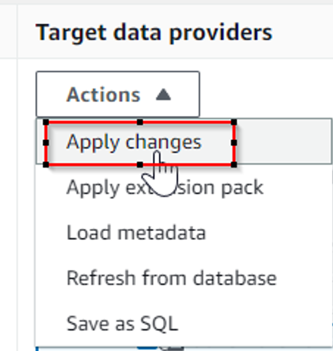
This will apply the automatically converted code to the target database.
If some objects require action items, DMS Schema conversion flags them and provides details of action items. For the items that require resolution, perform manual changes and apply the converted changes directly to the target database.
Perform data migration
The migration from Oracle Database to Amazon Redshift using Oracle GoldenGate begins with an initial load process, where Oracle GoldenGate’s Extract process captures the existing data from the Oracle source tables and sends this data to the Replicat process, which loads it into Redshift target tables through the appropriate database connectivity. Simultaneously, Oracle GoldenGate’s CDC mechanism tracks the ongoing changes (inserts, updates, and deletes) in the source Oracle database by reading the redo logs. These captured changes are then synchronized to Amazon Redshift in near real time through the Extract-Pump-Replicat process, facilitating data consistency between the source and target systems throughout the migration process.
Prepare source Oracle database for GoldenGate
Prepare your database for Oracle GoldenGate, including configuring connections and logging, enabling Oracle GoldenGate in your database, setting up the flashback query, and managing server resources.
Oracle GoldenGate for BigData only supports uncompressed UPDATE records when replicating to Amazon Redshift. When UPDATE records contain missing columns, those columns are set to null in the target.
To handle this situation, configure Extract to generate trail records with the column values (enable trandata for the columns). Alternatively, you can disable this check by setting gg.abend.on.missing.columns=false, which may result in unintended NULLs on the target database.When gg.abend.on.missing.columns=true, Replicat process on Oracle GoldenGate for BigData fails and returns the following error for compressed update records:
Install Oracle GoldenGate software on Amazon EC2
You must run Oracle GoldenGate on EC2 instances. The instances must have adequate CPU, memory, and storage to handle the anticipated replication volume. For more details, refer to Operating System Requirements. After you determine the CPU and memory requirements, select a current generation EC2 instance type for Oracle GoldenGate.
When the EC2 instance is up and running, download the following Oracle GoldenGate software from the Oracle GoldenGate Downloads page:
- Oracle GoldenGate for Oracle 21.3.0.0
- Oracle GoldenGate for Big Data 21c
For installation, refer to Install, Patch, and Upgrade and Installing and Upgrading Oracle GoldenGate for Big Data.
Configure Oracle GoldenGate for initial load
The initial load configuration transfers existing data from Oracle Database to Amazon Redshift. Complete the following configuration steps:
- Create an initial load extract parameter file for the source Oracle database using GoldenGate for Oracle. The following code is the sample file content:
- Add the EXTRACT on the GoldenGate for Oracle prompt by running the following command:
- Create a Replicat parameter file for the target Redshift database for the initial load using GoldenGate for Big Data. The following code is the sample file content:
- Add the REPLICAT on the GoldenGate for Big Data prompt by running the following command:
Configure Oracle GoldenGate for CDC and Amazon Redshift handler
In this section, we walk through the steps to configure Oracle GoldenGate for CDC and the Amazon Redshift handler.
Configure Oracle GoldenGate for extracting from source
For continuous replication, set up the Extract, Pump, and Replicat processes:
- Create an Extract parameter file for the source Oracle database for CDC using GoldenGate for Oracle. The following code is the sample file content:
- Add the Extract process and register it:
- Create an Extract Pump parameter file for the source Oracle database to send the trail files to the target Redshift database. The following code is the sample file content:
- Add the Pump process:
Configure Oracle GoldenGate Redshift handler to apply changes to target
To configure an Oracle GoldenGate Replicat to send data to a Redshift cluster, you must set up a Redshift properties file and a Replicat parameter file that defines how data is migrated to Amazon Redshift. Complete the following steps:
- Configure the Replicat properties file (rs.props), which consists of an S3 event handler and Redshift event handler. The following is an example Replicat properties file configured to connect to Amazon Redshift:
To authenticate Oracle GoldenGate’s access to the Redshift cluster for data load operations, you have two options. The recommended and more secure method is to use IAM role authentication by configuring the gg.eventhandler.redshift.AwsIamRole property in the properties file. This approach provides more secure, role-based access. Alternatively, you can use access key authentication by setting the environment variables AWS_ACCESS_KEY_ID and AWS_SECRET_ACCESS_KEY. For more information, refer to the Oracle GoldenGate for BigData documentation.
- Create a Replicat parameter file for the target Redshift database using Oracle GoldenGate for BigData. The following code is the sample file content:
- Add a Replicat process:
Start initial load and change sync
First start the change sync extract and data pump on the source Oracle database. This will start capturing changes while you perform the initial load.
- In the GoldenGate for Oracle GGSCI utility, start EXTPRD and PMPPRD:
Do not start Replicat at this point.
- Record the Source System Change Number (SCN) from the Oracle database, which serves as the starting point for replication on the target system:
- Start the initial load Extract process, which will automatically trigger the corresponding initial load Replicat on the target system:
- Monitor the initial load completion status by executing the following command on the GoldenGate for BigData GGSCI utility. Make sure the initial load process has completed successfully before proceeding to the next step. The report will indicate the load status and potential errors that need attention.
- Start the change synchronization Replicat RSPRD using the previously captured SCN to facilitate continuous data replication:
Refer to the Oracle GoldenGate documentation for Amazon Redshift handlers to learn more about its detailed functionality, unsupported operations, and system limitations.
When transitioning from initial load to continuous replication in an Oracle database to Amazon Redshift migration using Oracle GoldenGate, it’s crucial to properly manage data collisions to maintain data integrity. The key is to capture and use an appropriate SCN that marks the exact point where initial load ends and CDC begins. Without proper collision handling, you might encounter duplicate records or missing data during the transition period. Implementing appropriate collision handling mechanisms makes sure duplicate records are properly managed without causing data inconsistencies in the target system. For more information on HANDLECOLLISIONS, refer to the Oracle GoldenGate documentation.
Clean up
When the migration is complete, complete the following steps:
- Stop and remove Oracle GoldenGate processes (EXTRACT, PUMP, REPLICAT).
- Delete EC2 instances used for Oracle GoldenGate.
- Remove IAM roles created for migration.
- Delete S3 buckets used for DMS Schema Conversion (if no longer needed).
- Update application connection strings to point to the new Redshift cluster.
Conclusion
In this post, we showed how to modernize your data warehouse by migrating to Amazon Redshift using Oracle GoldenGate. This approach facilitates minimal downtime and provides a flexible, reliable method for transitioning your critical data workloads to the cloud. With the complexity involved in database migrations, we highly recommend testing the migration steps in non-production environments prior to making changes in production. By following the best practices outlined in this post, you can achieve a smooth migration process and set the foundation for a scalable, cost-effective data warehousing solution on AWS. Remember to continuously monitor your new Amazon Redshift environment, optimize query performance, and take advantage of the AWS suite of analytics tools to derive maximum value from your modernized data warehouse.