AWS Big Data Blog
Use trusted identity propagation for Apache Spark interactive sessions in Amazon SageMaker Unified Studio
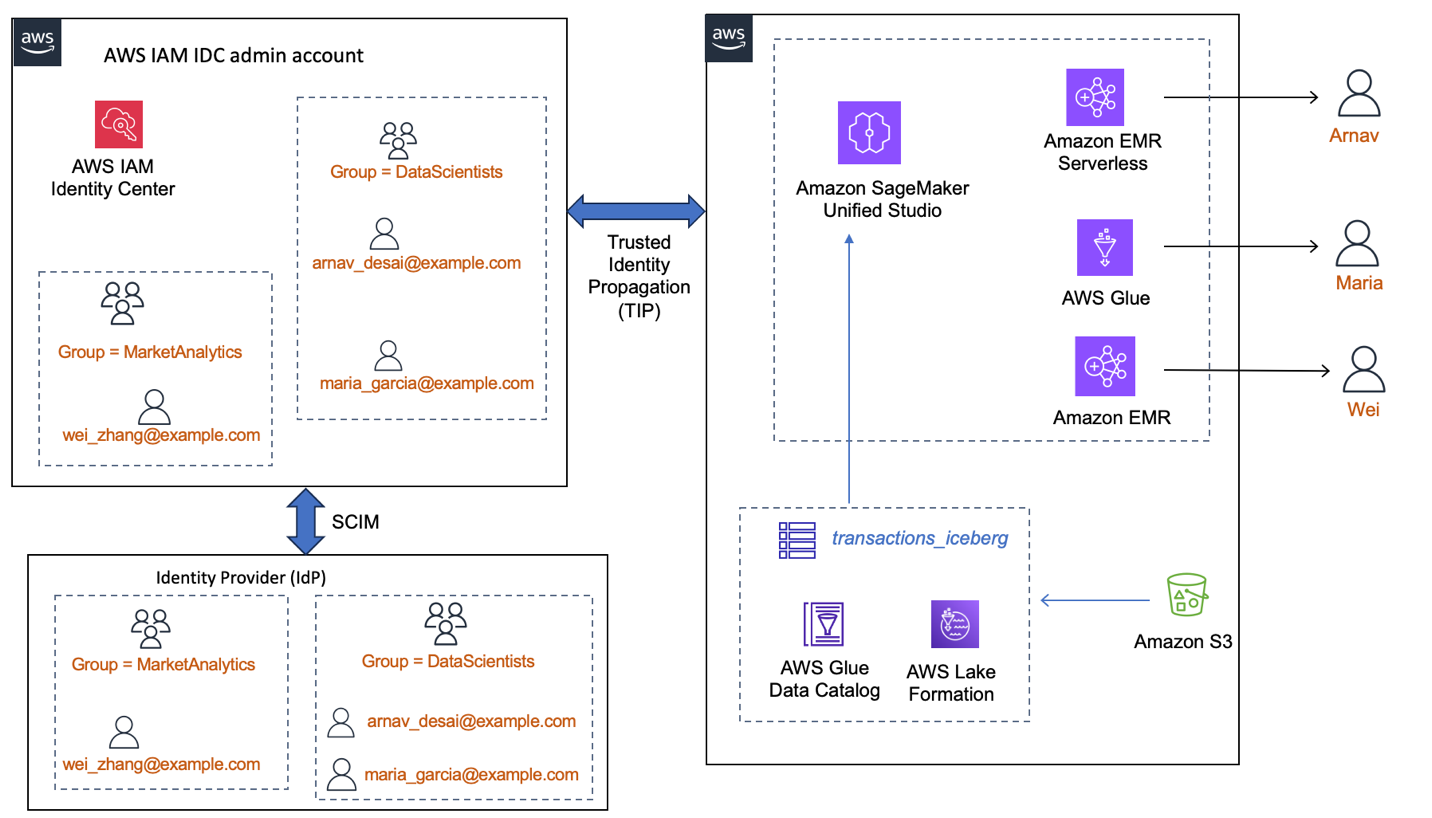
Amazon SageMaker Unified Studio introduces support for running interactive Apache Spark sessions with your corporate identities through trusted identity propagation. These Spark interactive sessions are available using Amazon EMR, Amazon EMR Serverless, and AWS Glue. Enterprises with their workforce corporate identity provider (IdP) integrated with AWS IAM Identity Center can now use their IAM Identity Center user and group identity seamlessly with SageMaker Unified Studio to access AWS Glue Data Catalog databases and tables.
Administrators of AWS services can use trusted identity propagation in IAM Identity Center to grant permissions based on user attributes, such as user ID or group associations. With trusted identity propagation, identity context is added to an IAM role to identify the user requesting access to AWS resources and is further propagated to other AWS services when requests are made. Until now, Spark sessions in SageMaker Unified Studio used the project IAM role for managing data access permissions for all members of the project. This provided fine-grained access control at the project IAM role level and not at the user level. Now, with the trusted identity propagation enabled in the SageMaker Unified Studio domain, the data access can be fine-grained at the user or group level.
The trusted identity propagation support for Spark interactive sessions makes the SageMaker Unified Studio a holistic offering for enterprise data users. Enabling trusted identity propagation in SageMaker Unified Studio saves time by avoiding the repeated permission grants to new project IAM roles and enhances security auditing with the IAM Identity Center user or group ID in the AWS CloudTrail logs.
The following are some of the use cases for trusted identity propagation in Spark sessions for SageMaker Unified Studio:
- Single sign-on experience with AWS analytics – For customers using enterprise data mesh built using AWS Lake Formation, single sign-on experience with trusted identity propagation is available for Spark applications through EMR Studio attached with Amazon EMR on EC2 and SQL experience through Amazon Athena query editor inside EMR Studio. With the addition of EMR Serverless, Amazon EMR on EC2, and AWS Glue for Spark sessions with trusted identity propagation enabled in SageMaker Unified Studio, the single sign-on experience is expanded to provide easier options for the data scientists and developers.
- Fine-grained access control based on user identity or group membership– Use a single project within the SageMaker Unified Studio domain across multiple data scientists, with the fine-grained permissions of AWS Lake Formation. When a data scientist accesses the AWS Glue Data Catalog table, the session is now enabled by their IAM Identity Center user or group permissions. Further, each can use their preferred tool, such as EMR Serverless, AWS Glue, or Amazon EMR on Amazon Elastic Compute Cloud (Amazon EC2), for the Spark sessions inside SageMaker Unified Studio.
- Isolated user sessions – The Spark interactive sessions in SageMaker Unified Studio are securely isolated for each IAM Identity Center user. With secure sessions, data teams can focus more on business data exploration and faster development cycles, rather than building guardrails.
- Auditing and reporting – Customers in regulated industries need strict compliance reports showing fine-grained details of their data access. CloudTrail logs provide the
additionalContextfield with the details of IAM Identity Center user ID or group ID and the analytics engine that accessed the Data Catalog tables from SageMaker Unified Studio. - Expand and scale with unified governance model – Customers who are already using Amazon Redshift, Amazon QuickSight and AWS Lake Formation permissions integrated with IAM Identity Center can now expand their ML and data analytics platform to include Spark sessions with EMR Serverless and AWS Glue options in SageMaker Unified Studio. They don’t have to maintain IAM role-based policy permissions. Trusted identity propagation for Spark sessions in SageMaker Unified Studio scales the existing permissions mechanism to a wider community of data scientists and developers.
In this post, we provide step-by-step instructions to set up Amazon EMR on EC2, EMR Serverless, and AWS Glue within SageMaker Unified Studio, enabled with trusted identity propagation. We use the setup to illustrate how different IAM Identity Center users can run their Spark sessions, using each compute setup, within the same project in SageMaker Unified Studio. We show how each user will see only tables or part of tables that they’re granted access to in Lake Formation.
Solution overview
A financial services company processes data from millions of retail banking transactions per day, pooled into their centralized data lake and accessed by traditional corporate identities. Their machine learning (ML) platform team would like to enable thousands of their data scientists, working across different teams, with the right dataset and tools in a secure, scalable and auditable fashion. The platform team chooses to use SageMaker Unified Studio, integrate their IdP with IAM Identity Center, and manage access for their data scientists on the data lake tables using fine-grained Lake Formation permissions.
In our sample implementation, we show how to enable three different data scientists—Arnav, Maria, and Wei—belonging to two different teams, to access the same datasets, but with different levels of access. We use Lake Formation tags to grant column restricted access and have the three data scientists run their Spark sessions within the same SageMaker Unified Studio project. When the individual users sign in to the SageMaker Unified Studio project, their IDC user or group identity context is added to the SageMaker Unified Studio project execution role, and their fine-grained permissions from Lake Formation on the catalog tables are effective. We show how their data exploration is isolated and unique.
The following diagram shows an instance of how an enterprise workforce IdP, integrated with IAM Identity Center, would make the users and groups available for use by AWS services. Here, Lake Formation and SageMaker Unified Studio domain are integrated with IAM Identity Center and trusted identity propagation is enabled. In this setup, (a) data permissions are granted to the IDC user or group identities directly instead of IAM roles (b) the user identity context is available end-to-end (c) data access control is centralized in Lake Formation no matter which analytics service the user uses.
Prerequisites
Working with IAM Identity Center and the AWS services that integrate with IAM Identity Center requires several steps. In this post we use one AWS account with IAM Identity Center enabled and a SageMaker Unified Studio domain created. We recommend that you use a test account to follow along the blog.
You need the following prerequisites:
- An AWS account setup with an IAM administrator role that has permissions to work with IAM Identity Center, Lake Formation, Amazon Simple Storage Service (Amazon S3), CloudTrail, SageMaker Unified Studio, Amazon EMR on EC2, EMR Serverless, and AWS Glue.
- Enable IAM Identity Center in the account. For details, refer to Enable IAM Identity Center.
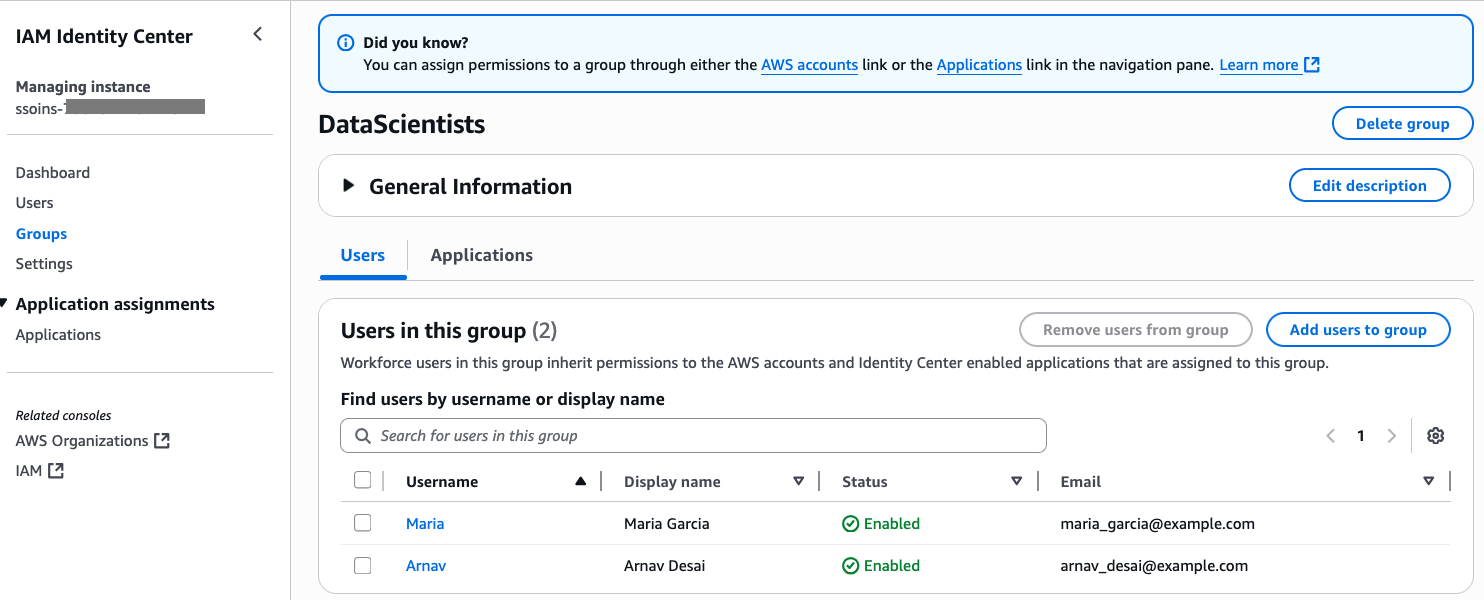
- Three IAM Identity Center users (Arnav, Maria, and Wei) and two groups (DataScientists and MarketAnalytics). For instructions on creating IAM Identity Center users, refer to Add users to your Identity Center directory. For instructions on creating groups, refer to Add groups to your Identity Center directory.
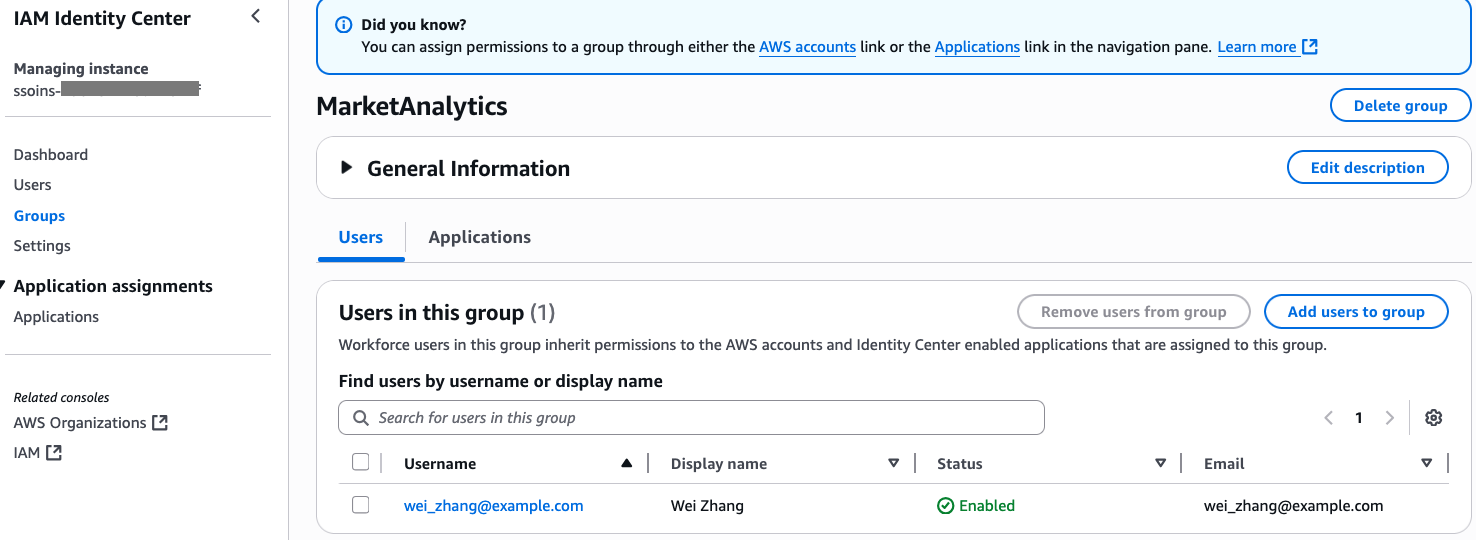
- Add Arnav and Maria to the DataScientists group and add Wei to the MarketAnalytics group. For instructions on adding users to groups, refer to Add users to groups.
The following screenshot shows users Maria and Arnav in the DataScientists group.
following screenshot shows user Wei in the MarketAnalytics group.
- Configure Lake Formation. For detailed instructions, refer to Data lake administrator permissions and Set up AWS Lake Formation in the Lake Formation documentation.
- Integrate Lake Formation with the IAM Identity Center instance. For instructions, refer to Integrating IAM Identity Center.
- A database and a table created in AWS Glue Data Catalog, with the table data in an S3 bucket.
- For the sample dataset and table used in this post, refer to Appendix A.
- Lake Formation tag-based permissions for the three IAM Identity Center users on the Data Catalog table.
- For creating and assigning LF-Tags to Data Catalog tables, refer to Creating LF-Tags, and Assigning LF-Tags to Data Catalog resources.
- For granting permissions using LF-Tags, refer to Granting data lake permissions using the LF-TBAC method.
- We have shown the sample LF-Tags and permissions for the IAM Identity Center users in Appendix B.
- A SageMaker Unified Studio domain
domain-tip-smus-blog. For instructions to create a SageMaker Unified Studio domain, refer to the quick setup guide in the SageMaker Unified Studio documentation.- The domain should be enabled with trusted identity propagation, following the instructions in Trusted identity propagation.
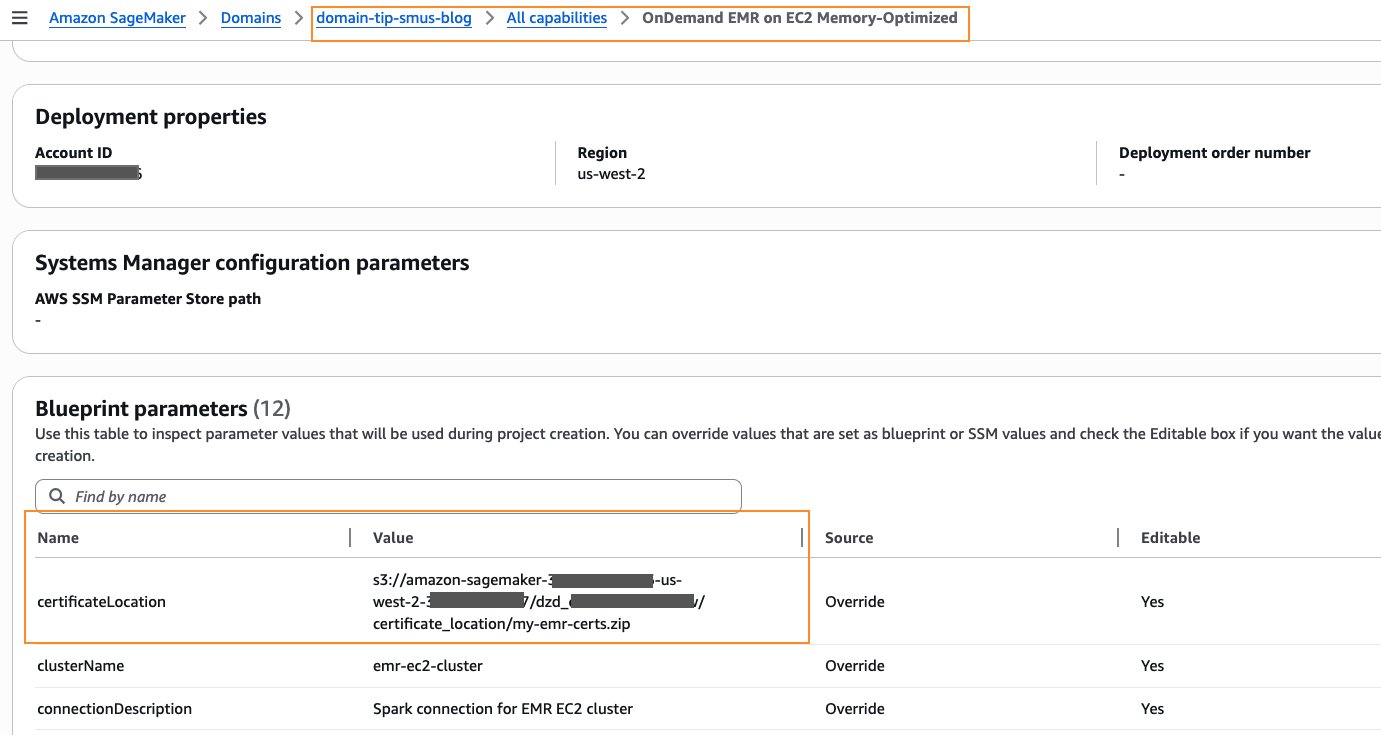
- The domain’s project profile should be enabled with Amazon EMR on EC2. You can choose either General purpose or Memory-Optimized profile. You will have to provide a value for certificateLocation, as shown in the following screenshot. For detailed instructions, refer to Specify PEM certificate for EmrOnEc2 blueprint. For this post, you can use OpenSSL to generate a self-signed X.509 certificate with a 2048-bit RSA private key. Detailed instructions for creating one are at the bottom of Create keys and certificates for data encryption with Amazon EMR.
- The two IAM Identity Center groups (
DataScientistsandMarketAnalytics) should be added to the domain as users. For instructions, refer to Managing users in Amazon SageMaker Unified Studio.
Create a project in SageMaker Unified Studio
Now that DataScientists and MarketAnalytics groups are granted access to the domain, IAM Identity Center users belonging to those two groups can sign in to the SageMaker Unified Studio portal for the next steps. Follow these steps:
- Sign in to the SageMaker Unified Studio portal as single sign-on user Arnav.
- Create a project
blogproject_tip_enabledunder the domain, as shown in the following screenshot. For details, follow the instructions in Create a project. - Select All capabilities for Project profile, as shown in the following screenshot. Leave the other parameters to default values.
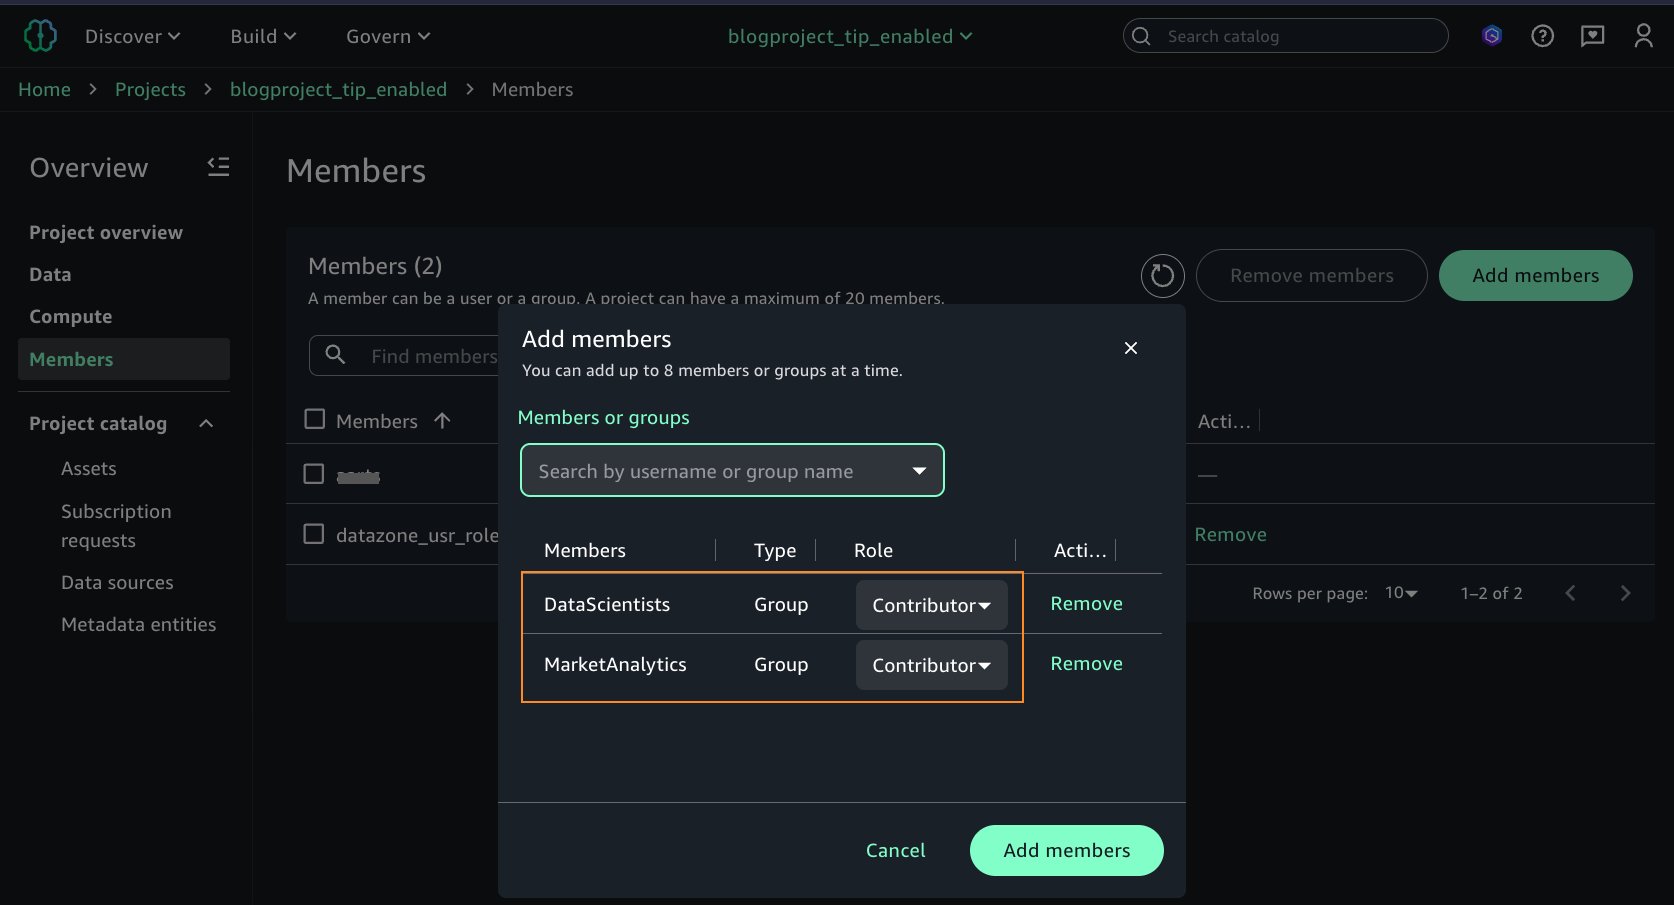
Arnav would like to collaborate with other team members. After creating the project, he grants access on the project to additional IAM Identity Center groups. He adds the two IAM Identity Center groups, DataScientists and MarketAnalytics, as Members of type Contributor to the project, as shown in the following screenshot.
So far, you’ve set up IAM Identity Center, created users and groups, created a SageMaker Unified Studio domain and project, and added the IAM Identity Center groups as users to the domain and the project. In the rest of the sections, we set up the three types of computes for Spark interactive session and enter a query on the Lake Formation managed tables as individual IAM Identity Center users Arnav, Maria, and Wei.
Set up EMR Serverless
In this section, we set up an EMR Serverless compute and run a Spark interactive session as Arnav.
- Sign in to the SageMaker Unified Studio domain as the single sign-on user Arnav. Refer to the domain’s detail page to get the URL.
- After signing in as Arnav, select the project
blogproject_tip_enabled. From the left navigation pane, choose Compute. On the Data processing tab, choose Add compute.
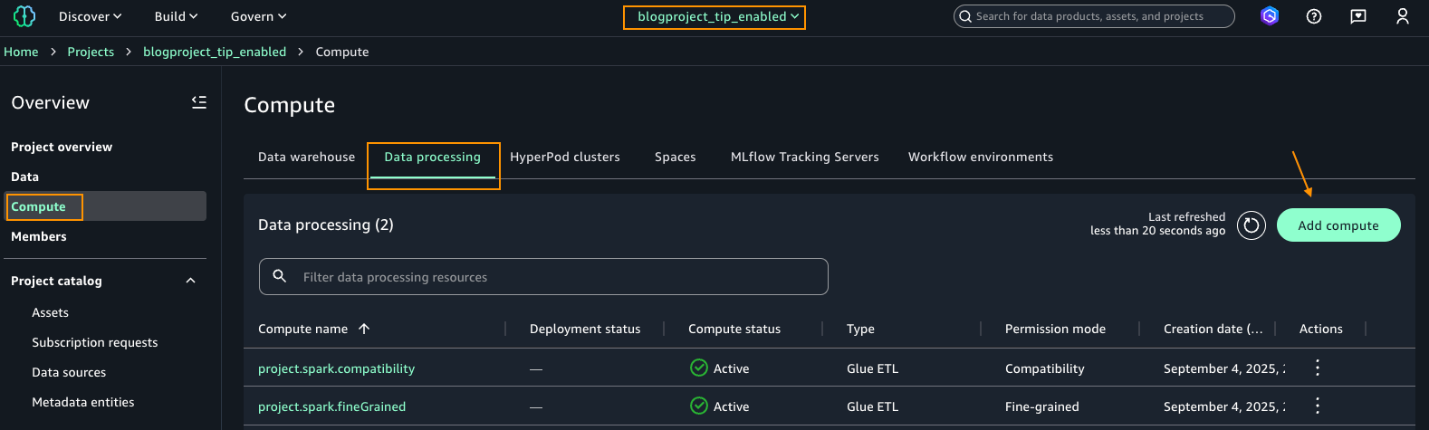
- Under Add compute, choose Create new compute resources, as shown in the following screenshot.
- Choose EMR Serverless.
- Under Release label, choose minimum version 7.8.0 and choose Fine-grained.
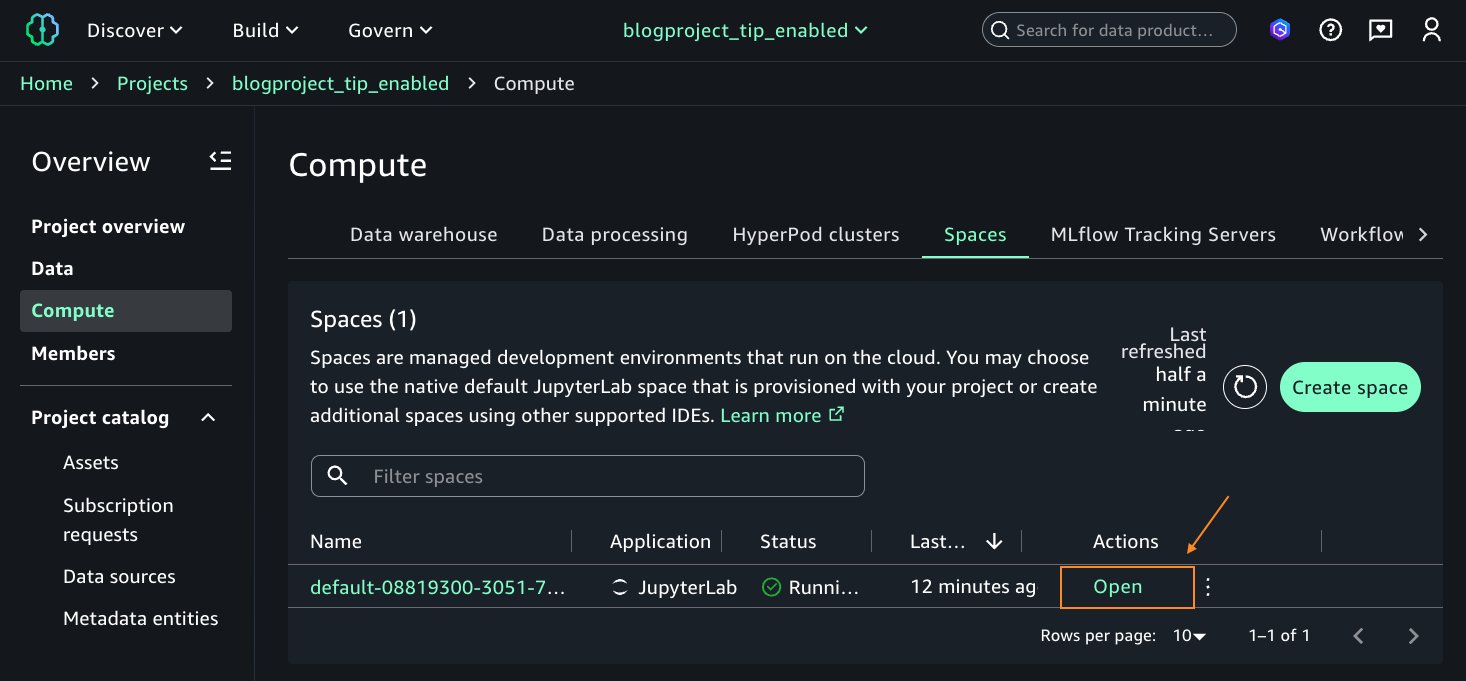
- After the EMR Serverless compute is in Created status, on the Actions dropdown list, choose Open JupyterLab IDE. This will open a Jupyter Notebook session.
- When the Jupyter notebook opens, you will see a banner to update the SageMaker Distribution image to version 2.9. Follow the instructions in Editing a space and update the space to use version 2.9. Save the space and restart after update.
- Open the space after it finishes updating. This will open the Jupyter notebook.
Now, your environment is ready, and you can run Spark queries and test your access to the tablebankdata_icebergtbl. - On the Launcher window, under Notebook, choose Python 3(ipykernel).
- On the top part of the notebook cell, choose PySpark from the kernel dropdown list and emr-s.blog_tipspark_emrserverless from the Compute dropdown list.
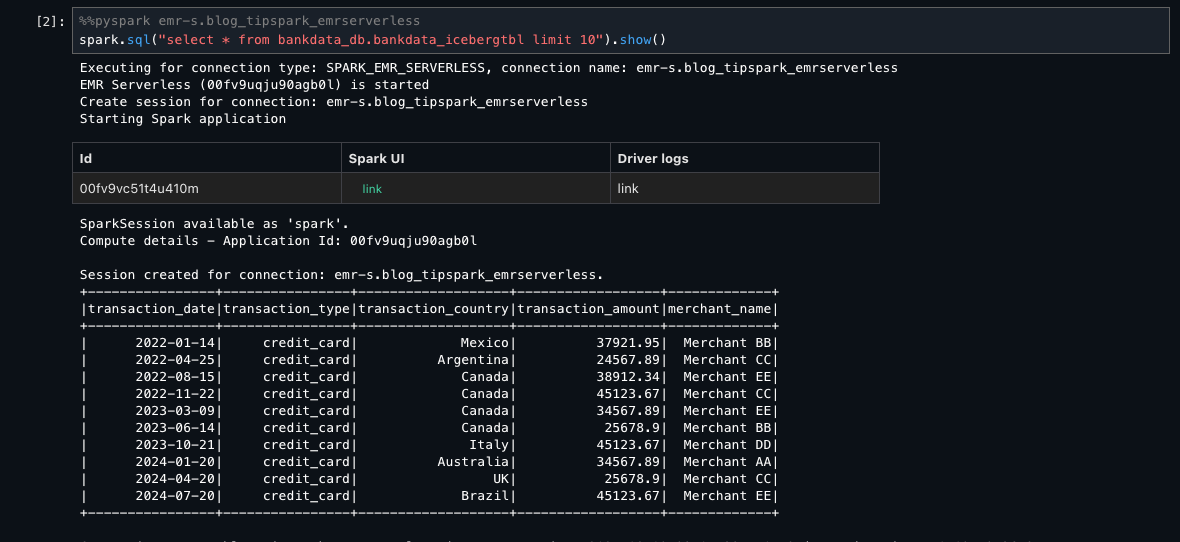
- Run the following query:
Because Arnav is part of the DataScientists group, he should see all columns of the table, as shown in the following screenshot.
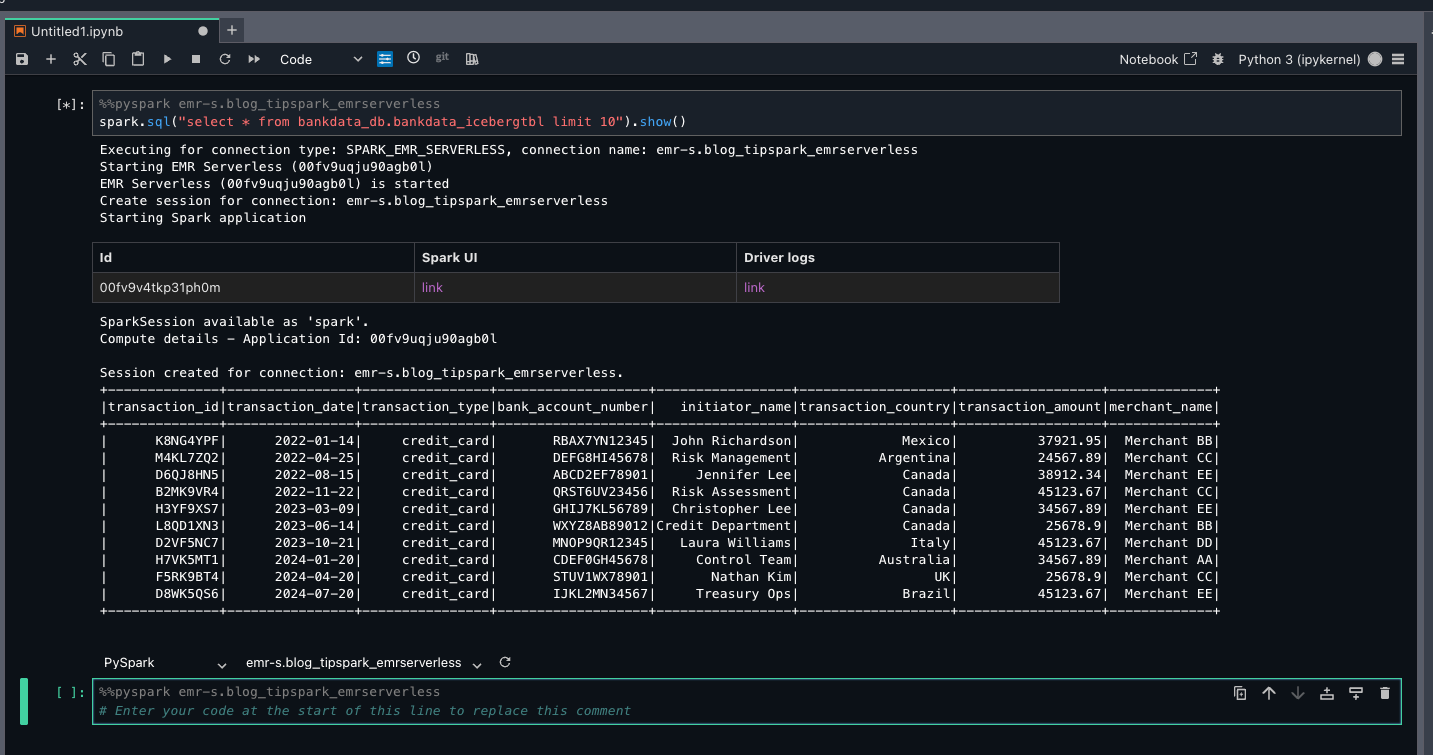
This verifies LF-Tags based access for Arnav on the bankdata_db.bankdata_icebergtbl using a Spark session in EMR Serverless compute.
Set up AWS Glue 5.0
In this section, we set up AWS Glue compute and run a Spark interactive session as Maria.
- Sign in to the SageMaker Unified Studio domain as the single sign-on user Maria.
- Choose the project
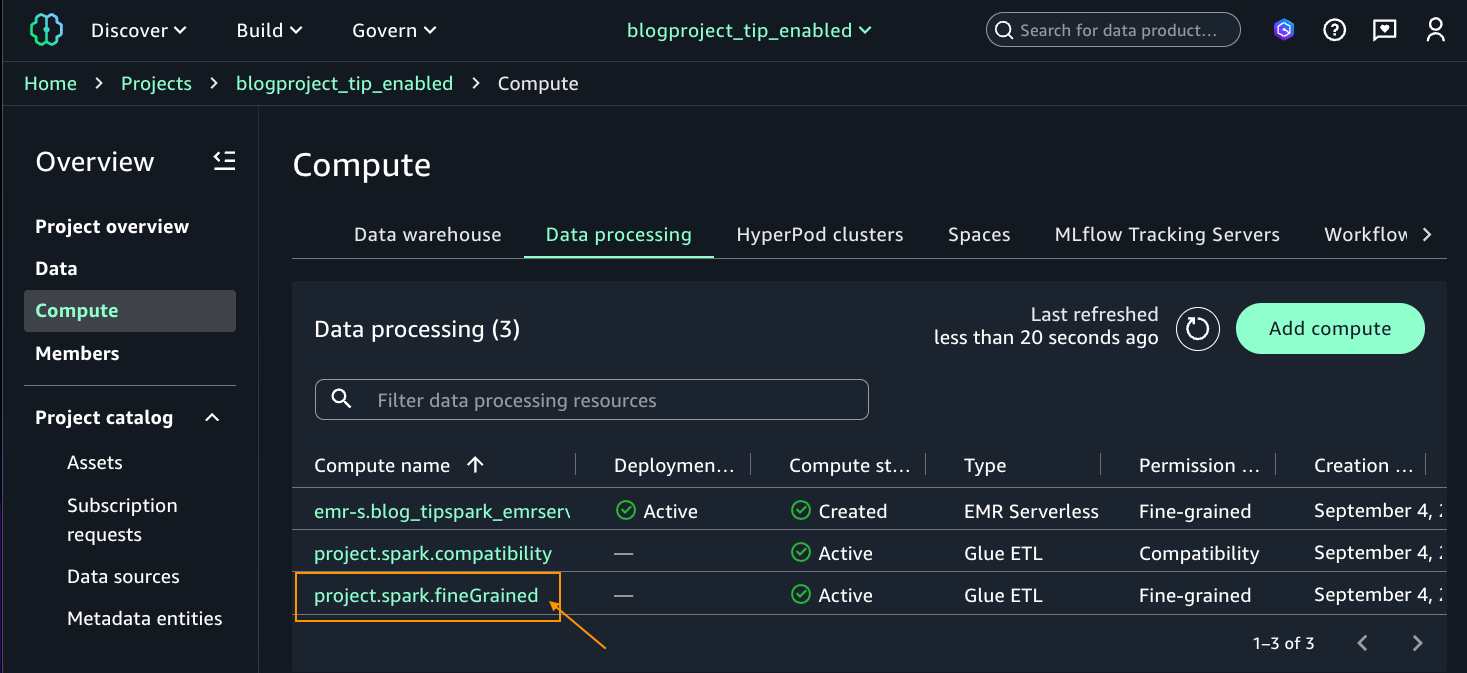
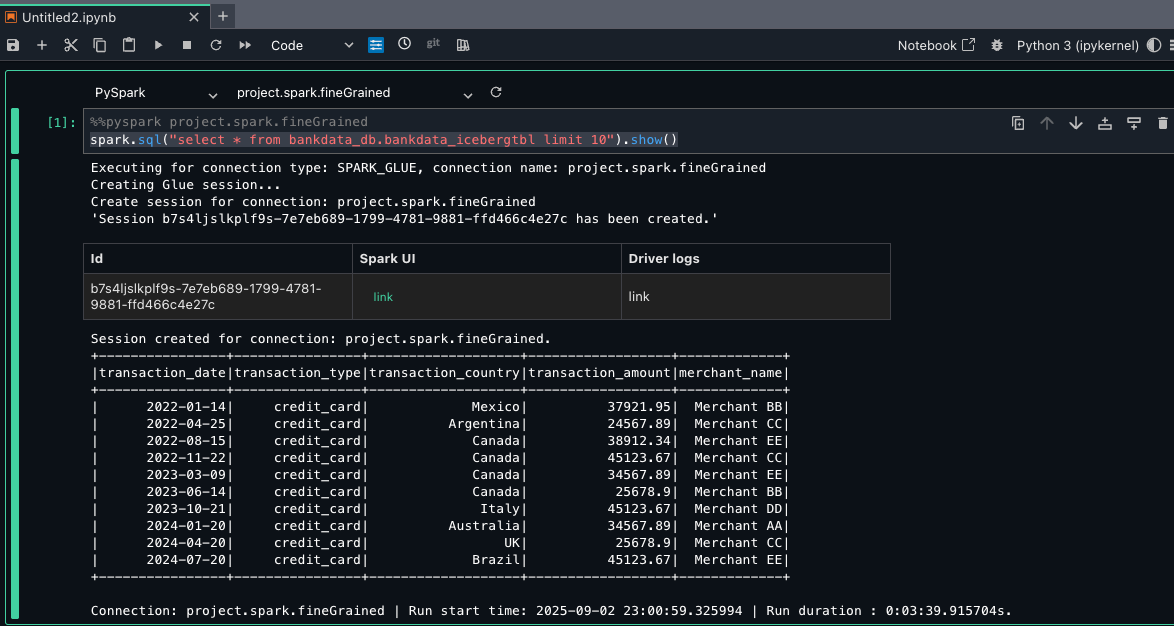
blogproject_tip_enabled. From the left navigation pane, choose Compute. On Data processing tab, you should see two computes created by default in Active status (project.spark.compatibility and project.spark.fineGrained) with Type Glue ETL. For additional details on these compute types, refer to AWS Glue ETL in Amazon SageMaker Unified Studio. - Select the project.spark.fineGrained and launch the Jupyter notebook with the PySpark kernel.
- For the notebook cell, choose pySpark for kernel and project.spark.fineGrained for compute. Enter the following query:
Because Maria is part of the DataScientists group, she should see all columns of the table, as shown in the following screenshot.
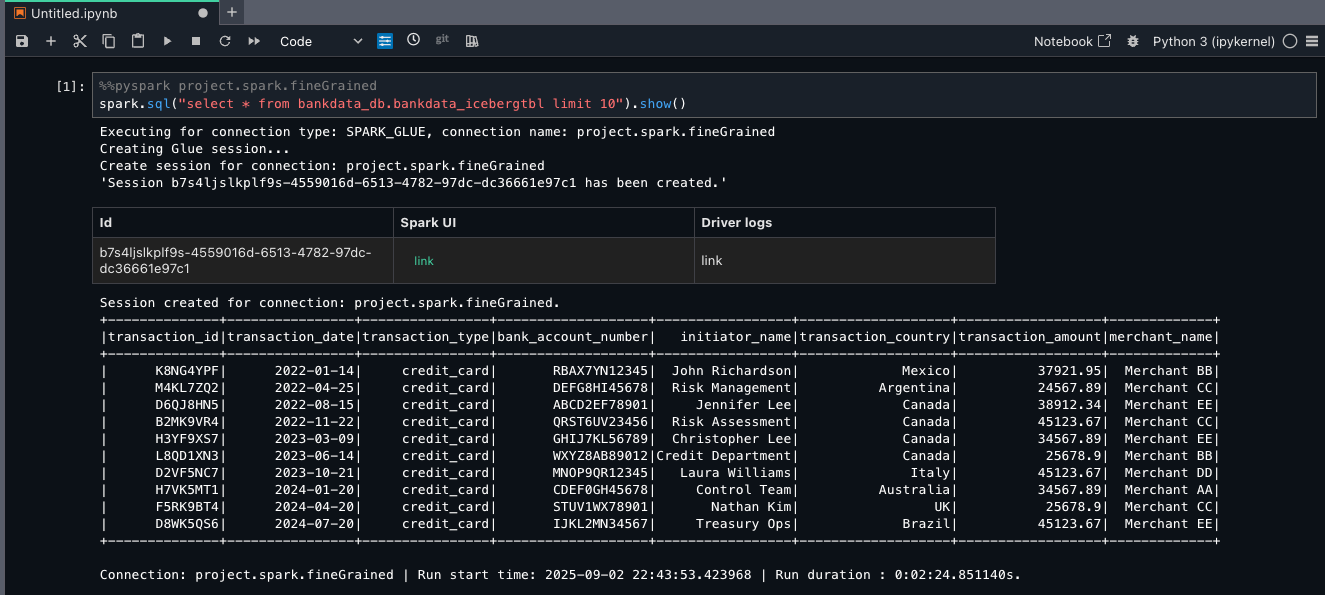
This verifies LF-Tags based access to Maria on the bankdata_db.bankdata_icebergtbl using Spark session in AWS Glue fine-grained access control (FGAC) compute.
To verify what access Wei has using EMR Serverless and AWS Glue, you can sign out and sign in as user Wei. Enter the Spark SELECT queries on the same table. Wei shouldn’t see the three personally identifiable information (PII) columns transaction_id, bank_account_number, and initiator_name, which were tagged as transactions=secured.
The following screenshot shows the same table for Wei using EMR Serverless.
The following screenshot shows the same table for Wei using AWS Glue FGAC mode.
Set up Amazon EMR on EC2
In this section, we set up an Amazon EMR on EC2 compute and run a Spark interactive session as Wei.
- Sign in to the SageMaker Unified Studio domain as the single sign-on user Wei.
- Create Amazon EMR on EC2 compute using the steps for EMR Serverless in Setup EMR serverless but choose EMR on EC2 cluster instead of EMR Serverless. For the EMR configuration, choose the MemoryOptimized or GeneralPurpose configuration, depending on which one you chose to upload your PEM certificates to in the project profiles blueprint in the Prerequisites section. Choose an Amazon EMR release label greater than or equal to 7.8.0.
- After the cluster is provisioned, locate the instance profile role name in the compute details page, as shown in the following screenshot.
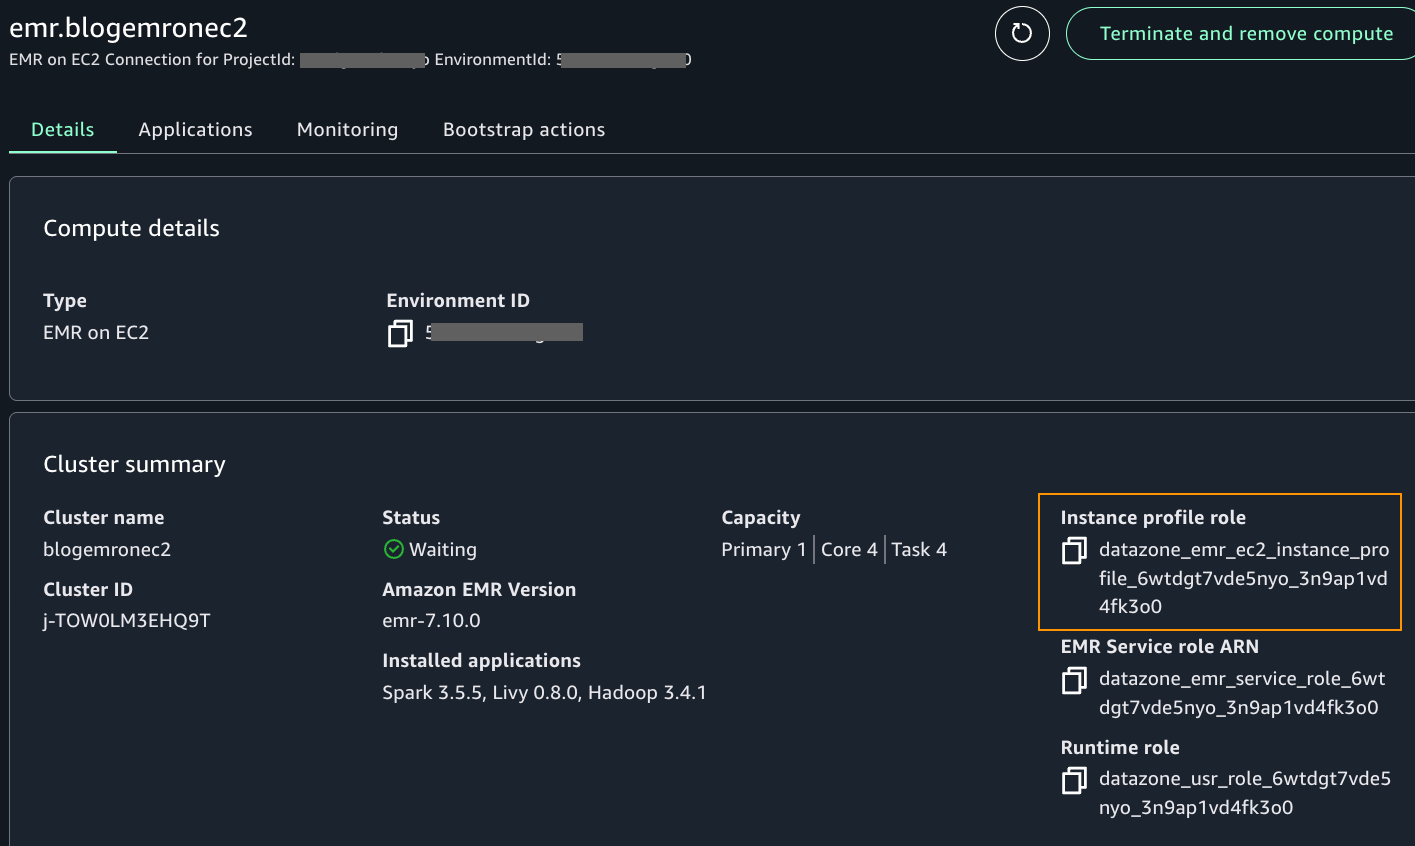
- As an admin user who can edit IAM policies in your account, add the following inline policy to the instance profile role. A manual intervention outside SageMaker Unified Studio is required currently to perform this step. This will be addressed in the future.
- After updating the role’s policy, you can use the Amazon EMR on EC2 connection to initiate an interactive Spark session. Similar to how you launched a notebook as Arnav and Maria, do the same steps to launch the notebook as user Wei.
- On the Build tab, choose JupyterNotebook from the project home page. Choose Python3(ipykernel) to launch the notebook. Choose Configure space to update to version 2.9. Refresh the notebook browser.
- Inside the notebook, on top of the cell, choose PySpark for kernel and emr.blog_tip_emronec2 that you launched for the compute.
- Enter a select query on the table as follows:
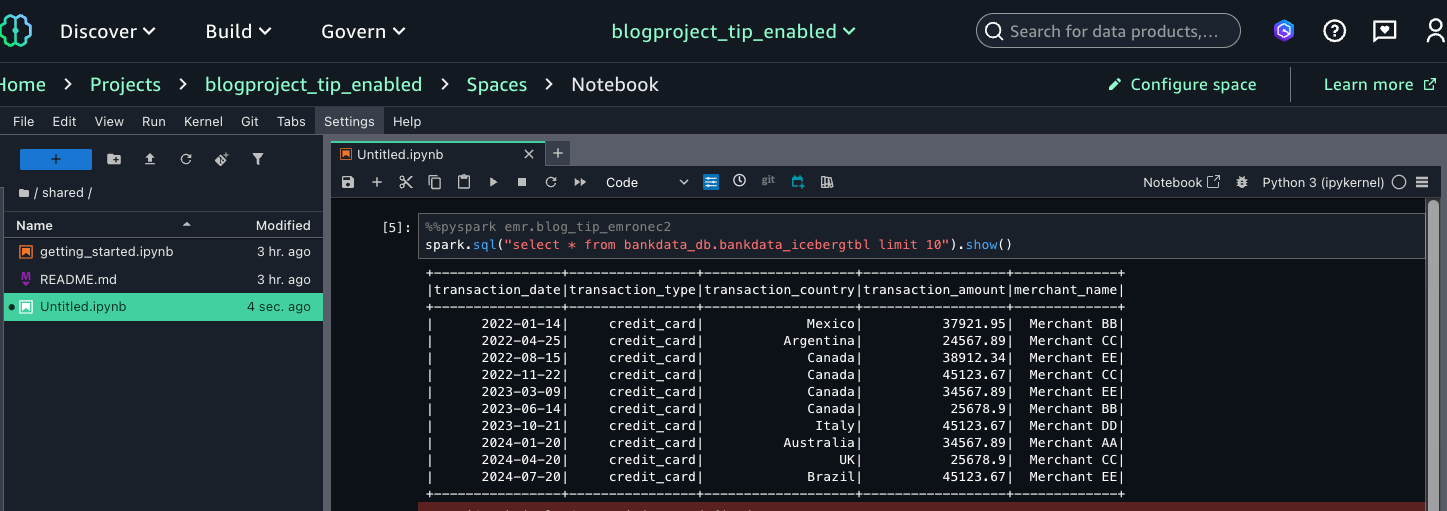
This verifies that Wei, as part of the MarketAnalytics group, sees all columns of the table with LF-Tags transactions=accessible but doesn’t have access to the three columns that were overwritten with LF-Tags transactions=secured (transaction_id, bank_account_number, and initiator_name).
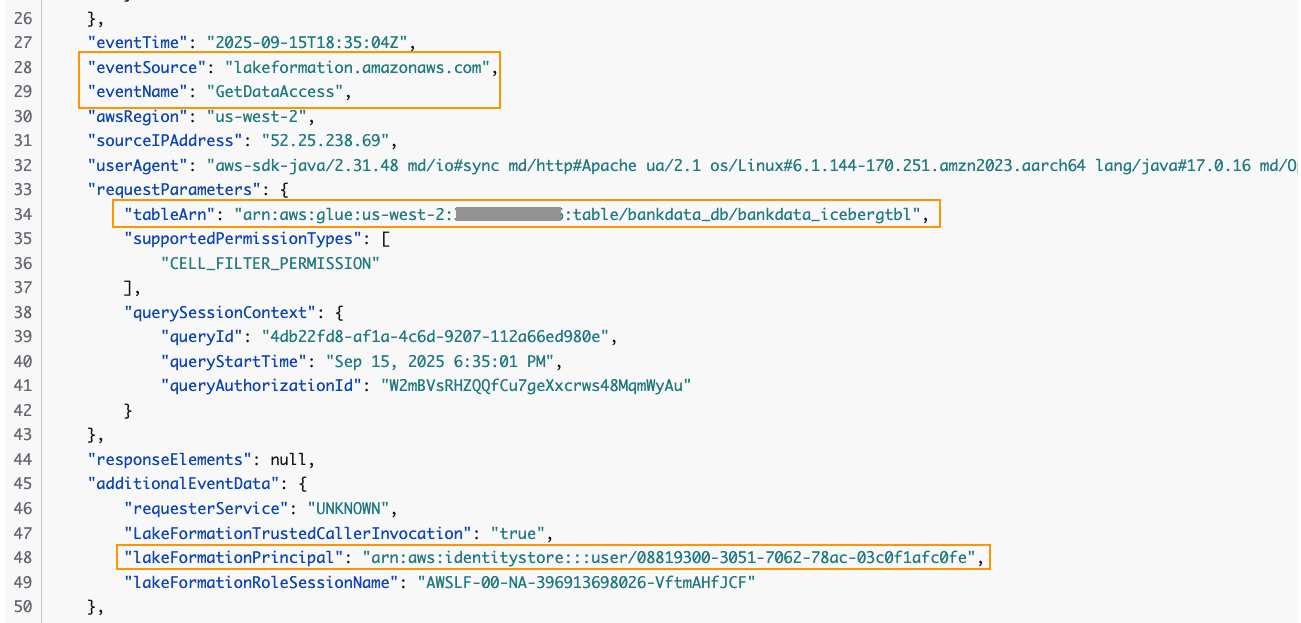
You can trace the user access of the table in the CloudTrail logs for EventName=GetDataAccess. In the relevant CloudTrail log shown below, we notice that the UserID for Wei is provided under additionalEventData field, whereas requestParameters has the tableARN.
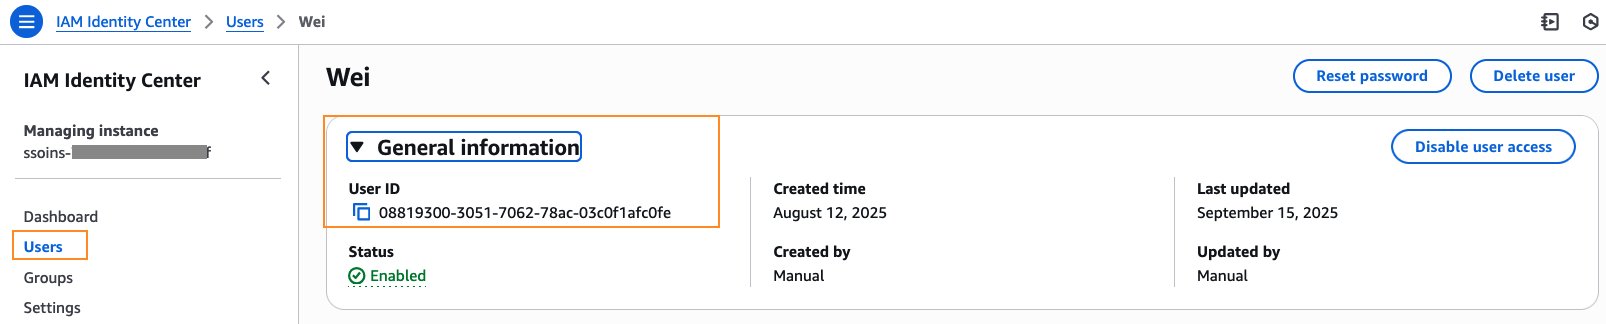
The user ID for Wei is available in the IAM Identity Center console under General information.
Thus, we were able to sign in as an individual IAM Identity Center user to the SageMaker Unified Studio domain and query the Data Catalog tables using Amazon EMR and AWS Glue compute. These IAM Identity Center users were able to query the tables that they were granted access to, instead of the SageMaker Unified Studio project’s IAM role.
Cleanup
To avoid incurring costs, it’s important to delete the resources launched for this walkthrough. Clean up the resources as follows:
- SageMaker Unified Studio by default shuts down idle resources such as JupyterLab after 1 hour. If you’ve created a SageMaker Unified Studio domain for this post, remember to delete the domain.
- If you’ve created IAM Identity Center users and groups, delete the users and delete the groups. Further, if you’ve created an IAM Identity Center instance only for this post, delete your IAM Identity Center instance.
- Delete the database
bankdata_dbfrom Lake Formation. This will also delete the tables and all associated permissions. Delete the LF-Tagtransactionsand its values. - Delete the table’s corresponding data from your S3 bucket two subfolders
bankdata-csvandbankdata-iceberg.
Conclusion
In this post, we walked through how to enable a SageMaker Unified Studio domain with IAM Identity Center trusted identity propagation and query Lake Formation managed tables in Data Catalog using Apache Spark interactive sessions with EMR Serverless, AWS Glue, and Amazon EMR on EC2. We also verified in CloudTrail logs the IAM Identity Center user ID accessing the table.
Amazon SageMaker Unified Studio with trusted identity propagation provides the following benefits.
Business benefits
- Enhanced data security
- Improved workforce data access and insights
Technical capabilities
- Enables data access based on workforce identity
- Provides unified governance through Lake Formation for Data Catalog tables when accessed through SMUS
- Ensures isolated and secure sessions for each IAM Identity Center user
- Supports multiple analytics options:
- Spark sessions via EMR Serverless, EMR on EC2, and AWS Glue
- SQL analytics through Athena and Redshift Spectrum
Organizational advantages
- Direct use of corporate identities for enterprise data access
- Simplified access to data platforms and meshes built on Data Catalog and Lake Formation
- Enables various user roles to work with their preferred AWS analytics services
- Reduces data exploration time for Spark-familiar data scientists
To learn more, refer to the following resources:
- Trusted identity propagation in SageMaker Unified Studio
- How to connect with other AWS services with trusted identity propagation enabled
We encourage you to check out the new trusted identity propagation enabled SageMaker Unified Studio for Spark sessions. Reach out to us through your AWS account teams or using the comments section.
Acknowledgment: A special thanks to everyone who contributed to the development and launch of this feature: Palani Nagarajan, Karthik Seshadri, Vikrant Kumar, Yijie Yan, Radhika Ravirala and Jerica Nicholls.
APPENDIX A – Table creation in Data Catalog
- We’ve created a synthetic bank transactions dataset with 100 rows in CSV format. Download the dataset dummy_bank_transaction_data.csv
- In your S3 bucket, create two subfolders:
bankdata-csvandbankdata-icebergand upload the dataset tobankdata-csv. - Open the Athena console, navigate to query editor, and enter the following statements in sequence:
- Enter a preview and verify the table data:
APPENDIX B – Creating LF-Tags, attaching tags to the table from Appendix A, and granting permissions to IAM Identity Center users.
We create a Lake Formation tag with Keyname = transactions and Values = secured, accessible. We associate the tag to the table and overwrite a few columns as summarized in the table.
|
Resource |
LF-Tag association |
|
|
Database |
bankdata_db |
transactions = accessible |
|
Table |
bankdata_icebergtbl |
transactions = accessible |
| Columns | transaction_id | transactions = secured |
| bank_account_number | transactions = secured | |
| initiator_name | transactions = secured |
We then grant Lake Formation permissions to the two IAM Identity Center groups using these LF-Tags as follows:
|
IAM Identity Center group |
LF-Tags |
Permission |
|
DataScientists |
transactions = accessible AND transactions = secured |
Database DESCRIBE, Table SELECT |
|
MarketAnalytics |
transactions = accessible |
Database DESCRIBE, Table SELECT |
- Sign in to the Lake Formation console and navigate to LF-Tags and permissions. Create an LF-Tag with Keyname =
transactionsand Values =secured,accessible. - Select the database
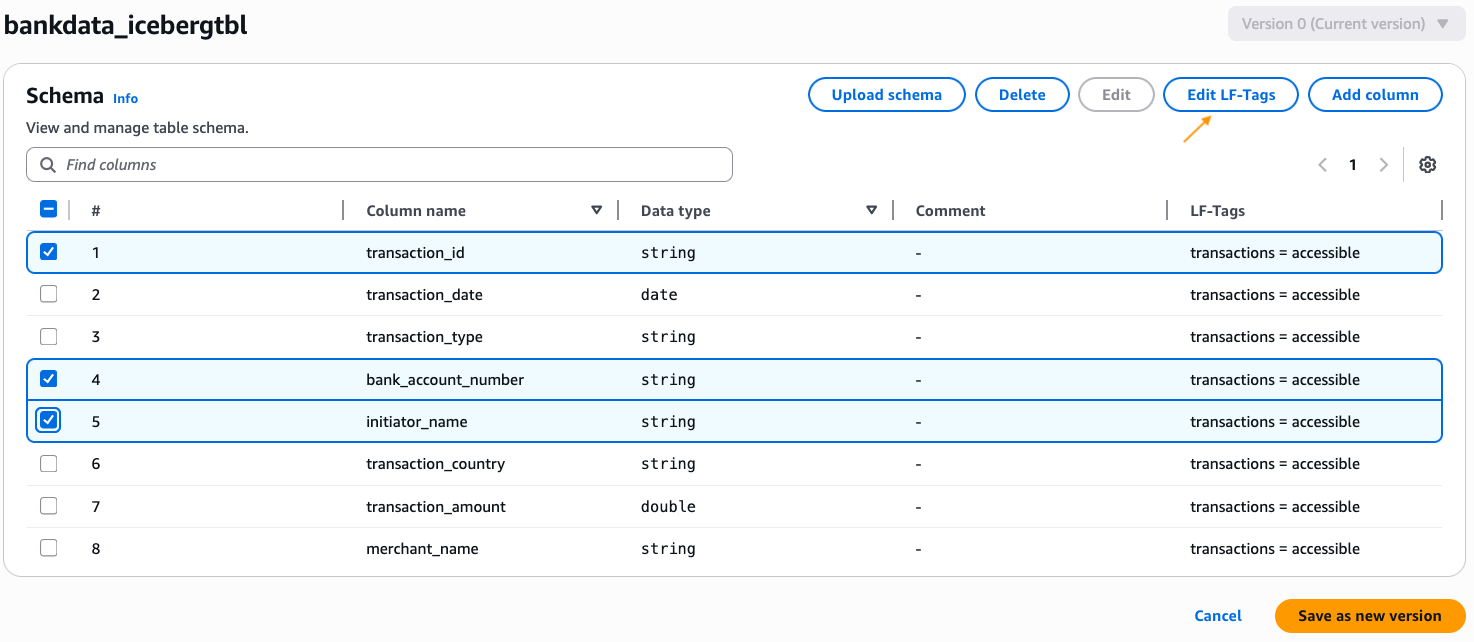
bankdata_dband associate the LF-Tagtransactions=accessible. - Select
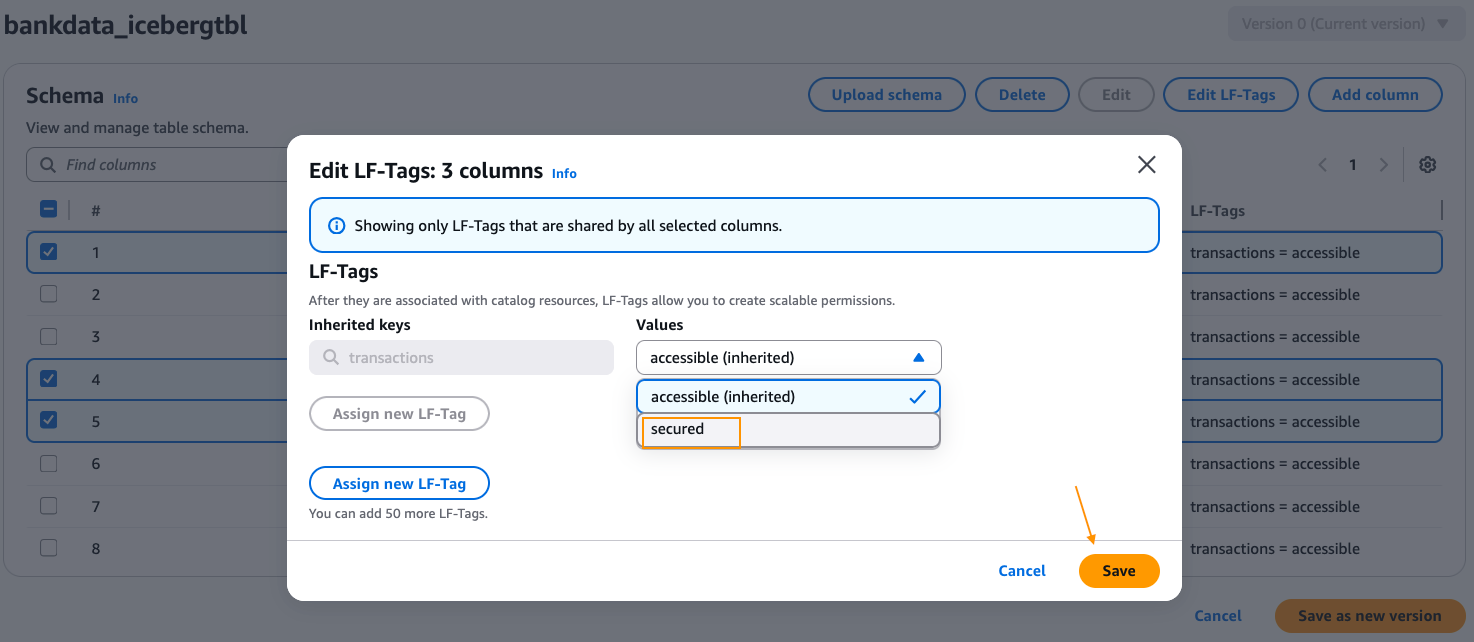
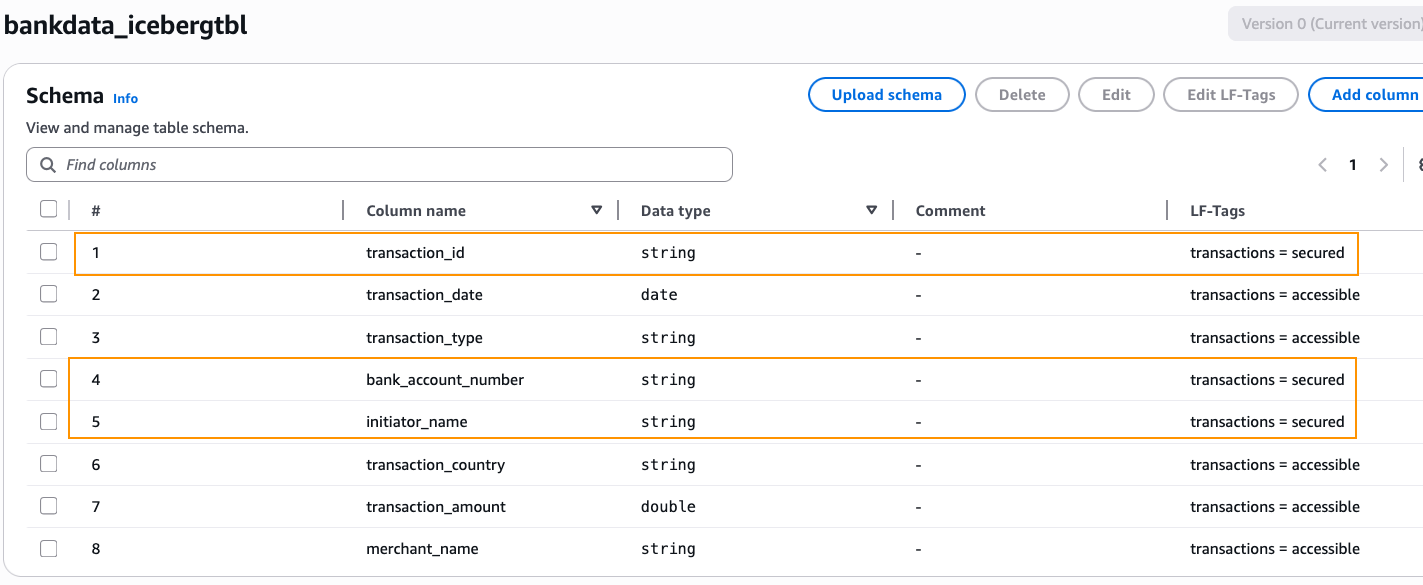
bankdata_icebergtbland verify that the LF-Tagtransactions=accessibleis inherited by the table. - Edit the schema of the table and change the LF-Tag value on the columns
transaction_id,bank_account_number, andinitiator_nametotransactions=secured. After changing, choose Save as new version.
- Navigate to the Data permissions page on the Lake Formation console. Choose Grant to grant permissions.
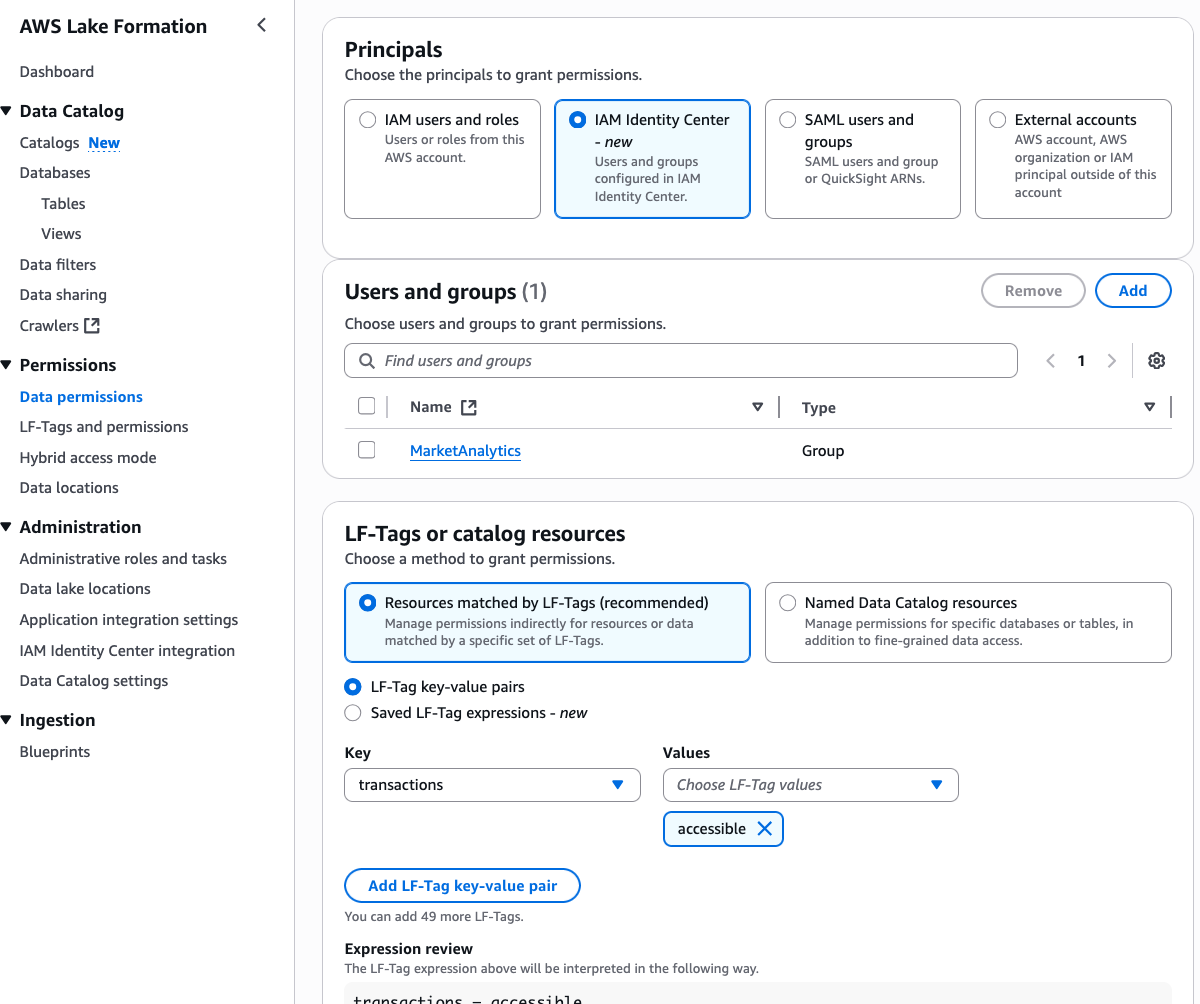
- Select the IAM Identity Center group
DataScientistsfor Principals. Select LF-Tagstransactionsand both the valuesaccessible,secured. Choose Database DESCRIBE and Tables SELECT permissions. Choose Grant.
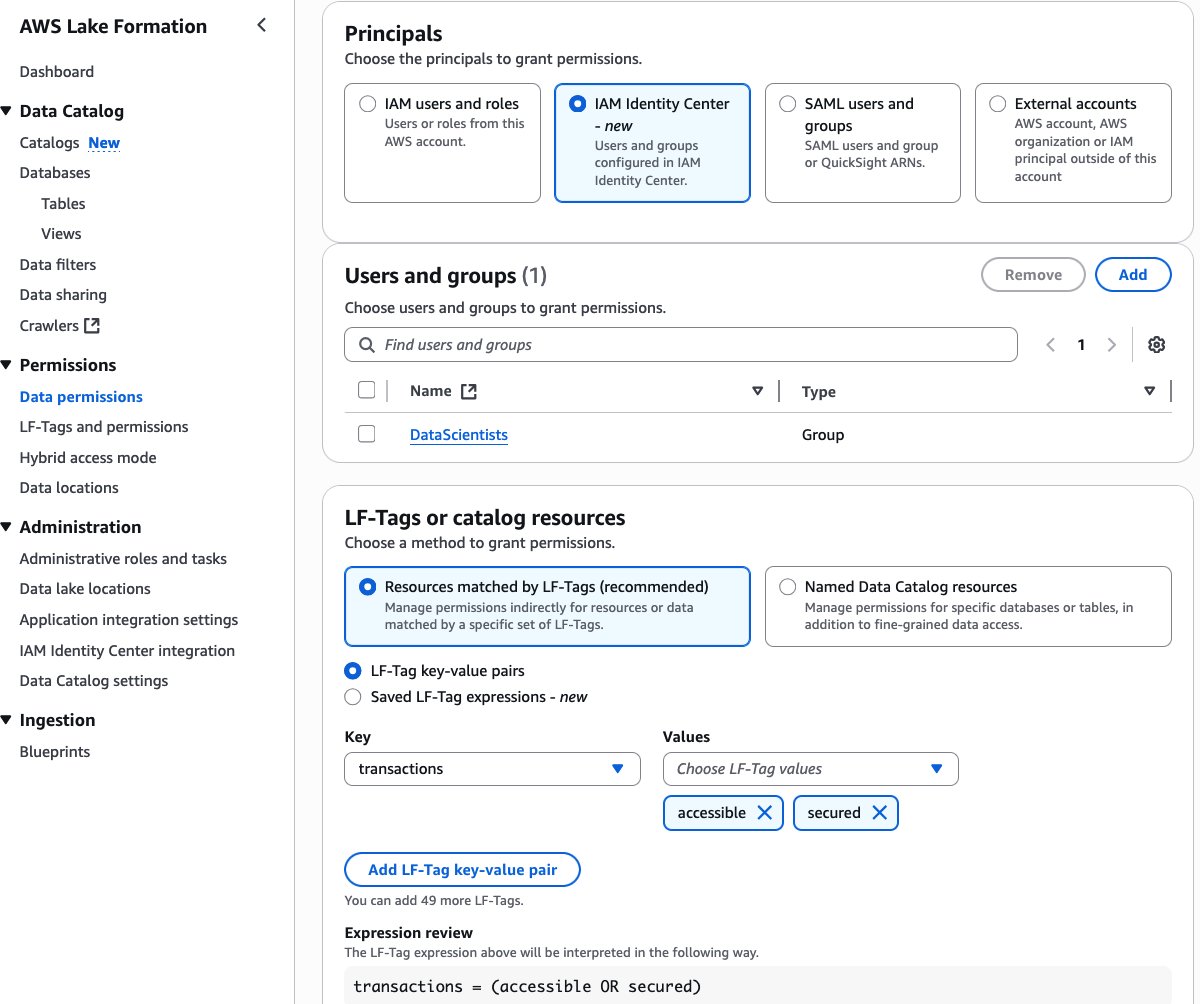
- On the Data permissions page on the Lake Formation console, choose Grant again.
- Select the IAM Identity Center group
MarketAnalyticsfor Principals. Select LF-Tagstransactionsand only one of the values,accessible. Select Database DESCRIBE and Tables SELECT permissions. Choose Grant.
- Also grant DESCRIBE permission on the
defaultdatabase to both the IDC groups. - Verify the granted permissions in the Data permissions page, by filtering with expression Principal type = IAM Identity Center group.
Thus, we’ve granted all column access on the table bankdata_icebergtbl to the DataScientists group while securing three PII columns from the MarketAnalytics group.