AWS Database Blog
Build resilient Kerberos authentication for Aurora Global Database without joining Active Directory domain
Your Amazon Aurora Global Database can replicate data across Regions in seconds, but what happens when users can’t authenticate because their authentication service is only available in one Region? As organizations increasingly adopt Aurora Global Database and Amazon Relational Database Service (Amazon RDS) cross-Region Replicas to achieve disaster recovery and global scalability, a single-Region authentication service creates a critical gap for database accessibility. While Aurora Global Database provides sub-second replication and smooth failover across Regions, authentication failures make your data inaccessible, even when your database remains operational.
In this post, we show you how to build a multi-Region Kerberos authentication system that matches your Aurora Global Database’s resilience using AWS Directory Service for Microsoft Active Directory (AWS Managed Microsoft AD) with multi-Region replication and a one-way forest trust to your on-premises Active Directory, so your Linux clients can authenticate without joining the AD domain.
Solution overview
In this post, you use a Linux machine in your on-premises network with MySQL client installed as a bastion host. The bastion host connects to Aurora Global Database MySQL using Kerberos authentication without joining the Active Directory domain.
The following diagram illustrates the solution architecture. The configuration uses AWS Managed Microsoft AD Multi-Region replication with a one-way outgoing forest trust to your on-premises Active Directory, allowing the Linux bastion host to authenticate to Aurora MySQL across both Regions without domain membership.
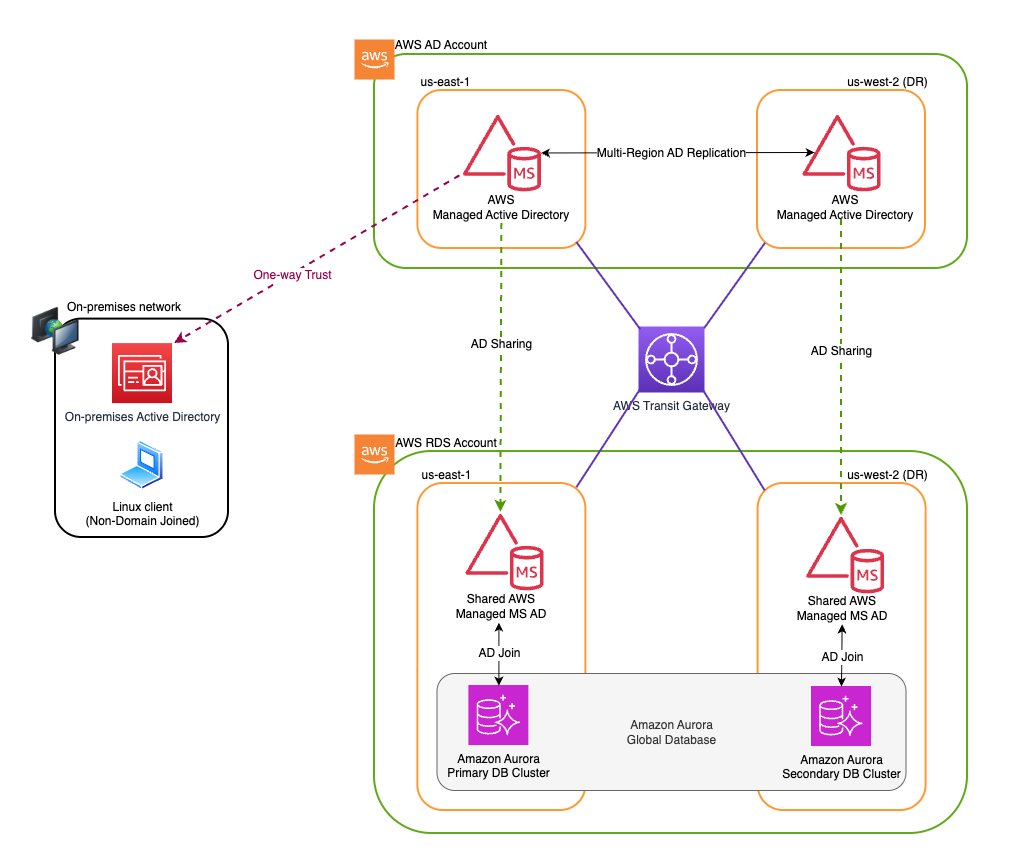
Note: Although this solution applies to multiple Amazon Aurora and Amazon RDS database engines, this post uses Amazon Aurora Global Database for MySQL to walk through the implementation steps. If you are using a different engine, such as Aurora PostgreSQL or Amazon RDS, you can follow the same overall approach and tailor the engine-specific steps (such as the MySQL client version, Kerberos plugin configuration, and database user creation syntax) accordingly.
Understanding Kerberos authentication workflow
Kerberos is a network authentication protocol that allows clients and services to verify each other’s identities securely over untrusted networks. This allows Amazon Aurora MySQL to integrate with centralized authentication services such as Microsoft Active Directory, which natively supports Kerberos. The authentication process uses a one-way forest trust relationship where AWS Managed Microsoft AD trusts the on-premises AD.The Kerberos authentication workflow consists of the following steps:
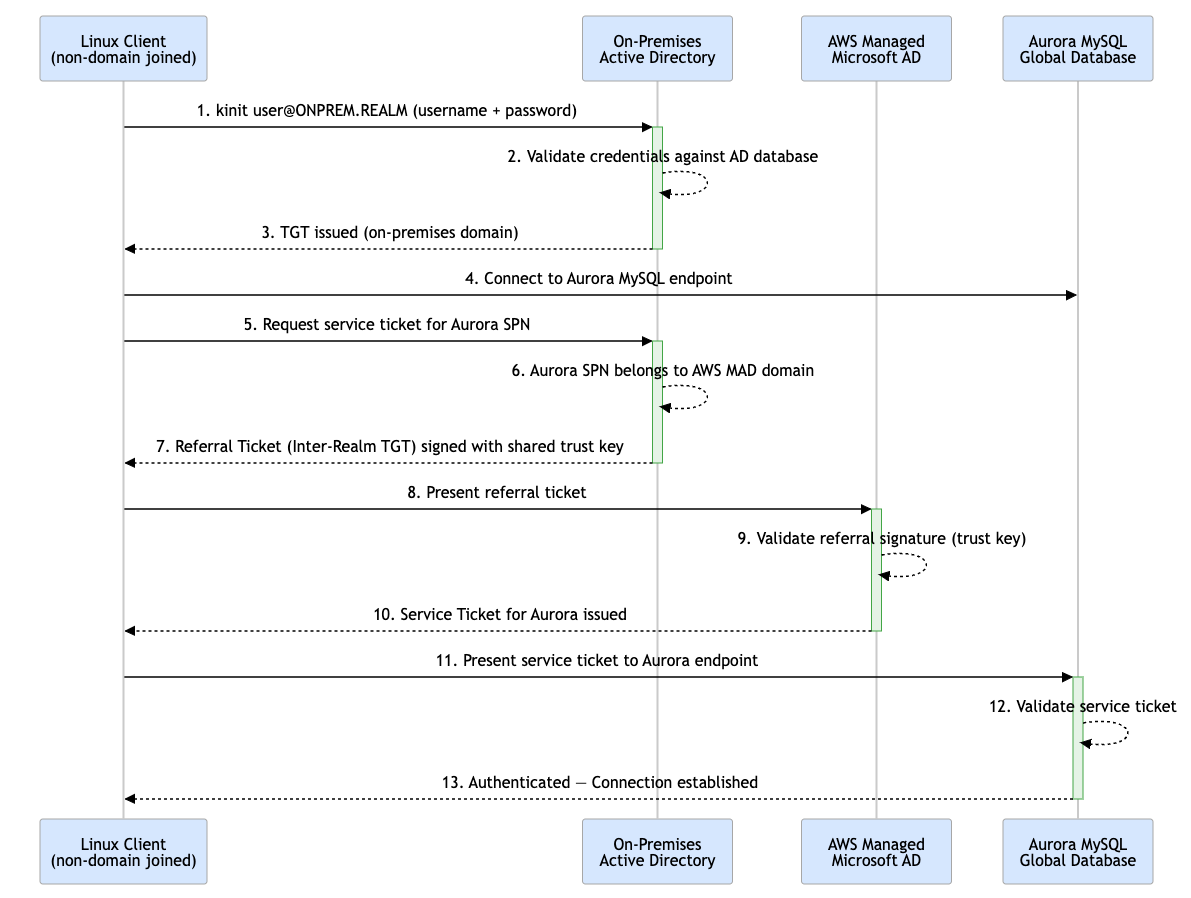
Kerberos Authentication Workflow
- The non-domain Linux client initiates authentication using kinit with Active Directory username and password credentials.
- The on-premises Active Directory authenticates the user against its database.
- Upon successful validation, a Ticket Granting Ticket (TGT) for the on-premises domain is issued and returned to the client.
- The client connects to the Aurora MySQL endpoint.
- The client requests a service ticket for the Aurora SPN from on-premises AD.
- On-premises AD recognizes Aurora resides in the AWS Managed Microsoft AD domain.
- A Referral Ticket (Inter-Realm TGT) is issued, signed with the shared trust key.
- The client presents the referral ticket to AWS Managed Microsoft AD.
- AWS Managed Microsoft AD validates the referral signature using the trust key — this validates the trust only, not user credentials.
- AWS Managed Microsoft AD issues a Service Ticket for Aurora, trusting the identity verified by on-premises AD.
- The client presents the service ticket to Aurora MySQL.
- Aurora validates the service ticket.
- Authentication successful
Prerequisites
Before you begin, make sure you have:
- Intermediate knowledge of Active Directory concepts, including forest trusts, Kerberos ticket flow, and DNS configuration
- AWS Command Line Interface (AWS CLI) configured with appropriate permissions to manage Directory Service, Amazon Virtual Private Cloud (Amazon VPC) security groups, and Aurora clusters
- MySQL client version 8.0.28 or higher installed on your Linux client machines.
- An existing self-managed Active Directory (such as onprem.example.com).
- Amazon Aurora Global Database for MySQL (version 3.03 or higher) deployed.
- Amazon Virtual Private Cloud (Amazon VPC) connectivity between the directory owner and Aurora consumer accounts established via VPC peering or AWS Transit Gateway.
- User accounts (such asaduser) and groups created in your self-managed Active Directory
- Amazon VPC security group for the Aurora Global Database configured to allow inbound traffic from the Linux bastion host (client) on port 3306
The environment configuration for this walkthrough:
- On-premises AD domain –
onprem.example.com - On-Premises Domain Controller IPs –
10.192.11.12;10.192.11.13 - Primary Region –
us-east-1 - Secondary Region –
us-west-2 - AWS Managed Microsoft AD
- AWS Account ID –
123456789012 - Amazon VPC CIDR (us-east-1 – Primary Region) –
10.0.0.0/16 - Amazon VPC CIDR (us-west-2 – Secondary Region)–
10.2.0.0/16 - AWS Managed Microsoft AD domain –
awsmad.kerberos.com - AWS Managed Directory Id –
d-xxxxxx0a
- AWS Account ID –
- Amazon AuroraGlobal Database –
- AWS Account ID –
987654321098 - Amazon VPC CIDR (us-east-1 – Primary Cluster) –
172.16.0.0/16 - Amazon VPC CIDR (us-west-2 – Secondary Cluster)–
172.17.0.0/16
- AWS Account ID –
Implementation steps
The following steps walk you through deploying AWS Managed Microsoft AD with multi-Region replication, establishing the forest trust with your on-premises Active Directory, sharing the directory across accounts, and enabling Kerberos authentication on your Aurora Global Database.
Step 1: Create IAM role for Amazon Aurora
Amazon Aurora requires an AWS Identity and Access Management (IAM) role to enable Kerberos authentication and communicate with Directory Service. For detailed instructions, refer to Create an IAM role for use by Amazon Aurora.
In this post, you create the IAM role named aurora-directoryservice-kerberos-access-role with a trust policy that allows both RDS and Directory Service to assume it:
Attach the following policy to the role, granting it permissions to interact with AWS Directory Service:
Step 2: Create AWS Managed Microsoft AD (primary Region)
Create an AWS Managed Microsoft AD directory in your dedicated Active Directory account (123456789012) in the us-east-1 Region. For steps to create AWS Managed Microsoft AD, see Creating your AWS Managed Microsoft AD.
Use the following AWS CLI command to create the directory:
When you create the directory, AWS Directory Service automatically:
- Sets up an Active Directory within your specified Amazon VPC
- Creates two domain controllers and DNS servers in different subnets for high availability
- Creates a directory administrator account with the usernameAdminand your specified password
- Creates a security group named
<DirectoryID>_Controllers(such asd-xxxxxx0a_controllers) for the directory controllers
For information about what gets created, see What gets created with your AWS Managed Microsoft AD.
Note: Enterprise Edition is required for multi-Region replication.
Step 3: Enable AWS Managed Microsoft AD – multi-Region replication (Secondary Region)
Enable multi-Region replication to automatically replicate your AWS Managed Microsoft AD directory data to the secondary Region (us-west-2). This feature uses native Active Directory replication to securely replicate directory data (including users, groups, group policies, and schema) across Regions. This provides low-latency access for your Aurora Global Database secondary cluster.Use the following AWS CLI command to enable multi-Region replication:
For more information, see Configure Multi-Region replication for AWS Managed Microsoft AD.
Step 4: Configure security groups (primary Region – us-east-1)
AWS Managed Microsoft AD automatically creates a VPC security group named <DirectoryID>_Controllers for the Primary directory, with the required ports already open for communication within the directory’s Amazon VPC. To enable Kerberos authentication on the Aurora Global Database primary DB Cluster, update the d-xxxxxx0a_controllers security group attached to the AWS Managed Microsoft AD Primary to allow inbound connectivity from the Aurora Primary DB cluster’s Amazon VPC CIDR 172.16.0.0/16 on following ports:
| Type | Protocol | Port Range |
| DNS(TCP) | TCP | 53 |
| DNS(UDP) | UDP | 53 |
| Custom TCP | TCP | 88 |
| Custom UDP | UDP | 88 |
| Custom UDP | UDP | 123 |
| Custom TCP | TCP | 135 |
| Custom UDP | UDP | 138 |
| LDAP | TCP | 389 |
| Custom UDP | UDP | 389 |
| SMB | TCP | 445 |
| Custom UDP | UDP | 445 |
| Custom TCP | TCP | 464 |
| Custom UDP | UDP | 464 |
| Custom TCP | TCP | 636 |
| Custom TCP | TCP | 1024 – 65535 |
| Custom TCP | TCP | 3268 – 3269 |
| All ICMP – IPV4 | ICMP | All |
The default outbound rule is sufficient for Aurora Kerberos authentication.
Step 5: Configure security groups (secondary Region)
Like Step 4, update the d-xxxxxx0a_controller ssecurity group attached to the AWS Managed Microsoft AD Replica to allow inbound connectivity from the Aurora Secondary DB cluster’s Amazon VPC CIDR (172.17.0.0/16) on the same ports listed in Step 4. The default outbound rule is sufficient for Aurora Kerberos authentication.
Step 6: Create one-way incoming forest trust in self-managed AD
Create a one-way incoming forest trust in your self-managed AD to allow AWS Managed Microsoft AD to trust your on-premises domain. This enables users from onprem.example.com to authenticate to resources using awsmad.kerberos.com.Before creating the trust, retrieve the DNS IP addresses of your AWS Managed Microsoft AD domain controllers using the following AWS CLI commands. You will need these to configure the conditional DNS forwarder on your self-managed AD.
To establish and maintain the forest trust, domain controllers from AWS Managed Microsoft AD (primary and replica) and the self-managed AD must be able to communicate with each other. Even though the trust is logically one-way, both sides independently initiate connections for activities such as trust validation, Kerberos authentication referrals, LDAP queries, and periodic trust health checks. This means traffic can flow in either direction, so firewall rules must explicitly allow it on both sides.
To allow this bidirectional communication, the following firewall and security group rules must be configured:
- On-premises network firewalls must allow inbound traffic from the AWS Managed Microsoft AD domain controllers (primary and replica) on the following ports:
- TCP/UDP 53 – DNS
- TCP/UDP 88 – Kerberos KDC
- TCP/UDP 445 – SMB
- TCP/UDP 389 – LDAP
- Update the
d-xxxxxx0a_controllerssecurity groups attached to the AWS Managed Microsoft AD primary and replica to allow inbound traffic from the on-premises domain controllers (10.192.11.12and10.192.11.13) on the following ports:
| Type | Protocol | Port Range |
| DNS(TCP) | TCP | 53 |
| DNS(UDP) | UDP | 53 |
| Custom TCP | TCP | 88 |
| Custom UDP | UDP | 88 |
| SMB | TCP | 445 |
| Custom UDP | UDP | 445 |
| LDAP | TCP | 389 |
| Custom UDP | UDP | 389 |
Note: If your organization uses a network firewall or perimeter security controls that restrict outbound traffic from the on-premises domain controllers to AWS, make sure those rules also permit outbound traffic to the AWS Managed Microsoft AD domain controllers (primary and replica) on the ports listed above. Without this, communication may fail even after the security group rules are updated.
Step 7: Create one-way outgoing forest trust from AWS Managed Microsoft AD
Create a “One-Way: Outgoing” forest trust from your AWS Managed Microsoft AD to the self-managed AD. This completes the trust relationship, allowing users from onprem.example.com to authenticate to resources using awsmad.kerberos.com. AWS Managed Microsoft AD automatically replicates the trust to the replica Region. You do not need to run this command separately for us-west-2.
Important: Replace 10.192.11.12 and 10.192.11.13 with your actual on-premises domain controller IPs. The trust password must match the password used when creating the incoming trust in Step 6.
Step 8: Share directory with AWS accounts hosting Aurora clusters
AWS Managed Microsoft AD supports sharing a directory across multiple AWS accounts. In this post, you use the Handshake method, which requires the consumer account to explicitly accept the sharing invitation, giving you direct control over directory access. For more information on directory sharing methods, refer to Share your AWS Managed Microsoft AD.
Important: Directory sharing is designed to work within the same AWS Region. Although multi-Region replication makes your AWS Managed Microsoft AD available in both us-east-1 and us-west-2, you must configure sharing separately in each Region where you want to grant access.
8.1 Share the directory from the owner account
Run the following command in the directory owner account (123456789012) to share the directory with the consumer account (987654321098).You must run this command in each Region used by your Aurora Global Database:
8.2 Accept the shared directory invitation in consumer account
Switch to the AWS account hosting your Aurora Global Database and accept the directory sharing invitations in each Region used by your Aurora Global Database. For more information, refer to Accept shared directory invite.
Note: The Shared DirectoryId (such as d-xxxxxx0b) returned is different from the owner directory ID (d-xxxxxx0a). Use the value from the describe-shared-directories output when running accept-shared-directory.
Step 9: Configure Kerberos authentication on Aurora Global Database
To enable Kerberos authentication for Aurora Global Database, you must configure it for every DB cluster in your Aurora Global Database. For more information, refer to Setting up Kerberos authentication for Aurora MySQL DB clusters.
Run the following commands in the Aurora consumer account to enable Kerberos authentication on both clusters:
Important: If you modify a DB cluster to turn on Kerberos authentication, reboot the reader DB instances after making the change.
Step 10: Create database users for Kerberos authentication
Create database users that will authenticate using Kerberos. The following example creates a user named aduserthat authenticates via Kerberos from the ONPREM.EXAMPLE.COM domain:
Grant the necessary permissions to the user:
Note:The domain name (ONPREM.EXAMPLE.COM) must be in uppercase and must match your self-managed AD domain name exactly.
Tip:By default, the MySQL database username must match the case of the Active Directory login. To enable case-insensitive username comparison, set the authentication_kerberos_caseins_cmp cluster parameter to true. For more information, see Configure case-insensitive username comparison.
Step 11: Configure Linux client for Kerberos authentication
Now that you’ve configured the infrastructure, you can set up a Linux client to connect to Aurora MySQL using Kerberos authentication without joining the Active Directory domain.
Linux Bastion Host (Client) → Self-Managed Microsoft AD
The client must be able to communicate with the self-managed Active Directory domain controllers where user accounts reside. This connectivity is required so the client can authenticate the user and obtain the initial Kerberos Ticket Granting Ticket (TGT) using kinit. On-premises network firewall rules must allow traffic from the client network to the self-managed AD domain controllers on following ports:
- TCP/UDP 53 – DNS
- TCP/UDP 88 – Kerberos KDC
- TCP/UDP 464 – Kerberos Password Change
Without this connectivity, the client cannot obtain a TGT, and authentication will not initiate.
Linux Bastion Host (Client) → AWS Managed Microsoft AD
The client must communicate directly with AWS Managed Microsoft AD domain controllers to obtain a service ticket for Aurora. Update the d-xxxxxx0a_controllers security groups attached to the AWS Managed Microsoft AD primary and Replica both to allow inbound traffic from the Linux bastion host (client) on the following ports:
| Type | Protocol | Port Range |
| DNS(TCP) | TCP | 53 |
| DNS(UDP) | UDP | 53 |
| Custom TCP | TCP | 88 |
| Custom UDP | UDP | 88 |
| Custom TCP | TCP | 464 |
| Custom UDP | UDP | 464 |
| LDAP | TCP | 389 |
Note: If your organization uses a network firewall or perimeter security controls (such as an on-premises firewall or AWS Network Firewall) that restricts outbound traffic from the Linux bastion host to AWS, make sure those rules also permit outbound traffic to the AWS Managed Microsoft AD domain controllers on the ports listed above. Without this, the client may be unable to reach the domain controllers even after the security group rules are updated.
Install required packages
The Kerberos client utility kinit is required on the client machine to obtain or renew the Kerberos ticket. Install the required packages:sudo yum install -y krb5-libs krb5-workstation
Configure DNS resolution
Edit /etc/resolv.conf to point DNS resolution to your self-managed AD domain controllers:
To make the changes inresolv.confpersistent across reboots, run the following command:sudo chattr +i /etc/resolv.conf
Note: The chattr +i command makes the file immutable, helping prevent it from being overwritten on reboot. This works on Amazon Linux 2 and RHEL-based systems. On systems managed by NetworkManager, DNS settings should be configured through NetworkManager instead. Otherwise, resolv.conf might be overwritten on reboot regardless. Refer to your Linux distribution’s documentation for the appropriate method.
Verify DNS is working correctly. The following ping command should resolve the AD domain to an IP address:
Create the Kerberos configuration file
Create the Kerberos configuration file:sudo vi /etc/krb5.confAdd the following configuration:
Configuration notes:
- ticket_lifetime: Defines how long your initial TGT is valid after issuance (10 hours in this example)
- renew_lifetime: You can renew your ticket without re-entering your password within this period (7 days in this example)
- rdns = false: Disables reverse DNS lookups, which can cause issues in cloud environments where reverse DNS may not resolve correctly
- [appdefaults]: The destroy_tickets = true setting stops the TGT from being cached, which is a security best practice for database connections. For more details on preventing ticket caching in MySQL, refer to Preventing ticket caching.
Step 12: Connect to Aurora Global Database using Kerberos authentication
You can connect using one of two methods: obtain a Kerberos ticket manually using kinit (no password required at the MySQL client) or supply your Active Directory password directly to the MySQL client. For more details, refer to Connecting to Aurora MySQL with Kerberos authentication.
In this post, you authenticate once with kinit and then connect to Aurora MySQL without entering your password each time.
Note: --ssl-mode=VERIFY_IDENTITY enforces SSL/TLS and verifies the server certificate. Download the global-bundle.pem certificate bundle from the AWS documentation if you haven’t already.
Run the following query to verify the connection and confirm Kerberos authentication is working:
Understanding regional authentication behavior
When a client connects to either Aurora cluster, Kerberos service ticket validation occurs against the AWS Managed Microsoft AD domain controllers in the same Region. For example, us-east-1 for the primary cluster and us-west-2 for the secondary cluster in this walkthrough. Aurora does not redirect Kerberos validation across Regions.
Behavior after Aurora Global Database failover
The Aurora Global Database global writer endpoint points to the current writer instance. After a global failover in either direction:
- The new writer validates Kerberos authentication against the AWS Managed Microsoft AD replica in that Region.
- Your existing Kerberos ticket continues to work seamlessly.
- No client-side configuration changes are required.
In short, after a failover, authentication automatically occurs against the AWS Managed Microsoft AD domain controllers in the region where the new writer is running. No client-side changes are required.
Clean up
If you are testing this solution, complete the following steps to remove resources and avoid charges:
- Modify the Aurora Global Database Primary and Secondary clusters to disable Kerberos authentication. Refer to Setting up Kerberos authentication for Aurora MySQL DB clusters.
- Unshare the directory from consumer accounts. Refer to Unsharing your directory.
- Delete the trust relationship between AWS Managed Microsoft AD and on-premises AD. Refer to Delete a trust relationship.
- Remove the corresponding trust from your on-premises Active Directory using Active Directory Domains and Trusts.
- Remove the replica Region before deleting the primary directory. Refer to Deleting a replicated Region for AWS Managed Microsoft AD.
- Delete the AWS Managed Microsoft AD directory. Refer to Deleting your AWS Managed Microsoft AD.
- Delete the Aurora Global Database. Refer to Deleting an Amazon Aurora global database.
Conclusion
In this post, we showed how you can build a resilient, multi-Region Kerberos authentication architecture for Aurora Global Database using AWS Managed Microsoft AD. By deploying AWS Managed Microsoft AD across us-east-1 and us-west-2 with a one-way forest trust to your on-premises Active Directory, you avoid a single point of failure in authentication while maintaining centralized user management.
The solution enables domain-free Linux clients to authenticate using Kerberos, makes sure failover behavior is seamless when the writer role moves between Regions, and provides the same high availability as your Aurora Global Database infrastructure. This architecture delivers robust security with reduced operational complexity, making sure your authentication services remain available during regional outages, matching the resilience of your globally distributed database.
Applicability to other database engines:
You can use the provided guidance to enable Kerberos authentication for:
- Amazon Aurora Global Database – PostgreSQL: Follow similar steps with PostgreSQL-specific Kerberos configuration. Refer to Using external Kerberos authentication with Amazon PostgreSQL for configuring Kerberos authentication for Aurora PostgreSQL.
- Amazon RDS with Cross-Region Replicas: Apply the same multi-Region authentication architecture to Amazon RDS for Oracle, Amazon RDS for PostgreSQL, Amazon RDS for SQL Server with cross-Region read replicas.
We welcome your feedback. If you have questions or suggestions, leave them in the comments section.