AWS Database Blog
Provision Oracle Database@AWS resources using Terraform
In this post, we show you how to provision key components of the Oracle Database@AWS offering, including the ODB network, Oracle Exadata infrastructure, Exadata VM clusters and Autonomous VM clusters using Terraform.
Oracle Database@AWS (ODB@AWS) delivers Oracle Exadata infrastructure, managed by Oracle Cloud Infrastructure (OCI), from within AWS data centers. With Oracle Database@AWS, you can migrate Oracle databases to AWS while benefiting from the high performance, scalability, and advanced capabilities of Exadata. Oracle Database@AWS offers deep integration with native AWS services, including Amazon Simple Storage Service (Amazon S3), zero-ETL pipelines, and AWS Key Management Service (AWS KMS). Oracle databases run alongside applications deployed on Amazon Elastic Compute Cloud (Amazon EC2), Amazon Elastic Container Service (Amazon ECS), Amazon Elastic Kubernetes Service (Amazon EKS), and more. This tight integration simplifies data flows, enhances security, and accelerates application development across diverse compute environments.
Currently, Oracle Database@AWS offers the following Oracle Database services:
- Oracle Autonomous AI Database on Dedicated Exadata Infrastructure (ADB-D).
- Oracle Exadata Database Service on Dedicated Infrastructure (ExaDB-D).
Infrastructure as code (IaC) is the process of provisioning and managing an application’s infrastructure through a set of configuration files. IaC is designed to help you centralize infrastructure management, standardize resources, and scale quickly so that new environments are repeatable, reliable, and consistent. You can deploy the resources in Oracle Database@AWS using IaC tools like Terraform or AWS CloudFormation.
HashiCorp Terraform is an infrastructure as code tool that lets you define both cloud and on-premises resources in human-readable configuration files that you can version, reuse, and share. You can then use a consistent workflow to provision and manage your infrastructure throughout its lifecycle.
This walkthrough is intended for database administrators and DevOps engineers who want to automate Oracle Database@AWS provisioning.
Solution overview
To get started with Oracle Database@AWS, you can view the listing in AWS Marketplace. To use the service, you configure it within your AWS account through a process referred to as onboarding. To begin onboarding, contact your Oracle representative and request a Private Offer. After you agree on pricing, terms and conditions, you complete the purchase through AWS Marketplace. After the purchase is complete, you link your AWS account with an OCI tenancy. This is called multicloud linking. Based on your requirements, you can use the entitlement sharing capability to share the AWS Marketplace entitlements for ODB@AWS across AWS accounts in the same AWS organization. After you complete onboarding, you can begin provisioning the Oracle Database@AWS system resources for Exadata Database Service on Dedicated Infrastructure and Autonomous AI Database on Dedicated Exadata Infrastructure. Provisioning starts with creating an ODB network and Exadata infrastructure. Based on your workloads and requirements, you then create either an Exadata VM cluster or an Autonomous VM cluster. The Exadata VM cluster supports the Oracle Exadata Database Service, and the Autonomous VM cluster supports Autonomous AI Database on Dedicated Exadata Infrastructure.
To begin using Oracle Database@AWS, you can create the following resources using the Oracle Database@AWS console, AWS Command Line Interface (AWS CLI), or APIs:
- ODB network.
- Oracle Exadata infrastructure.
- Exadata VM cluster or Autonomous VM cluster.
- ODB peering connection.
The following diagram shows the Oracle Database@AWS architecture.
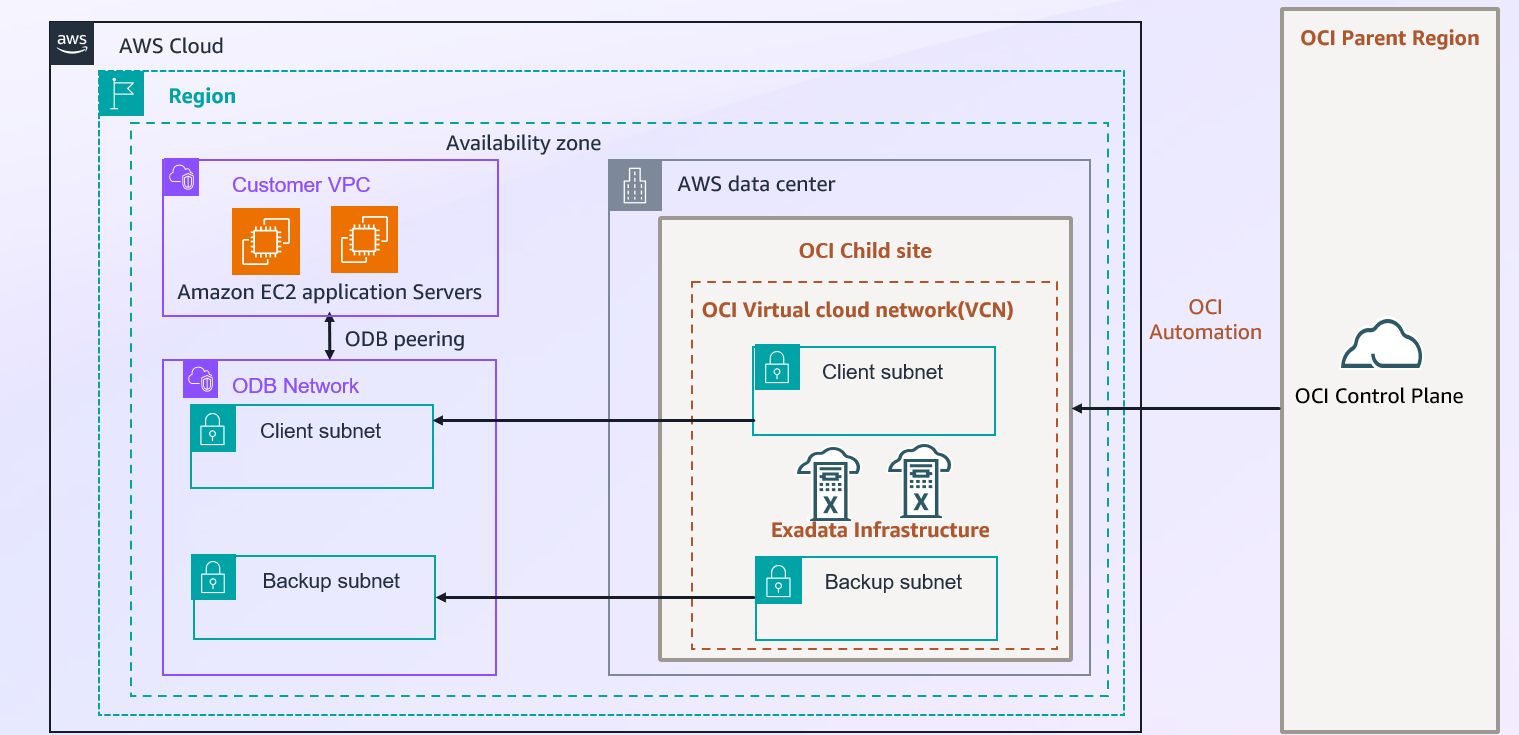
The following section describes the architecture of Oracle Database@AWS and its key components.
- Amazon Virtual Private Cloud and Subnet: An Amazon Virtual Private Cloud (Amazon VPC) lets you launch AWS resources into a virtual network that you’ve defined. This virtual network resembles a traditional network that you operate in your own data center, with the benefits of using the scalable infrastructure of AWS. After you create a VPC, you can add subnets. A subnet is a range of IP addresses in your Amazon VPC. You can create AWS resources, such as Amazon EC2 instances, in specific subnets.
- OCI Virtual Cloud Network (VCN) and Subnet: A Virtual Cloud Network (VCN) is a customizable, private network that you set up in an OCI tenancy within a specified Oracle Region. It provides a secure and scalable network environment where you can deploy and manage your OCI resources, such as compute instances, databases, and storage. VCNs let you isolate and segment your cloud resources within logically separated networks, which enhances security and manageability. In Oracle multicloud architecture, when you create an ODB network with client and backup subnets in an AWS Region, a corresponding OCI VCN with subnets is automatically created in your OCI tenancy. This VCN is created in the paired OCI region. For more details, see Overview of VCNs and Subnets.
- OCI Region (Parent Site): An OCI Region is a geographic area that has one or more data centers known as availability domains. In the Oracle multicloud model, an OCI region connected to a paired AWS Region is called a Parent Site. ODB@AWS is available only in the regions discussed in Regional Availability.
- OCI Child Site: An OCI child site is a data center that extends an OCI availability domain (AD) to an Availability Zone (AZ) in an AWS Region. With the OCI child site model, the Exadata infrastructure used for Oracle Database@AWS physically resides in an AWS data center (an AZ within an AWS region), but is logically mapped to an OCI region and its network components.
- ODB Network: The ODB network is a private and isolated network that hosts Oracle Exadata VM Clusters and Autonomous VM Clusters within a specified AWS Availability Zone (AZ). The ODB network consists of a CIDR range of IP addresses. The ODB network maps directly to the network that exists within the OCI child site and enables communication between AWS and OCI. In Oracle’s multicloud architecture, the ODB network provides network connectivity for the OCI components that are part of the Oracle Database@AWS service.
- Availability Zone — The ODB network is specific to an AZ. For the latest list of supported regions and Availability Zones, see Regional Availability. Run the following command to find the logical AZ names in your account that map to the preceding physical AZ IDs.
- Client CIDR addresses — The ODB network requires a client subnet CIDR for Exadata VM clusters and Autonomous VM clusters.
- Backup CIDR addresses — The ODB network requires a backup subnet CIDR for managed database backups of VM clusters. The backup subnet is optional for Exadata VM clusters.
- AWS service integrations — You can configure a network path for AWS service integrations such as Amazon S3 and zero-ETL with Amazon Redshift. For more information, see AWS service integrations. For more information on CIDR requirements, refer to ODB Network creation.
When you create an ODB network, you specify information such as the following:
- Oracle Exadata Infrastructure: Oracle Exadata infrastructure is a high-performance, integrated hardware and software platform designed for running Oracle Databases. In Oracle multicloud architecture, Exadata infrastructure is the underlying hardware for both Oracle Exadata Database Service and Oracle Autonomous AI Database.
- The total number of database servers.
- The total number of storage servers.
- The Exadata system model (X11M).
- The AZ that hosts the infrastructure (see Supported Regions for Oracle Database@AWS).
When you create Exadata infrastructure in Oracle Database@AWS, you specify information such as the following:
For more information, refer to Exadata Infrastructure.
- Exadata VM clusters: An Exadata VM cluster is a set of tightly coupled Exadata VMs. Each VM has a complete Oracle database installation that includes the features of Oracle Enterprise Edition, including Oracle Real Application Clusters (Oracle RAC) and Oracle Grid Infrastructure. You can create one or more Oracle Exadata databases on a VM cluster.
For diagrams that show the architecture of VMs and VM clusters, see Exadata Database Service on Dedicated Infrastructure Technical Architecture.
When you create a VM cluster, you specify information that includes the following:
- An ODB network.
- An Oracle Exadata infrastructure.
- The database servers on which to place the VMs in the cluster.
- The total amount of usable Exadata storage.
For more information, refer to Exadata VM Cluster.
- Autonomous VM clusters: Autonomous VM Clusters (AVMCs) allow a physical Exadata Cluster (Machine) to be partitioned into multiple virtual clusters. You can use them to isolate environments for different database workloads through separate access rules, network configurations, and customizable compute, memory, and storage resources. You can configure the ECPU core count per VM, database memory per CPU, database storage, and maximum number of autonomous container databases when you create an Autonomous VM Cluster. For more information, refer to Create Autonomous VM Cluster.
- ODB Peering: ODB peering is a user-created network connection that allows traffic to be routed privately between an Amazon VPC and an ODB network. In Oracle multicloud architecture, traffic between your applications in the VPC and the Oracle Database in the ODB network is routed privately through ODB peering without traversing the public internet. For more information, refer to creating ODB peering connection.
- Oracle Exadata databases: With Oracle Database@AWS, you use the AWS console to create the Oracle Exadata infrastructure and VM clusters that host the Exadata databases. You then use OCI APIs to create and manage the Oracle databases. For more information on how to create the database, refer to Exadata Database and Autonomous Database.
For more details on components of Oracle Database@AWS, refer to Architecture.
For detailed steps on how to create the preceding resources, refer to creating resources in your Oracle Database@AWS
Prerequisites
Before you begin, make sure you have the following prerequisites:
- A basic understanding of Terraform.
- An understanding of the Oracle Database@AWS offering.
- Perform the steps in Onboarding to Oracle Database@AWS. You must have accepted a private offer to use Oracle Database@AWS.
- Grant your AWS Identity and Access Management (IAM) principal the policy permissions listed in Allow users to provision Oracle Database@AWS resources. These permissions are necessary to use Oracle Database@AWS.
You can use the following Terraform templates to provision various resources in Oracle Database@AWS. Customize the parameters according to your business requirements. Understand the significance of each parameter and its allowed values before you apply a template.
The following templates are available for provisioning Oracle Database@AWS resources. For the latest information, refer to Provisioning Oracle Database@AWS through Terraform.
Step 1: Create an ODB network
Use the following Terraform configuration to create an ODB network in Oracle Database@AWS.
# Create an ODB Network without AWS service integrations
resource "aws_odb_network" "example" {
  display_name = "odb-my-net"
  availability_zone_id = "use1-az6"
  client_subnet_cidr = "10.2.0.0/24"
  backup_subnet_cidr = "10.2.1.0/24"
  s3_access = "DISABLED"
  zero_etl_access = "DISABLED"
  tags = {
    "env" = "dev"
  }
}
# Create an ODB Network with AWS service integrations
resource "aws_odb_network" "example" {
  display_name = "odb-my-net"
  availability_zone_id = "use1-az6"
  client_subnet_cidr = "10.2.0.0/24"
  backup_subnet_cidr = "10.2.1.0/24"
  s3_access = "ENABLED"
  zero_etl_access = "ENABLED"
  tags = {
    "env" = "dev"
  }
}
For more information on IP address requirements, refer to Planning IP address space in Oracle Database@AWS.
Step 2: Create an Oracle Exadata infrastructure
Use the following Terraform configuration to create an Oracle Exadata infrastructure in Oracle Database@AWS.
# Create an Exadata Infrastructure
resource "aws_odb_cloud_exadata_infrastructure" "example" {
  display_name = "my-exa-infra"
  shape = "Exadata.X11M"
  storage_count = 3
  compute_count = 2
  availability_zone_id = "use1-az6"
  customer_contacts_to_send_to_oci = [{ email = "abc@example.com" }, { email = "def@example.com" }]
  database_server_type = "X11M"
  storage_server_type = "X11M-HC"
  maintenance_window {
    custom_action_timeout_in_mins = 16
    days_of_week = [{ name = "MONDAY" }, { name = "TUESDAY" }]
    hours_of_day = [11, 16]
    is_custom_action_timeout_enabled = true
    lead_time_in_weeks = 3
    months = [{ name = "FEBRUARY" }, { name = "MAY" }, { name = "AUGUST" }, { name = "NOVEMBER" }]
    patching_mode = "ROLLING"
    preference = "CUSTOM_PREFERENCE"
    weeks_of_month = [2, 4]
  }
  tags = {
    "env" = "dev"
  }
}
Step 3: Create an Exadata VM cluster or Autonomous VM cluster
Use the following Terraform configuration to create an Exadata VM cluster or Autonomous VM cluster in Oracle Database@AWS.
# Create Exadata VM cluster with minimum parameters
resource "aws_odb_cloud_vm_cluster" "with_minimum_parameter" {
  display_name = "my_vm_cluster"
  cloud_exadata_infrastructure_id = "<aws_odb_cloud_exadata_infrastructure_id>"
  cpu_core_count = 6
  gi_version = "23.0.0.0"
  hostname_prefix = "apollo12"
  ssh_public_keys = ["public-ssh-key"]
  odb_network_id = "<aws_odb_network_id>"
  is_local_backup_enabled = true
  is_sparse_diskgroup_enabled = true
  license_model = "LICENSE_INCLUDED"
  data_storage_size_in_tbs = 20.0
  db_servers = ["db-server-1", "db-server-2"]
  db_node_storage_size_in_gbs = 120.0
  memory_size_in_gbs = 60
  data_collection_options {
    is_diagnostics_events_enabled = false
    is_health_monitoring_enabled = false
    is_incident_logs_enabled = false
  }
}
# Create Exadata VM cluster with all parameters
resource "aws_odb_cloud_vm_cluster" "with_all_parameters" {
  display_name = "my_vm_cluster"
  cloud_exadata_infrastructure_id = "<aws_odb_cloud_exadata_infrastructure_id>"
  cpu_core_count = 6
  gi_version = "23.0.0.0"
  hostname_prefix = "apollo12"
  ssh_public_keys = ["my-ssh-key"]
  odb_network_id = "<aws_odb_network_id>"
  is_local_backup_enabled = true
  is_sparse_diskgroup_enabled = true
  license_model = "LICENSE_INCLUDED"
  data_storage_size_in_tbs = 20.0
  db_servers = ["my-dbserver-1", "my-db-server-2"]
  db_node_storage_size_in_gbs = 120.0
  memory_size_in_gbs = 60
  cluster_name = "julia-13"
  timezone = "UTC"
  scan_listener_port_tcp = 1521
  tags = {
    "env" = "dev"
  }
  data_collection_options {
    is_diagnostics_events_enabled = true
    is_health_monitoring_enabled = true
    is_incident_logs_enabled = true
  }
}
# Create Autonomous VM cluster with minimum parameters
resource "aws_odb_cloud_autonomous_vm_cluster" "avmc_with_minimum_parameters" {
  cloud_exadata_infrastructure_id = "<aws_odb_cloud_exadata_infrastructure_id>"
  odb_network_id = "<aws_odb_network_id>"
  display_name = "my_autonomous_vm_cluster"
  autonomous_data_storage_size_in_tbs = 5
  memory_per_oracle_compute_unit_in_gbs = 2
  total_container_databases = 1
  cpu_core_count_per_node = 40
  license_model = "LICENSE_INCLUDED"
  # ids of db server. refer your exa infra. This is a mandatory field. Refer your cloud Exadata infrastructure for db server id
  db_servers = ["<my_db_server_id>"]
  scan_listener_port_tls = 8561
  scan_listener_port_non_tls = 1024
  maintenance_window {
    preference = "NO_PREFERENCE"
  }
}
# Create Autonomous VM cluster with all parameters
resource "aws_odb_cloud_autonomous_vm_cluster" "avmc_with_all_params" {
  description = "my first avmc"
  time_zone = "UTC"
  cloud_exadata_infrastructure_id = "<aws_odb_cloud_exadata_infrastructure_id>"
  odb_network_id = "<aws_odb_network_id>"
  display_name = "my_autonomous_vm_cluster"
  autonomous_data_storage_size_in_tbs = 5
  memory_per_oracle_compute_unit_in_gbs = 2
  total_container_databases = 1
  cpu_core_count_per_node = 40
  license_model = "LICENSE_INCLUDED"
  db_servers = ["<my_db_server_1>", "<my_db_server_2>"]
  scan_listener_port_tls = 8561
  scan_listener_port_non_tls = 1024
  maintenance_window {
    days_of_week = [{ name = "MONDAY" }, { name = "TUESDAY" }]
    hours_of_day = [4, 16]
    lead_time_in_weeks = 3
    months = [{ name = "FEBRUARY" }, { name = "MAY" }, { name = "AUGUST" }, { name = "NOVEMBER" }]
    preference = "CUSTOM_PREFERENCE"
    weeks_of_month = [2, 4]
  }
  tags = {
    "env" = "dev"
  }
}
Step 4: Create an ODB peering connection
Use the following Terraform configuration to create an ODB peering connection.
resource "aws_odb_network_peering_connection" "example" {
  display_name = "example"
  odb_network_id = "my-odb-network-id"
  peer_network_id = "my-vpc-id"
  tags = {
    "env" = "dev"
  }
}
Create the ODB@AWS stack using Terraform
To provision your resources with Terraform, complete the following steps. This Terraform template creates the following resources:
- A VPC
- An internet gateway
- Two public subnets
- Two private subnets
- A public route table
- A private route table
- A public route
- Route table associations for all four subnets
- An ODB network
- An ODB peering connection
- An Exadata infrastructure
- An Exadata VM cluster
- An Autonomous VM cluster
Before deploying, review the template carefully. If you don’t need any of these resources, modify the template accordingly.
- Clone the GitHub repository to your local machine or download the script from AWS Samples.
- Follow the GitHub README to verify the prerequisites and deploy the Terraform stack.
- Run
terraform planbefore runningterraform applyto review all proposed changes. Review the plan output carefully for anydestroyorreplaceactions before applying. - Verify the completion of the stack deployment.
Important: When you modify certain Terraform resource properties (such as CpuCoreCount and DbServers), Terraform replaces the resource entirely rather than updating it in place. Review the Terraform documentation for a complete list of properties that trigger replacement before modifying existing resources.
After you create the resources, configure connectivity between your VPC and the ODB Network. Complete the following steps:
- Configuring VPC route tables for OdbPeeringConnection.
- Configuring DNS for Oracle Database@AWS.
- An outbound endpoint. The endpoint is required to send DNS queries to the ODB network.
- A resolver rule. This rule specifies the domain name of the DNS queries that the Amazon Route 53 Resolver forwards to the DNS for the ODB network.
For more details, refer to network configuration.
Clean up
To avoid ongoing charges, delete the resources you created: ODB network, Exadata infrastructure, and VM clusters.
To delete the other resources that were launched as part of the Terraform stack, complete the steps using terraform destroy as mentioned in the GitHub README.
When you delete the ODB network, set delete_associated_resources to true. This parameter is false by default. If you do not set it to true, the OCI VCN mapped to the previous ODB network remains intact.
Conclusion
In this post, we walked through how to use Terraform to provision Oracle Database@AWS resources, including ODB networks, Exadata infrastructure, Exadata VM clusters, and Autonomous VM clusters. By adopting infrastructure as code with Terraform, you can automate deployments, maintain consistency across environments, and streamline the management of your Oracle Database@AWS stack.
To learn more, see Getting started with Oracle Database@AWS.