AWS DevOps & Developer Productivity Blog
Debug deployment failures faster with the Deployments tab in AWS Elastic Beanstalk
Introduction
When a deployment fails, finding the root cause often means piecing together information from multiple sources. You wait for the deployment to finish, request a log bundle, download it, and then search through files like eb-engine.log and cfn-init.log to find the error. If you’re not familiar with Elastic Beanstalk’s log file structure, you might not know which file to check first, and the process can take longer than fixing the actual problem.
Elastic Beanstalk now provides a Deployments tab in the environment dashboard that gives you a consolidated view of your deployment history and real-time deployment logs. You can see what’s happening during a deployment as it runs, and when something fails, the deployment log shows you the error output directly in the console.
In this post, you create an Elastic Beanstalk environment, trigger different types of deployments, deploy a broken application to see how the Deployments tab surfaces errors, and then fix and redeploy. By the end, you’ll know how to use deployment logs to diagnose failures without connecting to instances over SSH or downloading log bundles.
Solution overview
The Deployments tab displays a history of recent deployments for your environment, including application deployments, configuration updates, and environment launches. Each deployment has a detail page with two tabs: Events, which shows a filtered timeline of events for that deployment, and Deployment Logs, which shows a consolidated log from the instance.
Deployment logs capture each step of the deployment process: dependency installation, application builds, .ebextensions commands, platform hooks, and application startup output. The logs are designed to be concise. On success, you see summary messages showing which steps ran and completed. On failure, the log includes up to 50 lines of output from the failed step, so you can see what went wrong without searching through verbose output.
During a deployment, one instance uploads its log to Amazon Simple Storage Service (Amazon S3) as the deployment progresses. The Elastic Beanstalk console reads from Amazon S3, which means you can monitor progress in real time without connecting to the instance. After the deployment completes, the console fetches the final log to ensure you see the complete output. For environments with multiple instances, the deployment log is captured from one representative instance. To view logs from all instances, use the Request Logs feature.
Prerequisites
Before getting started, ensure that you have the following:
- An AWS account with permissions to create Elastic Beanstalk environments and associated resources (Amazon Elastic Compute Cloud (Amazon EC2) instances, Amazon S3 buckets, security groups). For the minimum AWS Identity and Access Management (IAM) permissions required, see Managing Elastic Beanstalk service roles. Follow the principle of least privilege and avoid using AWS account root or unrestricted administrator credentials.
- The default Elastic Beanstalk instance profile,
aws-elasticbeanstalk-ec2-role. New AWS accounts may not have this role created automatically. If your environment fails to launch because the role is missing, see Instance profile for Amazon EC2 instances in your Elastic Beanstalk environment. - A supported Elastic Beanstalk platform version. Deployment logs are available on Amazon Linux 2 and Amazon Linux 2023 platform versions released on or after March 11, 2026, and on Windows Server platform versions 2.23.0 and later.
- AWS Command Line Interface (AWS CLI) installed and configured with appropriate permissions. See Installing the AWS CLI.
- A Bash-compatible shell (Bash or Zsh). The commands in this walkthrough use Bash syntax (heredocs, &&, and shell variables).
Walkthrough
Follow the steps below to create an environment, explore the Deployments tab, deploy a broken application, and then fix it.
Open your terminal and set the following variables. Replace the values with your own unique Amazon S3 bucket name and the latest Node.js solution stack for your Region. This walkthrough uses us-east-1. You can substitute your preferred Region, but use the same Region consistently across all commands in the walkthrough. To find the latest solution stack, run aws elasticbeanstalk list-available-solution-stacks.
S3_BUCKET="your-unique-bucket-name"

# Replace with the latest Node.js solution stack for your Region
SOLUTION_STACK_NAME="64bit Amazon Linux 2023 v6.11.1 running Node.js 22"
Setting up the application
This walkthrough uses two versions of a Node.js application. The first version is a working HTTP server. The second version introduces a dependency on a non-existent npm package, simulating a common deployment failure where a dependency cannot be installed.
Create a project directory:
mkdir deployments-tab-demo && cd deployments-tab-demo
Create the working application file:
cat << 'EOF' > workingapp.js
const http = require('http');

const server = http.createServer((req, res) => {
  res.writeHead(200, { 'Content-Type': 'application/json' });
  res.end(JSON.stringify({ status: 'healthy', message: 'App is running' }));
});

const port = process.env.PORT || 8080;
server.listen(port, () => {
  console.log(`Server running on port ${port}`);
});
EOF
Create the working package.json:
cat << 'EOF' > working-package.json
{
  "name": "deployments-tab-demo",
  "version": "1.0.0",
  "description": "Sample app for Deployments tab walkthrough",
  "main": "app.js",
  "scripts": {
    "start": "node app.js"
  }
}
EOF
Create the broken package.json with a non-existent dependency:
cat << 'EOF' > broken-package.json
{
  "name": "deployments-tab-demo",
  "version": "2.0.0",
  "description": "Sample app for Deployments tab walkthrough",
  "main": "app.js",
  "scripts": {
    "start": "node app.js"
  },
  "dependencies": {
    "this-package-does-not-exist-abc123": "^1.0.0"
  }
}
EOF
Create the working application source bundle:
cp workingapp.js app.js
cp working-package.json package.json
zip -r nodejs-working-app.zip app.js package.json
Create the broken application source bundle:
cp broken-package.json package.json
zip -r nodejs-broken-app.zip app.js package.json
Step 1: Create an environment and explore the Deployments tab
Create an Amazon S3 bucket and upload the source bundles. This walkthrough uses default bucket settings for simplicity. For production workloads, enable server-side encryption and restrict bucket access to only the principals that need it.
aws s3 mb s3://$S3_BUCKET --region us-east-1

aws s3 cp nodejs-working-app.zip s3://$S3_BUCKET/nodejs-working-app.zip
aws s3 cp nodejs-broken-app.zip s3://$S3_BUCKET/nodejs-broken-app.zip
Create the Elastic Beanstalk application and the working version:
aws elasticbeanstalk create-application \
--application-name deployments-tab-demo \
--description "Deployments tab walkthrough" \
--region us-east-1

aws elasticbeanstalk create-application-version \
--application-name deployments-tab-demo \
--version-label v1-working \
--source-bundle S3Bucket="$S3_BUCKET",S3Key="nodejs-working-app.zip" \
--region us-east-1
Create the environment:
aws elasticbeanstalk create-environment \
--application-name deployments-tab-demo \
--environment-name deployments-tab-demo-env \
--solution-stack-name "$SOLUTION_STACK_NAME" \
--version-label v1-working \
--option-settings \
Namespace=aws:elasticbeanstalk:environment,OptionName=EnvironmentType,Value=SingleInstance \
Namespace=aws:autoscaling:launchconfiguration,OptionName=IamInstanceProfile,Value=aws-elasticbeanstalk-ec2-role \
--region us-east-1
Don’t wait for the environment to finish creating. Instead, open the Elastic Beanstalk console right away, navigate to your environment, and choose the Deployments tab.
You should see one deployment in the history table with a status of In Progress and a type of Environment Creation. The table also shows the request ID, start time, and duration (which updates as the deployment runs). Choose the Request ID link to open the deployment detail page.
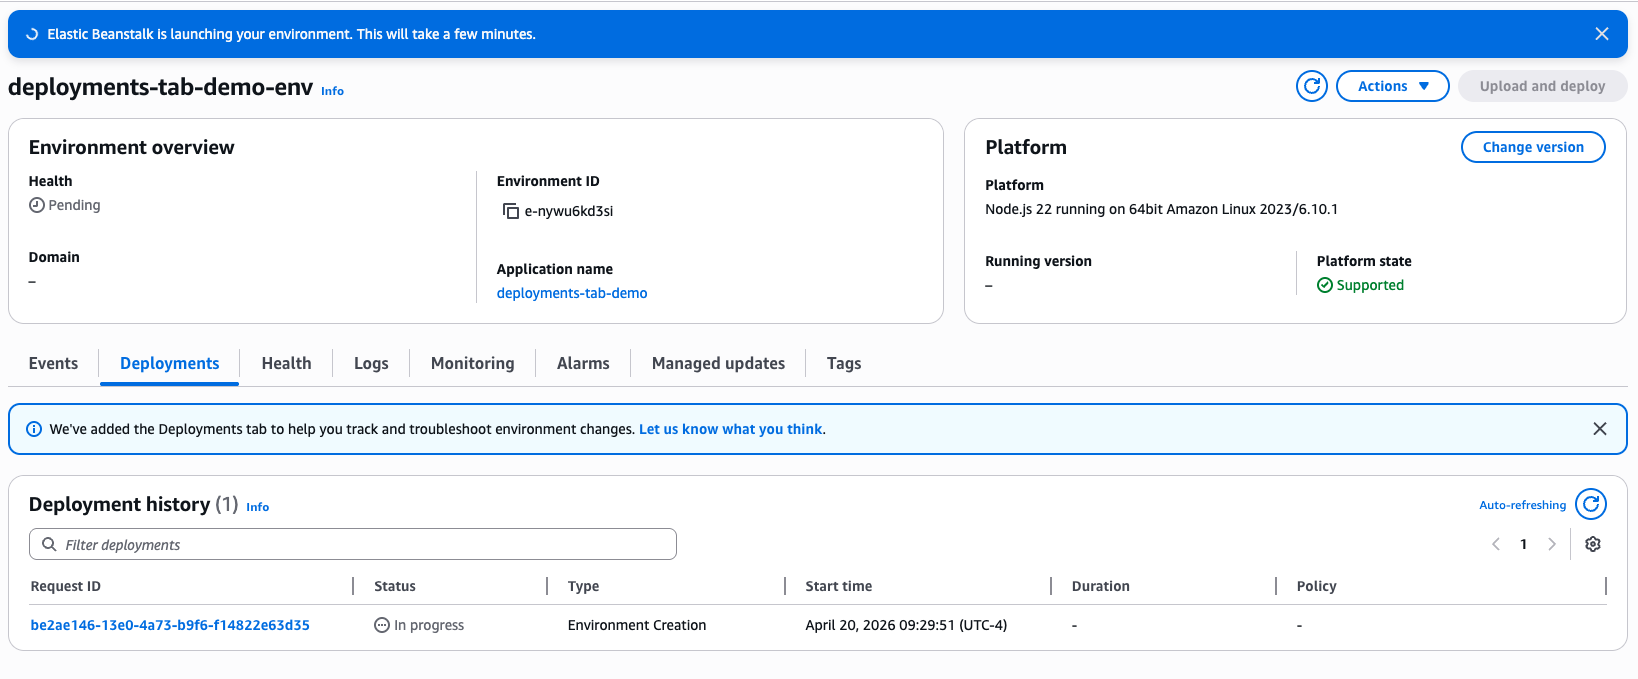
Figure 1 – Deployments tab history table showing the in-progress Environment Creation deployment
The detail page has a summary section with the deployment metadata and two tabs below it:
- Events shows a filtered timeline of events for this deployment. As the environment creation progresses, new events appear automatically.
- Deployment Logs shows the consolidated deployment log from the instance.
Select the Deployment Logs tab. At first, the tab may show a message indicating that the log is not yet available. This is expected. The deployment log is written on the EC2 instance and uploaded to Amazon S3, so it won’t appear until the instance launches and begins the deployment process. Once the instance is running, log entries start appearing and the tab refreshes automatically to show new entries as they are written. You can watch dependency installation, platform hooks, and application startup happen in real time.
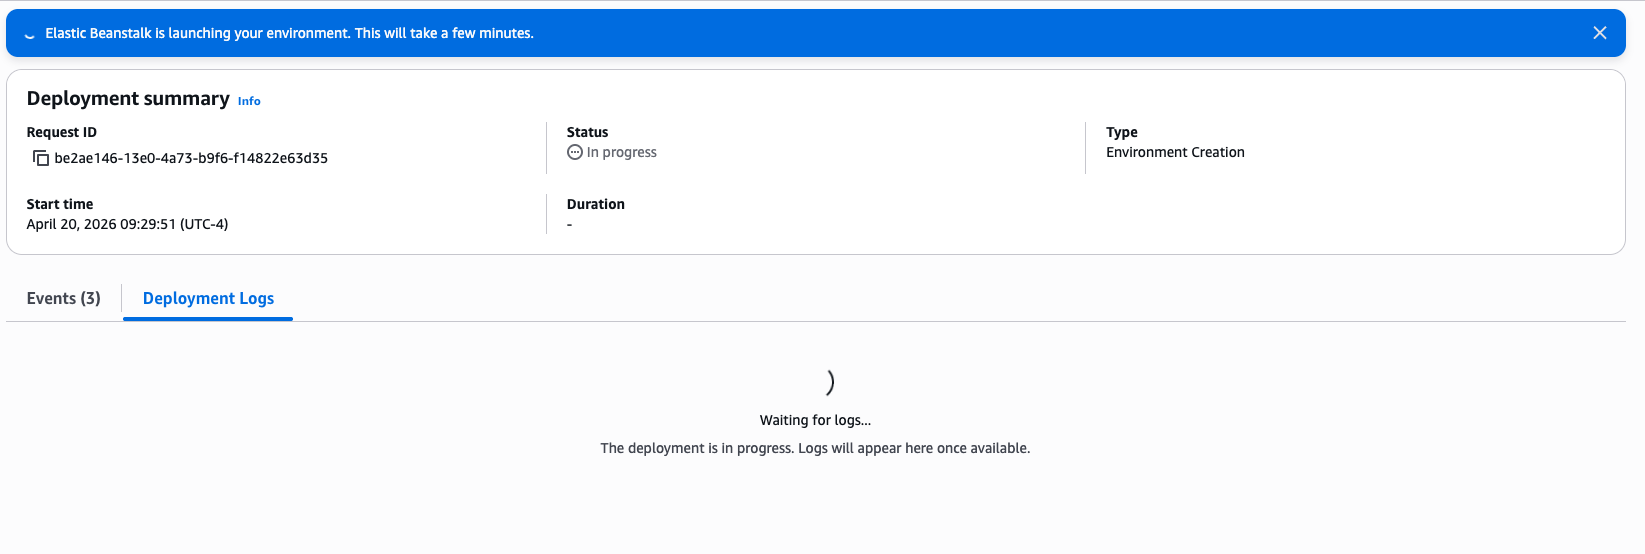
Figure 2 – Deployment Logs tab showing “log not yet available” message during early environment creation
After the environment creation completes, the deployment status changes to Succeeded and the log shows the final state. Because this deployment succeeded, the log contains only summary messages for each step. Take notice of how the log captures each phase of the deployment in order: .ebextensions commands, dependency installation (npm), container commands, and then the application startup. Pay attention to the Application Output section near the end of the log. It shows the initial stdout from your application process, confirming that it started and is listening on the expected port. This section is useful for verifying that your application launched correctly after a deployment.
You can also check the environment status from the CLI:
aws elasticbeanstalk describe-environments \
--environment-names deployments-tab-demo-env \
--query 'Environments[0].{Status:Status,Health:Health}' \
--region us-east-1
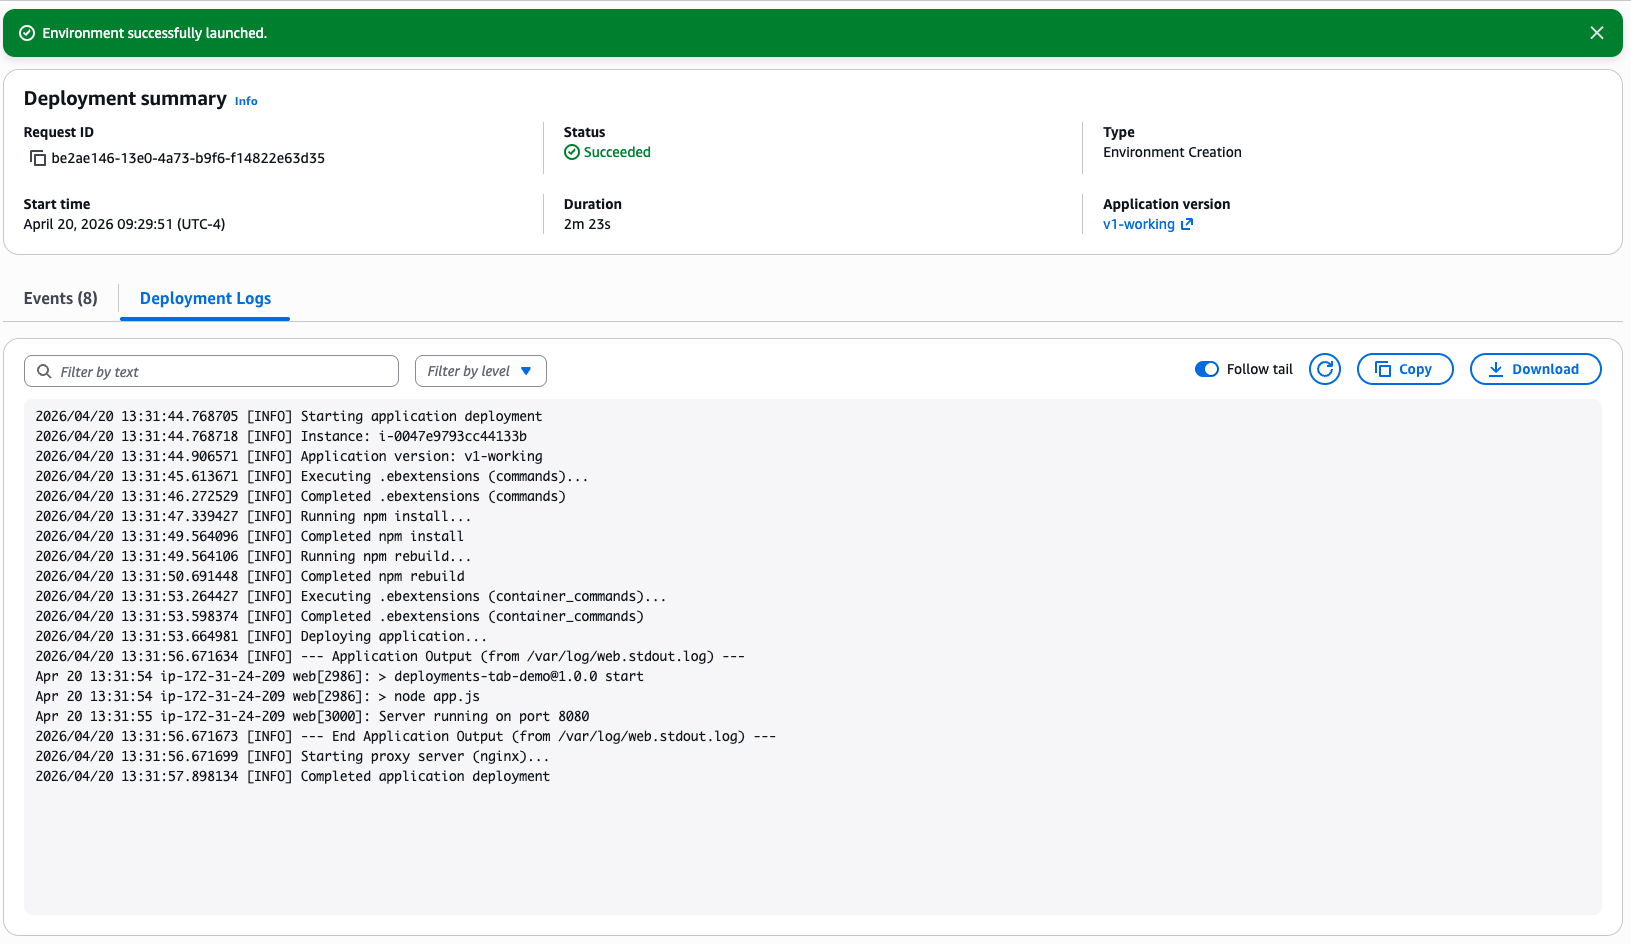
Figure 3 – Deployment detail page showing the completed Deployment Logs tab with successful log output
Step 2: Trigger a configuration update
To see how different deployment types appear in the Deployments tab, add an environment variable to your environment:
aws elasticbeanstalk update-environment \
--environment-name deployments-tab-demo-env \
--option-settings \
Namespace=aws:elasticbeanstalk:application:environment,OptionName=APP_ENV,Value=production \
--region us-east-1
While the update is in progress, go back to the Deployments tab in the console. You should see a second deployment appear in the history with a status of In Progress and a type of Environment Update. Choose the request ID to open the detail page, and select the Deployment Logs tab. The log updates automatically as new entries are written, so you can watch the deployment progress in real time.
After the update completes, the deployment status changes to Succeeded. You now have two deployments in your history, each with its own type and duration.
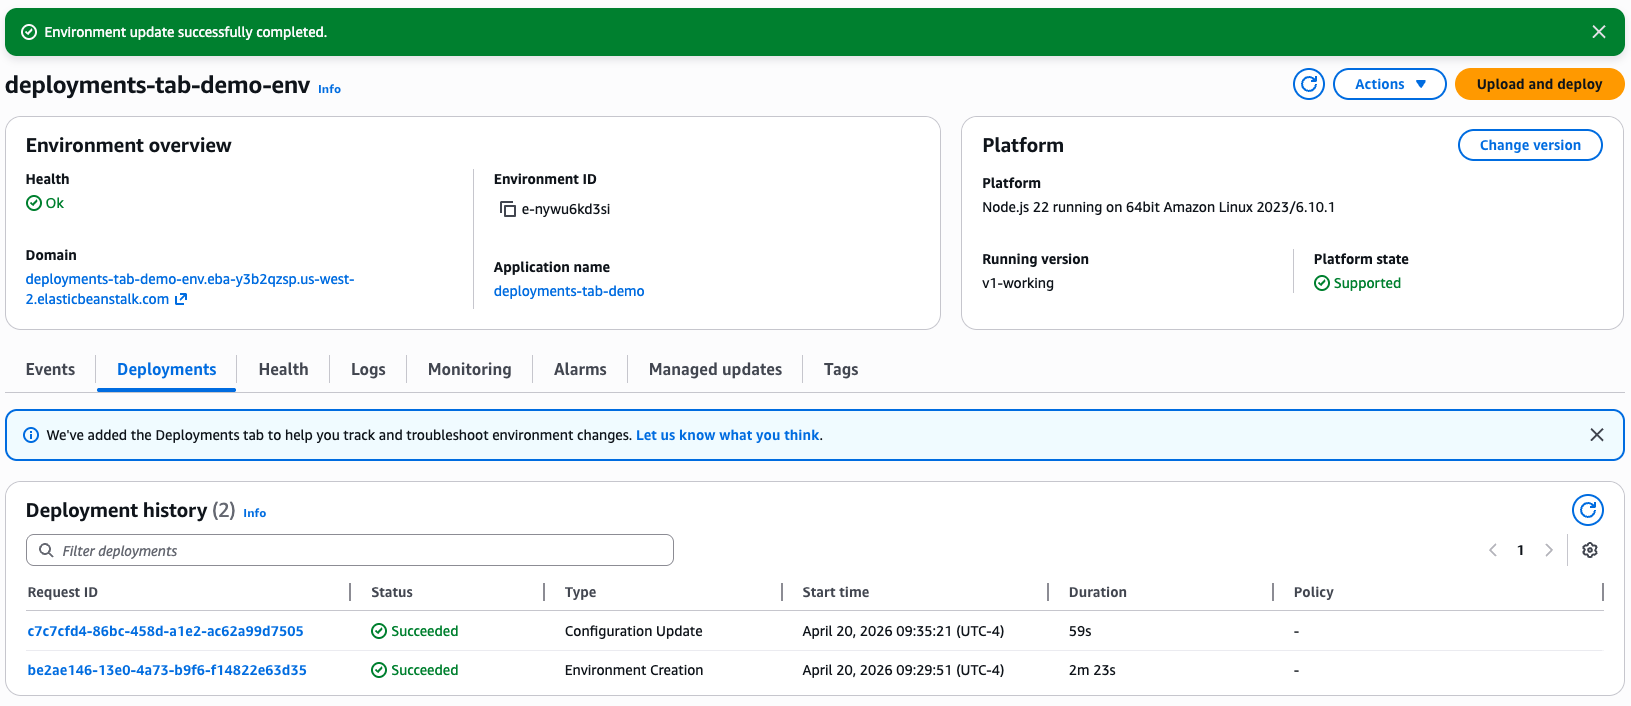
Figure 4 – Deployments tab showing two deployments: Environment Creation and Environment Update
Step 3: Deploy a broken application
This is where the Deployments tab shows its value. Create and deploy a broken application version that references a non-existent npm package:
aws elasticbeanstalk create-application-version \
--application-name deployments-tab-demo \
--version-label v2-broken \
--source-bundle S3Bucket="$S3_BUCKET",S3Key="nodejs-broken-app.zip" \
--region us-east-1

aws elasticbeanstalk update-environment \
--environment-name deployments-tab-demo-env \
--version-label v2-broken \
--region us-east-1
As soon as the deployment starts, go back to the Deployments tab in the console. You should see a new Application Deployment with a status of In Progress. Choose the request ID to open the deployment detail page and select the Deployment Logs tab.
Watch as the log streams in real time. You will see the deployment start, .ebextensions commands run, and then npm install begin. Shortly after, the error appears with the relevant output from the failed step, showing the exact npm error indicating that the package could not be found. The deployment status changes to Failed.
Elastic Beanstalk automatically rolls back to the previous working version, so your environment returns to a healthy state. Without the Deployments tab, diagnosing what went wrong would still require requesting a log bundle, downloading it, extracting it, and searching through the log files. With the Deployments tab, the diagnosis is immediate. There is no need to connect to the instance via SSH or download log bundles. The error is right there in the console.
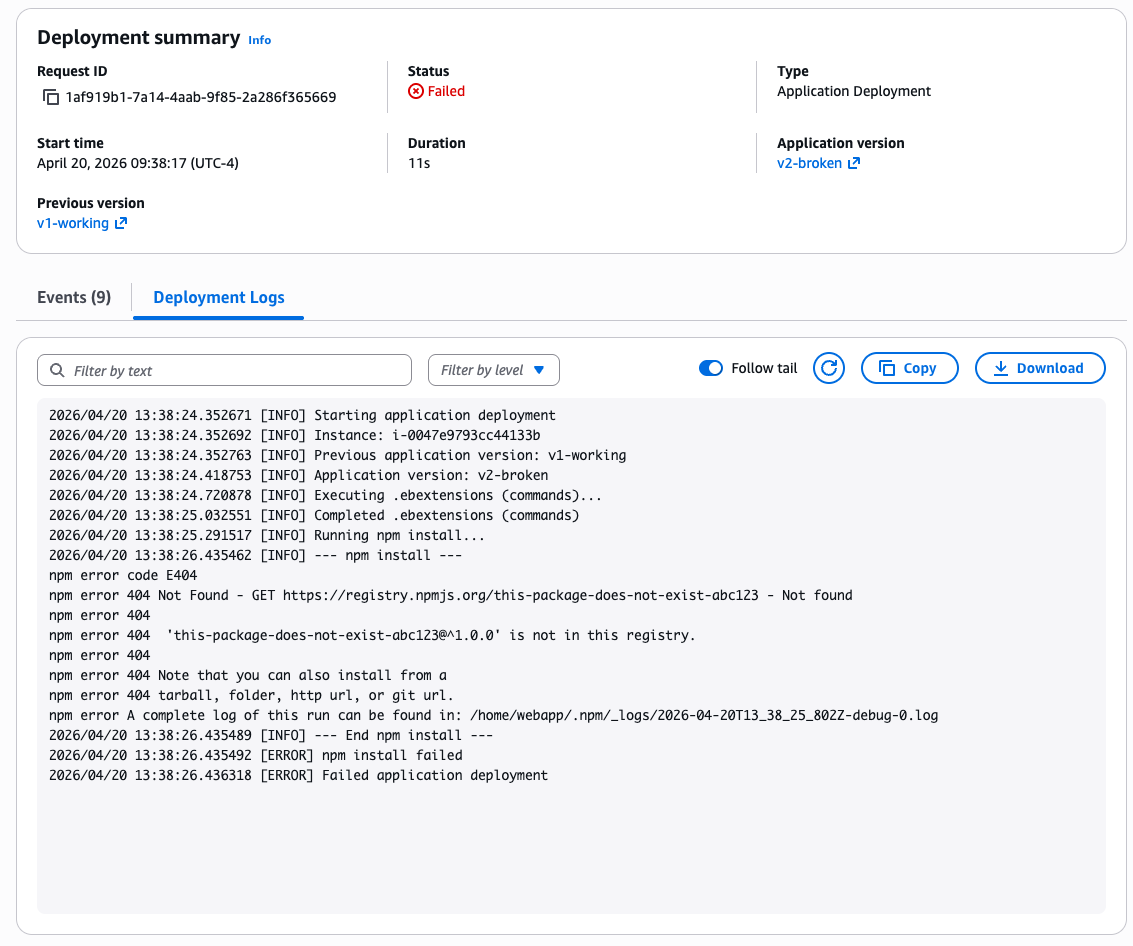
Figure 5 – Deployment detail page showing the failed deployment error and npm install output
Compare this to the successful deployment logs from Step 1. The successful log showed only summary messages. The failed log automatically includes the detailed error output. This smart verbosity means you don’t have to search through verbose logs on success, but you get the detail you need on failure.
Step 4: Deploy a fixed version
Although Elastic Beanstalk rolled back to the working version automatically, let’s deploy it explicitly to see what a successful application deployment log looks like after a failure:
aws elasticbeanstalk update-environment \
--environment-name deployments-tab-demo-env \
--version-label v1-working \
--region us-east-1
After the deployment completes, open the deployment detail page from the Deployments tab. The deployment log shows only summary messages for each step. The npm step completes without errors, the application starts, and the deployment finishes. Compare this to the failed deployment log from Step 3, where the error and detailed npm output appeared automatically.
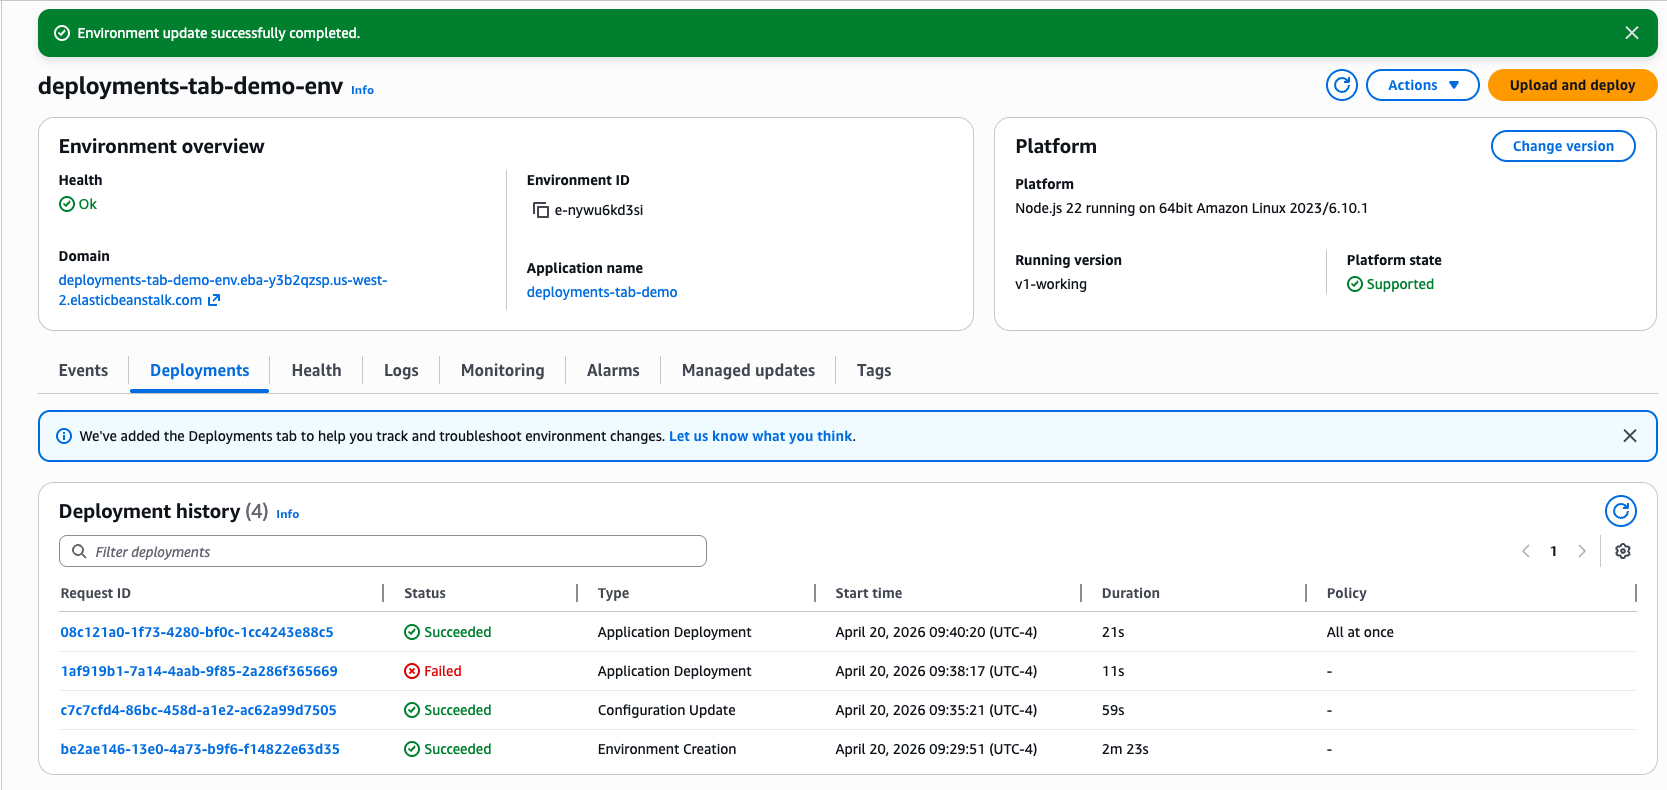
Figure 6 – Deployments tab showing all four deployments with their statuses
Cleaning up
To avoid ongoing charges, terminate the environment and delete the associated resources.
Terminate the environment:
aws elasticbeanstalk terminate-environment \
--environment-name deployments-tab-demo-env \
--region us-east-1
Delete the application (after the environment is terminated):
aws elasticbeanstalk delete-application \
--application-name deployments-tab-demo \
--terminate-env-by-force \
--region us-east-1
Delete the S3 bucket used for source bundles:
aws s3 rb s3://$S3_BUCKET --force --region us-east-1
Remove the local project directory. Before running the following command, make sure your current working directory is not inside deployments-tab-demo:
rm -rf deployments-tab-demo
Conclusion
The Deployments tab in AWS Elastic Beanstalk gives you a single place to view your deployment history and read deployment logs, including while a deployment is still running. When a deployment fails, the log shows you the error output from the failed step directly in the console, so you can identify the root cause without connecting to instances over SSH or downloading log bundles.
Deployment logs are available on Amazon Linux 2 and Amazon Linux 2023 platform versions released on or after March 11, 2026, and on Windows Server platform versions 2.23.0 and later, in all AWS Commercial Regions and AWS GovCloud (US) Regions. To get started, update your environment to a supported platform version and navigate to the Deployments tab in the Elastic Beanstalk console.
To learn more about deployment logs, see Viewing deployment logs in the AWS Elastic Beanstalk Developer Guide. For more information about AWS Elastic Beanstalk, visit the product page.