AWS DevOps & Developer Productivity Blog
Troubleshooting environment with AI analysis in AWS Elastic Beanstalk
Introduction
AWS Elastic Beanstalk simplifies the process of deploying and scaling web applications. You upload your code, and Elastic Beanstalk handles capacity provisioning, load balancing, auto scaling, and application health monitoring.
Elastic Beanstalk now offers AI Analysis to help troubleshoot environment health issues. When you request an analysis, Elastic Beanstalk triggers a script on the Amazon EC2 instance in your environment. The script collects environment events, health data, and instance logs, sends them to Amazon Bedrock for analysis, and uploads the results to Amazon S3. The result is a set of step-by-step troubleshooting recommendations tailored to your environment’s specific issues, helping you reduce mean time to resolution (MTTR).
In the Elastic Beanstalk console, the AI Analysis button appears on the environment overview page when your environment’s health status changes to Warning, Degraded, or Severe. AI analysis is also accessible from the logs page in the console, the AWS CLI, or the EB CLI.
Prerequisites
Before getting started, ensure that you have the following:
- An AWS account with access to AWS Elastic Beanstalk and Amazon Bedrock.
- A supported Elastic Beanstalk platform version – AI analysis is available on Amazon Linux 2 and AL2023 based platform versions released on or after February 16, 2026. Update your environment to a supported platform version if needed.
- Instance profile with required permissions – The managed policies AWSElasticBeanstalkWebTier, AWSElasticBeanstalkWorkerTier, and AWSElasticBeanstalkMulticontainerDocker now include the necessary permissions for AI analysis. Attach one or more of these managed policies to your environment’s instance profile based on your environment tier. If you use a custom instance profile, ensure it includes the following permissions:
bedrock:InvokeModelbedrock:ListFoundationModelselasticbeanstalk:DescribeEventselasticbeanstalk:DescribeEnvironmentHealth
- AWS CLI installed and configured with appropriate permissions. See Installing the AWS CLI.
- Anthropic use case details – AI analysis uses Anthropic Claude models through Amazon Bedrock. Anthropic requires you to submit a one-time use case details form before you can invoke their models. To submit this form, select an Anthropic model from the model catalog in the Amazon Bedrock console, or call the PutUseCaseForModelAccess API. You only need to do this once per AWS account. If you submit the form from the AWS Organizations management account, it automatically covers member accounts in the organization. For more information, see Access Amazon Bedrock foundation models.
- GovCloud Regions – If you are using AWS GovCloud (US) Regions, you must enable access to the latest Anthropic Claude Sonnet and/or Opus model in Amazon Bedrock before using AI analysis. For instructions on enabling model access in GovCloud Regions, see Manage access to Amazon Bedrock foundation models. For information about the latest available Anthropic Claude Sonnet and/or Opus model, see Supported Regions and models for inference profiles.
Solution Overview
In the following sections, we demonstrate how to use AI Analysis to diagnose a Node.js application that fails after a deployment.
- Create a working environment: Deploy a Node.js application to Elastic Beanstalk using the code snippets provided below.
- Break the environment: Update the application with code that requires missing environment variables. This causes the environment health status to transition to Degraded.
- Use AI Analysis: Request an AI Analysis from the Elastic Beanstalk console or the AWS CLI to identify the root cause of the health degradation.
- Apply the fix and verify: Apply the recommendations generated by AI Analysis and confirm that the environment health returns to Ok.
The following figure shows how AI Analysis works:
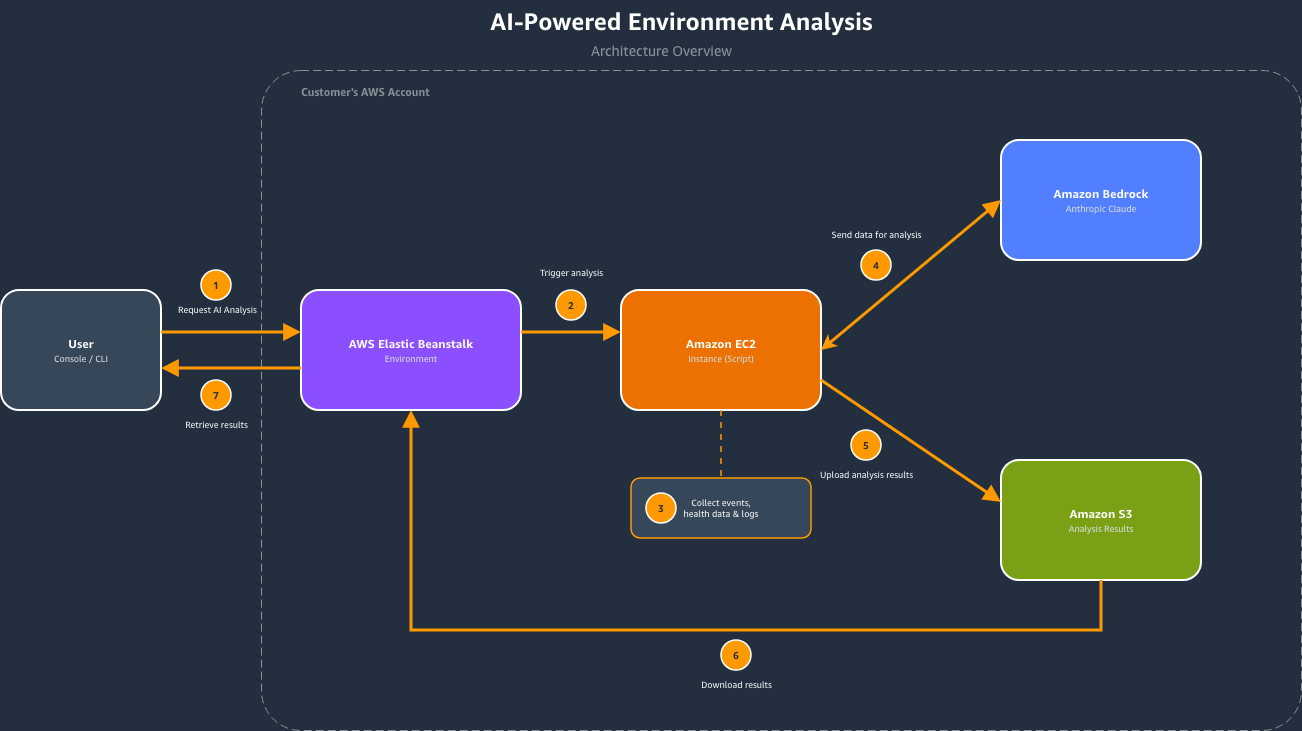
Figure 1 – AI Analysis architecture
- You initiate a request through the Elastic Beanstalk console (AI Analysis button) or the AWS CLI (RequestEnvironmentInfo API with InfoType set to “analyze”).
- Elastic Beanstalk collects environment data, analyzes it using Amazon Bedrock (a fully managed service that provides access to foundation models through API), and stores the results in Amazon S3.
- You retrieve the results through the console or the RetrieveEnvironmentInfo API using CLI.
Walkthrough
Follow the steps below to set up the sample application, break it, troubleshoot with AI Analysis, and restore the environment to a healthy state.
To try this feature, open your terminal and follow the steps below to create a sample Elastic Beanstalk environment. First, set the following variables. Replace the values with your own unique S3 bucket name and the latest Node.js solution stack for your region. To find the latest solution stack, run aws elasticbeanstalk list-available-solution-stacks.
S3_BUCKET="your-unique-bucket-name"

SOLUTION_STACK_NAME="64bit Amazon Linux 2023 v6.9.0 running Node.js 22"
Setting up the application
We use two versions of a simple Node.js application. The first version (v1-working) is a basic HTTP server that responds to requests successfully. The second version (v2-broken) introduces a dependency on environment variables that are not configured in the Elastic Beanstalk environment, simulating a common deployment issue.
Create a project directory:
mkdir test-app && cd test-app
Create the working application file (v1-working):
cat << 'EOF' > workingapp.js
const http = require('http');

const server = http.createServer((req, res) => {
    res.writeHead(200, { 'Content-Type': 'application/json' });
    res.end(JSON.stringify({ status: 'healthy', message: 'App is running' }));
});

const port = process.env.PORT || 8080;
server.listen(port, () => {
    console.log(`Server running on port ${port}`);
});
EOF
Create the broken application file (v2-broken):
cat << 'EOF' > brokenapp.js
const http = require('http');

// Application requires these environment variables to function
const VAR_1 = process.env.TEST_VARIABLE_1;
const VAR_2 = process.env.TEST_VARIABLE_2;
const VAR_3 = process.env.TEST_VARIABLE_3;

if (!VAR_1 || !VAR_2 || !VAR_3) {
    throw new Error(
        `Missing required environment variables. ` +
        `TEST_VARIABLE_1: ${VAR_1 ? 'set' : 'MISSING'}, ` +
        `TEST_VARIABLE_2: ${VAR_2 ? 'set' : 'MISSING'}, ` +
        `TEST_VARIABLE_3: ${VAR_3 ? 'set' : 'MISSING'}`
    );
}

const server = http.createServer((req, res) => {
    res.writeHead(200, { 'Content-Type': 'application/json' });
    res.end(JSON.stringify({ status: 'healthy', db: VAR_1 }));
});

const port = process.env.PORT || 8080;
server.listen(port, () => {
    console.log(`Server running on port ${port}`);
});
EOF
Create the package.json:
cat << 'EOF' > package.json
{
  "name": "test-app",
  "version": "1.0.0",
  "description": "Sample app that requires environment variables",
  "main": "app.js",
  "scripts": {
    "start": "node app.js"
  }
}
EOF
Create the working application source bundle:
cp workingapp.js app.js

zip -r nodejs-working-app.zip app.js package.json
Create the broken application source bundle:
cp brokenapp.js app.js

zip -r nodejs-broken-app.zip app.js package.json
Step 1: Create a working environment
First, create the Elastic Beanstalk application and deploy the working version.
Create an S3 bucket:
aws s3 mb s3://$S3_BUCKET --region us-east-1
Upload the working application source bundle:
aws s3 cp nodejs-working-app.zip s3://$S3_BUCKET/nodejs-working-app.zip
Create the Elastic Beanstalk application:
aws elasticbeanstalk create-application \
    --application-name test-app \
    --description "Test application" \
    --region us-east-1
Create the application version:
aws elasticbeanstalk create-application-version \
    --application-name test-app \
    --version-label v1-working \
    --source-bundle S3Bucket="$S3_BUCKET",S3Key="nodejs-working-app.zip" \
    --region us-east-1
Create the environment with the working version:
aws elasticbeanstalk create-environment \
    --application-name test-app \
    --environment-name test-app-env \
    --solution-stack-name "$SOLUTION_STACK_NAME" \
    --version-label v1-working \
    --option-settings \
        Namespace=aws:elasticbeanstalk:environment,OptionName=EnvironmentType,Value=SingleInstance \
        Namespace=aws:autoscaling:launchconfiguration,OptionName=IamInstanceProfile,Value=aws-elasticbeanstalk-ec2-role \
    --region us-east-1
Once your environment is created, verify the health:
aws elasticbeanstalk describe-environment-health \
    --environment-name test-app-env \
    --attribute-names All \
    --region us-east-1
Output:
{
    "EnvironmentName": "test-app-env",
    "HealthStatus": "Ok",
    "Status": "Ready",
    "Color": "Green",
    "Causes": [
        "Initialization completed 31 seconds ago and took 2 minutes."
    ],
    "ApplicationMetrics": {
        "RequestCount": 0
    },
    "InstancesHealth": {
        "NoData": 0,
        "Unknown": 0,
        "Pending": 0,
        "Ok": 1,
        "Info": 0,
        "Warning": 0,
        "Degraded": 0,
        "Severe": 0
    },
    "RefreshedAt": "2026-03-25T16:39:11Z"
}

Figure 2 – Environment health showing Ok (Green) status after initial deployment
Step 2: Break the environment
Now, deploy the broken version that requires missing environment variables.
Upload the broken version:
aws s3 cp nodejs-broken-app.zip s3://$S3_BUCKET/nodejs-broken-app.zip
Create the broken application version:
aws elasticbeanstalk create-application-version \
    --application-name test-app \
    --version-label v2-broken \
    --source-bundle S3Bucket="$S3_BUCKET",S3Key="nodejs-broken-app.zip" \
    --region us-east-1
Deploy the broken version:
aws elasticbeanstalk update-environment \
    --environment-name test-app-env \
    --version-label v2-broken \
    --region us-east-1
Within seconds of the deployment completing, the environment health transitions from Ok to Degraded:
aws elasticbeanstalk describe-environment-health \
    --environment-name test-app-env \
    --attribute-names All \
    --region us-east-1
Output:
{
    "EnvironmentName": "test-app-env",
    "HealthStatus": "Degraded",
    "Status": "Ready",
    "Color": "Red",
    "Causes": [
        "Impaired services on all instances."
    ],
    "ApplicationMetrics": {
        "RequestCount": 0
    },
    "InstancesHealth": {
        "NoData": 0,
        "Unknown": 0,
        "Pending": 0,
        "Ok": 0,
        "Info": 0,
        "Warning": 0,
        "Degraded": 0,
        "Severe": 1
    },
    "RefreshedAt": "2026-03-25T16:43:19Z"
}

Figure 3 – Environment health showing Degraded (Red) status with the AI Analysis button visible
Step 3: Use AI Analysis
Request AI analysis from the AWS CLI or the Elastic Beanstalk console. Both methods produce the same results. The CLI approach is useful for automation and scripting, while the console provides a visual workflow where you can view results directly on the environment page. We’ll cover both options below.
Using the AWS CLI
Request the analysis:
aws elasticbeanstalk request-environment-info \
    --environment-name test-app-env \
    --info-type analyze \
    --region us-east-1
Once the request environment operation is completed, retrieve the results:
aws elasticbeanstalk retrieve-environment-info \
    --environment-name test-app-env \
    --info-type analyze \
    --region us-east-1
The response includes an EnvironmentInfo array with a Message field containing a pre-signed S3 URL to the analysis results:
{
    "EnvironmentInfo": [
        {
            "InfoType": "analyze",
            "Ec2InstanceId": "i-1234567890abcdef0",
            "SampleTimestamp": "2026-03-20T20:49:22.763Z",
            "Message": "https://elasticbeanstalk-us-east-1-123456789012.s3.us-east-1.amazonaws.com/resources/environments/logs/analyze/..."
        }
    ]
}
Download and view the analysis:
ANALYSIS_URL=$(aws elasticbeanstalk retrieve-environment-info \
    --environment-name test-app-env \
    --info-type analyze \
    --region us-east-1 \
    --query 'sort_by(EnvironmentInfo, &SampleTimestamp)[-1].Message' \
    --output text)

curl -s "$ANALYSIS_URL"
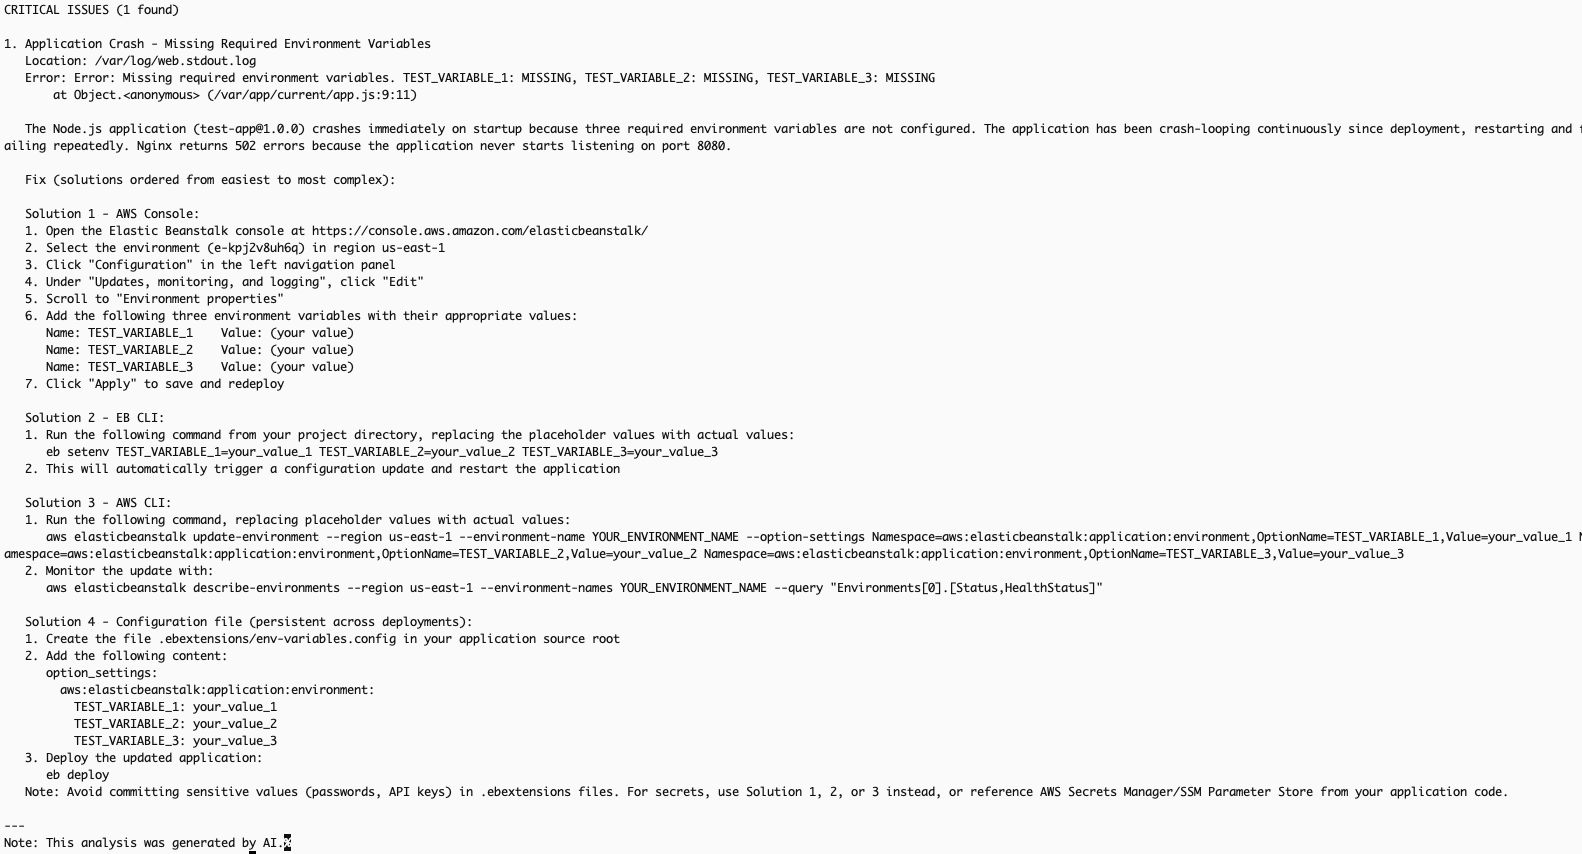
Figure 4 – AI analysis output retrieved via AWS CLI
Using the Elastic Beanstalk console
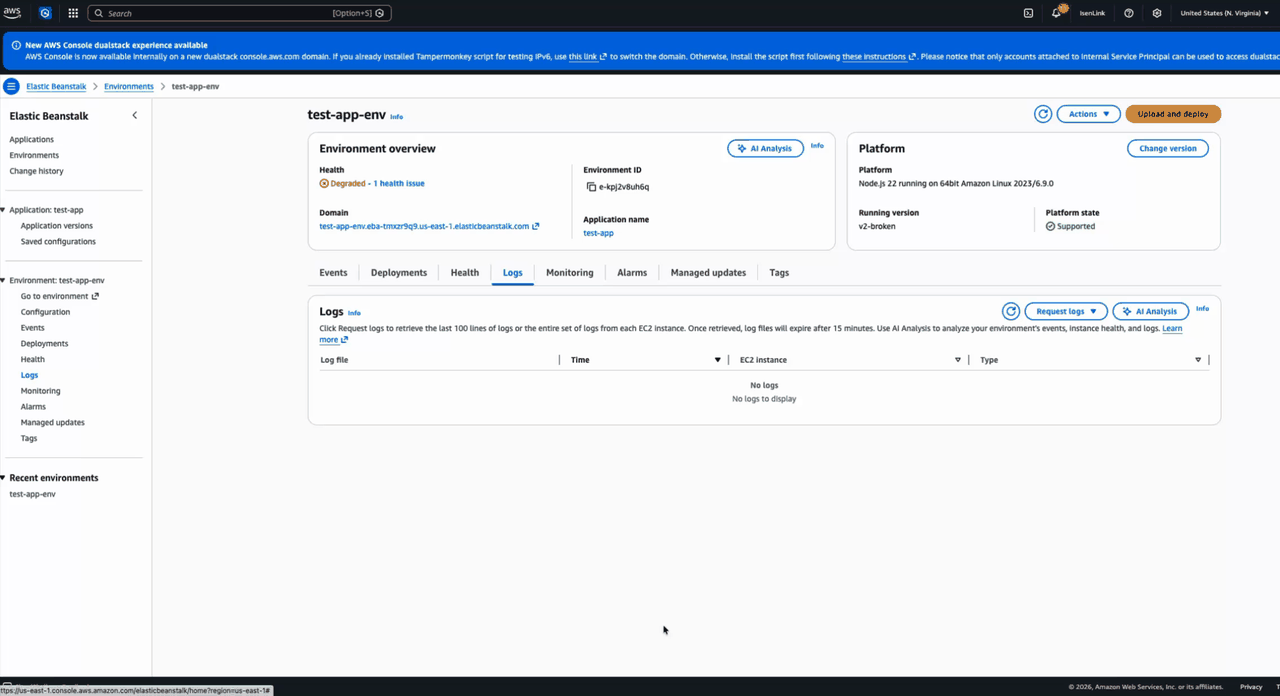
When your environment’s health status is Warning, Degraded, or Severe, the AI Analysis button appears in the environment overview section of the Elastic Beanstalk console.
- Navigate to the Elastic Beanstalk console.
- Select your environment (test-app-env).
- On the environment overview page, locate the AI Analysis button that appears when the health status indicates an issue.
- Choose AI Analysis to initiate the analysis.
Video 1 – Requesting AI analysis from the Elastic Beanstalk console
If you want to restart the analysis workflow, you can click on the Reanalyze button to start a new analysis.
Step 4: Apply the fix and verify
The AI analysis identified that the application crashes because the environment does not have three required environment variables configured: TEST_VARIABLE_1, TEST_VARIABLE_2, and TEST_VARIABLE_3. As recommended by the AI analysis, set these environment variables to resolve the issue:
aws elasticbeanstalk update-environment \
    --environment-name test-app-env \
    --option-settings \
        Namespace=aws:elasticbeanstalk:application:environment,OptionName=TEST_VARIABLE_1,Value=value1 \
        Namespace=aws:elasticbeanstalk:application:environment,OptionName=TEST_VARIABLE_2,Value=value2 \
        Namespace=aws:elasticbeanstalk:application:environment,OptionName=TEST_VARIABLE_3,Value=value3 \
    --region us-east-1
After the environment update completes, the application starts successfully and the environment health returns to Ok:
aws elasticbeanstalk describe-environment-health \
    --environment-name test-app-env \
    --attribute-names All \
    --region us-east-1
Output:
{
    "EnvironmentName": "test-app-env",
    "HealthStatus": "Ok",
    "Status": "Ready",
    "Color": "Green",
    "Causes": [
        "Configuration update completed 72 seconds ago and took 54 seconds."
    ],
    "ApplicationMetrics": {
        "RequestCount": 0
    },
    "InstancesHealth": {
        "NoData": 0,
        "Unknown": 0,
        "Pending": 0,
        "Ok": 1,
        "Info": 0,
        "Warning": 0,
        "Degraded": 0,
        "Severe": 0
    },
    "RefreshedAt": "2026-03-25T17:42:47Z"
}

Figure 5 – Environment health restored to Ok (Green) after setting environment variables
Note: The steps in this walkthrough can also be performed using the EB CLI. For more information, see the EB CLI Command Reference.
Best practices
Consider these recommendations to get the most out of AI analysis for your environments.
- Use supported platform versions: Ensure your environment is running an Amazon Linux 2 or AL2023 platform version released on or after February 16, 2026. Update your platform if you don’t see the AI Analysis option.
- Implement fixes incrementally: If the analysis recommends multiple actions, implement them one at a time to isolate which change resolves the issue.
- Review data privacy considerations: The analysis sends environment events and logs to Amazon Bedrock running in your account. For more information about how Amazon Bedrock handles your data, see the Amazon Bedrock security documentation.
Cleaning up
Terminate the environment:
aws elasticbeanstalk terminate-environment \
    --environment-name test-app-env \
    --region us-east-1
Delete the application (after the environment is terminated):
aws elasticbeanstalk delete-application \
    --application-name test-app \
    --terminate-env-by-force \
    --region us-east-1
Delete the S3 bucket used for source bundles:
aws s3 rb s3://$S3_BUCKET --force --region us-east-1
Remove the local project directory:
rm -rf test-app
Conclusion
AI-powered environment analysis in AWS Elastic Beanstalk significantly reduces the time and effort required to diagnose environment health issues. Instead of manually parsing through log files and cross-referencing documentation, you can now get targeted, actionable recommendations with a click of the AI Analysis button in the console or an API call.
Whether you prefer using the Elastic Beanstalk console for visual workflows or the AWS CLI/EB CLI for scripting and automation, AI analysis provides a consistent experience that helps you quickly identify root causes and resolve issues.
To learn more about AI-powered environment analysis, see the AWS Elastic Beanstalk Developer Guide. To learn more about AWS Elastic Beanstalk, visit the product page.