AWS for M&E Blog
Distribute NDI content from AWS with AWS Elemental MediaConnect
The secure and reliable egress of live NDI® (Network Device Interface) video content from the Amazon Web Services (AWS) Cloud has previously been a challenge for our customers. With the addition of NDI source support in AWS Elemental MediaConnect, you can now take live NDI video within an AWS Virtual Private Cloud (Amazon VPC) and seamlessly distribute it as a transport stream.
NDI is a high-quality video connectivity technology that facilitates ultra-low latency video communication over internet protocol (IP). NDI is widely used in live production applications and supported by more than 500 hardware products and 400 software applications. Systems use NDI to encode, transmit, and receive multiple streams of video and audio in near real-time.
The new AWS Elemental MediaConnect functionality that converts NDI sources to Secure Reliable Transport (SRT) or other compressed stream outputs provides an efficient way to bridge NDI with modern, transport stream-based distribution tools. Broadcasters and live production teams can use this capability to seamlessly integrate the flexibility of NDI-based production environments into their existing, standards-based distribution workflows.
In this post, we show you how to build a demonstration of low-latency live NDI video conversion to a transport stream in the AWS Cloud with MediaConnect. You will:
- Create an Amazon Virtual Private Cloud (Amazon VPC).
- Create a MediaConnect flow with an NDI source in the Amazon VPC.
- Create an Amazon Elemental MediaLive channel to receive MediaConnect output.
- Create a MediaConnect output to MediaLive.
- Create an Amazon Elemental MediaPackage output group to receive from MediaLive.
- Create a Windows Amazon Elastic Compute Cloud (Amazon EC2) instance in the Amazon VPC, install NDI Tools, an NDI Discovery Server and NDI Signal Generator.
- Use the NDI Signal Generator to stream video and audio data over NDI in the Amazon VPC to MediaConnect.
MediaConnect is a transport service that enables secure and reliable delivery of live video into, within, and out of the AWS Cloud. Using MediaConnect, you can send high-quality video to AWS for processing, storage, and distribution, with features including encryption, redundancy, and bandwidth-efficient protocols for reliable video transport.
The following diagram (Figure 1) shows how you can use the NDI Signal Generator to stream content over NDI in an Amazon VPC in the AWS Cloud. A Windows EC2 instance in the Amazon VPC, running NDI Tools Discovery Server, delivers the NDI content to MediaConnect. MediaConnect converts the NDI content to a transport stream output to MediaLive. MediaLive transcodes and sends the stream to MediaPackage. You can then use the MediaPackage console to view the transcoded media through the MediaPackage origin endpoint.
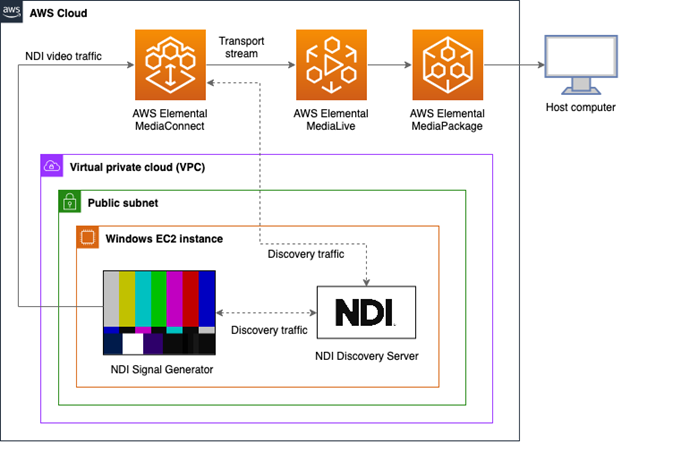
Figure 1: High-level architecture
The workflow
Within your private Amazon VPC, a public subnet hosts a Windows EC2 instance running the NDI Discovery Server and NDI Signal Generator. The NDI Signal Generator application acts as the NDI sender, outputting an NDI stream to a MediaConnect flow. A dedicated VPC interface handles MediaConnect NDI ingress traffic privately within the VPC. MediaConnect then converts the NDI feed to a transport stream for distribution through MediaLive and MediaPackage.
The AWS resources to enable this workflow are set up using AWS CloudFormation templates. CloudFormation is an infrastructure as code (IaC) service. Templates let you model, provision, and manage AWS and third-party resources as code. For more information about using CloudFormation templates, see Working with CloudFormation templates.
Prerequisites
To set up the solution in this post, you must have the following:
- An AWS account that has permission to create a GPU instance, which isn’t enabled by default.
- A service quota of at least four vCPUs for running on-demand G and VT instances to support a four vCPU g4dn.xlarge EC2 instance. To check your quota, use the EC2 Service Quota console.
This workflow is for demonstration purposes. For production workflows, apply additional security measures (such as permissions and CIDR blocks) for your specific environment.
The solution
With the prerequisites in place, you’re ready to set up and test the solution.
Step 1. Create the AWS Cloud resources
Deploy the AWS resources from a system that contains the AWS Command Line (AWS CLI) tools. Confirm the AWS account credentials and default AWS Region are set up.
1. Download the CloudFormation templates and scripts.
2. Create an Amazon Simple Storage Service (Amazon S3) bucket in your AWS account to store the CloudFormation template files.
3. To create the AWS Cloud resources, create a CloudFormation stack using the following command (be certain to replace the values in this bulleted list accordingly):
- <S3_BUCKET_NAME>: The name of your S3 bucket.
- <S3_FOLDER>: The name of the folder to create within the S3 bucket.
- <STACK_NAME>: The name of the stack to create.
- <PREFIX>: The prefix for new AWS resource names.
- <RDP_CIDR_BLOCK>: The CIDR block for the IP range for remote desktop access to the EC2 instance.
- (Optional) <IAM_PROFILE>: The AWS Identity and Access Management (IAM) profile to use instead of default AWS credentials. Default credentials require a region. Note, the
.aws/credentialsfile must contain the profile and default Region.
Linux command:
Windows PowerShell command:
4. If the process completes successfully, the script outputs the following information:
- FlowArn is the Amazon Resource Name (ARN) of the MediaConnect flow.
- The name of the EC2 instance keypair’s
PEMfile written to your current folder. The file is used in the next section.
Step 2. Install NVIDIA driver on the Windows EC2 instance
The NDI Studio Monitor application requires a GPU instance and a specific set of NVIDIA drivers. The CloudFormation template creates the GPU instance and downloads the NVIDIA driver installer application to the desktop. The application requires manual intervention to install the driver. Use the following to install the driver:
1. Retrieve the Administrator password for the instance using the PEM file from Step 1.
2. Sign in to the instance.
3. Navigate to the desktop and open the NVIDIA folder.
4. Continue to open the subfolders until you locate the installation executable file. The following is an example of the name:
XXX.XX_Cloud_Gaming_win10_win11_server2022_dch_64bit_international.exe
5. Open the file to launch it.
6. Follow the prompts to install.
Step 3. Install NDI Tools and launch the NDI Discovery Server
NDI distributes a set of tools that are free to download and use.
1. Download and install NDI Tools.
2. Launch the Discovery Server application from:
C:\Program Files\NDI\NDI 6 Tools\Discovery Service\NDI Discovery Service.exe
3. The server runs using a shell to display the output.
4. (Optional) To automatically launch the Discovery Server on system restarts, create a program shortcut and move it to:
C:\Users\Administrator\AppData\Roaming\Microsoft\Windows\Start Menu\Programs\Startup
Step 4. Configure NDI Discovery Server
Use NDI Tool’s Access Manager to configure the Discovery Server IP address, as shown in Figure 2, replacing XXX.XXX.XXX.XXX with the Private IP address of the Windows EC2 instance. Because the Discovery Server is on the instance, you can optionally specify the localhost instead of the IP address.
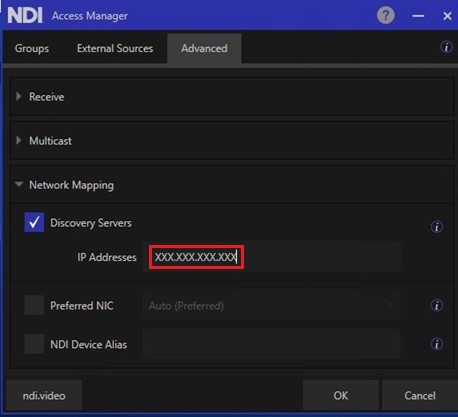
Figure 2: Set Discovery Server IP address using NDI Access Manager
Step 5. Install NDI Signal Generator on the Windows EC2 instance and create NDI source
1. Download and install an NDI Signal Generator application on the Windows instance.
2. Add an inbound rule to the Windows firewall to allow the NDI Signal Generator application to receive network traffic. You can add the rule using the Windows Defender Firewall with Advanced Security application, or by running the following command using an administrator command prompt:
3. Launch the application.
4. Start the NDI source. Note the NDI Channel Name. It will be used in the next step as the NDI source name.
Step 6. Set the NDI source name and start the MediaConnect flow (console)
1. Open the AWS Elemental MediaConnect console.
2. Navigate to Flows and select the <PREFIX>Flow flow.
3. Under the Sources tab, select the NDI source.
4. Choose Update and enter the name of the NDI source from the previous step. It should be something like EC2AMAZ-XXXXXXX (SIGNAL).
5. Choose Update source.
6. Choose Start to start the flow.
7. After the flow starts, the stream from the NDI Signal Generator application is visible in the flow’s thumbnail preview window.
Step 7. Start the MediaLive channel (console)
1. Open the AWS Elemental MediaLive console.
2. Navigate to Channels and select the <PREFIX>LiveChannel channel.
3. Choose Start.
4. After the channel starts, the stream from the MediaConnect is visible in the channel’s thumbnail preview window.
Step 8. Use MediaPackage to preview the stream
1. Open the AWS Elemental MediaPackage console.
2. Navigate to Live V2, Channel groups and select the <PREFIX>Group channel group.
3. On the Channels tab, select the <PREFIX>Channel channel.
4. Under Origin endpoints, choose the radio button for the endpoint.
5. Under Manifests, choose the radio button for the manifest.
6. Under Manifests, select Preview. The stream from MediaPackage is visible in the console window.
Clean up
To prevent charges after evaluating this solution, stop the flow and delete all the AWS resources created for the solution by using the following command (replace the values in this bulleted list accordingly):
- <STACK_NAME>: The name of the stack to delete.
- (Optional) <IAM_PROFILE>: The IAM Profile to use instead of default AWS credentials. Default credentials require a region. Note, the
.aws/credentialsfile must contain the profile and default region.
Linux command:
./delete_stack.sh <STACK_NAME> <IAM_PROFILE>
Windows PowerShell command:
.\delete_stack.ps1 <STACK_NAME> <IAM_PROFILE>
Verify that the AWS resources created for the solution no longer exist by checking the AWS console. This confirms no resources are accidentally left running, which could lead to additional charges.
Conclusion
In this post, you learned how to use AWS Elemental MediaConnect to convert an NDI source within an Amazon VPC into a transport stream and distribute it through MediaLive and MediaPackage. This facilitates communication between NDI enabled software and modern IP based live cloud production workflows.
Contact an AWS representative to learn how AWS can help accelerate your business.
Further reading
- AWS Elemental MediaConnect adds support for NDI inputs
- Guidance for Programmatic Deployment of NDI Discovery Servers for Broadcast Workflows on AWS
- Using NDI for video switching and routing in AWS
- AWS supports the second multi-partner live cloud production interoperability workshop
- NDI Docs & Guides