AWS for M&E Blog
Secure token generation for Amazon IVS Real-Time Streaming with AWS WAF
When building real-time audio and video applications, you often need to constrain where your streams can be watched from, and which websites are allowed to embed them.
Amazon Interactive Video Service (IVS) Real-Time Streaming gives you everything you need to add real-time audio and video to your applications. It supports use cases like virtual events, live auctions, and collaborative applications where multiple hosts and thousands of viewers need to interact in real time. Access to IVS Real-Time stages is controlled through participant tokens: short-lived JSON Web Tokens (JWTs) that determine who can join and what capabilities they have (publish, subscribe, or both).
To restrict a Real-Time stage by country and origin, you can enforce those rules at the point where a participant token is issued. Every participant needs a token to join a stage, so the token-issuing endpoint is the natural place to decide who receives one. AWS WAF can evaluate the caller’s country and the request’s Origin header before the request ever reaches your signing logic.
This post shows how to build that token-issuing service with AWS WAF, Amazon API Gateway, AWS Lambda, and AWS Secrets Manager, signing tokens server-side with a cryptographic key pair. We deploy the solution using AWS CloudFormation. This architecture provides several advantages:
- Key-based JWT signing with Secrets Manager: Your private key remains secured in AWS Secrets Manager with encryption at rest and IAM-controlled access, accessible only to your Lambda function. This design removes the need to expose AWS credentials to your application layer.
- End-to-end serverless solution: AWS Lambda and API Gateway handle JWT signing, API request routing, and scaling without requiring you to manage infrastructure.
- Country and origin filtering with WAF: AWS WAF checks the caller’s country and the request’s Origin header before API Gateway invokes the Lambda function. Requests from outside your allowed countries, or from a website you have not approved, never reach your signing logic. This filtering also reduces compute costs.
- Short-lived TTL controls: You set the token’s time-to-live (TTL) in your own signing logic, so tokens can expire in seconds or minutes rather than days. This shrinks the window for reuse or replay if a token is intercepted.
Solution overview
Figure 1 shows the architecture for this solution.
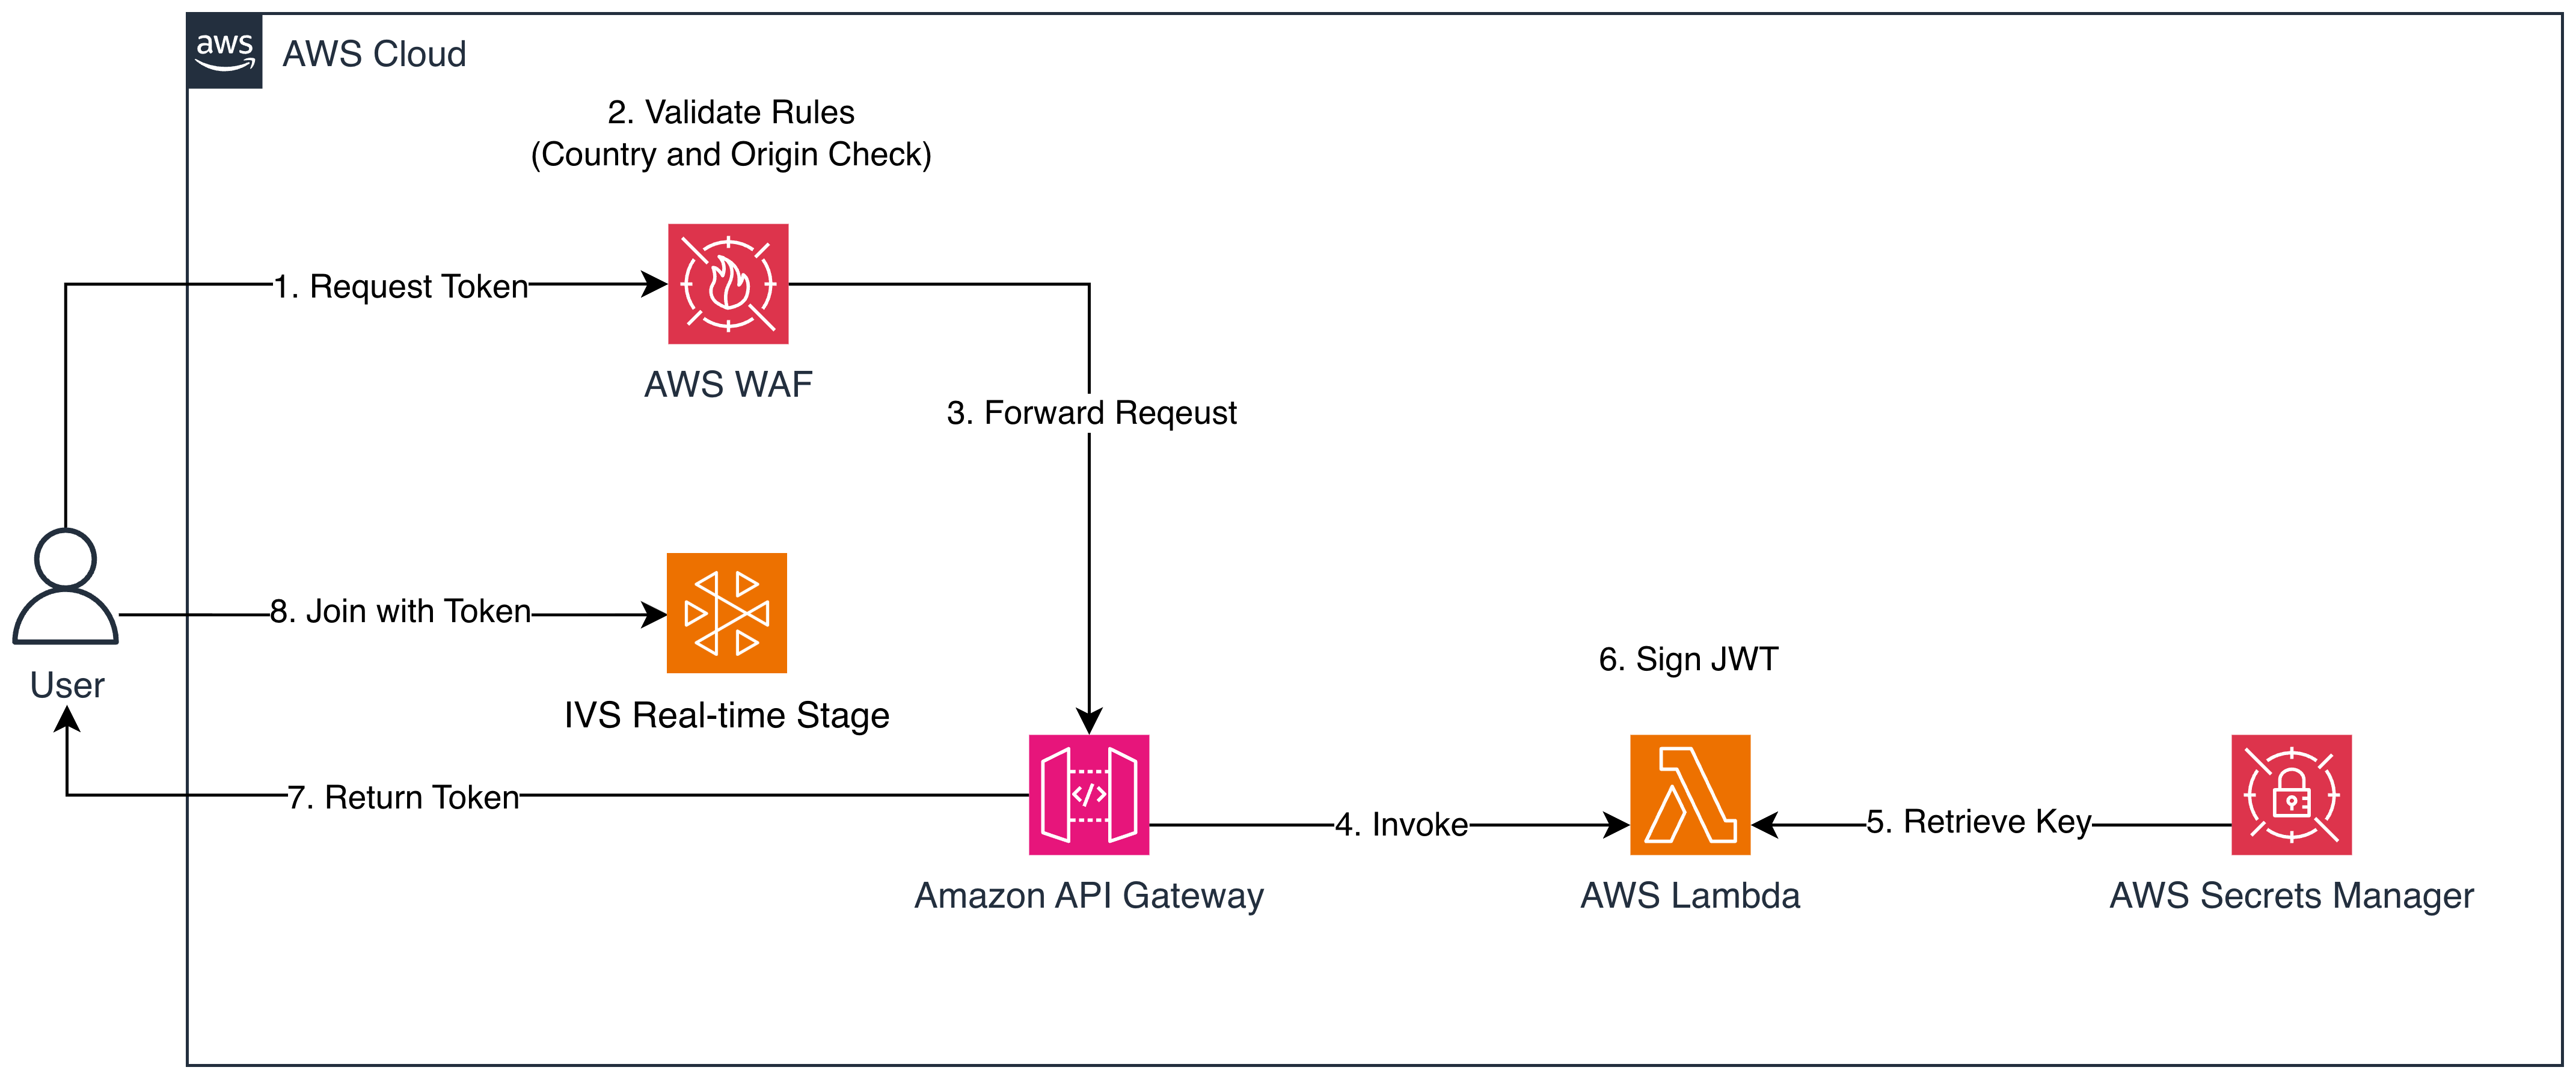
Figure 1: Request flow for the token-issuing architecture
When a user requests a token, the request flows through the following steps:
- Request token – The browser sends a POST request with the Origin header to AWS WAF.
- Validate rules (country and origin check) – AWS WAF checks that both the country code and origin match configured values, blocking unauthorized requests without consuming Lambda resources.
- Forward request – Valid requests are forwarded to API Gateway.
- Invoke – API Gateway invokes the token generator Lambda function.
- Retrieve key – Lambda fetches the private signing key from Secrets Manager (secured with encryption and IAM access controls).
- Sign JWT – Lambda retrieves the stage’s endpoints from the IVS API and creates a JWT signed with your private key. The token grants subscribe-only access and has a customizable expiration time (TTL), from seconds for testing to hours for extended sessions.
- Return token – API Gateway returns the signed token to the user’s browser with cross-origin resource sharing (CORS) headers.
- Join with token – The user connects to the IVS Real-Time stage using the token, where Amazon IVS validates the signature using the registered public key before granting access.
Scope of the country and origin checks
These controls protect the token-issuing endpoint, not the IVS stage itself. AWS WAF determines the request’s country from its source IP address and compares the Origin header with the configured allow list. The origin rule limits which website can request a token: AWS WAF blocks any request whose Origin header is not on the allow list.
Country and origin checks are request-filtering controls, not authentication. Users can route traffic through a VPN or proxy, and non-browser clients can supply an arbitrary Origin header. After a token is issued, these checks also do not prevent it from being shared or reused before it expires.
For production workloads, authenticate callers, authorize token capabilities based on their verified identity, keep token lifetimes short, and use AWS WAF rate-based rules to limit token requests.
Prerequisites
Before you begin, make sure you have the following:
- An AWS account.
- An AWS identity with sufficient permissions to deploy Lambda, API Gateway, Secrets Manager, WAF, and CloudFormation resources.
- An existing Amazon IVS Real-Time Streaming stage. For more information, refer to Creating a stage.
- Node.js 24.x or later installed locally for packaging the Lambda function.
Walkthrough
In this section, we walk you through the steps to deploy the secure token generation system. The walkthrough follows these high-level steps:
- Set up key pair (generate and import to IVS).
- Prepare the Lambda deployment package.
- Deploy the CloudFormation stack.
- Set the private key in Secrets Manager.
- Upload the Lambda function code.
- Get your API endpoint.
- Configure and run the player locally.
- Test token generation with the player.
- Verify security controls.
Complete the steps in the following sections.
Step 1: Set up key pair
To sign tokens securely, you need a public/private key pair. You store the private key in AWS Secrets Manager for Lambda to sign tokens, and you register the public key with Amazon IVS to verify token authenticity when participants join your stage. You have two options for creating the key pair:
Option A: Create with the console (recommended)
Create the key pair through the Amazon IVS console:
- Open the Amazon IVS console and choose your stage’s region.
- In the left navigation menu, choose Real-time streaming > Public keys.
- Choose Create public key.
- Follow the prompts and choose Create.
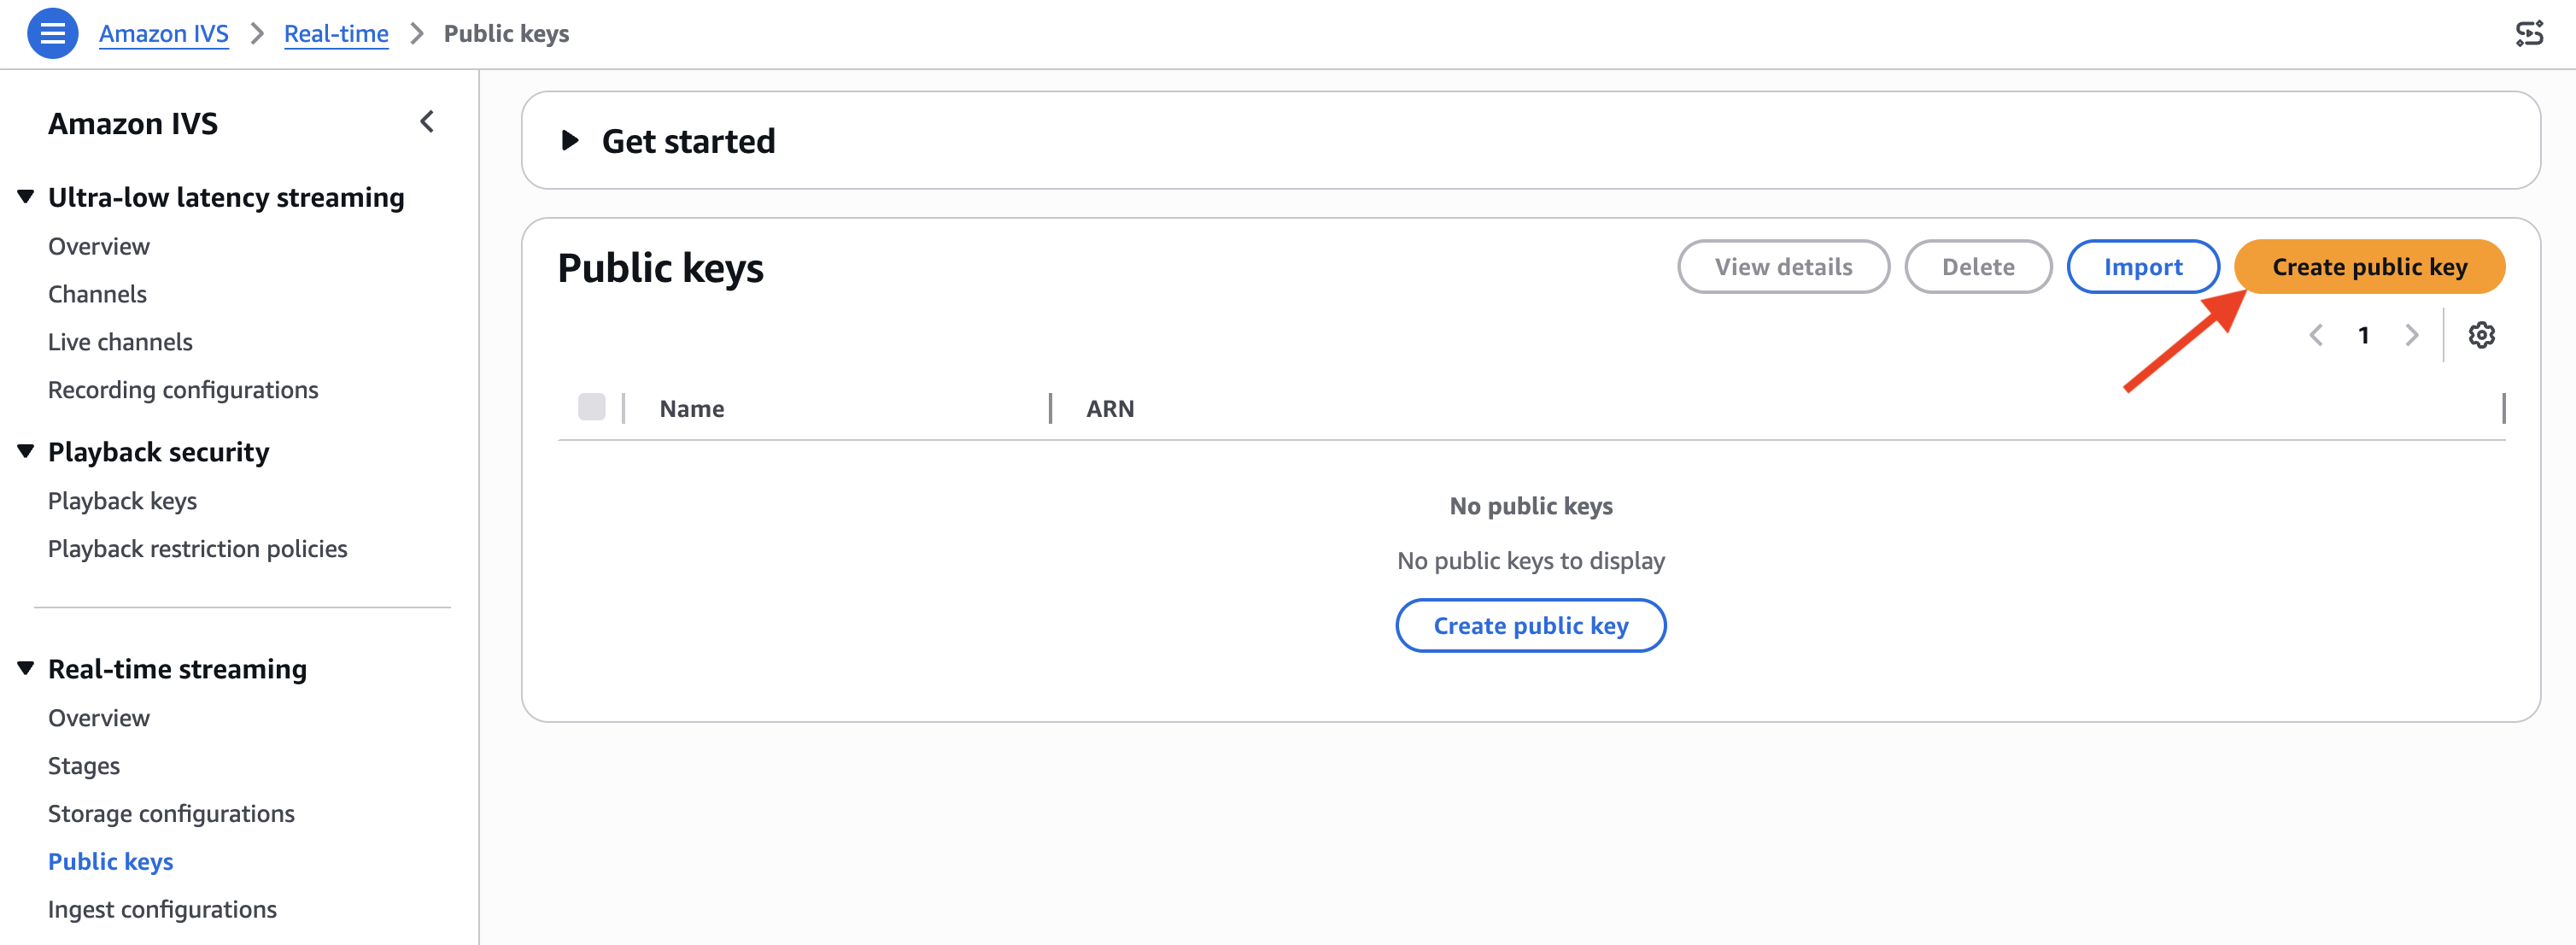
Figure 2: Creating a public key in the Amazon IVS console
Amazon IVS generates a new key pair. The public key is imported as a public key resource and the private key is immediately made available for download.
Important: Amazon IVS generates the key on the client side and does not store the private key. Make sure you save the key. You cannot retrieve it later.
Save the entire response:
- The public key’s Amazon Resource Name (ARN) is used in the CloudFormation
PublicKeyArnparameter (Step 3). - The private key content is stored in Secrets Manager (Step 4).
Option B: Create with OpenSSL and import
Alternatively, you can generate a key pair locally using OpenSSL and import the public key to Amazon IVS Real-Time Streaming using the AWS Command Line Interface (AWS CLI) ivs-realtime import-public-key command. This approach gives you full control over key generation.
Save the ARN from the import response for CloudFormation deployment (Step 3) and keep your private key secure for Secrets Manager setup (Step 4).
For more information, refer to Distribute Participant Tokens.
Step 2: Prepare the Lambda deployment package
Navigate to your project’s lambda directory and install dependencies:
npm ci installs the exact versions recorded in package-lock.json, so the deployment package is reproducible.
Create a deployment package:
The function.zip file is now ready for upload to Lambda.
Step 3: Deploy the CloudFormation stack
Navigate to the AWS CloudFormation console and choose Create stack.
Choose Upload a template file, select the infrastructure/template.yaml file from your project, and choose Next.
Configure the stack parameters:
- Stack name:
ivs-token-generator-key. - StageArn: Your IVS stage ARN (for example,
arn:aws:ivs:us-east-1:123456789012:stage/AbCdEfGhIjKl). - PublicKeyArn: The ARN from Step 1 (for example,
arn:aws:ivs:us-east-1:123456789012:public-key/AbCdEfGhIjKl). - AllowedOrigins:
http://localhost:3000(or your application’s origin). - AllowedCountry:
HK(two-letter ISO code for the country you are testing from).
Choose Next, then Next again. On the review page, check I acknowledge that AWS CloudFormation might create IAM resources, then choose Submit.
The stack deployment takes approximately 2-3 minutes. Wait for the status to change to CREATE_COMPLETE.
Step 4: Set private key in Secrets Manager
After the CloudFormation stack is created, you need to manually populate the private key in AWS Secrets Manager:
- Navigate to the AWS Secrets Manager console.
- Find and select the secret named
ivs-realtime-private-key. - Choose Retrieve secret value, then choose Edit.
- Replace the placeholder text with your private key from Step 1:
- If you created the key through the IVS console: Paste the entire
privateKeyMaterialcontent. - If you used OpenSSL: Paste the entire contents of your
priv.pemfile. - Make sure you include the PEM header and footer lines.
- If you created the key through the IVS console: Paste the entire
- Choose Save.
The Lambda function can now retrieve and use this private key to sign tokens.
Step 5: Upload Lambda function code
The CloudFormation stack creates the Lambda function with placeholder code. Now upload your actual implementation:
- Navigate to the AWS Lambda console and choose the
IVSTokenGeneratorKeyfunction. - Choose Upload from → .zip file.
- Select the
function.zipfile you created in Step 2. - Choose Save.
Verify the environment variables are correctly set:
- Navigate to Configuration → Environment variables.
- Confirm
STAGE_ARN,PUBLIC_KEY_ARN, andSECRET_NAMEare present.
Step 6: Get your API endpoint
Return to the AWS CloudFormation console, select your stack, and choose the Outputs tab. Copy the ApiEndpoint value.
Step 7: Configure and run the player
Update the API endpoint in your player code. Open player/player.js and replace line 27 with your API endpoint from Step 6:
Start a local web server to serve the player. Navigate to the player directory and run:
This uses http-server, a Node.js web server that npx downloads and runs to serve the player on port 3000.
Open your browser and navigate to http://localhost:3000/player.html
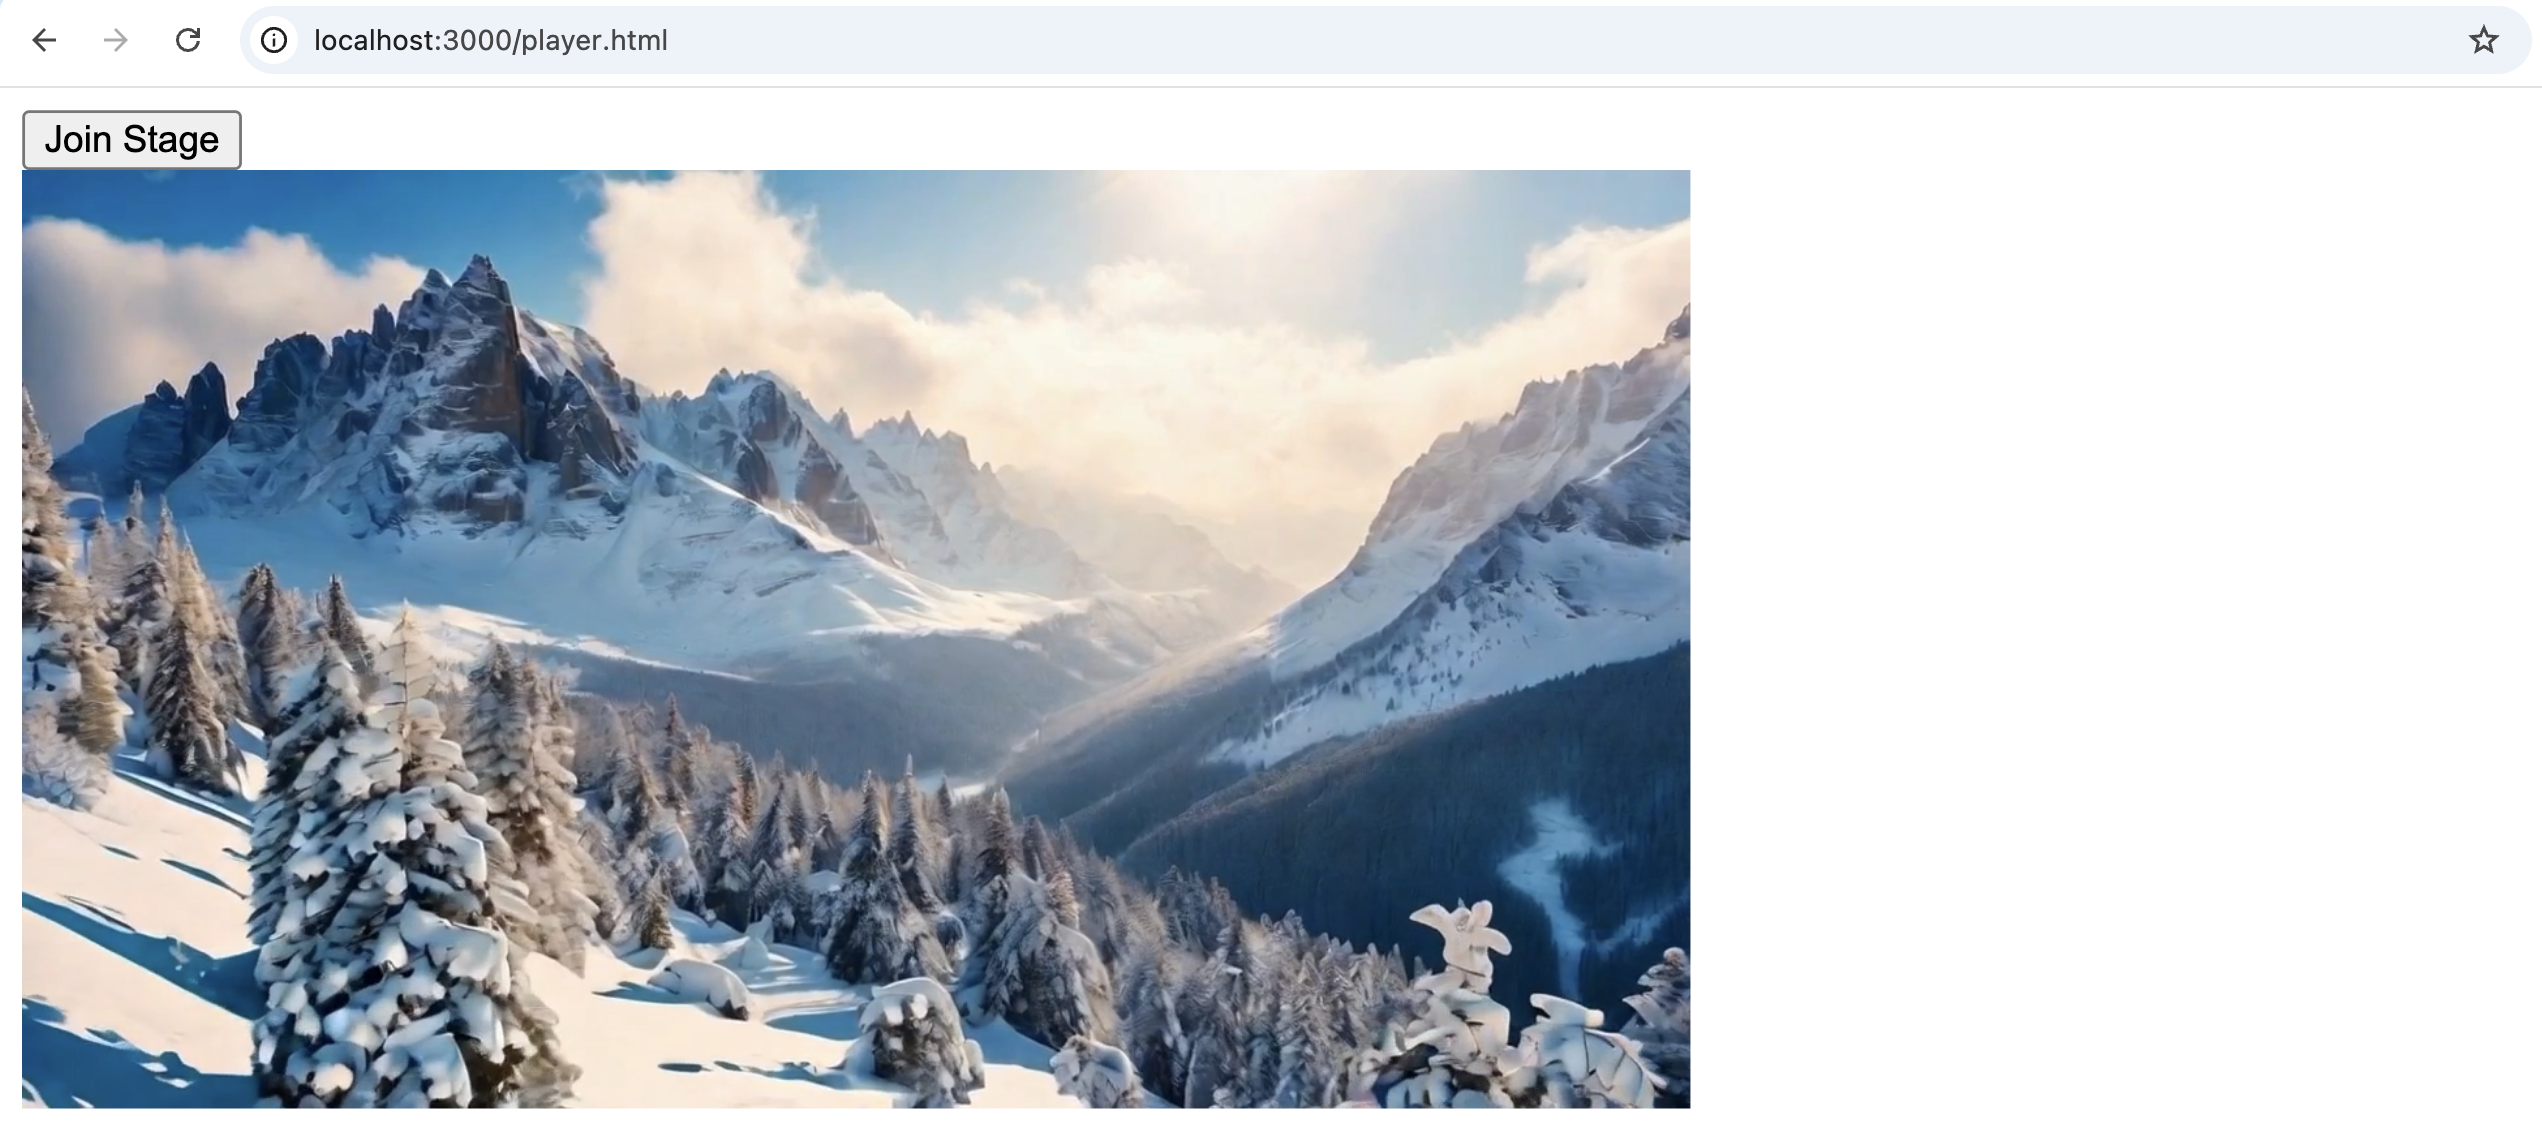
Figure 3: The sample player after joining the stage
Step 8: Test token generation with the player
Choose Join Stage in the player interface. The player then does the following:
- Automatically fetches a token from your API Gateway endpoint.
- Includes the Origin header (
http://localhost:3000) in the request. - Submits the request from your current geographic location.
- AWS WAF validates both the origin and country.
- If validation passes, the token is returned and used to join the Amazon IVS Real-Time Streaming stage.
Open your browser’s developer console (F12) to view the token fetch request and response. A successful token generation will show:
The sample signs tokens with a 5-second expiry, which is deliberately short so you can see the TTL take effect: the player fetches a token and joins immediately, but the same token is useless a moment later. For longer sessions, raise the exp claim in lambda/tokenGenerator.js and redeploy the function.
Step 9: Verify security controls
Test that WAF correctly blocks token requests that fail the country and origin checks, using the player.
Both checks apply when the player requests a token, so each test needs a fresh token request. Leave the stage if you are still connected, reload http://localhost:3000/player.html, then choose Join Stage again. A token you already hold was signed before the change and keeps working until it expires, and a participant who has already joined stays connected. Amazon IVS validates the token when the participant joins, not continuously.
Test 1: Geo-blocking
- Connect to a VPN server in a country different from your configured allowed country.
- Reload the player page at
http://localhost:3000/player.html. - Choose Join Stage to trigger a new token request.
- Expected result: the token request is blocked with a 403 Forbidden error in the browser console.
Test 2: Origin validation
- Temporarily update your CloudFormation stack to change
AllowedOriginsto a different value (for example,http://localhost:8000). - Wait for the stack update to complete. Allow a few moments after that for the Web ACL change to take effect.
- Reload the player at
http://localhost:3000and choose Join Stage, so a new token is requested with the old origin. - Expected result: the token request is blocked with a 403 Forbidden error in the browser console.
- Revert the CloudFormation parameter back to
http://localhost:3000.
Test 3: View WAF metrics
- Navigate to the AWS WAF console.
- Choose Web ACLs →
IVSTokenAPIKeyWebACL. - Choose the Metrics tab to view allowed and blocked requests.
- You should see metrics for successful token requests and any blocked attempts.
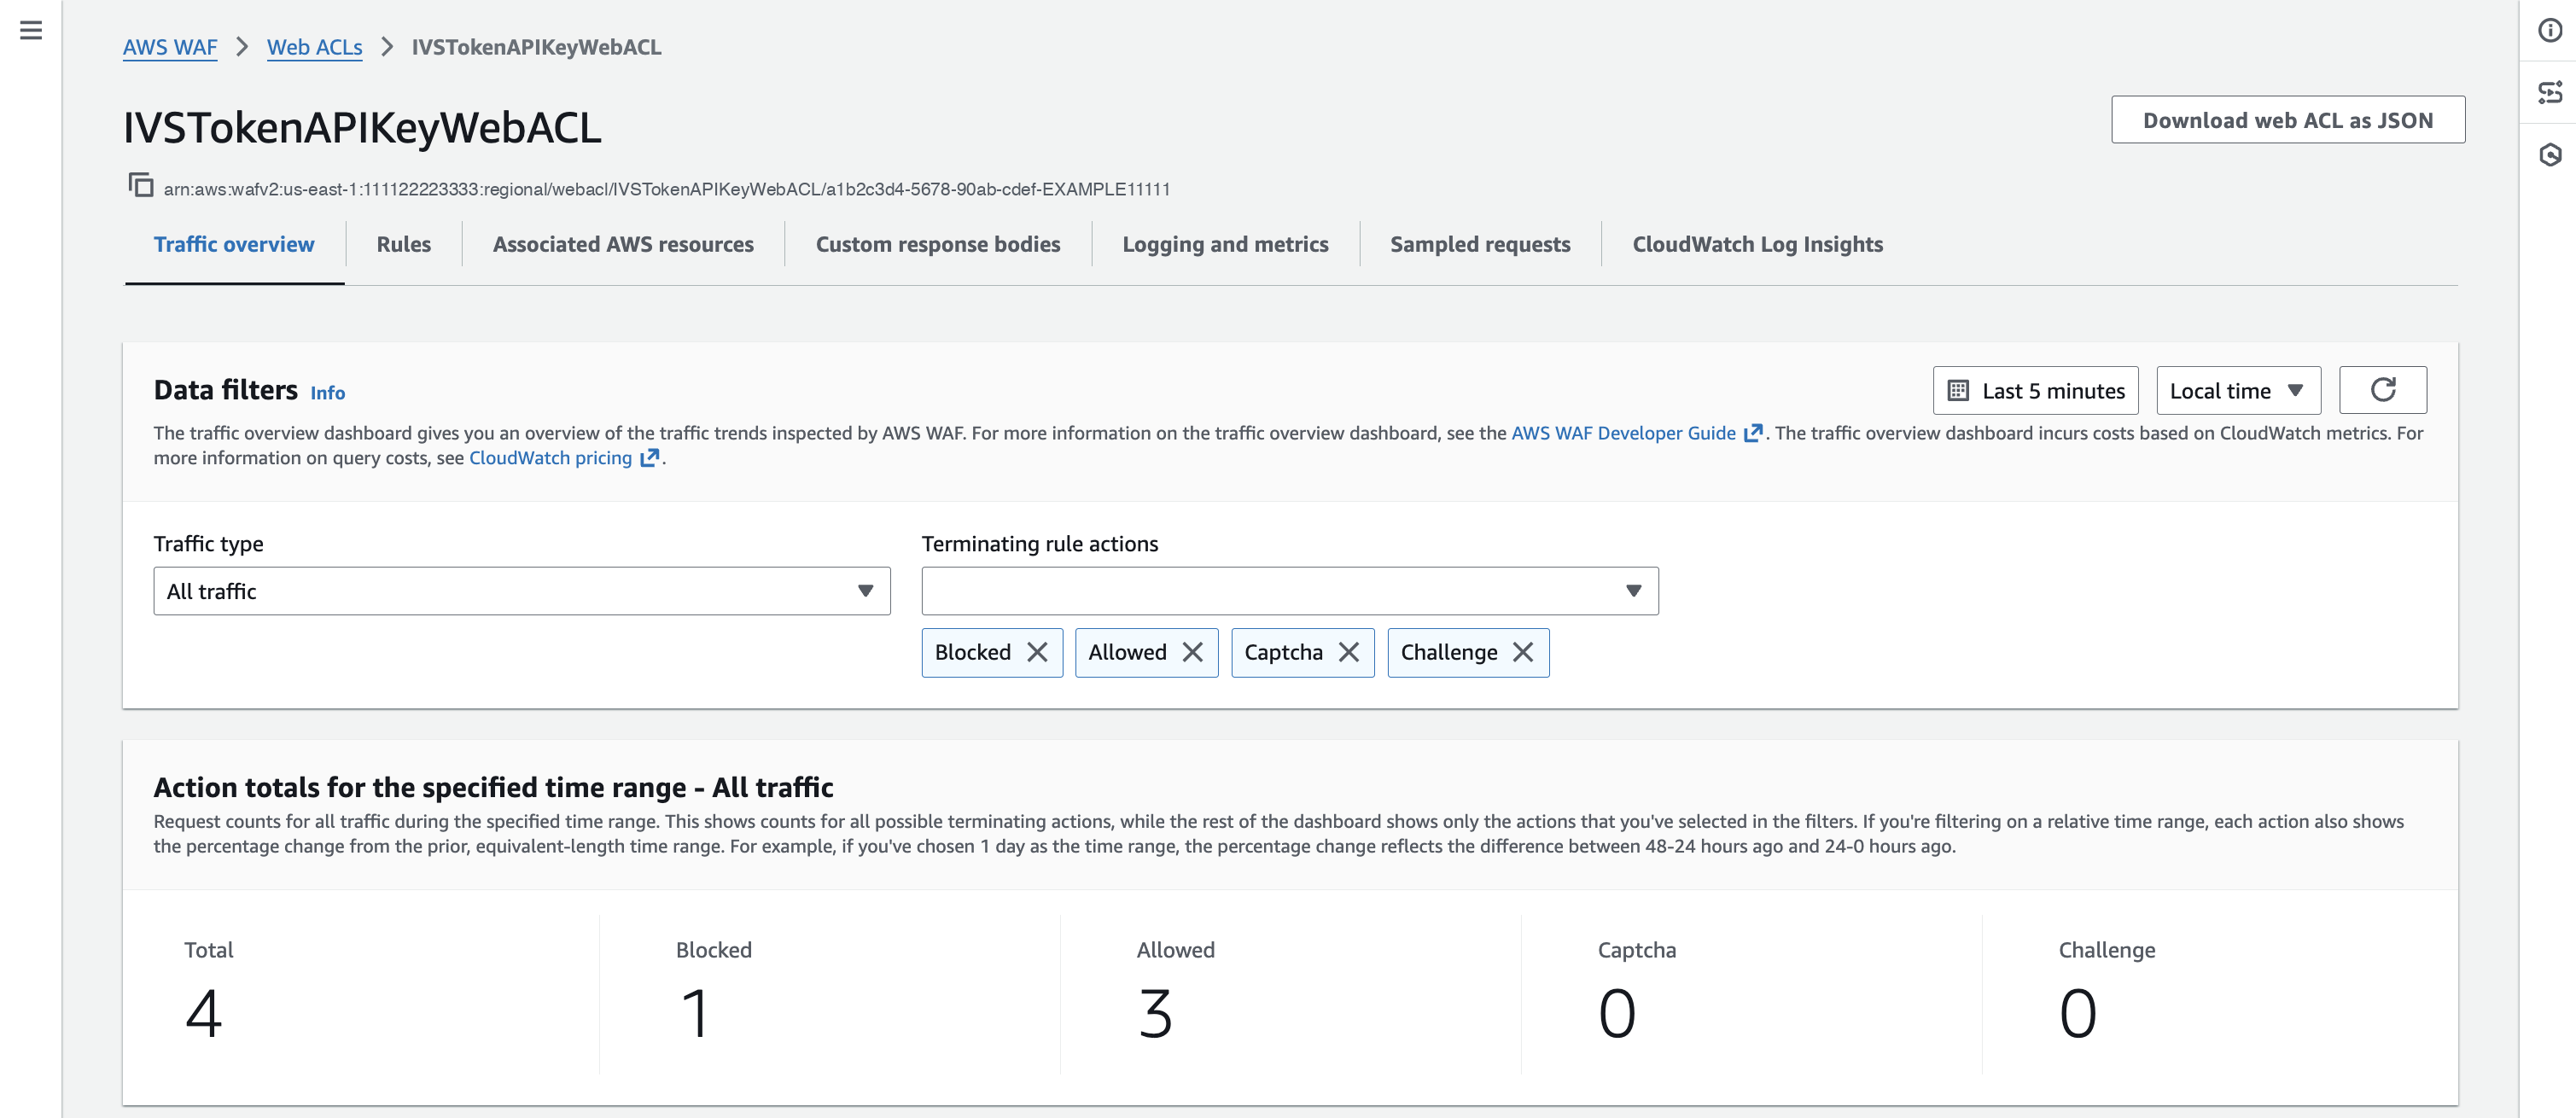
Figure 4: Allowed and blocked requests in the AWS WAF console
Cleaning up
To avoid incurring future charges, delete the CloudFormation stack:
- Navigate to the AWS CloudFormation console.
- Select the
ivs-token-generator-keystack. - Choose Delete.
- Choose Delete stack to confirm.
This removes all created resources including Lambda, API Gateway, WAF, Secrets Manager secret, and IAM roles.
Conclusion
In this post, we showed you how to secure token generation for Amazon IVS Real-Time Streaming using a defense-in-depth approach. By combining AWS WAF request filtering, customizable TTL controls, and key-based JWT signing, you gain control over which requests reach your token issuer. You also control how long the tokens it returns remain valid. This sample demonstrates the pattern. It is not production-ready as-is. Before deploying to a production environment, evaluate it against your own security, compliance, and operational requirements and apply additional hardening, testing, and a security review appropriate to your workload.
Beyond the authentication, short token lifetimes, and rate-based rules noted earlier, you can extend this starting point with AWS WAF Bot Control to detect and manage automated traffic. You can also add CAPTCHA or silent Challenge actions for potentially automated or otherwise unwanted requests, given the appropriate client integration. If you add Amazon Cognito for authentication, you can also issue fresh short-lived tokens whenever clients need to join or reconnect.
For the complete code and deployment templates, visit the GitHub repository. If you have questions or feedback about this solution, leave a comment.