AWS Messaging Blog
Track SMS spend by team and use case with AWS End User Messaging
If you send SMS for several teams or applications from one AWS account, you’ve probably been asked which team drove last month’s bill. The bill and the default AWS Cost Explorer view show one total for AWS End User Messaging. Grouping by usage type doesn’t help when teams send to the same country with the same type of origination identity, because their message fees land on one line. So each month, someone splits the bill by hand in a spreadsheet.
In this post, we show how to attribute AWS End User Messaging SMS spend to the teams, cost centers, and use cases that generate it. We walk through tagging your origination identities, activating those tags for cost allocation, and reading the results in Cost Explorer. Every step uses the AWS Management Console, and we include the equivalent AWS Command Line Interface (AWS CLI) commands if you want to script the setup.
This post is for FinOps practitioners, platform owners, and solutions architects who run shared SMS workloads and need showback or chargeback by team.
Challenges with tracking SMS spend
Organizations that send SMS for several teams from one AWS account commonly face these challenges:
- The bill and the default Cost Explorer view report AWS End User Messaging as a single service, with no split by team or application.
- Grouping by usage type shows what you paid for, such as message fees by destination country and origination identity type, but not who sent the messages.
- When two or more teams send to the same country with the same type of origination identity, their message fees combine into one usage type line. For example, three sender IDs that all send to the United Kingdom share one line.
- Finance teams need a monthly showback or chargeback report that they can rerun without manual spreadsheet work.
To address these challenges, you can tag each origination identity with the team and use case that owns it, and then activate those tag keys as cost allocation tags. Cost Explorer can then group your SMS spend by any of those keys, and the same tags flow into your AWS Cost and Usage Report (CUR) and AWS Data Exports.
Solution overview
Cost allocation for AWS End User Messaging SMS works at the level of the origination identity. Phone numbers, sender IDs, and phone pools are AWS resources with their own Amazon Resource Names (ARNs), and each one can carry up to 50 tags. When you send a message from a tagged phone number or sender ID, AWS records the charges for that message against that resource, along with its tags. The monthly fee for a tagged phone number carries its tags too.
The process has four stages, and each stage maps to one or more of the steps in this post:
- Tag your origination identities (Steps 1 and 2) – Assign each phone number and sender ID a set of tags, such as
business-unit,cost-center, anduse-case. - Send traffic (Step 3) – Messages from your tagged identities generate charges that carry the tags. New tag keys can take up to 24 hours to appear in AWS Billing and Cost Management.
- Activate the tag keys (Steps 4 and 5) – In the management account of your organization, or in a standalone account, activate the keys as cost allocation tags. Activation can take up to another 24 hours.
- Analyze (Steps 6 and 7) – Group your SMS spend by tag in Cost Explorer, or use the tags in your cost and usage reports.
Cost Explorer places charges that don’t belong to a tagged resource in the untagged group, a group that it labels No tag key: key-name.
The following diagram illustrates how the charges from a tagged sender ID reach Cost Explorer.
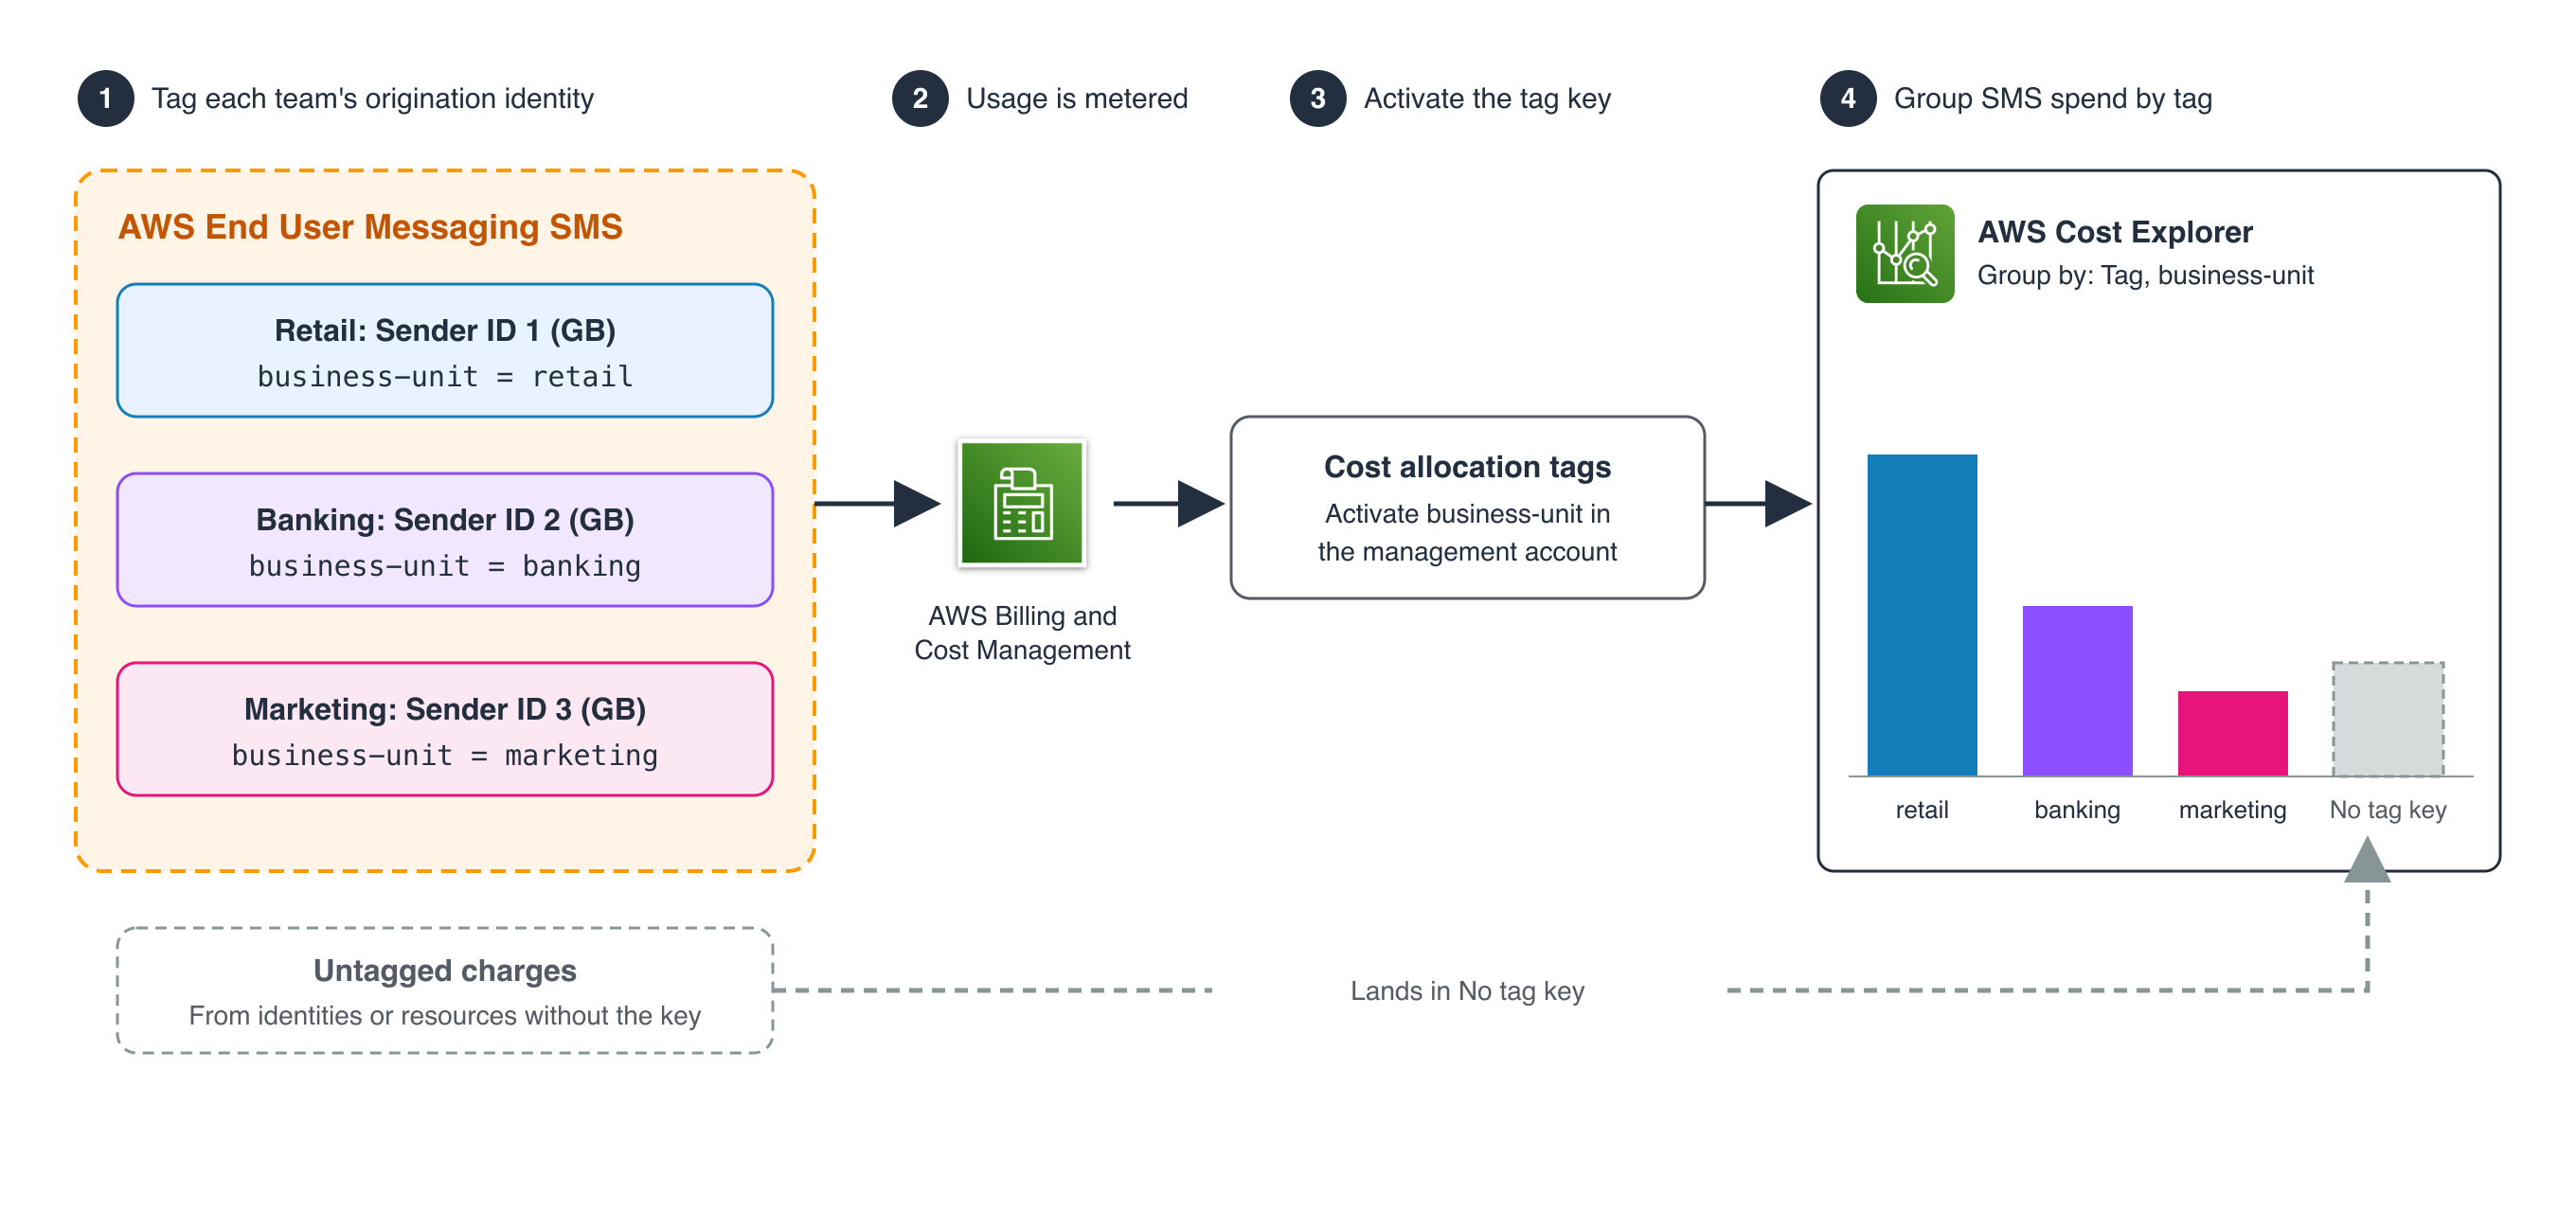
Figure 1: Each business unit sends from its own tagged sender ID. After the business-unit key is activated, Cost Explorer splits SMS spend by team. Charges from identities or resources without the key appear under No tag key.
Example scenario
Throughout this post, AnyCompany runs three business units that send SMS from one AWS account. All three send to the United Kingdom, each with its own sender ID, so usage type alone can’t separate their spend. AnyCompany uses the following tagging plan.
| Origination identity | business-unit | cost-center | use-case |
| Sender ID 1 (United Kingdom) | retail | cc-4100 | order-notifications |
| Sender ID 2 (United Kingdom) | banking | cc-7250 | otp |
| Sender ID 3 (United Kingdom) | marketing | cc-3300 | promotional |
Prerequisites
Before you begin, make sure you have the following components and permissions in place:
- An AWS account with AWS End User Messaging SMS and at least one origination identity (phone number or sender ID) that you send messages from.
- Access to the management account of your organization in AWS Organizations, or a standalone account. Only these accounts can activate cost allocation tags. If your SMS runs in a member account, you tag the origination identities there, and the management account activates the keys and requests any backfill.
- Cost Explorer enabled. The management account sees costs for every account. A member account sees only its own costs, and the management account can turn off Cost Explorer access for member accounts.
- AWS Identity and Access Management (IAM) permissions to view and tag AWS End User Messaging SMS resources (
sms-voice:DescribePhoneNumbers,sms-voice:DescribeSenderIds,sms-voice:DescribePools,sms-voice:TagResource,sms-voice:UntagResource, andsms-voice:ListTagsForResource). If you use the AWS Resource Groups Tagging API, you also needtag:TagResourcesandtag:GetResources. - IAM permissions in the management account or standalone account to activate and backfill cost allocation tags (
ce:ListCostAllocationTags,ce:UpdateCostAllocationTagsStatus,ce:StartCostAllocationTagBackfill, andce:ListCostAllocationTagBackfillHistory), and to view Cost Explorer reports, such asce:GetCostAndUsage,ce:GetDimensionValues, andce:GetTags.
Step 1: Plan your tag keys
Decide your keys before you tag anything. Tag keys and values are case sensitive, so Business-Unit and business-unit become two separate keys in your cost reports. Pick one convention, such as lowercase with hyphens, and use it everywhere.
AnyCompany uses three keys: business-unit (which team owns this spend), cost-center (which budget to charge), and use-case (what the traffic is for).
A tag describes the resource, so a sender ID that two teams share can only carry one business-unit value. If you need to split spend between teams, give each team its own origination identity. To see spend for each origination identity, for example, when one team owns several sender IDs, add a key that names the identity, such as identity-name.
Don’t include sensitive information, such as customer names or phone numbers, in tags. Cost allocation tags appear in billing reports that many people in your organization can read.
Step 2: Tag your origination identities
The following steps tag a sender ID. The steps for a phone number are the same, starting from Phone numbers under SMS & RCS.
- Open the AWS End User Messaging console.
- In the navigation pane, under SMS & RCS, choose Sender IDs.
- Choose the sender ID that you want to tag.
- On the Tags tab, choose Manage tags.
- Choose Add new tag, and then enter a Key and Value. Repeat for each key in your tagging plan.
- Choose Save changes.
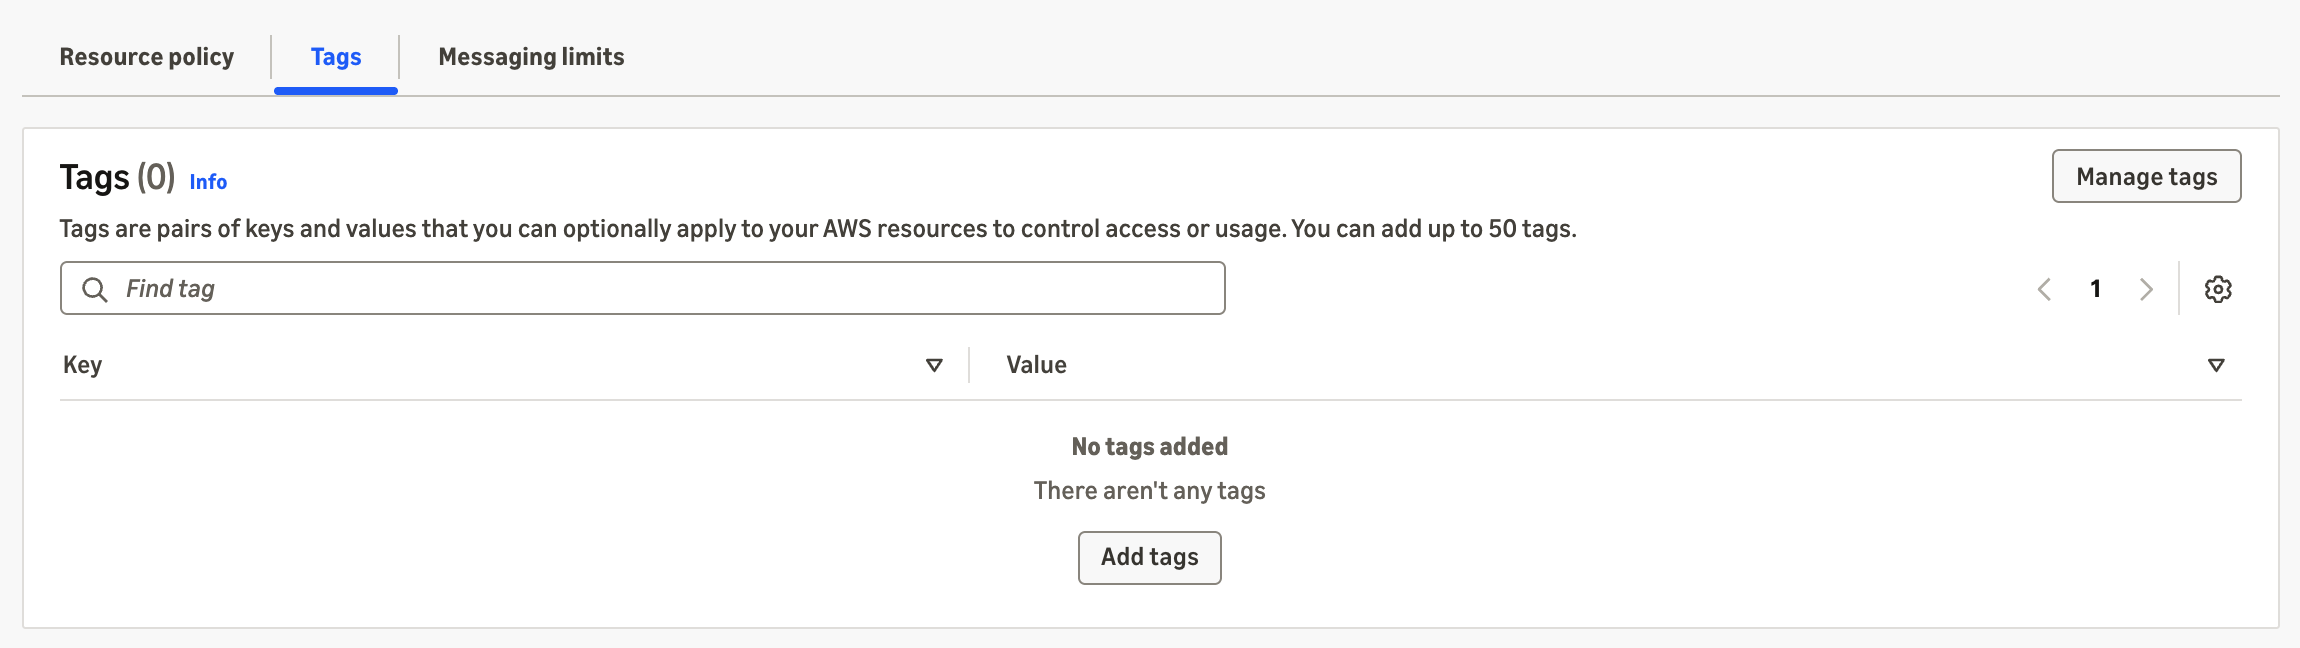
Figure 2: The Tags tab of a sender ID that has no tags yet. Choose Manage tags to add, edit, or remove tags.
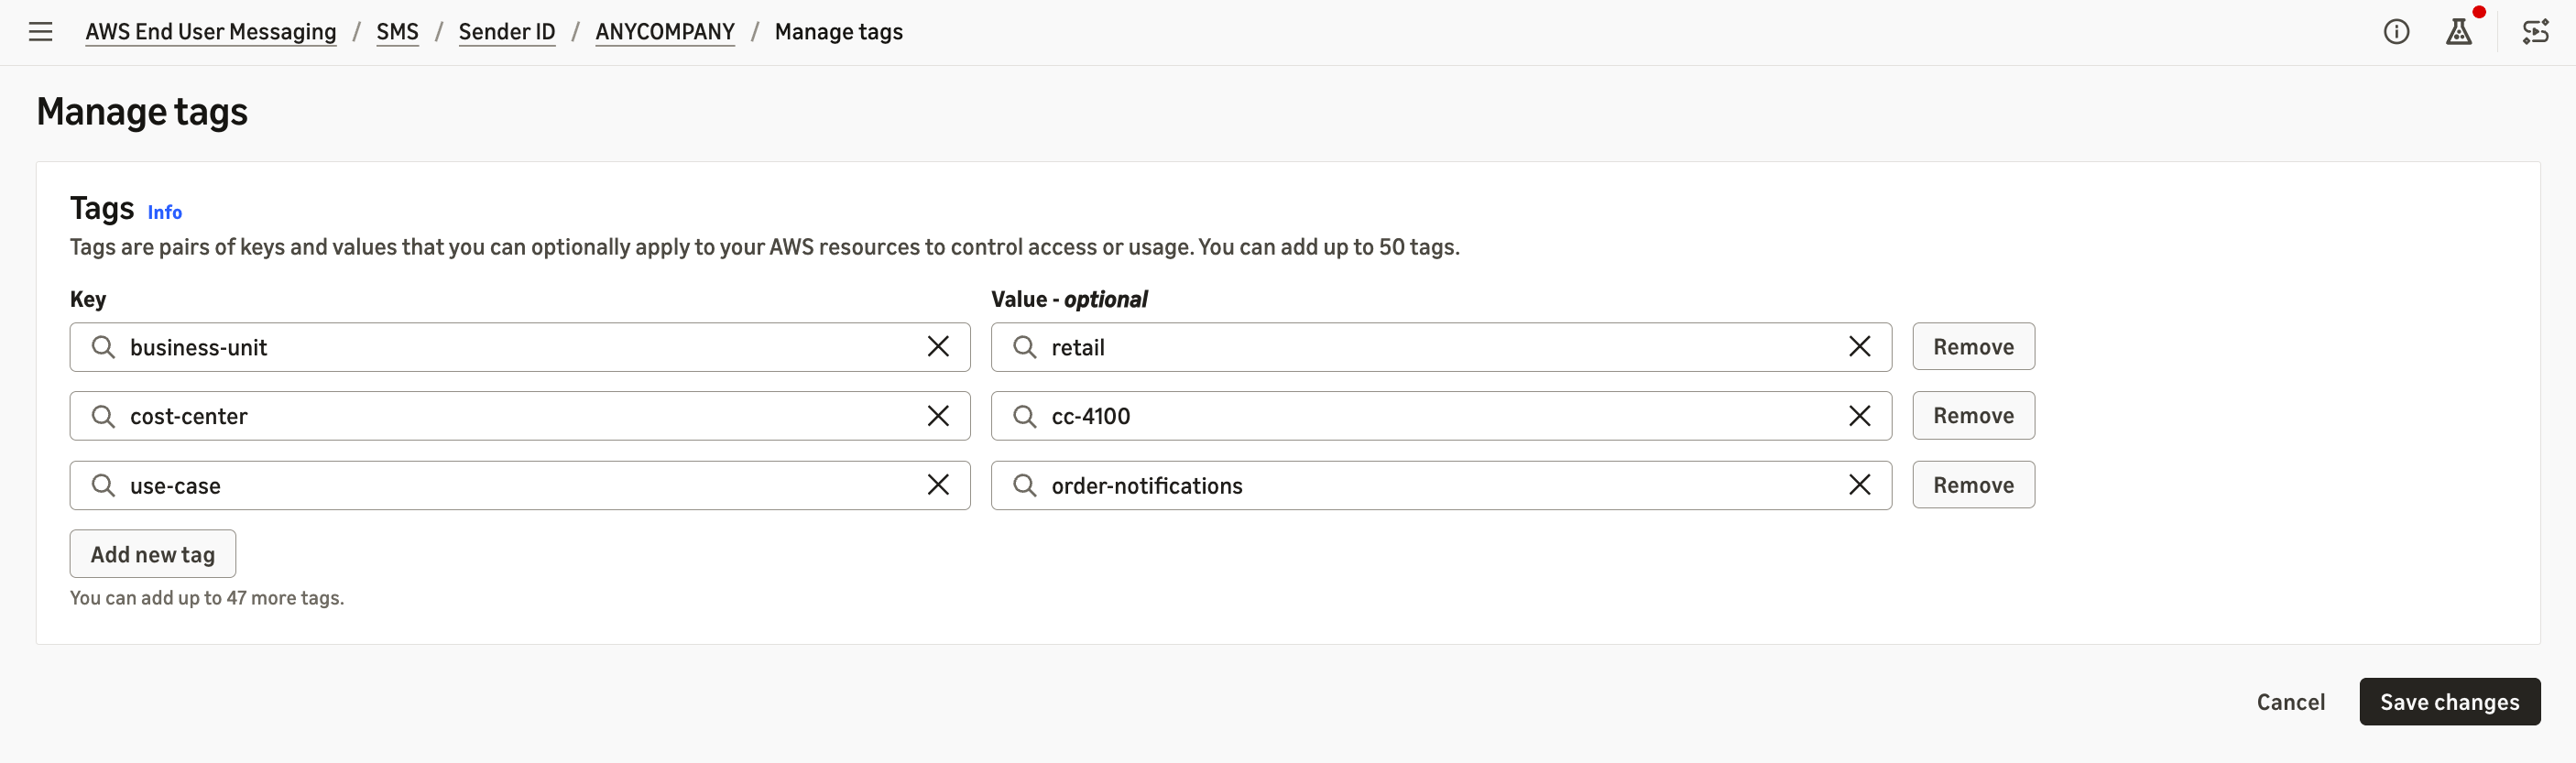
Figure 3: The Manage tags dialog for the retail sender ID. Enter a key and value for each tag in your tagging plan.
If you send through a phone pool, tag every phone number and sender ID in the pool. Message charges carry the tags of the origination identity that sends the message, not the tags on the pool.
The AWS Resource Groups Tag Editor console doesn’t list AWS End User Messaging SMS resources, but the Resource Groups Tagging API supports them. To tag many identities at once, use the TagResource operation with the AWS CLI or an AWS SDK, or the Tagging API. For examples, see Automate with the AWS CLI later in this post.
Step 3: Send traffic and wait for the tag keys to appear
Send messages from your tagged identities as usual. A new key can take up to 24 hours to appear on the Cost allocation tags page. You can’t activate it until it does, but you can attribute charges from that period with a backfill in Step 5.
If a key still isn’t listed after 24 hours, check the tag on the resource’s Tags tab. Also confirm that the key’s spelling and case match your plan, and that you’re signed in to the management account or standalone account.
Step 4: Activate the tag keys
- Sign in to the management account, or your standalone account, and open the AWS Billing and Cost Management console.
- In the navigation pane, choose Cost Allocation Tags.
- In the Cost allocation tags table, select
business-unit,cost-center, anduse-case. To find a key, enter it in Find cost allocation tags. Keys from tags on your resources have the type Resource. - Choose Activate.
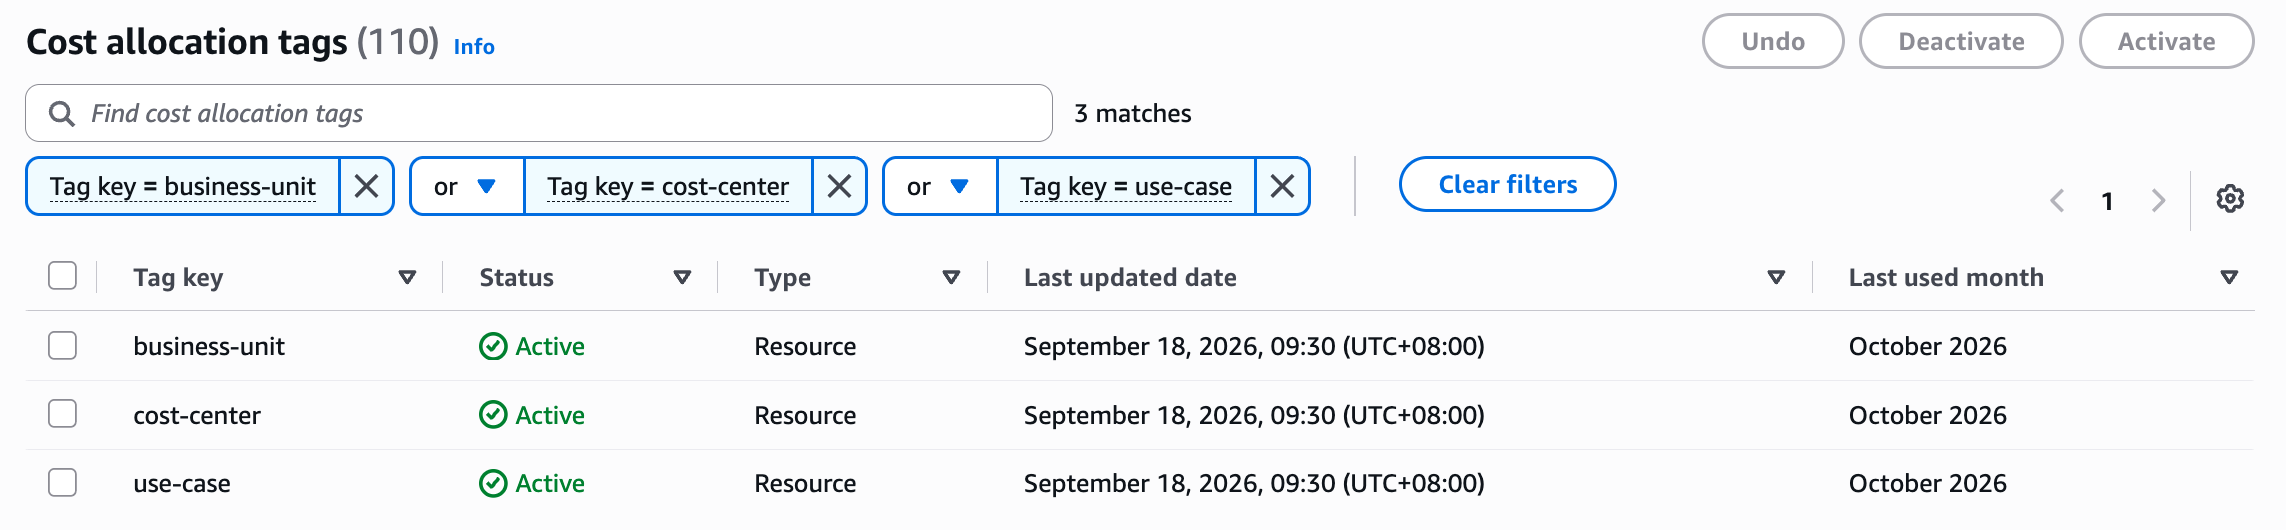
Figure 4: The Cost allocation tags page showing AnyCompany’s three keys after activation.
After you activate a key, it can take up to 24 hours to become active in Cost Explorer. Activation applies from that point forward, so charges from before activation stay in the untagged group unless you backfill them.
Step 5 (optional): Backfill earlier months
If you tagged your origination identities before activating the keys, the management account can backfill up to 12 months.
- On the Cost allocation tags page, choose Backfill tags.
- Choose the earliest month in which your origination identities carried the tags.
- Choose Confirm.
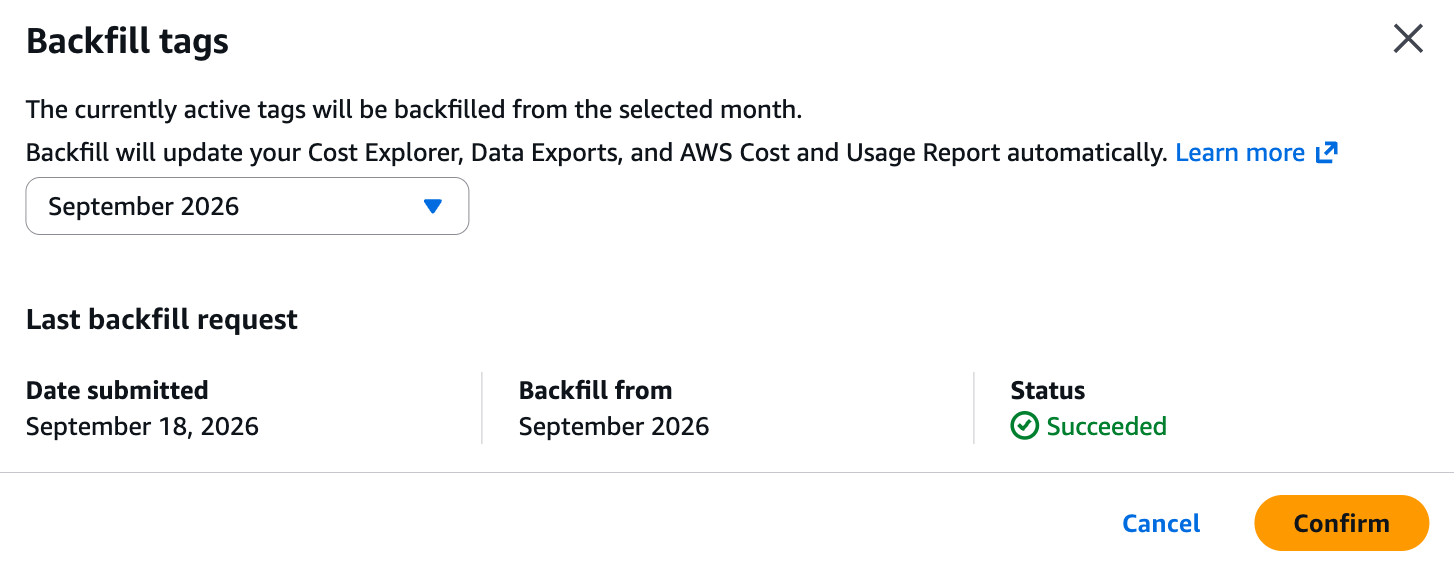
Figure 5: The Backfill tags dialog. Choose the earliest month when your origination identities carried the tags.
A backfill only adds tag values for periods when the tag was attached to the resource. For example, if you tagged a sender ID on September 17 and request a backfill from September 1, charges from September 1–16 remain untagged. You can submit one backfill request every 24 hours, and Cost Explorer shows the results after its next daily data refresh. A backfill applies each key’s current status, so any key you’ve since deactivated is also removed from earlier months.
Step 6: View SMS spend by tag in Cost Explorer
- Open Cost Explorer.
- In the Report parameters panel, set Date Range and Granularity. For example, choose the last three months and Monthly.
- Under Group by, for Dimension, choose Tag, and then for Tag, choose your key, such as
business-unit. Group by with a tag key splits your spend into one line per tag value. A Tag filter only narrows the data to the values that you select. - Under Filters, for Service, choose End User Messaging, and then choose Apply.
Note: SMS carrier fees are billed under this service. The separate End User Messaging Third Party Fees service covers fees such as the WhatsApp fees that Meta charges.
From the management account, you can also filter by Linked account to see the costs of one member account.
Before any tagged usage is metered for a key, every charge sits in a single group, as shown in the following screenshot.
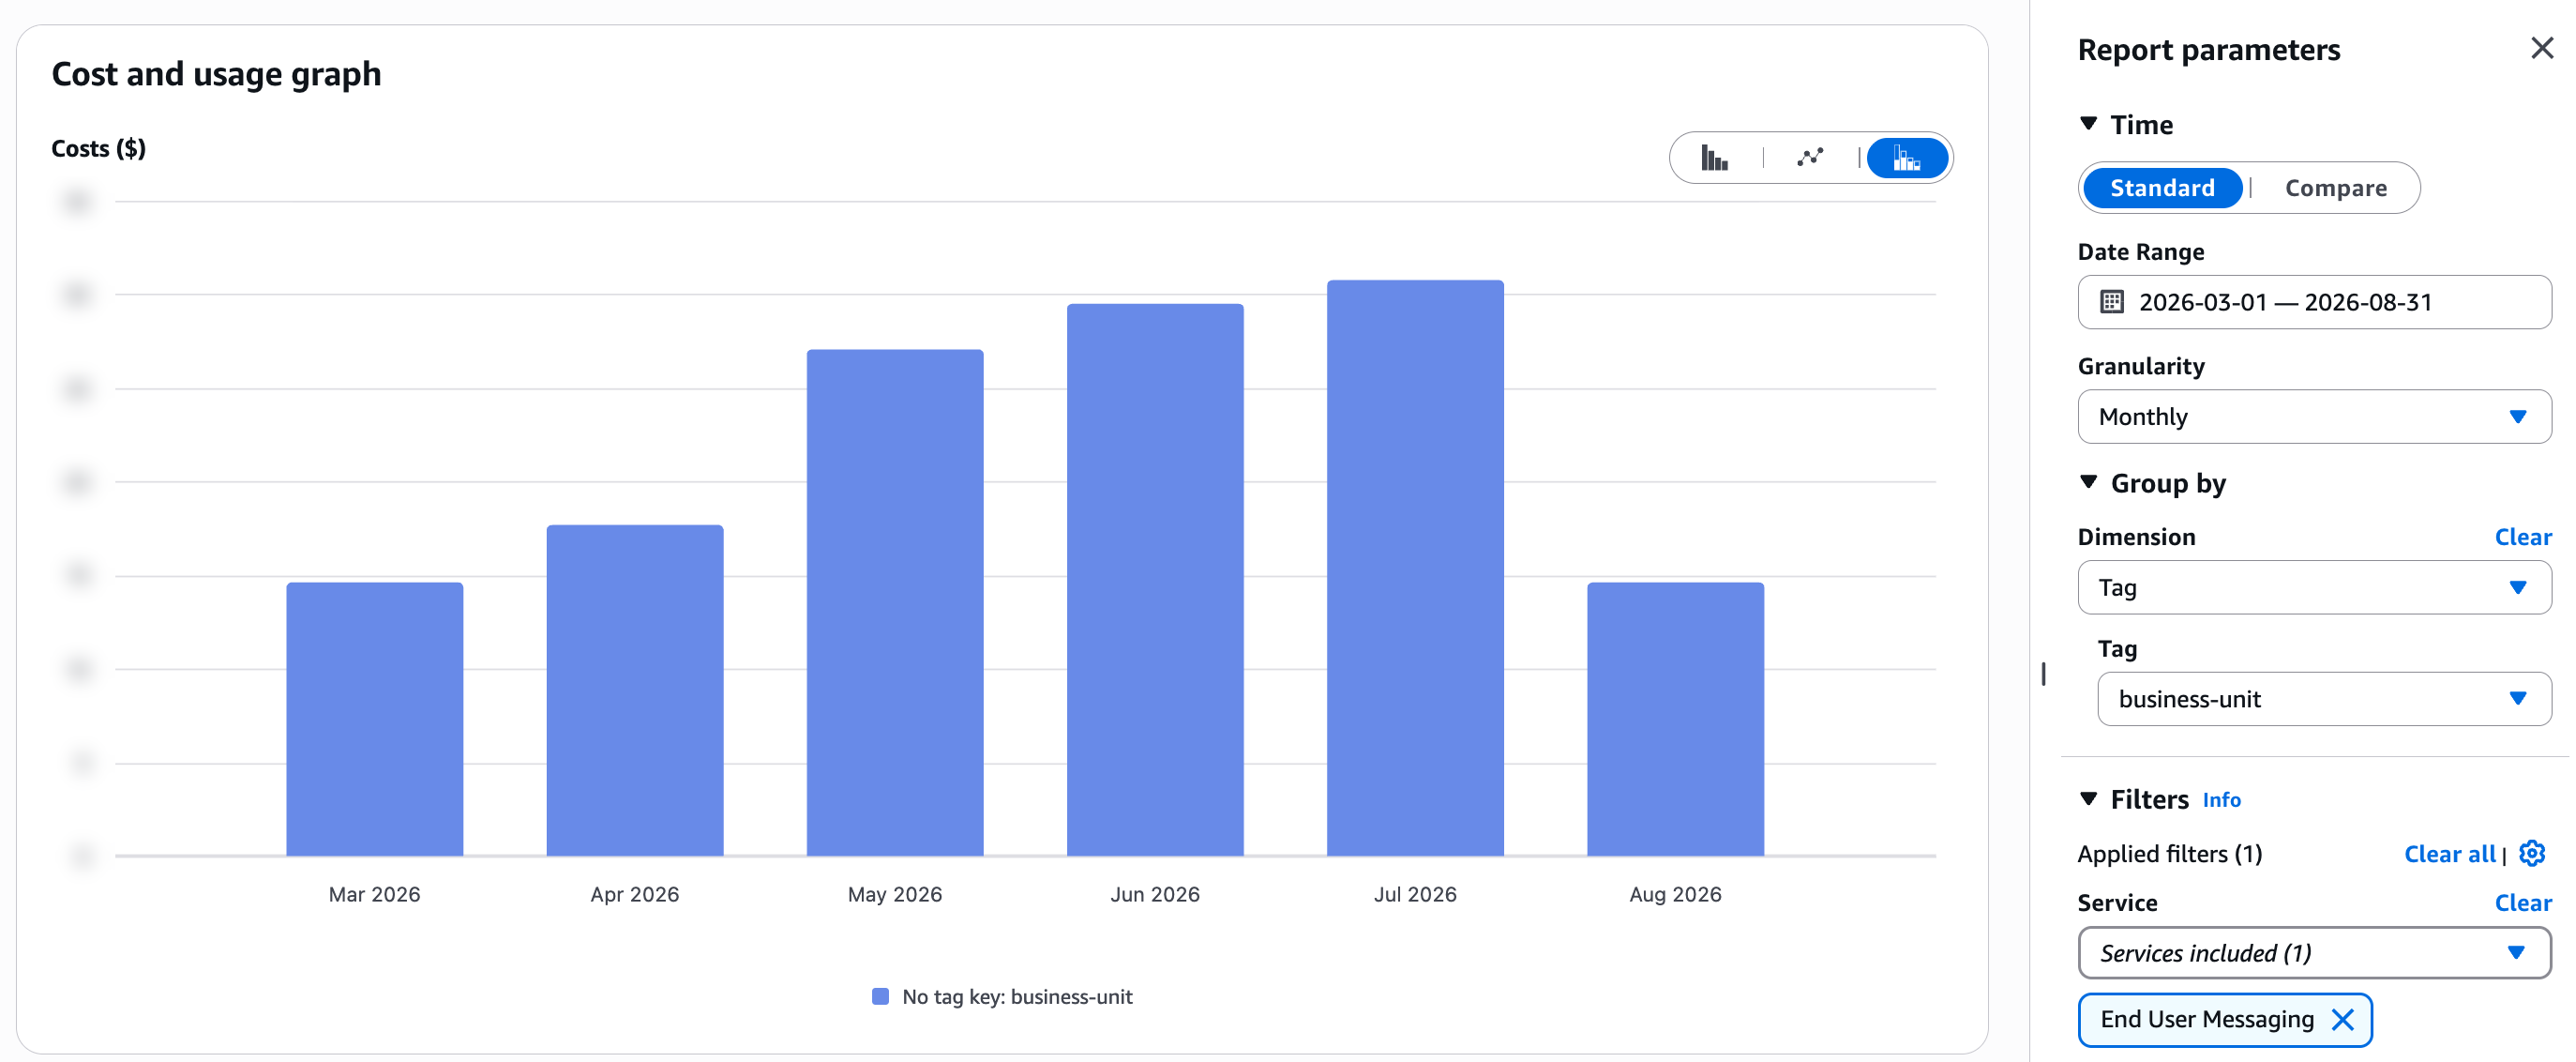
Figure 6: Cost Explorer grouped by business-unit for the months before the sender IDs were tagged. All AWS End User Messaging spend appears under No tag key: business-unit.
If you still see only No tag key more than 24 hours after activation, check that the key shows Active on the Cost allocation tags page. Also confirm that you’ve sent messages from a tagged identity since activation, or that you requested a backfill.
After the key is active and tagged usage has been metered, Cost Explorer shows one group for each tag value.
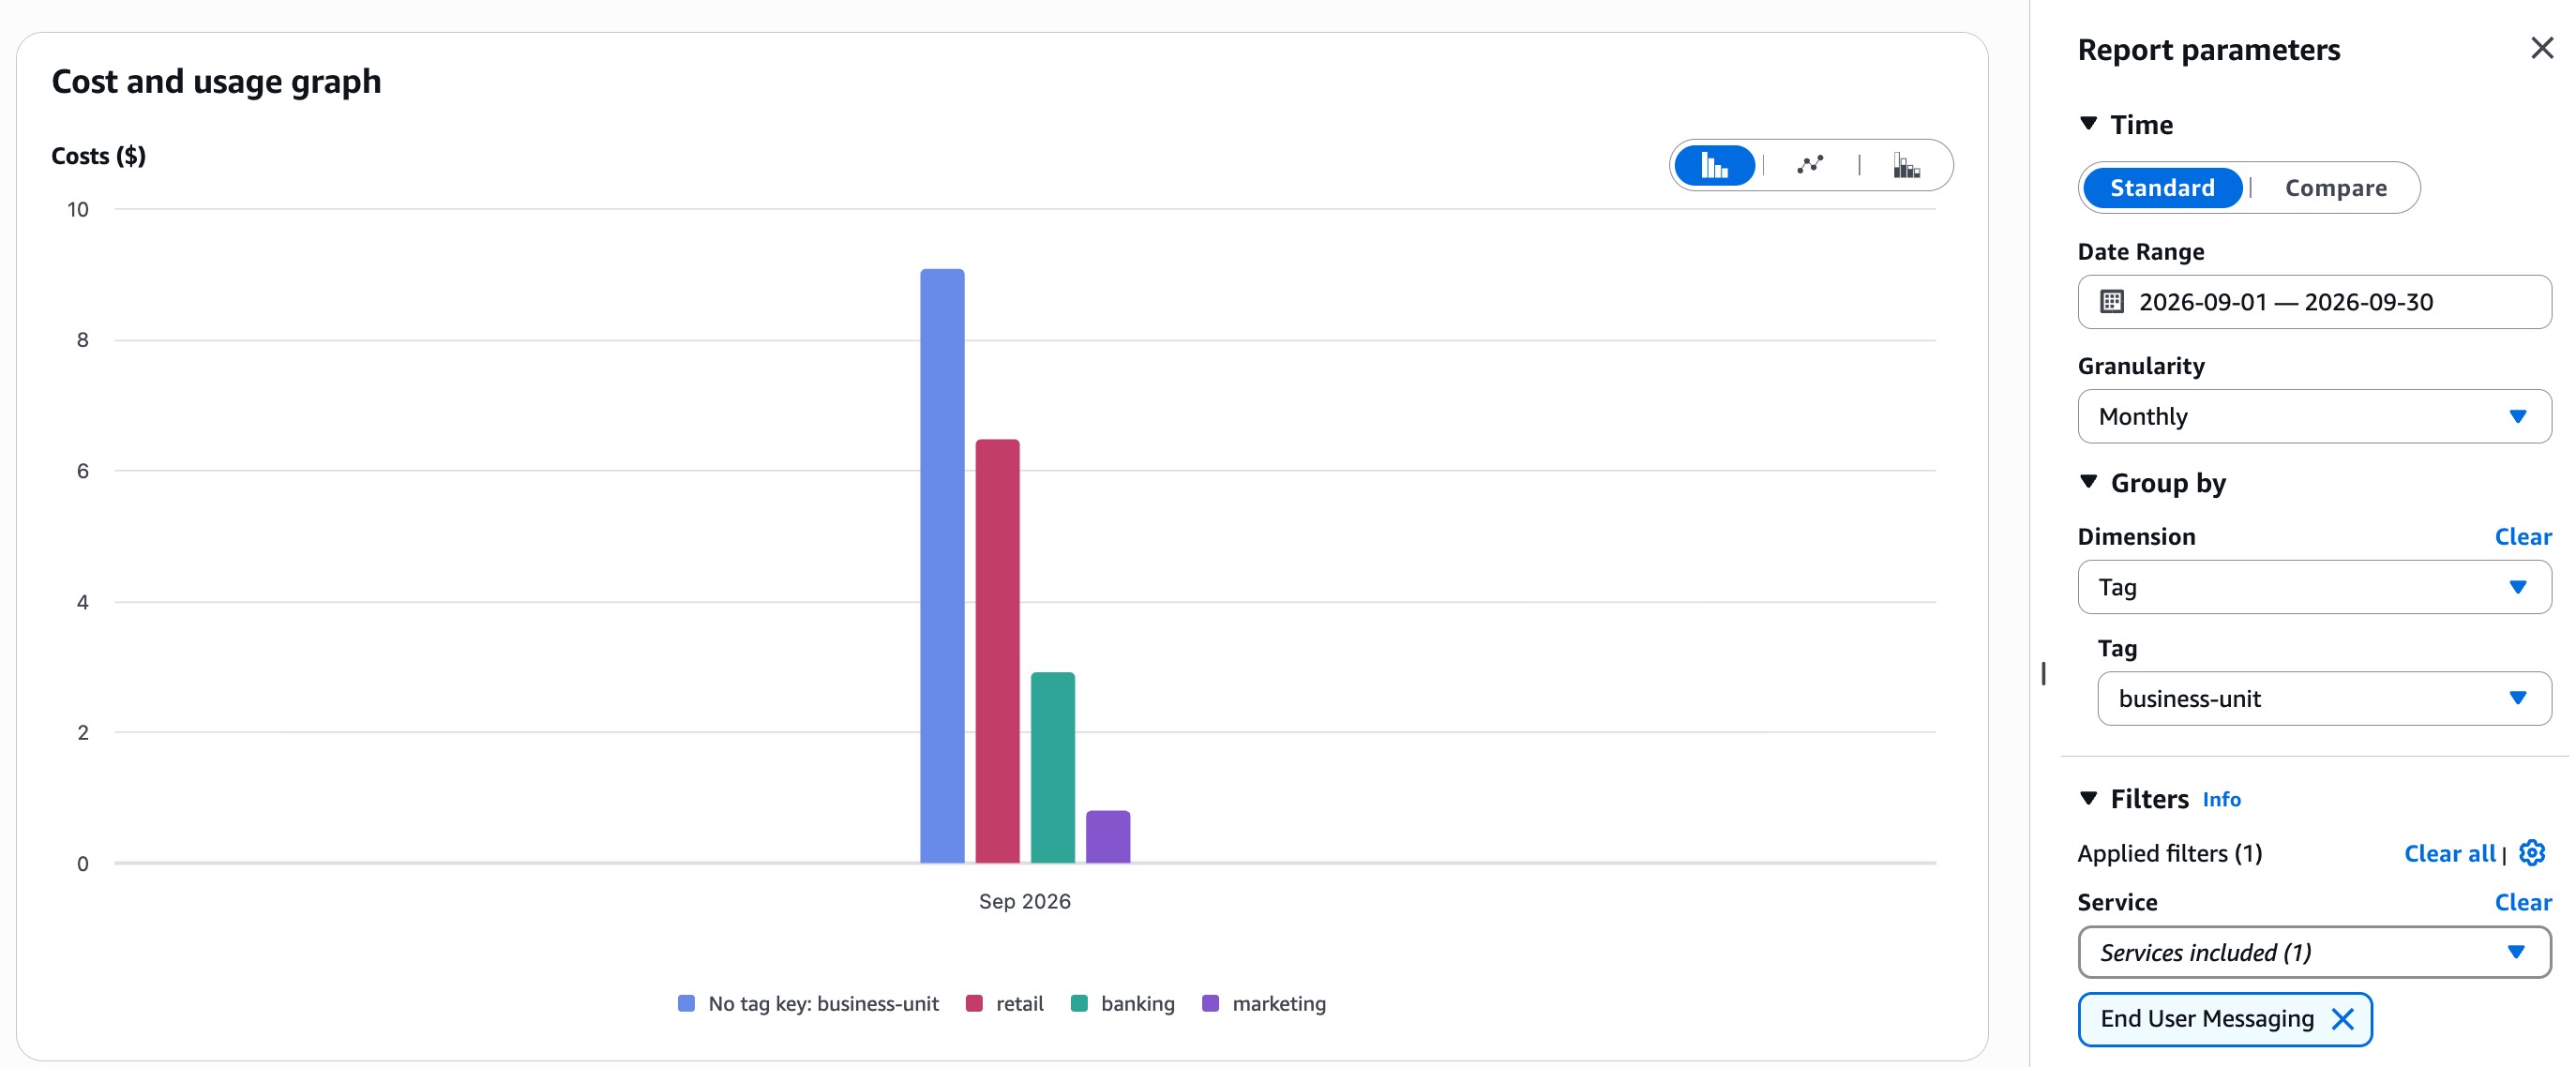
Figure 7: AnyCompany’s AWS End User Messaging spend for September, grouped by business-unit. Charges from resources without the key appear under No tag key: business-unit.
The No tag key group holds charges that have no value for the key. These include:
- Origination identities that you haven’t tagged yet, or that use a different spelling or case of the key.
- Other AWS End User Messaging resources that don’t carry the key, such as RCS agents.
- Messages sent over shared routes, which don’t use one of your origination identities.
- 10DLC registration fees, such as brand, vetting, and campaign fees.
- Charges from before the tag was attached or the key was activated.
To reuse this view each month, keep a relative date range, such as the last three months, and choose Save to report library.
Step 7: Combine usage type and tags
Group by Usage type to see what you’re paying for. Usage type names include the AWS Region prefix, the destination country, the origination identity type, and the type of charge, for example USE1-OutboundSMS-GB-Standard-Senderid-MessageFees. Message fees for all three AnyCompany United Kingdom sender IDs appear on this one line.
To split that line by team, set Group by to your tag key and add a Usage type filter for that line. The table then lists a costs row and a usage row for each tag value. To see only the cost rows, enter costs in the search box above the table.
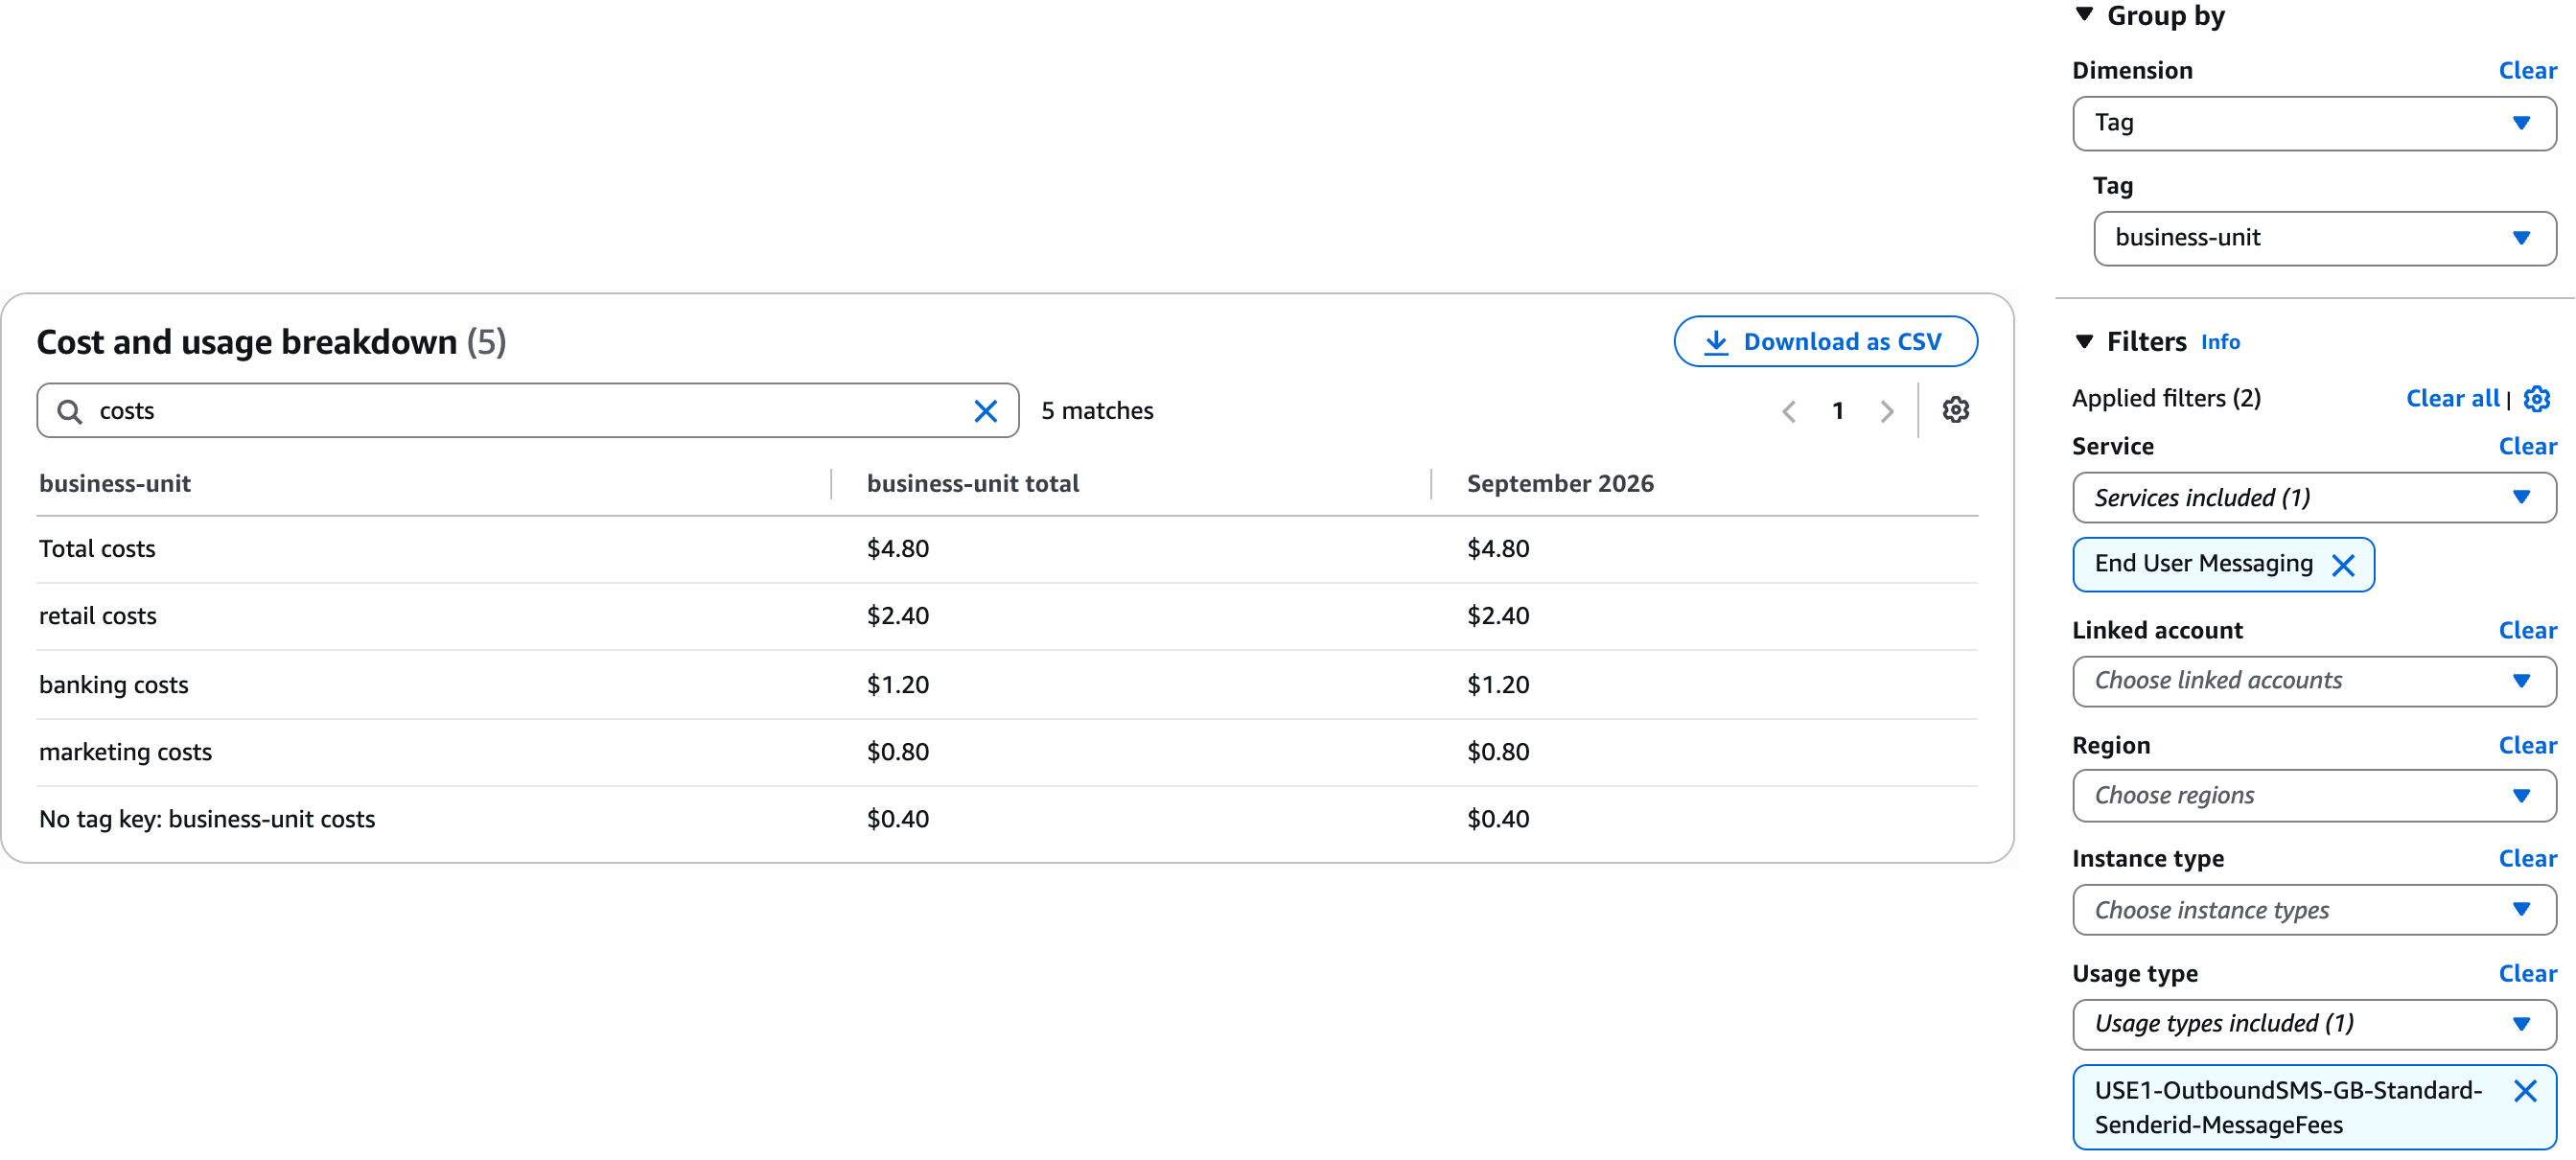
Figure 8: United Kingdom sender ID message fees split by business unit, with Group by set to the business-unit tag and a Usage type filter applied.
Automate with the AWS CLI
If you manage many origination identities, or you want to add tagging to your provisioning scripts, you can run the same steps with the AWS CLI. Replace the example ARNs and account ID with your own. To list your ARNs, run aws pinpoint-sms-voice-v2 describe-sender-ids or aws pinpoint-sms-voice-v2 describe-phone-numbers.
To tag a sender ID when you request it, add --tags. The request-phone-number and create-pool commands accept the same option.
To tag an existing sender ID or phone number (Step 2), run the following command:
To apply the same tags to several identities in one call, use the Resource Groups Tagging API. Each call accepts up to 20 ARNs:
To check which sender IDs carry a key, filter by that key. For phone numbers and pools, use sms-voice:phone-number and sms-voice:pool.
To activate the tag keys (Step 4), run the following command in the management account or standalone account. If a key hasn’t appeared yet, the command returns a Tag keys not found error. Wait and try again, as described in Step 3.
To backfill earlier months (Step 5), set --backfill-from to the first day of a month, and then check the status of the request:
To get the monthly split by tag (Step 6), run the following command. In the API, the service name is AWS End User Messaging. Charges without the key are returned under business-unit$, which is the API form of No tag key.
To split a single usage type line by team (Step 7), add a USAGE_TYPE dimension to the filter, for example:
Going further
With your tag keys active, you can reuse them in other AWS Cost Management features:
- Budgets per team – Create an AWS Budgets cost budget filtered by
business-unitto alert each team when its SMS spend crosses a threshold. To receive those alerts on WhatsApp, see Establishing finops management: Integrating AWS Budgets with WhatsApp using AWS End User Messaging. - Anomaly alerts – Create an AWS Cost Anomaly Detection monitor for a cost allocation tag, so that an unexpected spike in one team’s SMS spend raises an alert for that team. Create the monitor in the management account, because monitors for cost allocation tags can only be created there.
- Chargeback reports – Activated tags are included in the cost and usage reports that you create with AWS Data Exports, so you can build monthly chargeback reports in Amazon Athena or your business intelligence tool.
Best practices for SMS cost allocation
- Tag origination identities when you provision them, so that the first message they send is attributed.
- Give each team its own origination identity when you need to split its spend.
- Tag every phone number and sender ID in a phone pool. Tags on the pool itself don’t appear on message charges.
- Use the same tag keys that your organization uses for other AWS services, so that SMS spend rolls up with the rest of each team’s costs.
- Review the No tag key group each month. If it grows, check for new origination identities that are missing tags.
Conclusion
By tagging your AWS End User Messaging SMS origination identities and activating those tags for cost allocation, you can see SMS spend by team, cost center, and use case next to the rest of your AWS costs. Tags also separate teams that send to the same country, which usage type alone can’t do.
Tag your identities and send traffic first, and then activate the keys after they appear. If you tagged before activating, backfill up to 12 months so that earlier charges are attributed too. Review the No tag key group each month to catch new identities that are missing tags. To build upon this foundation, consider adding per-team budgets and anomaly monitors on the same tag keys.
For additional implementation guidance and best practices, refer to the following resources:
- Tag AWS End User Messaging SMS resources for billing
- Manage tags for a sender ID in AWS End User Messaging SMS
- Manage tags for a phone number in AWS End User Messaging SMS
- Manage AWS End User Messaging SMS tags for phone pools
- Activating user-defined cost allocation tags
- Backfill cost allocation tags
- Filtering the data that you want to view in Cost Explorer